Your Audio Mastering Questions, Answered | Are You Listening? Season 2 Episode 7
To close out season two of our mastering video series Are You Listening?, professional mastering engineer and iZotope Director of Education Jonathan Wyner answers your common mastering questions.
Season two has come to a close for Are You Listening?, our audio mastering video series with pro mastering engineer and iZotope Education Director, Jonathan Wyner. He sat down to answer the most common questions you had throughout the season, just like we did at the end of season one.
Watch him answer these questions in the video below, and check out the rest of this article for additional information and helpful resources on each question. Let’s dive in!
Jump to a specific question:
- Is it a problem to normalize mixes between -30 and -20 LUFS?
- What are intersample peaks and how do you deal with them?
- Is there a checklist to determine when a master is done?
- What’s the best LUFS level for mastering hip hop for streaming?
- How can you ensure the best stereo separation and imaging in mastering when mixing?
- Is mid/side compression ever appropriate in mastering?
- Any advice for mastering without great equipment?
- Why are high-pass filters problematic in mastering?
- What do you do if you disagree with the client on how the master should sound?
- Can you expand on the Crest Factor meter in Tonal Balance Control?
1. Most of my mixes end up too low. Is there a problem normalizing mixes between -30 and -20 LUFS?
If we’re talking about integrated LUFS, there shouldn’t be a problem, especially if you’re working in a modern DAW using floating-point math. A floating-point scale introduces additional possible amplitude values into the system, leading to nearly infinite headroom in our DAW. DAWs have different behavior in different areas of the software—Ableton Live, for example, will not distort at channel faders, but will distort at the master fader.
Sylvia Massy asked a similar question in this episode of Are You Listening?, having noticed that her mixes were sounding better when she was printing them fairly low.
2. What are intersample peaks and how do you deal with them?
To capture an analog audio wave in a digital setting, we have to measure its amplitude thousands of times per second. If you play these samples back through a DAC, it will reconstruct the original analog wave.
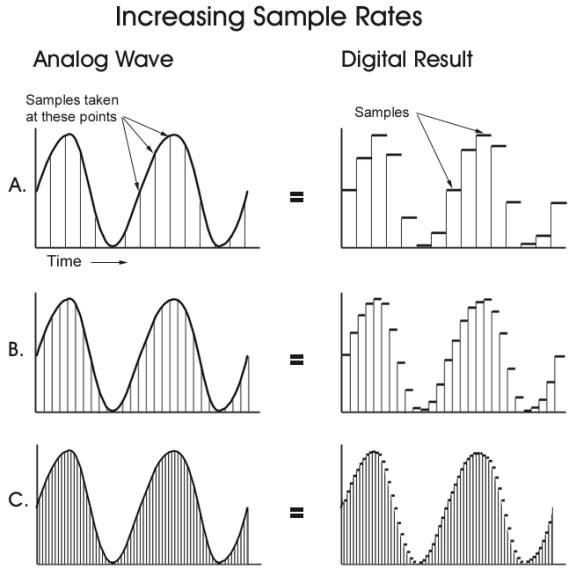
The basics of sample rate
Sometimes, these measurements occur exactly when the wave reaches its peak amplitude. But more often than not, these measurements occur before or after the peak. Because they happen between the samples, these peaks are called intersample peaks.
Normally, intersample peaks aren’t an issue, and the system is able to accurately recreate the original analog wave. However, we start to run into problems with hot masters that have intersample peaks.
Why might this be? Well, if audio is loud enough to approach the point of distortion, those intersample peaks could clip. You won’t hear clipping in your DAW’s busses if you’re using a modern DAW with floating-point math, but this clipping will occur on playback through a physical DAC.

Clipping intersample peaks
To solve this issue, as we’re about to print our master file, we can drop the ceiling a bit and get some headroom back. Dropping the ceiling


Ozone 11 Advanced

Ceiling dropped to give master more headroom
You'll also notice that there’s a button labeled True Peak in the Ozone 9 Maximizer. True peak is another way of saying intersample peak.
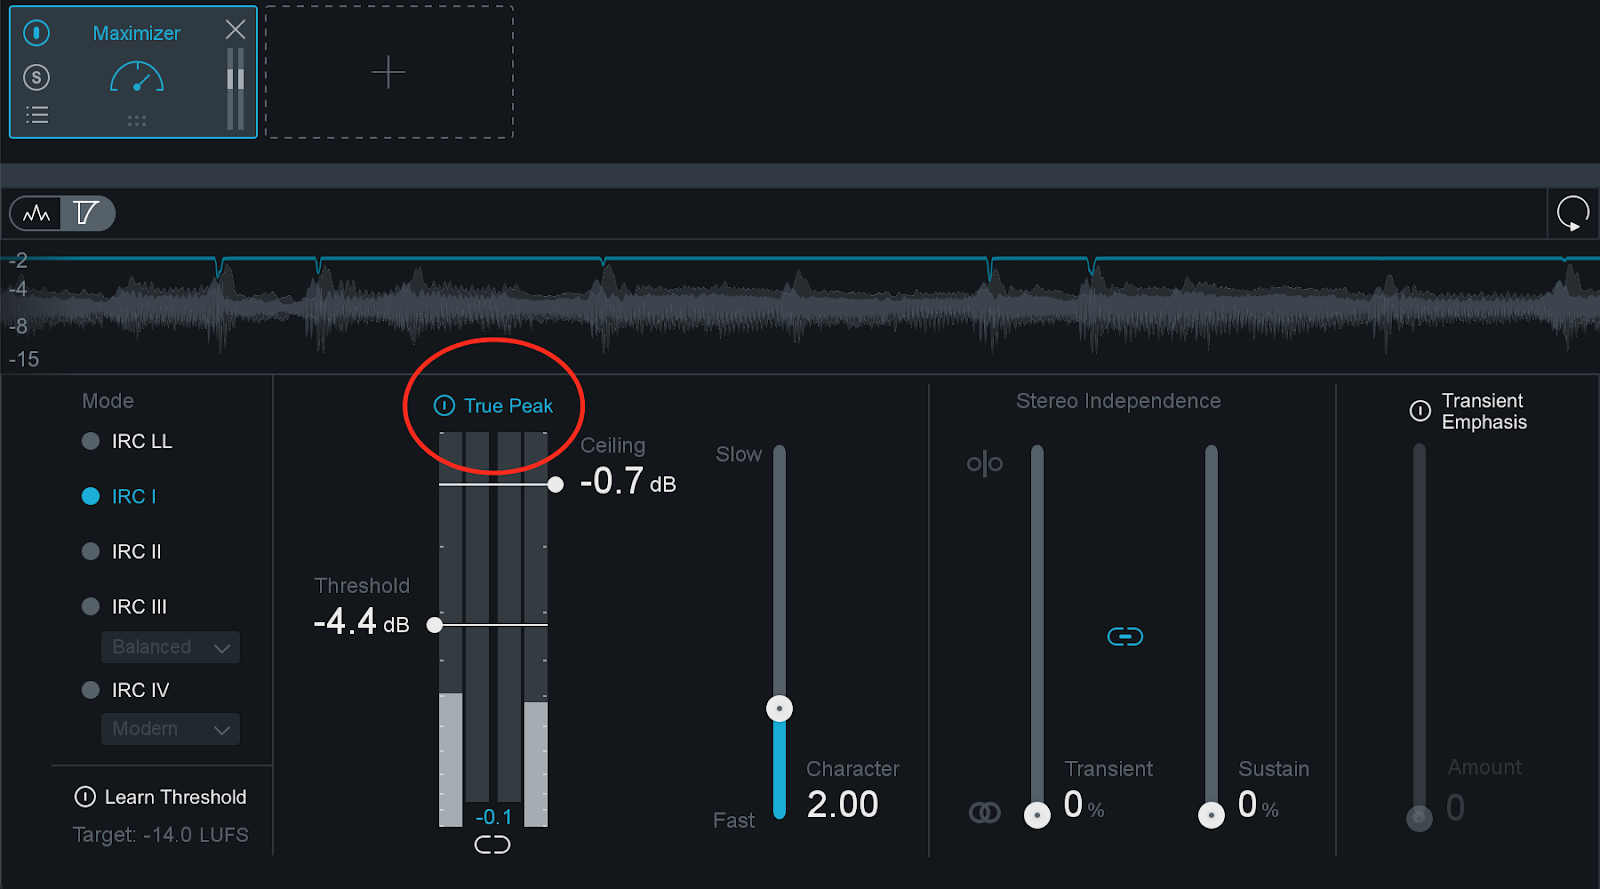
True Peak mode on the Ozone 9 Maximizer
Selecting True Peak mode on the Maximizer will cause Ozone to oversample the audio, reading it again and placing additional sample points between the existing ones. This creates a more accurate representation of the audio, reducing intersample peaks which reduces the chances of clipping.
3. Is there a checklist to determine when a master is done?
Aesthetically, there isn’t ever a defined point at which mastering is done. Your master doesn’t necessarily need to conform to any standard; technical or otherwise. A checklist approach might work well when mastering your own mixes, since you likely have specific mastering moves you prefer to use on your own work. But this can be a problem if you work with someone else’s mix. Just because you often use multiband compression to boost highs doesn’t mean you always should.
All that being said, there are a few necessary housekeeping tasks to complete before declaring your master complete:
Format your file correctly
To upload to streaming platforms, you’ll likely use an aggregator, a site that prepares your files for many platforms. You need to provide aggregators—or the platforms themselves—with correctly formatted masters to get your tracks out to the masses. Make sure you bounce with the proper bit depth, sample rate, and file format for the aggregator or platform you’re approaching. Apple Music, for example, will accept a sample rate of up to 96 kHz and migrate it to 44.1 kHz for you, while other platforms require a sample rate of 44.1 kHz.
Pay attention to your headroom
Of course your master shouldn’t be too close to zero, but it should also be hot enough. If you leave a bunch of headroom and upload your mix to a distribution service, it will assume this is what you want and leave that headroom.
Final quality check
Once you’ve printed your audio, the last step is to sit down and do one final pass from beginning to end. This isn’t to decide whether the master sounds good, but rather to listen for flaws like clicks and pops, missed fades, etc. This is the version that people are going to hear all over the world, so you don't want anything to be wrong with it.
4. What’s the best LUFS level for mastering hip hop for streaming?
It’s difficult to have hard-and-fast rules for hip hop loudness, as it can be an extremely varied genre both in terms of artistic choices and dynamic range. To learn more about the different types of LUFS measurements—short-term, momentary, integrated—check out the episode on metering in mastering.
In general, genres that rely heavily on rhythm shouldn’t be pushed as hard as others. Since the drums are likely the loudest mix elements, they’ll hit the limiter first, and will be more and more compressed the harder we push the limiter. We’re met with the choice, get another dB or two in overall level, or let the kick really hit. Follow your ears; only seek that extra bit of level if you can do so without sacrificing the kick’s impact.
Keep in mind that different streaming platforms also use different standards for loudness—and even use different measurements to evaluate level. Spotify uses replay gain in response to LUFS, YouTube uses loudness normalization in response to LUFS, and Apple Music uses a variation of something called PLR. Spotify and YouTube use -14 LUFS—integrated—as a target.
All that being said, the differences in standards are small enough that when you make something that sounds great, it will play back well on all streaming platforms. You don’t need to make a separate master for every streaming option, and you shouldn’t worry about hitting some LUFS level that’s etched in stone.
5. What can be done in mixing for better stereo separation and imaging in mastering?
The outcome of mastering relies so heavily on what happens in mixing. You shouldn’t rely wholly on mastering to give a track width and depth, as there’s only so much that can be done in this department. A narrow, well-balanced mix will be torn up if you try to spread it or boost the side information in mastering; take care of stereo separation and imaging in the mixing stage.
Follow your ears and use panning to unmask mix elements and give them space. Just mix with the mindset that stereo separation is relatively locked-in when the mixdown is finished.
6. Is mid/side compression ever appropriate in mastering?
In general, unlinked mid/side compression can have a strange effect in mastering. Compressing the center will cause the sides to sound louder, messing with the track’s ambience and stereo balance. Compressing the sides will cause the sides to sound quieter, making the mix sound overly dry and focused in the center.
This makes mid/side compression a bit of a challenge in mastering, as it’s hard to control how loud a primary element, like the vocal, is at any given moment.
There are, however, instances while mastering in which having access to the center or side channels can be helpful, as certain mix elements are often only in one of those places.
First, a lead vocal may need a bit of de-essing in the mastering stage. Since the lead vocal is nearly always in the center, we can apply some high-frequency compression or dynamic EQ in the center channel to control the sibilant frequencies. This way, we can address vocal sibilance without messing up high-frequency information in wide mix elements, like cymbals and reverbs.
Similarly, a kick drum may be overly boomy in the center channel. We can apply low-band compression or dynamic EQ in the center channel and compress the low end. This allows us to control the kick drum without messing up the entire stereo image.
7. Any advice for mastering without great equipment?
Regardless of your equipment, the most important thing to do is practice. Master a track, listen in multiple environments, repeat. There isn’t any substitute for experience, and that experience will help you make better decisions down the road.
Over time, you’ll create an internal compass for what “balanced” sounds like, but a good environment will allow you to hear your audio accurately enough to determine that it’s balanced in the first place.
Of course, not everyone has access to a mastering studio. This is where visualizations like Tonal Balance Control come into play. Meters like this can help in any listening environment, but are especially useful if you’re doubting your equipment. Again, check out the metering in masteringepisode for more info.
8. Why are high-pass filters are problematic in mastering?
The concerns here are two-fold in mastering, but it’s worth noting that you shouldn’t avoid high-pass filters altogether. If it’s the best tool for the job, use it, just know the trade-offs so you can use your tools most effectively.
First, it’s common for beginning engineers to turn to a high-pass filter, even when a low-shelf filter would achieve better results.
A high-pass filter is designed to eliminate some part of the signal that isn’t supposed to be there. If you set the cutoff frequency far enough away from the fundamental frequency of the element with the lowest note, you should be good. Be sure that the filter isn’t causing your signal to lose too much body, but there's nothing wrong with using a high pass filter to thin out the low end.
Shelves, on the other hand, are much gentler, and are a better choice when you’re using an EQ to change tone rather than eliminate problems. In mastering, when we’re working with a full track and making more nuanced moves, a high-pass filter can be heavy-handed.
High-pass filters also add a bit of distortion that affects the signal’s phase. These phase changes can create a resonance around the filter’s cutoff frequency, which can potentially increase your peak level. You’ll also lose some of the focus in the very deep bass. It’s up to you to use your ears and decide if this is a problem for your track.
9. What do you do if you disagree with the client on how the master should sound?
If you’re mastering a track for a client, you’re inherently collaborating with them. Depending on their background, they may have crucial perspectives that help push the project in the right direction. If you’re working with the artist or composer, and they comment that something you’re doing in mastering is taking away from the piece of music, listen to them!
It’s the artist’s face and name that’ll be connected to the record, not yours. You may get credit, but your main goal when mastering for someone else should be to make them happy, as the final decision is theirs to make. Coming to the table from the assumption that you know better isn’t conducive to achieving a master that the client likes.
10. Can you expand on the Crest Factor meter in Tobal Balance Control?
First of all, keep in mind that meters are just helpful tools for understanding what you’re hearing, and you don’t need to do something every time a meter tells you that you should. Look at the meter, think about the context of your track, and decide whether or not you need to make an adjustment.
The Crest Factor meter in Tonal Balance Control is no exception, but can be helpful in revealing the nature of your low end. Remember, the crest factor is the difference between peak and average level, often represented by transient and sustained information. On the left of the meter you’ll see a shape that indicates transients in the audio, while on the right of the meter you’ll see a shape indicating sustained audio with few transients.
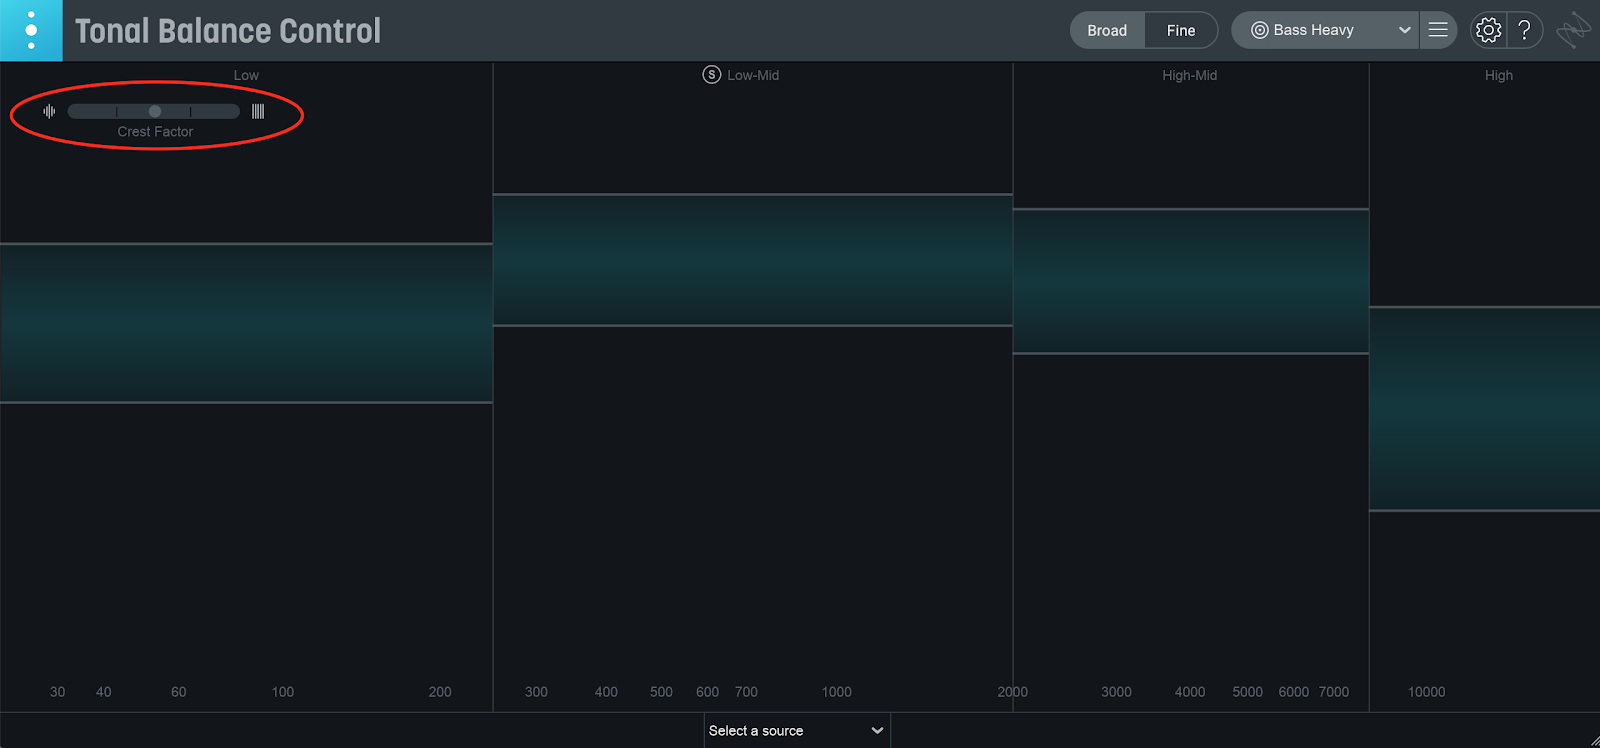
Crest Factor meter in Tonal Balance Control
This meter, located in the low-frequency band, only applies to the lows. There are a couple hash lines on the meter that indicate the ideal relationship of transient material to sustained material in the genre you’re targeting. If the indicator is between the hash lines, your low end has a healthy crest factor for your genre.
If the indicator moves to the left of the left hash, your low transients may be too powerful. This could happen if you had a quiet, sustained bass and a loud kick drum.
If the indicator moves to the right of the right hash, your low end may be lacking some punch. This could happen if you had a loud, sustained bass and a quiet kick drum.
You can use this meter, plus the context of the track you’re mastering, to make more informed decisions about your low end. If you were working on a dance track with a pumping kick drum and saw the indicator off to the right, you may want to pull the bass down a little, or push the kick drum up—this is quick and simple using the new Low End Focus module in Ozone 9.
Any more questions?
Hopefully these tips make your next master easier, better, and faster to finish. Make sure to keep your questions and comments coming; we’d love to hear what you’d like to learn.
Don’t forget to subscribe to our YouTube channel for more informative videos, and explore iZotope Learn for more mastering articles to help you continue developing your chops. Thanks for reading, and stay tuned for the next season!
Still can’t get enough of these mastering tips? Check out both seasons of our Are You Listening?mastering video series below:
Are You Listening? Mastering Video Series
Explore the first season of Are You Listening? with Jonathan Wyner:
- Audio Mastering Basics
- Your Listening Environment
- Compression in Mastering
- Limiting in Mastering
- EQ in Mastering
- Mixing Meets Mastering: Sylvia Massey in Conversation
- How to Master an Album, and More Audio Mastering Questions Answered
And get caught up on season two:
