Multiband Compression in Action: 3 Examples in the Audio Mastering World
The multiband compressor is one of the more specialized audio mastering tools at our disposal. Read three examples of how it’s used in various mastering sessions.
When we talk about audio mastering, the trusty equalizer, compressor, and limiter all tend to get a bigger chunk of the spotlight as far as tools of the trade are concerned. But there are several occasions where these three tools might not be enough to achieve a certain sound at the mastering stage, given the limited headroom mastering engineers are left to work with. Here we take a closer look at the multiband compressor, one of the more specialized audio mastering tools at an engineer’s disposal. We’ve covered the basics before, but now let’s discuss how it’s been applied in various mastering sessions with different scenarios.
What is multiband compression and how does it fit in the audio mastering world?
Before we dig into what multiband compression is, let’s first head on over to Jonathan Wyner’s Are You Listening? series, where he devotes an entire episode to compression in mastering.
Much like any form of audio compressor, a multiband compressor lets you control the dynamic range of your audio source. But what sets it apart is its unique capability to hone in on a specific range of frequencies when controlling dynamics.
Though not as commonly utilized in the signal chain, the multiband compressor becomes helpful for specific situations such as navigating a sporadic frequency build-up in the mix, or for taming the occasional harshness in the high-mid frequency range. With the multiband compressor, you can target multiple frequency bands and fine-tune different compression settings that address these issues.
Sounds like the ideal problem-solver for mastering engineers, right? Maybe not quite.
In the world of mastering, where the smallest amount of processing can yield drastic sonic results, the multiband compressor might not be the most transparent solution. For a multiband compressor to work, it essentially relies on the use of crossover filters to separate your audio’s frequency spectrum into multiple bands. The crossover filters will introduce phase shifts which, if not set thoughtfully, would lead to problems resulting in potential distortion and/or audible fidelity loss.
So where does multiband compression fit in the critical world of audio mastering? It helps to start by treating this tool not as a powerhouse compressor with multiple frequency band functions, but instead focusing on its unique ability to target a frequency range to address challenging concerns in a minimal, transparent manner. Treat it as a “split-band” rather than “multiband” compressor in that sense. Precision and intent are key, as we will observe in the following 3 examples:
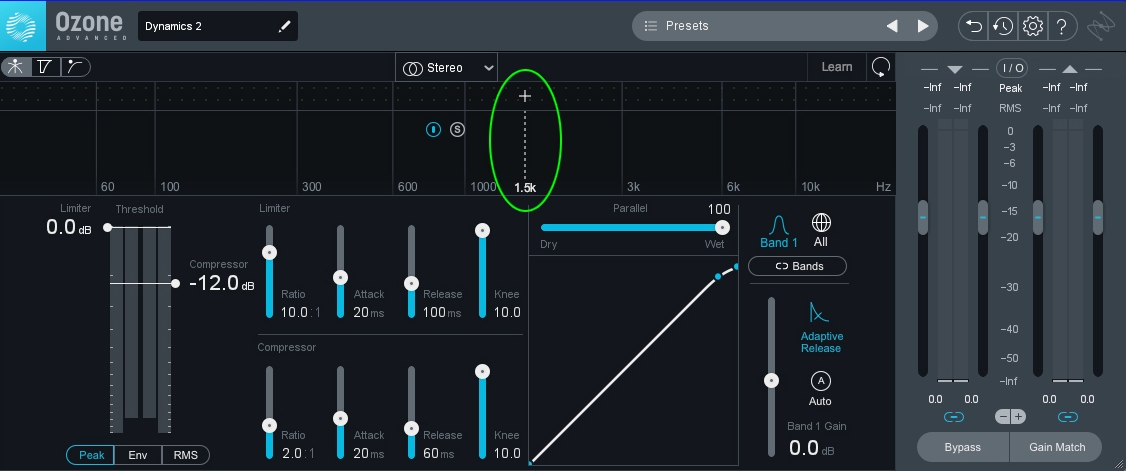
Precision and intent are key. Select “+” on the module to add a band. To finetune the frequency crossover, you can nudge to—or manually input—the target frequency.
Multiband compression in action during mastering
Controlling the balance of the kick in relation to the rest of the mix
One of the common challenges mastering engineers face is striving for the ideal balance between the low-end energy and the rest of the mix when the music is brought up to consumer playback levels. There comes a time when the kick drums, bass guitars, and low-frequency synths may overwhelm and swallow the rest of the music. A thoughtful subtractive EQ treatment often does the trick, but there are occasions when an EQ adjustment may not be enough.
For this, I am pleased to have KiSMiT’s new single “Show Me” as an example. The band KiSMiT is known for their signature blend of dance-pop, soul, and funk—three musical styles that are all predominantly drum- and bass-driven—and their latest track is no exception to this.
Before we proceed, let’s first listen to the mastered song for context:
Song and Artist: “Show Me” by KiSMiT
Recorded by: Baz King
Mixed by: Drew ofthe Drew, additional mixing by Jorel Corpus

KiSMiT’s “Show Me”
From a quick listen, you can instantly hear the funk and soul influence on this pop track. As I was mastering this song, it was key for me not to lose the artistic intent behind this production. Driven primarily by the drums and bass, the mix delivered on this vibe and energy, and my goal was to make sure this energy carried through to the mastering stage. However, in the mastering world where there is limited headroom, the low end on this track begins to overpower, particularly from the attack of the kick drum.
Let’s listen to the “Show Me” master before any treatment in the kick:
With the mastering settings optimized to bring out the clarity and energy in this pop record, the kick still distorts and swallows the energy from the rest of the frequency spectrum. To carefully tame the kick drum, I utilized Ozone’s Dynamics module and its split-band compression function. Removing all the unnecessary bands, I set my one frequency crossover around 120 Hz—only enabling the low-end compressor and disabling that same feature on the others (see image below).
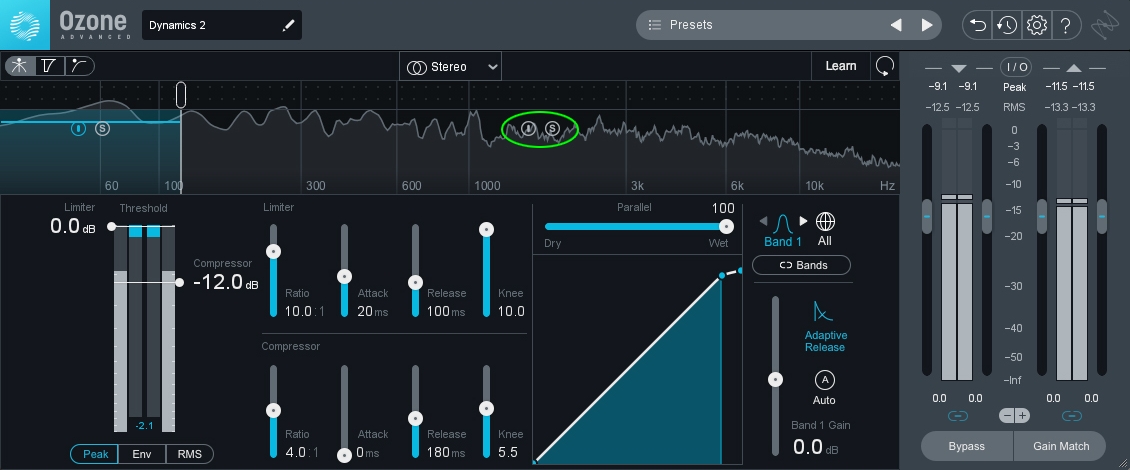
KiSMiT “Show Me” multiband compression settings (Make sure to disable the compressor on the other bands not being used)
Honing in on the overpowering transient of the kick drum, I have the compression attack set to an immediate 0 ms with a relatively fast release time. This allows the compressor to target the transient, therefore letting the bass guitar and other low-end synths breathe and come through. I have the compression threshold set to -12 dB, which was optimal for capturing the kick’s transients with minimal effect to the rest of the elements in the low-end frequency range.
With our multiband compression focusing on the kick, let’s listen once again to “Show Me.” The kick is now much more balanced in relation to the rest of the master. We hear the various details in the vocals and instrumentation come through while retaining the drive and energy provided by the bass guitar and kick drum.
Controlling low-end build-up in tricky scenarios
Controlling low-end build-up with multiband compression isn’t just for the drums and bass guitar. In this unique scenario, artist Z Berg brought in an unconventional Christmas record with an equally unconventional mastering challenge.
Before we proceed to the challenge at hand, let’s first listen to the full song for context:
Song and Artist: “The Bad List” by Z Berg and Ryan Ross
Produced by: Ethan Gruska
Engineered by: Tony Berg
Mixed by: Joseph Lorge at Sound City

Z Berg and Ryan Ross’ “The Bad List”
Before “The Bad List” came into the studio, the artist Z Berg made a specific note about how she needed help addressing low-end distortion that was overwhelming several speakers. After a brief back-and-forth, we’ve identified this distortion as a build-up that was caused by the low-mid resonance from the piano.
Let’s listen to the master of “The Bad List” before any low-mid treatment in the piano:
After a few listens, you can hear the low-mid resonance on the piano periodically overwhelm Z Berg and Ryan Ross’s vocal performance. Though a bell-shaped subtractive EQ would address the build-up, this would result in a thinning in the vocals because both the piano’s low-mid resonance and the body of the vocal performance live within the same frequency range.
Rather than an EQ adjustment, I relied instead on the multiband function in Ozone’s Dynamics module. With the crossover filters set at 176 Hz and 353 Hz and the other bands disabled, the compressor then hones in on the low-mid resonance with the threshold set so that it only latches on during those periodic build-ups, therefore leaving Z Berg and Ryan Ross’ vocal performance unscathed.
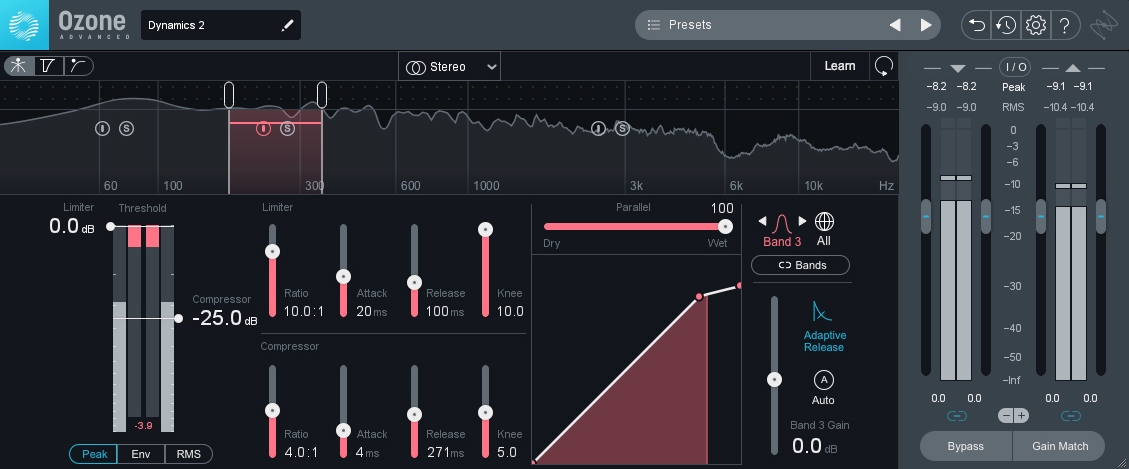
Z Berg and Ryan Ross “The Bad List” multiband compression settings
Let’s listen once again to “The Bad List,” this time with the multiband compressor enabled:
Taming harshness in the mids or high-end frequencies
Of course, the multiband compressor isn’t just for the low-end side of the frequency spectrum. It’s also helpful when it comes to taming harshness in the mids or high-end frequencies. In fact, your trusty de-esser counts as a multiband compressor as well. For this last example, however, we’re going to skip de-essing to focus on a more unique situation that deals with a wide dynamic range, specifically in the high-mid frequencies—choral music.
Let’s listen to this performance of the Philippine Madrigal Singers singing “Kaisa-isa Nyan,” composed by Nilo Alcala.
Song and Artist: “Kaisa-isa Nyan” by the Philippine Madrigal Singers
Composer: Nilo Alcala
Recorded and mixed by: Aji Manalo and Jaymee Ranoa

Philippine Madrigal Singers’ “Kaisa-isa Nyan” from the album Onomatopoeia: The Choral Works of Nilo Alcala
Choral music (and classical music overall) is characterized by its wide dynamic range. But within the choral ensemble, sopranos are known for their wider dynamic range relative to the other sections.
As you can hear from the audio clip of the same music without the multiband compression treatment, there are certain parts of the music where the overall balance gets thrown off because of the drastic dynamic swell in the soprano range.
There are many ways to control the sopranos’ wide dynamic range in this situation. In most cases, a smooth gain ride or clip gain on your playback DAW is all you need, or you can choose from a variety of dynamic compression techniques—parallel compression, Ozone’s Vintage Compressor, etc.—as long as they’re executed in a minimal, tasteful manner. In this case, a touch of multiband compression with frequency crossovers at 348 Hz and 2.69 kHz helped effectively maintain the balance among the choral singers throughout the song. Keeping a light touch with the compression, I set my threshold at -5.8 dB with a slow attack and release.

Philippine Madrigal Singers “Kaisa-isa Nyan” multiband compression settings
Let’s listen to the “Kaisa-isa Nyan” master with the multiband compressor enabled for comparison.
Parting words: Precision and intent are key
As I've mentioned in the beginning, precision and intent are critical when using the multiband compressor in the audio mastering world. Only reach for it once you’ve exhausted all possible routes with your equalizer and/or compressor. It’s indeed a rarity for mastering engineers to use the multiband compressor, but when a unique session calls for it, it’s an extremely helpful tool to have in your arsenal.

