Multiband Compression Basics
In this piece, we cover the basics of multiband compression. Learn when to reach for a multiband compressor along with how to set it up for mixing or mastering.
There are no two ways about it: without some good guidance, multiband compression is tricky! As a young, intrepid engineer, I remember asking one of the senior engineers at a studio I was interning at, “Do you have any tips on how to use multiband compression effectively?” He replied, “Oh, I don’t really get into that. Maybe ask Will.” I asked Will—one of the other engineers. Will responded, “Oh, yeah, it’s pretty complex. I use it for mastering sometimes, but I wouldn’t really worry about it if I were you.”
Well, that was about 15 years ago, and thankfully I’ve had some great mentors along the way. In this article, I’m going to give you the advice I wish one of those engineers had given me all those years ago. We’re going to take a look at when to reach for a multiband compressor, some tips for setting them up in both mixing and mastering, and what to watch out for when you use them. Let’s get into it!
In this piece you’ll learn:
- When to use multiband compression
- How to create an actionable strategy for your compression needs
- How to set up a multiband compressor for either mixing or mastering
Interested in following along with this tutorial in your DAW? Start a free trial of a


iZotope Music Production Suite Pro: Monthly


Neutron


Ozone 11 Advanced
What is multiband compression, and when do I use it?
Let's start by outlining what multiband compression is in the first place. At its core, a multiband compressor is essentially a group of several compressors, each of which operates on one section of the full audio spectrum. These sections are created using something called a crossover, which splits the audio into frequency bands below the crossover frequency as well as above it.
For example, a crossover at 200 Hz would split the audio into everything below 200 Hz—which could then be fed to one compressor—and everything above 200 Hz—which could be fed into another compressor. That would be a two-band compressor. You could take this further and create another crossover, this time perhaps at 2 kHz. Now you have a three-band compressor that operates independently below 200 Hz, from 200–2000Hz, and above 2 kHz. Additionally, the compressor attached to each band could have different settings, tailored to the frequency range it’s working on—more on that later.
It’s worth mentioning that the frequencies in a given band don’t suddenly stop dead in their tracks at the crossover frequency, but roll off gently both above and below it. Crossover design is decidedly a topic for another day. Suffice it to say, this behavior is generally desirable and actually helps give a multiband compressor a more transparent sound than it would have if the crossovers used so-called “brick wall” filters.
So, with some basic definitions under our belt, when should we be using multiband compression?
In mixing
When it comes to multiband compression in mixing, there are generally two broad use cases that may prompt me to use it: 1) to help control a problematic frequency region in a source recording, or 2) to help achieve more transparent sidechain compression. We’ll look at a specific example of this below, but some high-level ideas could include things like:
- Compressing just the high end of drum overhead mics to control overly bright cymbals
- Compressing the upper midrange of an acoustic guitar with an over-accentuated pluck
- Using an external sidechain to compress just the low end of a bass to a kick drum for increased clarity without pumping in the midrange
- Using an external sidechain to compress the vocal presence range of an instrument bus to the lead vocal, making room for enhanced intelligibility
In mastering
In a mastering context, things almost get simpler. I will generally only reach for multiband compression if I either 1) want to control a specific frequency range—most often just the low end or high end—or, 2) want that gluey cohesion we can get from wideband compression, but the kick or bass is causing too much pumping in the upper frequency ranges. Again, we’ll look at some specific examples of this below.
How to set up a multiband compressor
While certain types of processors will forgive or even reward somewhat aimless experimentation, multiband compressors tend not to fall into this category. It’s easy to think, “Let me just create a few bands, maybe solo them one at a time, dial in some compression for each along the way, and see where that gets me,” but this is where it’s easy to get into trouble. And yet, so many of us learn through this kind of experimentation. So how can we learn to use multiband compressors in a consistent way?
Well, in my experience, it’s absolutely crucial to have a plan when you start setting up a multiband compressor, with a definite goal or outcome that you’re trying to achieve in mind. In these next sections, I’m going to share the thought process I use, along with some examples, so that you can create your own multiband compression objectives.
This article references a previous version of Neutron. Learn about 

Neutron 5
For mixing
As I mentioned above, in a mixing context I tend to use multiband compression more as a spectral problem-solver than a broad dynamic shaping tool. Of course, the first step to solving any problem is identifying it. To that end, try to define for yourself exactly what the problem is, and what the fix should accomplish. For example, an acoustic guitar recording—maybe made via a direct input (DI)—has too much upper midrange pluck, so we would like to use very fast compression in just that range to push the pluckiness back into the body of the guitar.
Once you’ve defined the problem and the solution, you can create a band that focuses on the desired frequency range. This is a great place to use band-solo functionality to hear exactly which frequencies the band is encompassing. Then, unsolo the band and start dialing in your compression in the context of the larger problem. In the example above, you need to hear the pluckiness in the context of the full guitar recording to know how much compression is right.
What about one of the other examples I mentioned, like sidechain compression on just the low end of a bass? Let’s walk through this one. First, here’s a drum and bass loop with no compression at all.
I’m noticing that the low end of both the kick and the bass feel poorly defined, and like a bit of a muddy mess. To fix this, I would like to push the low end of the bass down when the kick hits. I could do this with traditional wideband sidechain compression, but this bass has a lot of rich upper harmonics, and I don’t want them to start pumping with the amount of compression I suspect I’ll need.
To do this, I’ll add an instance of Neutron compressor, and create a crossover point. I’ll solo the bass and the low band I’ve created, moving the crossover point around until I’m happy with the frequency range it’s defining. Here, I’ve settled on 200 Hz. Then I’ll route the drum track to the external sidechain input, pop out the sidechain controls for the low band, set them to External Band 1, unsolo everything, and start dialing in my compression. Here’s what I ended up with.
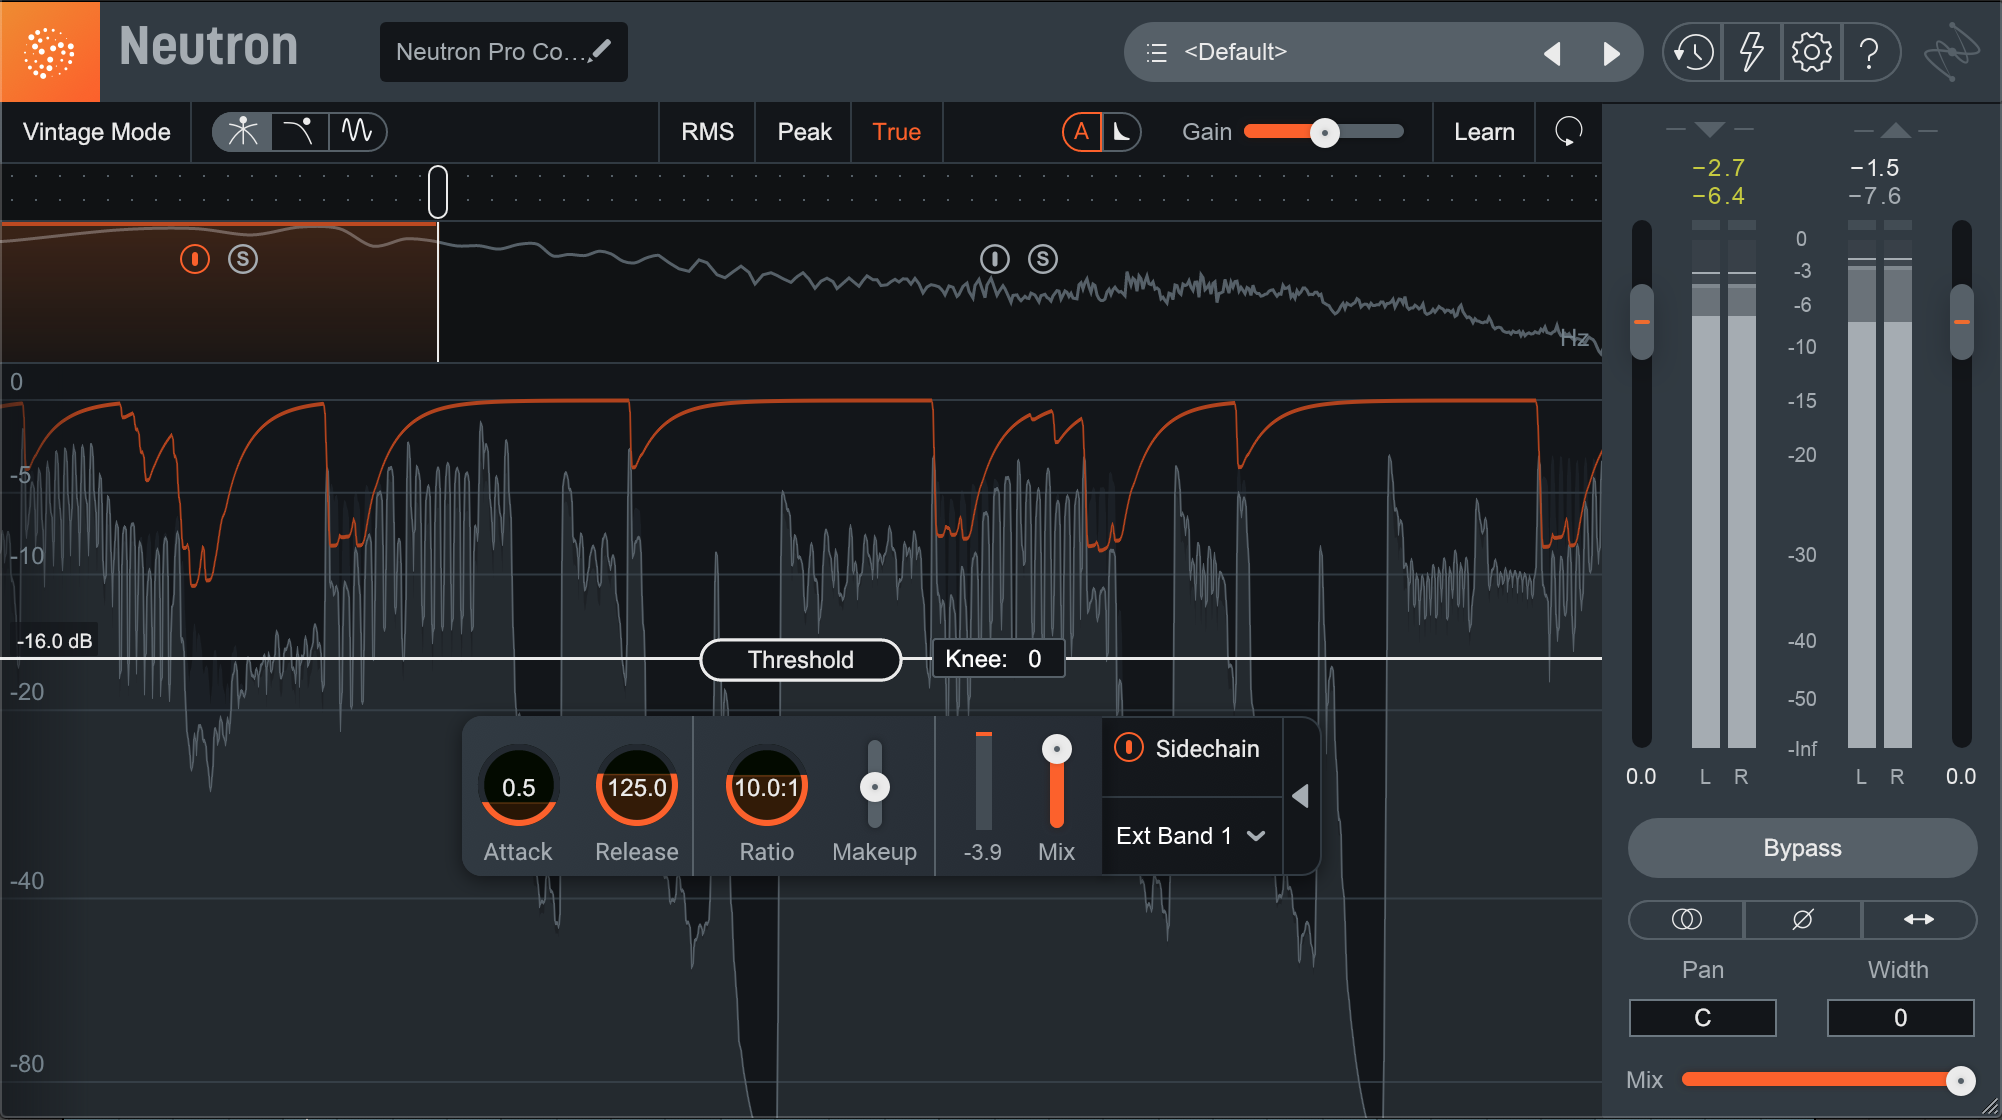
Sidechain compression on the bass low end
And here’s the result. Notice how the kick cuts through more and carries more weight, without the upper harmonics of the bass starting to pump.
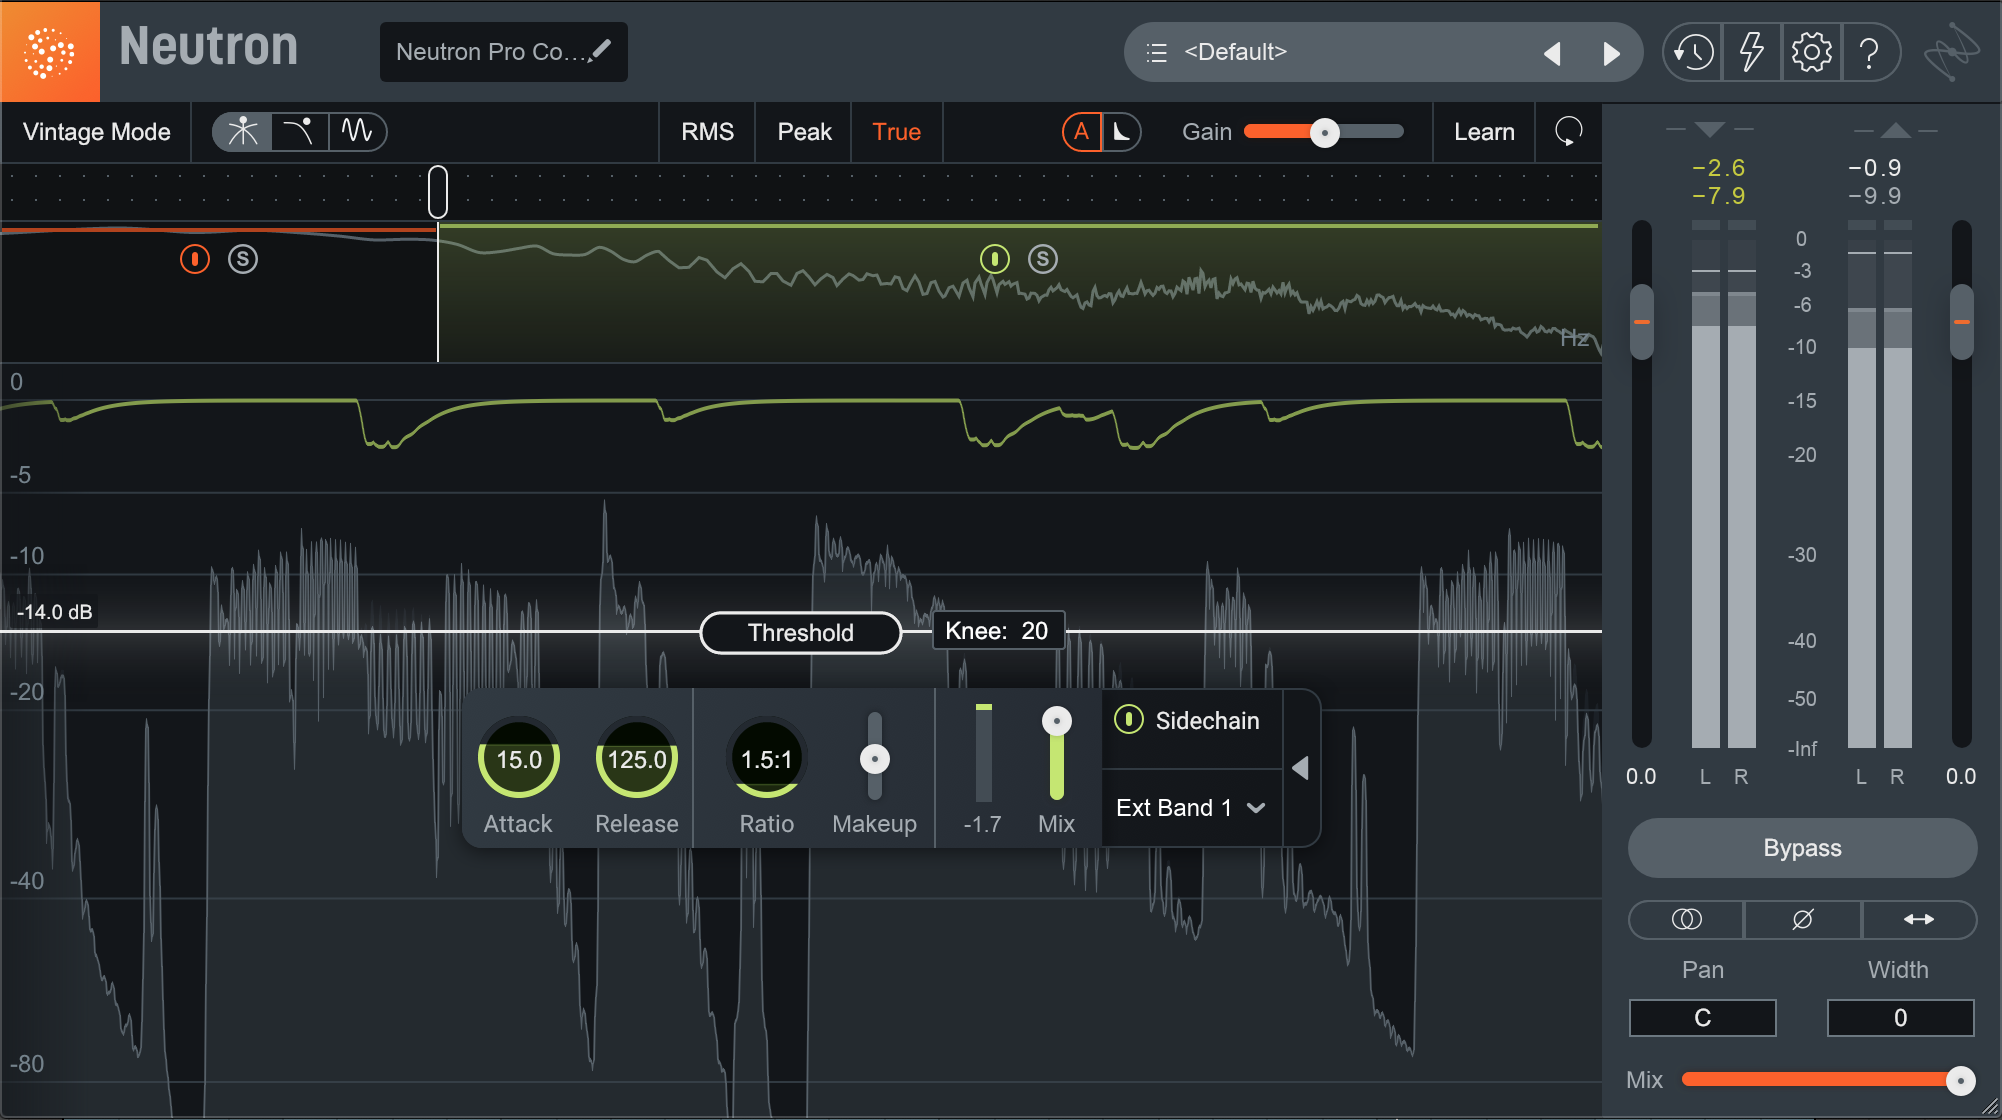
Adding high band pumping to taste in Neutron
And by way of contrast, here’s what it would sound like with normal wideband sidechain compression. Listen in particular to the bass turnaround and drum fill in the middle of the loop and notice how the midrange of the bass really gets pushed back, pumping and chattering away.
For mastering
When it comes to multiband compression in mastering, there are usually three main questions you need to answer to determine how you’ll set it up:
- How many bands?
- What crossover frequencies?
- What settings per band?
Again, to answer these it helps to define what you’re trying to accomplish by using multiband compression, although here it could be as simple as tightening up the low end, or something more akin to wideband bus compression. Let’s look at how to answer each of these questions in turn.
The simple answer to the question of how many bands is, “as few as possible.” Very often two bands will suffice—you may only need to compress in one of them—and sometimes three can give a nice degree of control. Very occasionally a particularly challenging mix will warrant four bands, but if you find yourself wanting more than that, it may be time to look at dynamic EQ. In general, you can use the following guidelines as a cheat sheet to get started.
- Two bands: you only want to control a particularly dynamic bottom or top end, in which case only one of the two bands need even be active, or you’re after a gluey, bus compression sound, but the low end is causing the upper frequencies to pump in an undesirable way.
- Three bands: you want to control the low and high end independently, but are happy to leave the midrange uncompressed, or you’re again after a gluey, bus compression sound, but need a little extra smoothing in the high end, in addition to the aforementioned low band control.
- Four bands: you have a very specific problem you’re trying to solve.
Once you’ve determined the number of bands, it’s time to set your crossover frequencies.


Ozone 11 Advanced
Finally, what compression settings do you use in each band? If you’re just looking to control a limited frequency range, hopefully the answer to this is pretty straightforward. Use whatever compression settings you need to control that band. You might compress just the low band much like you would a kick or bass—or a kick and bass bus—or you might compress just the high band to control sibilance or overly bright or pokey transients.
If you’re after some variation on the gluey, bus compression theme, my best advice is this: start with the same settings in each band. You can easily achieve this using the Link Bands control in Ozone Pro Dynamics. Some great general starting settings I like are a 2:1 ratio, 100-ms attack and release, and a soft knee. From there, keeping Link Bands on, you can pull down the threshold until you start to see a little gain reduction in one or two of the bands.
Now that you’ve got a good home base set up, you can experiment a little with individual band settings. Maybe a slightly lower ratio on the mid band would sound nice, or perhaps you want a lower threshold and faster attack and release times to grab a little more of the high band. If you find yourself getting in trouble with an individual band, you can always return to your home base settings.
By way of example, here’s Caleb Hawley’s “Tell Me What It’s Like to Have a Dream Come True” with just a little EQ and limiting.
By tweaking my recommended starting point just a little, I can get to a result I’m really happy with. It tightens up the low end nicely, tames the high end transients just a little, and adds some cohesion to the midrange, resulting in an overall tighter, yet simultaneously more open sound. Here are the settings I landed on.

Ozone Dynamics settings for “Tell Me What It’s Like…”
And here’s the same excerpt of the song, with the multiband compression added.
Start using multiband compression
Compression is tricky—multiband compression doubly, or triply so. If you take nothing else away from this though, I would urge you to remember: form a strategy any time you think you may want to use multiband compression, and keep things as simple as you can while still accomplishing those goals. If you do that for a while, you’ll be able to develop a sense of how multiband compression can work for you without it radically changing the sound of an instrument or mix in a way you didn’t intend.
Once you’ve got that under your belt, you can start experimenting with more specialized and advanced techniques, like mid/side or parallel varieties, but as with anything it’s important to have a strong foundation to build upon. Hopefully this has helped you lay that foundation and given you some ideas on how to best approach multiband compression.
