3 Uses for Parallel Compression in Audio Mastering
If you're a fan of parallel compression but wonder how to use it when mastering, this one's for you. Learn three parallel compression techniques for audio mastering.
Ahh, parallel compression! Ever popular in mixing for its ability to beef up drums, park a vocal, and generally add energy, it can also be put to good use in the mastering process. When you’re using it across an entire mix though, there are some extra considerations. And as always, careful, attentive listening is required.
In this piece, you’ll learn three parallel compression techniques for mastering, including:
- How to add punch and dynamics
- How to add density without sacrificing transients
- How to enhance tonal balance
But first...
Before we dig in, I want to make sure that we’re all on the same page, know what’s meant by “parallel,” and how to set it up. As a quick aside, this technique was sometimes referred to as “New York Style” compression, after the mix engineers in New York City who pioneered it.
In a nutshell, parallel compression—or any type of parallel processing, really—is the practice of blending a compressed or otherwise affected signal with a dry, unprocessed one. That’s it! There are a few ways to implement this in your digital audio work.
The simplest is a wet/dry control, which is becoming common in more and more plug-ins—sometimes labeled mix or even parallel. This allows you to mix between the wet (processed), and dry (unprocessed) signals. You’ll find a Mix fader on a lot of the modules in iZotope plug-ins like


Ozone Advanced


Neutron
If your compressor of choice doesn’t feature a wet/dry control, you’ll need to get your audio onto a parallel channel in your DAW. You could simply copy the mix file over to another channel, but you’ll need to copy any additional processing that happens before the compression too, and things can quickly get unwieldy—for you, and for your CPU. For my money, the best bet is to use three channels with the following routing:
- Channel A is your Pre-Process channel for things like corrective EQ. It routes to two busses, which we’ll call Bus 1 and Bus 2, but does not route to the master output.
- Channel B is for your parallel compression, and in some DAWs input monitoring will need to be enabled. Its input is set to Bus 1 and its output is set to Bus 2, or you can opt to deactivate the output and just send to Bus 2.
- Channel C is your Post Process channel for post-eq, limiting, or any other processing you may need after your parallel compression. Its input is set to Bus 2—again with input monitoring enabled—and its output is set to your master output.
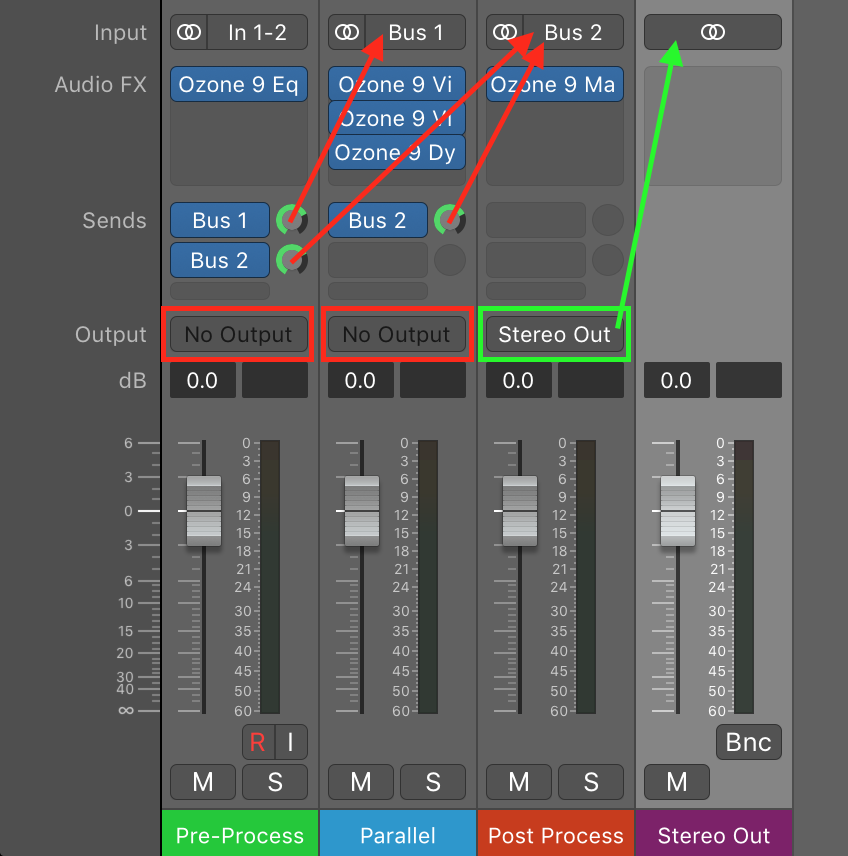
Parallel routing setup for mastering
Take note: it is absolutely critical that your audio workstation has latency compensation enabled. This shouldn’t be a problem in almost any modern DAW, but without proper latency compensation, this type of routing will result in a comb-filtered, phasey mess!
Adding punch and dynamics
“Wait a minute!” I hear you say. “Isn’t compression supposed to reduce dynamic range?” Well yes, under normal circumstances that can be part of its role. However, if we tune the compression and blend it in with the dry signal at the right level, we can get the transients to pop through while leaving the obviously compressed sounding bit below the average level of the program material.
The Vintage Compressor in Ozone is great at doing this, especially in its “Sharp” mode. While I can’t give you a magic setting that will work for everything, I can share some guiding principles and show how I put them to use on a demo track. In this case, my goal is to get the kick drum to punch through a little more. With that in mind, let’s examine some specific settings.
Detection filter
The Vintage Compressor in Ozone has an incredibly flexible detection (aka sidechain) filter that allows us to tune the signal the compression circuit “listens” to. Since I want to get the kick to poke through, I’m going to roll out some of the extreme low-end so the compressor doesn’t worry about it too much. I’m also going to push a little in the mid-range where the snare is more prominent, so it gets a little more compression to push it out of the way.
Ratio
While we normally like to deal with fairly low, gentle ratios in mastering, here we want something more aggressive. This is to help accentuate the difference between the transients and the body of the sound. Here, I’m liking 4:1.
Attack and release
The key here is to set your attack long enough to let the transients you want to keep come through, and to set your release short enough that the compressor is back to little (or no) gain reduction by the time the next transient hits. This can vary greatly depending on your compressor and your goals. For sharper, snappier transients, an attack time anywhere in the 10–30 ms range might work. For punchier, heavier sounds, like kick drums, 30–100 ms may be more appropriate. For your release, try starting around 100 ms and moving a bit in either direction until you find something that works. Let your ears be your guide.

Full-band parallel compression for punch
In this case, I liked 50 and 80 ms attack and release times respectively, and ended up blending the compressed signal in 14 dB below the dry signal. Let’s have a listen. First, here’s an excerpt from “Planet Hop” by dance music duo Horizon Wireless with just some EQ and limiting.
Next, here it is with the above parallel compression applied. Notice how the kick drum seems to jump out and have a bit more space around it, without the rest of the track feeling obviously squashed.
Adding density without sacrificing transients
In the previous example, our aim was to enhance the transients while leaving the body of the song less affected. What if we wanted to do the opposite though? What if we wanted to bring up some of the body and quieter detail without sacrificing the transients?
Again, we can achieve this with the Vintage Compressor working in parallel. Of course, we’ll need to adjust our settings and blend level. First things first, we’ll want to switch the mode to “Smooth,” which is designed to focus on the body of the signal and reduce dynamics.
Detection filter
Once again, the detection filter plays a major role in helping us achieve the sound we’re after, but in a very different way. This time, I’m going to leave the high-pass filter all the way down at 30 Hz, just to filter out any infrasonic rumble while still enabling the compressor to latch onto those bassy kicks. I’m also going to push the high end above 4 kHz a bit to make sure that any quieter, high-frequency transients are grabbed by the compressor as well.
Ratio
Like our previous example, we want a fairly high ratio (at least by mastering standards). We still want to avoid unwanted distortion though, so we’ll have to balance this with our attack and release times. This can be a bit of a circular game. Be patient and try different combinations until you find what works. In this case, I settled on 4.5:1.
Attack and release
This type of compression relies on faster time constants so we’re going to shorten those up, being careful to avoid overt distortion, and tweaking our ratio as we go. A good approach can be to start with longer times and slowly bring them down. If you hear distortion creeping in but find there’s still too much transient information getting through, back off your ratio a little. Once you’re below 10 ms on attack, and under 50 ms on release, you’ve probably taken things as far as you can—although this can be highly compressor-dependent. See how far you can bring your ratio up without distortion, and you’re there!
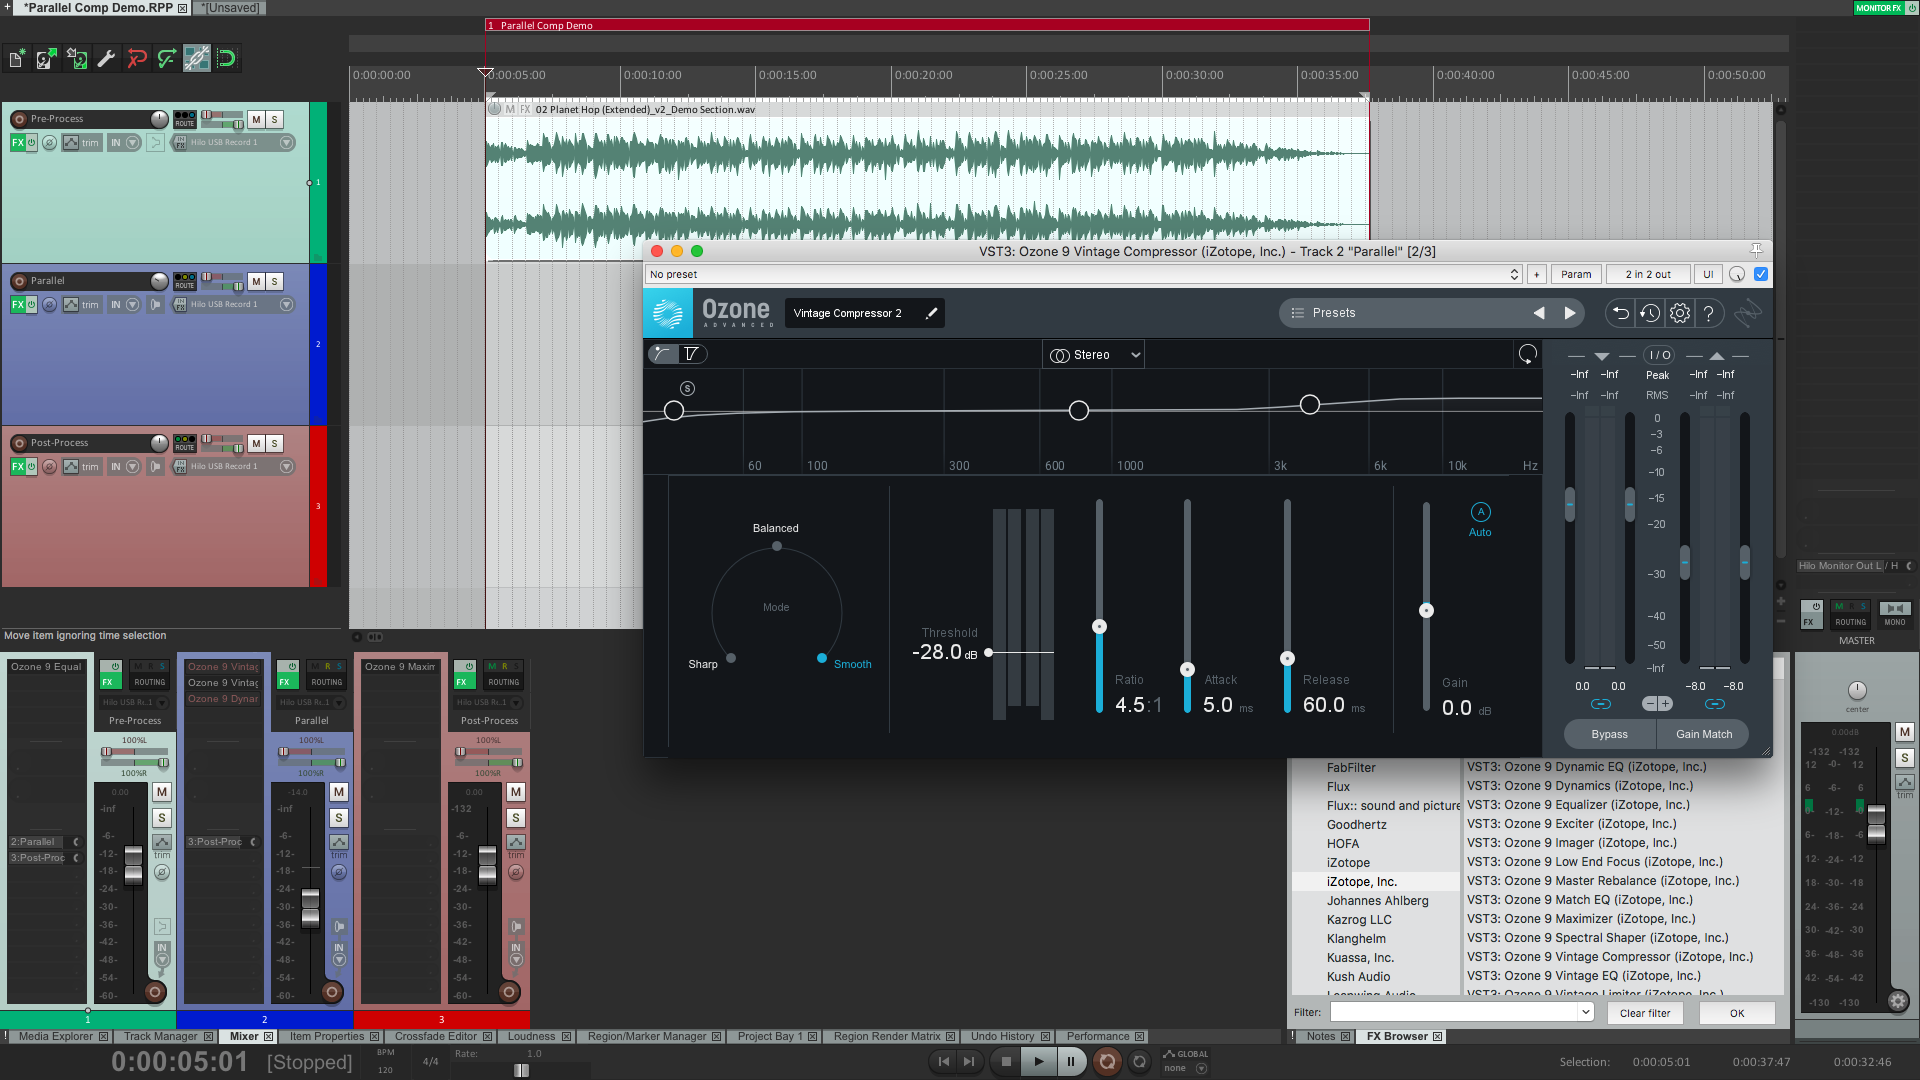
Full-band parallel compression for density
In this example, I settled on attack and release times of five and 60 ms respectively and dropped the blend down a further eight dB, a full 22 dB below the dry signal. Have a listen and compare to the original.
Notice how the section at the very front (before the drums come in) has come up in level, and how everything seems a bit fuller and louder, but without the transient squash you would hear if you listened to the compressed signal by itself.
Sweetening with tonal enhancement
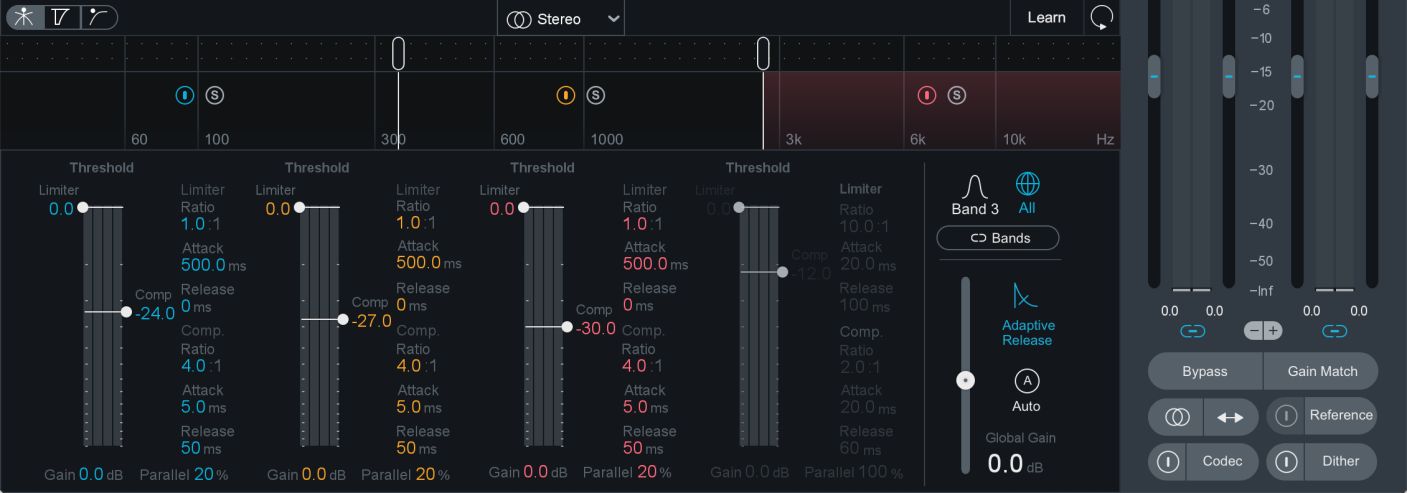
For our final example, we’re going to switch gears a bit and use the Dynamics module in Ozone in multiband mode. Not only that, but we’re going to see what kind of results we can get with a Mid/Side setup, something I would almost never try in mastering outside of a parallel context.
As a side note—pardon the pun—if you want to avoid the routing described at the beginning of this article, the Dynamics module has a built-in “Parallel” control, so you can use the Dynamics module in single-band mode for either of the techniques described above. While the other controls will be slightly different, you can achieve similar results.
Due to the nature of multiband and Mid/Side processing, the settings can multiply quickly and become more complex. So rather than go into detail as we did above, let’s talk about some general guiding principles.
Keep it simple
If you’ve never experimented with this type of processing before, start simple. Use two, maybe three bands. Keep things in stereo rather than Mid/Side. Use similar or identical attack and release times, ratios, thresholds, etc. for each band.
Start small
Once you find a simple setting that gets you in the ballpark, listen carefully and make targeted moves to a single parameter at a time. For example, adjust the threshold of one band at a time to achieve similar amounts of gain reduction in each band and maintain a more even tonal balance through the compressor. Or, adjust attack and release times in one band at a time to achieve suitable compression without distortion.
Mix and match
Once you get to grips with how parallel multiband processing behaves, start introducing the techniques we’ve discussed above to different bands—but always with purpose and intention! Think about the possibility of adding punch to the low end while enhancing the density of the mid-range and high-end, or vice versa.
Mind your phase
Any time you use parallel processing in audio mastering, it’s important to be aware of any phase shift on the parallel channel. The crossovers in any multiband processor can cause substantial phase shift if used in a minimum phase—analog—mode. In Ozone, setting the crossovers to Digital or Hybrid mode will allow for a linear phase process, preventing unwanted coloration when blending the processed signal back in with the original.
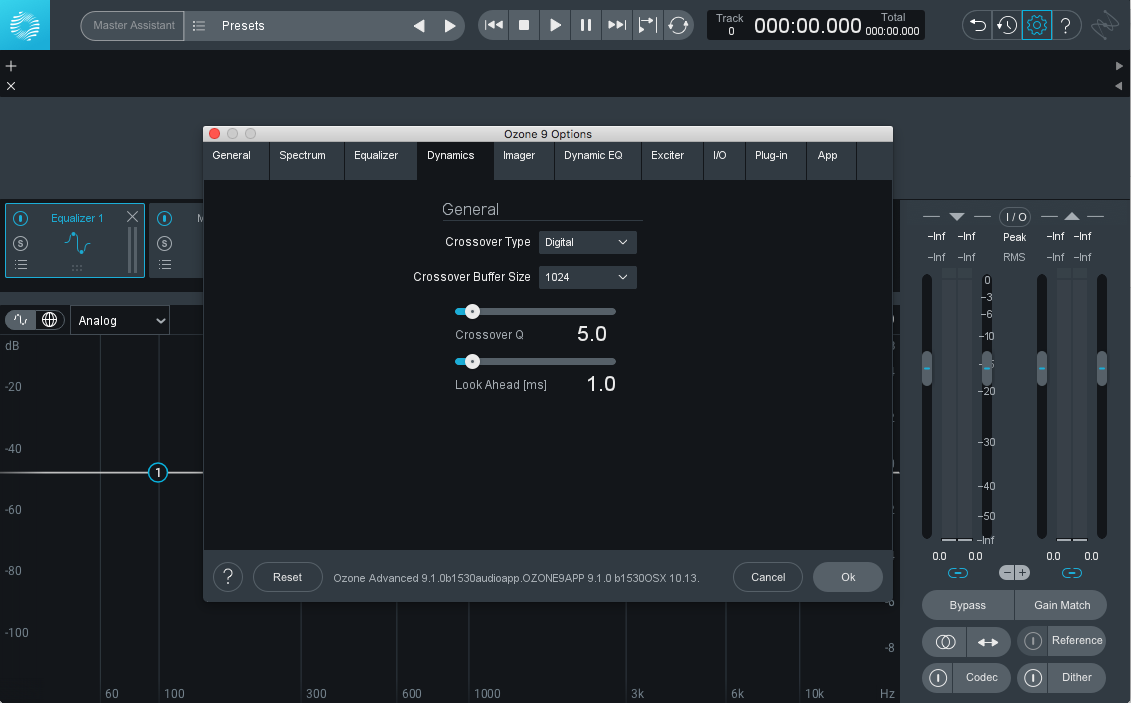
Ozone’s Dynamics crossover settings
In this example, my goal was to add some overall tonal and spatial enhancement. To that end, I’ve used the same settings in each band with the only difference between Mid and Side being a 6 dB drop in the side thresholds to achieve similar gain reduction amounts in each section. Additionally, I’ve used the versatile Tilt mode in the detection filter to balance the gain reduction between all three bands without changing relative thresholds. I’ve then blended the processed signal with the unprocessed signal, 20 dB below the dry version.
This processing brings out a number of different enhancements in the music: longer sustain in the bass notes without losing the punch of the kick, a subtle thickness in the mids, some extra shimmer in the highs, and an increased sense of spaciousness.
One final note, taken from all three examples presented above: you may have noticed that I was blending in the compressed signal at quite a low level compared to the dry component—14–22 dB lower in fact! While there are no magic numbers here either, I can share the technique that works for me.
After achieving the style of compression I’m after (often done listening to the compressed signal in solo with the fader at unity), I’ll drop the fader all the way down.
Then, with my eyes closed and the music playing back, I’ll slowly raise the fader until I hear the effect I’m after. A MIDI controller is a fantastic tool here, as muscle memory can help you A/B and fine-tune around the sweet spot in real-time.
I’ll then toggle the mute state of the parallel channel, listening to ensure the change isn’t too drastic. If it is, I’ll back down the level of the compressed signal until I strike a balance.
Conclusion
These are a few of the primary ways parallel compression can be used in audio mastering. As with other techniques we’ve discussed though, it’s important to be judicious and exercise restraint. The results of these techniques can be highly seductive, so as always, level-matched A/B comparisons are vital to ensure you don’t overdo things.
Still, don’t be afraid to dig in and get your hands dirty. You can always pull the Mix amount back if you find you’ve overprocessed your mix. What other situations can you think of where parallel compression might help you out? It’s not always the tool for the job, but when it is, it has a way of working unlike much else. Have fun, and happy mastering!

