7 tips for mixing the low end
Turn your muddy low end into a clear mix with these seven tips for mixing the low end. Learn about using tools like sidechain compression, low end EQ, frequency analyzers, and more on your bass and percussion instruments.
The low end is one of the most crucial and defining aspects of any recording. It can change how you feel, identify your genre, and even determine how listenable your mixes are. It can be hard to tell what’s going on down there, regardless of the listening environment. Of course, a finely tuned room and experience will help. Today, we’ll dive into some tips to hear and see what’s happening, and discuss how you should manage the low end of your mixes.
In this article I’ll also be using some isolated sound clips from my friend Skye Skjelset's record “Back in Heaven.”
In this piece you’ll learn how to:
- Unmask the low end
- EQ the low end
- Compress the low end
- Use sidechain compression
- Use different monitoring platforms with low end
- Use referencing tracks and frequency analyzers
- Get a punchier low end with Ozone Pro
Learn about low end frequencies and how to mix them effectively in the video below.
Mix the low end in your DAW
Try these low end mixing tips using the plug-ins in this tutorial with iZotope’s


Music Production Suite 7
What is the low end in mixing?
The low end of the frequency spectrum lies between 20 Hz–250 Hz. The area of frequencies between 20 Hz–160 Hz typically hosts the most energy for low end centric sounds like kick drums, basses, etc. Once we get past 250 Hz up to about 500 Hz, we refer to that area commonly as the low midrange or “low-mids.”

iZotope Carnegie Chart
How to mix the low end
Clarity is a great overall objective for the low end of your mix, and that is what we’ll focus on in this article. Having some definition and separation in the low end between things like kick drums, bass guitars, bass synths, or other low end heavy sounds will make it easier to hear them in the mix without having it all collectively turn into a messy, muddy low end. The relationship between these instruments and the amount of certain low frequencies they share or do not share is crucial to having elements like the bass and kick drum work together, as well being heard separately in the mix!
This article references a previous version of Neutron. Learn about 

Neutron 5
1. Unmask your low end
Frequency masking occurs when two instruments are fighting for the same space in the frequency spectrum. In the case of low end, one could imagine the low end of bass masking the sonic information of the kick, which leads to two specific problems. First, you won’t be able to hear either instrument particularly well. Second, with a buildup of shared frequencies of both, you may experience a woofy and undefined low end in your mix. For example, your bass guitar and your kick drum might share a lot of frequencies around 80 Hz, causing frequency masking, which is not ideal.
With tools like


Neutron
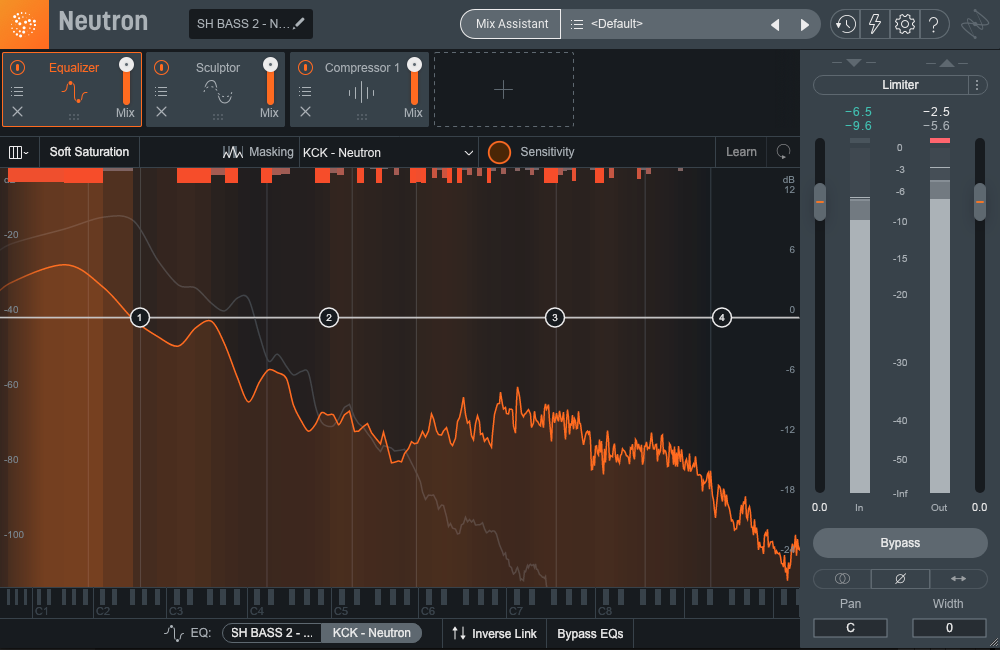
Neutron showing heavy masking between a kick drum and sub bass
2. EQ the low end to give low end elements more room
Once you understand where the areas of shared frequency content are masking each other, it’s time to make some low end decisions with EQ. Let’s keep going with the kick drum and bass guitar example. Usually, the contested real estate is something like 40 Hz–60 Hz (often called “sub bass”), and 70 Hz–100 Hz (I'll dub this the “round bass.”) Essentially, the idea is one track’s low end is going to live predominantly a little lower, and one track is going to live a bit higher. Giving each track its own little pocket of real estate, even by just a few dB, is going to make a difference.
This decision and process are nuanced. What the artist wants, or what sort of genre you’re working in, might be valuable pieces of information here. Even if you want the volume of each track to be sort of similar, what level and space of the low end frequencies each track has is going to make everything more clear. Pop music, R&B, hip hop, and lots of rock music might want that subbier low kick drum. Really heavy rock music might want that nice subby bass! In my work, I find the kick drum tends to be the lower of the two elements, but I’ve had certain artists tell me “I don’t like subby kicks,” and then that’s that! I find that music that people want to sound “older” also typically has less low end in the kick, and more in bass.

Cutting some higher low end to leave space for the bass guitar in Neutron
So for this example, try cutting around 50 Hz in your bass, and around 80 Hz in the kick drum. Try adjusting the opposing track up in gain if they need a bit more, and give that kick drum a little 50 Hz bump. Mess around with the gain until you can hear some separation between those two frequency areas between the two tracks.
Use a low EQ shelf for more mid range definition
My favorite thing as of late is the low EQ shelf. Bass guitar just seems to have...well...a lot of bass! And, often, not enough stuff in the upper mid range where you get that sweet note definition.
Here’s a trick for quickly setting bass level especially when you can tell you have too much low end (this could apply to a bass synthesizer as well). I like to start by taking a low shelf, and subtracting as much gain as possible, and roll the frequency value upwards from 20 until you feel like “the bass is gone from this bass.” Usually, I’m landing somewhere around 160 Hz. Now you’re just left with the higher end of the bass. With the full song playing, adjust the volume to where you’ve got the bass high end in the right spot, then roll back in the gain of the low until it feels good! This is a nice trick to get bass in a good starting place, and you could apply it to other low end instruments to achieve similar results.
3. Use compression and multiband compression to tame jumpy notes
When you have some uneven dynamics, or a jumpy note or two on a bass, compression is a great place to turn to. Using a mixing plug-in like Neutron, set your compressor to a higher threshold, a higher ratio like 10:1, and quick attack and release to grab the occasional jumpy note.
Or, for overall cleanup, try lowering the threshold and ratio to 2-4:1, use a slow attack to allow transients to come off more naturally, and a release timed to the rhythm of the song; meaning, try and allow the compressor to disengage and come back to 0 by the time the next note rolls around if possible!
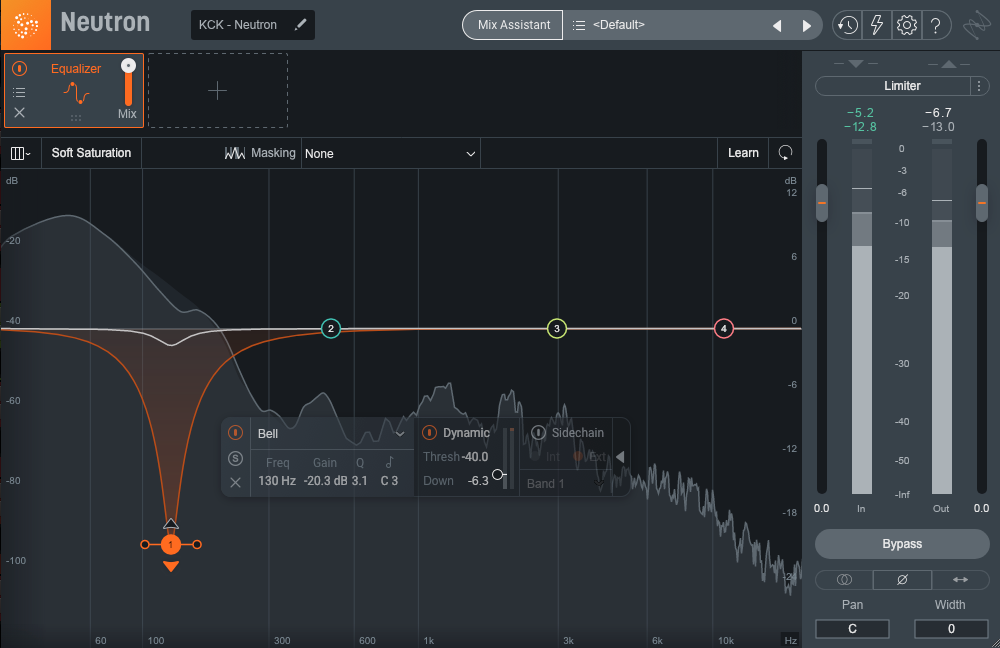
Using dynamic EQ in Neutron to cut a bit peaky high bass from a kick drum
Multiband compression is also great for low end tracks, and can be more of a surgical, precise, and sometimes unnoticeable way to clear up low end on a track. You can target just the offending area, say below 100 Hz, and set it in a way that I described using normal compression. Neutron Pro has ways to use multiband compression and dynamic EQ, a similar tool, to compress just certain frequency bands.
4. Sidechain tracks to create more space in the low end
Another great way to calibrate the low-end is to sidechain a sustained bass element to a more percussive one. You hear obvious examples of this all the time in pop and dance music, where the bass sucks down and ducks to the kick. That version is sometimes more of an effect, but It can be done in a more subtle way for all sorts of genres, and is especially useful when you want a percussive and low end instrument to really inhabit similar areas of the low end in your mix.
By using a send on your percussive low end track, send it to a side chain input on your low end instrument, in this example, using the Neutron Pro inserted onto this SH101 synth bass track. You can see the side chain input bus on the top left on the screen below.

Using Oscilloscope in Neutron Pro to analyze sidechain compression
The hit of the kick drum now triggers the compression on the synth bass, and it can be adjusted just as you would normally use a compressor. For a subtle bit of low end clarity, try getting your sidechained track to compress a couple dB on impact, and time the attack and release to allow just the amount of time needed to duck during a single hit. In the example above, I’m going one step further by using the Oscilloscope view in Neutron Pro (the sine wave button below the modules) to visually monitor what happens to the waveform of the synth bass as it’s being processed by the compression, while also showing the kick drum waveform. This is super cool, and so useful for having an eye on what’s happening. You can also see how attack and release change the waveform, which gives you a visual leg up on leaving that perfect amount of time for the kick to cut through!
Here’s a subtle but noticeable audio example of how this sounds:

Sidechaining to dynamic EQ in Neutron
Additionally, you could also sidechain a multiband compressor or dynamic EQ inside of Neutron Pro to repeat duck just the low end while your percussive element is happening. That means that everything past your crossover or outside your frequency band will remain the same while the compression is happening. This is especially useful when you’re looking for an even more imperceptible way to make some space in the low end.
5. Use different monitoring platforms to listen to the low end
Unless you’re in a finely tuned studio environment, you might not have the best system for hearing your low end. Although, if you’ve got perhaps, a car, a set of studio monitors, a home speaker system, and some headphones, you’ve got several listening environments to notice trends that can help you make a good call.
Listen back to your mix on all your speaker systems and headphones. Take note of what works and what doesn’t. If the mix sounds consistently muddy in the low-mids or lows, you know you have a problem.
6. Use references and a frequency analyzers to keep yourself honest
I firmly believe in stacking your mix against two or three reference tracks. It keeps you honest—especially in the low end, where your monitoring situation, headphone choice, and sheer love for the lows can trick you into overhyping the bass in an unprofessional way.
As you’re listening back on your different platforms, play some music that’s familiar to you and understand how those speakers or headphones sound, especially the low end! It might be discouraging to hear a well crafted track next to the one you’re working on, but it will pay off. Taking notes and being honest about what you notice between your work in progress and something totally wrapped up will give you some of the most honest perspective of what needs to be addressed.
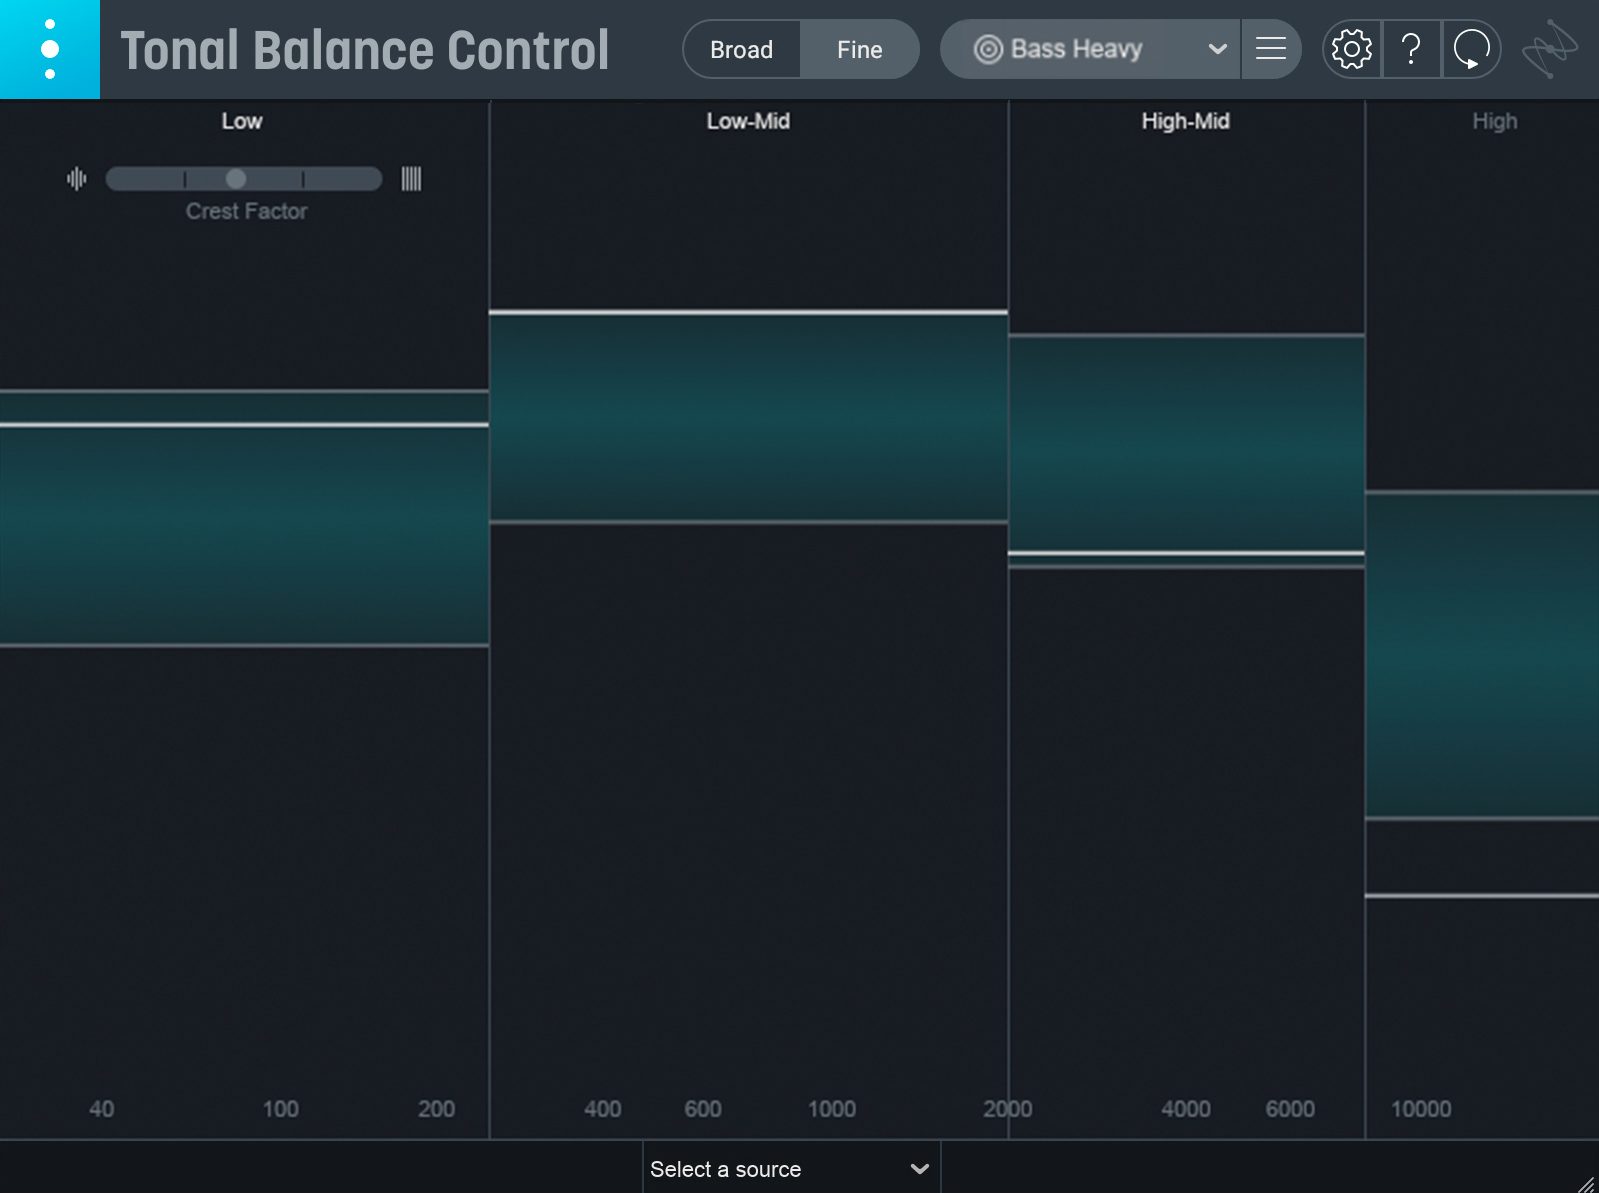
Using Tonal Balance Control on the master bus of the mix
Frequency analyzers come in especially handy when you’re trying to get some additional visual perspective on what’s happening. Tools like


Ozone Advanced


Tonal Balance Control 2
This article references a previous version of Ozone. Learn about 

Ozone 11 Advanced
7. Use Low End Focus in Ozone to get a punchier low end
As you’re finishing your mix, you might find you need to make a master tonal adjustment for some of the referencing you were doing between speakers, references, etc. It’s common to want to insert an EQ on your master bus, and do a slight boost or cut with either a shelf or a band that is pinpointing the area that you feel needs to be boosted or cut overall.
One tool that is really interesting to use, and is a bit out of the EQ paradigm, is the Low End Focus tool in Ozone. Select a region from 20 Hz to 300 Hz inside the frequency analyzer and raise the contrast to increase the difference between low and high level content and attenuate ‘out-of-focus’ low level content, bringing out transients and leading to a punchier sound.
Negative levels of contrast will decrease the difference between low and high level content. The sound will blur and smooth like some really thick analog compression. Punchy and smooth modes further accentuate these differences.
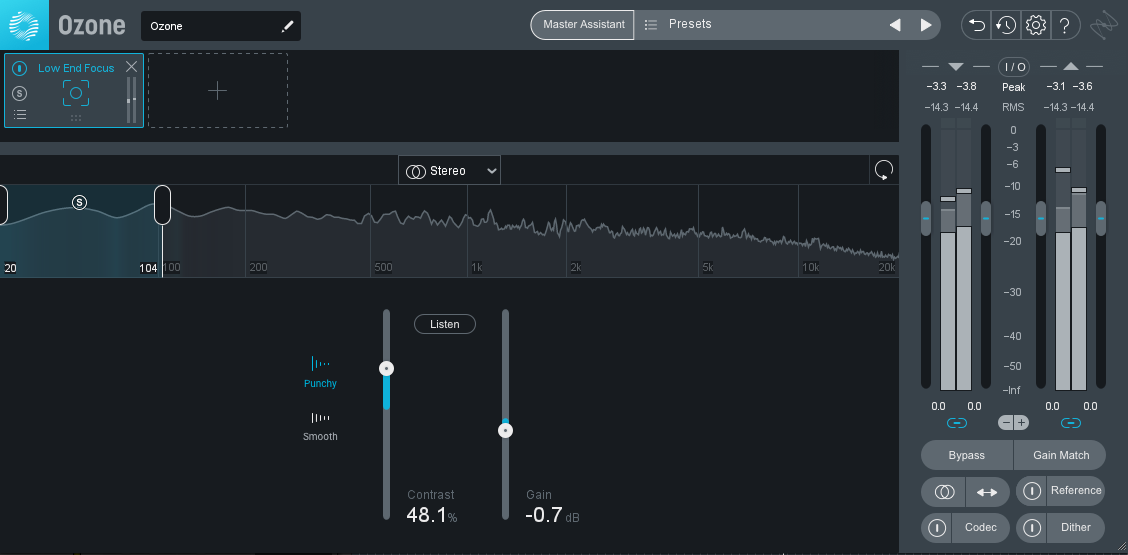
Listen to the audio examples of how using the settings in the picture above makes a noticeable difference in how the kick drum sticks out in the mix—magic!
Get a clean, well-defined sound in your low end
Mixing the low end is truly one of the most difficult aspects of engineering. I feel like every record I make, I’m learning something new about how to manage bass frequencies, even if it’s in retrospect! That’s part of the whole thing—be easy on yourself and allow yourself to move on and learn. When you listen to music that you think sounds good, take note of what bass centric instruments sound like, and how you might be able to carry some of those ideas into your own craft.
