How to master for streaming platforms: normalization, LUFS, and loudness
Whether you’re a mastering pro, or prepping your first release, this article will get you ready to master for Spotify, Apple Music, and more in 2025 and beyond.
I think it’s safe to say we’re officially in the age of streaming – in fact, you could probably argue that we have been since about 2015. While it’s true that physical formats like vinyl, which has seen nearly exponential growth since 2007, and CD, which made a modest comeback in 2021 but has since declined, have seen increased sales in recent years, they still pale in comparison to streaming. In 2023, streaming enjoyed a commanding 84% market share.
With that in mind, understanding how to master a song for streaming is as important now as it’s ever been. This is because each platform has loudness standards and specifications, and if you want your music to be heard as intended you need to understand how those standards will impact the sound of your music. Let's dive into streaming platform specifications for loudness, level, and normalization.
Follow along in your DAW with iZotope mastering plugins like


Ozone Advanced


RX 11 Advanced


Insight 2
Common questions about mastering for streaming platforms
What does mastering for streaming platforms involve?
It involves optimizing your track's loudness, dynamics, and technical specs to ensure it sounds consistent across various streaming services and playback systems.
What loudness level should I aim for when mastering for streaming?
Though each platform has its own normalization target, the key is to avoid over-compression and leave enough headroom.
Should I master differently for Spotify, Apple Music, and YouTube?
While exact targets vary, a well-balanced master around -14 LUFS with -1 dBTP true peak is generally safe across all platforms.
What is true peak limiting and why is it important?
True peak limiting ensures your audio doesn't clip when converted to lossy streaming formats, preserving sound quality.
Do I need multiple masters for different streaming platforms?
Usually not. One well-mastered file that meets loudness and true peak guidelines will perform reliably across all major platforms.
Loudness, LUFS, and normalization
One of the core questions we’ll need to address is, “how loud should I master?” To answer this though, we’ll need to have a good understanding of loudness, LUFS measurements, and the concept of normalization. Let’s start by bringing some definition to those terms.
Loudness
Loudness seems like it ought to be a simple enough concept, but if we pry a little we can uncover some of its complexities. Is loudness intrinsic to a file? Or is it dependent on the sound pressure level – SPL – in the air? Where do user volume controls factor in, and what about tonal balance and the personal hearing traits of the listener? You can read more about some of these complexities of loudness in this article, but for our discussion here, we’ll think about loudness as it relates to so-called “loudness meters.”
Loudness meters, like those found in the Loudness panel of Insight, are a modern way of measuring perceived loudness in a digital environment, and the units they measure are known as LUFS – loudness units, full scale.
LUFS
Unlike the idea of “loudness,” LUFS meters and their operation are very well defined. However, that definition is still quite complex. We don’t need to get into all the nuts and bolts here, but let’s take a high-level look at how LUFS meters work, and what the different measurements they show us indicate.
The first thing to understand about LUFS measurements is that they attempt to account for the fact that humans don’t perceive all frequencies as equally loud for a given SPL. We’ve talked about this in more detail in this article about monitor gain, and to emulate this, LUFS meters gently roll off incoming signals below about 100 Hz, while accentuating them above about 2 kHz. This is known as “K-weighting” and effectively means that LUFS meters are less sensitive to low frequencies, and more sensitive to higher frequencies. If you’re interested, you can read more about the technical details of LUFS.
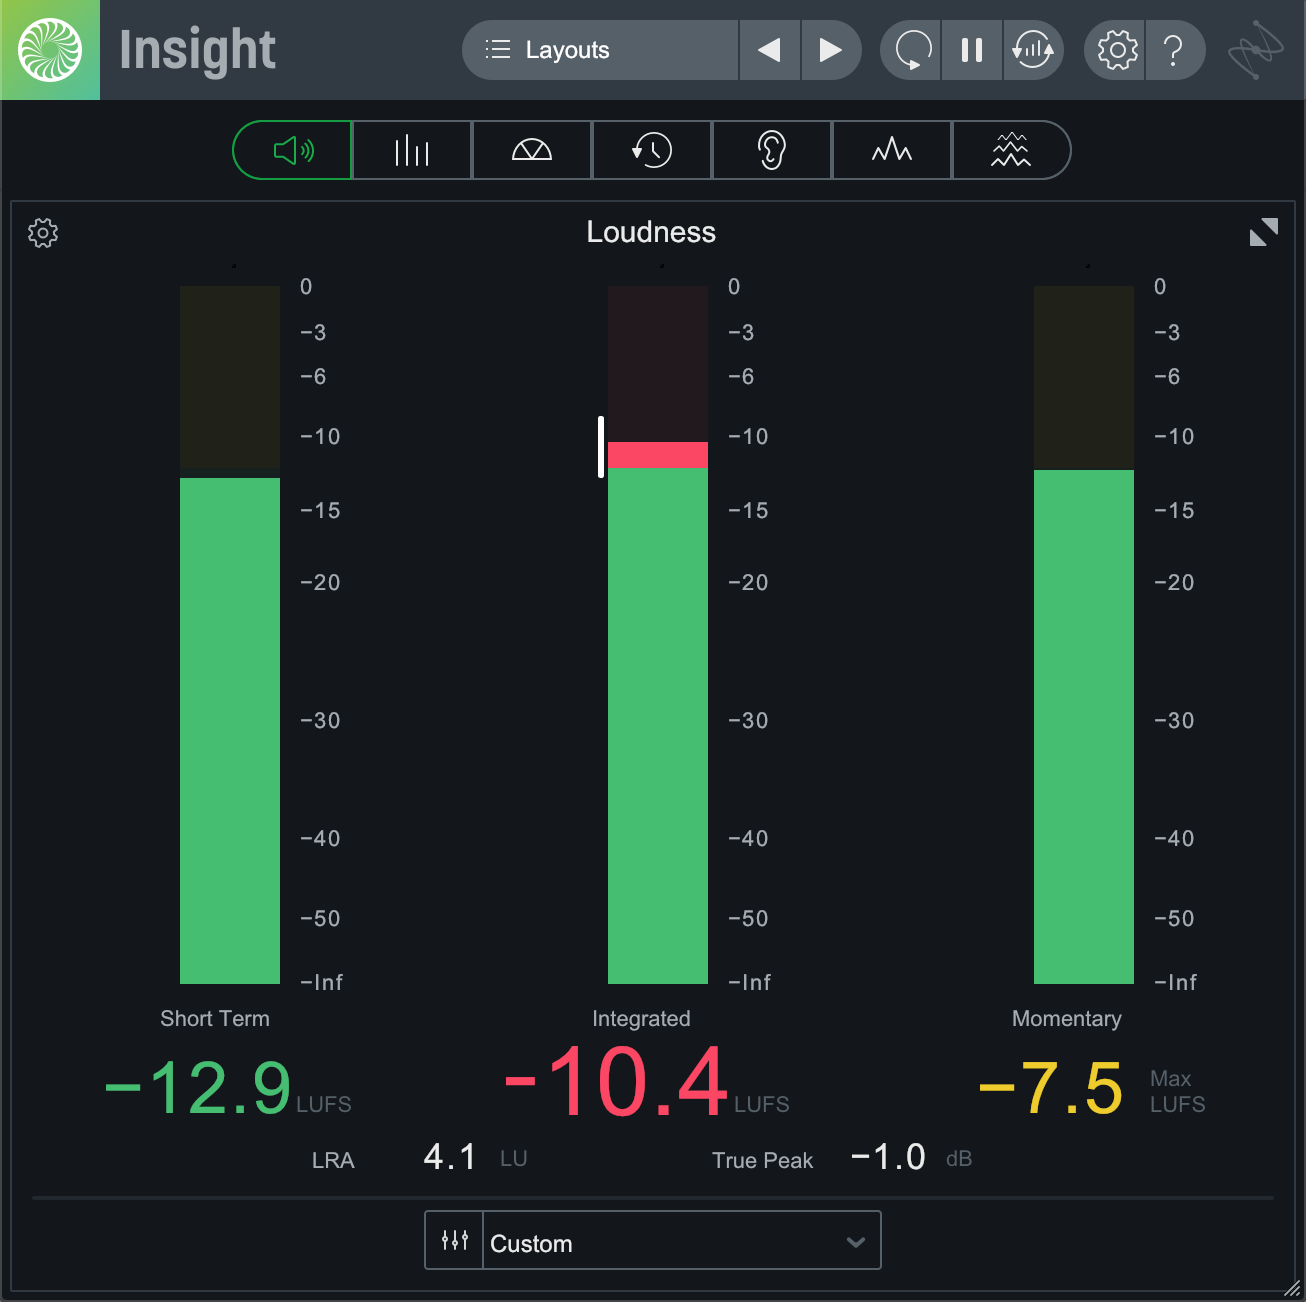
Insight loudness measurements
The next thing to understand is that most meters use “EBU Mode” to show five different loudness metrics, as shown above in Insight. Let’s walk through them to quickly explain what each one shows us.
Momentary and Short Term meters are both essentially RMS measurements. They are K-weighted, as described above, and Momentary uses a 400 ms time-scale, while Short Term uses a 3-second time-scale.
The Integrated metric is essentially a K-weighted measurement of a whole song, built up from the Momentary measurements. Additionally, there are two measurement “gates.” This means that very quiet signals – below -70 LUFS – do not contribute to the loudness measurement, and once that threshold is crossed, signals 10 LU below the integrated measurement also don’t count.
In other words, if the integrated measurement is -12 LUFS, momentary portions of the signal below -22 LUFS will no longer contribute to the integrated loudness measurement. This can be important to understanding why your music sounds as loud as it does on streaming, and there are new tools in RX 11 to help analyze and optimize this. Further, when we talk about normalization, it will be the integrated measurement that we’re interested in.
Continuing our tour of Insight, we have Loudness Range, or LRA. LRA is quite complex, but essentially you can think of it as a measure of musical dynamics. A classical recording, with wide variations between soft, pianissimo sections, and loud fortissimo sections, could have a very high LRA – perhaps 20 dB or more. Meanwhile, a metal song that’s full-on all the way through, might have an LRA measurement of just 3–4 dB.
Finally, True Peak measurements are meant to be an improvement on traditional sample peak measurements. They use oversampling to attempt to show the actual peak level that will come out of a digital-to-analog converter – or DAC – which can help avoid clipping.
Normalization
Normalization is the process of setting some particular metric of a track – typically peak level or integrated loudness – to a specific, predetermined level. In the old days, this usually meant setting the highest peak level in a file to 0 dBFS. In practice, the predetermined level doesn’t have to be 0 dBFS, it can be any value we want, and in fact that’s exactly how the Normalize module in RX works. In either case, this is what’s known as “peak normalization.”
If your goal is to use as much headroom as possible without clipping, then peak normalization is fine. However, if your goal is to make two songs sound roughly the same in terms of loudness, “loudness normalization” is the key. There are multiple ways to accomplish this, but most frequently the integrated loudness of a song is measured, and a gain offset is applied to make the measured value match the predetermined one.
This is the way the Loudness Control module in RX works, and it’s also the technique most streaming services use. More on this in a bit.
Creating a streaming master
With an understanding of loudness, LUFS, and normalization, let’s dig into the details of creating a master for streaming platforms. If you’re looking for some tips to help you get started on your mastering journey, please check out the What Is Mastering? section of the website. Here, we’re going to look at the specific issues that affect streaming.
One of the most frequent questions I hear on this topic is, “Should I master to -14 LUFS?” The answer may surprise you: no! Or at least, not necessarily. It’s not hard to see why people would think this though. If streaming services like Spotify and Amazon normalize music to -14 LUFS – we’ll get into the details of specific levels shortly – then why not just use that as a target when mastering? There are a few problems with this.
The goal of normalization
The goal of loudness normalization was never to force, or even encourage, mastering engineers to work toward a specific level. Loudness normalization is purely for the benefit of the end-user. It exists so that when an end-user is listening to program material from a variety of sources – like a playlist – they don’t have to constantly reach to adjust their volume control. That’s it.
Once you think of it like this, you may realize that loudness normalization actually gives you a lot of freedom. If you want to master your music close to -14 LUFS, making use of the ample headroom for dynamic impact, you’re free to do so, knowing it may just get turned down a few dB. If, on the other hand, you want the denser, more compact sound that often comes from a loud master, you’re free to do that too, it will just get turned down more – and that’s not necessarily a bad thing.
What’s more, there’s another reason you shouldn’t worry about making your master match any given platform’s normalization level.
Reference levels can always change
While there’s been a convergence toward -14 LUFS in the last few years, there are still platforms that use different reference levels. For example, Apple Music uses -16 LUFS – most of the time – Deezer uses -15, and Pandora doesn’t actually use LUFS.
In fact, Spotify’s reference level is user-selectable between -19, -14, and -11 LUFS! To muddy the waters further, there’s nothing to prevent any of the streaming services from changing either their reference level, normalization method, or both down the road.
So what’s an engineer to do about mastering for streaming platforms?
With all this in mind, here’s my best advice. Make a track sound as good as possible at as high a level as it can handle before losing impact. That's an abstracted idea because there's no single number that I can realistically use. It varies by genre, song, and artist’s intention. My goal as a mastering engineer is to ensure I’m making something sound as good as it can so that it works well in as many different playback paradigms as possible.
Finally, there are two other factors to bear in mind when creating a streaming master: peak level and album balances.
Peak level
The second half of 2021 saw a bit of a sea change, with nearly all the major streaming platforms offering lossless streaming at no extra cost. The notable exceptions are Spotify and SoundCloud – Spotify announced a lossless, possibly hi-res tier, although three years on it’s not clear if or when it will be available. This leaves us at a bit of a crossroads.
When lossless streaming was the exception rather than the norm, it was important to leave a bit of peak headroom to avoid distortion during the encode and decode process of lossy streaming. A good rule of thumb was to leave at least 1 dB True Peak headroom. Sometimes though, more could sound better, especially with louder material or lower bitrates.
The best way to audition this is by using the new Streaming Preview module in RX. It gives you access to all the common codecs used by Spotify, Amazon, Apple, Tidal, YouTube, and others. It can also be used to audition the impact of loudness normalization via a comprehensive list of presets. More on this later. You can also use the Codec Preview feature in the Ozone mothership plugin, although those codecs are limited to MP3 and AAC.

Streaming Preview in RX 11
When you use Streaming Preview or Codec Preview, you may notice that the peak level of the output is somewhat higher than it was at the input. This is a natural byproduct of taking a WAV or AIF file and turning it into a lossy file. The peak level ends up being different at the output than it is in the lossless version. You can't avoid it, but you can prepare for it by lowering the level of your master so that when it gets turned into a lossy file, it won't overdrive the output.
With lossless streaming, however, this isn’t a concern. As long as your True Peak levels stay below -0.3 dBTP or so, you’ll be fine. Which path you choose is very much up to you. You can make use of the extra level with the knowledge that listeners playing lossy streams may suffer a little extra distortion, or play it safe and cater to the lower common denominator.
Personally, I like to make the best of both and use a non-True Peak limiter with a ceiling at -1 dBFS, followed by a True Peak limiter – Like the Ozone Maximizer – set to -0.3 dBTP.
Album balance
Another question that sometimes comes up is, “Should I master all the songs on my album to the same level?” Again, it’s not hard to understand why people might think this. If streaming platforms are turning your songs down to their reference level, and different songs on your album are at different levels, doesn’t that mean they'll get turned down by different amounts, thereby changing your album balance?
Thankfully, the answer here is also: mostly, no. Amazon, Deezer, Pandora, and YouTube use track normalization exclusively, meaning all tracks are adjusted to the reference level. For platforms like these where users predominantly listen to singles or radio-type streams, this makes some sense. However, these platforms also have a relatively smaller market share.
Apple Music and Spotify, on the other hand, both have an album normalization mode. The technique employed for album normalization is to use either the level of the loudest song on an album (or EP), or the average level of the entire album, and set that equal to the platform reference level. Then the same gain offset is applied to all other songs on the album. For Spotify and Apple Music, this kicks in when two or more songs from an album are played consecutively.
Interestingly, Tidal has elected to use album normalization for all songs, even when they’re in a playlist. This method was implemented after Eelco Grimm published research on the matter in 2017, presenting strong evidence that album normalization is preferred for both album and playlist listening by a majority of users. If we analyze this, it points to another important fact: we shouldn’t let normalization reference levels dictate how we level songs on an album, but rather let the artistic intent and natural flow of the music be our guide.
Loudness specifications by streaming platform
After all that, you may wonder why we would care about a particular platform’s specifications. After all, I am saying that we really shouldn’t worry about these too much, and just make the music sound the best it can. However, part of our job as mastering engineers is to be informed.
Following are some specifications by platform, to help you understand the different variables we’re all dealing with. Thanks to Ian Shepherd and Ian Kerr at MeterPlugs for helping compile a lot of this information!
Apple Music
Apple Music uses a reference level of -16 LUFS, enables normalization on new installations, will turn quieter songs up only as much as peak levels allow, never uses limiting, and allows for both track and album normalization depending on whether a playlist or album is being played.
The caveat here is that older versions of macOS and iOS may still be using Sound Check – a non-LUFS based normalization method – and didn't always enable it by default.
Spotify
Spotify uses a default reference level of -14 LUFS but has additional user-selectable levels of -19 and -11 LUFS. Normalization is enabled by default on new installations, and quieter songs will be turned up only as much as peak levels allow for the -19 and -14 LUFS settings. Limiting will be used for the -11 LUFS setting, however, more than 87% of Spotify users don’t change the default setting. Spotify also allows for both track and album normalization depending on whether a playlist or album is being played.
YouTube
YouTube uses a reference level of -14 LUFS, and normalization is always enabled. It will not turn quieter songs up, never uses limiting, and uses track normalization exclusively.
SoundCloud
SoundCloud does not use normalization and also does not offer lossless streams. Additionally, artists typically upload directly to SoundCloud rather than using an aggregator. For these reasons, you may actually want to consider a separate master for SoundCloud, although you certainly don’t need to.
Read more about how to optimize your master for SoundCloud.
Amazon Music, Tidal, and more
Amazon Music and Tidal both use -14 LUFS, while Deezer uses -15 LUFS, and Pandora is close to -14, but doesn’t actually use LUFS. Tidal and Amazon have normalization on by default, while Deezer and Pandora don’t allow it to be turned off. Amazon, Pandora and Deezer use only track normalization, while Tidal uses only album normalization. Only Pandora will turn quieter songs up, and none of them will use limiting.
The official AES recommendation
On top of all this, it should be noted that the Audio Engineering Society has made a set of recommendations in the form of AESTD1008. It’s a comprehensive document, but here are some of the highlights:
- Use album normalization whenever possible, even for playlists
- Normalize speech to -18 LUFS
- Normalize music to -16 LUFS. If using album normalization, normalize the loudest track from the album to -14 LUFS
Checking the specs of your master
If you want to check the specs of your master to see how it will be handled you can use the Loudness panel in Insight, as shown above. If you do this, you’ll need to play the song from start to finish without interruption. This might not be a bad idea anyway though. After all, you’re about to release it to the world, so this is your last chance to make changes.
If you’ve already done that and you’re looking for a faster method to measure your specs, you can also use the “Waveform Statistics” window in RX. You can access this under the “Window” menu, or using the Option+D shortcut.
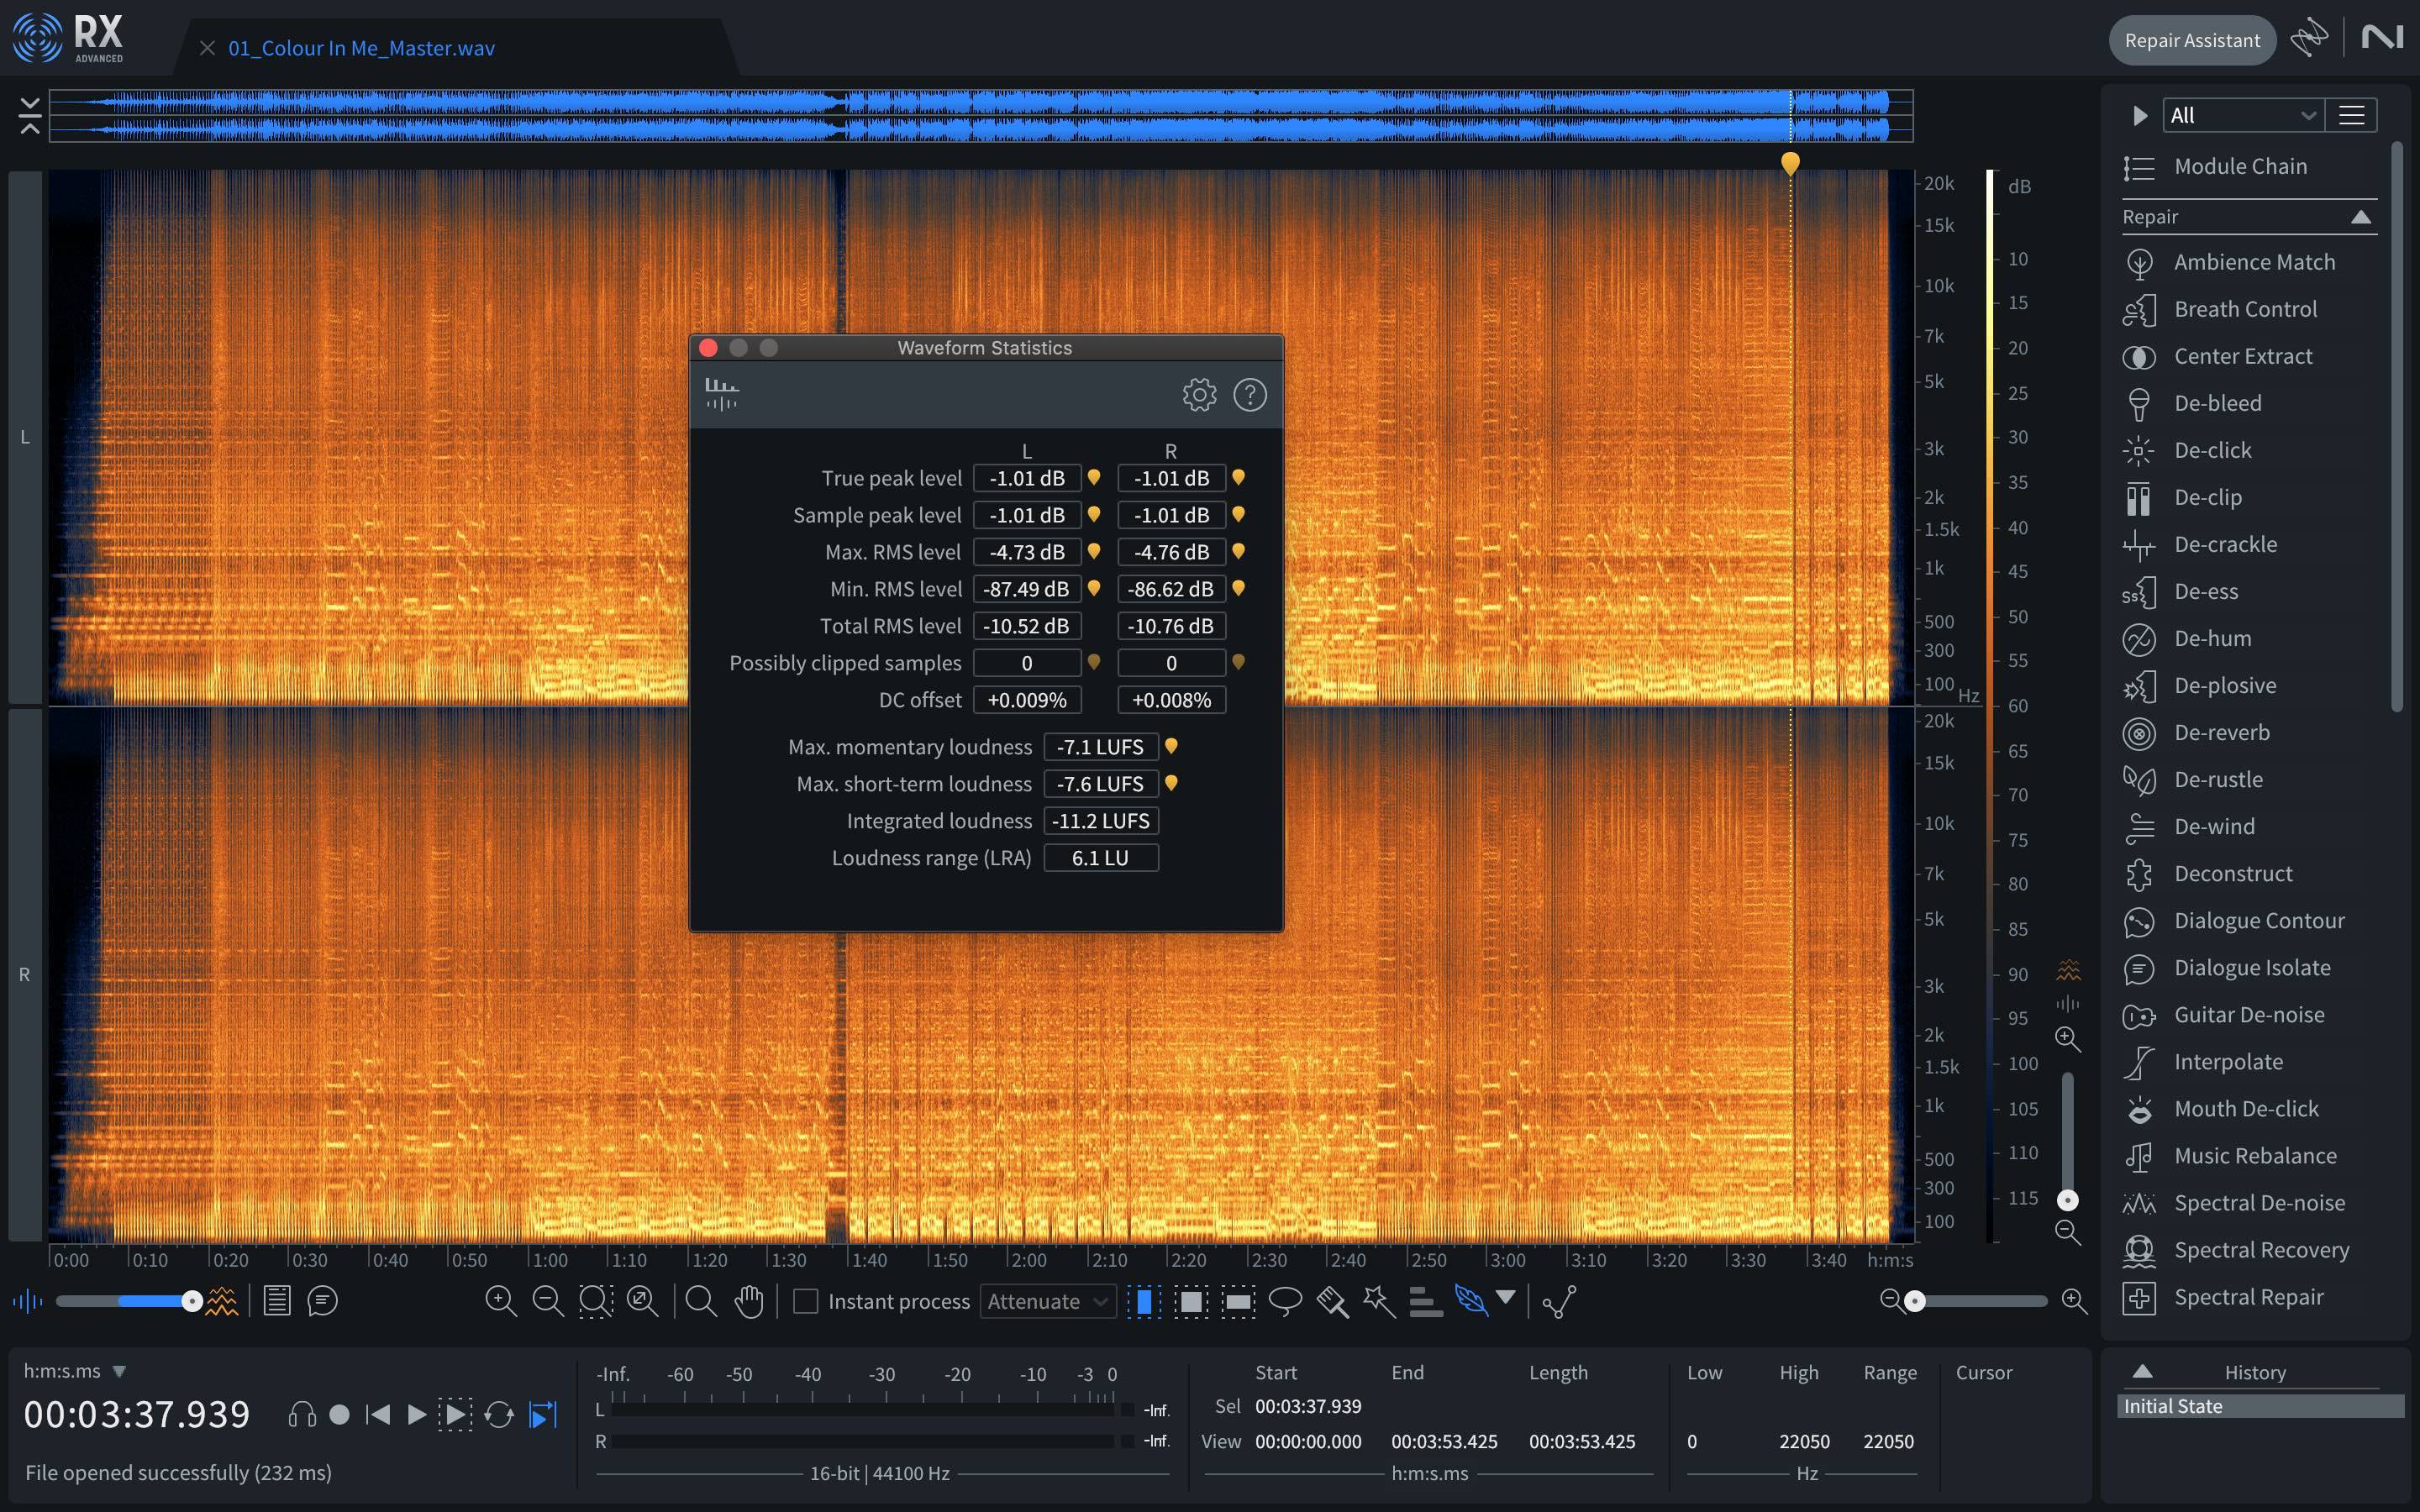
Waveform statistics of a mastered song in RX 11
Why does my music still sound quieter than other releases on streaming?
Every so often you can end up with a master that, despite measuring louder than the reference level of a given streaming platform – meaning it will get turned down – ends up sounding quieter than other similar songs when normalization is enabled. What’s going on here? Is there a conspiracy that allows major label releases to play back marginally louder than independent ones?
Not in the slightest. This is simply a byproduct of the details of how LUFS measurements work. Thankfully, there’s a new module in RX 11 to help overcome this. Enter Loudness Optimize. Remember the measurement gates I mentioned earlier? The secondary “floating” gate is the culprit here, and Loudness Optimize helps analyze and minimize its effects.
Let’s briefly analyze the cause and the remedy. Imagine we have a song that has some substantial differences between its softest and loudest sections. Perhaps it sounds – and looks – like this:
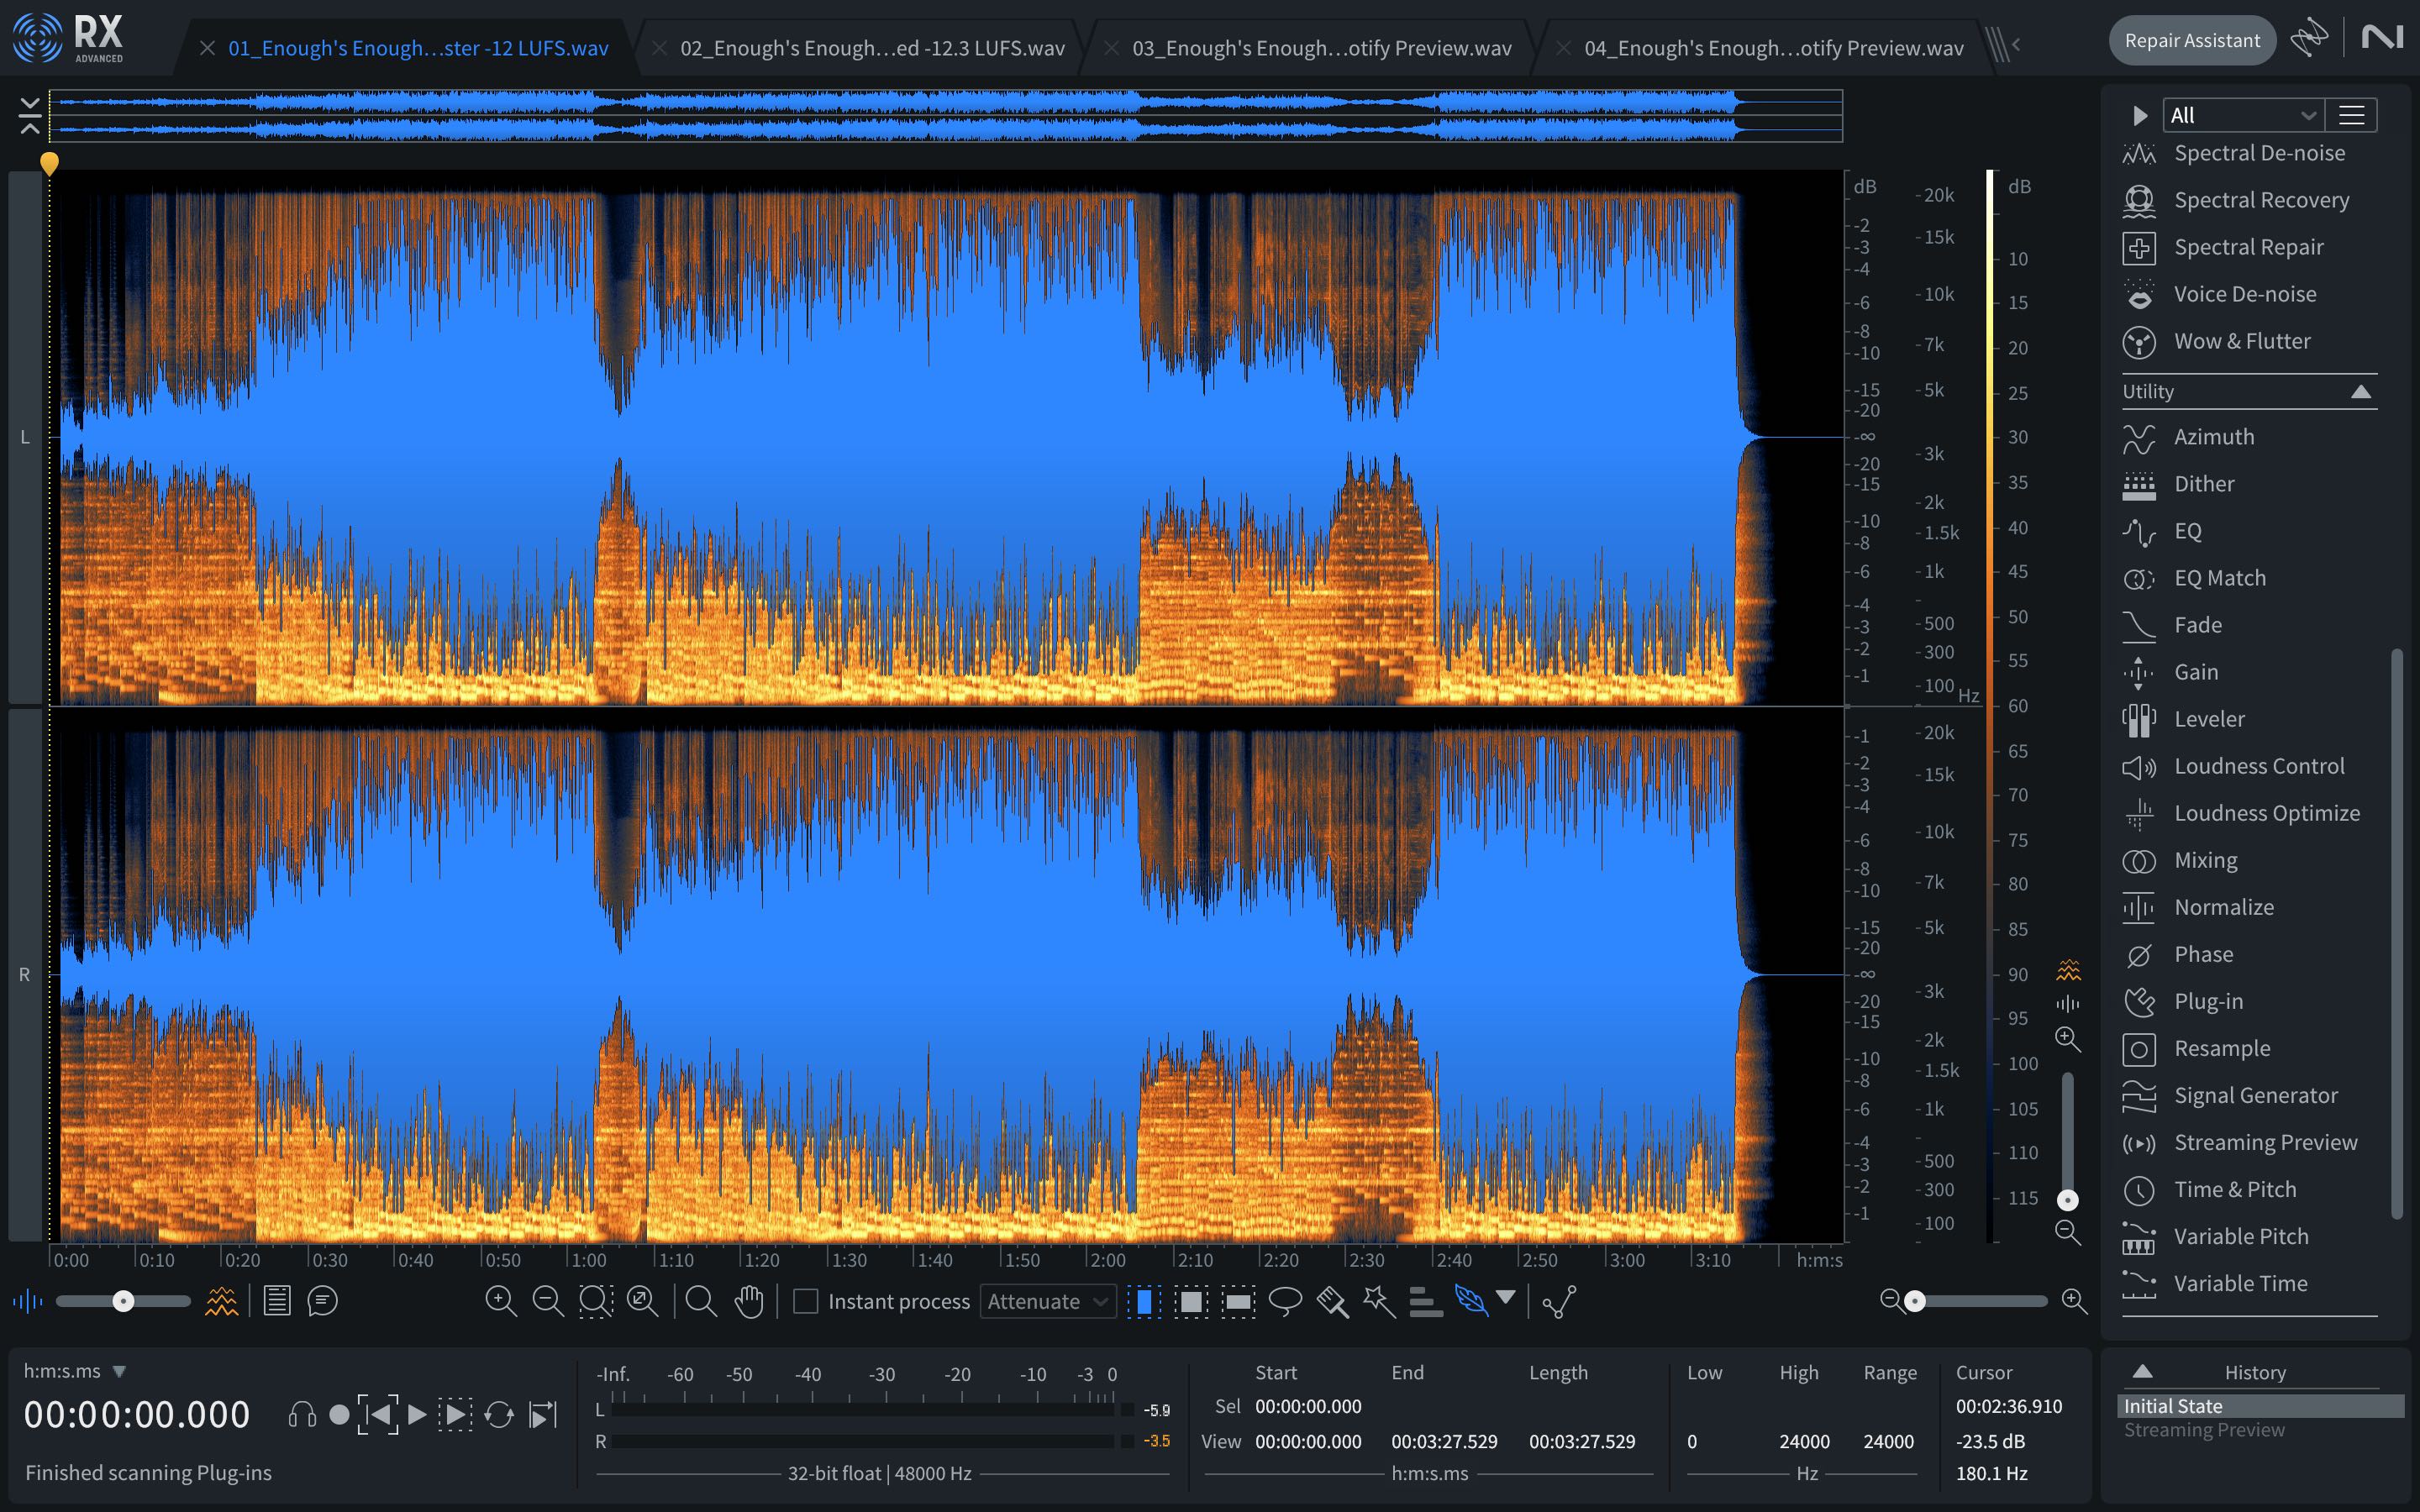
A master at -12 LUFS with high macro dynamics in RX 11
With a song like this, something slightly counterintuitive happens. Because substantial amounts of the audio are below the floating gate – in this case, -22 LUFS – the integrated measurement focuses on the louder parts and ends up being higher than if those quiet sections had been a little bit louder. Loudness Optimize allows us to see where this is happening and to what percent of the measurements.

Loudness Optimize in RX 11
Here, we can see that 12% of the audio is falling below the gate and therefore not contributing to the integrated measurement. We can also see where that is occurring within the song, and this gives us the power to do something about it.
The first thing I would always recommend trying is using the Clip Gain envelope to essentially add level automation that raises the softer parts. If you’re already happy with the sound and density of your master, this will be the most transparent way to improve the perceived to measured loudness correlation. If you keep Loudness Optimize open, you can even see how the changes you’re making impact the result in nearly real-time.
However, Loudness Optimize also has a built-in upward compressor that can help improve measured loudness, and if you’re happy to add a little low-level density and detail, it may be just the ticket. In either case, for this song, we can get a result where the measured loudness is about 0.25 dB lower – meaning the song will be turned down less on streaming, yet the way we’ve achieved that is by making the quiet sections louder.
When we compare how the beginning of the song will sound for both versions on streaming using the Streaming Preview module, this is the result.
That’s a nearly 3 dB perceived improvement!
Now, here’s the caveat! We must make sure this sort of manipulation serves the song musically. In this case, the original mix and master had more macro-dynamics than really made sense for the song and genre. However, it is entirely possible to take this sort of processing too far. Of note is what I call “dynamic inversion” wherein a section that is meant to sound softer than surrounding parts ends up sounding louder.
As always, let your ears be your ultimate guide.
Start mastering for Spotify, Apple Music, and more
I get it, it’s a lot to absorb. I know I’ve not given many concrete numbers or rules of thumb, but hopefully, you see that it’s because there are a lot of variables that have the potential to change at any time. Still, since you’ve made it this far, let me share with you a few personal axioms that guide my day-to-day work:
- First and foremost, do what serves the music. It is a real shame to try to force a piece of music to conform to an arbitrary and temporary standard if it is not in the best interest of the song or album.
- An integrated level of roughly -12 LUFS, with peaks no higher than -1 dBTP, and a max short-term level of no more than -10 or -9 LUFS is likely to get turned down at least a little on all the major streaming platforms – at least for now. This does not mean all songs need to be exactly this loud (see next point).
- When leveling an album, don’t worry if some songs are below a platform’s reference level. Moreover, don’t push the level of the whole album higher, sacrificing the dynamics of the loudest song(s), in an effort to get the softer songs closer to the reference level.
- A song with substantial differences between soft and loud passages may sound quieter than expected. If this is of concern and it is not detrimental to the music, subtle level automation or judicious upward compression can help even out these dynamic changes without unnecessary reduction of the crest factor.
Hopefully, these four parting tips, along with a better understanding of the forces at work on loudness-normalized streaming platforms, will better equip you to make masters that translate well not only today but for years to come.
You can start mastering for streaming platforms with iZotope mastering plug-ins like RX and Ozone that are included in


Music Production Suite 7
