What is Mid/Side Processing?
Discover what mid/side processing is and how to use it when mixing and mastering to create a full, wide mix that sounds more present and has a more sonically interesting texture.
Mid/side processing seems to be everywhere these days. The vast majority of


Ozone Advanced
To start, mid/side processing is the practice of applying processing—EQ, compression, saturation, etc.—to the mid and side channels individually.
In this article we’ll get into all that and more, discovering how mid/side processing is an undeniably powerful technique. It gives mixing and mastering engineers a wide range of sonic sculpting tools not available with traditional stereo processing, however, as we all learned from Spiderman’s Uncle Ben, “with great power comes great responsibility.”
In this piece you’ll learn:
Start getting wider, more focused mixes by trying mid/side processing in your DAW with the


Ozone Advanced


Music Production Suite 7
So what is mid/side processing and how do you use it? To answer that question, we should really start by asking—and answering—another question: what is mid/side?
What is mid/side?
Mid/side (sometimes called sum/difference) is an alternative way of using two channels of audio to represent stereo information. In that sense, it’s actually got a bit in common with left/right stereo.
In fact, the connection between mid/side and left/right goes even further. Mid/side was originally developed as a mic’ing technique by Alan Blumlein, perhaps better known for his “Blumlein Pair”—a left/right stereo mic’ing technique. In mid/side mic’ing, a cardioid mic is pointed at the sound source, while a figure-eight—or bi-directional—mic is set up with its axis offset by 90 degrees.
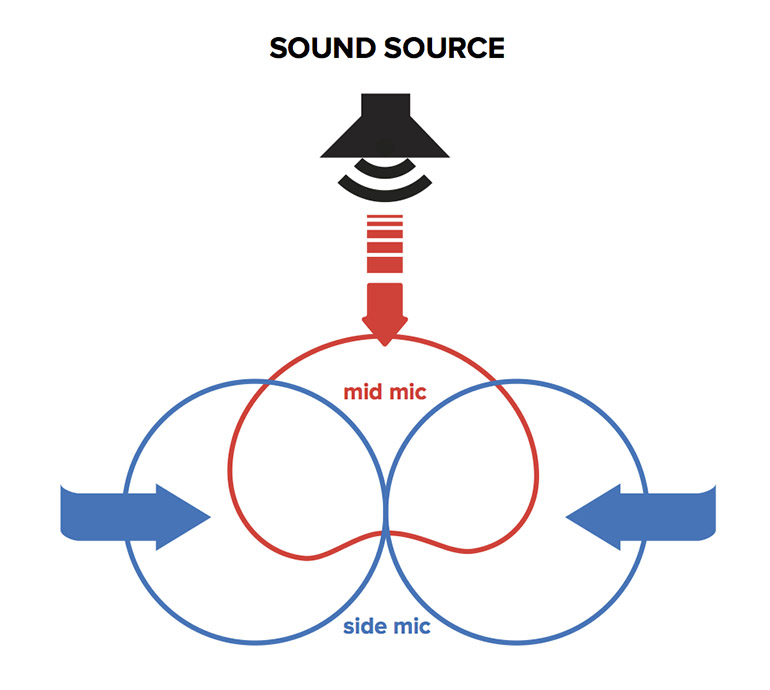
Mid/side mic’ing setup
It’s worth pointing out now that the two sides of a figure-eight mic have opposite polarity to one another. This is very important, as we’ll see later, but back to the matter at hand. In left/right stereo recording, a sound’s position is determined by its level balance between the left and right channels. If you’ve ever used a pan knob this probably feels pretty intuitive, but to state the obvious:
- Signal in the left channel only = hard-panned left
- Equal signal in the left and right channels = center-panned
- Signal in the right channel only = hard-panned right
- And of course different balances of left to right can give us positions anywhere in between
In mid/side recording, things are a little different. Here, a sound’s stereo positioning is determined by both the level and polarity relationship between mid and side. Here’s how it breaks down:
- Signal in the mid channel only = center-panned
- Equal level and polarity signal in the mid and side channels = hard-panned left
- Equal level but opposite polarity signal in the mid and side channels = hard-panned right
- Signal in the side channel only = wonky (in practice this doesn’t happen)
- As level drops in the side channel compared to the mid, the stereo position moves toward the center (polarity still determines left or right)
- If level in the side channel becomes greater than in the mid channel, the stereo position can appear to move “outside the speakers”—left of hard left, or right of hard right. A little of this can sound exciting, but too much can quickly sound very weird, and has implications in mono.
Another way to think of this is that the mid mic captures everything, and the side mic encodes the direction of each sound. The polarity relationship between mid and side determines whether a sound is to the left or right, and the level balance determines how far in that direction it is.
To answer the titular question then, mid/side processing is the practice of applying processing—EQ, compression, saturation, etc.—to the mid and side channels individually. But how do you do this, and why would you want to? Glad you asked.
How does mid/side processing work?
I’m willing to bet that when you create or receive stereo tracks they’re in left/right format rather than mid/side. So if you want to apply mid/side processing, how do you convert from left/right to mid/side, and back? Luckily, this isn’t something you really have to worry about since pretty much any plug-in that offers mid/side processing will include the conversion—also known as a mid/side matrix.
However, a little understanding of what’s going on under the hood here goes a long way, and it’s also not terribly complicated. The simple version of what’s know as a mid/side encode is this:
- Mid (aka, Sum) = Left + Right
- Side (aka, Difference) = Left - Right
In this context, subtracting a signal really just means adding a polarity-inverted version (hint, hint, remember the polarity difference between the front and back of the figure-eight mic?). To get from mid/side back to left/right—also know as a mid/side decode—is equally trivial:
- Left = Mid + Side
- Right = Mid - Side
Technically there’s also some gain compensation in there. After all, if you just keep adding signals together they’ll just get louder and louder. This can be done at the encode or decode stage, or even split between them. In any event, this gives us a pretty good picture of how a mid/side-capable plug-in works.
- Encode from left/right to mid/side
- Process mid and side channels independently
- Decode from mid/side back to left/right
Before we get into the how and why of using this in mixing or mastering, there are some important details to be aware of.
What mid/side processing looks like
If you've been paying really close attention, or you’ve read my musings on the topic before, you may have picked up on two details. First, if mid = left + right, that seems to imply that the mid channel consists of not only center panned elements, but also hard panned ones. Second, polarity plays a crucial role, and polarity and phase are closely related.
Let’s dissect that first one, as it’s probably contrary to things you’ve heard elsewhere. So often mid is described as affecting the center of the stereo image, while side is said to affect the edges, or hard panned elements. While there is an element of truth in that, it’s really much more nuanced.
We can illustrate both the misconception and the reality of the situation graphically. First, here’s a sine wave that just pans from left to right, left channel on top, right channel on the bottom.

Left to right pan, left/right
Again, like the pan knob, this should feel fairly intuitive. Next, here’s what a lot of people envision this looks like when encoded to mid/side, this time mid on top, side on the bottom.
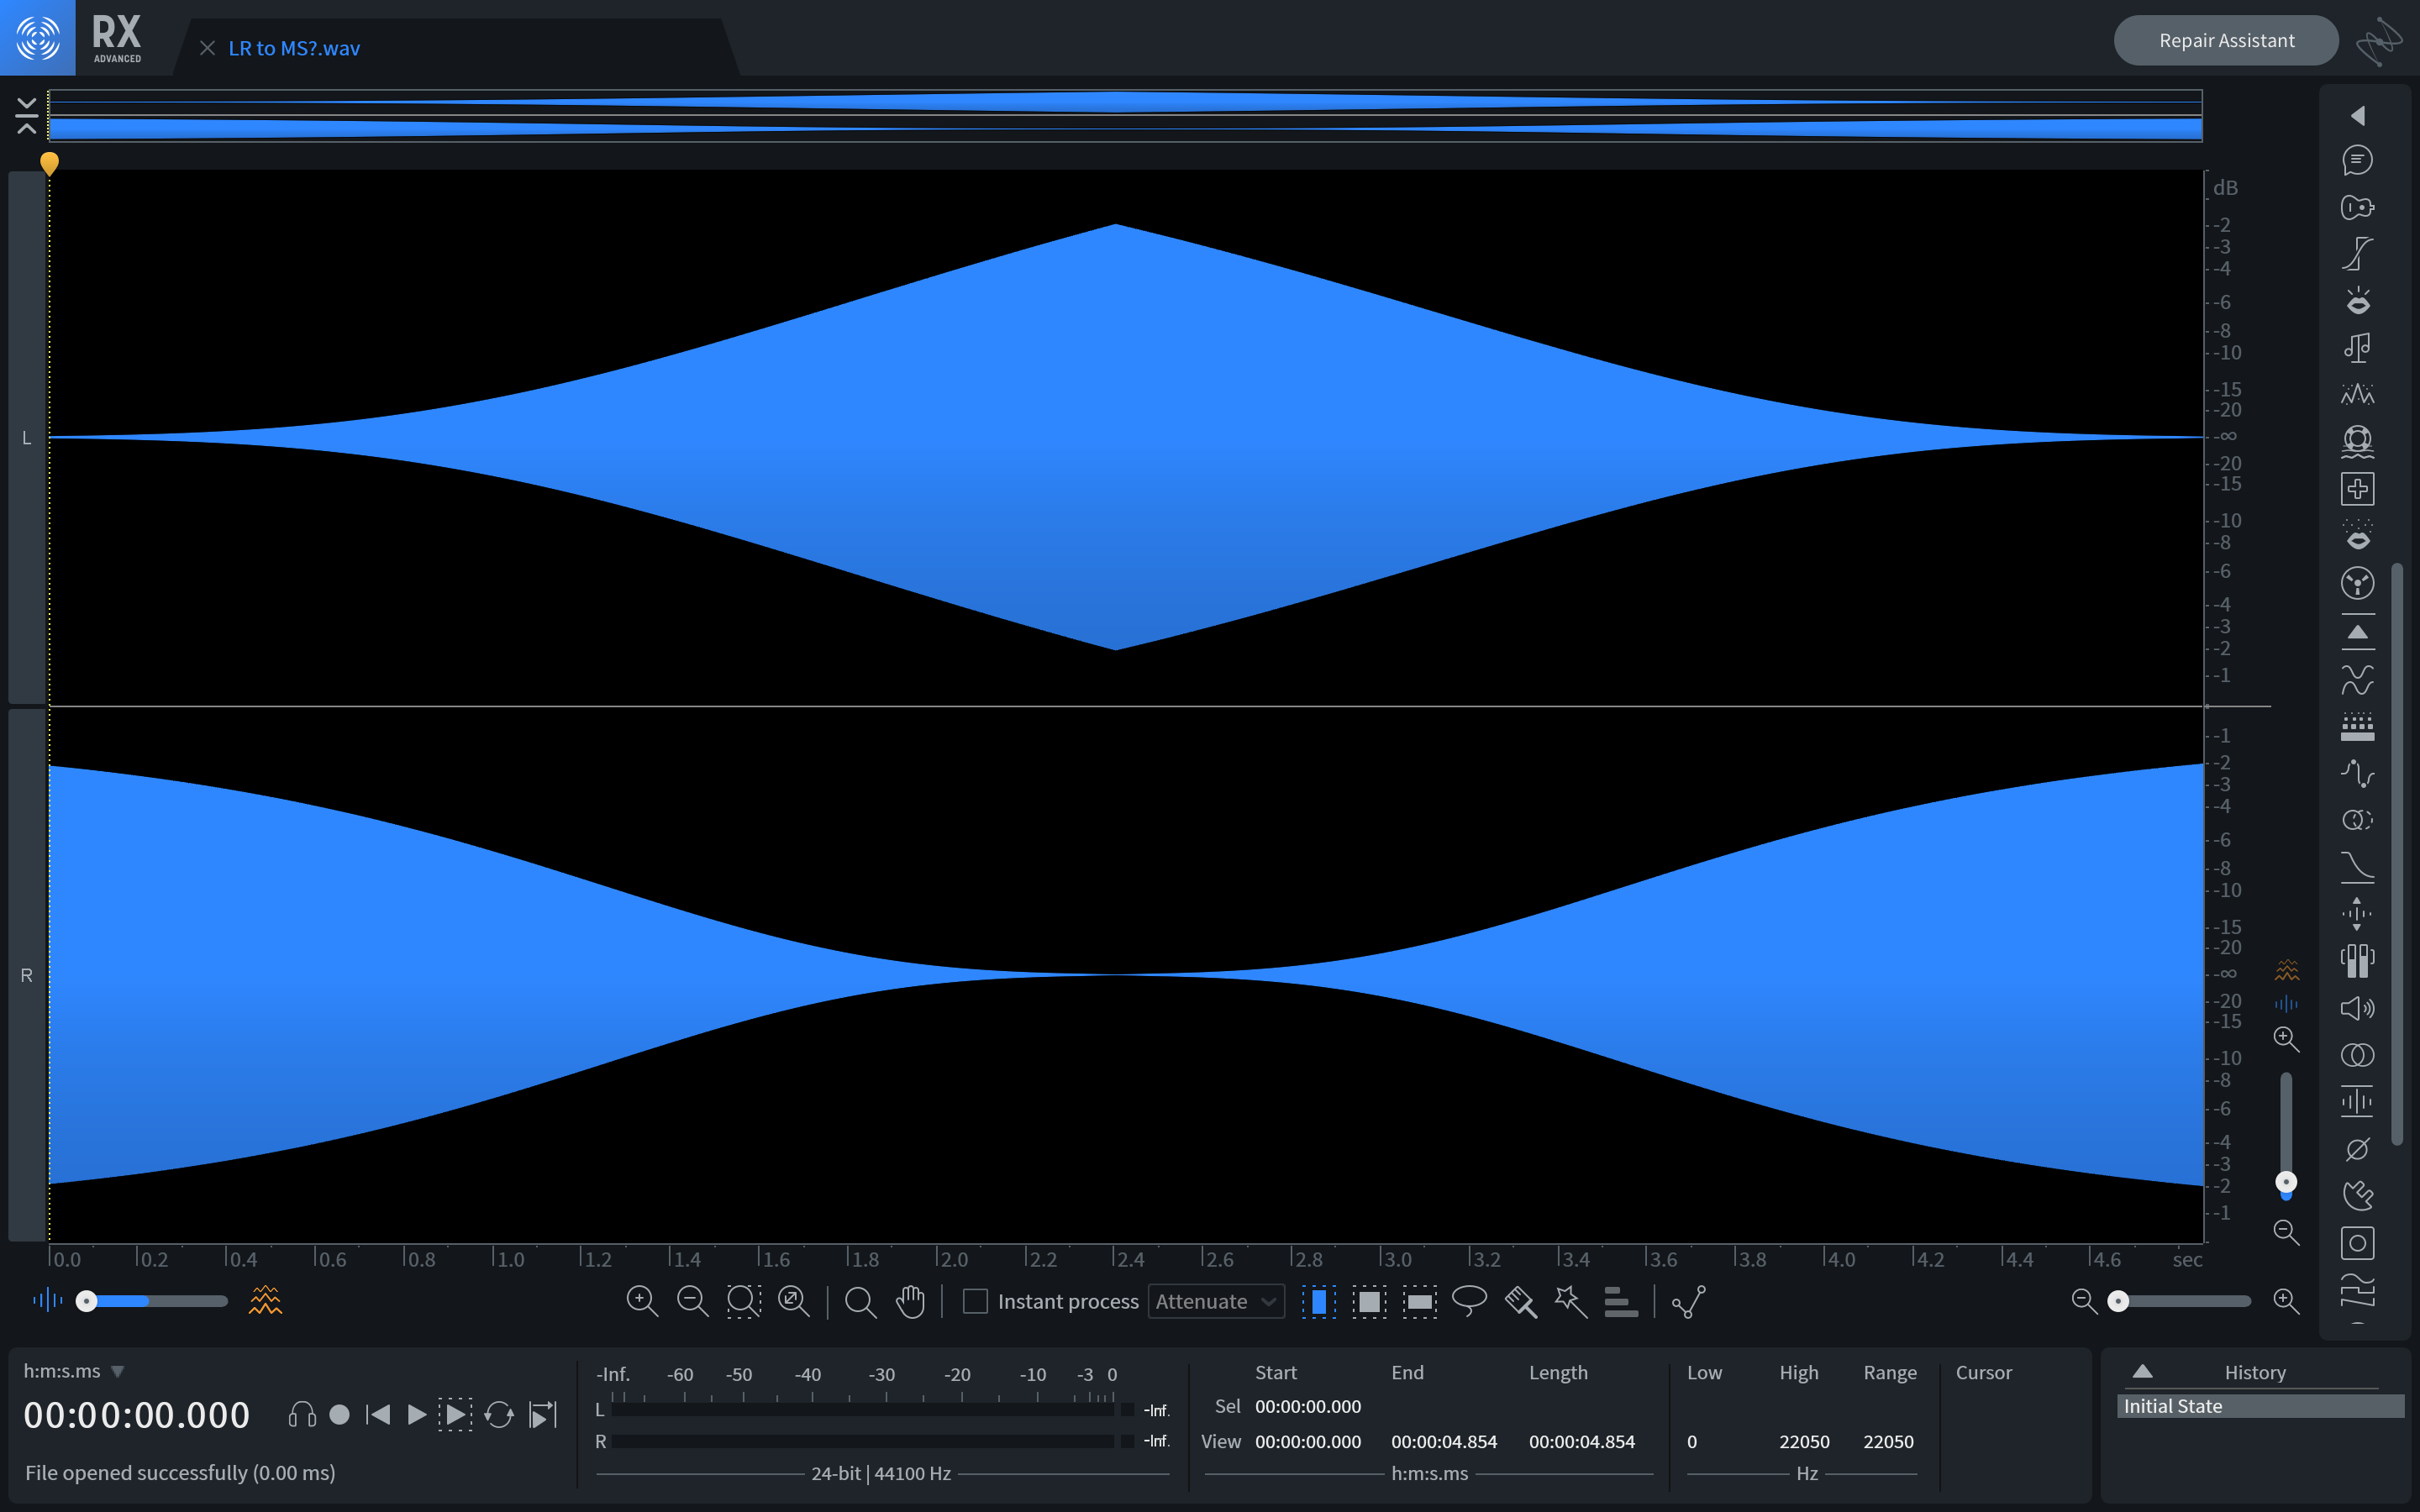
What people think happens when converting left/right to mid/side
However, as I’ve alluded to, this isn’t really what happens. Here’s what does happen.

What actually happens when converting left/right to mid/side
Yup, that’s right, hard-panned elements are split 50/50 between mid and side, and it’s only in the absolute dead center that sounds drop out of the side channel entirely. We’ll come back to the ramifications of this in a bit, but this is important, so try to internalize it.
Lastly, before we get on to the juicy bits, let’s talk about that phase thing a little. If you think back to our breakdown of how level and polarity determine position in mid/side recording, you may have noticed that the only difference between left and right was a reversal of polarity in the side channel. If you’d like to go back and check, go ahead!
I’ve mentioned the relationship between polarity and phase before, and while they’re not quite interchangeable, they’re definitely related. The fact that polarity is so integrally related to positioning in mid/side should give us some clues that if, in the process of applying mid/side processing, we change the phase relationship between mid and side, we’ll also change the positioning of sounds when we convert back to left/right.
And indeed, this is the case. Let’s look at perhaps the most common example of this: a high pass filter on the side channel—usually intended to “mono the low-end.” We’ll start with some pink noise, hard-panned left, and then use the Ozone EQ in digital mode to apply a 24 db/oct high-pass filter at 100 Hz on the side channel. One of the nice things about digital mode is that it allows us to freely morph between minimum and linear phase responses.
To examine this, we’ll use the Multipanorama meter in WaveLab which shows us pan position by frequency. First, here’s what happens if you use linear phase—e.g. no phase shift—which is pretty much what you would expect.
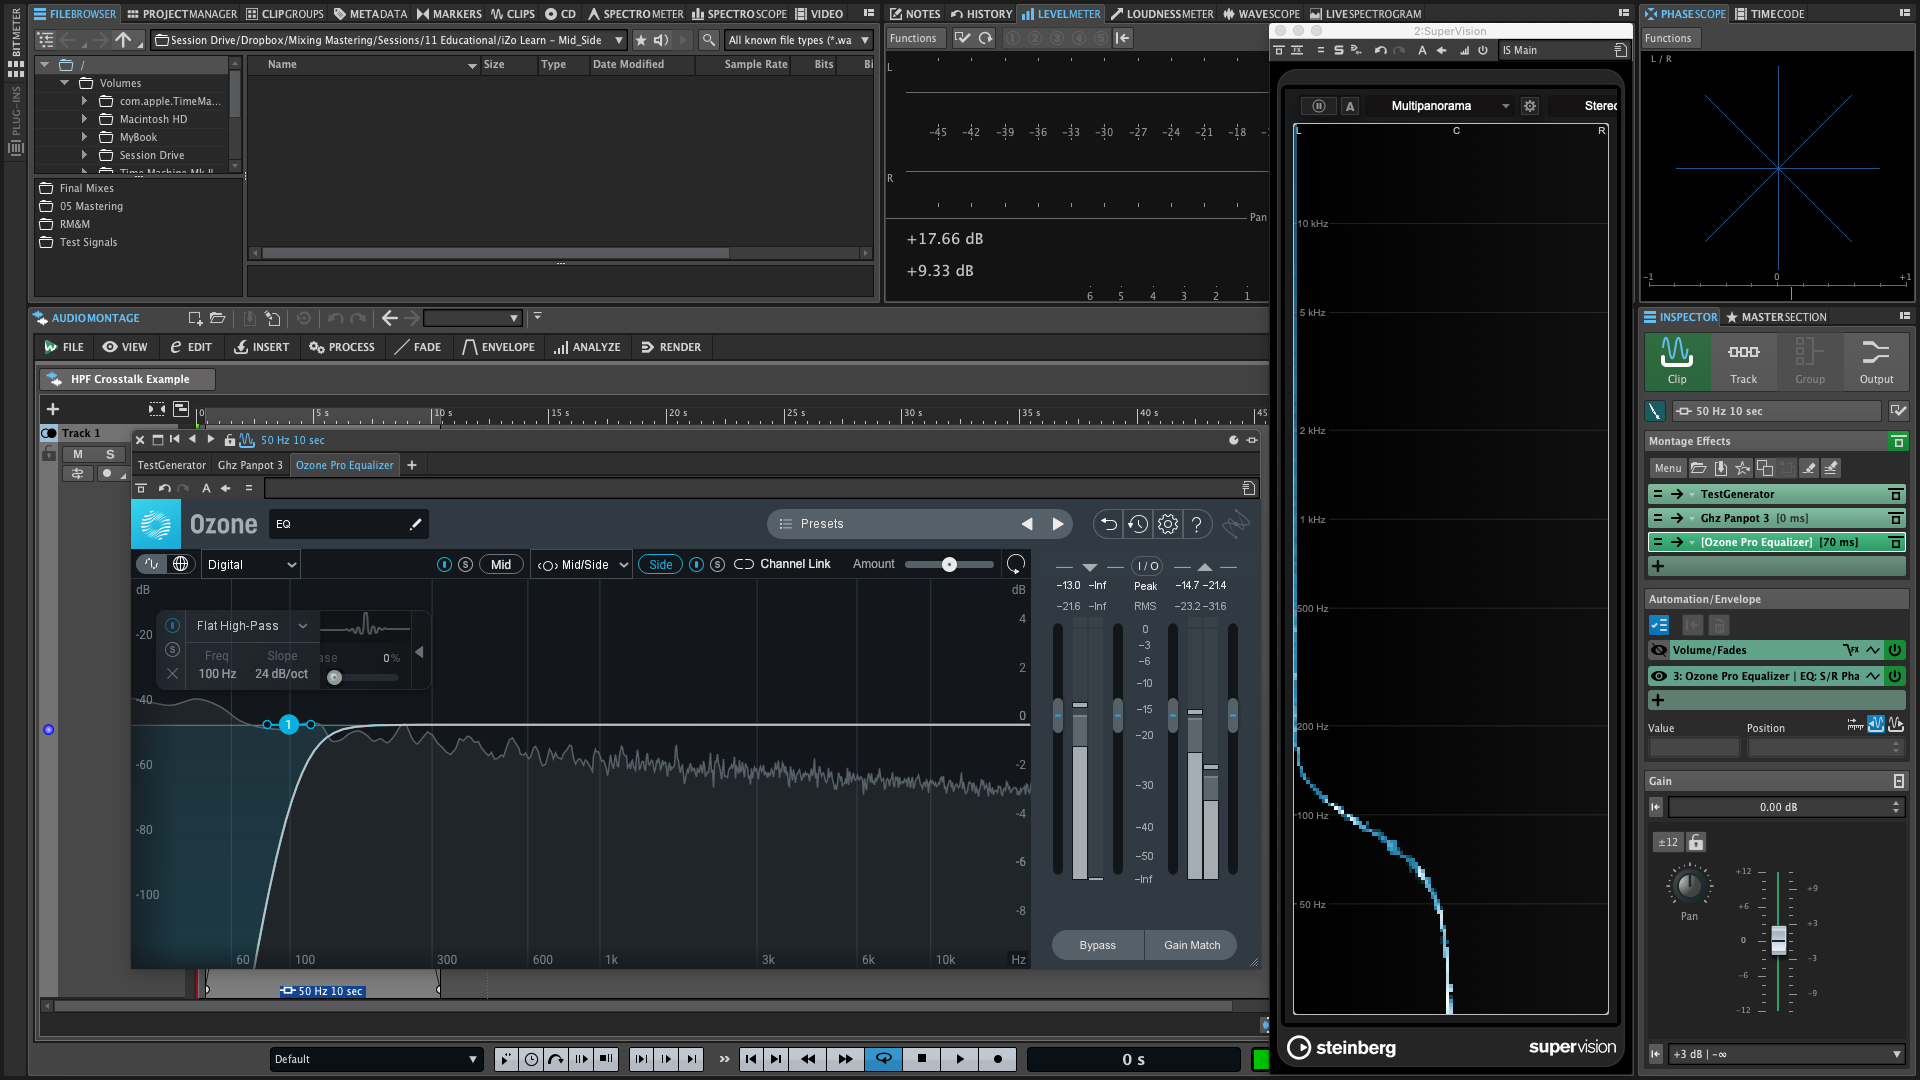
Linear phase HPF on the side channel
Since we’re removing frequencies below 100 Hz on the side channel—which, as we said, is how stereo positioning is encoded—the low frequencies end up centered. Meanwhile, frequencies above the high-pass filter cutoff are retained on the left. Great! What happens if we use minimum phase, though?

Well that’s interesting, isn’t it? Not only is 100 Hz—the cutoff frequency of the filter—getting pulled past center to the right, but the rest of the spectrum doesn’t return to full left panning until well over 5 kHz. This is the impact phase shift can have on stereo positioning in mid/side processing. Best not to ignore it!
So, with those two important factoids under our belt, let’s look at how we can use mid/side processing in mixing and mastering, and what to watch out for along the way.
How to use mid/side processing in mixing
In mixing, there’s not necessarily a right or wrong way to use mid/side processing. After all, you’re in creative control, and mid/side can allow you to achieve some unique stereo imaging results. Just bear these three things in mind.
- Phase, phase, phase! You might like how a minimum phase high-pass filter on the side channel scrambles the stereo image a little, just be aware that it’s happening. Any EQ that is not explicitly linear phase will likely do this to some extent whether you’re using bells, shelves, or high-pass/low-pass filters. What starts on the left or right may not end up there. It’s your call whether or not that’s right for the mix.
- Monitoring. In order to judge these sorts of things, you need good stereo monitoring. Headphones can certainly work for this, and if you’re using speakers make sure that they’re positioned well in an acoustically decent room. After all, you can’t fix—or avoid—what you can’t hear.
- Check it in mono. As mentioned above, adding too much side channel content to a sound can have negative implications in mono, so be sure to check your mix in mono with and without any mid/side processing to make sure you’re comfortable with what it’s doing. Some audio workstations have a built-in mono button, or you can use the one in Ozone.
This article references a previous version of Ozone. Learn about 

Ozone 11 Advanced
Mid/side techniques to try in mixing
Ok, so cautionary finger-wagging out of the way, here are some cool ways you can use mid/side processing in your mix.
Probably my favorite way to use mid/side processing is also one of the simplest: adjusting the overall level balance between mid and side channels. In fact, this is exactly what


Ozone Imager V2

Using Ozone Imager for mid/side balance
Of course, you can also use mid/side EQ, although I would urge you not to think of this as EQing the center and sides differently—hopefully you see why by now. Instead, think of it as frequency-based width manipulation. This might seem similar to Imager in multiband mode, but of course an EQ allows you to sculpt complex curves. Here are the basic principles of how to use mid/side EQ.
- Boost the mid, or cut the side, to narrow a frequency area
- Cut the mid, or boost the side, to widen a frequency area
- Adjustments to the mid channel affect everything, including hard panned elements
- Adjustments to the side channel affect everything except elements that are dead center
- Try the Ozone EQ in Digital Mode so that you can adjust each filter between linear and minimum phase to see what works best on your mix
You can even use things like mid/side compression, or mid/side excitation. With mid/side compression, try thinking of it as dynamic width control. Compressing the mid channel means that loud sounds closer to the center of the stereo image will make the overall image wider. Conversely, compressing the side channel means that loud sounds furtherfrom the center will make the overall image narrower. In a mix, this sort of dynamic imaging can add interest, although too much may be distracting.
Mid/side excitation can get complex quickly! If you add an exciter just to the side channel, the effect will disappear completely in mono—in fact this is true of any processing done exclusively on the side channel. Then again, maybe that’s exactly what you’re after if it helps make the stereo mix exciting, while still retaining good mono compatibility.
How to use mid/side processing in mastering
In mastering, it pays to be extra careful with mid/side processing, for all the reasons we’ve discussed above. Doubly so if you’re mastering someone else’s music. That said, we shouldn’t shy away from it unnecessarily as it absolutely gives us some powerful options.
Mid/side techniques in mastering
First, when dealing with a full mix, it can be useful to isolate mid and side to hear exactly what you’re dealing with in both. You can do this in any Ozone module that offers mid/side processing. First, use the dropdown in the top-center of the module to switch from Stereo to Mid/Side mode. Next, use the “S” buttons next to the Mid and Side buttons to hear either channel in solo.
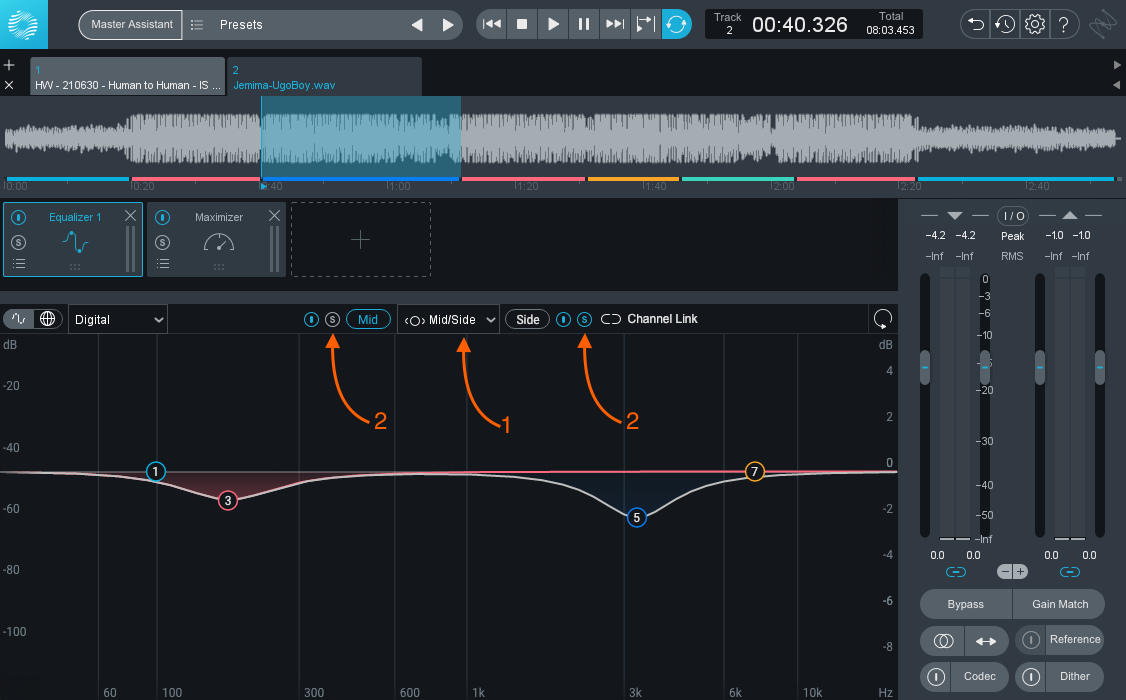
Using Ozone to solo mid and side
Next, as when mixing, a simple mid/side level tweak with Ozone Imager can work wonders, especially if it’s not something the mix engineer has taken advantage of. You might be surprised how often you can even get away with using a single band to do this. If you need to restrict your overall width adjustment to, or from, a specific frequency range though, Imager’s multiple bands can come in very handy.
Mid/side EQ in mastering is also extremely powerful. Unlike in mixing though, I will almost exclusively use linear phase EQ. I’ve done a lot of auditioning between linear and minimum phase over the years, and experience has taught me that on a full mix, I almost always prefer the sound of linear phase.
For example, here’s an excerpt of “Jemima” by UgoBoy, both with and without mid/side EQ. In simple terms, the version without EQ just feels a little more sterile to me. Specifically though, I’ve used the mid channel to pull out some low-mid resonance from the bass around 170 Hz, as well as some brittleness around 3k in the vocal. That 3k dip is also making the background vocals and claps slightly wider in that region.
I’ve also used the side channel to do a wide boost around 550 Hz, which adds some width and energy to the keys, and again the background vocals. Lastly, a high shelf boost on the side channel has widened the top of the percussion for a little extra ear candy. Here’s the before and after.
Mid/Side Audio Example
Advanced concept: Mid/side EQ is actually parallel EQ
Remember, hard panned sounds are 50% mid, 50% side, so when you EQ just the side channel, for example, hard-panned elements are getting mixed together with an un-EQed copy in the mid channel. You can use this to your advantage though. Say the vocal could use a little presence around 6 kHz, but a stereo EQ boost there would make the cymbals too bright.
You could boost just the mid channel and the effect on the cymbals will only be 50% of what it is on the vocal. You could even do a complimentary cut on the side channel—for example a 1.5 dB boost at 6 kHz on the mid channel, and a 1.5 dB cut at 6 kHz on the side channel. This will keep the original tonality of the cymbals intact, however it will also narrow them.
As for mid/side compression, nonetheless mid/side multiband compression, that’s really a topic all on its own. It can be used to great effect, both creatively and as a problem-solver, but it can be distinctly different from the kind of groove enhancement you can get with stereo compression. In general, remember to think of it as dynamic width control as outlined in the mix section above, and that should be a good starting guide.
When to and when NOT to use mid/side processing
Mid/side processing is best used in a mix or master that needs a bit more attention to how it presents in the stereo field. It can be useful to emphasize and widen stereo-panned guitar layers with the side channel, or bring a lead vocal out of the shadows with the mid channel. Remember though, it’s never as simple as “center and sides,” and there are almost always some tradeoffs you’ll have to make.
Modern plug-ins also make it a lot easier for budding engineers to experiment with these techniques. However, although this type of processing can feel very tempting, it isn’t necessarily useful for all mixes or masters. Mid/side processing is a powerful tool, but it isn’t foolproof, and pitfalls abound. Remember what we’ve discussed in terms of phase and dynamic width changes, and be sure to listen closely for unintended consequences.
You should also be mindful of how mid/side manipulation will impact the way your mix is perceived. For example, if you want a super-wide mix and compress and boost the side channel, you might bury your lead vocal or any center-panned elements in the process, and mono compatibility may also suffer. Make sure you can find the right balance so it doesn’t sway your mix too far in one direction or the other.
Start using mid/side processing in your productions
As we said at the outset, mid/side processing is an undeniably powerful technique, but with great power comes great responsibility. In mixing, I encourage you to experiment and find what does and doesn’t work, just remember to keep an ear out for the “side” effects—har har.
In mastering though, everything is a compromise. Often it’s possible to employ techniques for which the benefits outweigh the drawbacks. Sometimes though, confirmation bias can sneak in, and if you’re expecting to hear one benefit but don’t know of the associated drawback, you may miss it altogether.
Hopefully this deep dive has helped illuminate some of the pitfalls associated with mid/side processing and given you some creative ways to think about navigating around them, or maybe even abusing them to your advantage! Mid/side offers us powerful techniques which can absolutely help bring a mix or master to life, but they must be used judiciously.
So bust out your copy of


Ozone Advanced
