6 ways to use a high-pass filter when mixing
Unlock the clarity of high-pass filters without sacrificing your mix's integrity. Learn the right way to use them and avoid common pitfalls.
A high-pass filter is an EQ curve used to remove low-frequency sounds from an audio signal. We call it a high-pass filter because it allows high-frequency signals to pass through, while attenuating (reducing the amplitude of) lower-frequency signals.
High-pass filters are fantastic for removing muddiness and tightening up arrangements. When used incorrectly however, they can strip the life and groove right out of your music. To help you understand the high-pass filter, here are six ways to use them while mixing.
Follow along with this tutorial using
![]()
![]()
Neutron
![]()
![]()
Ozone Advanced
![]()
![]()
Music Production Suite 7
Discover Music Production Suite
What’s the difference between a high-pass filter and a low-pass filter?
A high-pass filter removes frequencies below a certain cutoff point, allowing higher frequencies to "pass" through, effectively cutting out low-end rumble and muddiness.
Conversely, a low-pass filter removes frequencies above a certain cutoff point, allowing lower frequencies to "pass" through, often used to tame harsh high frequencies or create a "muffled" effect.
Now that you got the low-down on high-pass terminology, let’s move on to our main event:
How to use a high-pass filter
High-pass filters eliminate unnecessary low-end buildup, improving clarity and allowing bass-heavy instruments to stand out.
Let’s explore a few of these scenarios in greater detail:
1. Remove low end rumble
Almost all audio sources, especially of the live variety, include unwanted sounds that lurk below the most important frequency information.
As we get to the lowest parts of the spectrum around 20–40 Hz, we might not even perceive rumble due to the limits of our hearing, making it a silent headroom killer in large quantities. A bunch of tracks all piling on 20–40 Hz might rob your limiter of its ability to help you achieve commercial loudness in your mix.
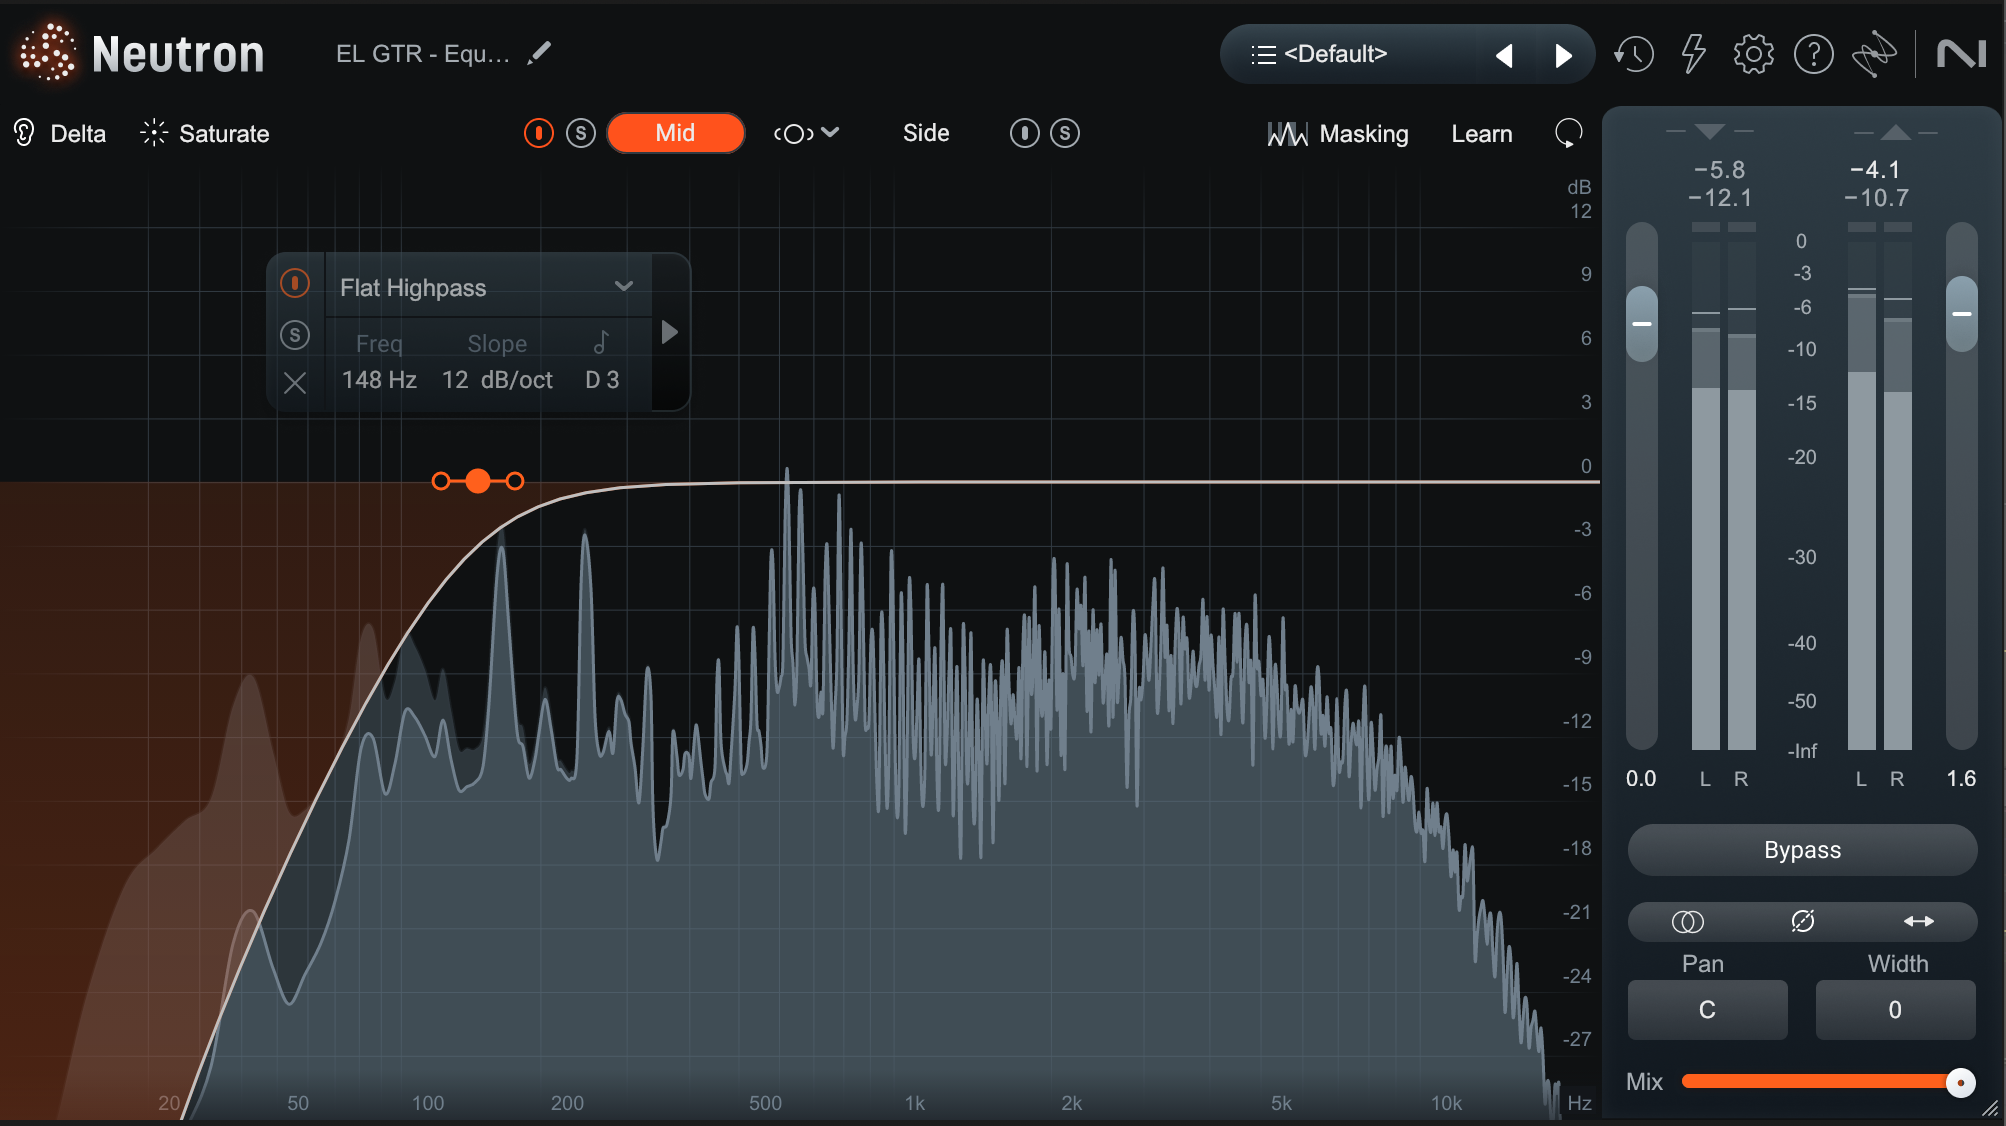
Let me show you a vocal, analyzed in Neutron:
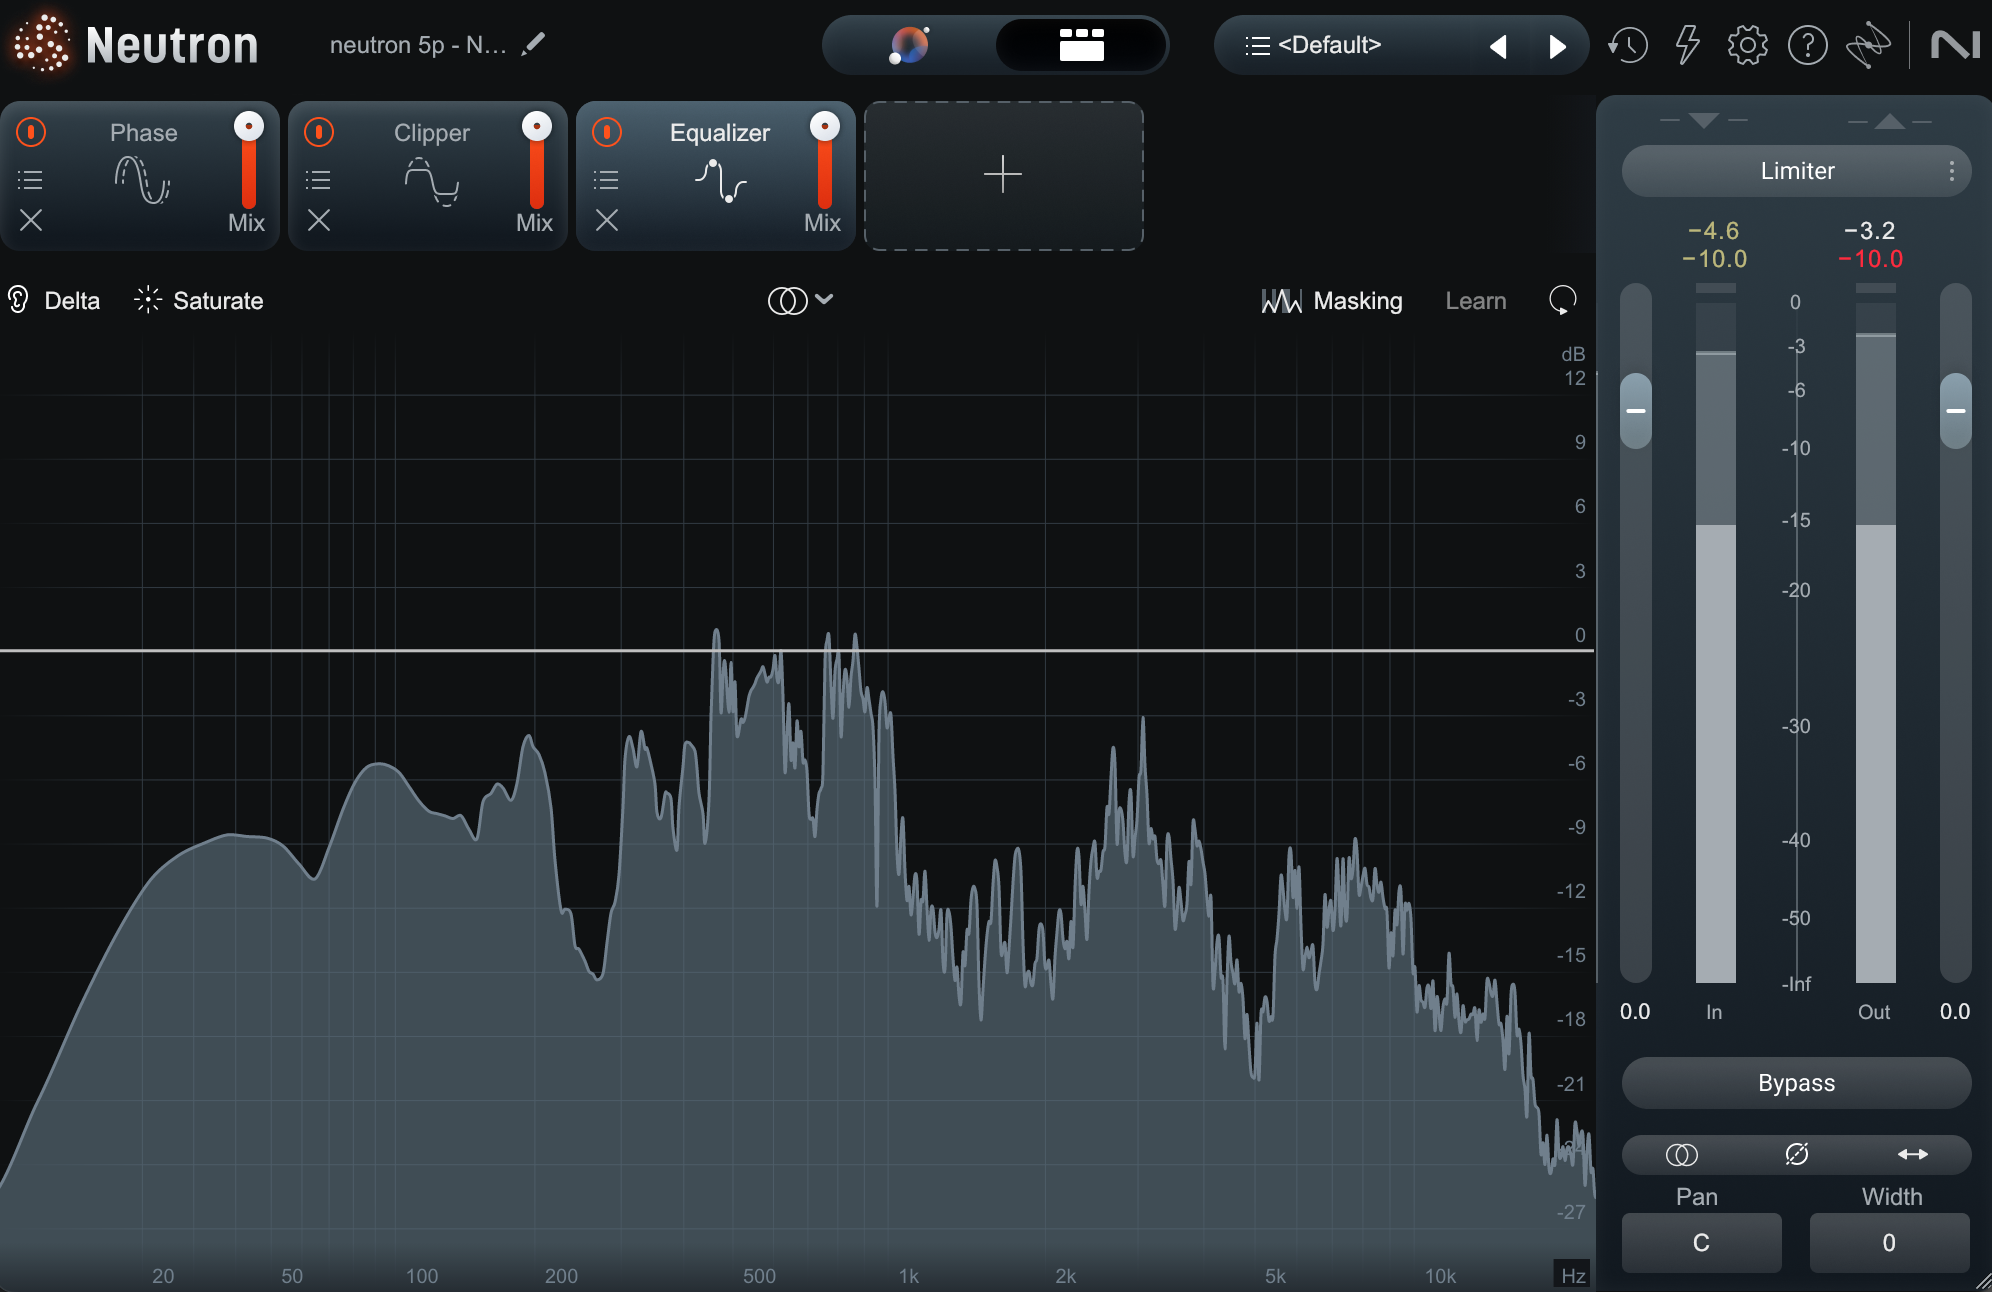
Neutron showing low end rumble
See that low-end bump below 100 Hz? It’s low end rumble. It won’t help us much.
This noise doesn’t come up so clearly on a pair of earbuds. But on a pair of full range monitors, it does. My limiter also hears it and reacts accordingly.
More importantly, I’ve heard it and deemed it undesirable, so down it goes.
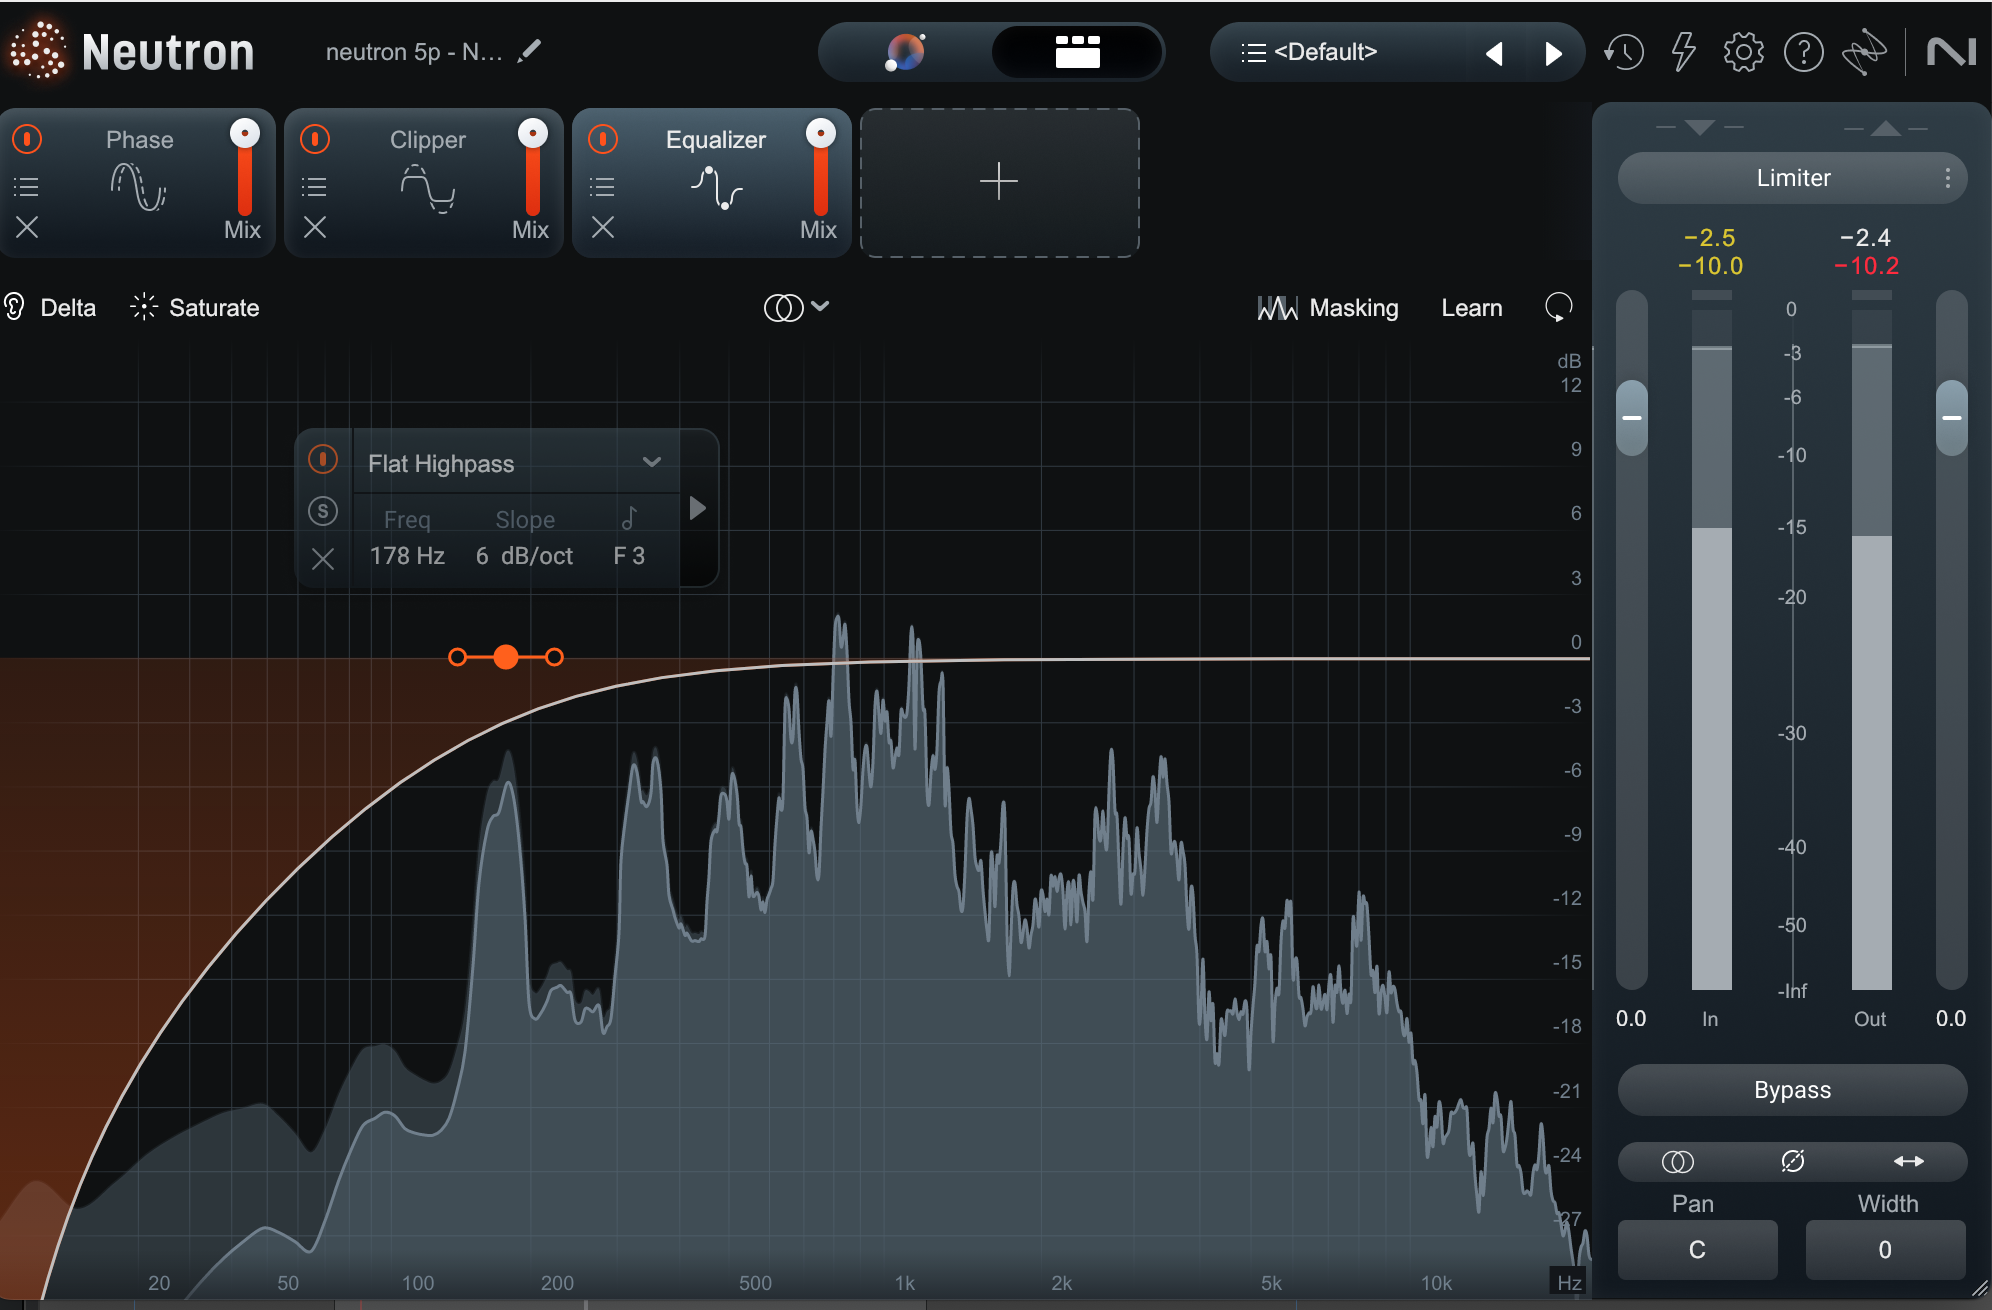
Vocal with flat high-pass
Take your time to scope out where these sneaky sounds are hiding.
As you remove them, remember to be very careful where you set the filter – the place we often call “the corner frequency.” You can’t just use the same setting for every track in your mix. What worked on one instrument might grab too much meat off a guitar or not enough from a vocal.
Pro tip: If you’re using Neutron and have trouble determining just how high you should cut, hit command (or control for PC) and select the lowest node, which will “solo” the band of frequencies it covers. Sweep up until you start to reach the tonal part of the instrument, and then pull back slightly. Now release the key to hear the entire signal. You want the noise to be gone without compromising the intelligibility or power of the audio.
2. Use a high-pass filter to give your low-end instruments their space
One of the most critical roles of a high-pass filter is to clear out unnecessary low end from tracks that don’t need it. This not only tightens up the mix, but also ensures that the kick and bass – the foundation of your arrangement – have the space they need to shine.
By high-passing instruments that aren’t contributing to the low end, you can create a cleaner, more powerful mix with a well-defined low-frequency range.
This may look similar to the previous tip, but here we’re thinking about everything playing all at once, rather than spots of rumble here or there. We’re talking about clearing the way for our bassier instruments so they’re not clouded or obstructed.
Observe this mix:
It’s good, but our low end is being handled by an upright bass – not the most pronounced of bass instruments. Our kick also has a pillowy sound. Let’s see what we can do with some carefully-placed high-pass filters on the other instruments.
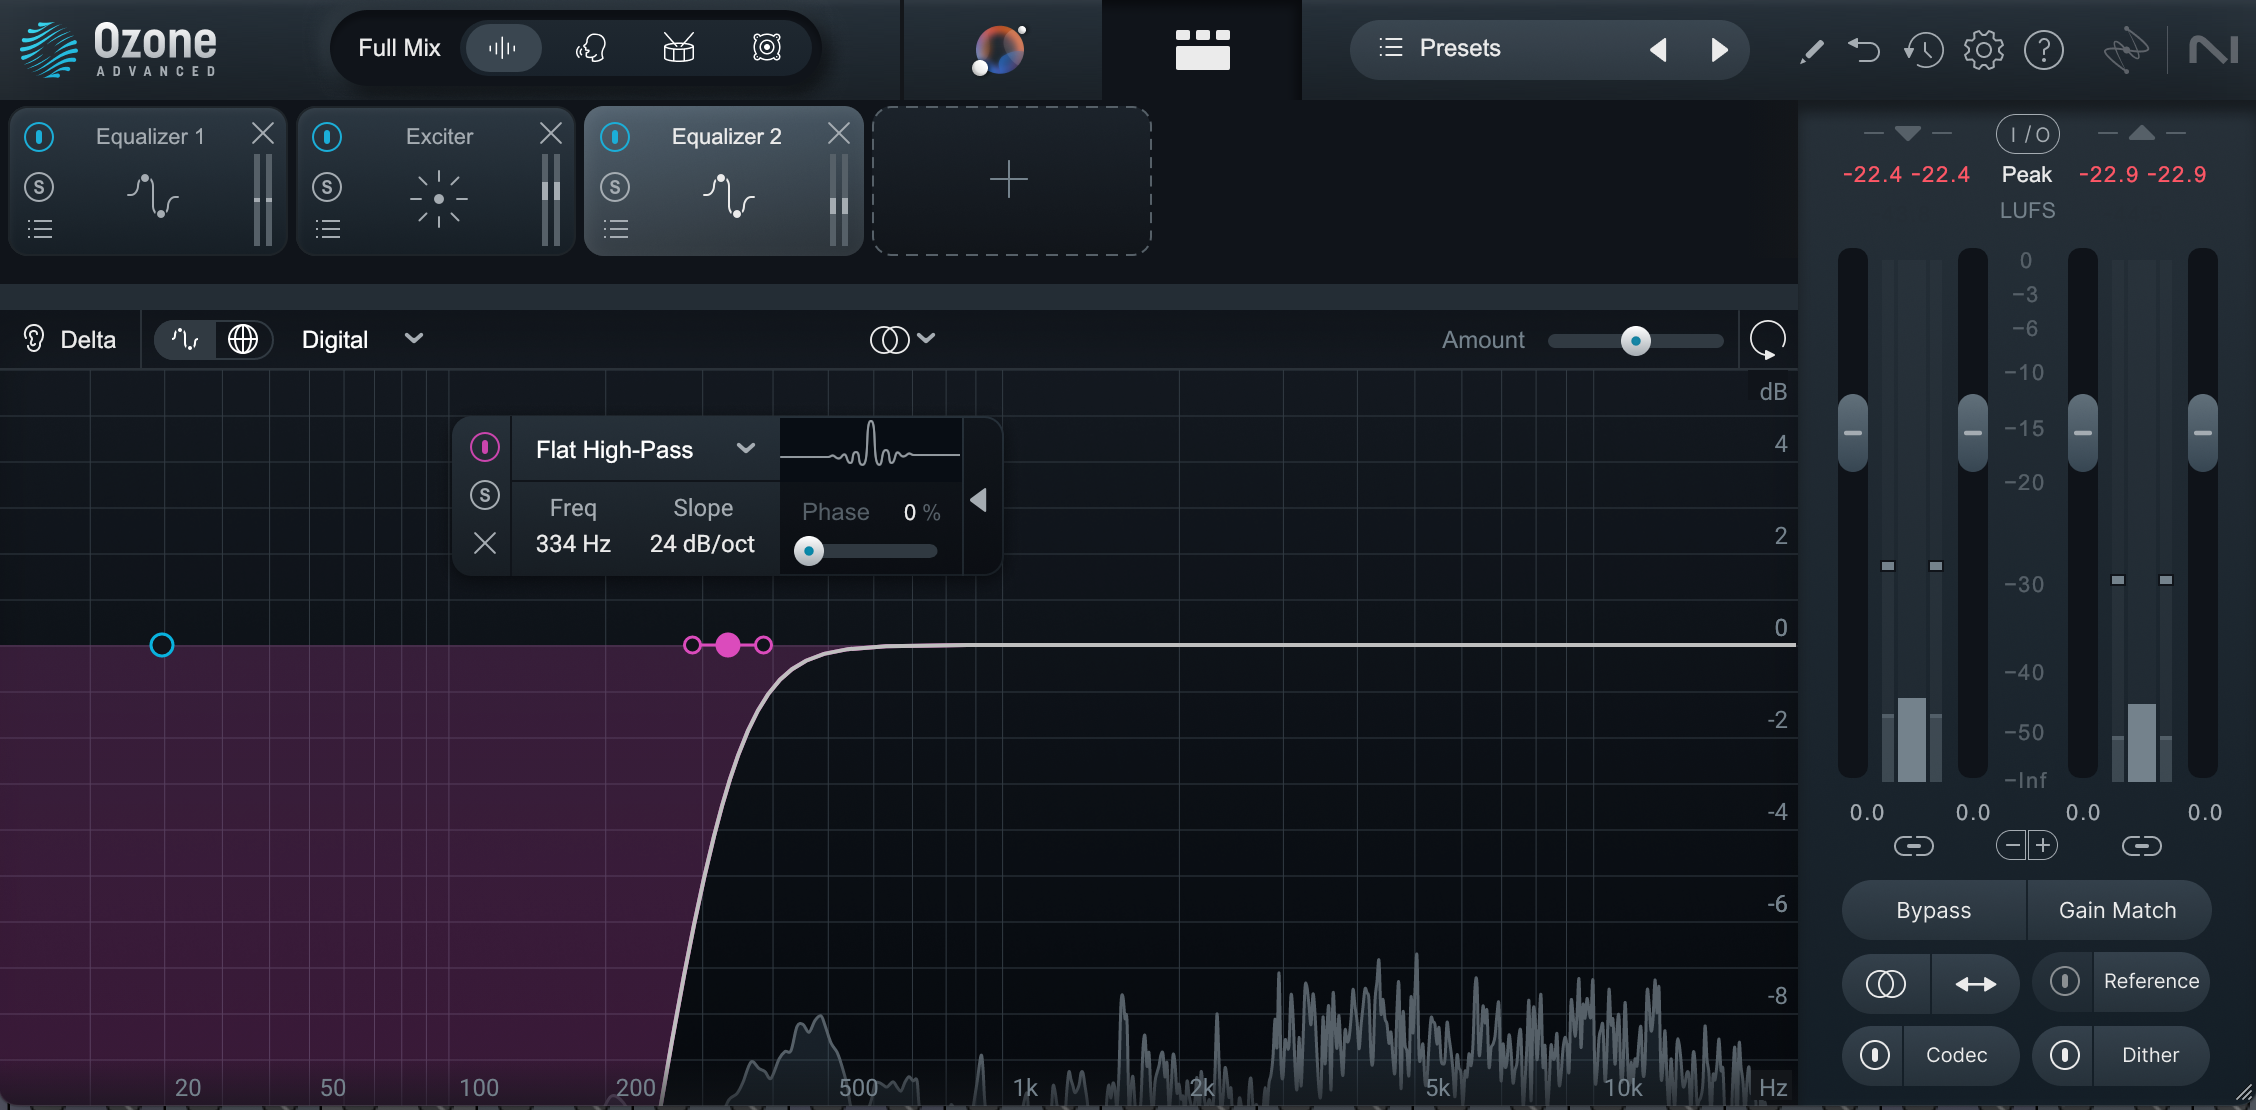
I’ll start with the submixes and see how that feels, using Ozone’s gentle flat high-pass filter to roll off low end on my harmonic bus, my vocal bus, and my overall effects submix bus.

Ozone high-pass filter
I’m using Ozone on the vocals. The instruments will get a different setting, determined by ear. Again, don’t use the same setting for every track.
Listen to this before and after comparison:
The bass and kick drum sound cleaner, but let’s see if we can do more.
I’ll now go down to my instrument submix and high-pass the electric guitars and keyboard bus. I’ll also high-pass my guitar effects, keyboard effects, and vocal effects submixes (yes, I make submixes for everything).
That gets us here:
We can go even farther, high-passing all the instruments that might potentially get in the way of the kick and bass.
But beware: I’m showing you what too much high-passing does to the mix. There is a point of diminishing returns. Stacking high-passes will make everything feel anemic, and “blurrier” as well when it comes to transients – we’re using minimum phase filters on many of the instruments, and a whole host of them to boot.
I think the second example was the sweet spot.
Whatever the case, do remember to use a linear phase filter whenever high-passing drums within a multi-mic’ed drum kit, or else you can mess up the phase relationships.
A linear phase filter delays all frequency content by the same constant amount – known as the group delay – during processing, thereby preventing phase distortion. You can find one in the Ozone EQ module.
Linear phase high-pass filter
3. Use a resonant high-pass filter to tighten an instrument without thinning it out completely
Neutron, Ozone, and Nectar all come with resonant high-pass filters, which you can use to focus the low end of your instruments.
Resonant high-pass filters can introduce a boost in signal at the corner frequency, right around the start of the cut. The result is a bit of roundness to the sound, even as you shape it.
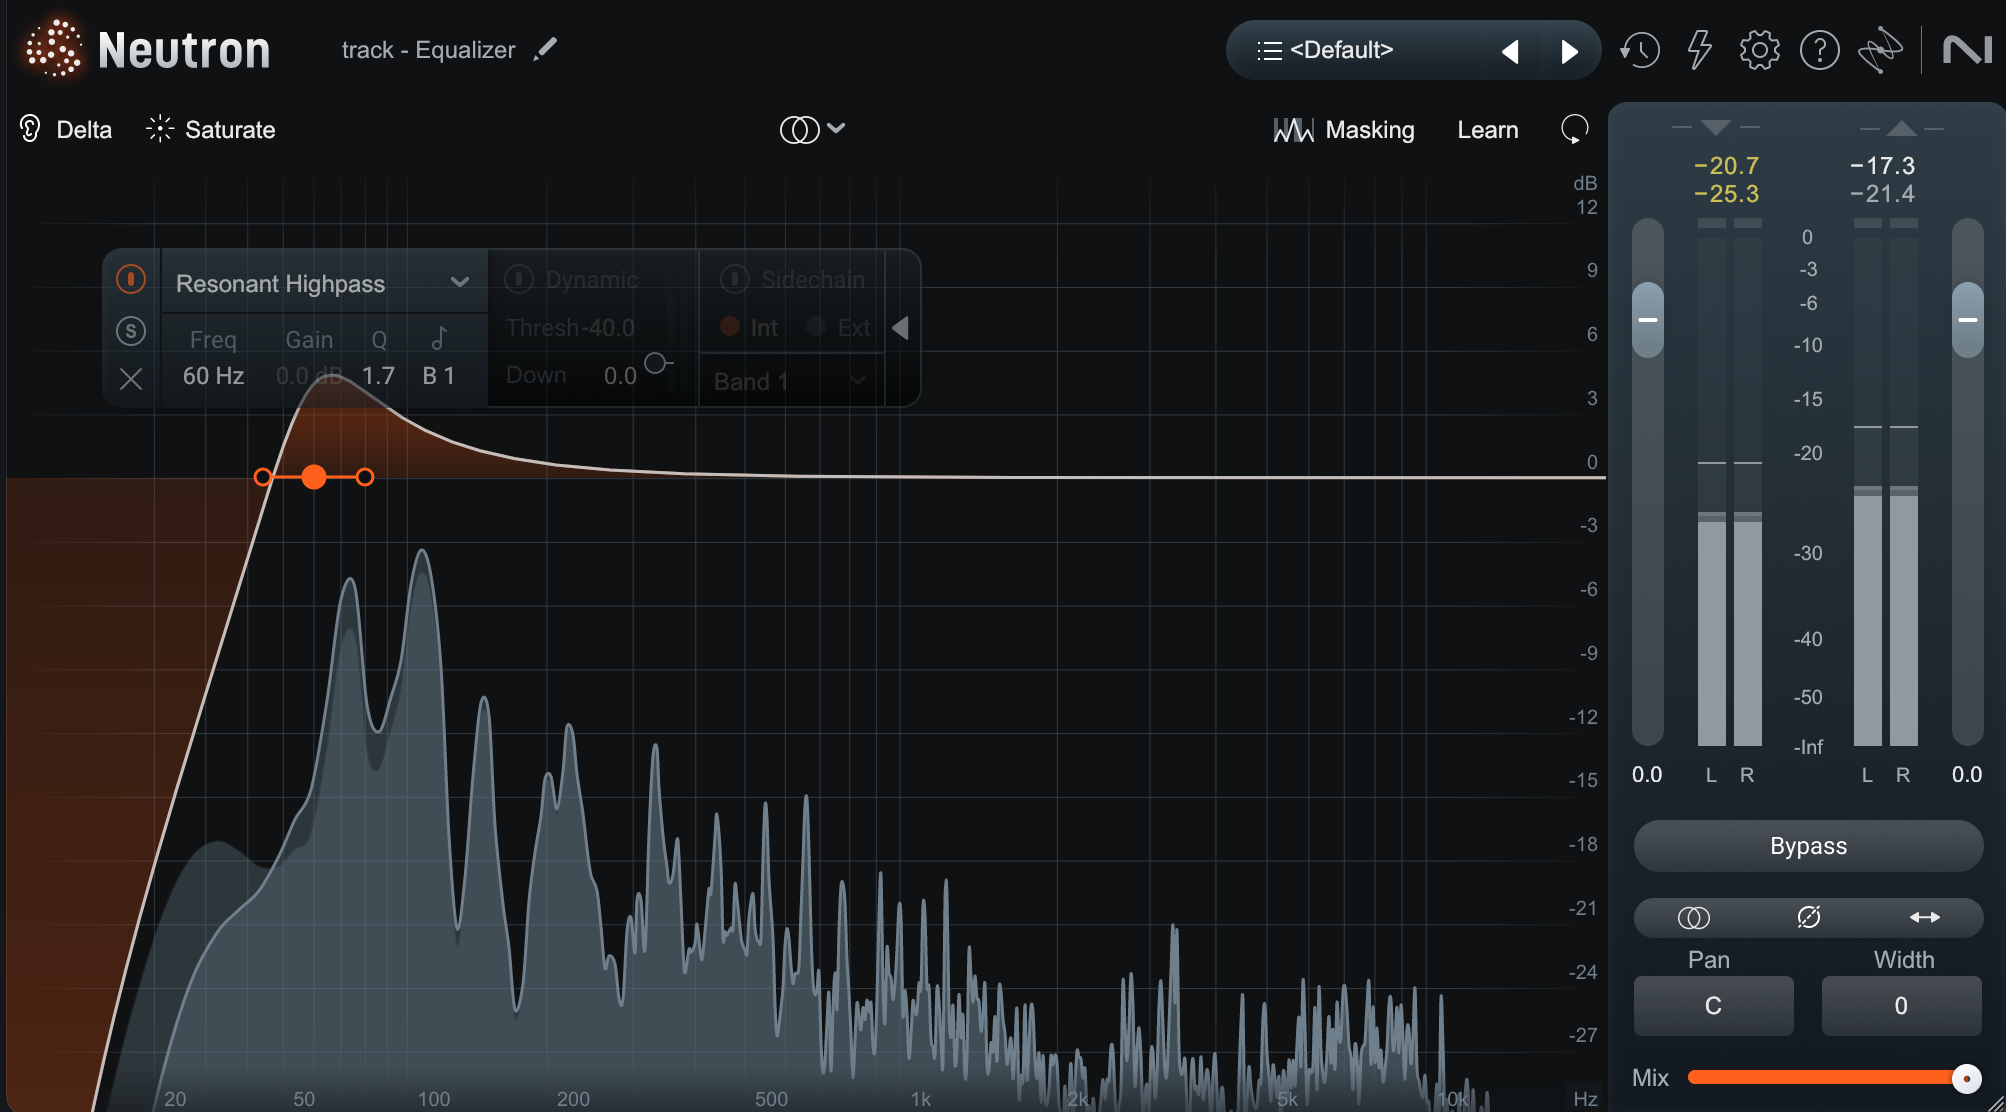
Resonant high-pass filter on bass
Listen to this mix with no resonant high-pass filter on the bass.
Here’s the mix with a resonant high-pass filter used on the bass:
The bass is more focused in the latter example.
Resonant high-pass filters work particularly well on kicks, basses, and their electronic equivalents. As always, don’t overdo it!
4. Play with the stereo image
A high-pass filter can be an interesting effect for dealing with hard-panned instruments like guitars or synths. Using a high-pass filter on the submix of two hard-panned instruments can help make them feel more naturally wide.
This is a technique popularized by Dan Worrall, and it works roughly as follows:
- Start with two instruments (e.g., double-tracked guitars) that are hard-panned left and right.
- Route these tracks to a stereo submix and apply a high-pass filter to either the mid or side channel of the submix. This is easy to do in an EQ like Ozone or Neutron.
A couple things to keep in mind:
- High-passing the mid channel reduces the low-end content in the center, which can make the meat of the instruments feel more "spread out"
- High-passing the side channel has the opposite effect: the center of the instruments will feel more weighty.
Either way, you’ll create a more natural stereo image that allows both ears to perceive both sides of the sound while still feeling wide.
Here’s an example with this pair of hard-panned synths:
Keep in mind that this trick relies entirely on the phase-shifting inherent to linear-phase EQ processing, so use a linear phase filter to remove the effect entirely.
Personally, I like the sound of hard panned instruments, especially on the choruses. I grew up listening to headphones, so it feels quite natural for me to hard-pan a pair of distorted guitars.
I still employ this trick quite often for pre-choruses, which allows me to have subtle variations.
Check out this mix, with hard-panned synths in the drop:
I’ll put this high-pass filter on the mid channel of these synths for the first four bars:
High-pass filter on mid channel
But I’ll bypass this high-pass filter half way through the example, and the synths will get wider:
This is an effective way to build dynamic changes from section to section.
5. Give a section its own vibe
A mix isn’t just about clarity, but also movement, contrast, and emotion. One way to carve out a distinct feel for a bridge or breakdown is by using a high-pass filter on the entire section. This is particularly effective during intros or bridges: you can make a section feel like it's floating, radio-filtered, or even slightly unstable.
Try this on a vocal, guitar, or synth pad as the song shifts gears. Automate the filter’s frequency or resonance to add motion – maybe it starts thin and builds back into full-range warmth as the section resolves. The result is a moment that stands apart from the rest of the track, drawing the listener in before slamming them back into the mix.
Applying a resonant high-pass filter to an entire submix, like the drums, guitars, or even the whole instrumental, can make a section feel like its own distinct entity. It’s a great way to momentarily pull back the weight of a mix, creating anticipation before slamming back into full-range impact. Try automating it so the effect swells in and out, or use it in tandem with reverb and delay throws to enhance the transition even further.
Here’s an experimental jazz song I mixed a few years ago for a band called Ginger’s Palace. It begins with severely filtered material, and often moves to high-passed filtered material throughout:
6. Use a high-pass filter carefully or not at all
High-pass filters are one of the most overused tools in production, probably due to the obvious and immediate effect they have on a sound. It’s all too easy to neuter all the lows that poke out from mid and high-range instruments, unintentionally removing what actually gives the mix depth and groove.
Even worse, steep curves can introduce a ringing or distortion around the cutoff point, especially when placed partway through busy material.
You don’t have to severely filter these elements out just because they typically favor higher frequencies. You can also use a shelf to cut frequencies, which can often be more gentle.
When we use a high-pass filter, we are striving for clarity. But clarity in a mix doesn’t come solely from EQ and filtering. Pan position and level are equally useful to help separate elements in a mix. When balancing tracks, be sure to explore these options before defaulting to a high-pass.
Start using high-pass filters in your mix
Despite the simple function of a high-pass filter, it is a versatile tool that can be used in dozens of scenarios for a greater sense of tonal balance.
Like all audio tools however, it has the potential to be overused with disastrous results. When I first started producing and mixing music, I went overboard with my filters and EQ cuts and ended up with music that sounded unnatural and flat. Over time I’ve learned that subtle, intentional moves are what gets the job done more effectively.
High-pass only the frequencies that are stopping your mix from communicating clearly to the listeners, and not those you think should be removed based on a preset or an instrument range chart.
And a friendly reminder – you can experiment to your heart’s content with high-pass filters found in iZotope products including Neutron, Ozone, and Nectar – all found in
![]()
![]()
Music Production Suite 7