5 Tips for More Transparent Compression
Audio compression is an essential part of music production. Learn five tips to help keep your compression sounding transparent and clean.
It could easily be argued that no contemporary music production would be complete without a good dose of dynamic range compression. Certainly, there are exceptions, but generally speaking, compression is very much part of the sound of modern music.
That said, while there are times where we may want to use compression as an obvious effect, it’s important to be able to employ it in as transparent a way as possible. After all, the last thing we want is for it to sound jarring or distract from the main focus of the song! So with that in mind, let’s take a look at five tips for more transparent audio compression.
Want to practice more transparent compression techniques in your mixes as you follow along with the article? Try a free trial of iZotope’s


iZotope Music Production Suite Pro: Monthly
Tip 1: Understand the basics of ratio, attack, and release times
The key to any good-sounding compression starts with the basics, and when it comes to compression the most fundamental controls are those of ratio, attack, and release. Even just considering these three parameters, things can quickly get complex when the goal is transparency. To help think about this, I find it useful to consider what I would characterize as the “extremes” of each control. Let’s look at them one by one.
First up: ratio. What might be considered an “extreme” ratio is going to be very dependent on the source you’re working on compressing—in fact, that’s largely true with all three of these parameters. For highly transient material, ratios up to 4:1 or even 6:1 can be quite common, while with more sustained sources those values might be cut in half—closer to 2–3:1. Keep these in the back of your mind for now.
Next up: attack! Attack times are a little tricky because 30ms on one compressor can sound very different from 30ms on another compressor, plus they are incredibly source-dependent. With that in mind, use the following numbers only as a very general guideline. For transient material, an “extreme” attack time might be less than 5ms. Then again, sometimes very fast attack times—even on the order of microseconds—can still sound transparent if employed carefully. For more sustained material, the crossover from “extreme” to “normal” attack times might be in the 15–50ms range. Again, file these values away in your memory.
Lastly: release. As with the previous two parameters there’s a substantial fudge-factor here. For transients, release times below 30–50ms might fall into the “extreme” category, while for sustained or legato sources, that window may be closer to 100–300ms. If you hear the sustained portion of a sound “chattering,” your release is likely too fast.
Now, here’s the punchline: if your aim is transparency, you can usually only afford to have one of those three parameters in their extreme range. Need a high ratio? Be careful with your attack and release times. Want a fast release to enhance low-level signals? Take it easy with your ratio and attack time. These are by no means gospel truths, and some of the following tips will demonstrate ways to circumvent them to an extent, but it’s a lot harder to overdo things when you keep these guidelines in mind.
This article references a previous version of Neutron. Learn about 

Neutron 5
Tip 2: Avoid over-compression with serial compression
Serial compression—or using multiple compressors in a row—is a classic way to avoid obvious over-compression. One important factor to keep in mind here is that compression is multiplicative. In other words, a 4:1 compressor followed by a 2:1 compressor is equivalent to an 8:1 compressor! You don’t necessarily need to do this math every time you use serial compression, but the principle is worth bearing in mind.
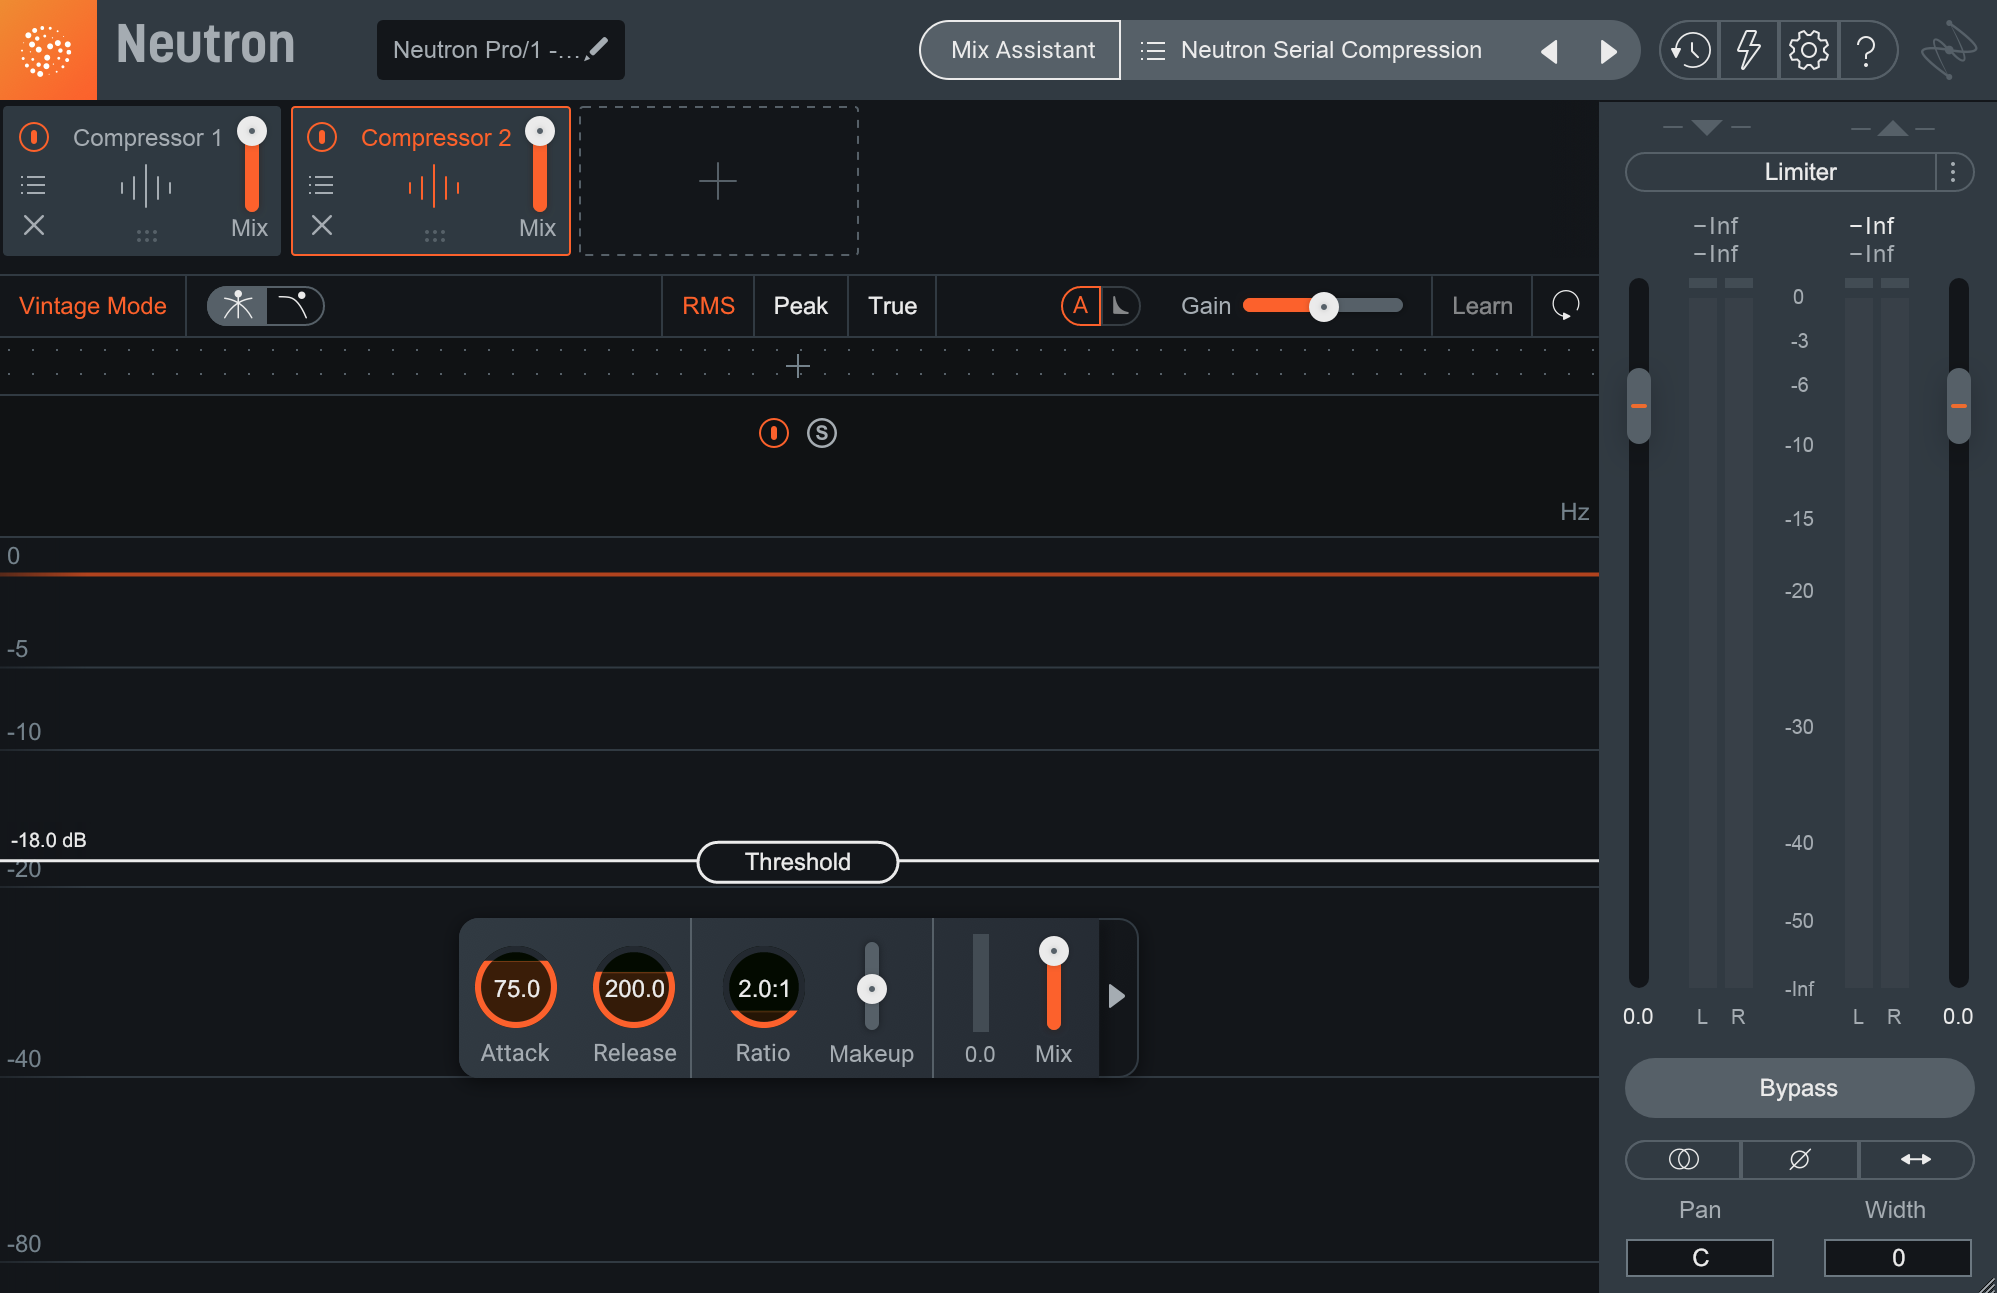
So, how do you use serial compression in practice? The classic technique is to start with a relatively fast, high-ratio compressor and set the threshold so it’s catching the very highest peaks of the signal. You don’t want it to be working hard all the time, just kicking in quickly on the loudest sections. By controlling just these peaks, you help prevent them from triggering over-compression down the line.

Serial compression preset in Neutron Pro
Next, you might use a slower, lower ratio compressor to gently control the overall dynamics of the signal. Opto or RMS style compressors are great for this application since they naturally have a slower response than something like a peak, FET, or VCA style compressor. Check out the “Serial Compression” Neutron preset included in this article for a great starting point. Optionally, you could follow this up with some compression on a bus or aux, or even split the RMS compression into two stages.
However you go about it, by just doing a little compression at each stage, you can keep things sounding clean and transparent while still achieving a substantial amount of overall compression and dynamic control.
Tip 3: Using low-ratio compression can help transparency
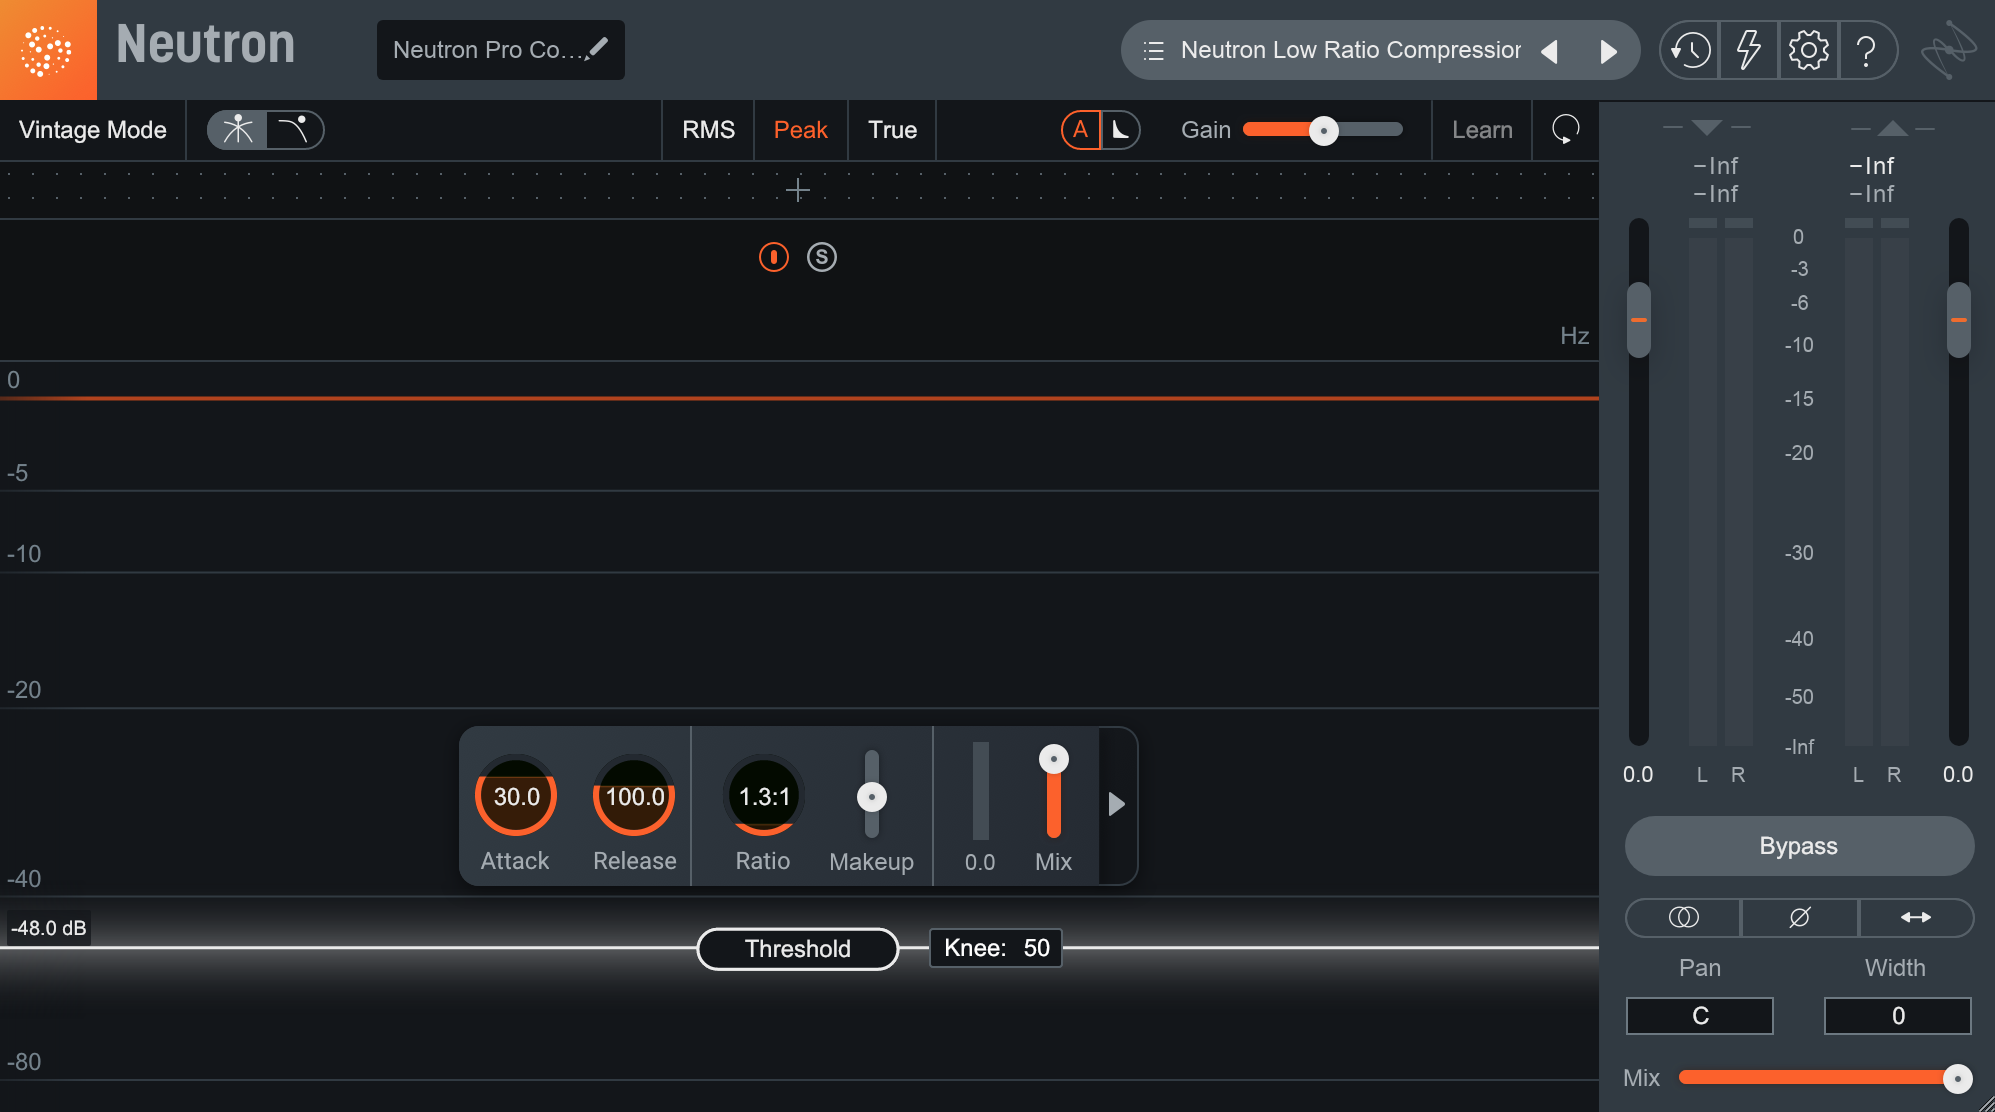
Using low-ratio audio compression is another great way to keep things transparent. For me, “low-ratio” means definitely under 2:1, and often under 1.5:1! If you’ve never thought to try them, there’s a lot of use that can be made from the ratios between 1.1–1.3:1, and by keeping the ratio so low you can often get away with more aggressive thresholds, attack and release times.
For example, with a 1.2:1 ratio, you might try setting the threshold so that the signal is always in compression—unless there’s silence. This could be as low as -48 dBFS! Then adjust your attack and release times to taste, and don’t be surprised if you can get away with a 15–30ms attack, and 50–100ms release—although of course you can go faster or slower if you like the sound of it.

Low-ratio compression in Neutron Pro
With settings like this you might only see 6–7 dB of gain reduction, which is probably right about on target for a lot of sources. You could also use this type of compression either before or after the serial compression technique described above, and there are presets included for both


Neutron


Ozone 11 Advanced
Tip 4: Do more with parallel compression
I’ve written before at length about parallel compression, but it deserves a mention here too. Similar to low-ratio compression, you can often get away with much more heavy-handed settings than you could otherwise, while still achieving a fairly transparent sound. Settings that might initially create 20 or more dB of gain reduction—low threshold, high ratio, and fast attack and release—can easily be dialed back to 3–4 dB of effective gain reduction when mixed in at only 35% or so.
Speaking of parallel compression and gain reduction, did you know that the gain reduction trace in iZotope plug-ins shows the effective gain reduction after the mix slider is factored in? This makes it easy to dial in a mix slider value to achieve only as much total gain reduction as you’d like, even if you start out with very aggressive compression settings.
Tip 5: Maintain transparency with sidechain filtering
Lastly, sidechain filtering can be an extremely powerful way to maintain transparency and avoid over-compression, especially in a mastering context. Many times there can be a specific frequency—or frequency range—that will contribute a disproportionate amount of energy to a signal and trigger compression when you don’t necessarily want it to. By applying a filter or EQ to the internal sidechain of a compressor, you can remedy this behavior.
Ozone’s Vintage Compressor has a highly versatile internal sidechain filter that’s well-suited for this purpose. You can think of the EQ curve that you create with it sort of like an inverted, frequency-dependent threshold. Roll out some low end with the high-pass filter? That effectively raises the threshold for those frequencies, meaning it takes more energy to trigger compression. Push a little 3 kHz with the bell filter? That equates to a lower threshold for that range which will now compress more easily.
I’ve included an Ozone Vintage Compressor preset below to demonstrate the principle, but this will definitely need to be tailored to the specific audio you’re working on. That said, the benefits of this kind of experimentation can absolutely pay dividends, especially in a mastering context, so don’t be afraid to dive in and get your hands dirty!

Sculpting the sidechain EQ in Ozone Pro
Try these compression tips
So, there you have it: five ways to achieve more transparent audio compression. If you haven’t tried some of these techniques before, the presets included at the top of this article along with the plug-ins included in a Music Production Suite Pro subscription can be a great way to wrap your head around them. As always though, experimentation is key to learning the details of any given technique and discovering what you do and don’t like about it.
