8 common compression mistakes music producers make
Learn how to avoid common audio compression mistakes when mixing music. Discover expert tips and techniques to achieve a balanced, professional sound without over-compressing your tracks.
If you're a mixing engineer or music producer, then you've probably been bitten by the compression bug. Slamming that audio is a surefire way to give your sounds the heft and punch they deserve, right?
Turns out, maybe not: on the road to dynamic glory there are many pitfalls. Compressing the wrong way can squash the dynamic range of a track, introduce unwanted pumping effects, and distort the natural tone of instruments like vocals.
Here you will learn how to identify common compression mistakes in your mix and discover how you can use compression appropriately to enhance your sound.
In this piece you’ll learn:
- How to identify common audio compression mistakes in mixing
- Compression techniques that will enhance your tracks rather than hurt them
- Alternative methods to using compression in your mix to create a polished sound
Follow along with these compression tips using


Neutron 5
1. Using audio compression without intention
Doing anything without a purpose will keep you stuck in the land of the amateurs. You might stumble on some technique, but if you don’t make any connection to why it worked, it won’t help you long term.
With that in mind, let’s introduce a few goals we can achieve with compression. If you stick to these goals, you’ll achieve better results.
Use compression to even out the dynamics of a performance
Compression is a powerful tool for evening out the dynamics of a performance. You can use a compressor to make the loud parts of a performance quieter, thereby restricting the dynamic range.
You can also make the quieter parts louder, either by using parallel compression to bolster low-level signals, or an upwards compressor such as Density to restrict the dynamic range from the bottom upwards.
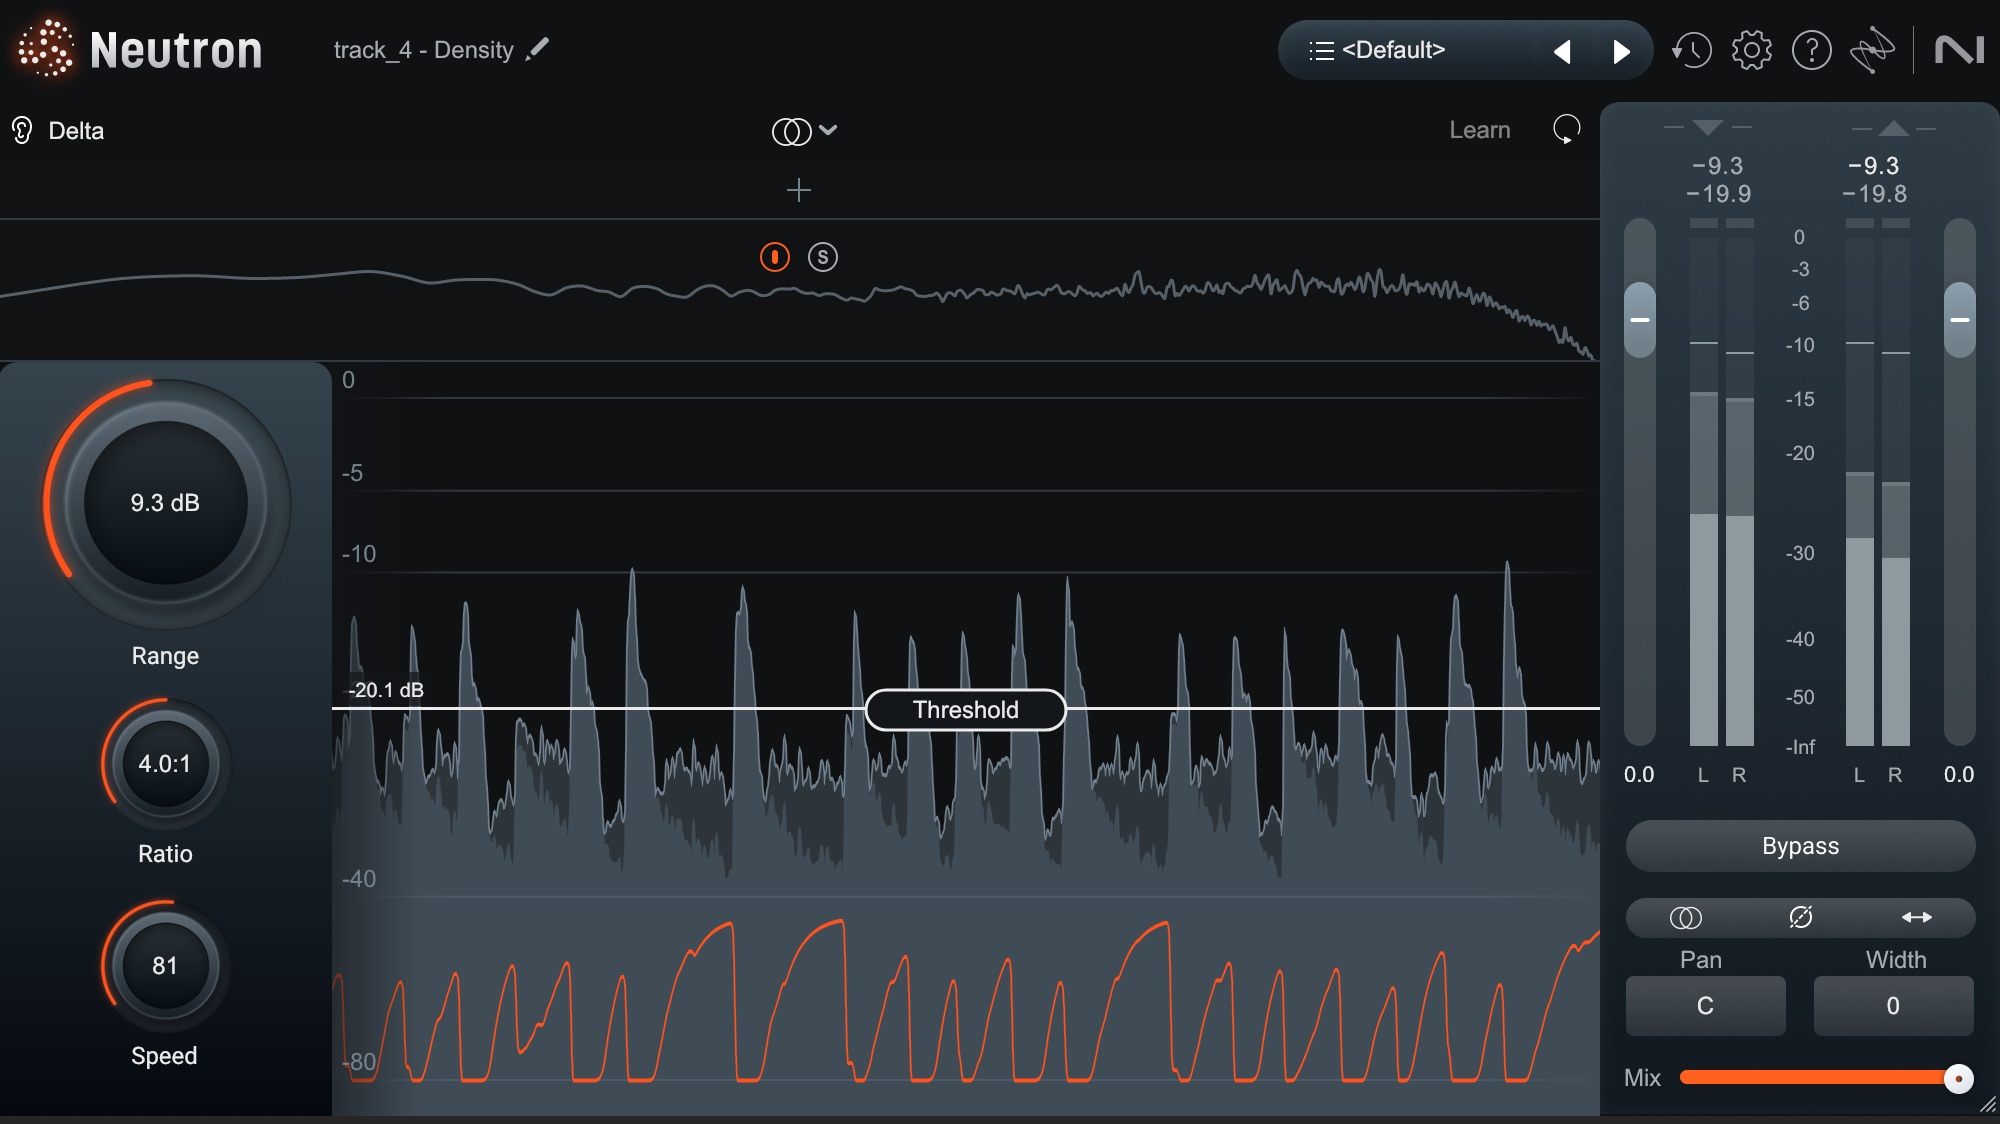
The Density module in Neutron is an intelligent upwards compressor
By controlling the dynamic range, compression helps create a more balanced and polished sound, allowing every detail of the performance to shine through consistently.
Use compression to shape the envelope (attack, decay, sustain, release) of a waveform
Compression can also shape the “envelope” of a note – or, how a sound generates from silence and resolves back into silence anew. This is thanks to the attack and release parameters found on more compressors.
Compression can change the impact of anything from a specific transient (like a drum hit) to the overall groove of a part (like a drum loop). Some compressors notable for their ability to shape envelopes are: the Purple Audio MC77, the Punch Module in Neutron 5, and VCA-style compressors such as the bx_townhouse.
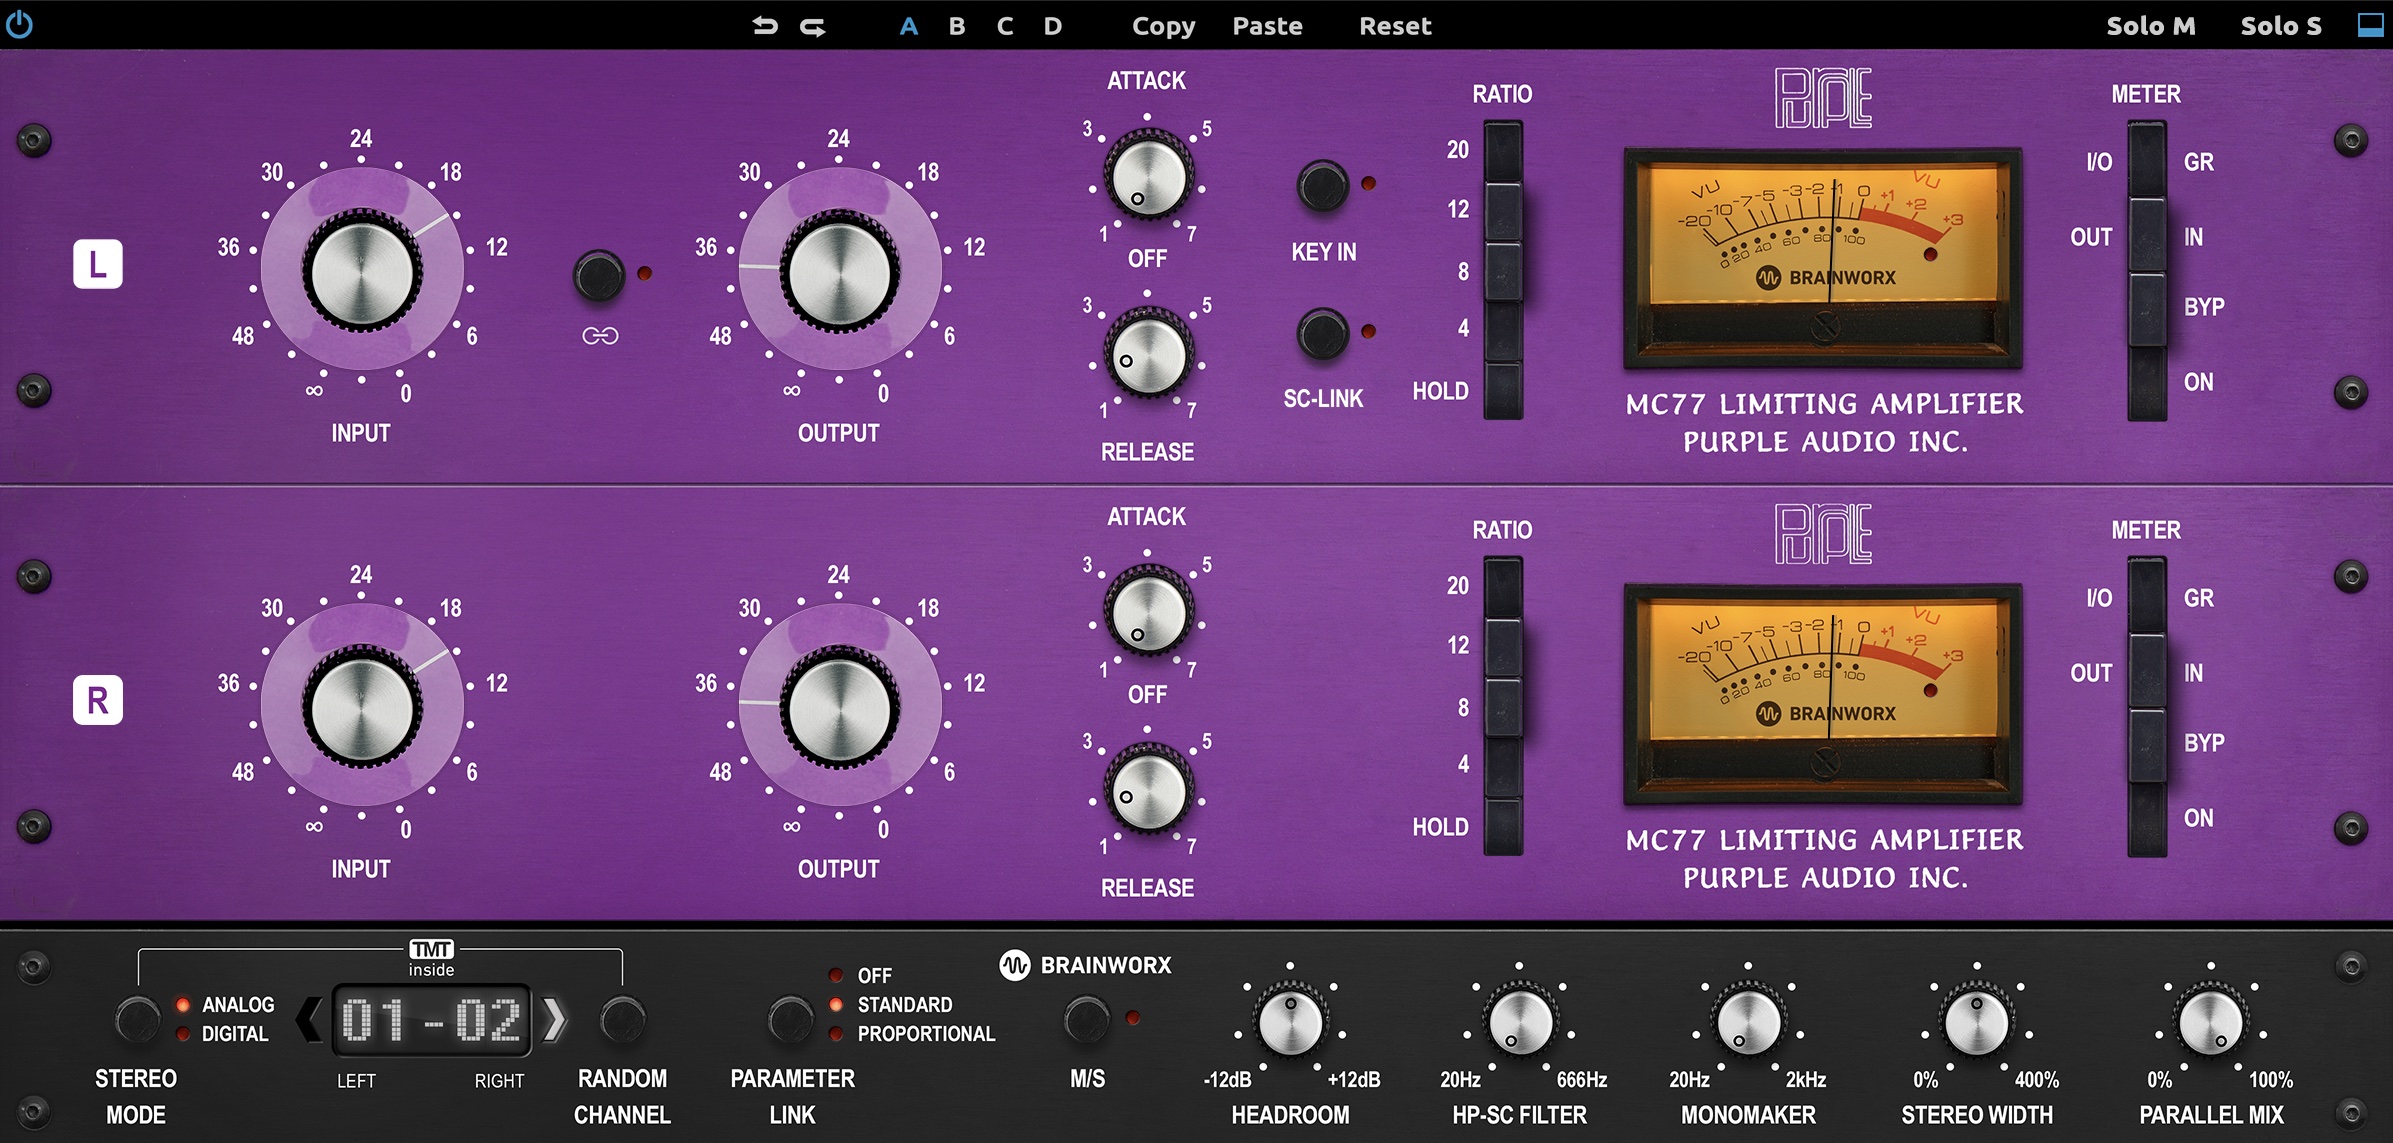
Purple MC77 compressor
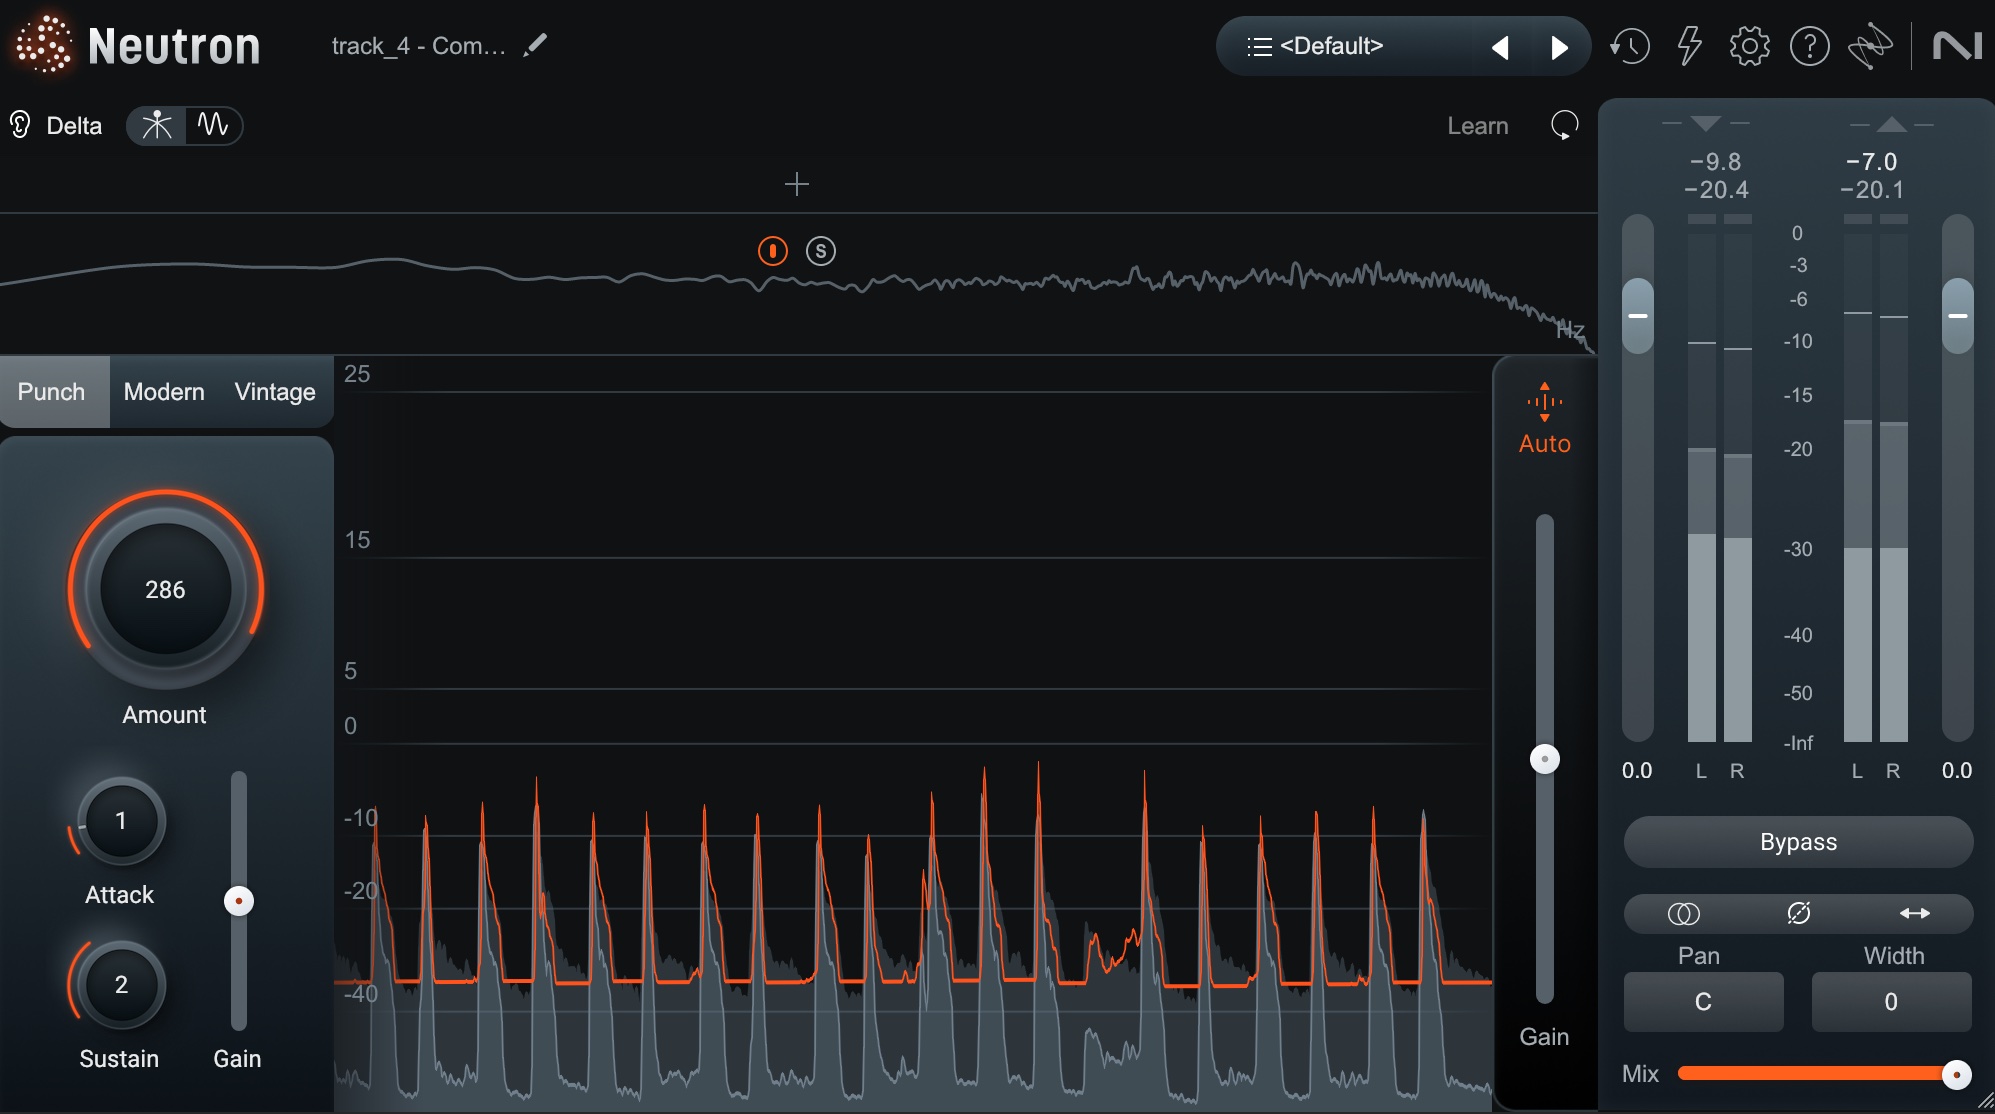
Neutron Punch module

Brainworx bx_townhouse Buss Compressor
Use compression to color the sound
The compressors of yore didn’t just change timing behavior or dynamic range. They also had colorful influences on the sound itself. Again, the Purple MC77 comes to mind as a particularly colorful choice.
Even supposedly transparent compressors can alter the sonic quality of a track, especially in parallel; they can add a density or gravitas that wasn’t there before. Here Neutron’s Density, again, is worthy of a look.
Using compression to “Glue” together instruments
Glue is such a ubiquitous term in compression that multiple plugins have “glue” in the name. But there’s a reason we use it: compression can gel multiple instruments into a singular whole.
I would argue that what people call glue is a conglomeration of the previous two use cases: the envelope shaping of disparate elements, combined with the unique color of the compressor in question.
Still, “glue” is enough of its own thing to warrant its own subhead.
Glue usually describes the dynamic manipulation of sound at the bus level. VCA compressors, vari-mu style compressors, and opto compressors are frequently employed for this purpose. You can read more about the different types of compressors.
You can use plugins like bx_townhouse and bx_glue for the VCA style, or SPL IRON and NEOLD WUNDERLICH for the Mu effect; the Shadow Hills Mastering Compressor and the Mixland Vac Attack are some of the optos on offer.
Use compression to manipulate the stereo separation of stereo signals (less common/more advanced)
If used well, compressors can impact stereo material in a variety of interesting ways, from subtle to heavy-handed. We’re talking about unlinked stereo compressors, dual-mono compressors with slightly different settings (very slight indeed!), or unlinked mid/side compression. This stuff can really add movement to otherwise staid stereo parts.
The caveat, however, is that you can’t abuse these techniques – and it’s very easy to do so. Do about 60% of what you think is necessary and you’ll be on safer ground.
So yes, think carefully before inserting a compressor!
Ask yourself, do I want to even out the dynamics? Do I want to shape the envelope of the sound? Do I want to color the sound with the specific characteristics of a specific compressor? Do I want to use advanced techniques to change the apparent stereo qualities of a submix?
If the answer to these questions is “no,” don’t use compression! Unnecessary compression can ruin the feel, groove, or dynamics of your mix – and potentially compromise the width or integrity of the stereo field.
2. Using unmusical attack and release times
Attack and release controls are vital to a compressor’s behavior. Misusing these controls can lead to unnatural results – too fast an attack can kill transients, making the mix sound dull, while a release that's too slow can cause pumping or unwanted sustain. Let’s dive into some common issues with attack and release:
Your attack time is too fast
In an attempt to keep up with loudness wars, many producers approach compression with the intention of squashing transients to create more headroom in the mix. See, fast attack times will step on the transients, allowing you to raise the sound overall against the digital ceiling.
But transients are what give your sounds the definition and impact that make them unique.
The “transient” is the high amplitude burst of energy that occurs during the attack phase of a sound. If you outright remove the transients, you lose the punch and energy that brings life to your mix. You also risk adding a particularly nasty kind of distortion to the proceedings.
Here’s a drum loop from a lo-fi project I’m mixing. It responds quite well to errors in compression, which is why I’m using it.
Here are some settings that are way too fast:
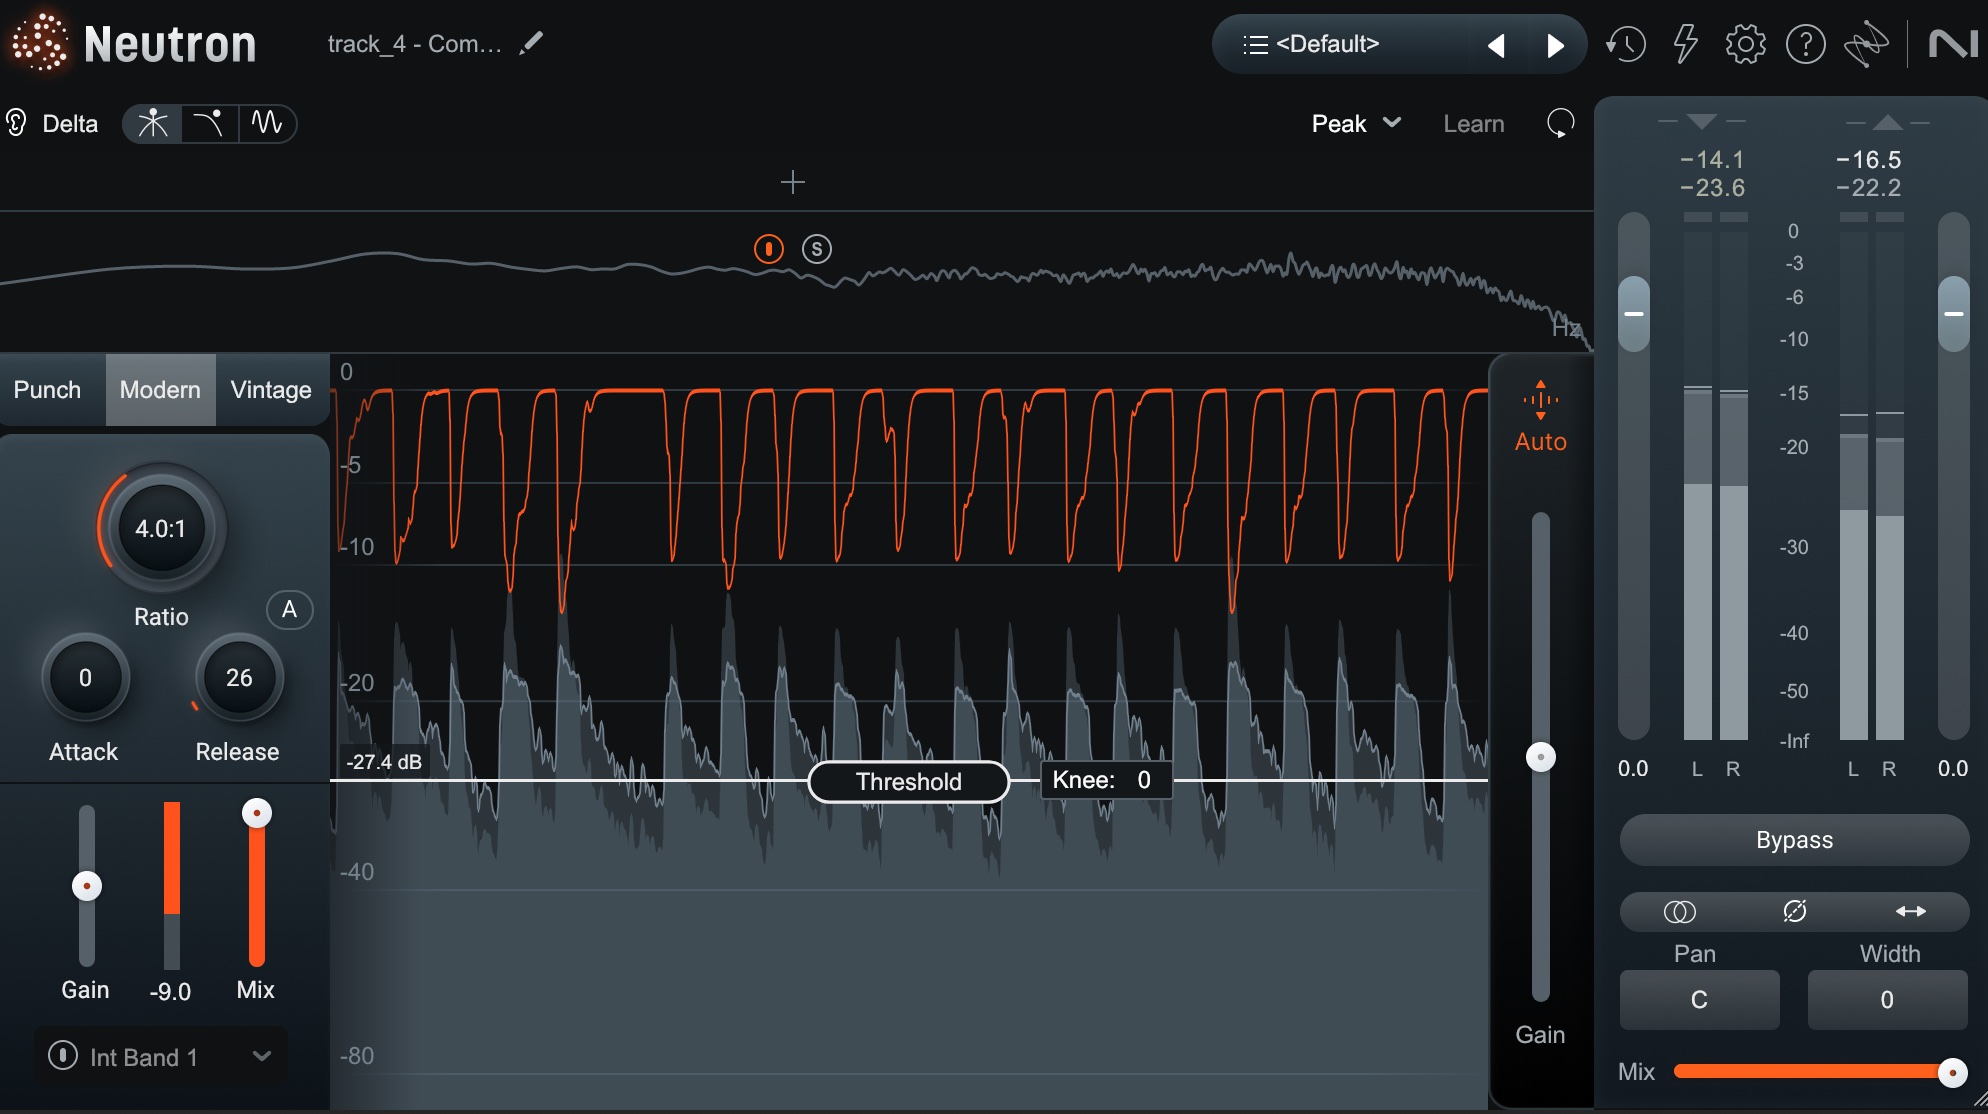
Compression settings with the attack time set too fast
You can hear the distortion, as well as the complete lack of impact:
To avoid this mistake, slow your attack time down a bit to preserve your transients. You’ll end up with the benefits of compression without the downfall of a flat, listless mix.
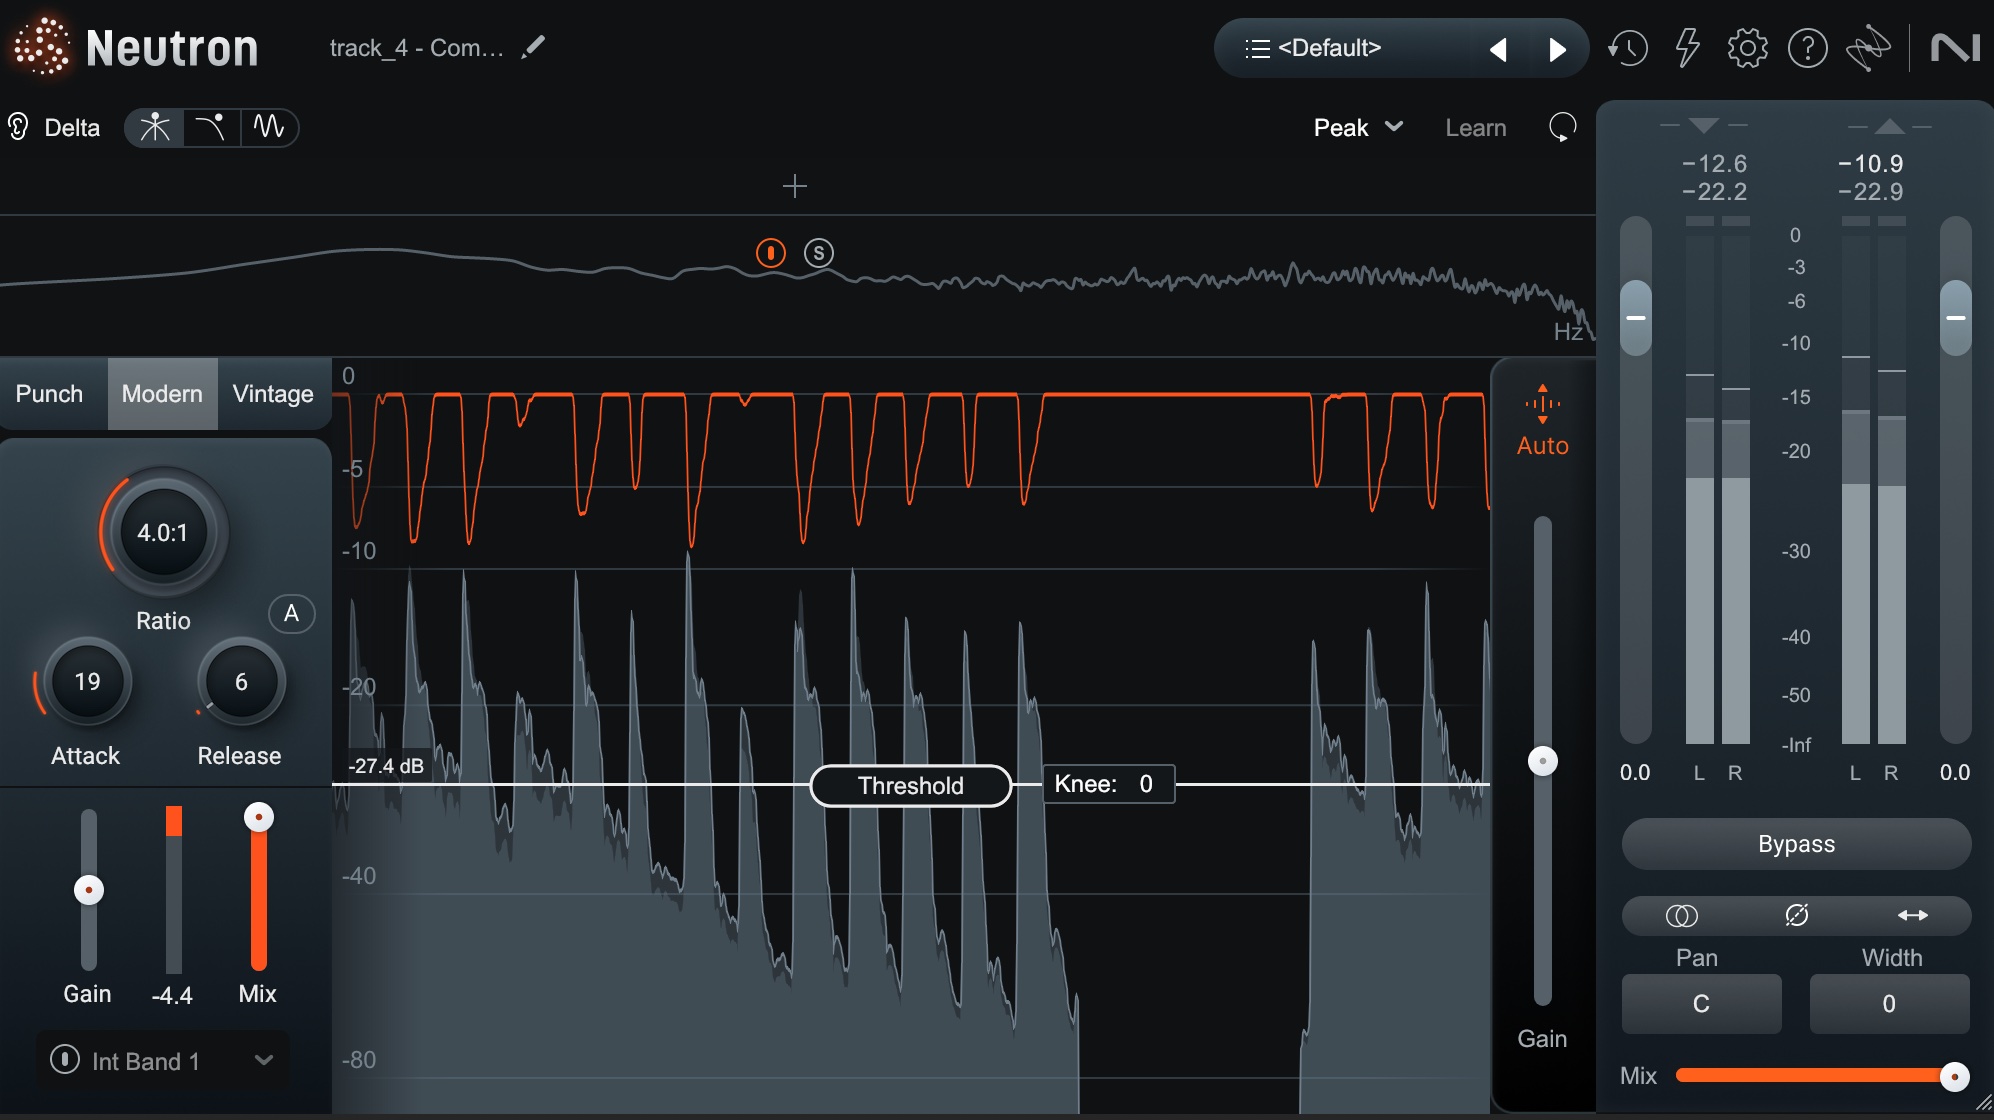
Compression settings with a slower attack
Bonus tip: you can also control transients by foregoing compression completely in favor of clipping. The reasons for doing this are outside the scope of this article, but you can read about clipping here.
Your release time is too slow
If your release time is too slow, the compression effect will linger for longer than it should, resulting in undesired effects like unmusical pumping – or pushing elements of the sound far into the background.
Again, let’s hear our drum loop:
Let’s hear what happens when our release time is too slow.
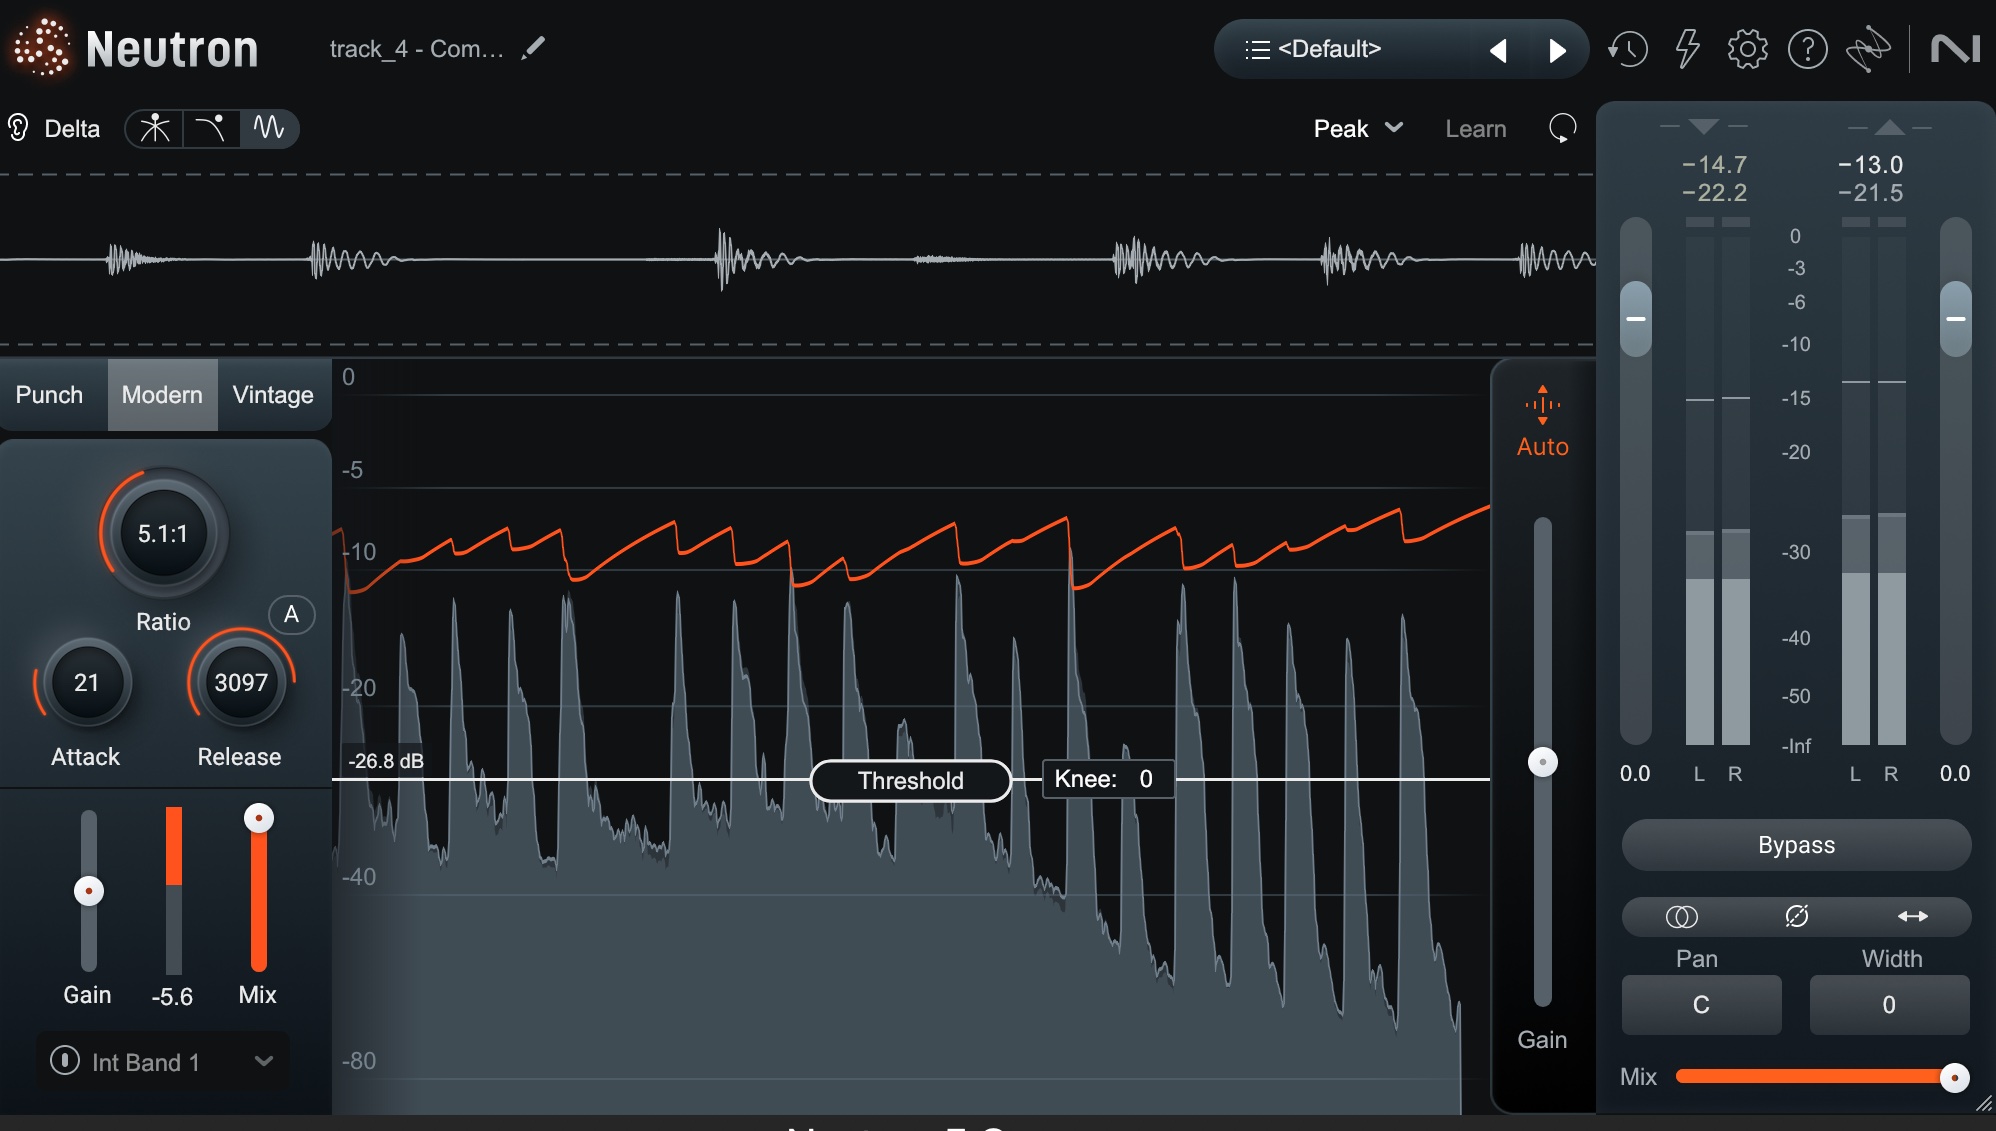
Compression release too slow
We’ve lost definition in the kick and snare, and the cymbals are pushed all the way to the back of the picture. It’s like they’re being played from miles behind the shell pieces.
Your release time is too fast
Conversely, if your release time is too fast, the compressor will let go of the sound too quickly, leading to distortion and a different kind of unmusical pumping, as you’re not allowing notes to ring out naturally.
Again, our drum example.
Here we’ve pushed things too fast.
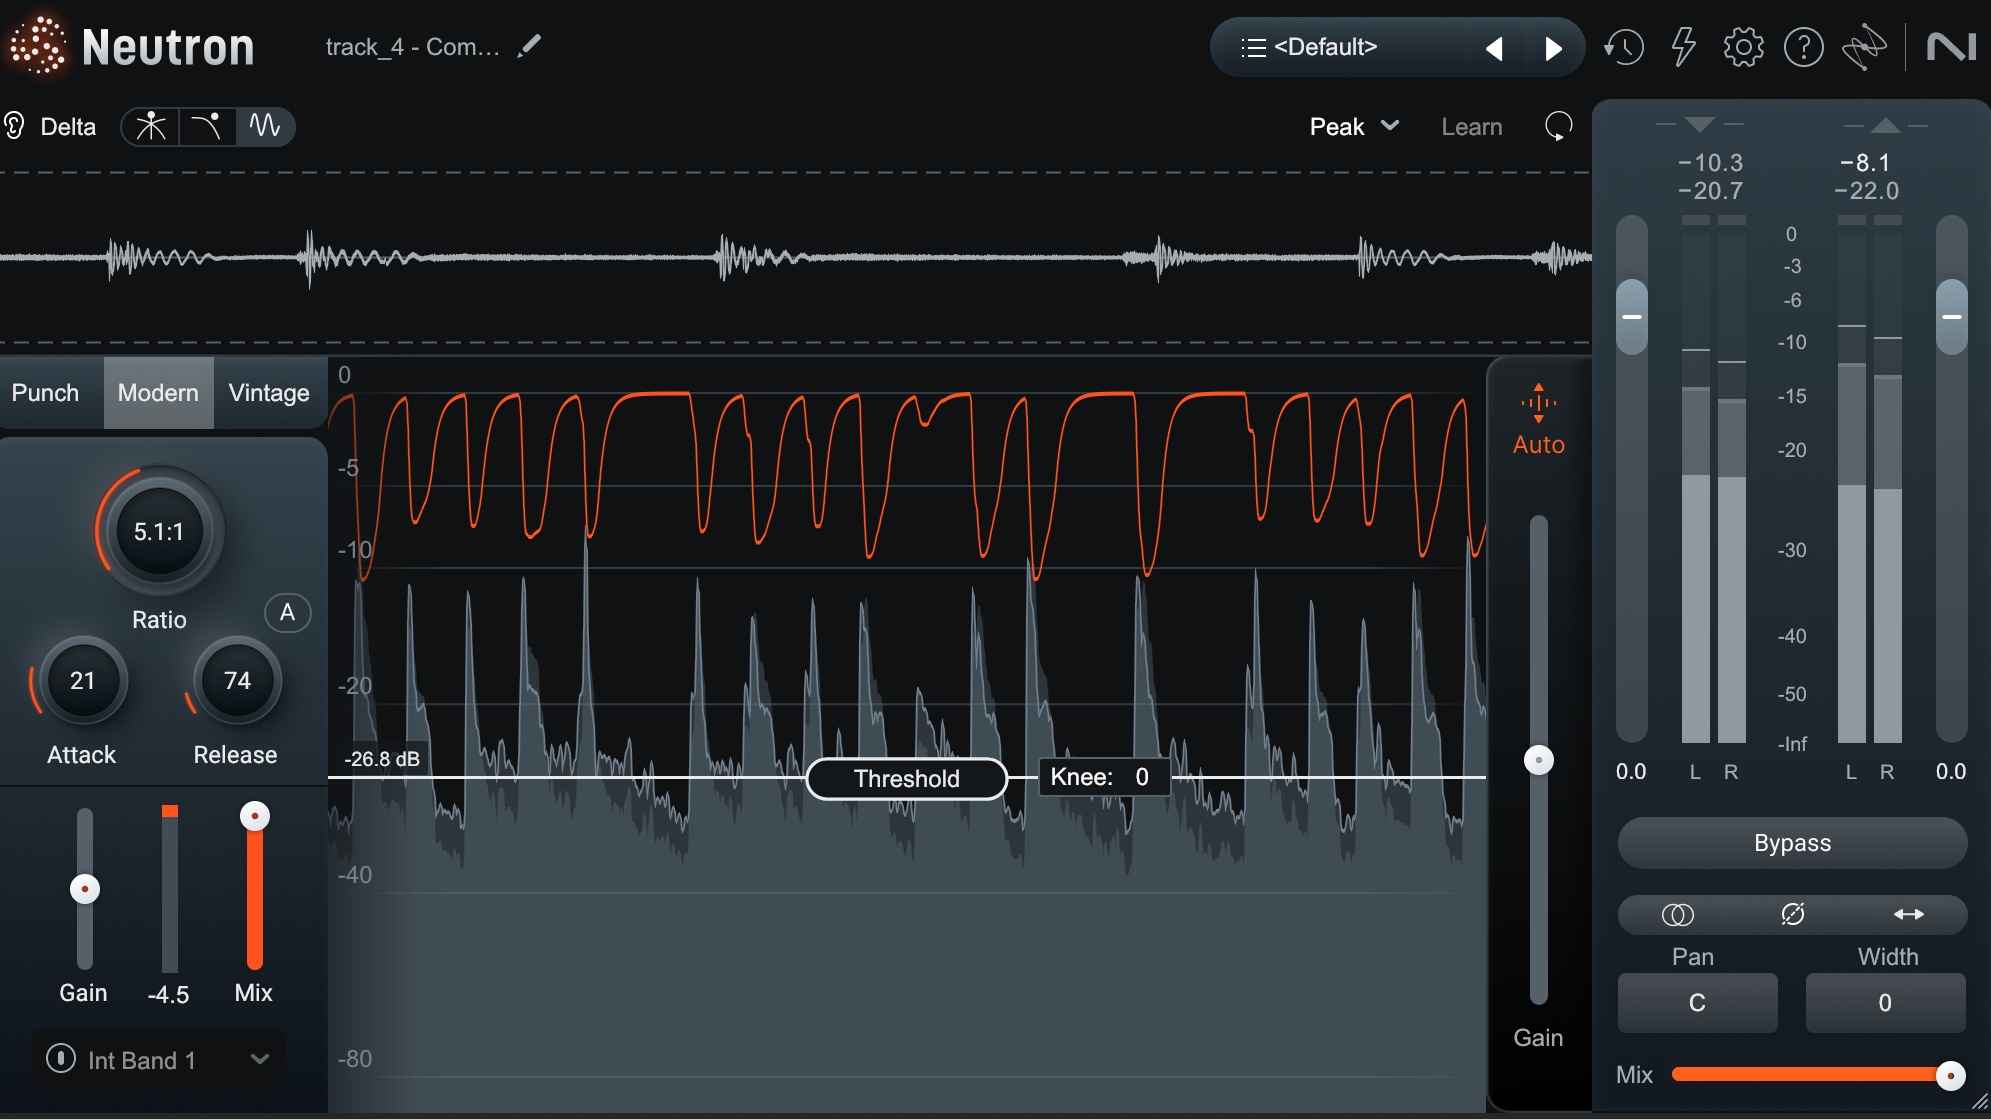
Compression release too fast
Now, we have horrid distortion, and the cymbals are slicing against our ears in the most unpleasant manner.
Let’s dial in a better, more balanced setting for these drums.
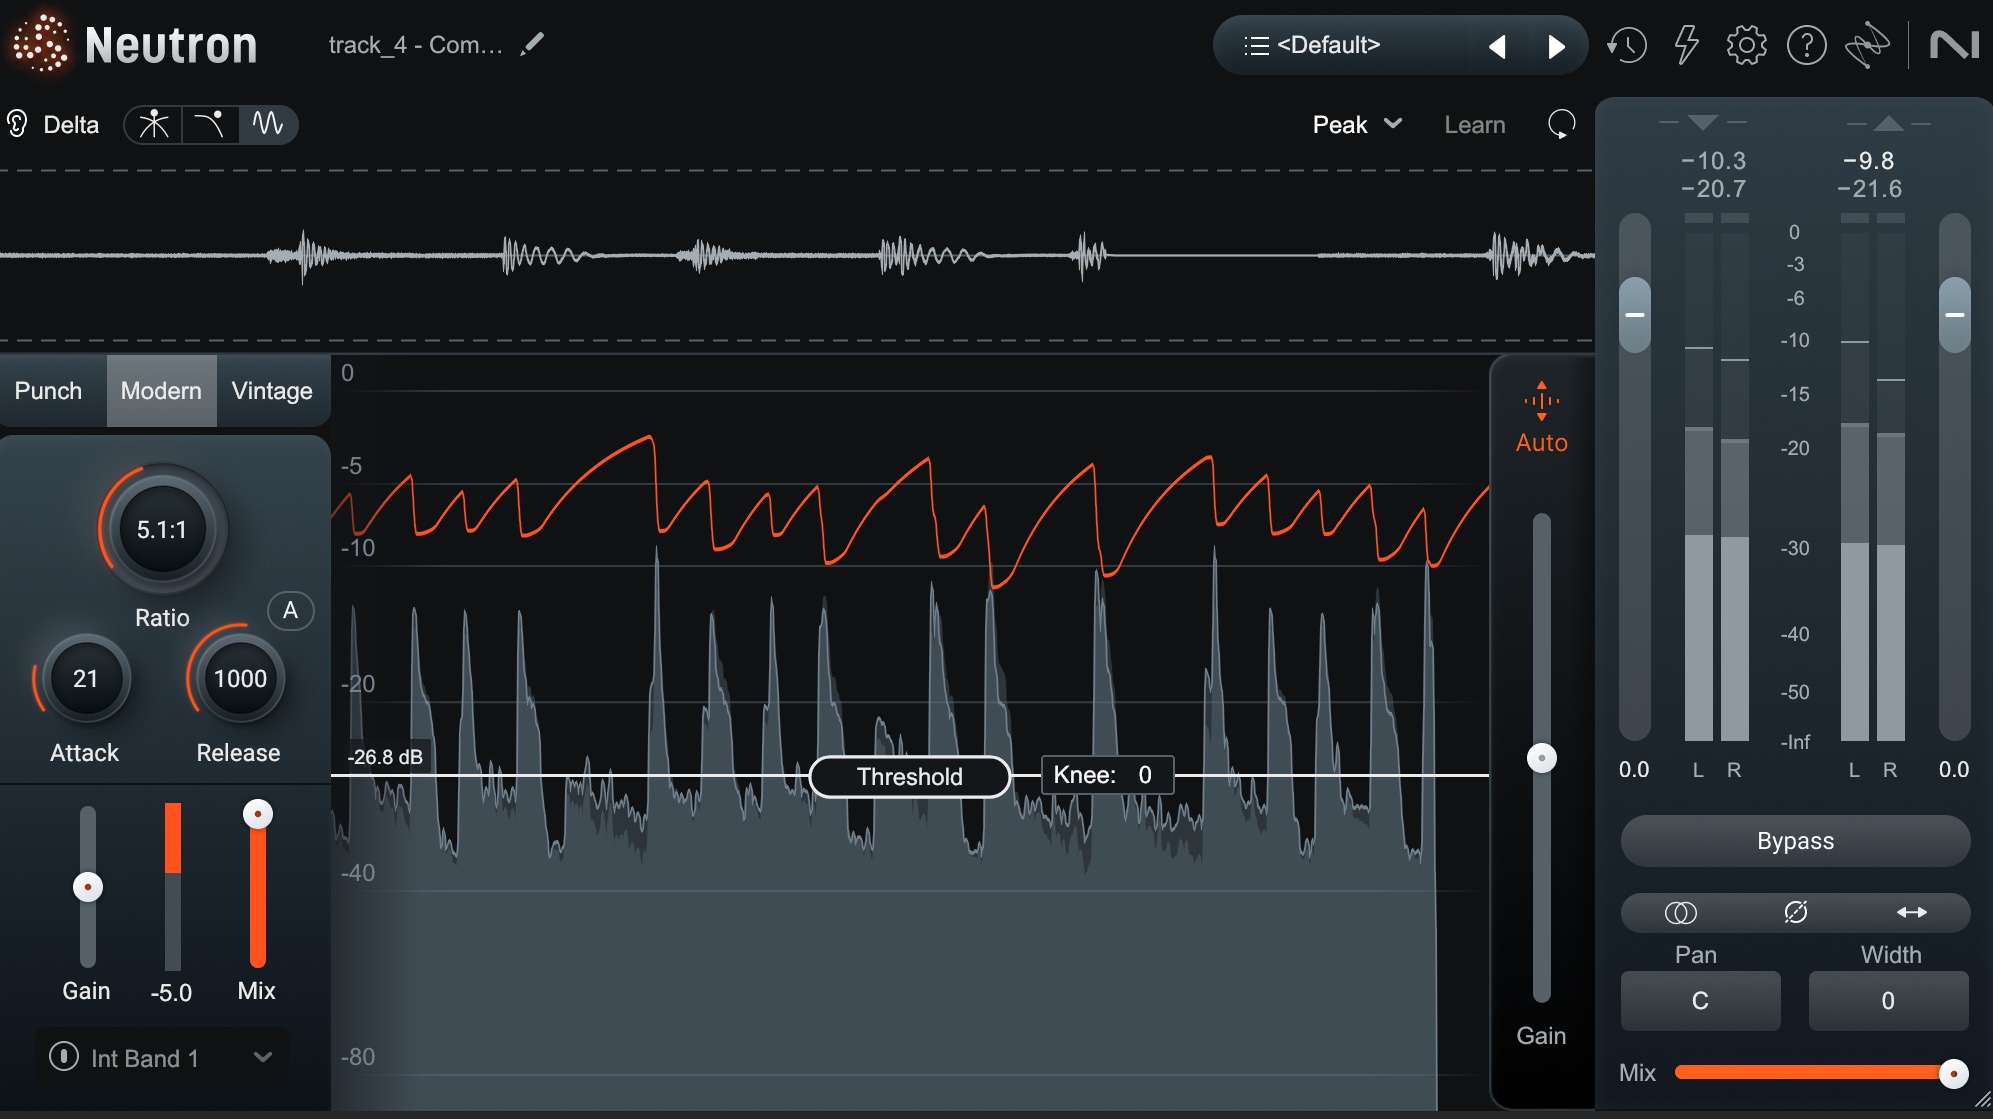
Compression settings with good balance of definition and impact
Now we’ve got a balanced result that doesn’t sound all that different from the original. The notes retain impact, yet we’ve achieved a sense of density that was lacking before.
Also, we’ve achieved a lower peak level relative to the average level. This means we’ve gained headroom.
Do note that there are, in fact, a range of correct attack and release time constants. The range depends on both the sound that you’re presented and your ultimate goal. There is no one correct time – but there’s no one incorrect time either. You have to really listen to understand how the time controls affect your overall sound.
How to dial in rhythmic compression settings
If you’re learning how to hear compression, one of the first things you want to do is set an exaggerated threshold so you can really hear the effects of the time constants. You’ll go back to better settings later, but for now you’ll hear how the compressor is pumping.
With a better sense of how the compressor is reacting to your audio signal, you can fine tune the attack until you like how it’s clamping down and then work on getting the release to a place where you like how the signal returns to its original state. Then bring the threshold up to a more musical level, and Bob's your uncle.
Do remember that attack and release will have an effect on one another. The controls are somewhat interdependent. This is why it can be quite beneficial to listen to delta settings, such as the type provided in Neutron. We can try to go for an aggravated pumping, see if we like it, and then check how it measures against the delta.
3. Bad ratio settings
A compressor’s ratio control determines how aggressively the circuit acts once the input signal surpasses the threshold. Misjudging the ratio can either leave your compression barely noticeable or completely destroy the dynamics of your track. Let’s break down how to avoid common mistakes with ratio settings.
The ratio is too low
If your ratio is too low, the compressor won’t effectively manage the dynamics of your signal. For instance, if you’re trying to control a vocal with wildly varying levels, a 2:1 ratio might not do the trick. You’ll still hear those peaks and valleys, and your mix may lack the polish you’re going for.
On the other hand, a low ratio can be perfect when you just want subtle smoothing without compromising the natural feel of a performance – like on a soft acoustic guitar or string section.
The ratio is too high
On the flip side, if your ratio is too high – especially when paired with a low threshold – you risk incurring strange spikes of compression. That stuff can really stand out and sound terrible, or flatten your track into a dead and lifeless mass.
High ratios might occasionally be perfect for taming unruly transients, but you should apply them sparingly. If everything sounds smashed, nothing will stand out, and your mix will lose its emotional impact.
The tricky trouble with ratios – and the fast fix
Ratios are inherently tricky things to judge. Like all compressor parameters, their effect is reliant on all other controls in the circuit.
But here’s the thing: The default threshold on a compressor is usually set so high that it doesn’t work until you begin to pull it down. On the other hand, there aren’t many compressors with a ratio defaulting to 1:1.
So, as soon as you move the threshold and begin compressing, you are subject to a ratio that’s already been determined. You are making your first decision based on a ratio you didn’t set.
The instrument through which you’re judging compression already has a flavor to it, a perspective to it, that will influence your results.
Over time, you will learn to intuit the effect of ratios. In fact, you will learn to intuit the effect of ratios across a broad number of compressors: one day you will anticipate what 4:1 on a 76-style FET is going to get you versus 4:1 on a british-style VCA.
But that takes years. If you’re at the beginning of your journey, follow these two simple tips.
Set the default ratio on your compressor to 1:1 if possible
If you’re working with a modern compressor like Neutron or the TBT Cenozoix, simply change the default setting of the ratio control to 1:1. Now you’ll be able to choose your ratio, rather than let the default 4:1 or 2:1 influence your hearing from the outset. You can easily flick one in with no prior influence.
Practice listening to sounds through different ratios
Practice makes perfect. Study how different drums, drum buses, basses, guitars, vocals, and other instruments respond to different ratios at different thresholds.
4. Improper compressor thresholds
The compressor’s threshold determines the level at which gain reduction starts to take place. Set it too high, and you won’t achieve the desirable “glued” sound because not enough gain reduction will happen. Set it too low, and you risk boosting unwanted noise and squashing your signal to the point of unwanted pumping.
There are a couple different ways to decide on the optimal threshold for your audio source.
- You can set the threshold just below your signal’s most dominant peaks, so you only apply gain reduction to the loudest parts of a signal. This can be useful in a situation where the transients are too harsh, and the difference between the loudest and quietest part of an audio signal are too significant. By applying compression to only the loudest parts of a signal, you can tame these sudden spikes to achieve a more consistent overall level.
- You can set the threshold lower to apply gain reduction to more of the signal. The lower the threshold, the more of the audio signal will experience gain reduction. This approach is useful for evening out a performance or gluing together a group of instruments.
The first step is to know which one you’re going for. Observe our drums again.
On drums like this, the best approach could be option 2: setting your threshold lower, deeper into the audio, so that it grabs more of the signal, and the groove begins to dance in a pleasant manner.
I’ll dig into them in a classic way with a VCA compressor:

Drums with a lower threshold
Note the before and after of how they sound:
Still, the other method might work better – especially for things like vocals or bass, where some notes have a way of jumping up in level. Here, it might be better to set the threshold to catch an errant peak here or there.
Of course, you could do both, which leads us to another tip.
5. Only using one audio compressor
A fool smashes things with one heavy-handed compressor. A wise person uses the gentler touch of two subtle compressors in tandem.
The classic example would be an 1176-style FET compressor followed by an optical compressor on a vocal.
Use the 1176-style compressor first to tame peaks, doing so with a relatively high ratio, a fast attack, and a medium-fast release.
A 76-style compressor like the purple MC 77 doesn’t have an adjustable threshold, so you’re counter-balancing input and output knobs to get the signal to the right action point, tamping down only the parts of the parts of the vocal that pop out too much.
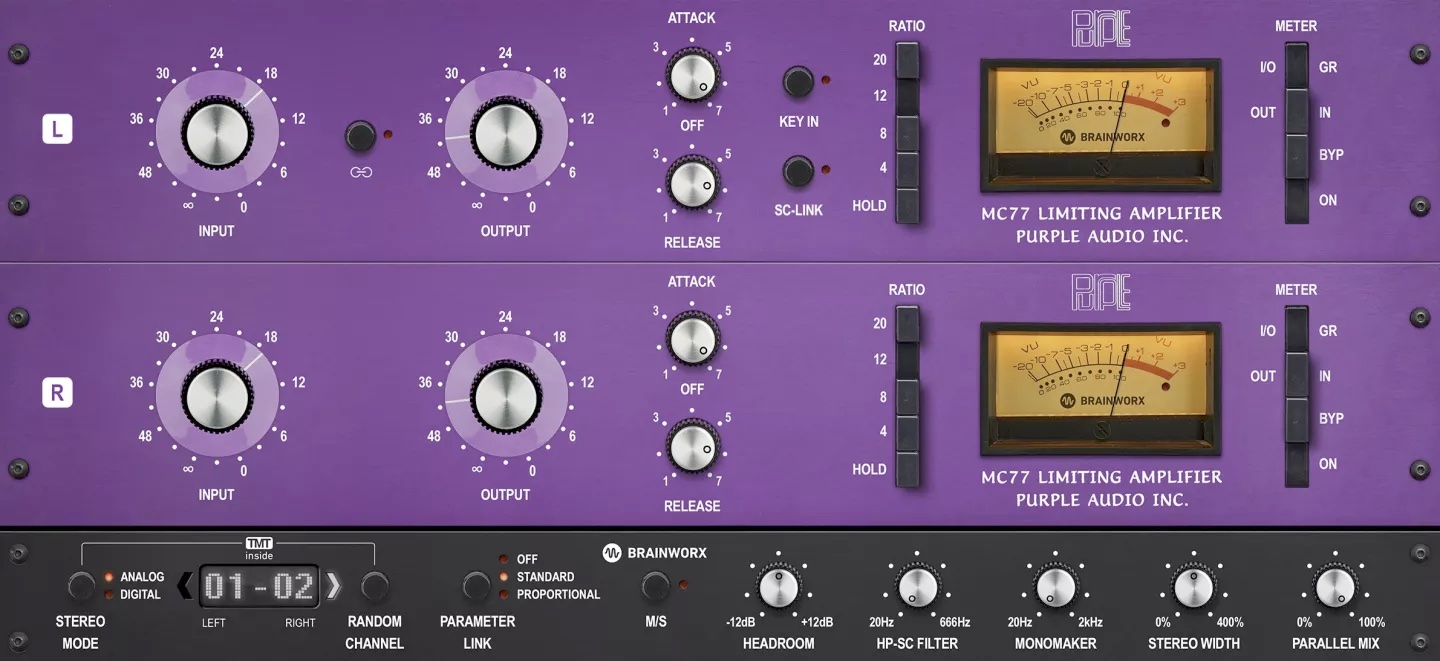
Purple MC77 on vocals
The optical compressor like NEOLD U2A, on the other hand, is a slower beast: its attack and release stages are fixed, yet much more complicated than an FET compressor. The effect is musical: the compressor reacts organically to the swing of the vocal’s dynamic.

NEOLD U2A optical compressor on vocals
With judicious use of both, we go from a vocal with no compression a dynamic, smooth vocal performance.
6. Placing the audio compressor improperly in the signal chain
Pick an engineer’s brain and you might very well hear an absolute statement like, “I always EQ into my compressor," or, "I always compress into an EQ,” or occasionally, “I do all my EQ cuts, then compress, then do all my EQ boosts.”
All of these tactics are fine, but you have to be the judge of which tactic is best because it depends entirely on the circumstances.
EQ before compression
Corrective EQ before compression is usually the best approach when the audio signal has unpleasant frequencies that need to be attenuated or removed. If you don’t remove these problems before compression, you risk amplifying them in the process.
Compression before EQ
If an engineer recorded the sounds in questions to suit the arrangement at hand, then corrective EQ might not be necessary. Your first task will be to use compression to balance the dynamics of individual tracks and to glue them together in their corresponding bus channels. Once you’ve done that, you’ll then fix frequency masking issues with EQ.
The order of processing should depend on the processors you’re using, the source material, and most importantly, what you wish to achieve in a given operation. Take these drums:
Let’s slap some drastic EQ settings across them with


Ozone 11 Advanced
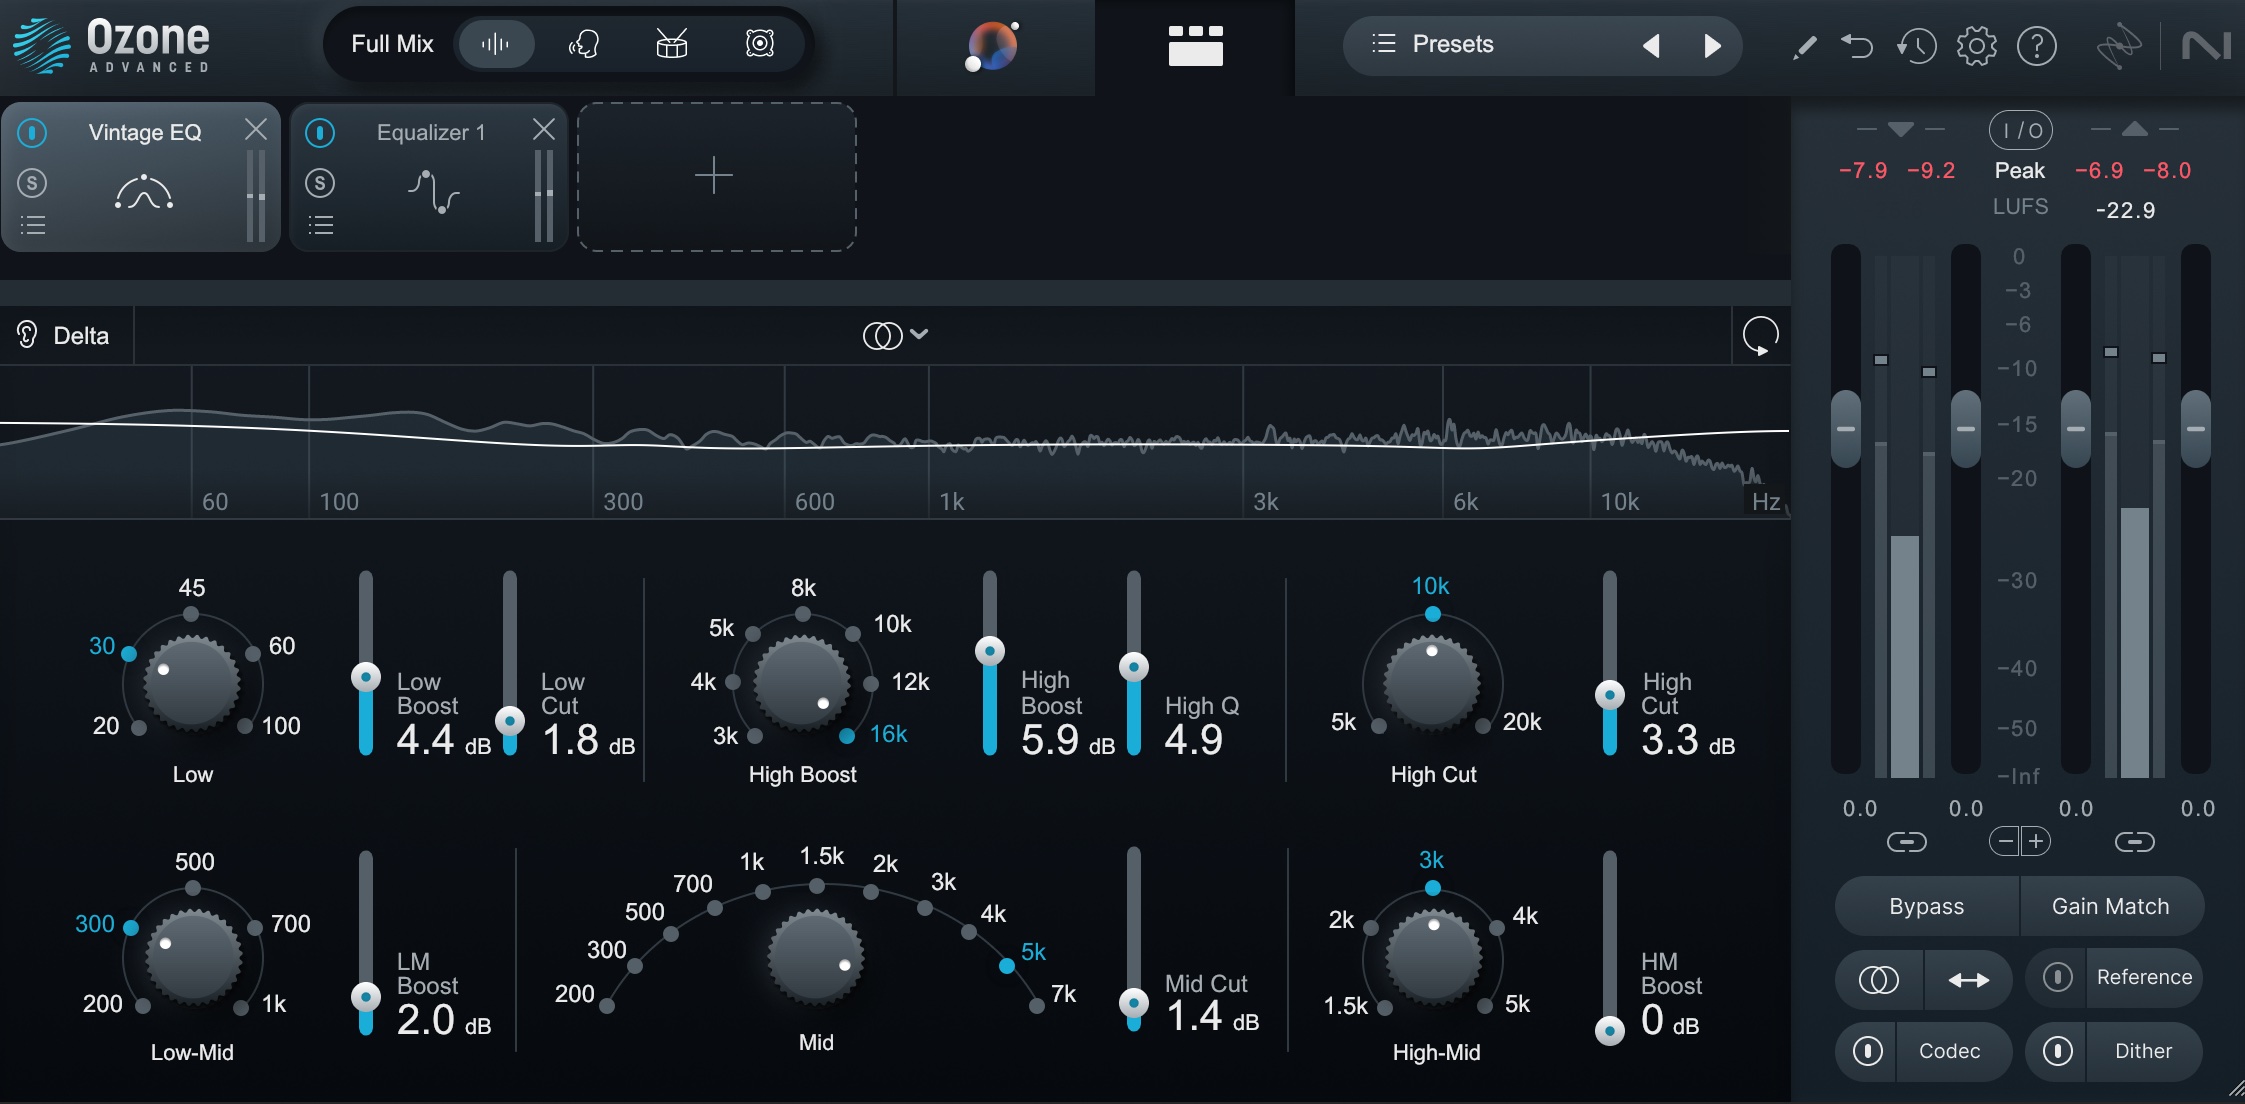
First EQ in Ozone
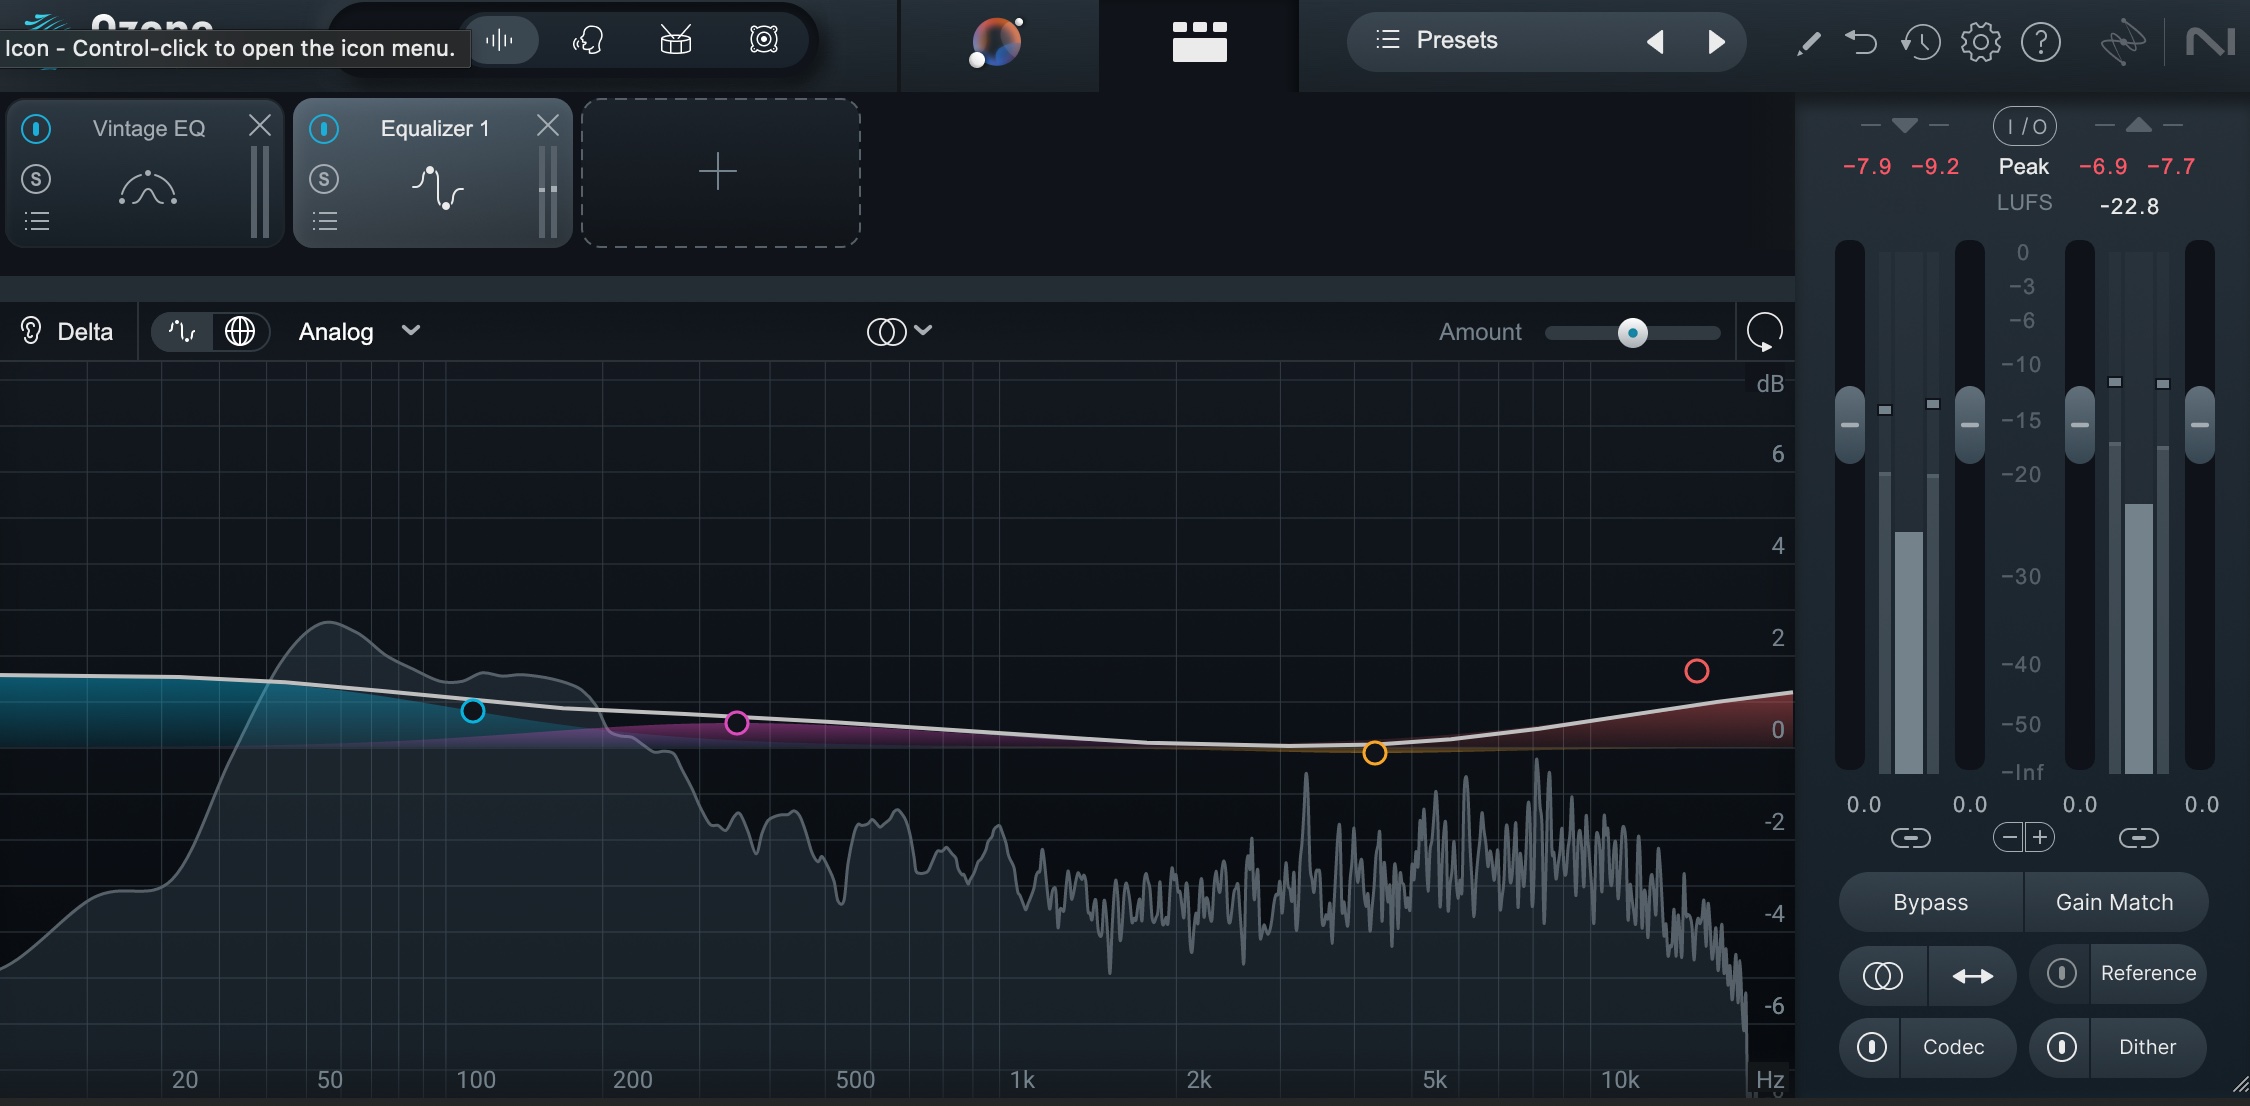
Second EQ in Ozone
If we place the compressor before these EQs, it sounds like this.
But if we place the compressor after the EQs, we get a different flavor, because the EQ now changes the nature of which sonic information is slamming into the threshold.
Pop quiz: which one sounds better?
- Comp before EQ
- Comp after E
- This is a trick question; I can’t possibly know the answer unless I heard it in the mix.
The answer is C!
7. Ignoring your sidechain
When most people begin to use compression, they don’t fully understand all the sidechain options that come with most dynamics tools. Heck, they might not even know what sidechain compression is.
So let’s start there, by defining the sidechain. This is best illustrated with some flow charts.
Here’s what a typical person might think a compressor’s signal flow looks like:
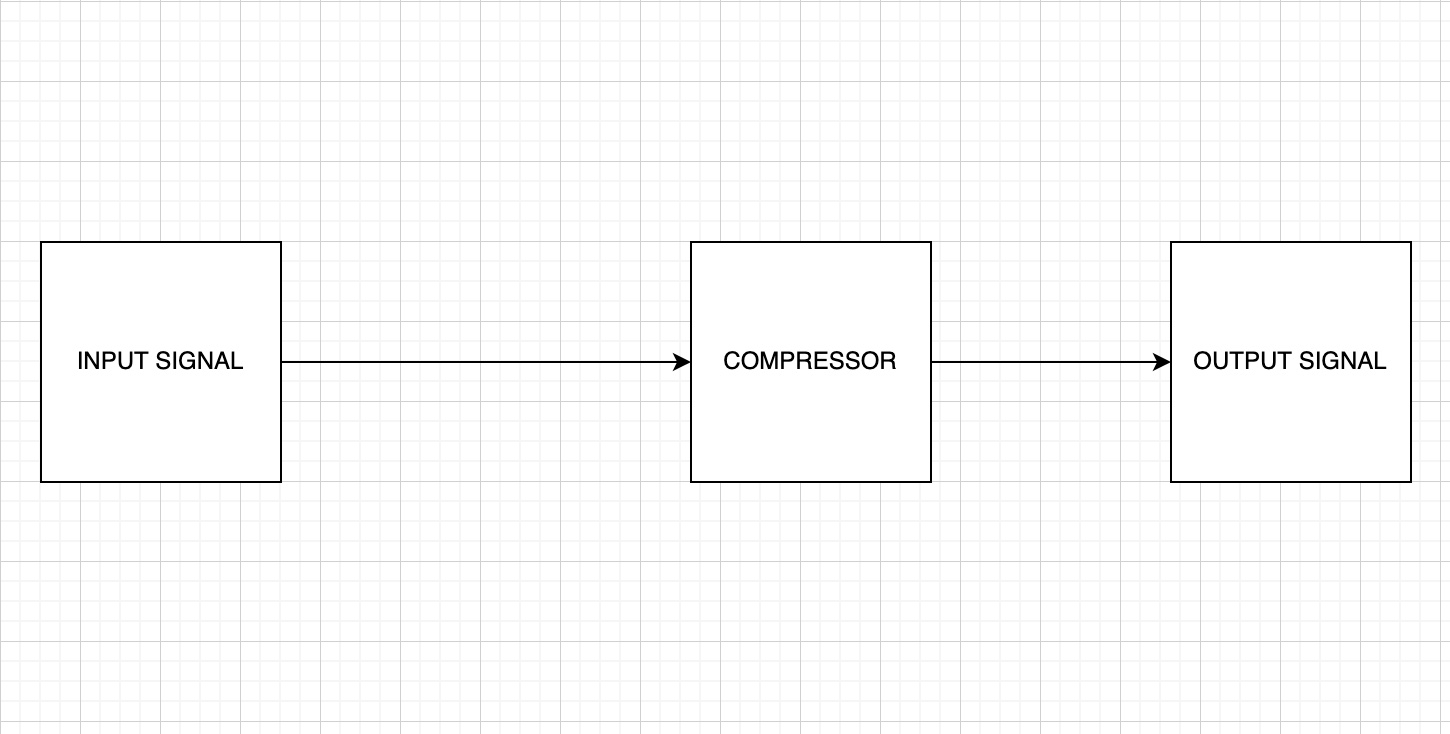
Simple idea of a compressor
Seems simple: signal flows from the input, gets compressed, and goes on its merry way. The compressor responds to the input signal, taking its cues from its level.
But most compressors actually utilize signal-routing more like this:
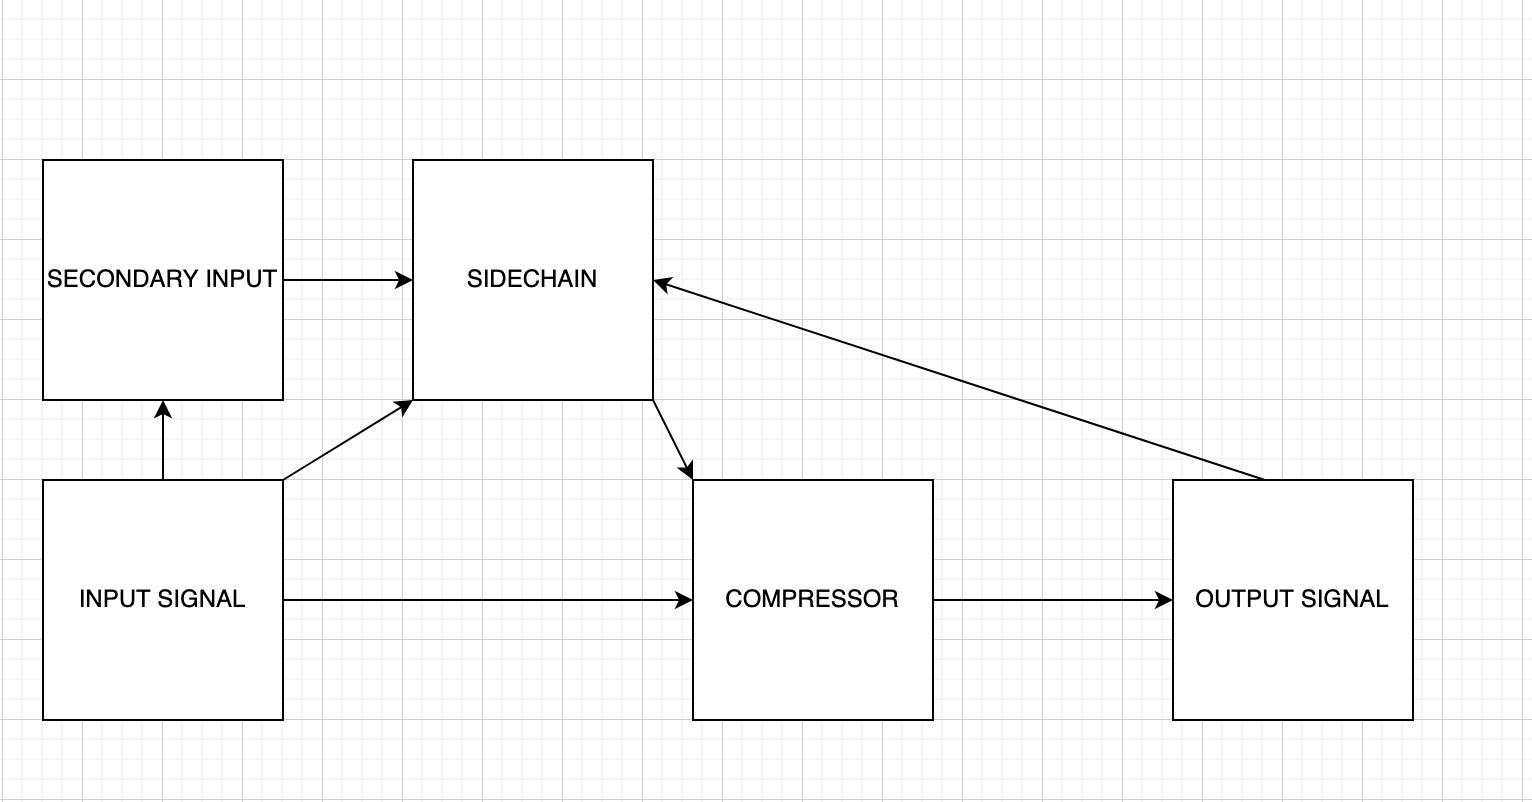
A more accurate representation of a compressor
What the heck does that mean?
Well, the input signal can dictate the compressor’s behavior. But so can a completely different, external signal (think bass ducking when the kick hits). In classic feedback compressors, the output signal itself dictates how the compressor will react! Seems impossible, but that’s actually how they work.
Many digital compressors give you extensive options in the sidechain, providing routing flexibility, built-in filtering, or even comprehensive EQs for shaping the sound that the compressor hears. Not taking advantage of this feature would be a serious mistake.
8. Compressing audio that doesn’t need compression
This harkens back to tip one – knowing why you’re even using compression – though with some added caveats:
Remember that the sounds in your session might’ve been compressed already. An engineer might’ve applied compression on the way in. A distorted electric guitar is already compressed by virtue of its overdrive.
Likewise, most synth patches have already been treated by the producer. They might not come to you with compression, but they definitely arrive at your digital doorstep with their envelopes and LFOs finely-tuned for maximum impact. Your compression could negatively impact these parameters. If you're working with a sample, well, it’s probably been processed too.
You might be noticing a theme here – yes, the “don't overdo it on the compression” mantra might be wearing thin – but it’s simply the biggest trap when learning how to tame dynamics.
Training yourself to hear compression
So here’s an exercise to get you speedily over the hump: Take a track (any track will do) and squash it to the point where you can easily hear that it's too squashed. Now study the aspects of its timbre, so that you drill down on what too much compression sounds like.
Home in, specifically, on resulting tonal changes that might be unfavorable, or unmusical changes in the feel/groove. Now dial all the settings back halfway or so, and listen again. This time, switch between bypassed signal and instantiated sound when listening. Upon hearing the compressed signal, do you recognize any tell-tales of over-compression? Keep playing around with the ratio of these settings until you start to notice when things sound just right. Then, when you do make the call to compress any instrument, you’ll know exactly why.
By all means, compress. But do so smartly: consider all these variables before compressing, because you could end up fighting against the quintessence of the sound.
Learn how to compress for a polished sound
This list comprises what we judge to be the biggest errors in audio compression. You’ll notice that the common theme in most of these involves not understanding the basics of dynamics or not understanding when to use compression.
Once you’re ready to use audio compression, however, make sure to stay away from these eight mistakes and you’ll be on track to handling dynamics like a pro. Demo professional-grade compression today with Neutron 5.
