Audio dynamics 101: compressors, limiters, expanders, and gates
Audio dynamics processing is a major part of mixing in music production. In this article, we discuss the basics of dynamics in audio.
In this article, we’ll demystify the compressor and other audio dynamics processors. We’ll cover the four main types of plug-ins used to control dynamics: limiters, compressors, expanders, and gates. We’ll discuss the mathematical processes behind these tools, how they affect the sound, and the best scenarios in which to use them.
Dynamics and dynamic range
Before we discuss audio dynamics processors, it’s important to understand what dynamic range is.
Dynamic range is the difference between an audio signal's loudest and quietest level. Audio dynamics processors are used to control this quality of a sound and for the most part, the names of these processors refer to how they're affecting a sound's dynamics.
Want to follow along?
Get your copy of


Music Production Suite 7


Ozone Advanced


Neutron
What do compressors do?
A compressor is used to reduce a signal's dynamic range—that is, to reduce the difference in level between the loudest and quietest parts of an audio signal.
Compression is commonly used to attenuate loud transient peaks (e.g., when a singer suddenly belts out a high note) to help maintain a consistent level.
Compression essentially causes distortion in a signal, in that it changes the original sound of the signal through its processing. The compressor typically achieves this by emphasizing certain harmonics based on how the compressor is hitting the incoming signal. It’s our job to make that distortion feel transparent and to use our dynamics to create the best-sounding performance we can.
In compression, the dynamic range becomes narrower — the highest peaks and the quietest parts have fewer dB of level difference between them.
Compressor parameters
We actually won’t dive too deep into parameters here, as we’ve actually already covered compressor parameters in our Pro Audio Essentials course.
The average compressor has six main parameters that are important to understand: threshold, ratio, knee, attack time, release time, and makeup gain.
Take a look at the compressor below, just one of useful modules for channel processing and mixing found in


Neutron
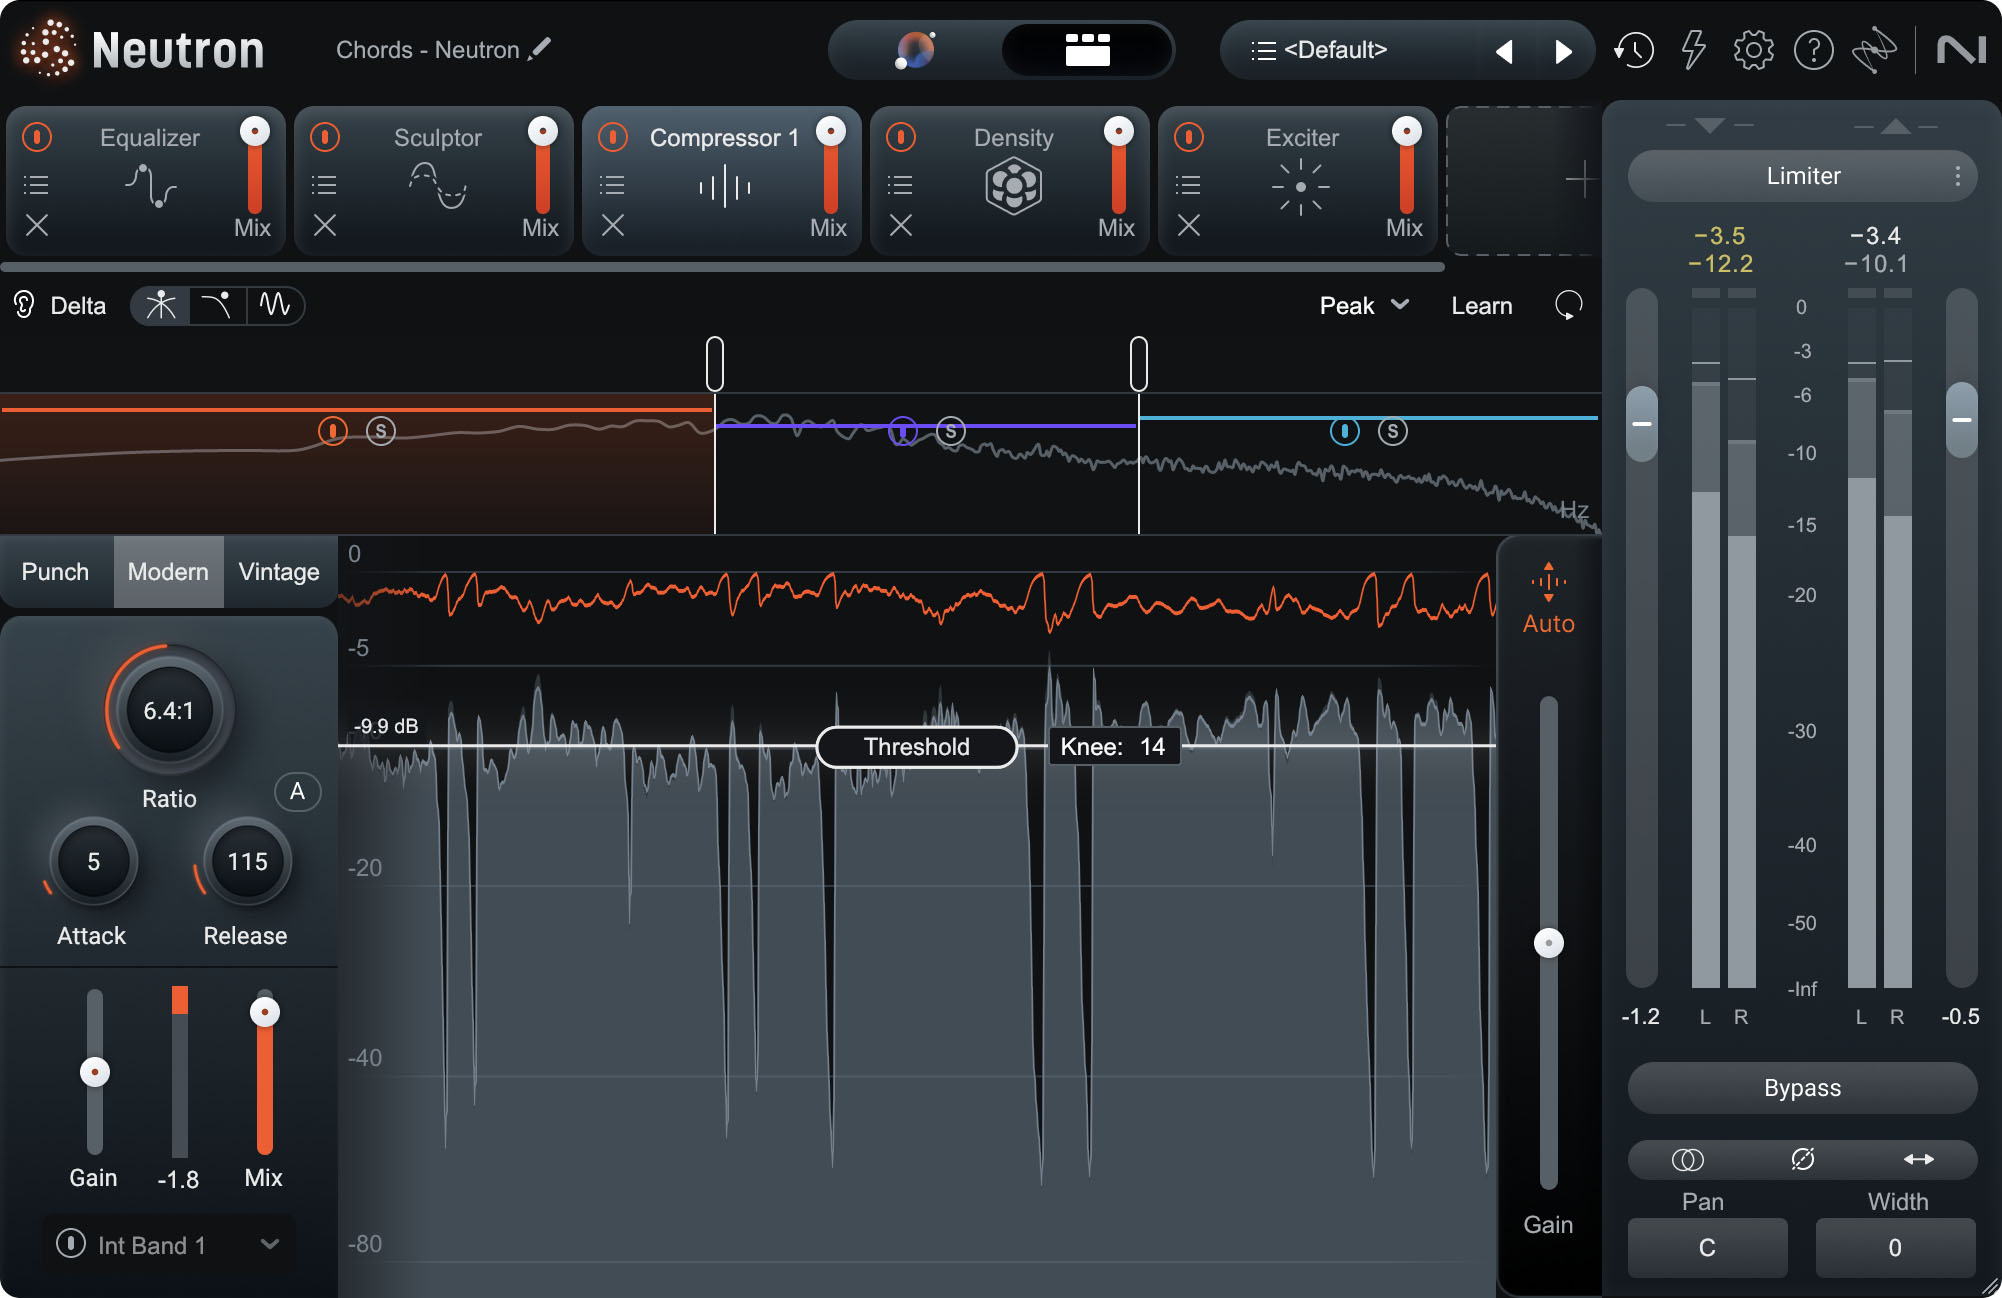
Neutron compressor module
All of the parameters discussed above are clearly labeled at the center of the screen. The horizontal line indicates the threshold level and its bright glow indicates that the knee has been turned way up. Below that line, the pop-up box has controls for attack, release, ratio, and makeup gain, all neatly accessible. Here’s what all of the controls do.
Threshold
The threshold is the level at which dynamics processing begins. With compression, the threshold sets the level (in dB) above which the compressor acts upon the incoming signal.
Ratio
The amount of compression that occurs once the signal rises above the threshold is controlled by the ratio. In a standard compressor, a ratio of x:1 attenuates the signal to a level of 1 dB above the threshold for every x dB it crosses.
The following figure illustrates a threshold of various ratios.
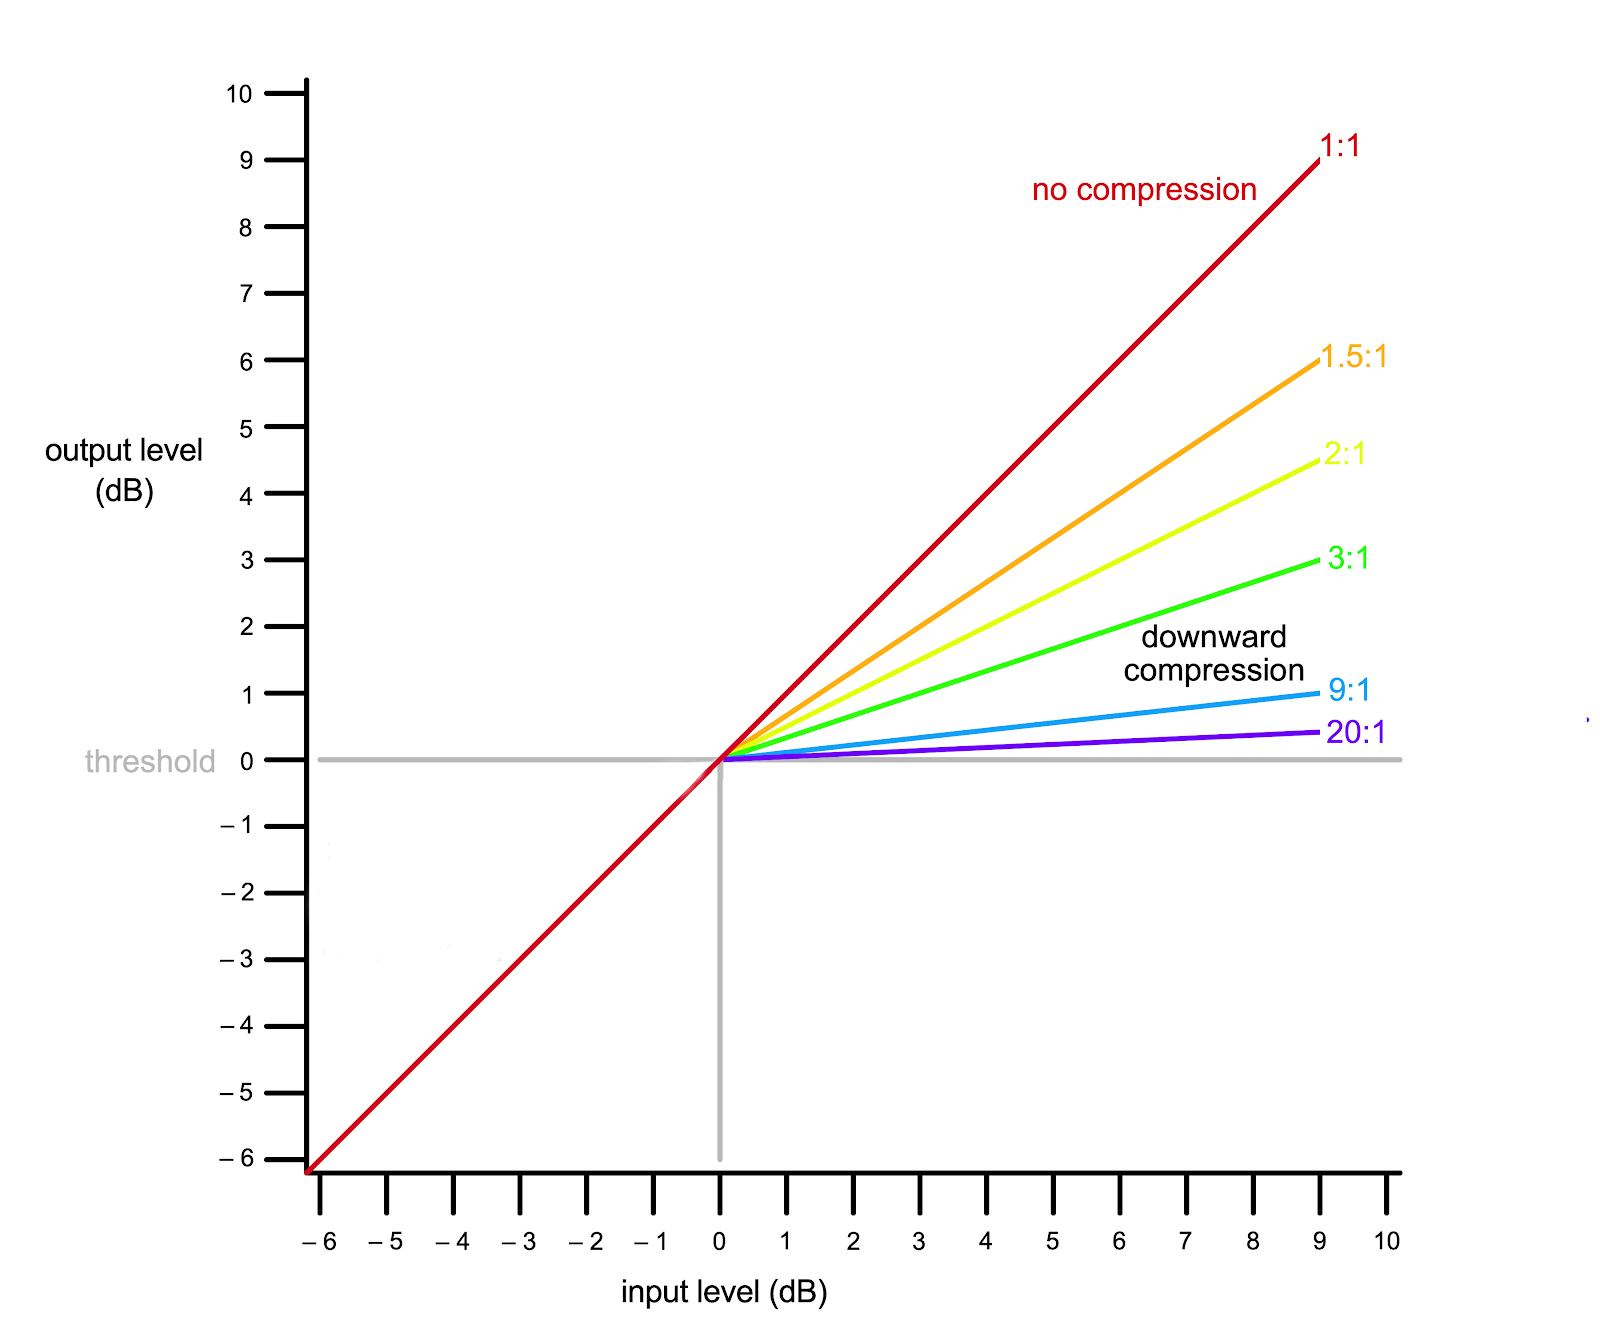
Chart of a compression figure grid
In this example, the grey line represents the threshold. The red line shows the response for 1:1 ratio, meaning no compression. As you can see, the level in equals the level out.
The colored lines represent various compression ratios. The orange line is a very gentle 1.5:1 ratio, where every 1.5 dB of input gain above the threshold results in only 1dB of gain at the output , so for example an input level of 9 dB above the threshold would yield an output level increase of 6 dB. The yellow line shows a 2:1 ratio, so an input level of 9 dB above the threshold would only yield 4.5 dB of gain at the output.
The blue line shows a 9:1 compression ratio, which is on the edge of the very aggressive level control known as limiting (for example, the purple line illustrates a 20:1 ratio).
The green line shows a 3:1 ratio, where we have the line up and to the right of the 0 dB threshold — for example, an input level of 6 dB yields an output level of only 2 dB — the louder parts of the signal are now quieter.
With the threshold, ratio, and input level, we can determine the output level using the equation below.

Output level equation
Knee
The knee affects how a compressor behaves with signals that are very near the threshold. Think of it as a narrowing or widening of the threshold point, smoothing out the transition between “not compressing at all” below the threshold and “compressing at the chosen ratio” above it.
In the figure drawn above, all the lines corner sharply when they get to the threshold — from off to all the way on, instantly. That’s called a hard knee. Often this sort of behavior is just fine, but sometimes it may sound abrupt and unnatural.
For a smoother and more musical handling of compression, you can set a soft knee, where compression turns on gradually as signals approach the threshold and then pass it. Knee is often measured in decibels and indicates the transition band between the regions of action and inaction.
Here is an example starting with a hard knee, moving to a soft knee.
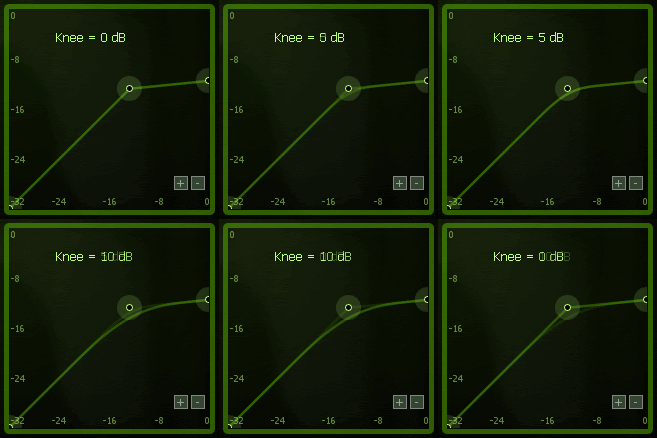
The choice of hard versus soft knee is usually made based on the sound you want to achieve. A hard knee usually results in an 'edgier' tone due to the compressor's rapid switching on and off that produces high frequency distortion. Usually this approach does a better job of preserving the sharp energy in a track. A soft knee usually produces a smoother tone.
Check out this example from iZotope Ozone Dynamics module.
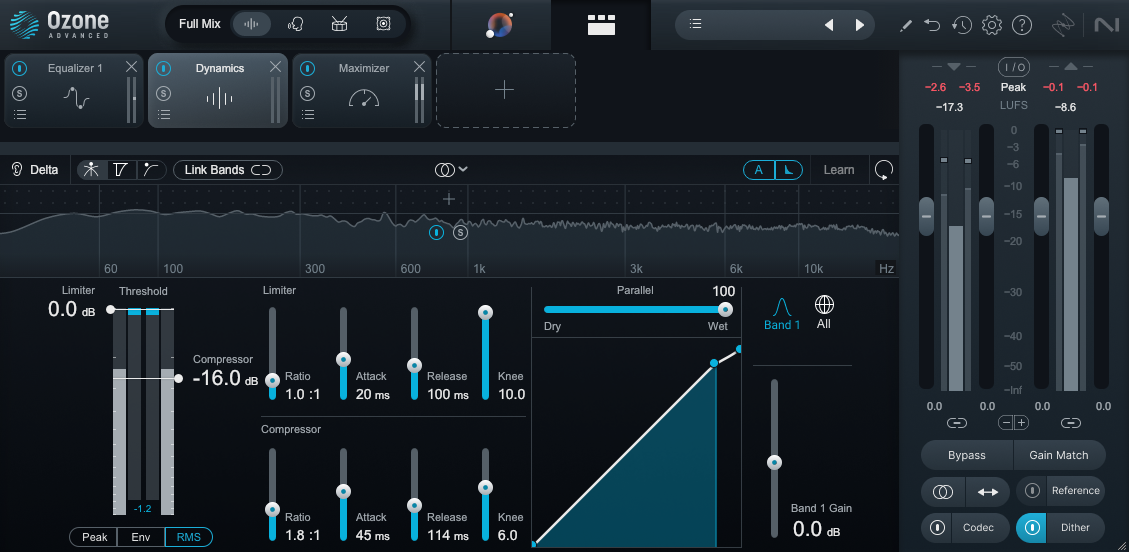
Ozone Dynamics module
As you can see, Ozone Dynamics has a lot going on. This display shows controls for a separate Compressor and Limiter, to allow for two stages of dynamics control. You can set these parameters for up to four frequency ranges, so (for example) you can compress bass frequencies hard while leaving highs alone. It’s a full-featured solution for mastering and other fine audio work, and is just one of the many useful modules in


Ozone Advanced
Attack and Release Times
Remember, we said that the threshold activates the compressor, not compression in general. The compressor isn’t able to instantly compress the signal, and needs time to react as the signal bounces above and below the threshold. Otherwise, if the signal crosses the threshold often, the compressor will create unpleasant artifacts as it rapidly turns on and off.
The attack time is the amount of time the compressor will go from zero compression to full compression based on the ratio and threshold settings.
The signal will eventually drop below the threshold, meaning compression has to stop. The release time determines how long it takes for the compressor to stop compression.
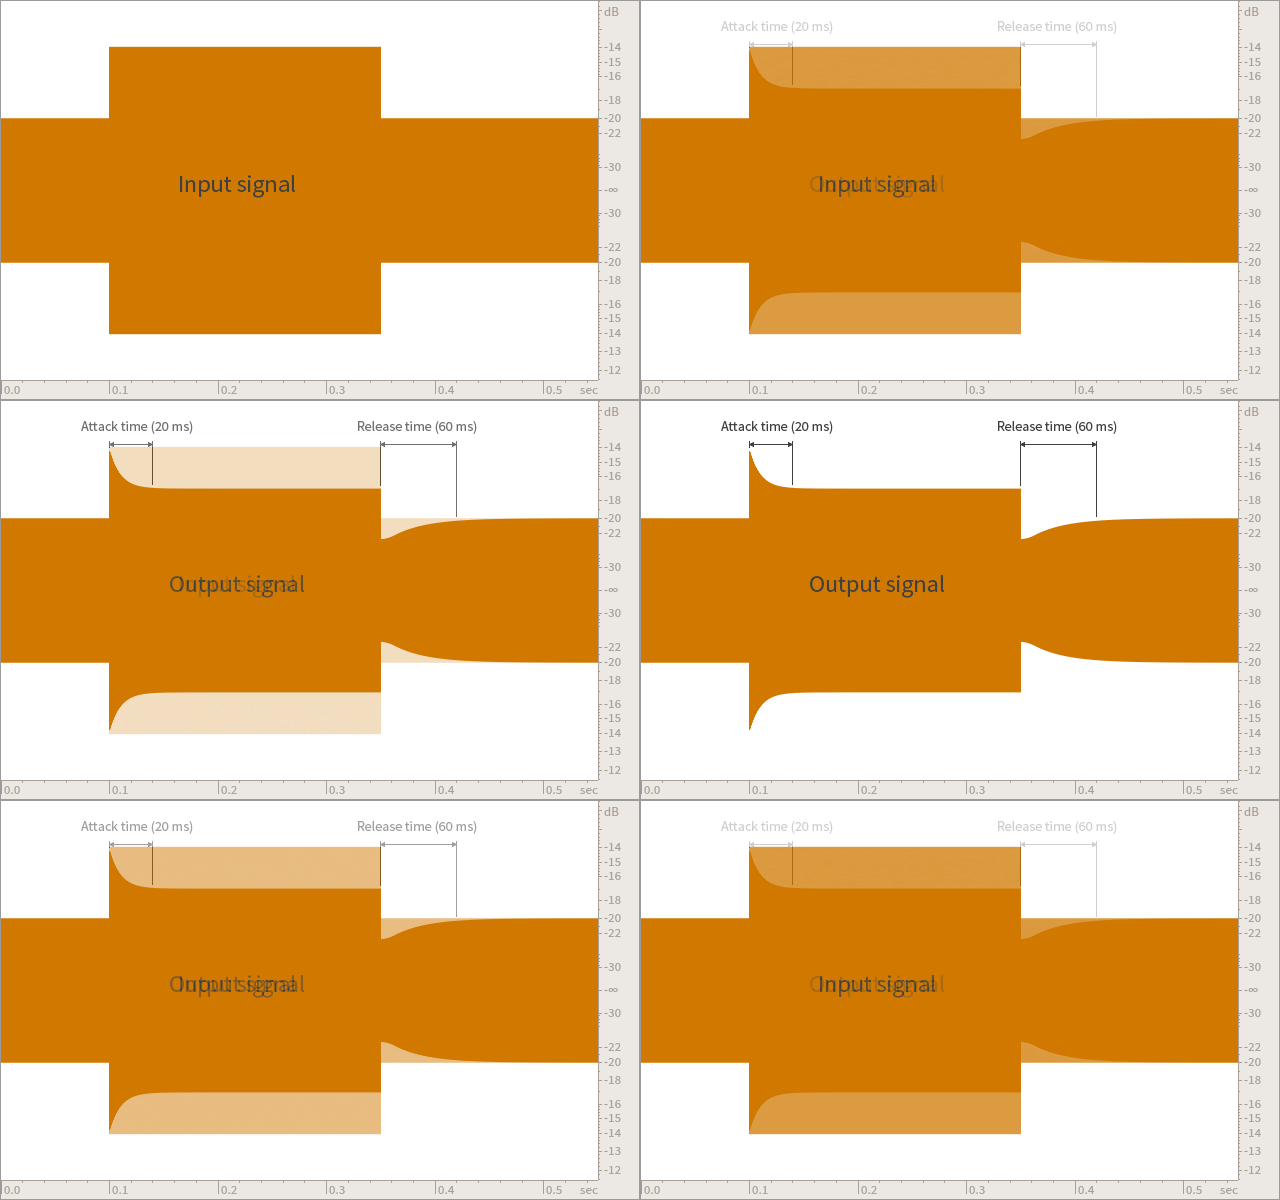
Setting appropriate attack and release times can create useful musical effects, as we’ll discuss below.
Makeup Gain
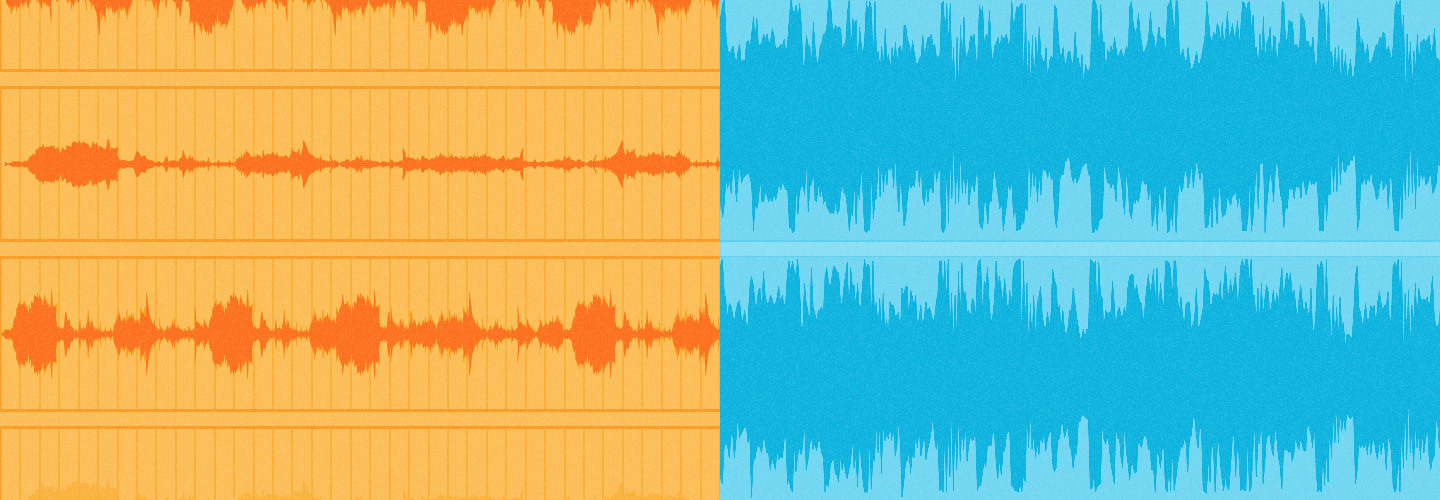
Because compression only impacts the sound while it’s crossed the threshold, the loudest parts of the resulting signal become quieter. See this in the guitar tracks shown below, where the upper waveform shows the stereo signal before compression and the lower one shows it after compression.
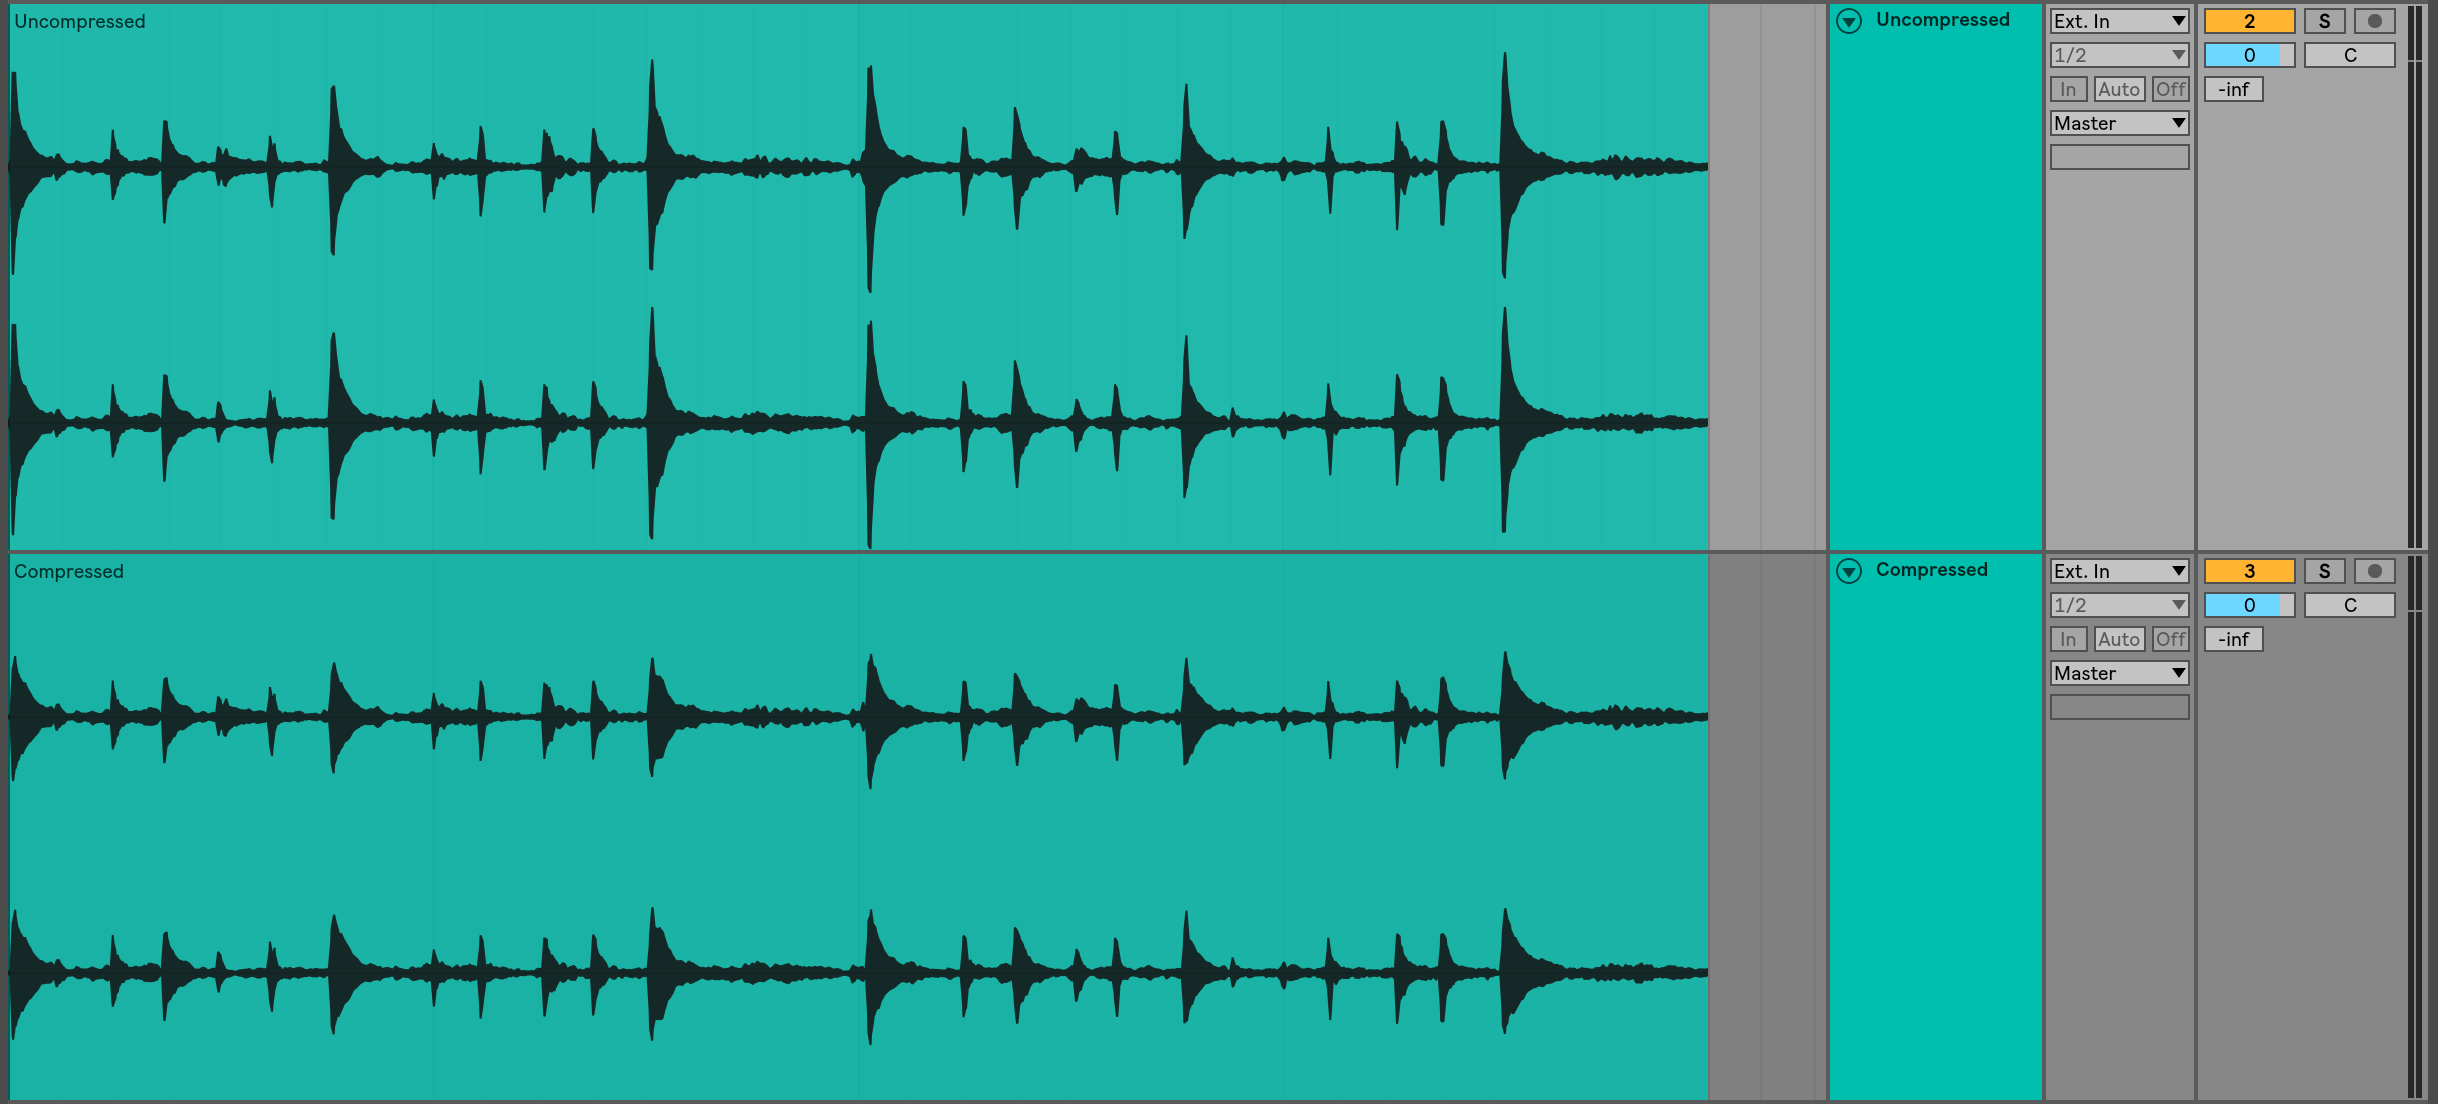
Uncompressed vs. compressed
To compensate for this, we can use the makeup gain parameter to amplify the output signal, “making up” for the lost gain.
However, when we do this, the entire signal is amplified, so the quieter parts get amplified right along with the louder parts. The signal will have a narrower dynamic range, but a higher RMS level (an average—see the Pro Audio Essentials video here) — and if there is noticeable noise in the background (the noise floor), it will be more audible.
It’s important to note that makeup gain is most commonly used to achieve input RMS = output RMS.
Why use a compressor?
Power, presence, and tone color
The main reason to use compression is to reduce the contrast between high and low amplitude signals and/or to alter the ADSR envelope and change the character of the sound.
While compression may sound somewhat less natural or ‘hi-fi’ it can help an element sit well in a mix and therefore the music may sound better.
Additionally, compressors can be used to add color to a sound. Each compressor is unique, with different analog circuits and digital algorithms being used. Some compressors have a particular “sound” that engineers like for different types of instruments (e.g. the Teletronix LA-2A compressor for vocals).

Teletronix LA-2A compressor
Compressors are also important for controlling the dynamics of live-recorded instruments and vocals. These tend to vary quite widely in level over the course of a performance, so some compression can help make the level more consistent.
This can bring out a full and polished sound, more like the “professional” sound of instruments in the mix. However, you can always opt to perform less compression (or none at all) if you want to preserve a more dynamic and “live” quality in the performance.
Transient Shaping
You can also use compressors to shape transients in sounds like drums. A transient is the first part of any musical sound, where the instrument is hit, bowed, blown into, plucked, etc., to get it to resonate and make sound. Transients carry some of the essential information the human ear needs to determine what the sound is, so playing with them can create a wide variety of musical effects.
For example, lower (faster) attack times can be used to attenuate the initial transient (like the crack of the snare or the beater snap of the kick drum), making the tail of the drum hit more prominent.
More commonly, drum compression uses increased (slower) attack times. A slow attack lets the initial transient slip through untouched while the compressor is still getting started compressing. This will make the transient pop out even more, making drums punchier.
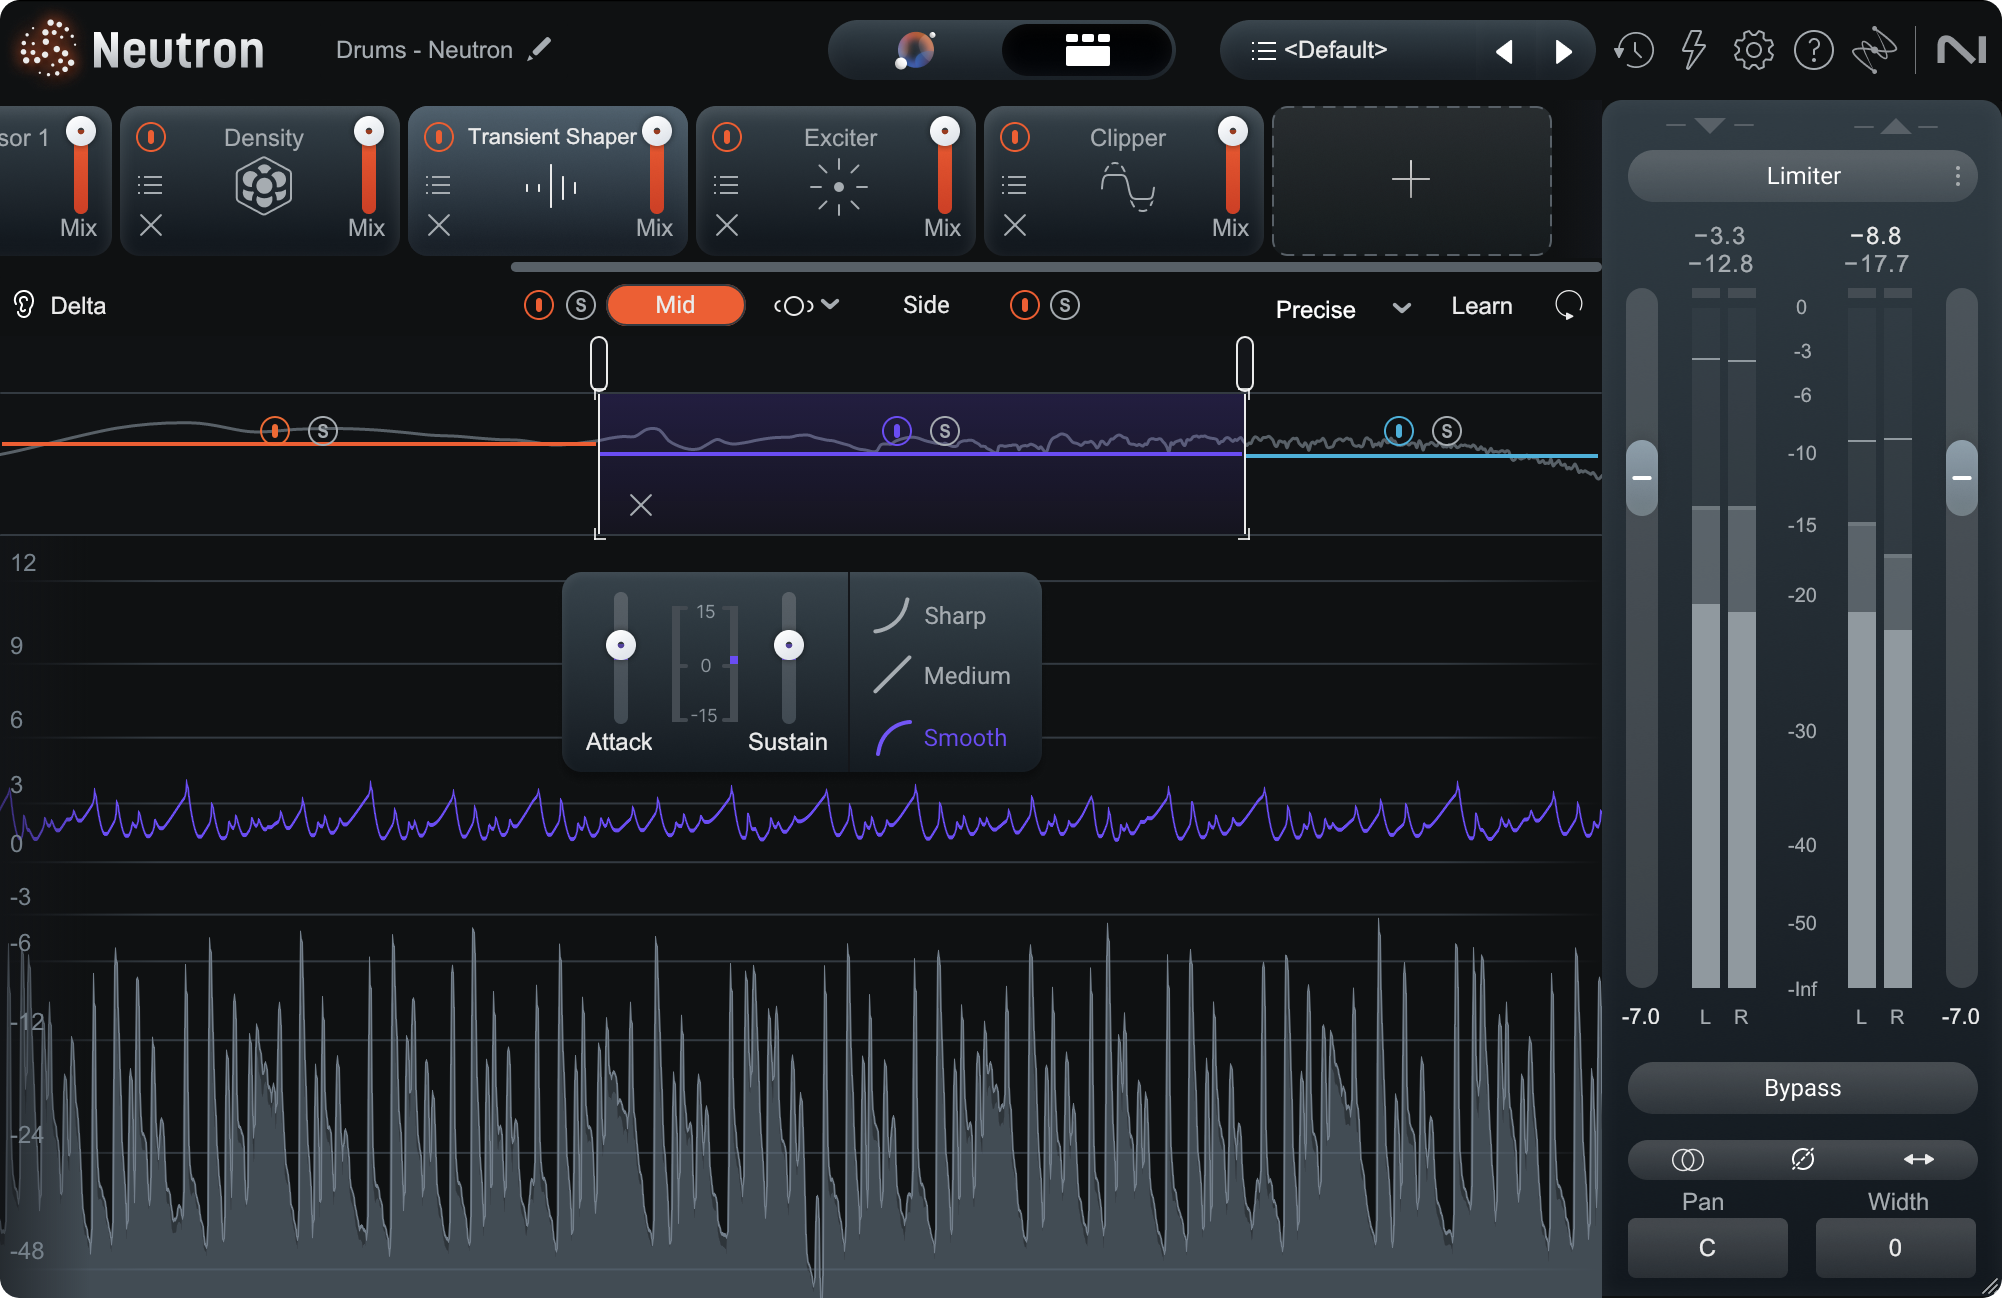
Neutron Transient Shaper module
Check out the “Compressor Attack” video to hear this in action:
Similarly, stretching out or tightening up the release time of a compressor affects how notes trail away. Sometimes release times are set to match the tempo of a track, causing a rhythmic “pumping” or “breathing” effect; other times, release times are set very long (even over one second) to smooth out the dynamic control of busier parts. In the screenshot above, the release time of roughly 100 ms allows the compression to ease back to zero in a very musical way before the next hit.
Parallel and Sidechain Compression
There are two other techniques worth mentioning where compression is concerned. The first is parallel compression, which has become more common in recent years. Parallel Compression is a technique that involves mixing a lightly compressed signal with a heavily compressed (and sometimes high-pass filtered) version of the same signal. This allows for a smoother result, with crisp and level sound in the high end without any loud peaks or squashed transients. If you go back and look at all the iZotope plug-ins that include compressors, you’ll see a Mix slider in Neutron and Nectar, and a Parallel slider in Ozone—that’s what they’re for!
Finally, there’s sidechain compression. This form of compression uses one instrument’s level over a threshold to activate the gain reduction (compression) on another instrument. For example, inserting a compressor on a bass track that reacts to the kick drum will compress the bass every time the kick drum is hit. This method will ‘tame’ the bass track and ‘duck’ it out of the way each time the kick is hit, while still maintaining its overall level in the mix.
Another great example of sidechaining is an effect called a de-esser. In a de-esser, a vocal is run through a compressor, and the sidechain input controlling it is the exact same vocal — after being run through an EQ to isolate the hissy, essy parts of vocal sounds that we call sibilance. This way, sibilance causes the vocal to compress a bit and makes the sibilance itself less audible. The sibilance teaches the compressor how to remove itself.
Nectar has a dedicated De-esser module in its signal chain, that looks like this:
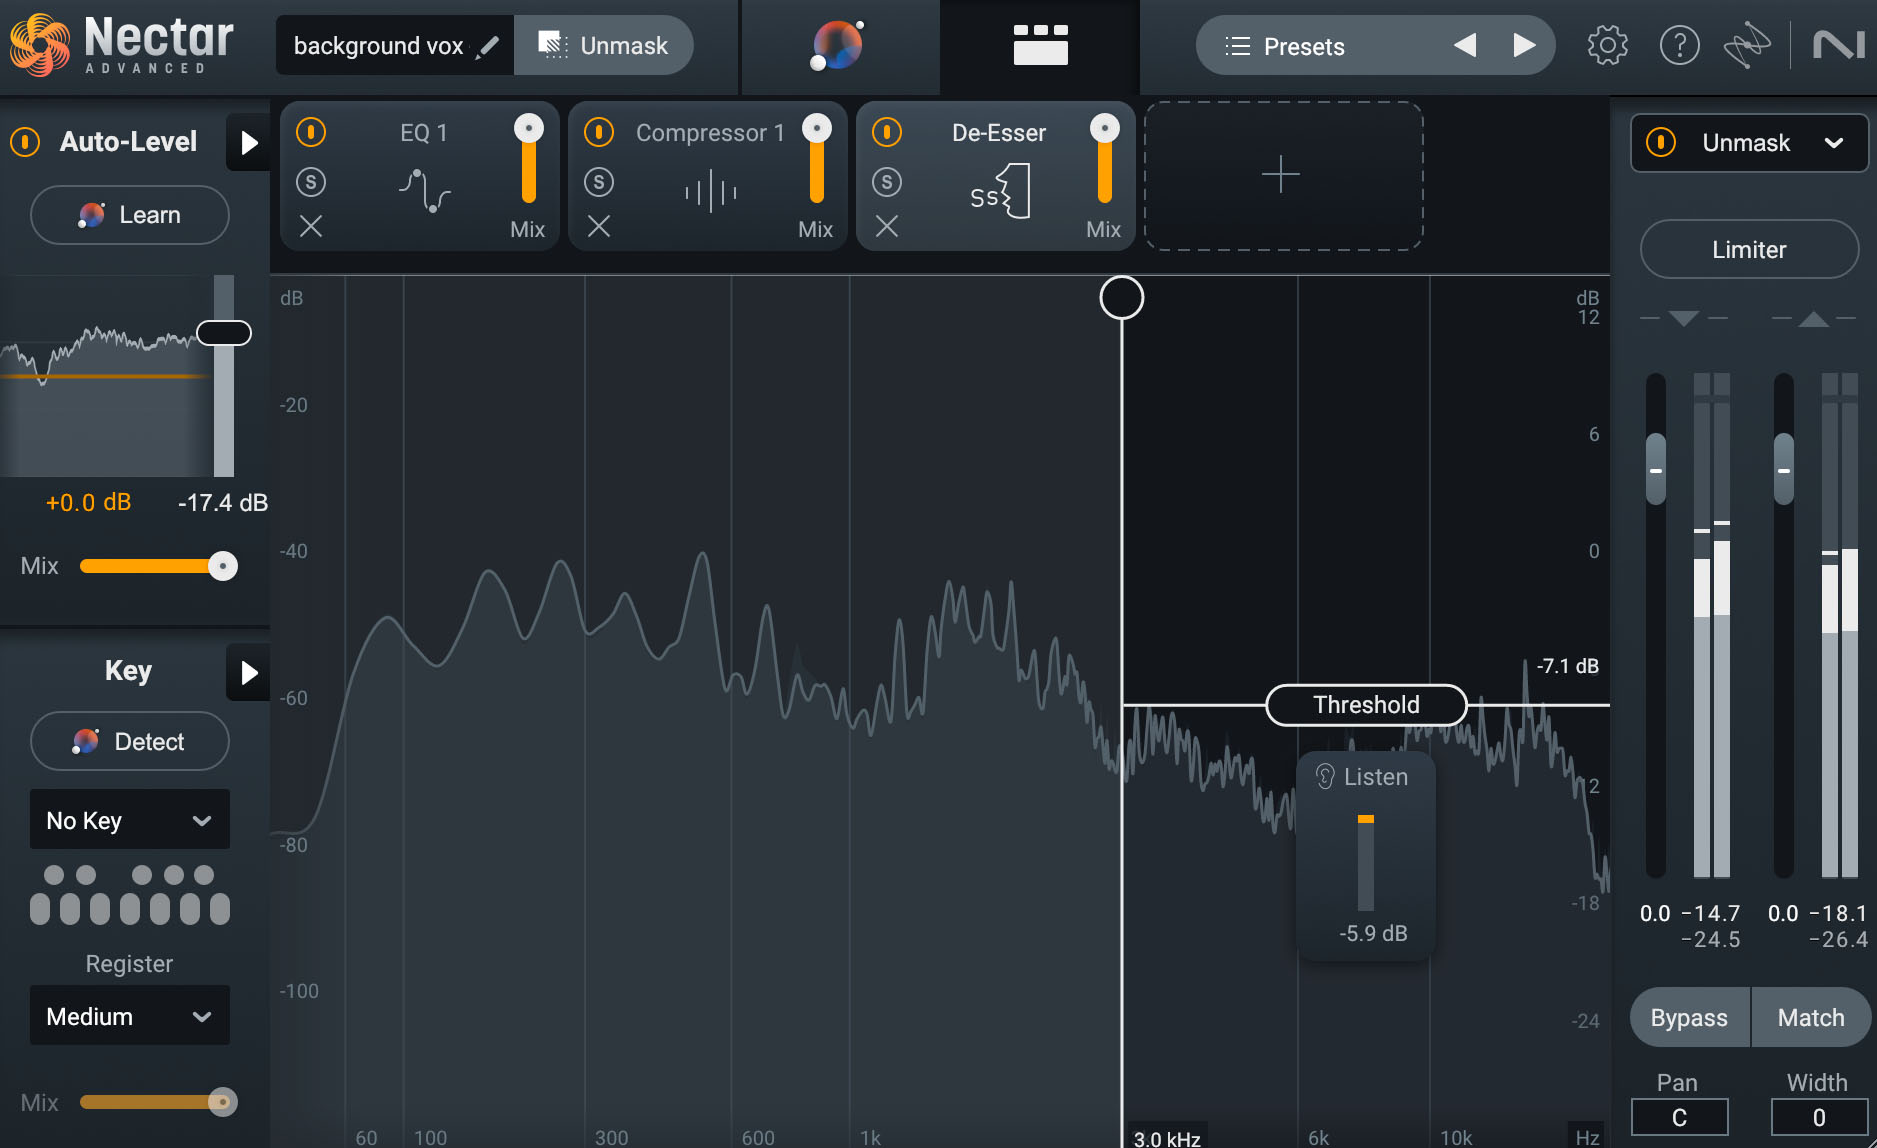
Nectar De-esser module
The vertical line sets the lowest frequency that’s fed into the sidechain, and the Listen meter shows how much audio in this range is being gain-reduced in real time. Note how this module doesn’t have many of the controls we’ve discussed, as its sidechain routing is handled internally behind the scenes in order to make the process easier — but at its heart, it’s still a compressor.
Limiters
What do limiters do?
Just as a compressor “compresses” the dynamic range, a limiter limits it. The limiter serves as a ceiling which signal cannot pass. If the signal hits this ceiling, it will be harshly compressed so that it does not pass above.
You may be wondering if a limiter attenuates the loudest parts of a signal, how is it any different from a compressor? Essentially, a limiter is just a compressor with a very high ratio.
As a compressor’s ratio increases, so will the amount of compression. Eventually, that compression amounts to an impermeable ceiling.
For example, let’s say that we have a compressor with a ratio of 2:1 (not very high). We send three signals through it, at levels of 2 dB, 4 dB, and 8 dB over the threshold.
With this ratio, the compressor would output signals at levels of 1 dB, 2 dB, and 4 dB over the threshold. Closer to each other in level, but still not so consistent.
However, if we turned the ratio up to 8:1 (quite high), the compressor would output signals at levels of 0.25 dB, 0.5 dB, and 1 dB over the threshold. These signals are now much closer to each other and much closer to the threshold level itself.
Eventually, as the ratio increases, the signal will not be allowed to cross the threshold, which becomes a sort of “ceiling.”
The exact number you’ll hear changes from source to source, but any compression with a ratio of around 12:1 or higher could be considered limiting.
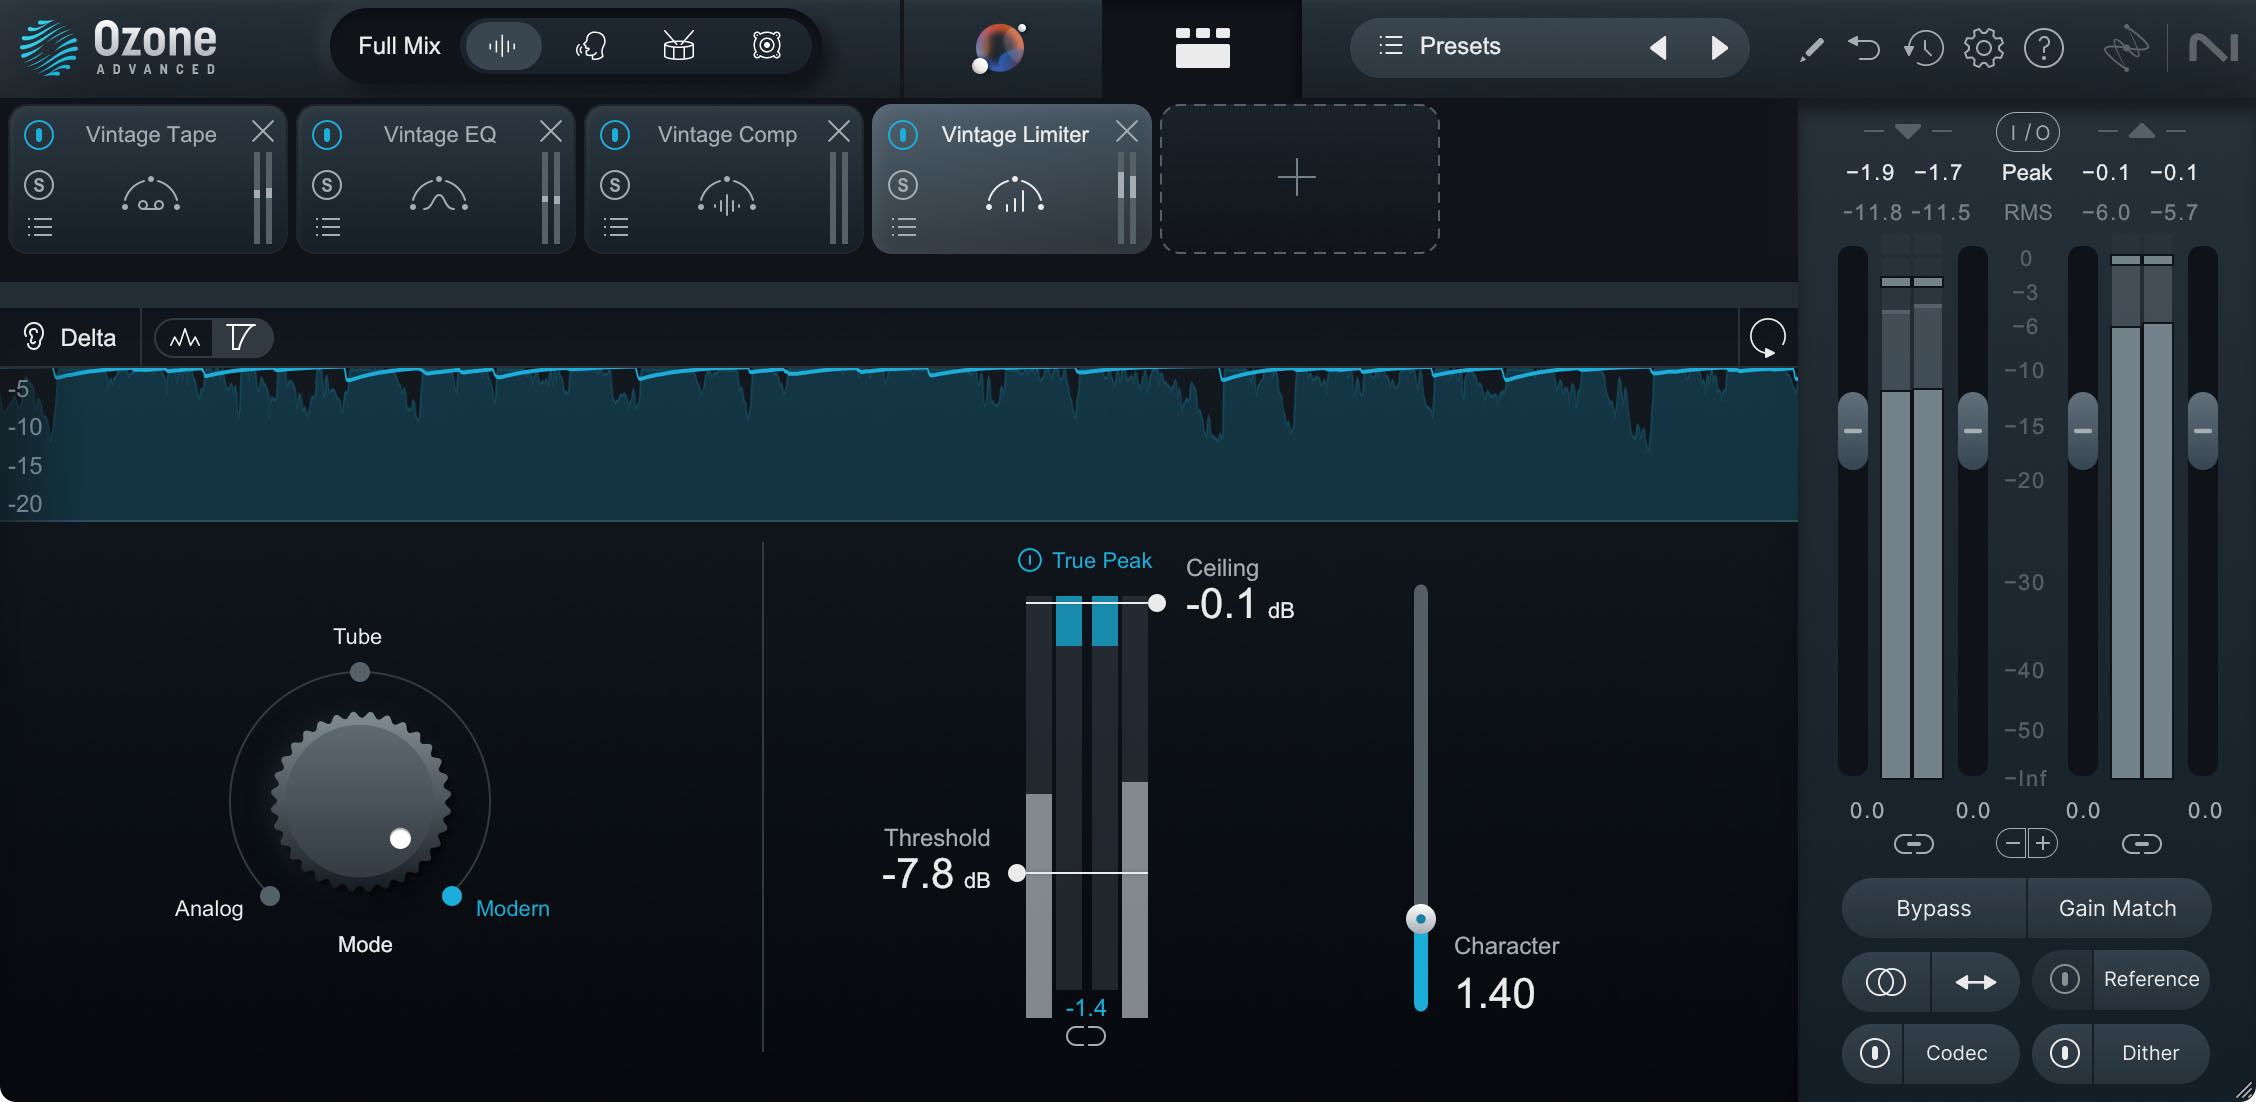
Ozone Vintage Limiter module
Limiter parameters
Every limiter will have at least one parameter: gain. This is used to boost signal until it hits the ceiling and is compressed.
Some limiters will have an adjustable threshold level, which is also often referred to as the ceiling.
If your limiter does not have this capability, you can always compensate for the added gain with a dedicated gain plug-in or at the channel fader. However, as limiters are mostly used in mastering as a means to bring the signal to unity gain, you’ll rarely need this.
Most limiters will have a release time parameter as well. This functions like a compressor’s release time, determining how long the limiter will take to return to zero compression.
Not all limiters will have an adjustable attack time, however. Some, like the Vintage Limiter in Ozone, have connected attack and release parameters (set with the “Character” parameter).
Now that we know a limiter is essentially a compressor with a high ratio, take a look at our compression output level equation again:

Output level equation
As the ratio increases, that fraction will approach 0. Therefore, the equation will eventually become this:

As expected, as the ratio increases, the output level for a signal that crosses the threshold will become closer and closer to the threshold itself. The signal cannot pass it.
Why use a limiter?
The main use, and really only use, of a limiter, is in mastering. The compression that they offer is so extreme that they’re rarely used on the channel level. Instead, limiters are often used on the master to bring the track up to a commercial level, and through compression commercial “loudness.” This final stage of compression can glue the elements of the track together and make the track louder at the same level.
Remembering that our ears naturally prefer louder music, limiters provide mastering engineers a big advantage in making a track sound professional. Just be sure not to overdo limiter settings, as the added compression and eventual distortion can suck the life out of a dynamic mix.
Another use for limiters is in a live sound setting, as a fail-safe precaution. If a loud sound occurs (one that would blow everybody’s ears out), this limiter will make sure to control it. Again, these limiters are usually placed on the master channel.
Be sure to check out our “Introduction to Limiters” article for a bunch more information on uses and parameters for different types of limiters.
Expanders
What do expanders do?
Again, like a compressor “compresses” and a limiter “limits” the dynamic range, an expander expands it. Louder and quieter parts become relatively louder and quieter respectively. As such, it’s essentially the opposite of a compressor.
“Upward expanders” amplify the level of signal that passes the threshold, rather than attenuate it like a “downward compressor.” A “downward expander” attenuates signal that drops below the threshold, rather than amplify it like an “upward compressor.”
Be sure to check this article out for more information on upward and downward expanders in mixing.
Most expanders are upward expanders (like the expansion featured in Ozone when setting the compressor/limiter ratio to a negative number), but you’ll find plenty of downward expanders too. Downward expanders act similarly to gates, which we’ll get to in a second.
Expander parameters
The parameters found in an expander are and function mostly the same as those in a compressor.
The threshold once again determines the input level at which the expander will activate. This happens when the signal is loud enough to cross this threshold level (upward expansion) or quiet enough to fall below it (downward expansion).
Ratio, however, acts a bit differently. In a standard expander (which is upward), an expansion ratio of 1:x amplifies the signal to a level of x dB above the threshold for every 1 dB it crosses.
Again, let’s look at an example. Say we had an upward expander with a ratio of 1:3 and a threshold set at 0 dB. If the incoming signal were at 1 dB (1 dB above the threshold), the signal would be amplified to 3 dB at the output. If the signal were at 2 dB (2 dB above the threshold), the signal would be amplified to 6 dB at the output. The louder parts of the signal are now louder.
In a downward expander, a ratio of x:1 attenuates signal to a level of x dB below the threshold for every 1 dB it drops below the threshold.
Say we had a downward expander with a ratio of 1:3 and a threshold set at 0 dB. If the incoming signal were at -1 dB (1 dB below the threshold), the signal would be attenuated to -3 dB at the output. If the signal were at -2 dB (2 dB below the threshold), the signal would be attenuated to -6 dB at the output. The quieter parts of the signal are now quieter.
With the threshold, ratio, and input level, we can determine the output level using this equation (this works for downward and upward expansion):

Knee, attack time, and release time for expanders would all work the same as in compressors.
Makeup gain is only really necessary for upward expansion. As louder parts become louder, the signal will be louder after the expander than before, which can eventually lead to distortion of your gain-staging is off. The makeup gain can be used to attenuate the signal, returning the louder parts to their previous level.
Downward expansion does not require makeup gain, as the quiet parts will simply be quieter.
Why use an expander?
An expander can be used to achieve the opposite result of a compressor, expanding the dynamic range rather than compressing it. Therefore, expanders are best used when you want to have a wider dynamic range.
Expanders can be used to make instrumental or vocal performances a bit more varied in volume. This can be very useful if you want a more organic sound. This can, however, reduce presence in the mix. It can also potentially cause unnatural pumping, as these expansions in dynamic range are caused by mathematical processes ignorant to musical phrasing.
One of the main uses of expanders is in mixing a recorded drum kit. Each drum is individually mic'd, allowing each to have a separate channel on the mixer. However, total isolation is difficult, and bits of the other drums are bound to bleed through into other microphones.
An expander can be used, for example, to decrease the volume of the hat in the snare mic. As the hat will be further away from the mic than the snare, it will be quieter than the snare when picked up by the snare mic. Therefore, downward expansion can be used to attenuate it.
With the same logic, you can use expanders to remove reverb from drums. The reverb signal will be lower than the threshold, causing it to be attenuated in between the drum hits. Listen to the example below:
The reason this works with drums is that, after each drum hit, there is space for the signal to drop below the threshold level. With a low release time, it’s possible to mostly cut out the reverb tail. In a more sustained instrument, like a vocal or keys, this wouldn’t work because the dry instrument will still keep the overall signal above the threshold, allowing the reverb through.
Lastly, expanders can be used like compressors for sidechaining purposes. With sidechain expansion, a signal (“Sound A”) is attenuated by an expander, which is triggered by the fluctuating level of a different signal (“Sound B”). As a result, Sound A will be attenuated when Sound B drops below the expander’s threshold.
This is interesting, as it can cause an element to play more loudly while another element is playing. This has the effect of blending the two sounds like they’re one sound.
Check out this example of sidechain compression in action. The first audio file is a drum loop. The second is a sample of vinyl static.
I’ve placed an expander on the static‘s channel and triggered it with the drum loop. Hear how the static pumps with the drum groove when it’s soloed. And hear the added layer of texture it gives to the drums when both are played together.
Gates
What do gates do?
Our last dynamics processor is a gate, which is essentially the extreme version of a downward expander. Gates provide a floor level which signal must cross to get through the gate. If the signal is too quiet to reach this floor, it will be attenuated to silence.
Let’s see how a gate simply acts as an expander with a high ratio.
For example, let’s say that we have an expander with a ratio of 1:2 (not very high). We send three signals through it, at levels of 2 dB, 4 dB, and 8 dB below the threshold.
With this ratio, the expander would output signals at levels of 4 dB, 8 dB, and 16 dB below the threshold. The signals’ levels are further apart but are all still relatively close.
However, if we turned the ratio up to 1:4 (very high), the expander would output signals at levels of 8 dB, 16 dB, and 32 dB below the threshold. These signals are now much further apart and much closer to being inaudible.
Eventually, as the ratio increases, any signal will be greatly attenuated, and all signal that passes through the gate will have to cross this floor level.
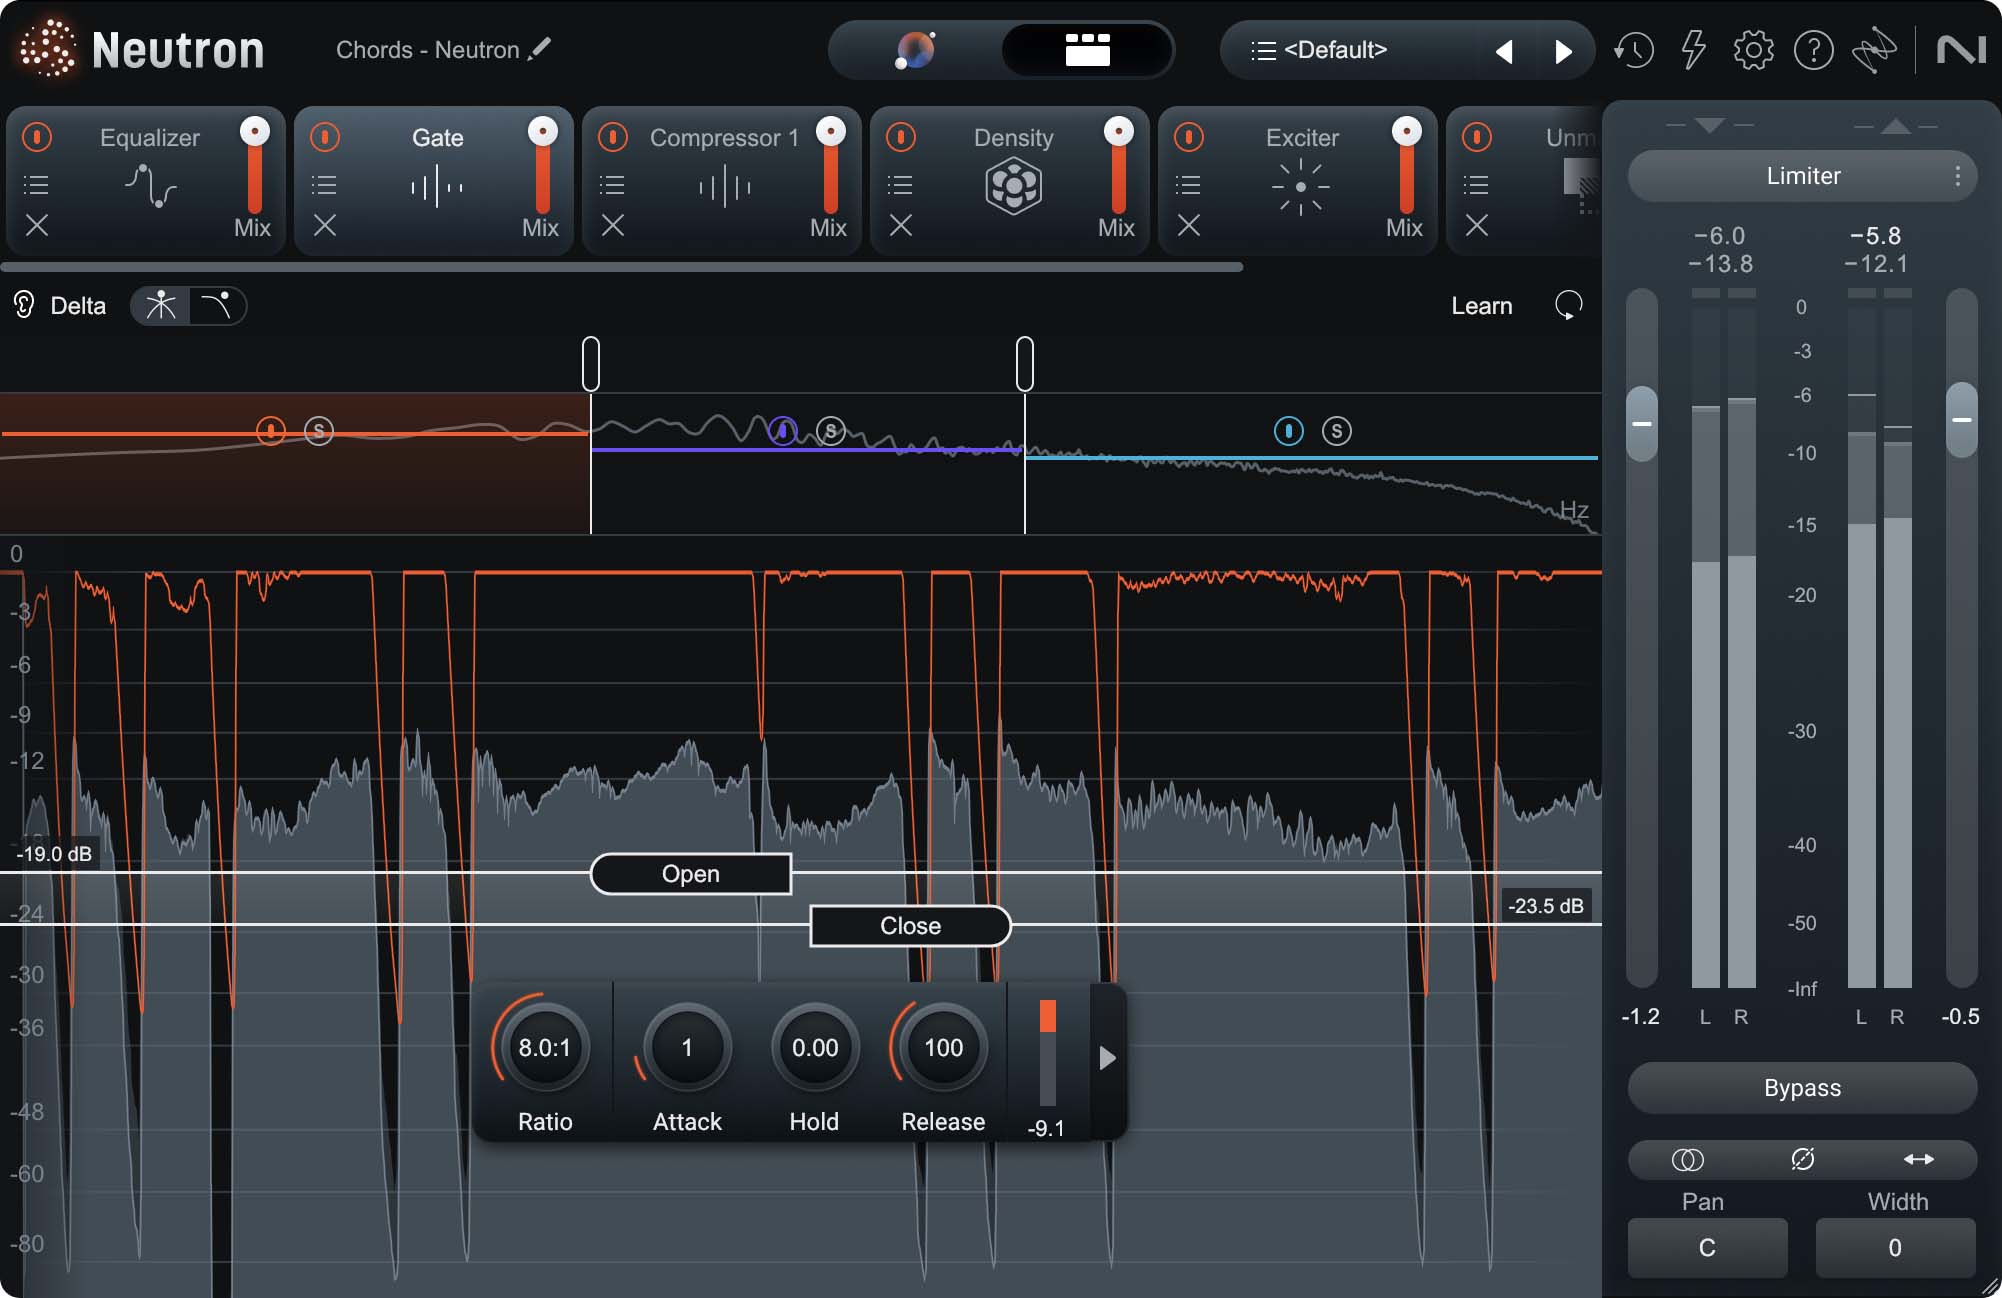
Neutron Gate module
Gate parameters
Every gate will have at least three parameters: threshold, attack time, and release time. These all function the same as in compressors and expanders.
Some gates will also have a hold parameter, causing the gate to remain open for a period of time (in ms) after the signal has dropped below the threshold and before the release phase begins.
Some gates will also offer the ability to have the gate close at a different level than the threshold, which is only used for opening the gate. This parameter is often called the close or return level.
And just like the fact that some limiters have an adjustable ceiling, some gates will have an adjustable floor level. This is the level that signal will remain at while the gate is closed, and can be increased up from -∞ dB.
Now that we know a gate is essentially an expander with a high ratio, take a look at our expansion output level equation again:

As the ratio increases, that total fraction will become larger and larger. Therefore, the equation will eventually become this:

As expected, as the ratio increases, the output level for a signal that falls below the threshold will become quieter and quieter. Eventually, the signal will not be able to pass if it is below the threshold—a gate.
Why use a gate?
Gates are mainly used to cut out audio when it’s quiet and unneeded. This can be on a vocal to eliminate breaths, or can be used as an expander to isolate louder signals in a recording (e.g. isolating drums). Gates are equally useful in a studio recording or live sound context.
They can also be used in a similarly creative way as the expander example above. However, a gate would cause that static sample to pump harder and therefore have a more difficult time blending with the drums. Therefore, you may just want to use an expander for that.
Start using audio dynamics tools in your music
Dynamic range is a major aspect of any sound’s identity. Additionally, the level balance between elements over the course of a track is super important for mixing. As a result, audio dynamics processors like compressors, limiters, expanders, and gates are invaluable tools for any producer or mix engineer. With the four of them, you should be able to shape a sound’s dynamics in any way you’d like.
Make sure to try the dynamics processing shown in this article with a free trial of


iZotope Music Production Suite Pro: Monthly


Music Production Suite 7
