
Dialogue Repair: 6 Problems You Thought You Couldn't Fix
Some dialogue problems can’t be fixed. Distortion, errant sirens, wind gumming the microphones—it’s impossible. Or is it? The truth is, with iZotope RX, you can fix all sorts of previously impossible problems. Here are six tips to get you out of a dialogue bind.
In the old days, I used to pull my hair out when confronted with certain audio problems. Sirens drove me crazy and wind was a real hassle. Distortion? Forget about it. Now, RX 7 is more than up to the task. Observe these six problems you thought you couldn’t fix, now dispatched thanks to RX 7.
1. Attenuation in Spectral Repair
The Spectral Repair module in RX is a beast for sorting out issues that bedevil common noise-reduction algorithms. In dialogue editing, its Attenuation mode is particularly useful. The process may be a bit advanced for some users, but totally worth reading up on.
Spectral Repair is able to take out intermittent issues—things like sirens, dog barks, chairs squeaking, and other anomalies—while preserving the essential integrity of the original signal. With substantial accuracy and nuance, you can tamp down these problems with minimal interference to the original transient characteristics and tonality of the original sound.
When any of the typical processors in RX don’t work, this is often the first tool I try. However, you need to pair it with the right selector tool. If you use the default selector in RX, you’ll make a mess of things when you use this processing.
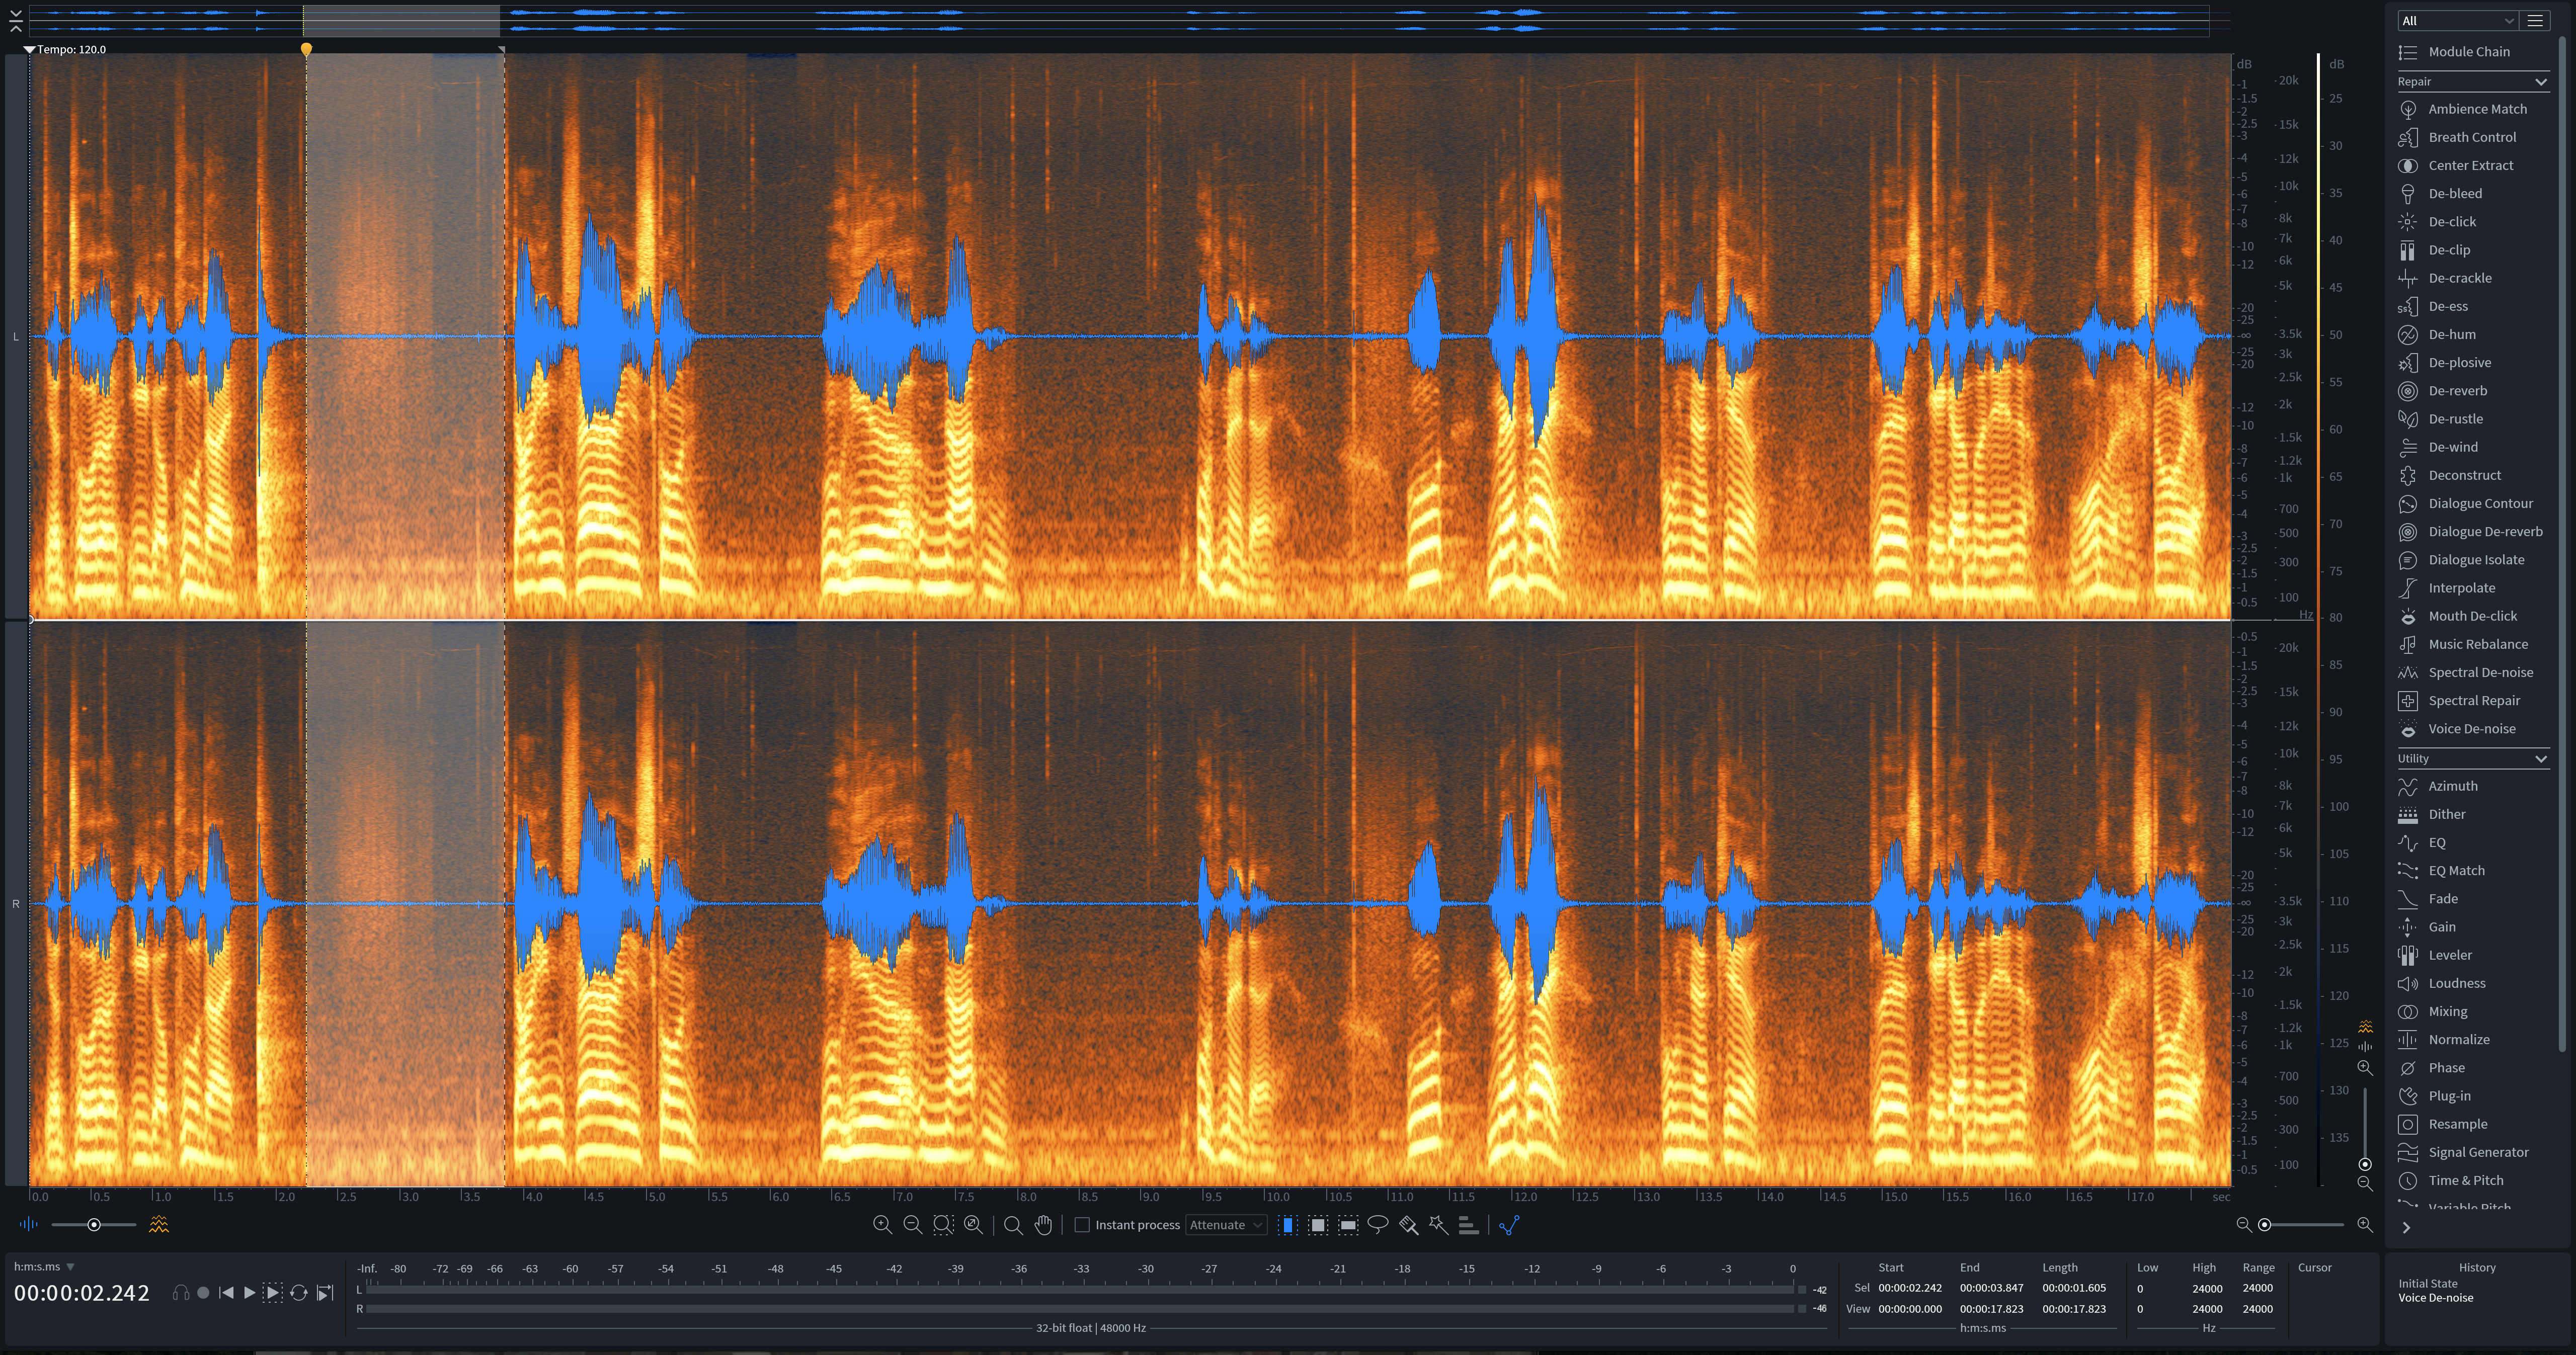
The default method of selection in RX
The above screenshot depicts the default method of selection, which is usually horrible for Spectral Repair. I invite you, in standalone mode, to familiarize yourself with the following hotkeys: R, B, and L. R gives you a freely draggable box—you can box up a region of time and frequencies however you like.
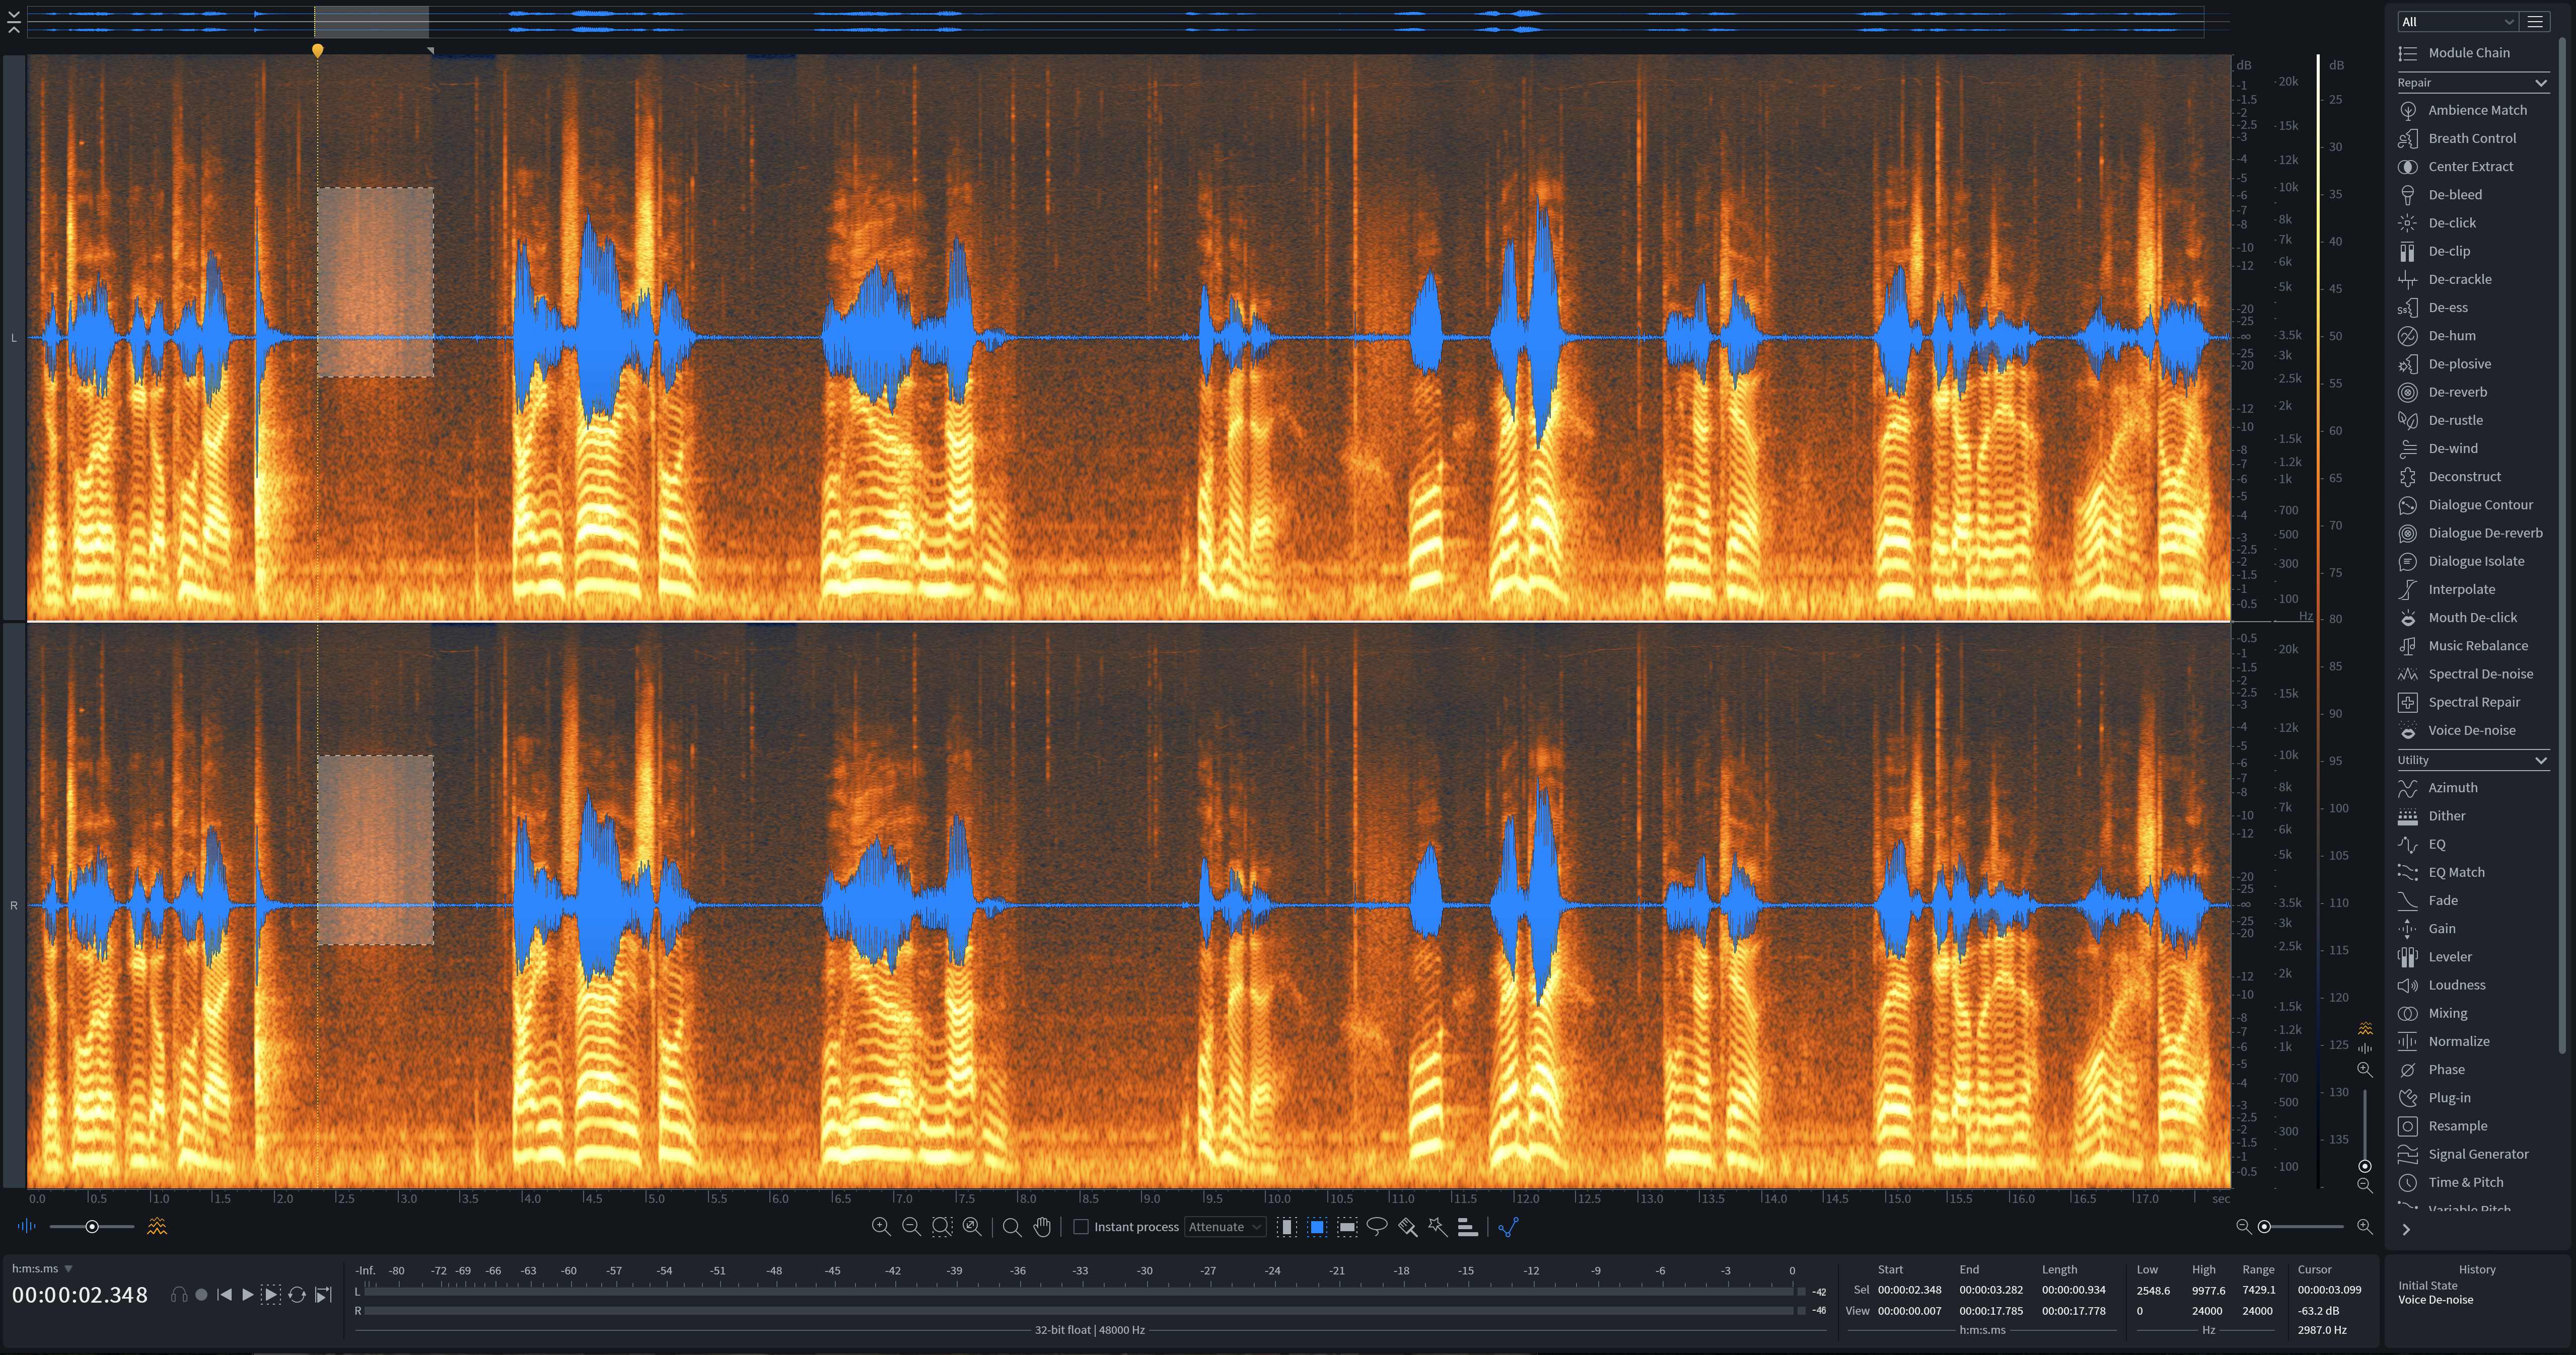
Selection via the R hotkey in RX
This screenshot depicts a box selected with the R key. The B hotkey accesses a sort of “pen” tool: you can draw on top of the specific area you need to process.
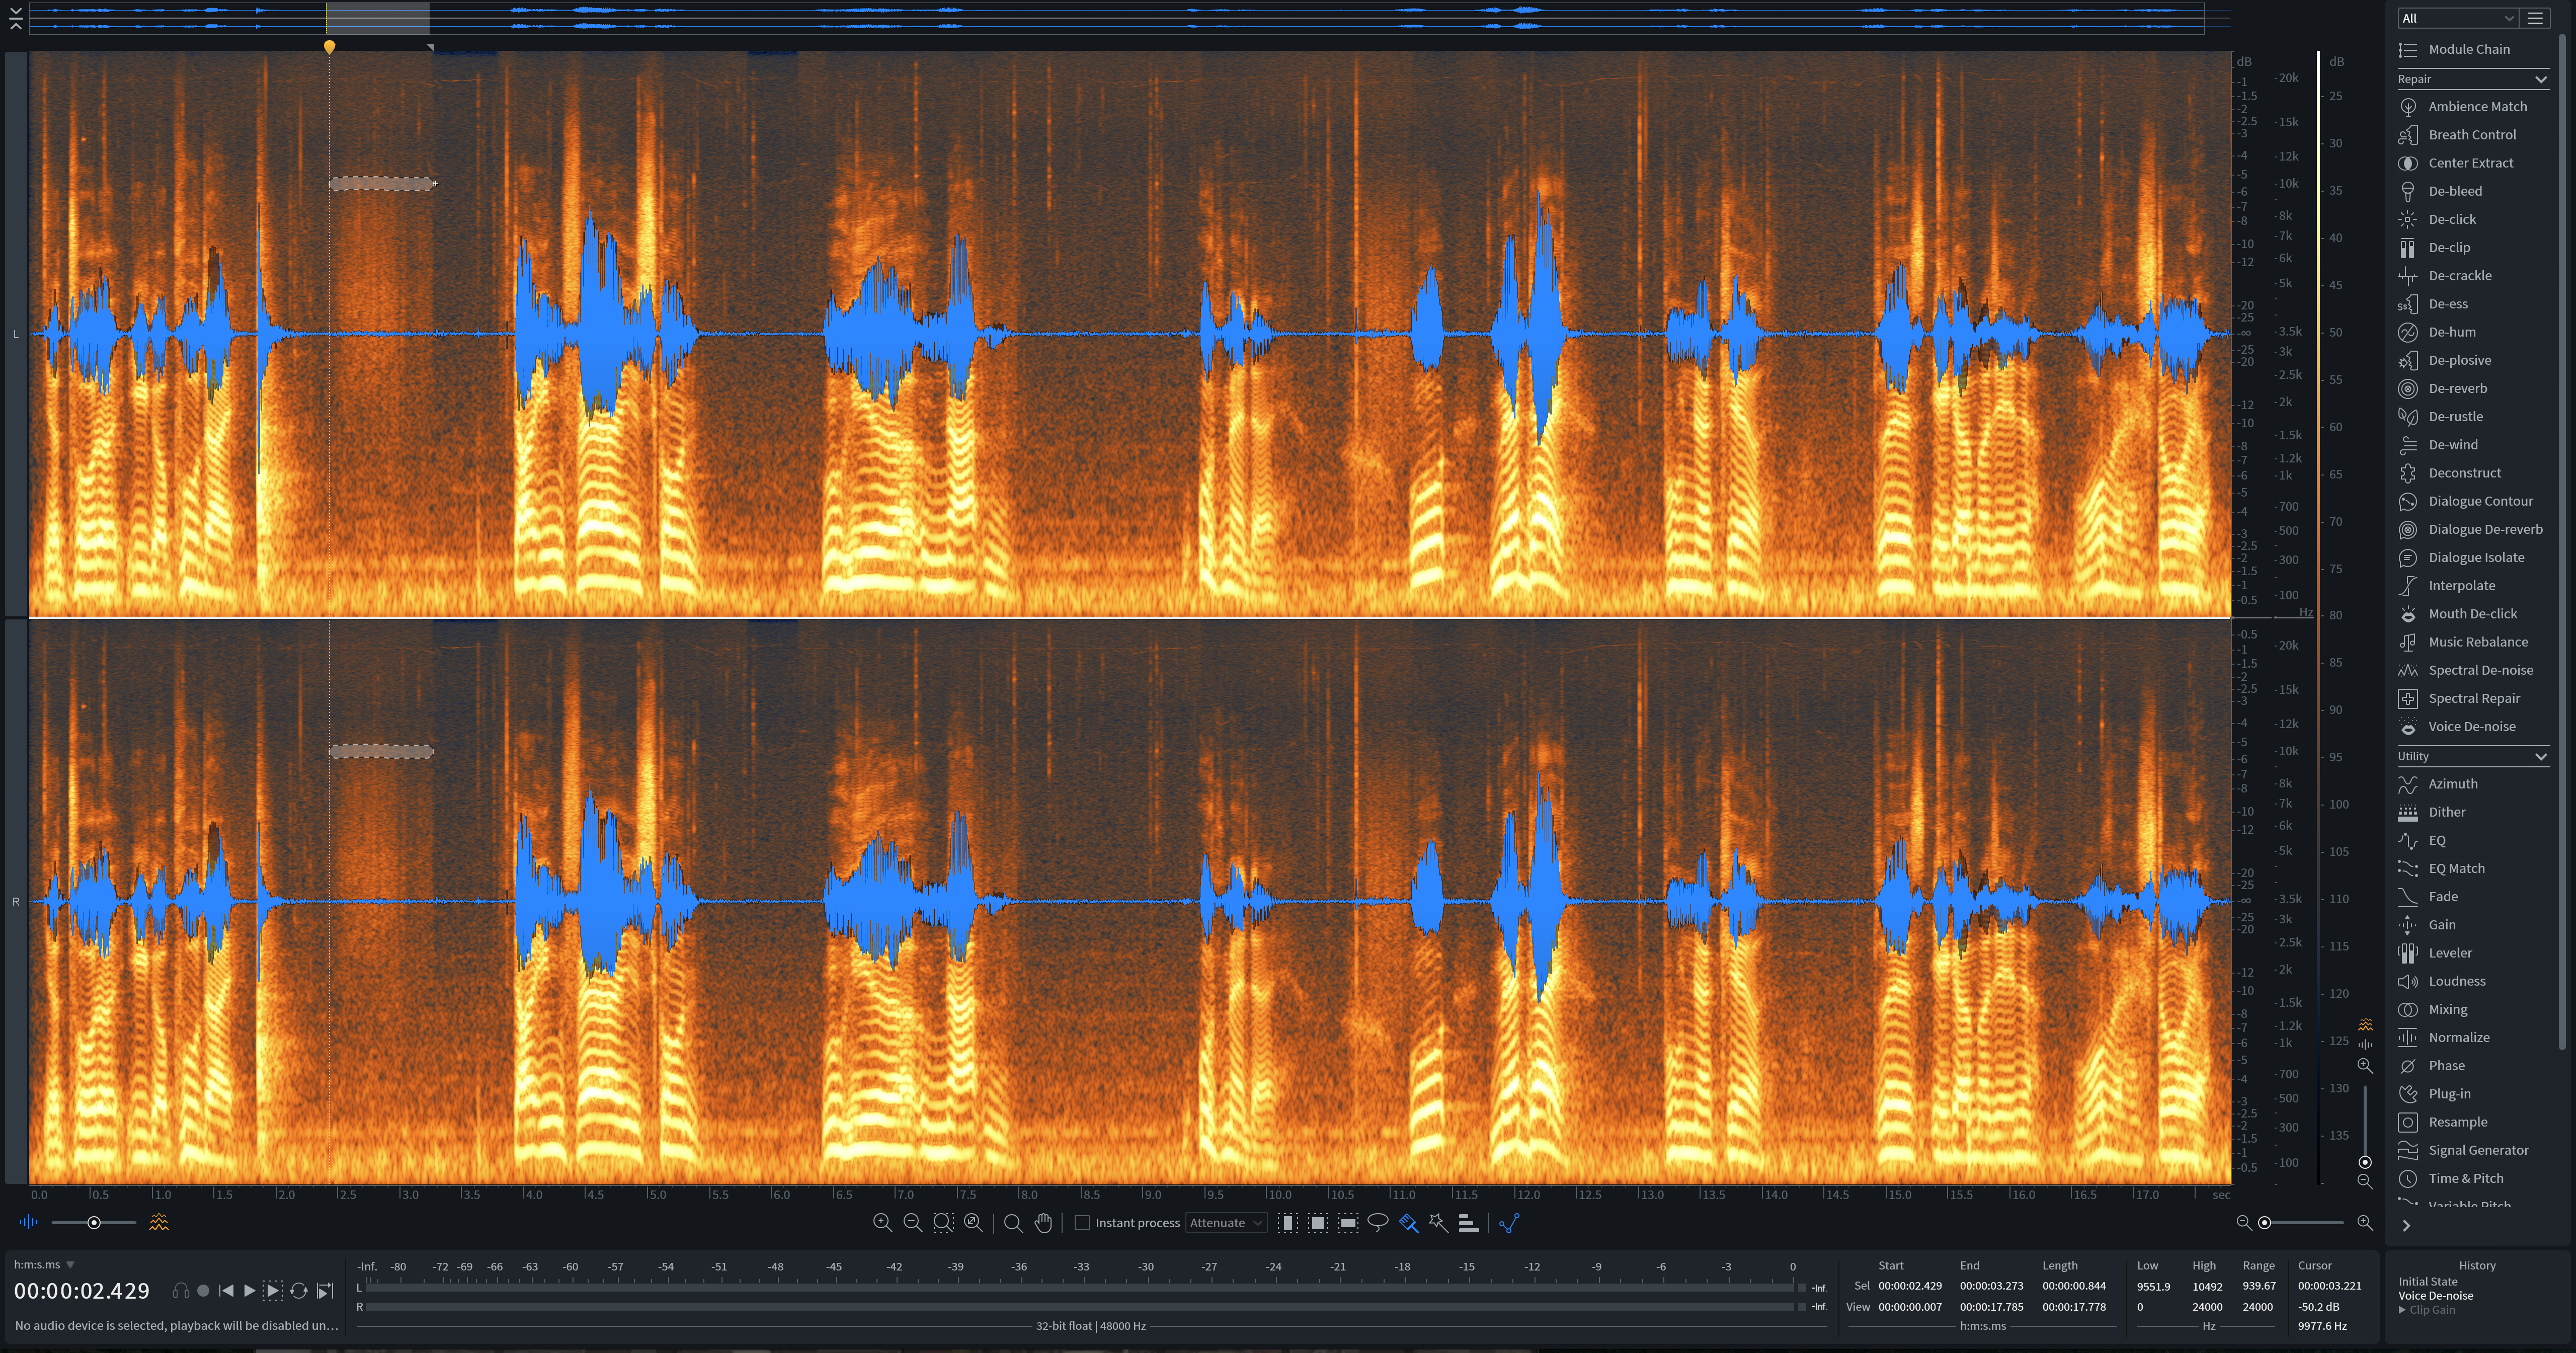
Selection via the B hotkey in RX
In drawing on top of it, you select that particular area of sound. The L hotkey is your lasso. You can use it to draw around any area in the spectral view that needs processing.
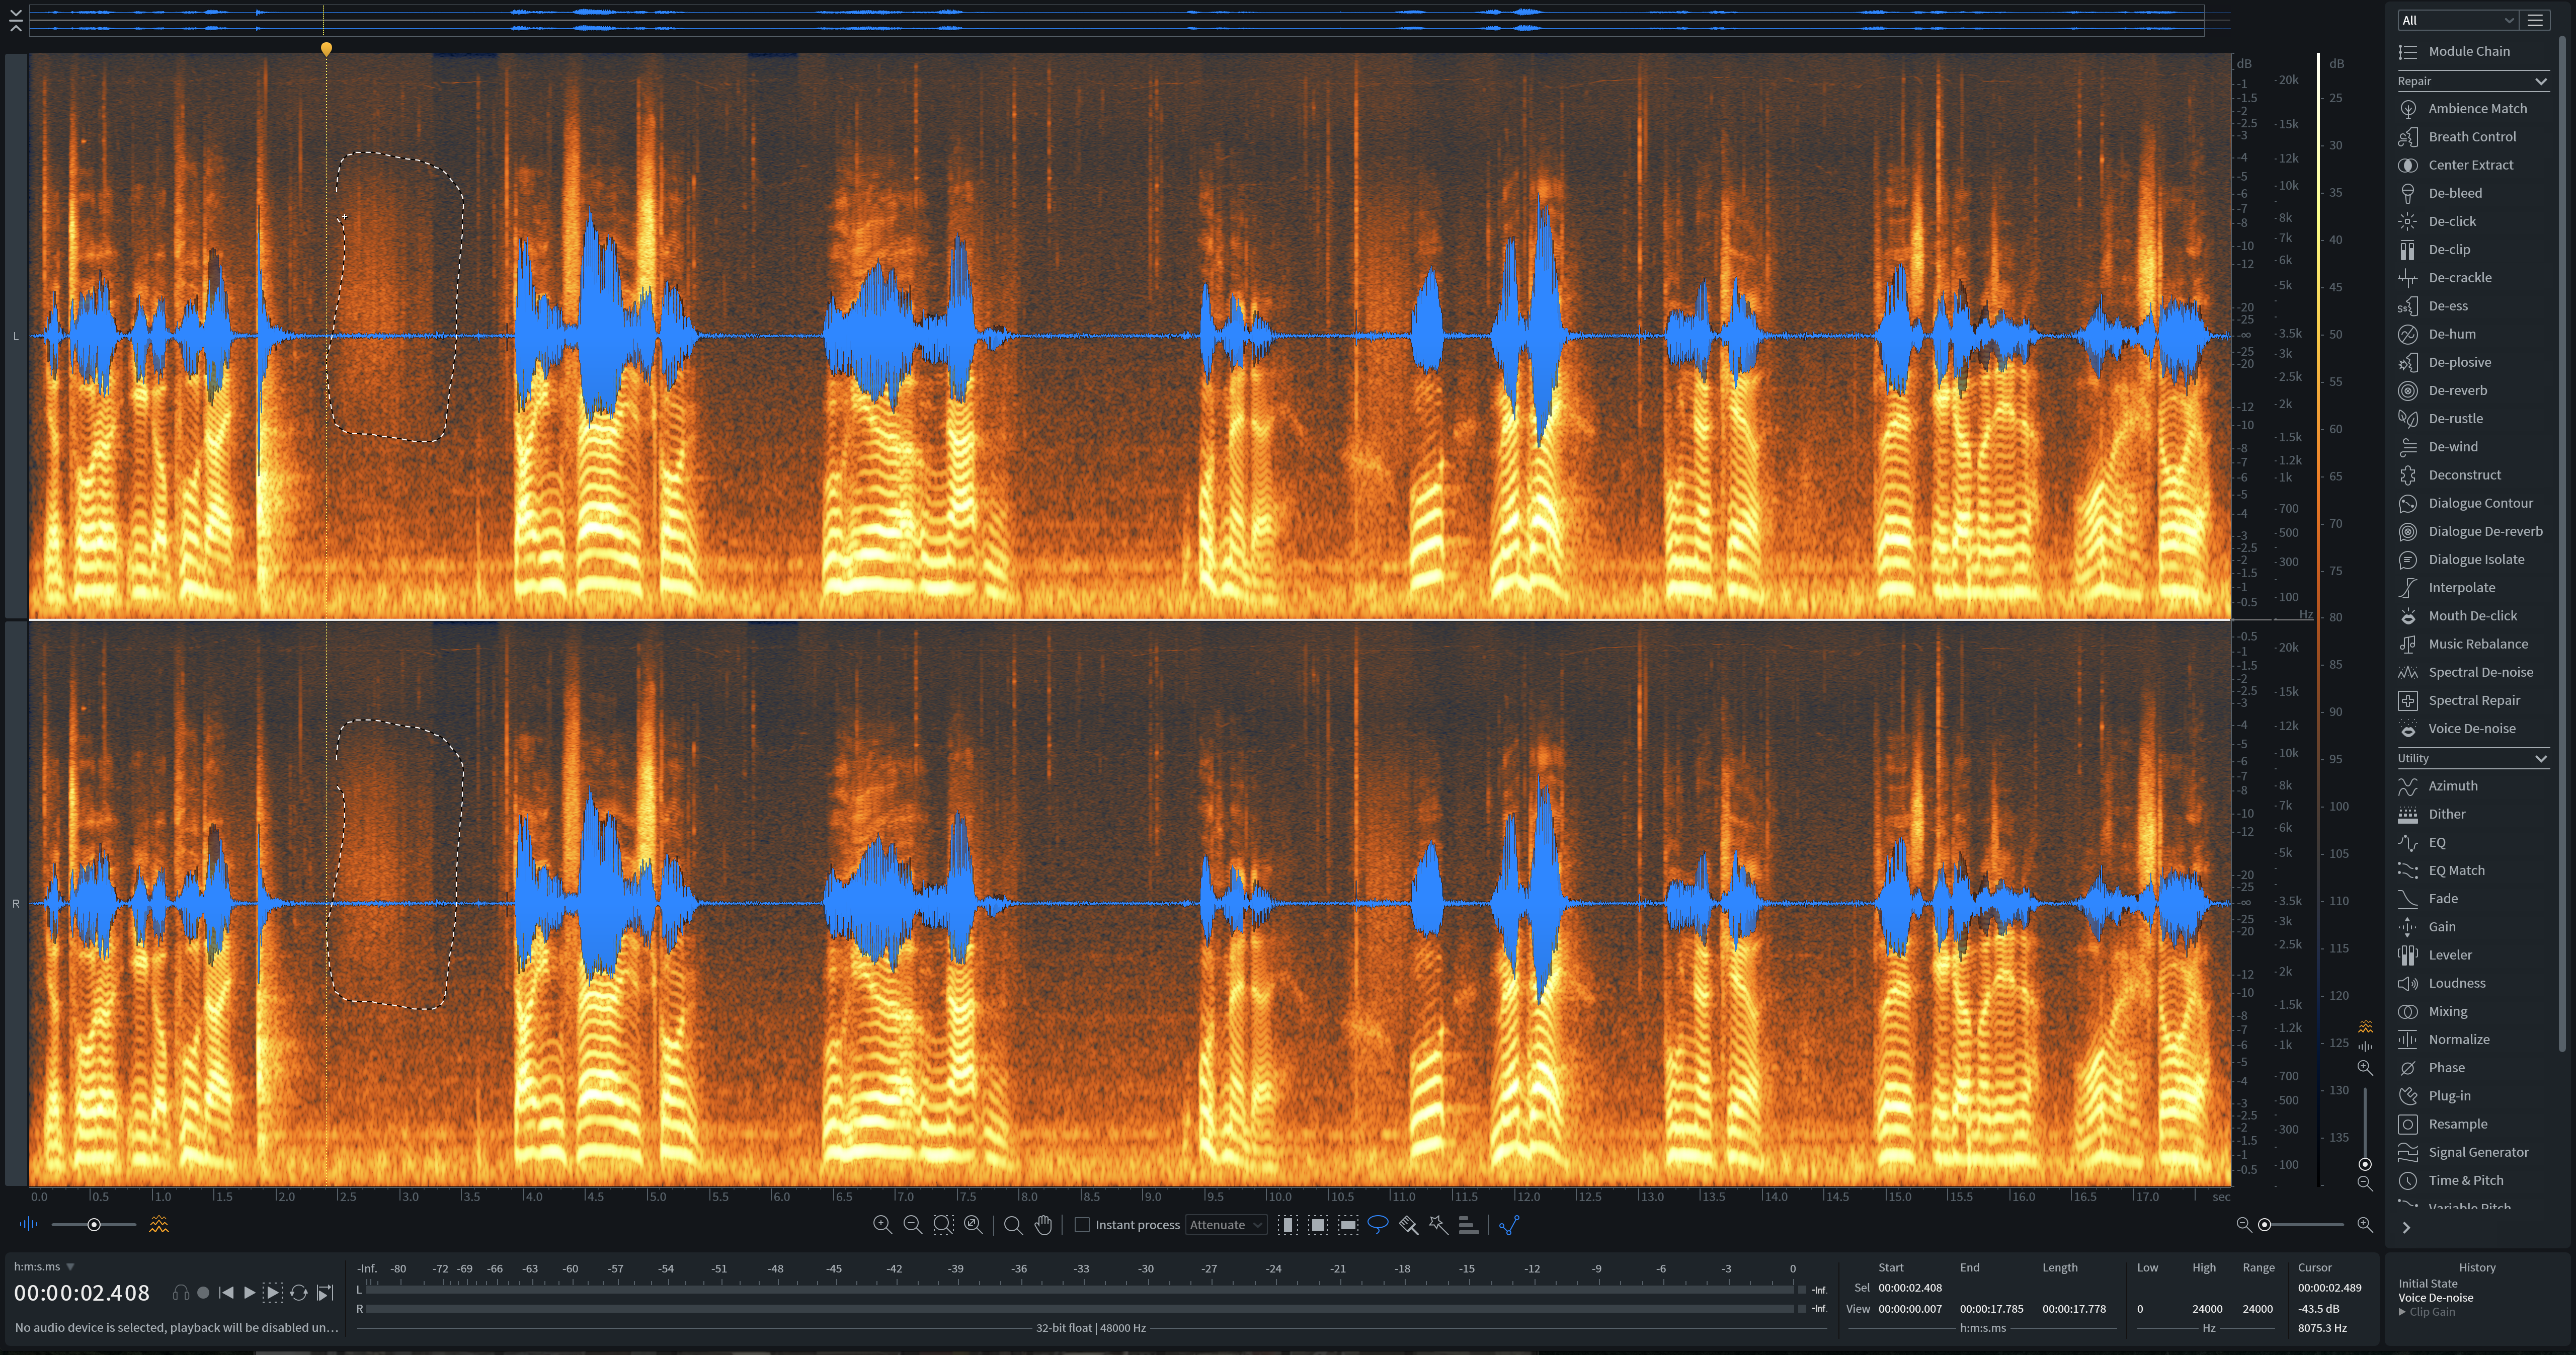
Selection via the L lasso hotkey in RX
In Spectral Repair it can help to grab the first overtone of whatever you’re selecting, as tonal issues, such as sirens and chair squeaks, will have musical overtones. You can do that by selecting the icon you see circled in the following screenshot:
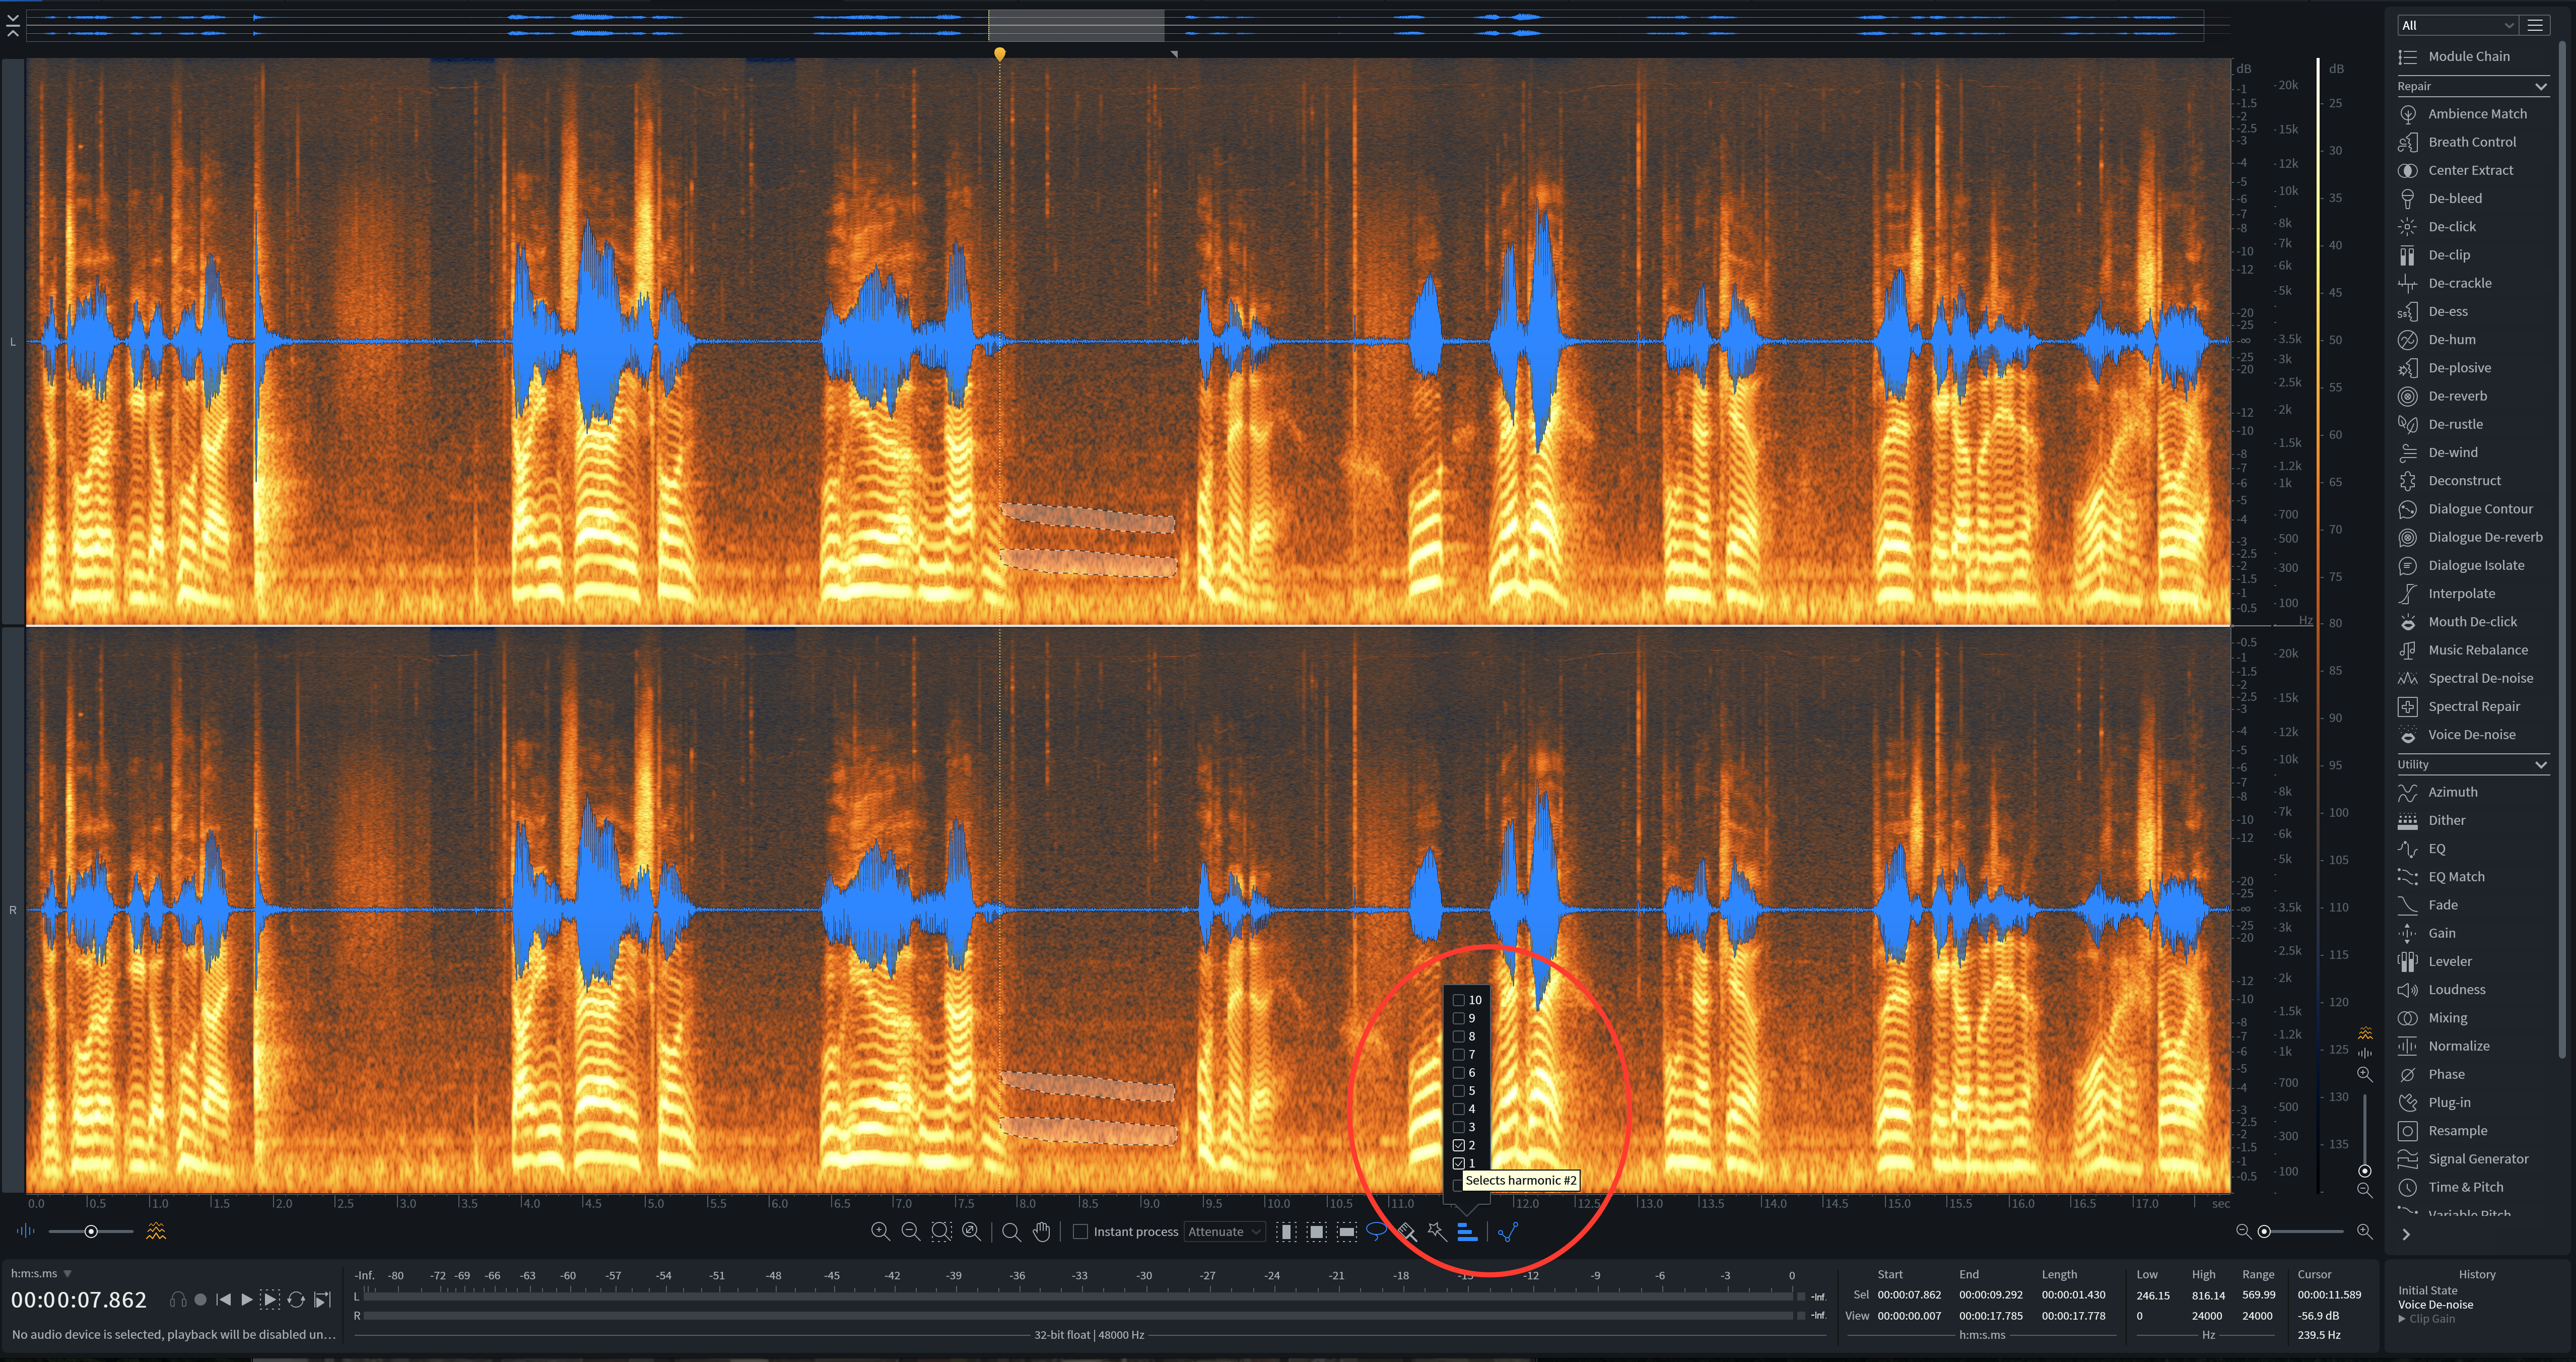
Harmonic selection in RX
The tools and hotkeys I’ve shown are immeasurably helpful, and to get back to your main tool, just press T.
Now, to get good at using Spectral Repair, you’ll need to learn to see what you’re hearing. This is what the spectrogram view is for: it shows you your waveform overlaid on the spectrogram, and lets you choose if you want to see more waveform or spectrogram. For editing with Spectral Repair, I find it helps to favor the spectrogram view of the slider, for it will help you learn how to see what you’re hearing. See, a siren may sound like this:
But it will look like this:
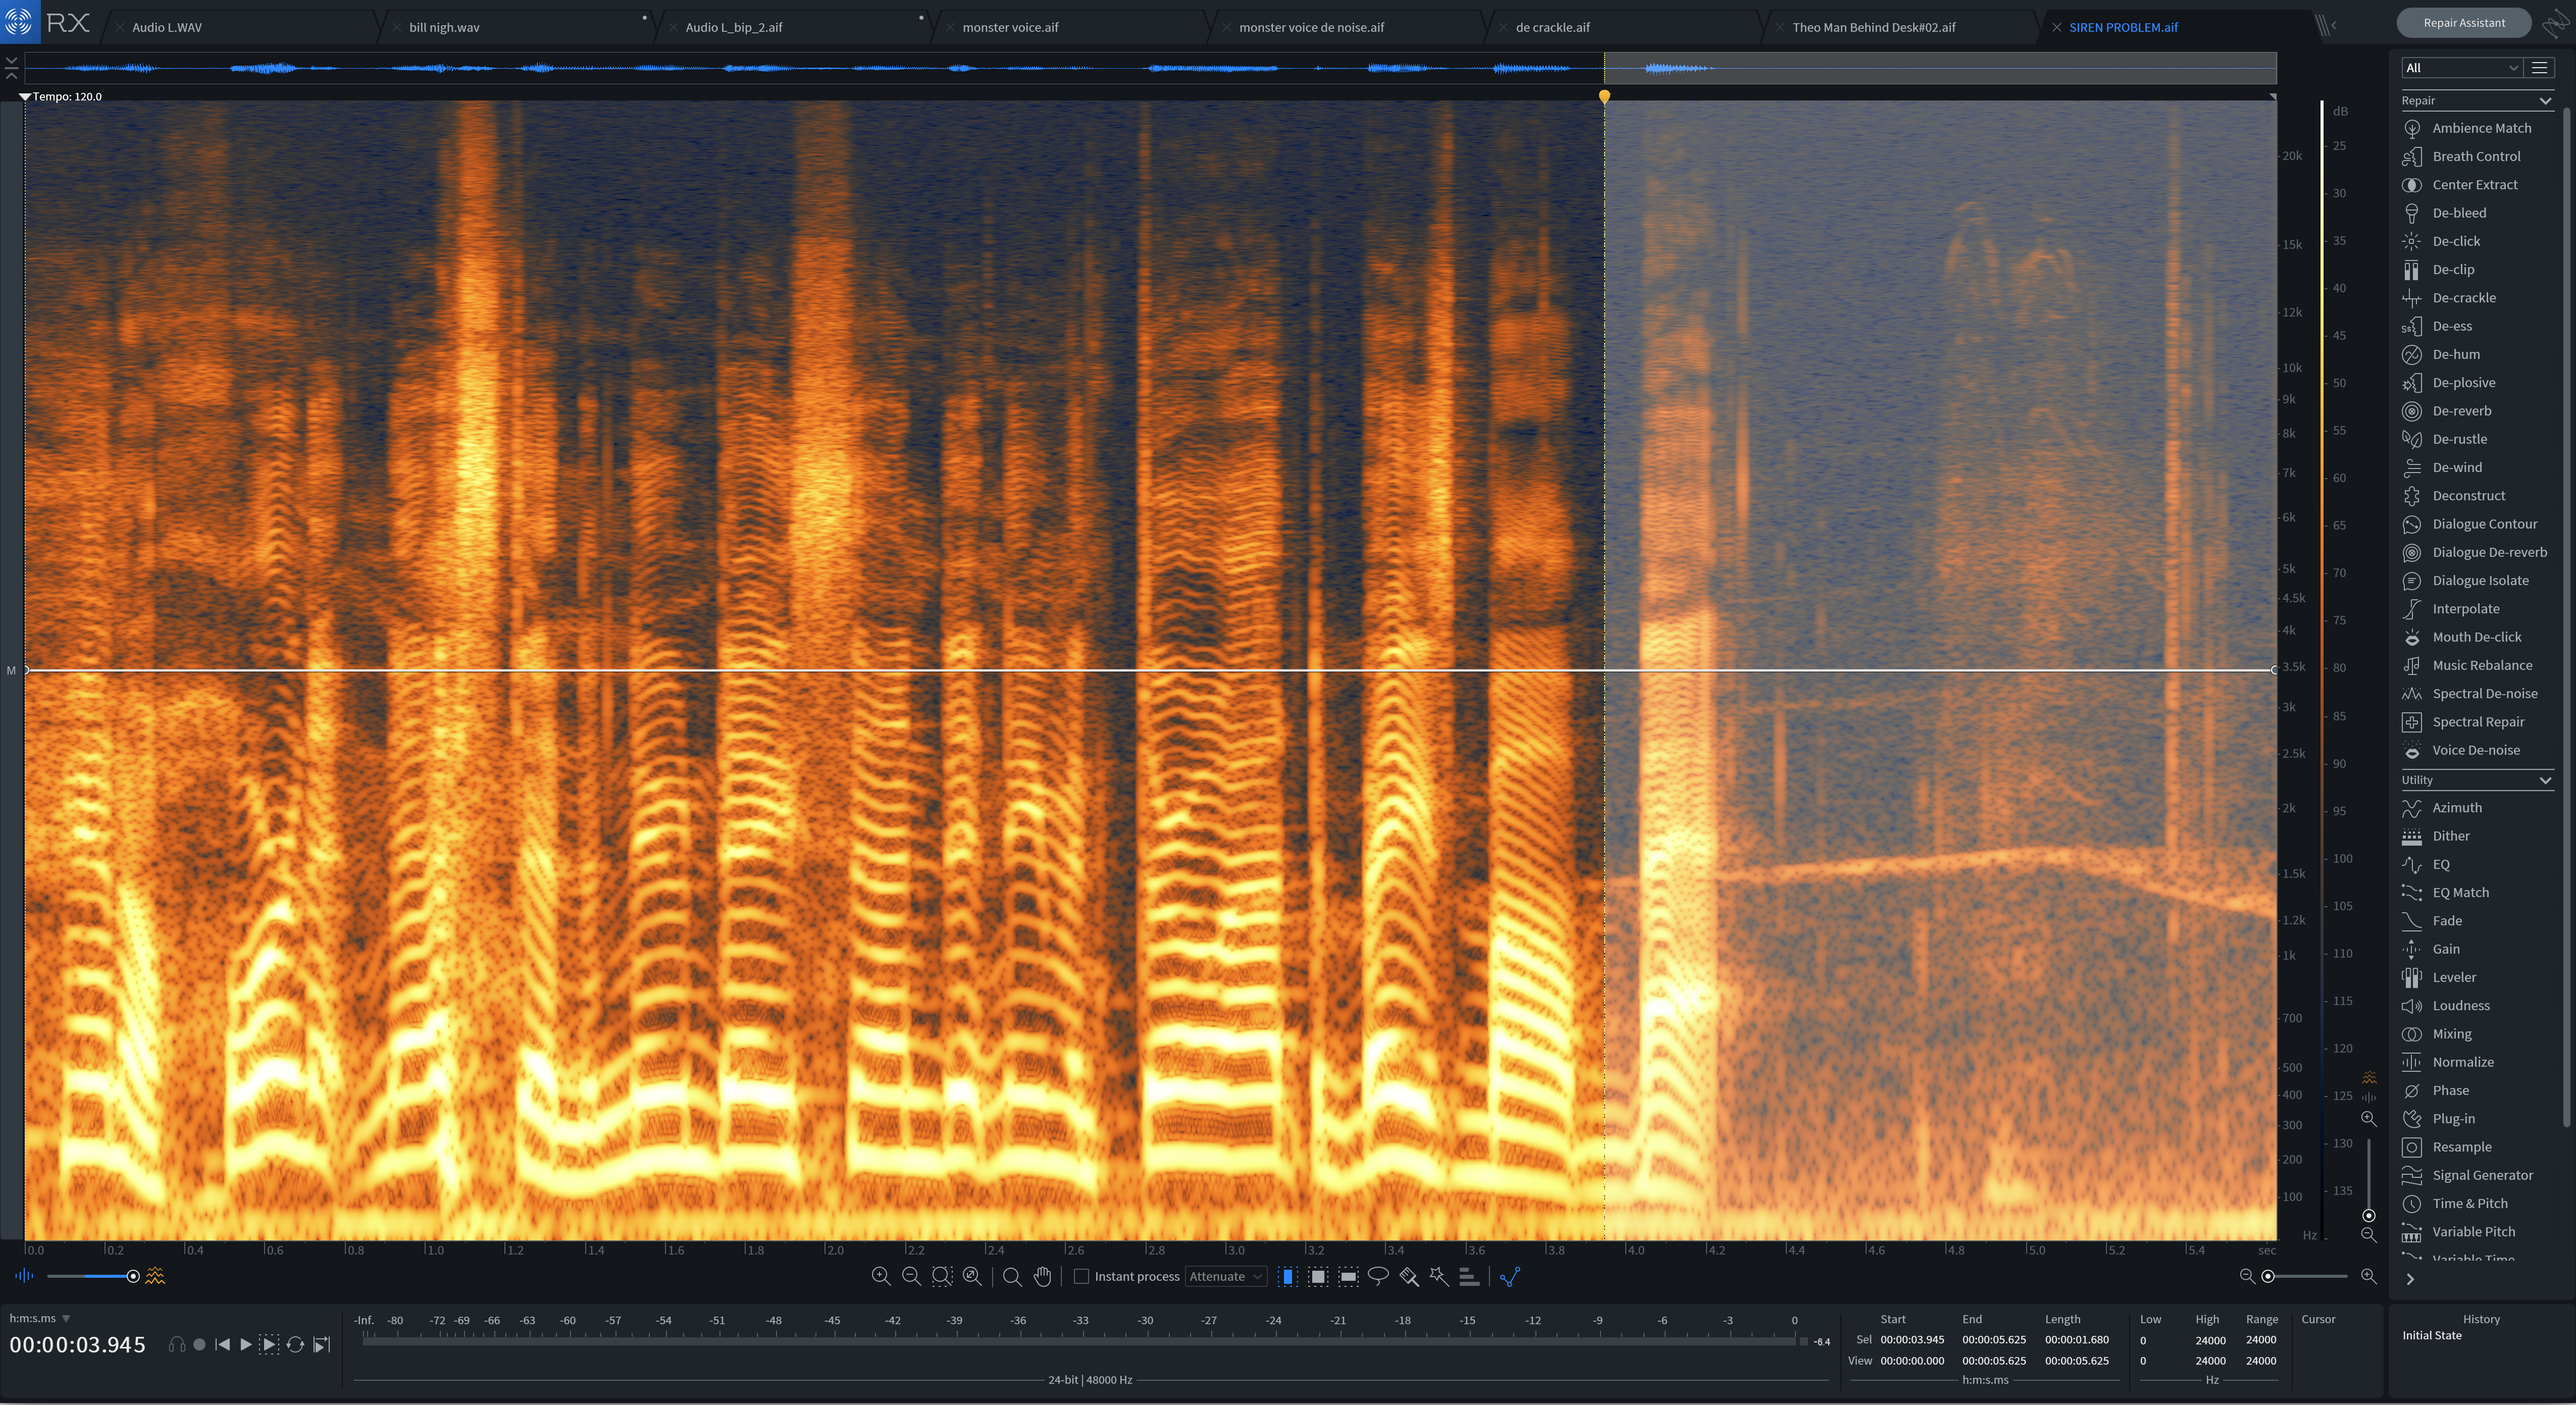
A siren in RX Spectrogram view
The audio selected in this screenshot is the prominent siren. If you gander at the slider in the bottom-left corner of the screenshot, you’ll see we’re only looking at the spectrogram, so we can view the sound as it moves through time: note the line that rises up like a mountain ridge; this is our siren.
We can literally select that line and make the problem disappear. We’ll click L, lasso the siren, and select its overtone as well. See below to check out how it’s done.

A siren in RX Spectrogram view
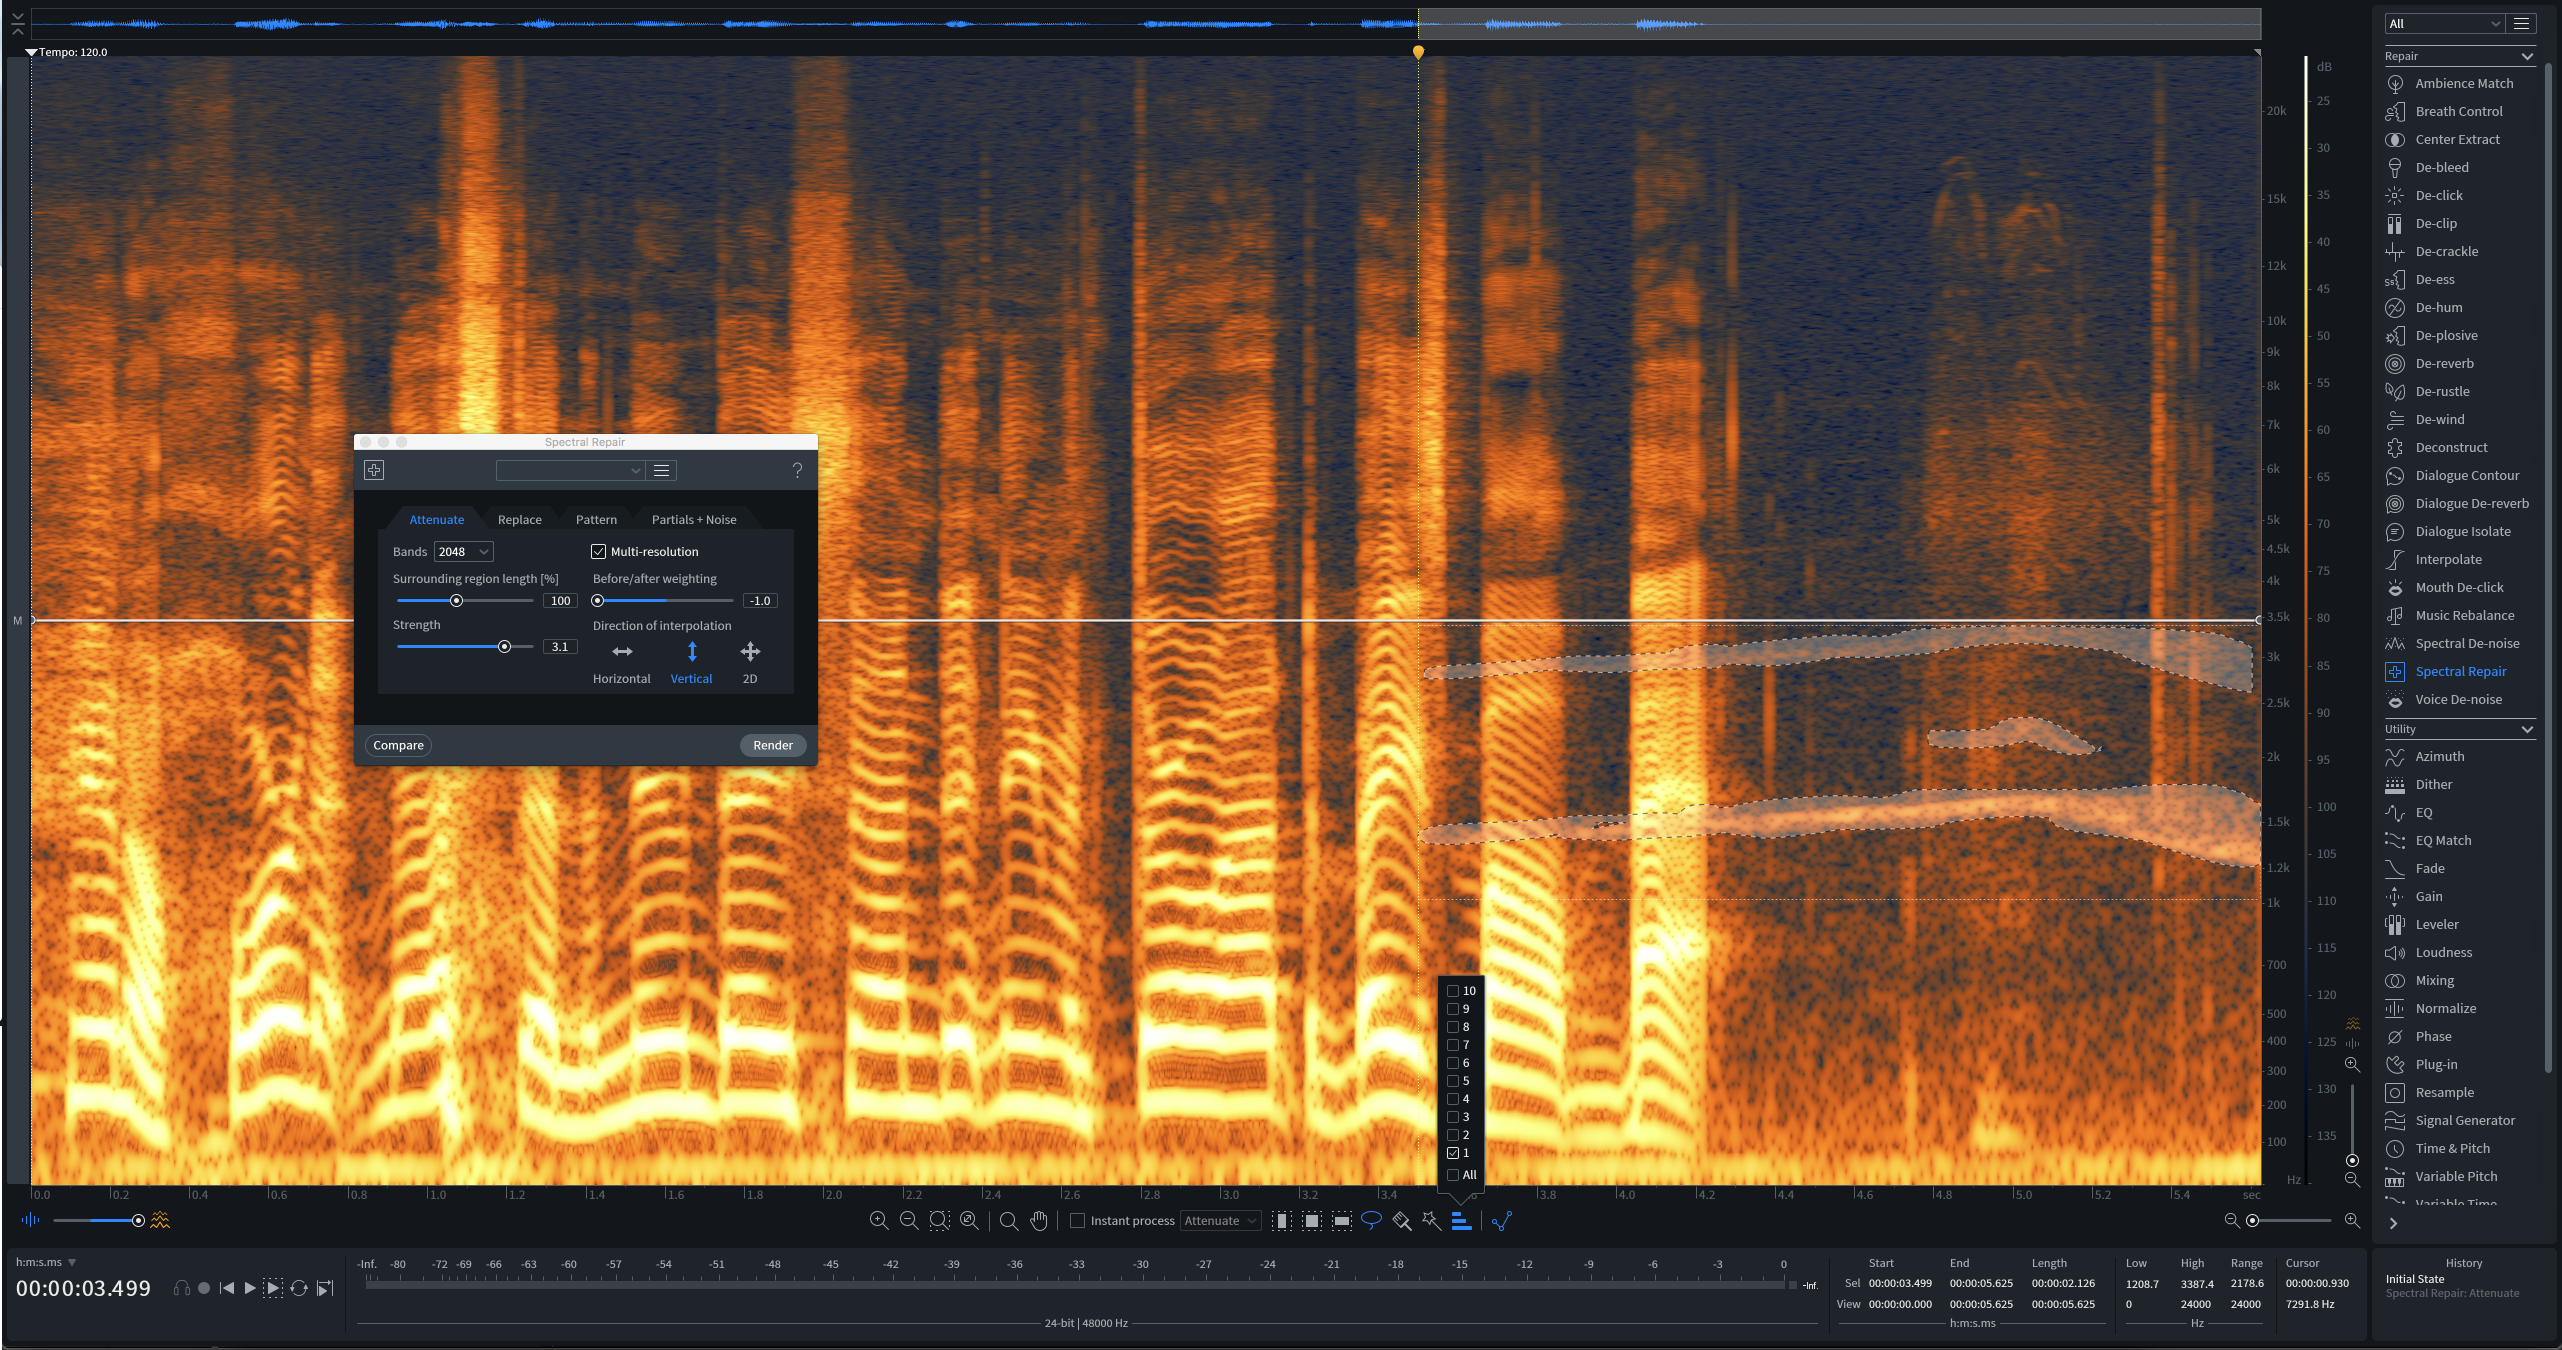
Removing a siren with the RX L lasso hotkey
The audio selected in this screenshot is the prominent siren. If you gander at the slider in the bottom-left corner of the screenshot, you’ll see we’re only looking at the spectrogram, so we can view the sound as it moves through time: note the line that rises up like a mountain ridge; this is our siren.
We can literally select that line and make the problem disappear. We’ll click L, lasso the siren, and select its overtone as well. See below to check out how it’s done.
Sounds good, but further processing is needed to reintroduce the ambience. I can easily sample the sound back in with the Ambience Match module—but that’s a subject for our second tip.
2. Ambience Match for sample-replacing ambience
The issue: an incongruent, gaping hole where our siren used to be. The solution: Ambience Match.
This module has a learn function that samples the ambience of anything you throw under its lasso. As with other modules, you can use it in a frequency-dependent manner to fill the exact holes you need. So make use of your R, L, or B hotkeys.
In this instance, we can scroll to a different passage of dialogue and pick out a silent moment to sample some ambience. Now, our siren sounded between chiefly 1 and 3.5 kHz. So, using the R hotkey, I’ve boxed up some ambience, as shown in this screenshot:
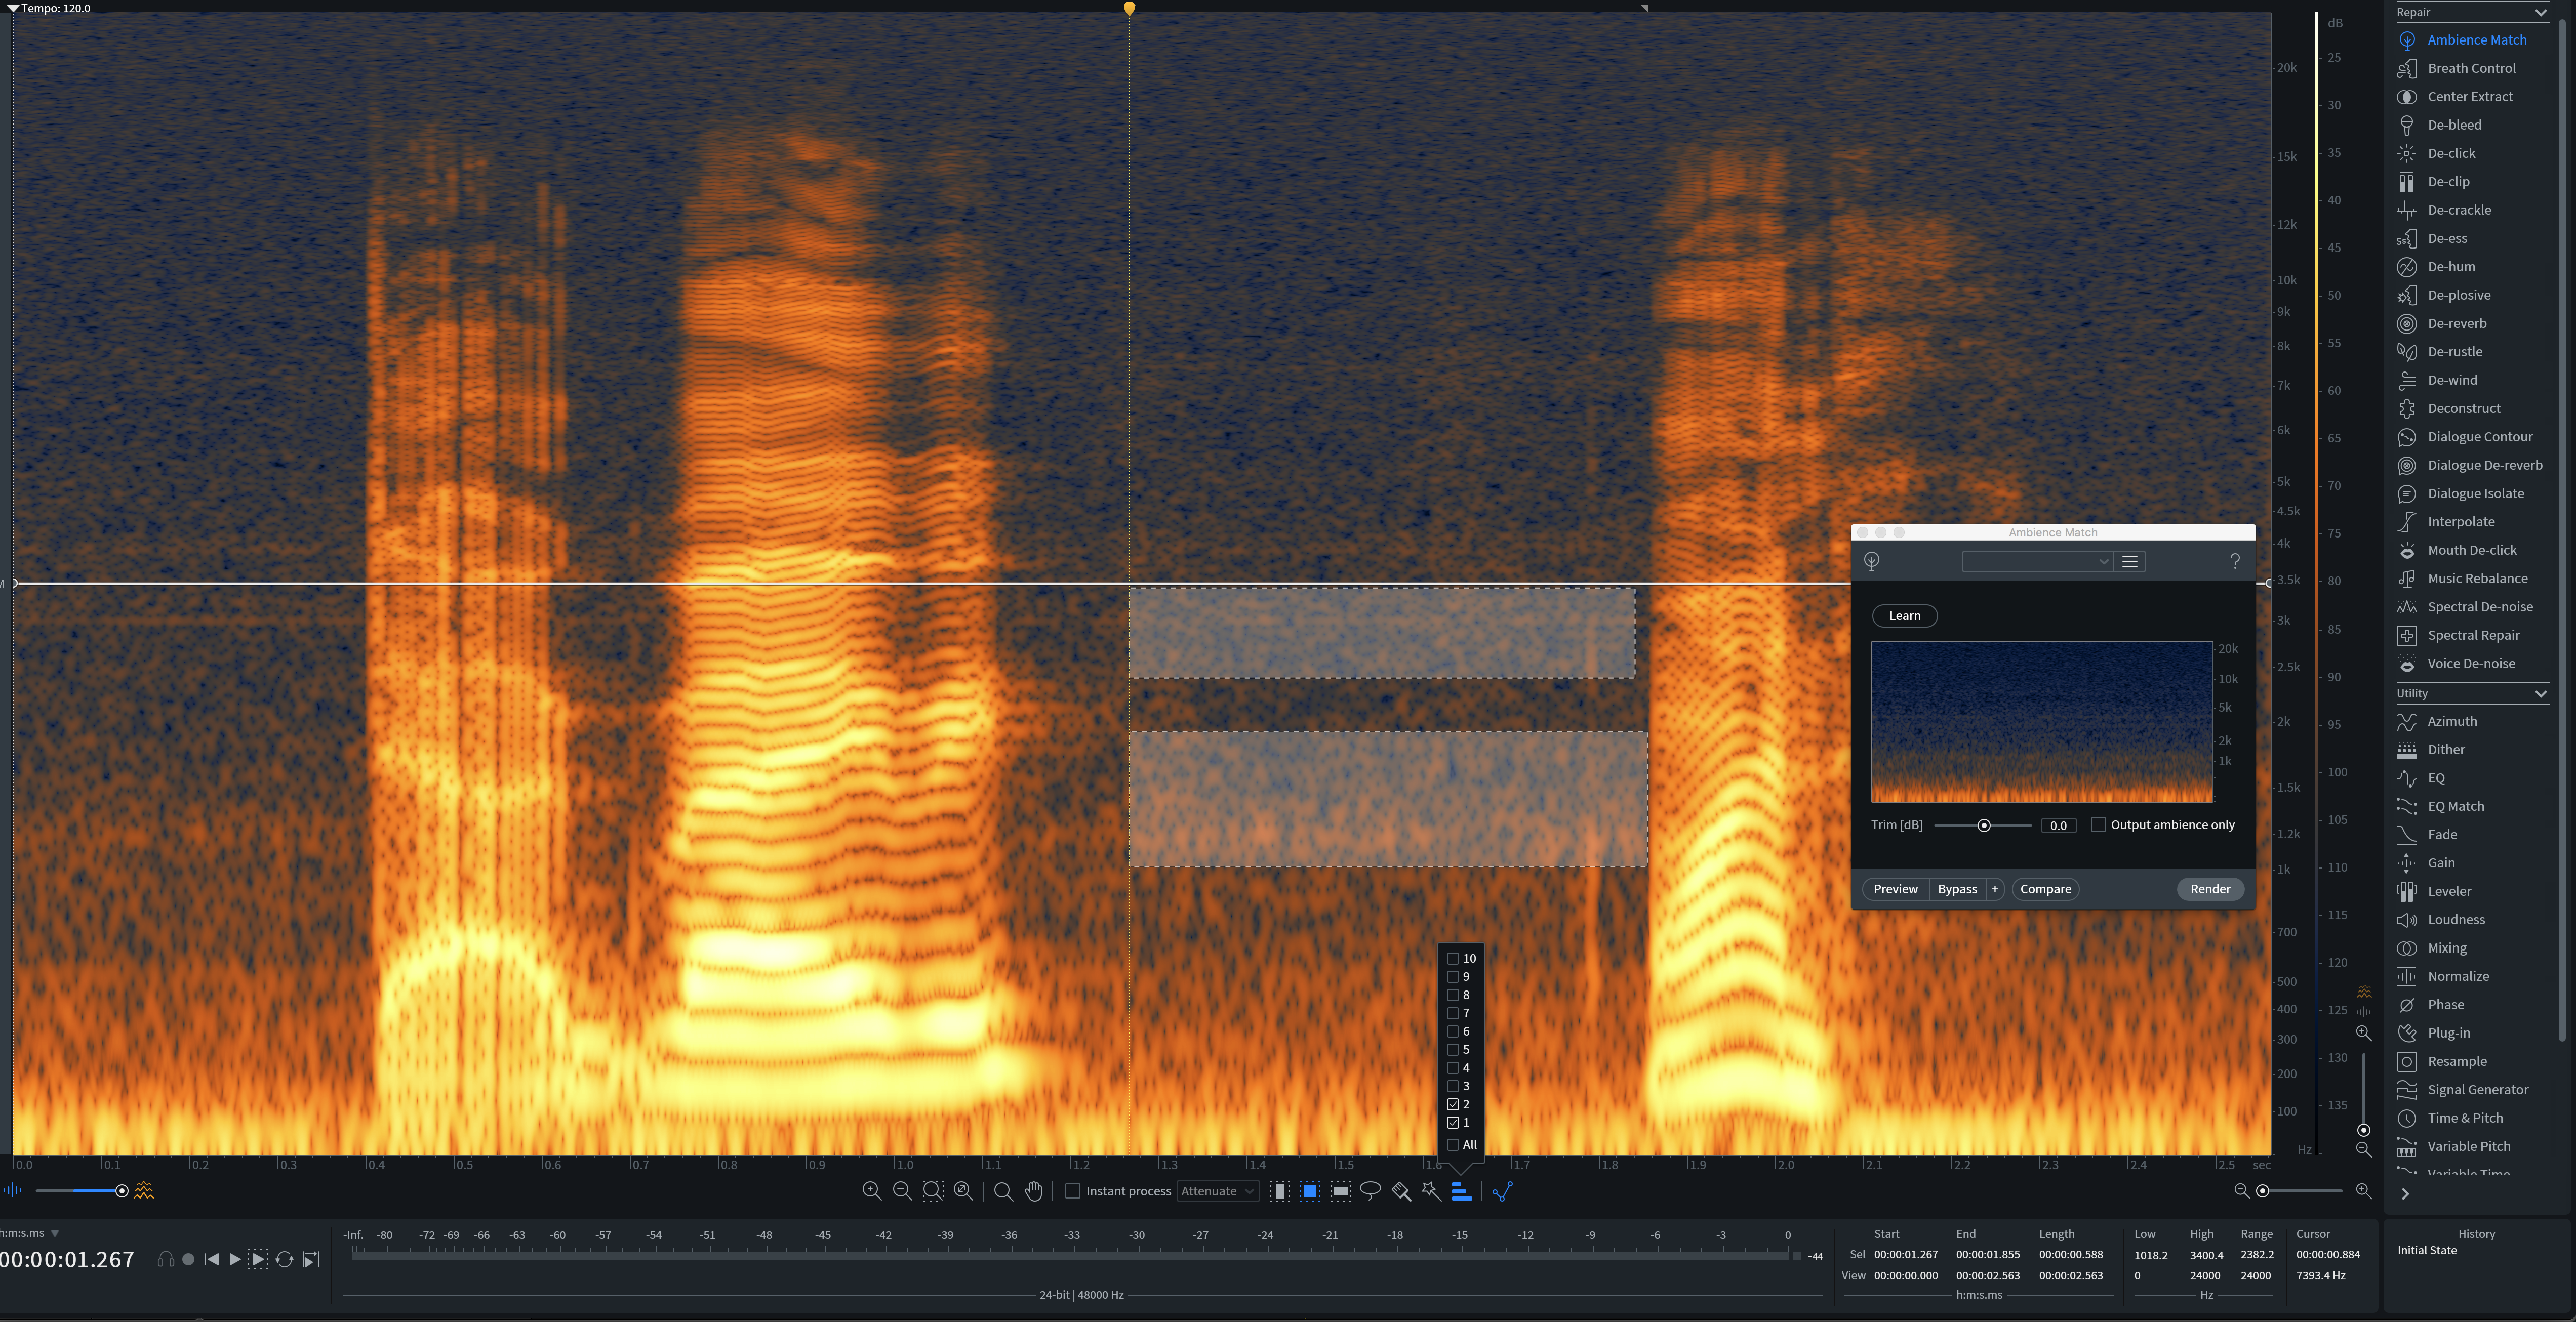
Ambience selected with the R hotkey in RX to run through the Ambience Match module
We hit learn, and scroll back to the siren-less audio:
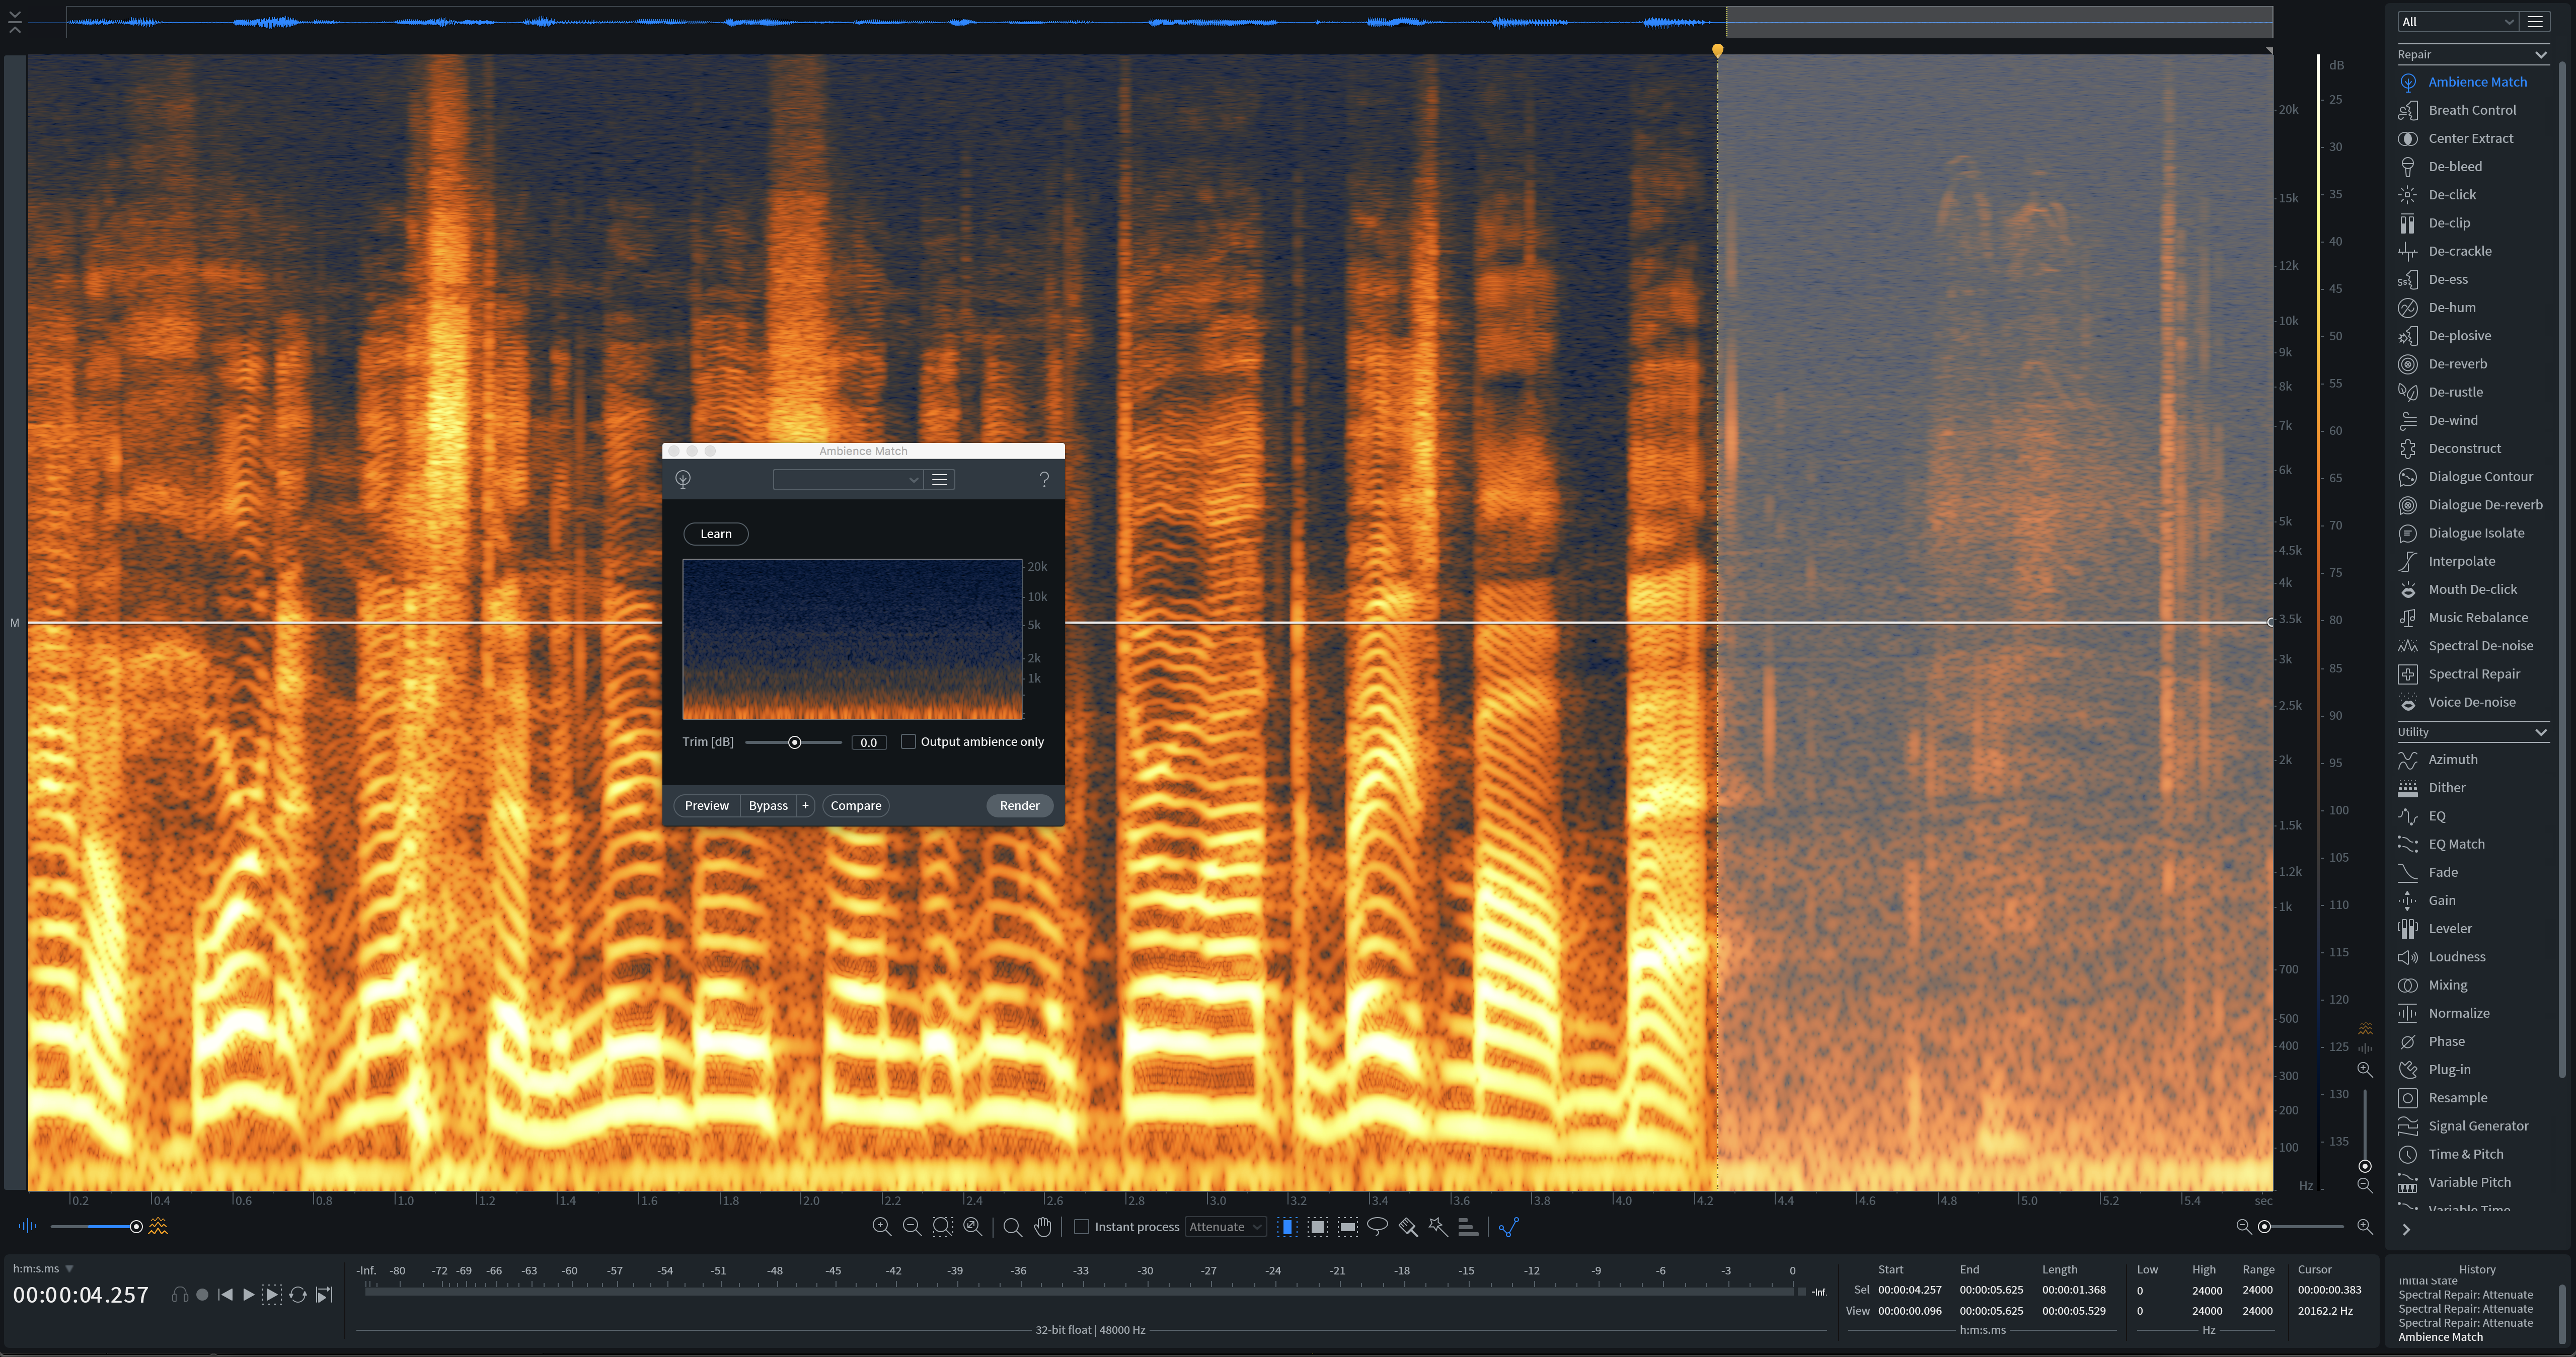
Our siren-less audio selection, after Ambience Match
The result sounds like this, which is more natural:
This is an essential step in covering our tracks. Frequency-based spectral attenuation, followed by supplemental ambience matching, can fix many baffling situations. The only catch is that you must dive into the standalone version to work in a frequency-dependent manner.
3. Undistorting vocals with De-click, De-crackle, and De-clip and gain
Often I have to remove distortion from a vocal. You’d think that the De-clip module, being a distortion-reducing algorithm, would do the best work—not necessarily so. Distortion can manifest in all sorts of ways, necessitating all sorts of fixes in post.
It’s common to find oneself using combinations of De-clip, De-crackle, and De-click. Observe some distorted vocals I got during a live-taped podcast:
De-clipping this on its own won’t work, as observed:
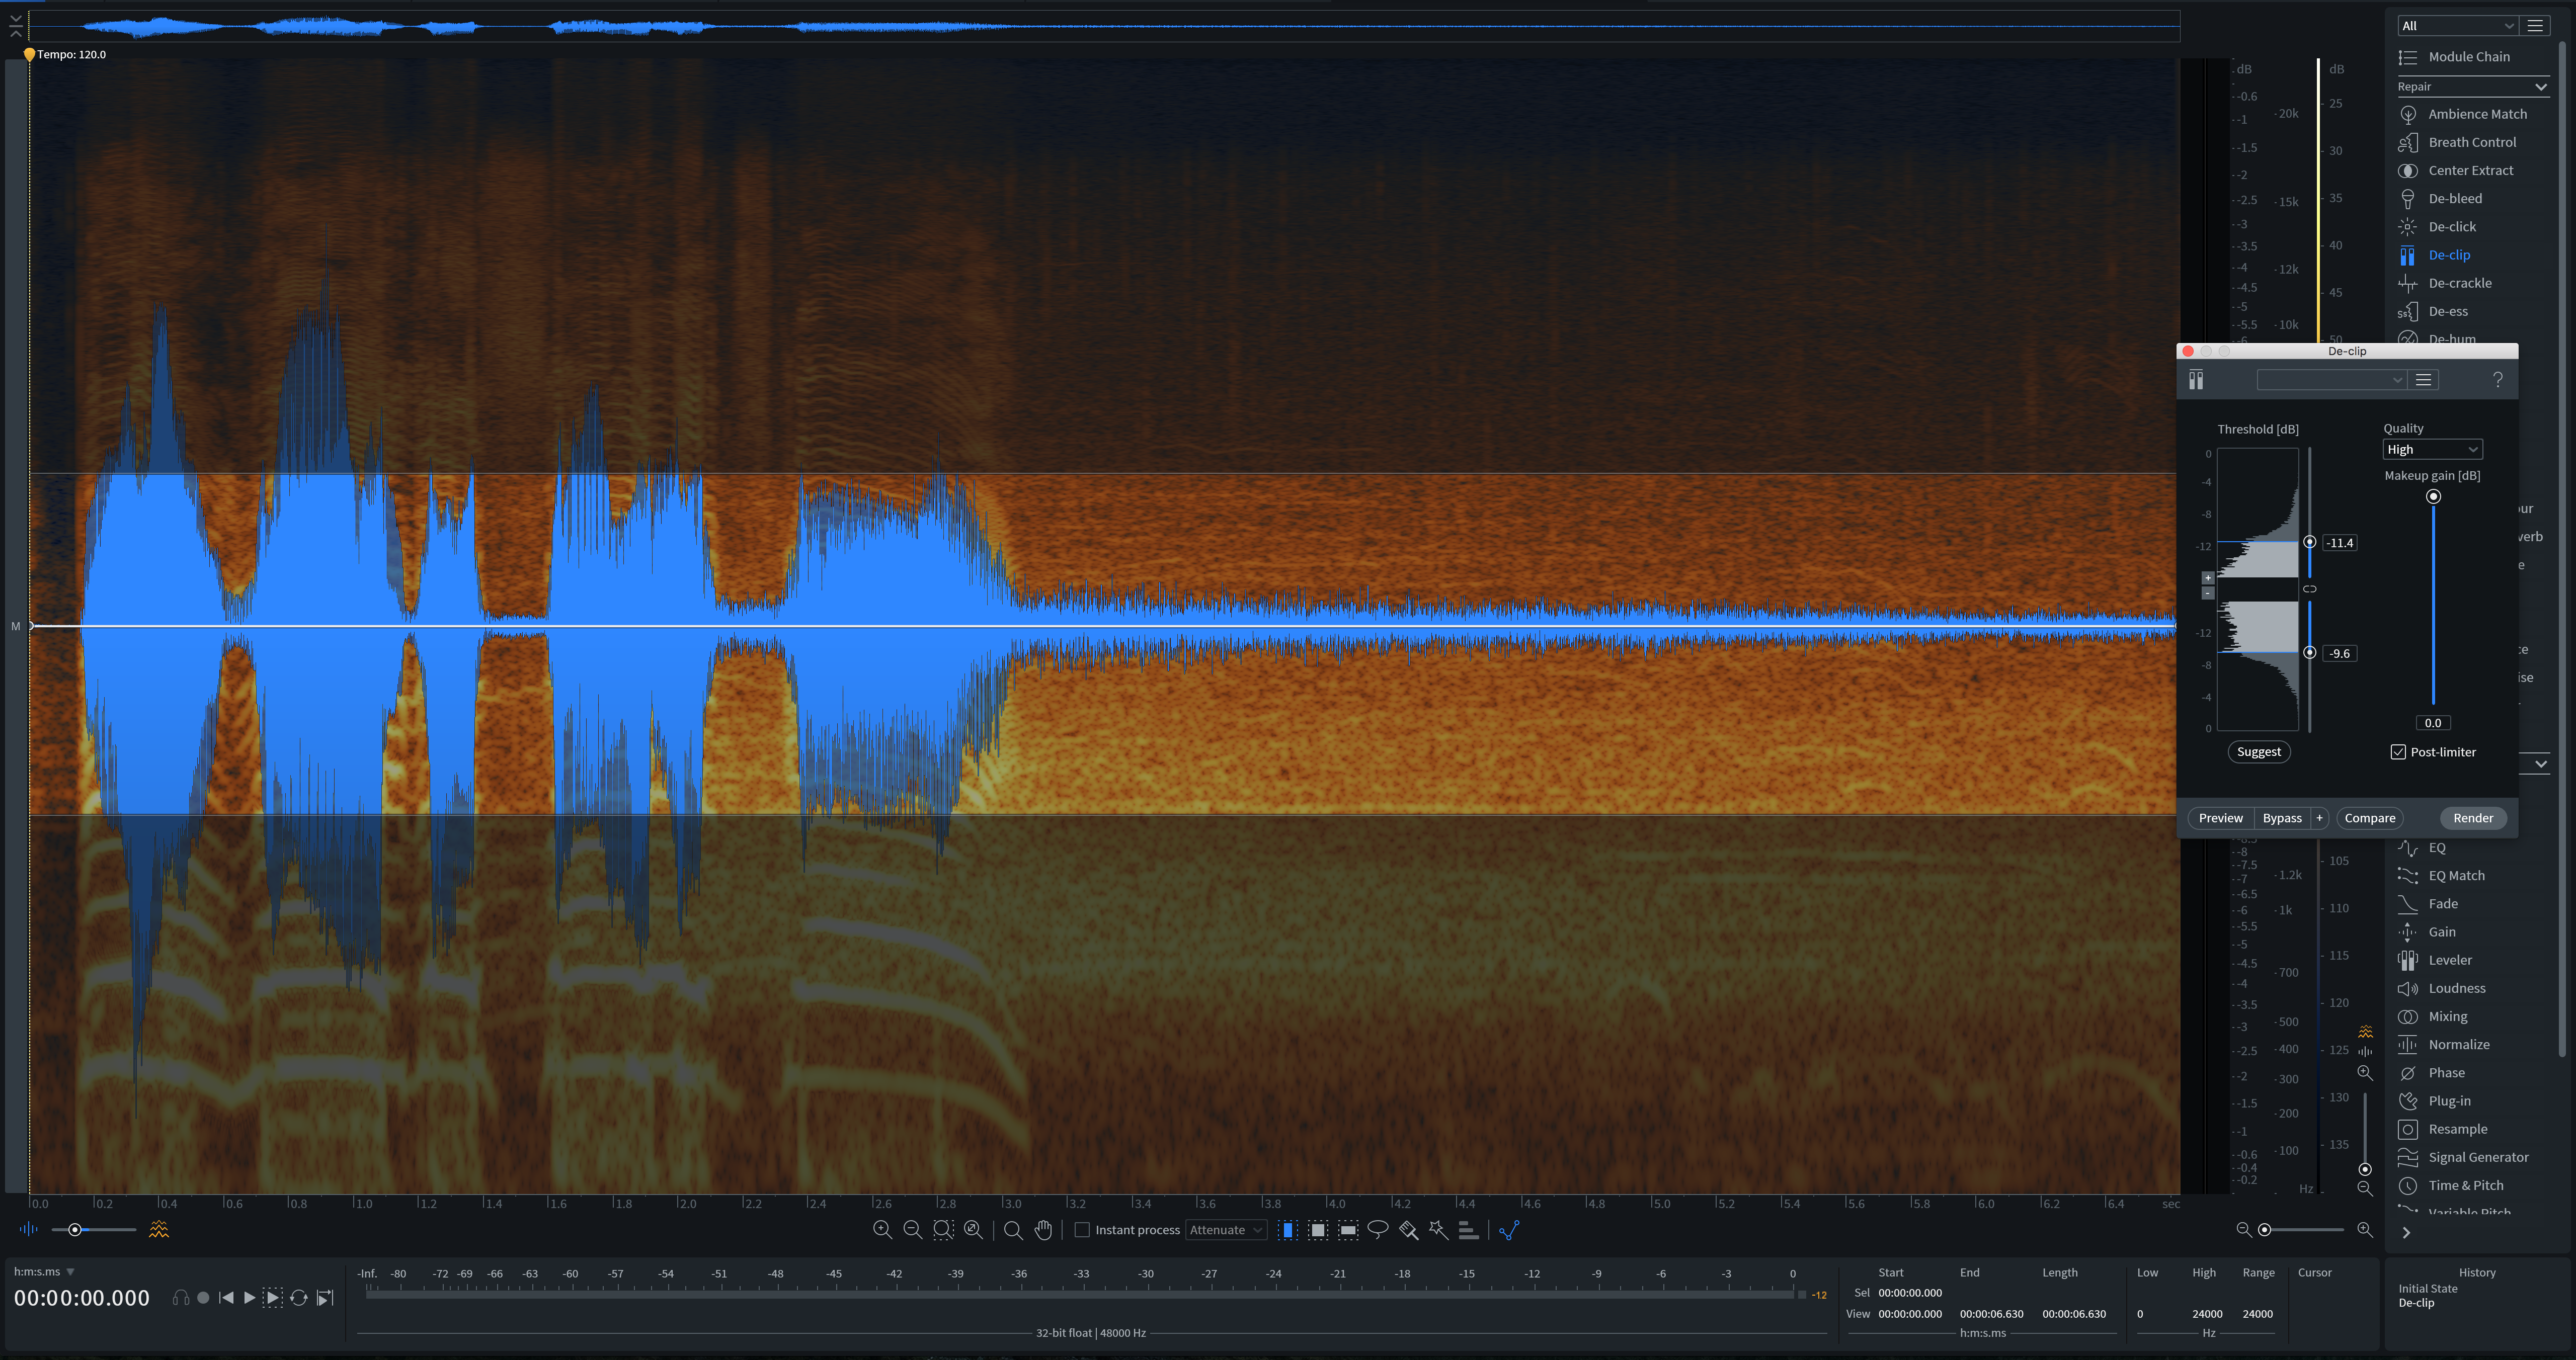
Attempting to De-clip a distorted vocal
There’s still a lot of artifacting going on here; it doesn’t sound natural or pleasant. Now, it’ll never be perfect—distortion is a devil to get out, especially when one has continuously oversaturated the preamp. That said, there are ways of minimizing the crunchiness further.
But here’s where frequency-selective tools can really help: in the spectrogram above, you can clearly see fundamentals and harmonics of the voice.
But note the prominent line of sonic information under the harmonic: this is the distortion we’re hearing, and we can take this out using the simple gain tool. Once we do so, we get this:
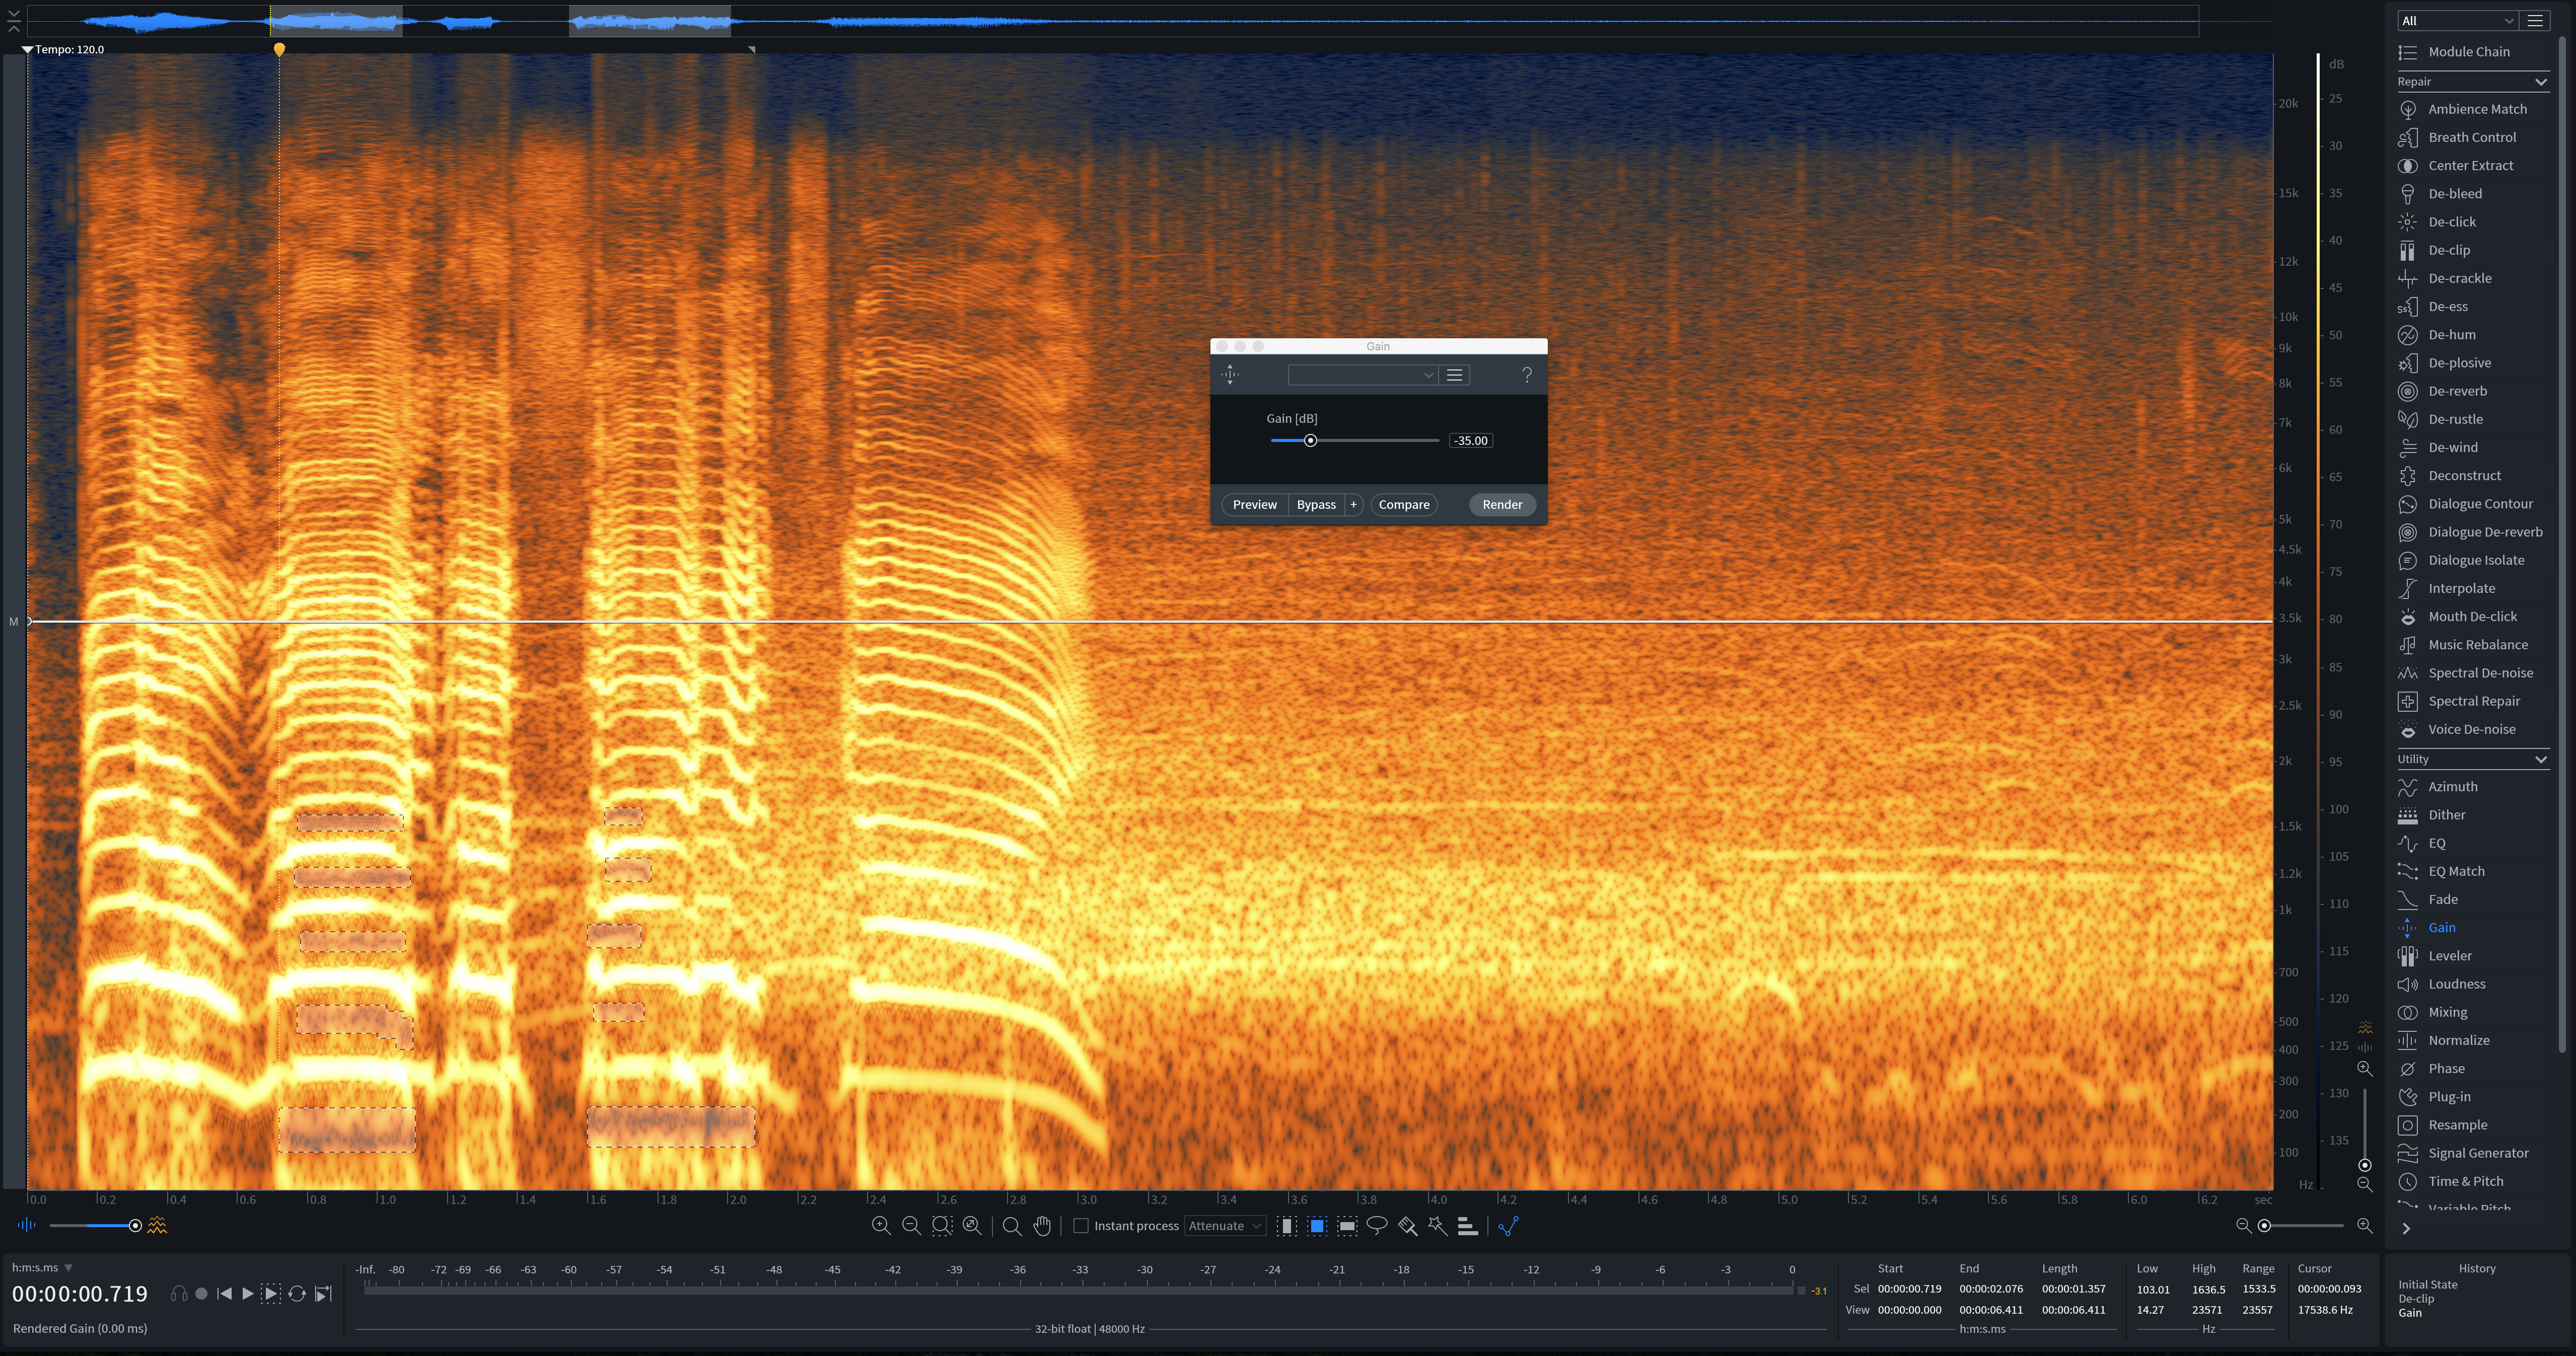
Removing distortion with the RX gain tool
Then, we De-click the thumps in the last word (observe the bottom of the above screenshot to see them), and De-crackle some more high-end distortion out of the signal with the following settings:
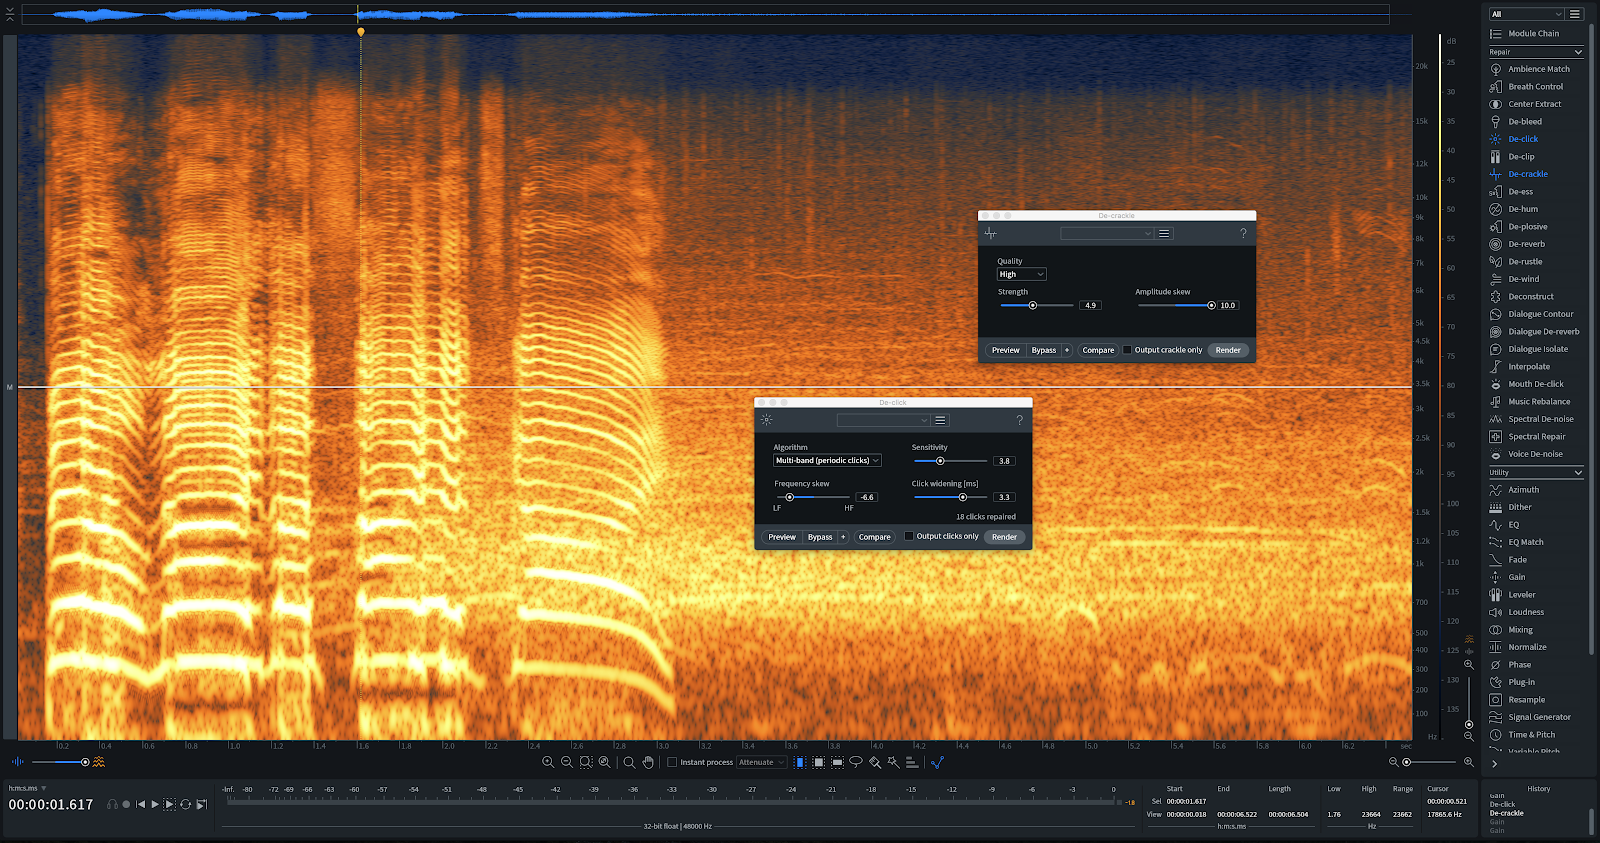
De-clicking and De-crackling thumps
Finally, we use an intelligent selector tool called the “wand” (hit W) to automatically select the fundamental and first harmonic of the signal, and we gain these down by 3 dB, as they were particularly saturated.
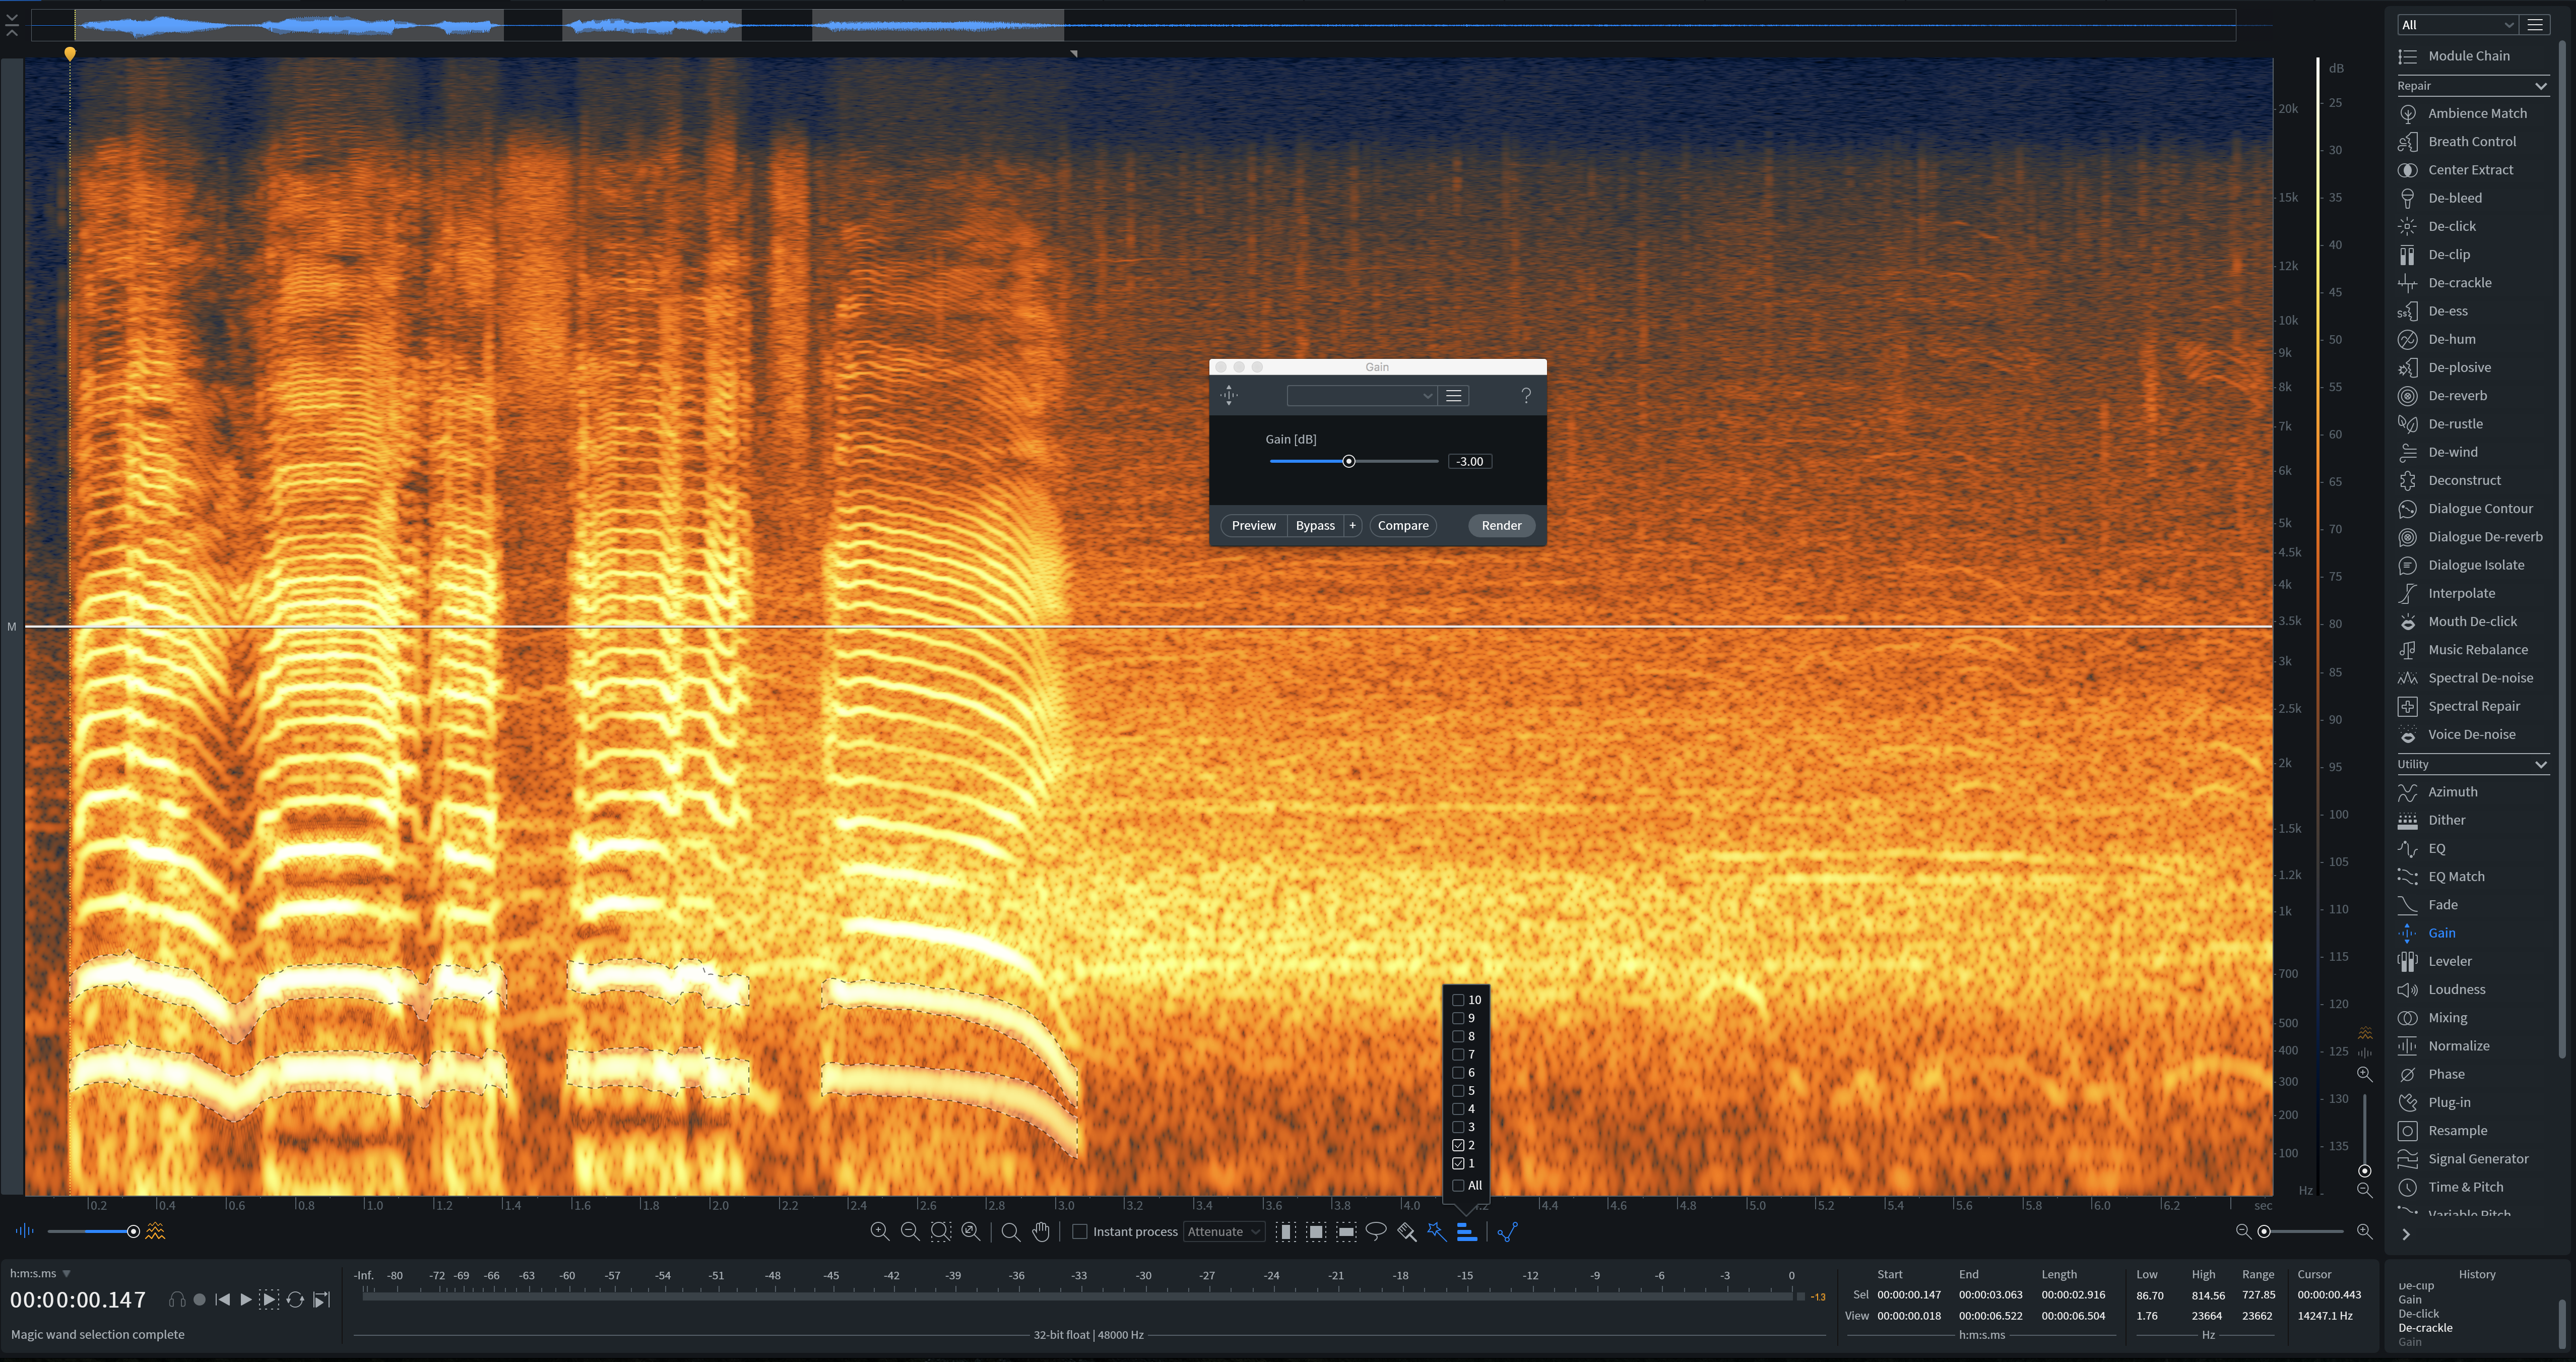
Gaining down saturated harmonics by 3 dB
4. Taking out wind with RX De-wind module
I worked a film once which had a scene set in a windy field. The gusts were so prominent that they disrupted the actors’ voices.
Good thing I had RX 7. Previous to the seventh version, I would use various processes to varying effect, including De-noise, Dialogue Isolate, and hiding the issue with more gusts of wind from a sound library.
RX 7, however, has a De-wind module that makes minimizing the wind easy.
Listen to this track:
In previous years, I’d have to use a bunch of tools. First Spectral Repair, as outlined above, to eliminate the frequency rumble of the wind. Then I’d have to De-noise the whole track, EQ it, add some fake wind back to the scene, EQ the wind to match the sound sample, and blend it all.
Years ago, when iZotope RX 5 came around, it got easier: I could get around the issue with Spectral Repair and Ambience Match:
But now, one simple module can handle it all: De-wind. Observe the following settings and sounds:
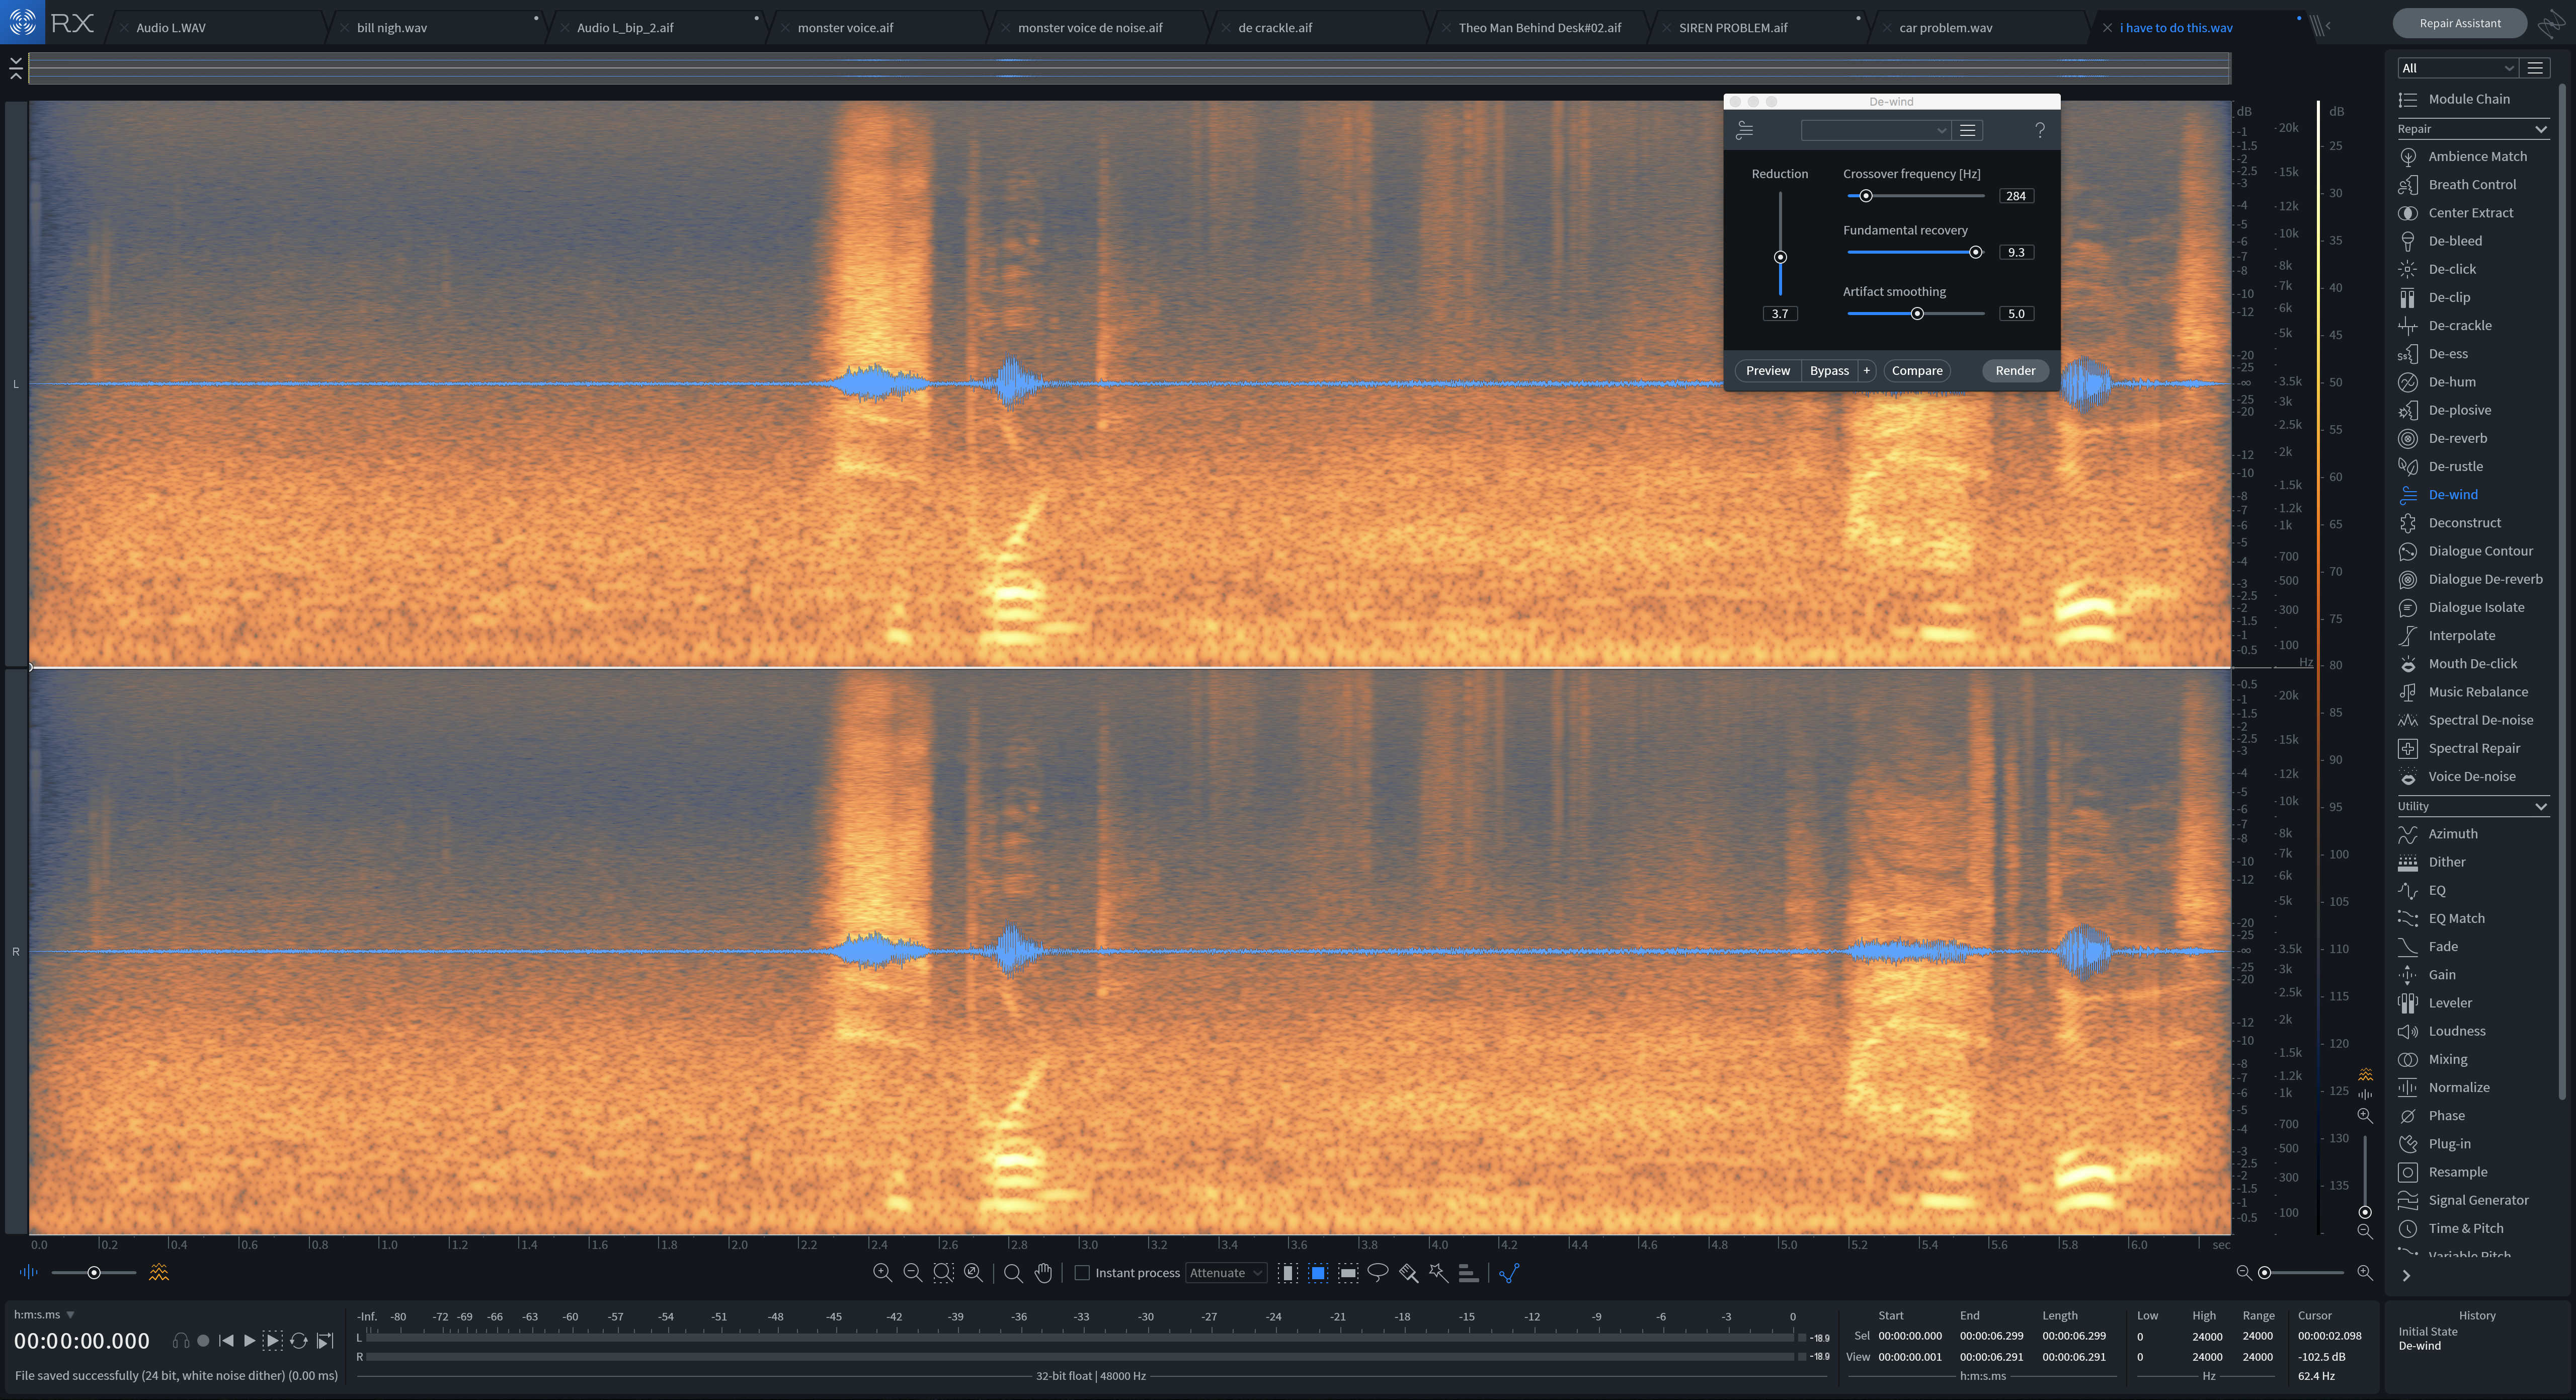
De-wind settings in RX 7
5. Taking out background sounds quickly with Dialogue Isolate in RX
Deadlines are the bane of all existence, so tools that speed up workflow are always welcome. As such, I’d like to highlight an interesting use for Dialogue Isolate.
This is a great tool for cleaning dialogue with dynamic noise issues. The following, however, wasn’t a dialogue issue, though it did involve preserving an actor’s mic:
It was a viking movie. A farmer, looking for his wife, hid from some goons in the forest. The sound of this man flattening himself against a tree was perfectly captured. A small problem however: there were cars and machine noises in the audio. I don’t know how much you know about viking times, but they didn’t have cars.
This is what we had to deal with:
The obvious fix is to trash all the audio and foley everything in. Doable if you don’t have a deadline. I, however, had just one day.
On a lark I decided to see what Dialogue Isolate would get me with the following settings:
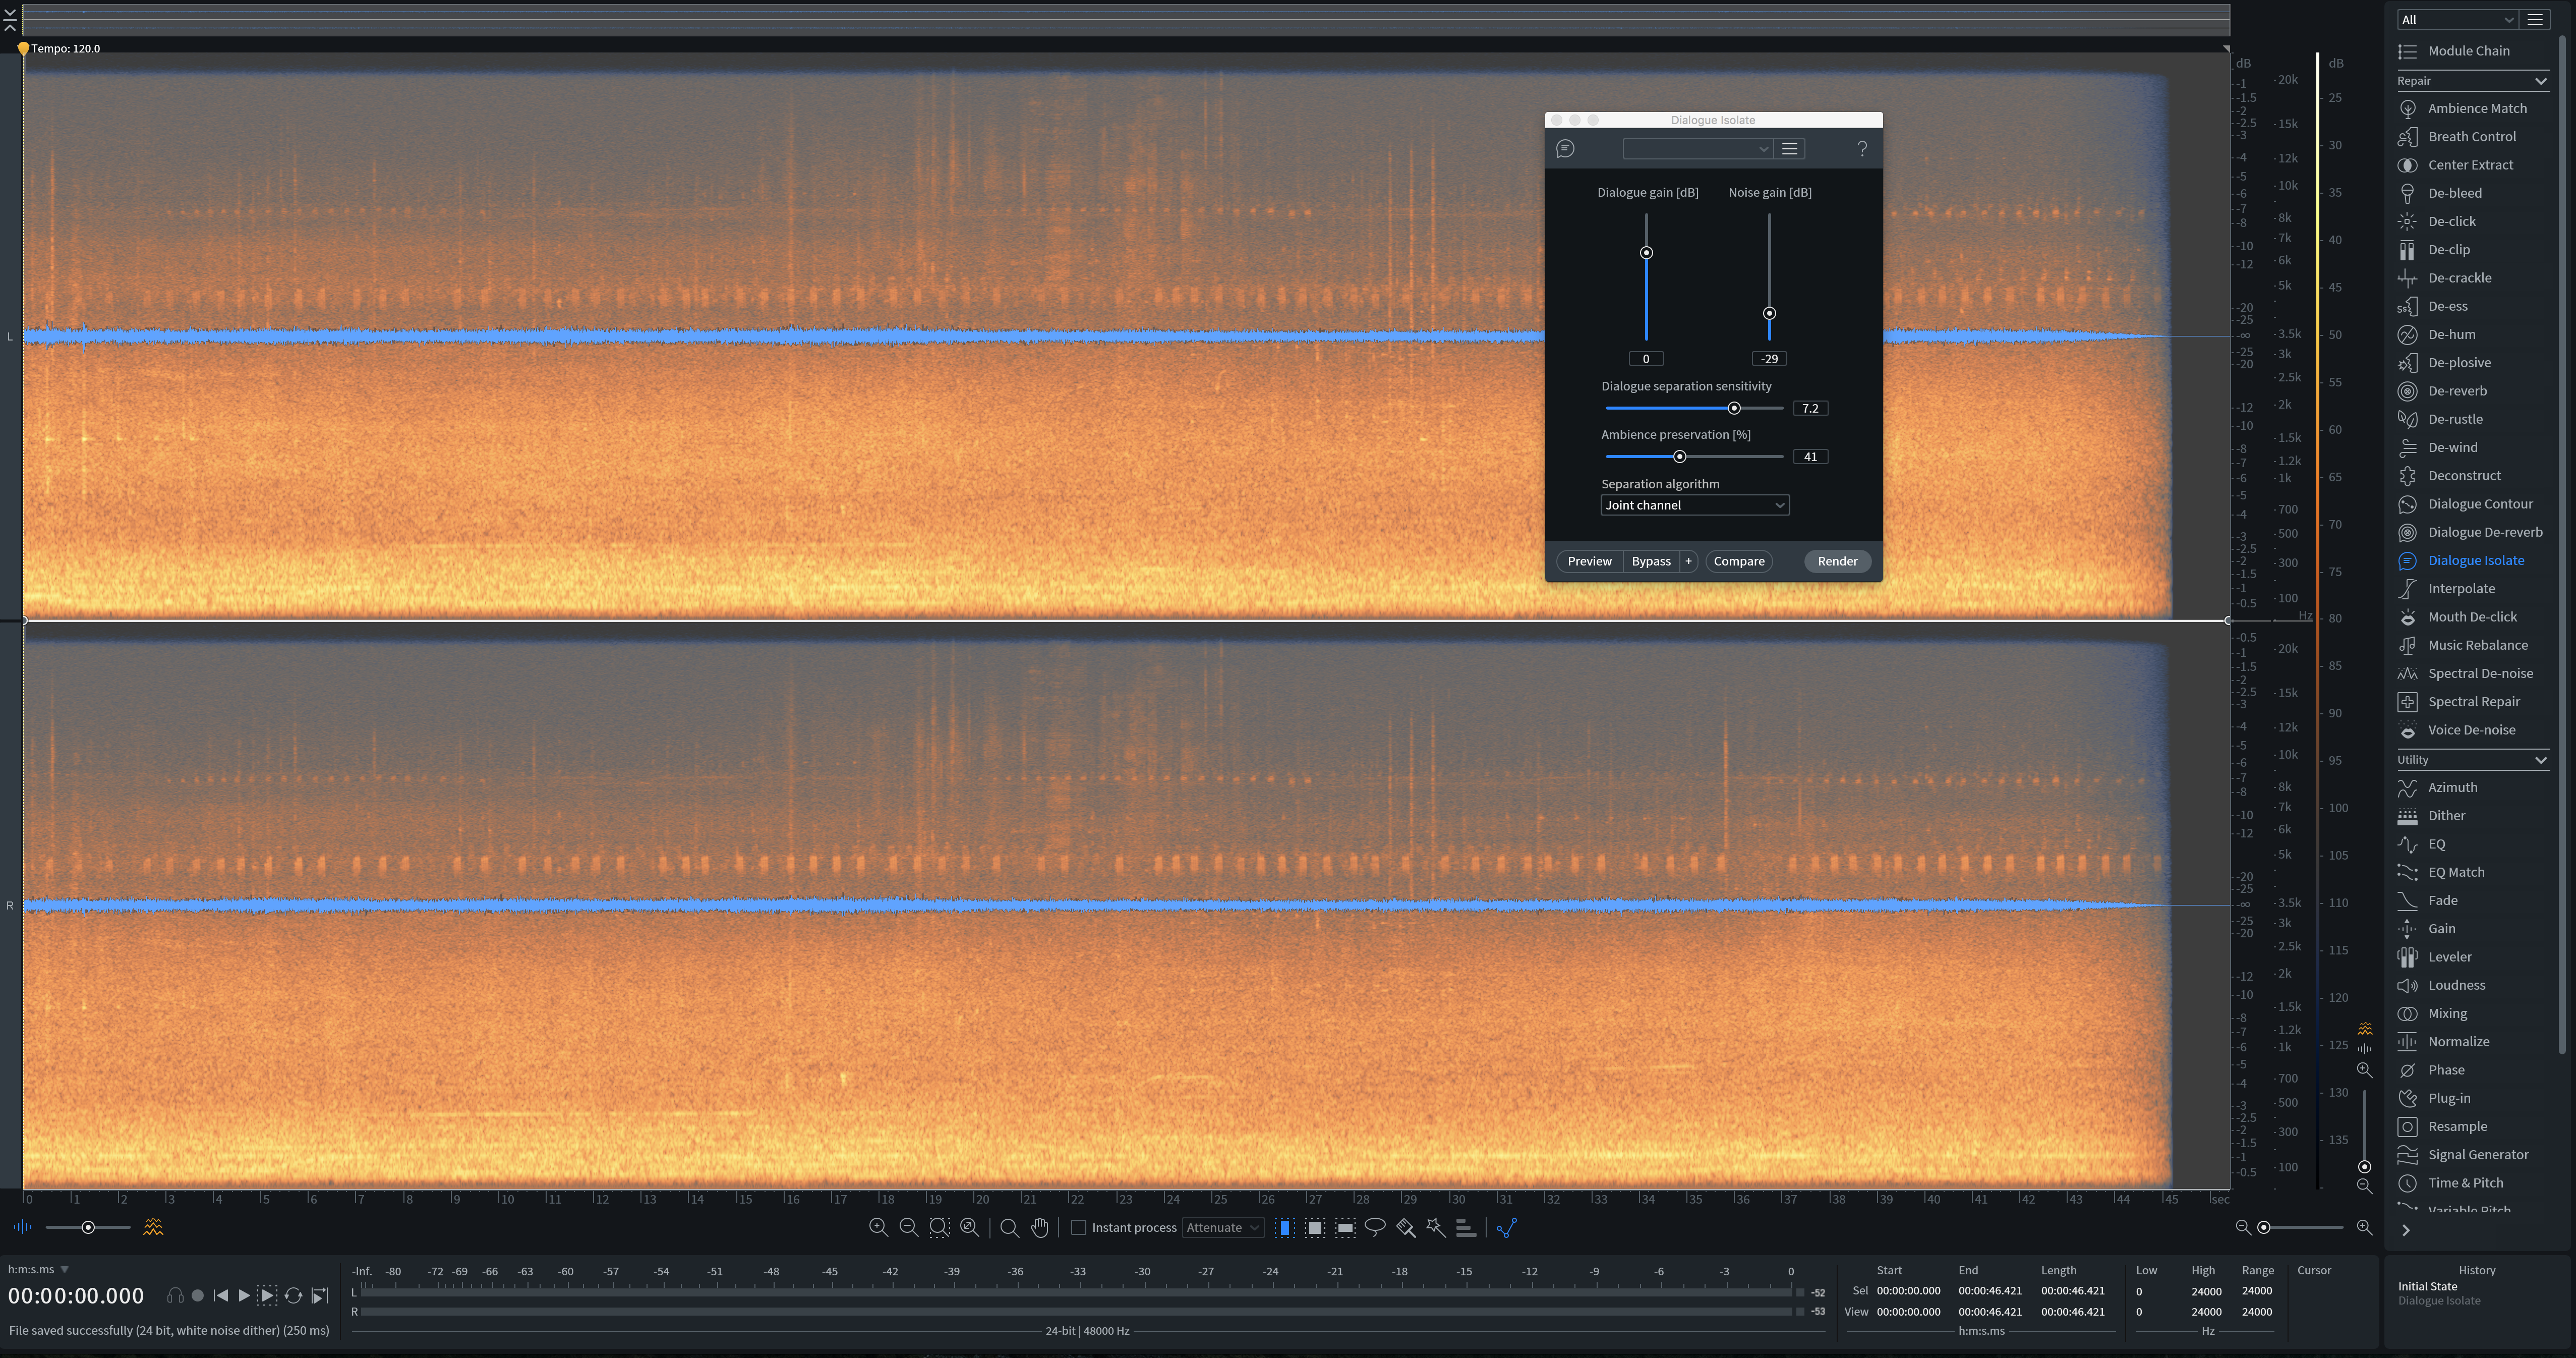
Dialogue Isolate settings in RX?
The results?
6. Dialogue Match and Ambience Match
In a previous article, I wrote about the lengths it takes to blend incongruous vocals with their surroundings. We used an example of looped dialogue—dialogue overdubbed in post—which was de-noised, equalized, and reverberated. It was a multi-step process.
How fast time flies! This is now a one-step process thanks to a new tool from iZotope: Dialogue Match.
Pairing technologies from RX with reverbs developed by Michael Carnes, this tool blends the strengths of both companies to deliver incredible results.
Observe this scene again, with its dialogue sticking out like a sore thumb:
We select the audio we want to process and enable Dialogue Match as an AudioSuite process in Pro Tools. The following window pops up:
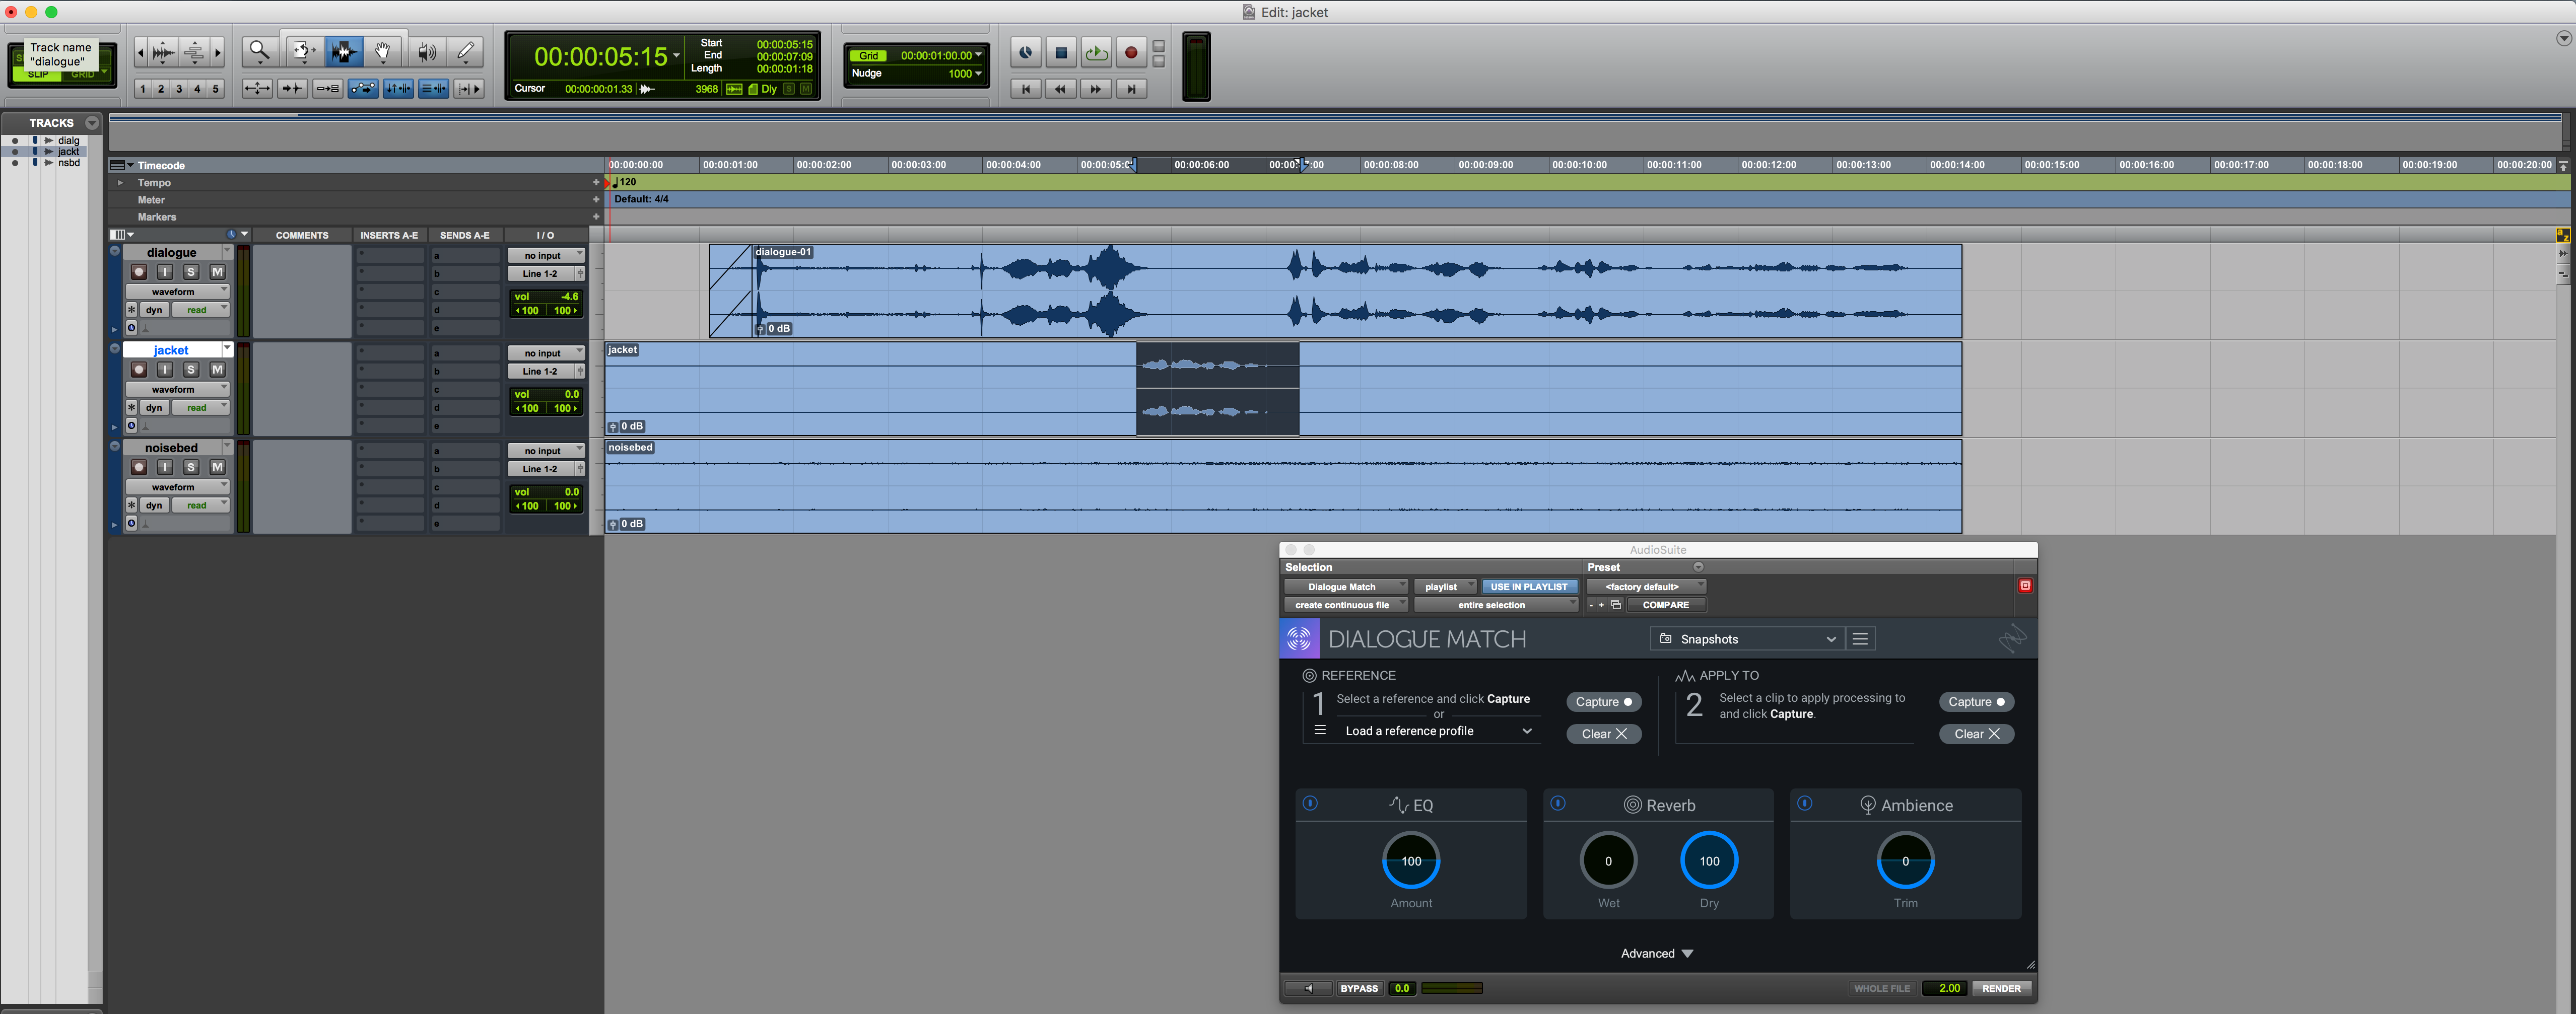
Dialogue Match in Pro Tools
You select the reference audio, which, in our case, is the dialogue recorded on location. Hit Capture in the Reference section of Dialogue Match, and a reference profile is made.
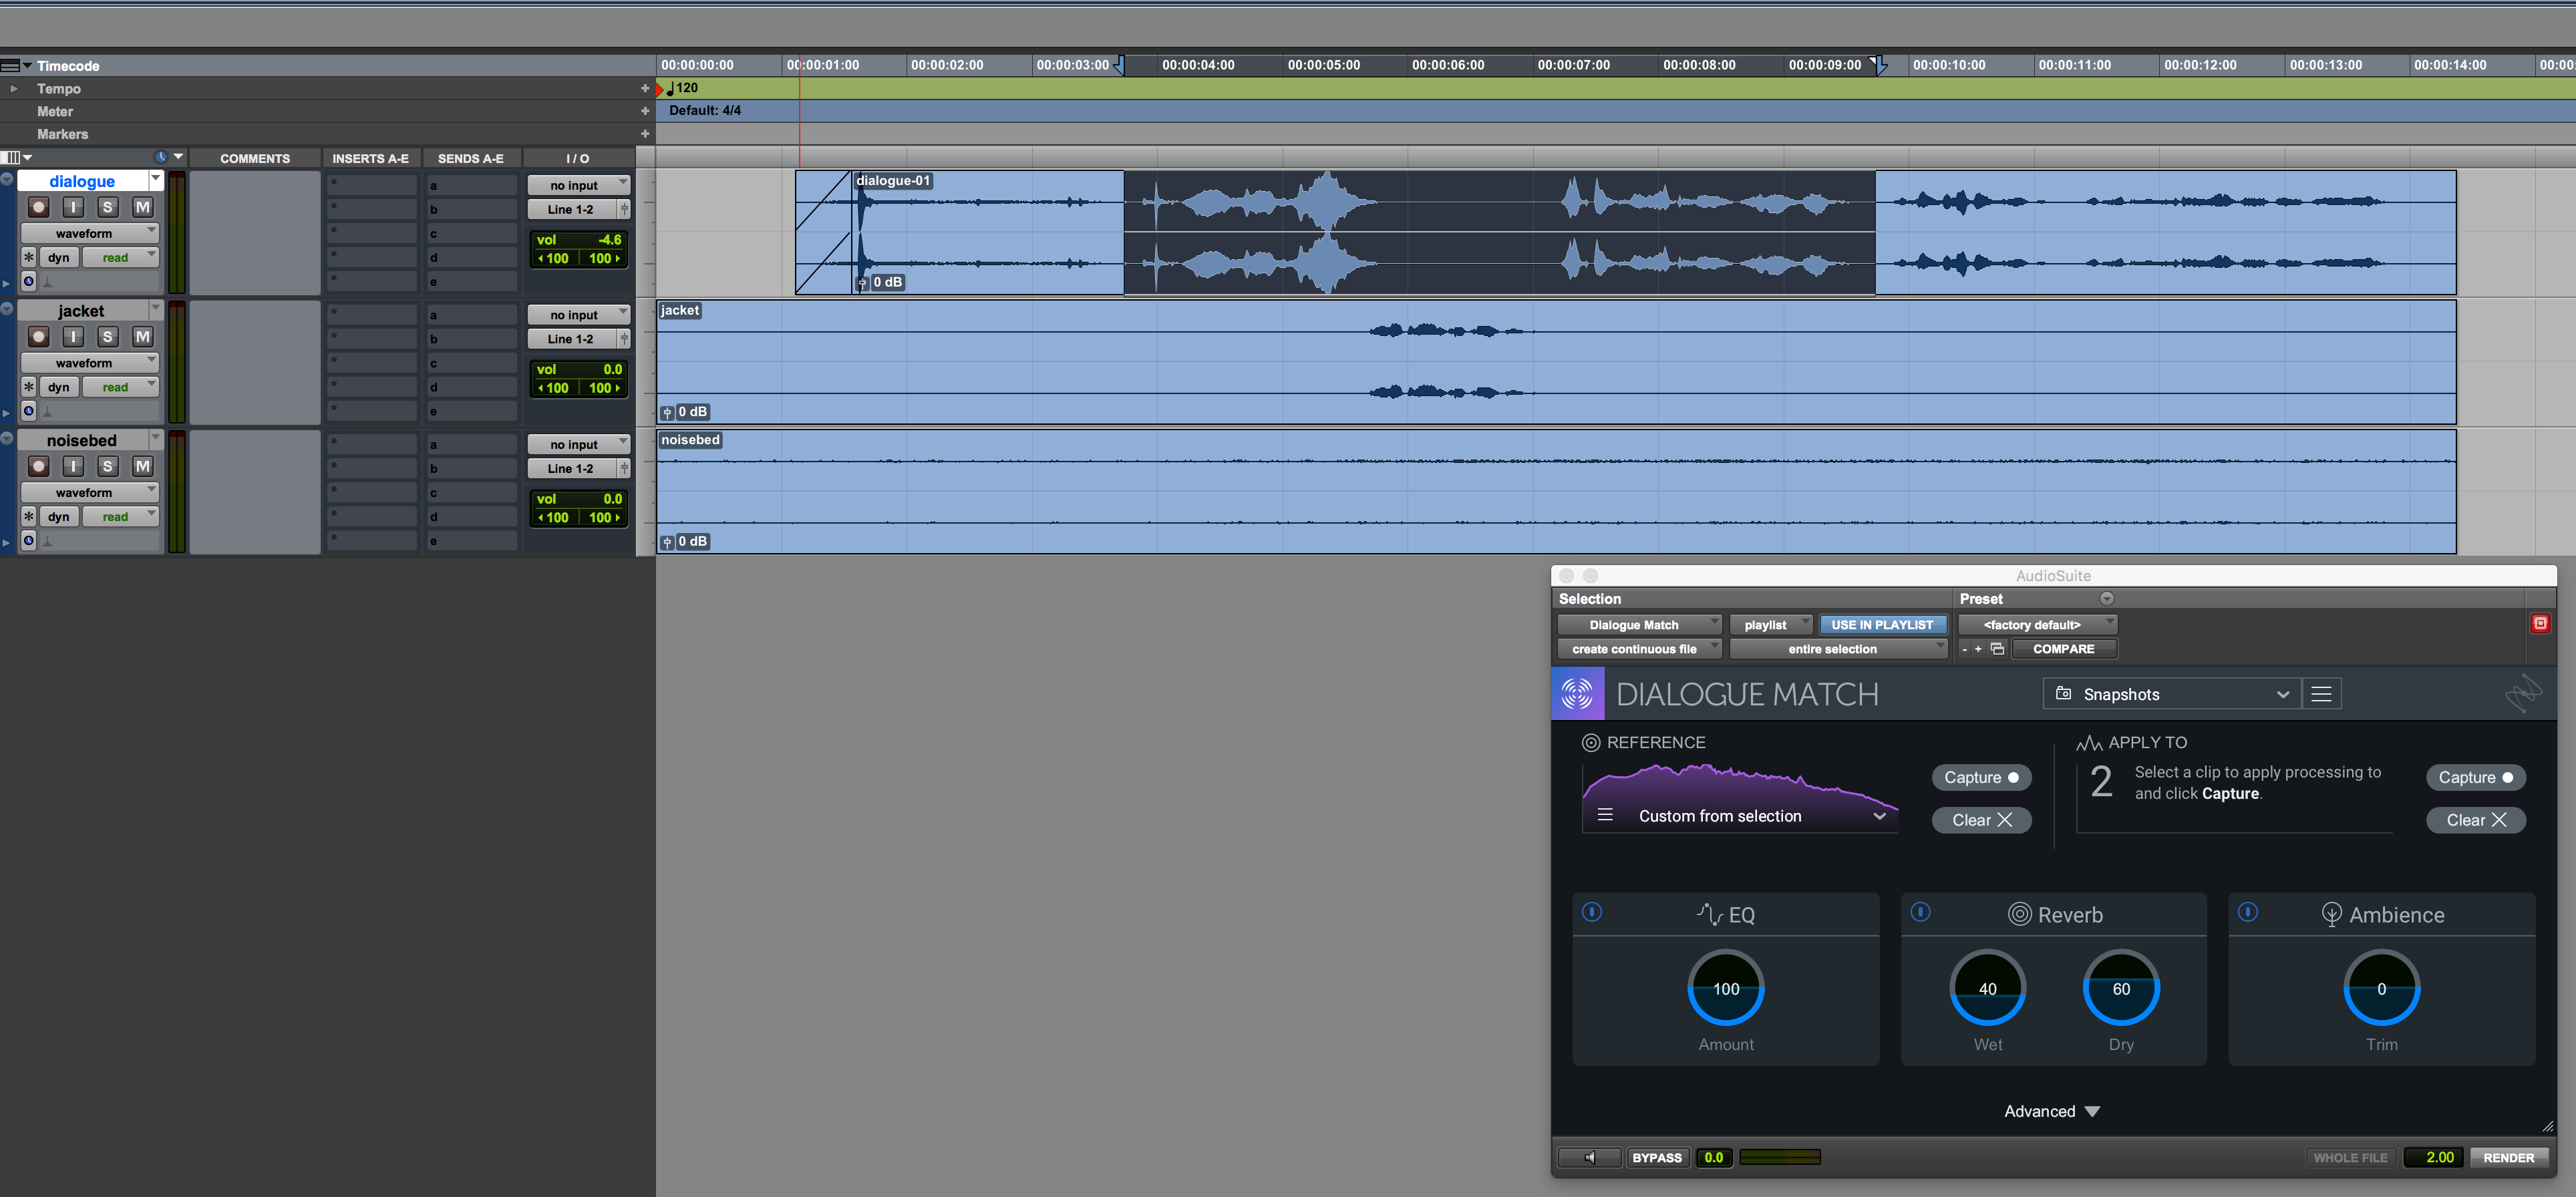
Dialogue Match reference section
Do the same thing with in the Apply To pane of the GUI, this time selecting the region you wish to process.
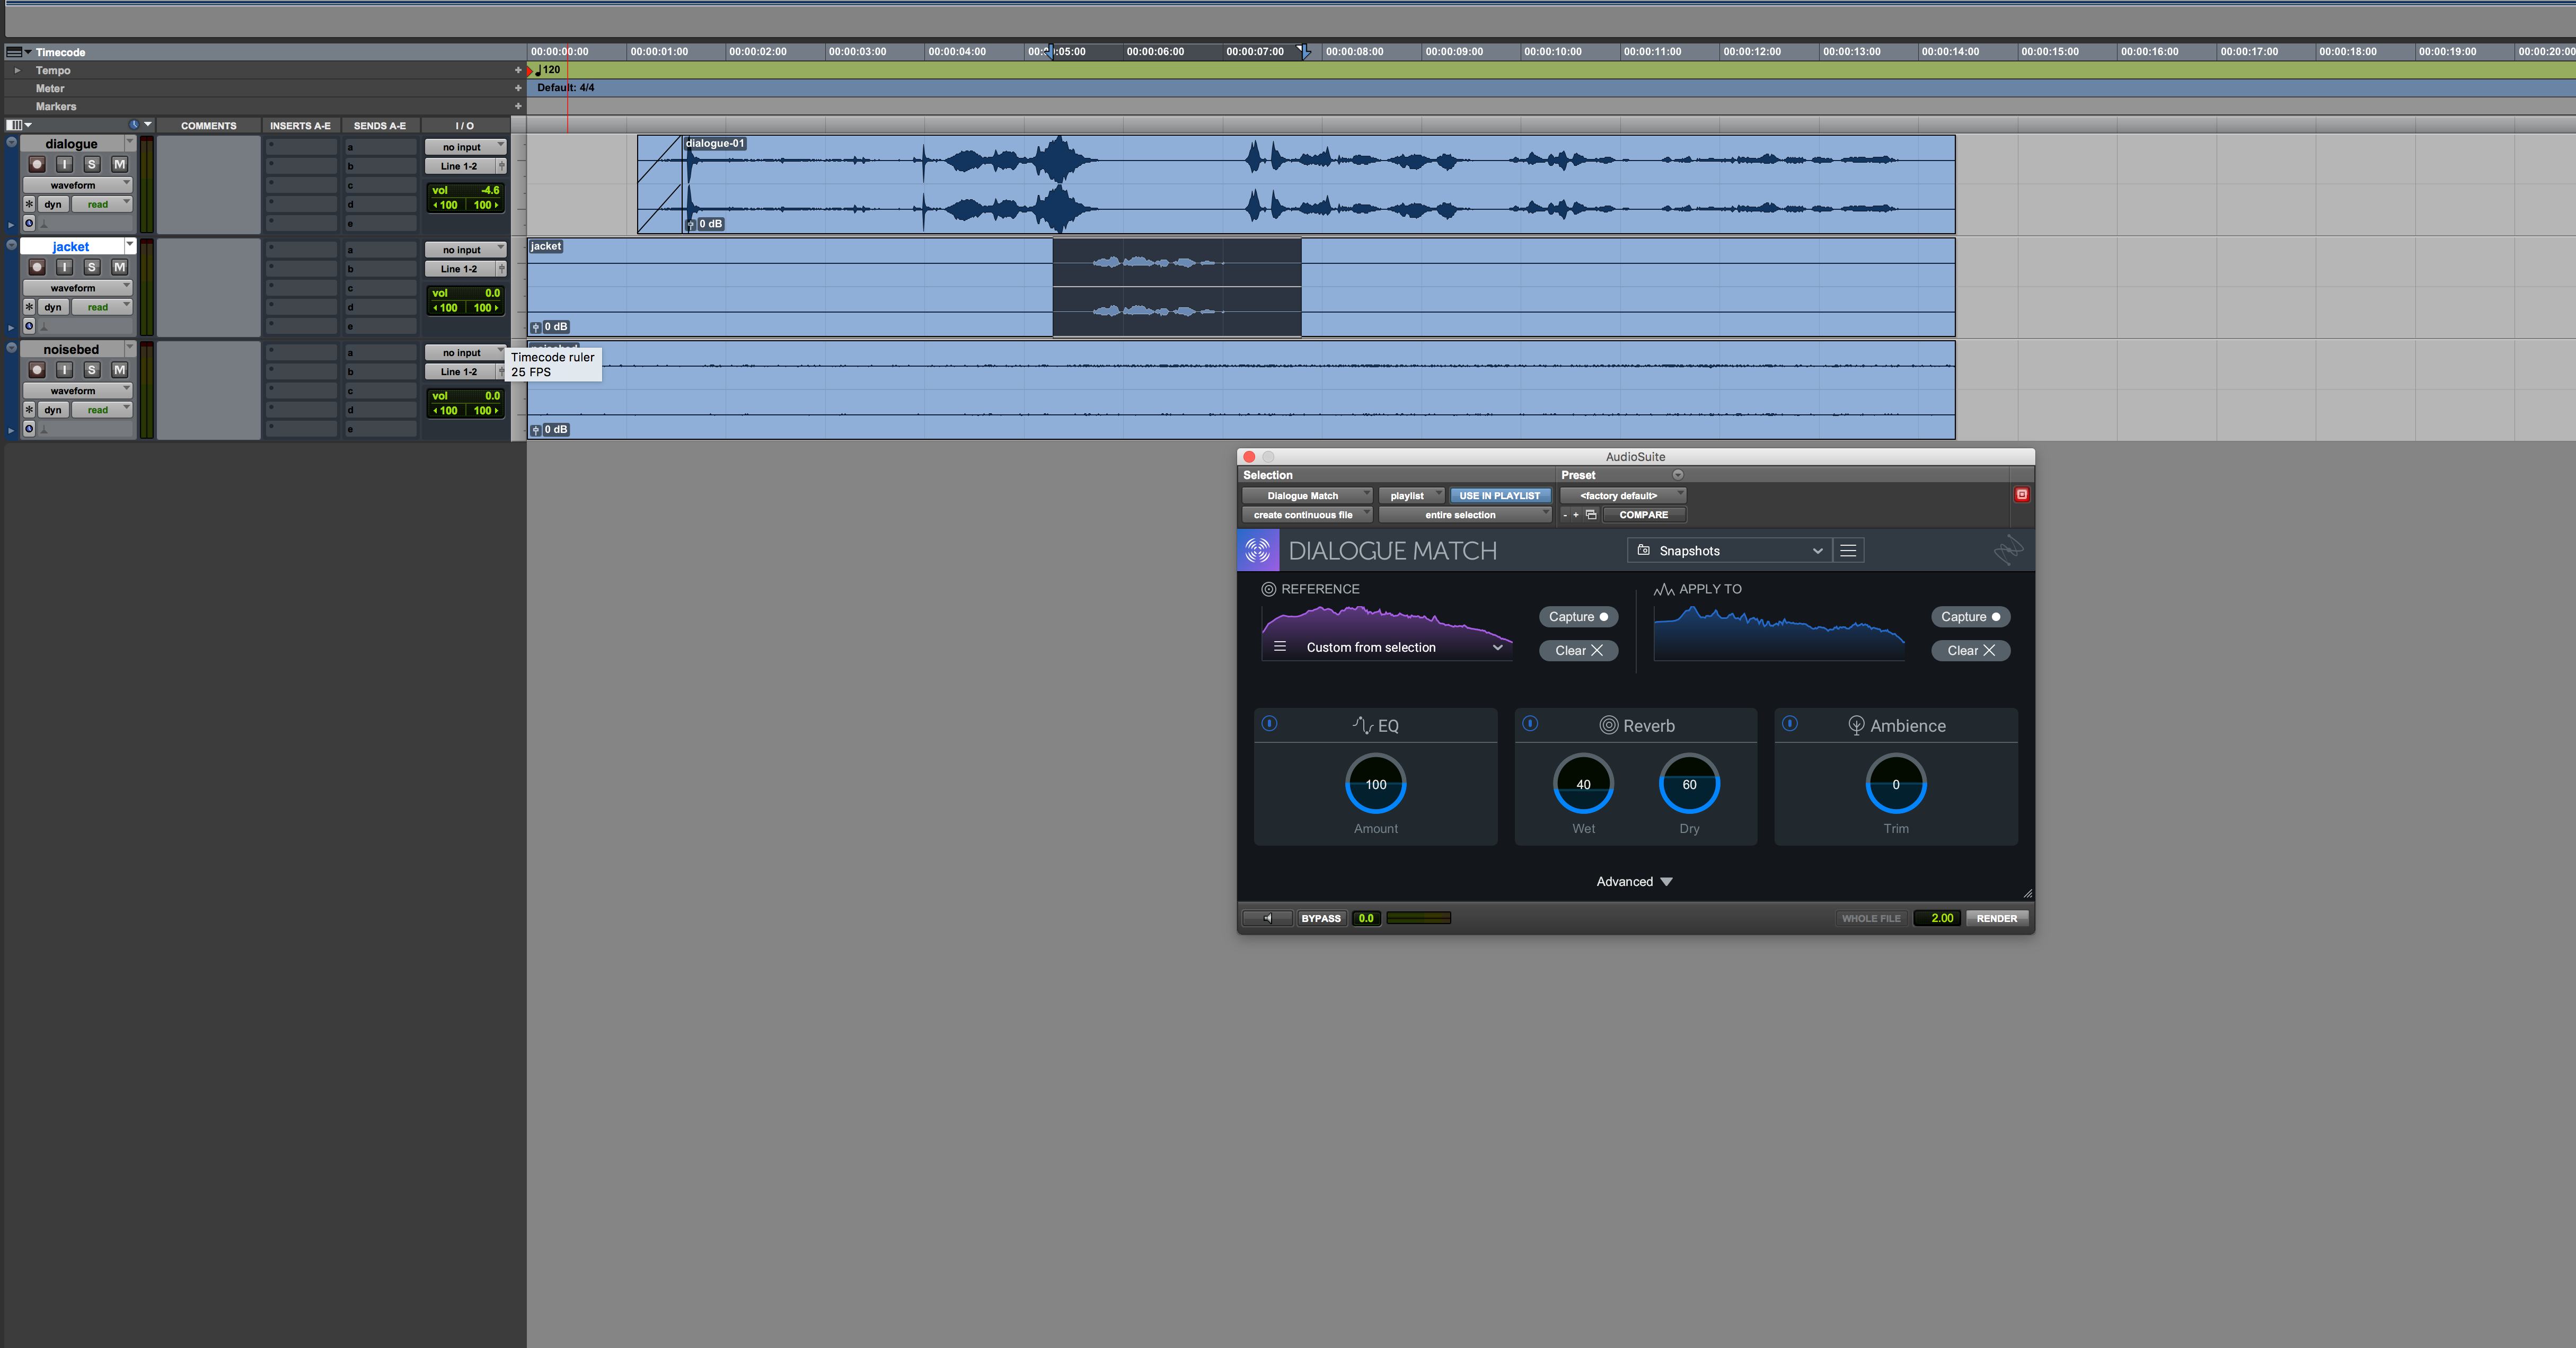
Dialogue Match with processing region selected
From there, we just tweak as we preview the results, and this is what we settle on:
That’s one step for fixing a time-consuming process. This makes life eminently easier.
Conclusion
We’ve seen the good RX 7 can do your troublesome problems. Let me end, however, with a word of advice: you need not go overboard in every case, dealing with every problem. Indeed, if you work in this business, you’ll be subjected to deadlines all the time! Many of the tools in RX 7 are useful not because of how completely they can work, but how fast they can work.
Yes, you can go deep into issues of clipping and distortion when dealing with dialogue in RX 7. But really, your job is to make sure the issues fly by unnoticed—not to make sure they’re audiophile perfect. So always have a clock on hand when you’re editing dialogue. If the fix is good enough after ten minutes of work, move on. The next day, when you do a QC pass, you’ll probably be more than happy with it!
Download a free trial of RX or Dialogue Match today.


