How to Fix 8 Common Podcast Audio Issues
So you want to get into podcasting? This article will present real-world examples of what problems you can expand in editing and mixing audio for podcasts.
Podcasts have their own unique audio challenges. Here are tips on how to solve common podcast mix problems. These tips for mixing podcasts have come in handy when I’ve done work for venues like NPR, Startalk Live, OZY Media and my own independent podcasts.
We’ve some common mixing pitfalls, followed by audio techniques to resolve and avoid them. I have many, many more tips and tricks, so if you want a sequel, please write in and let us know!
Important notice: Dialogue Match is longer available for purchase from iZotope. We are continually developing new products, services, and solutions to enable and innovate on journeys in audio production.
We occasionally need to retire older products in order to focus our resources and development efforts on building new, innovative products and features. Support for this product will remain in effect for 12 months from your date of purchase up through September 24, 2026.
1. Vocals don’t match from take to take
You’ve recorded your podcast in different spaces, and the vocals don’t sound congruent from take to take. You’d think this was a beginner mistake, but it isn’t—this actually happens in professional podcasts for a variety of reasons. Many are the times I’ve mixed a whole episode, only to see an unexpected email drop in my lap, with a frightful subject line:
“NEW VOCAL PICKUPS – PLEASE INSERT!”
This is industry jargon for a new vocal take, and the provided overdub will often sound nothing like the original.
Whether your problem is in your own podcast or the one you’re hired to mix, the issue is maddening—it can take hours of EQ surgery to match these takes—unless you have a handy-dandy tool like Dialogue Match. Dialogue Match makes the process simple: highlight and “capture” a selection of audio you want the new stuff to sound like:
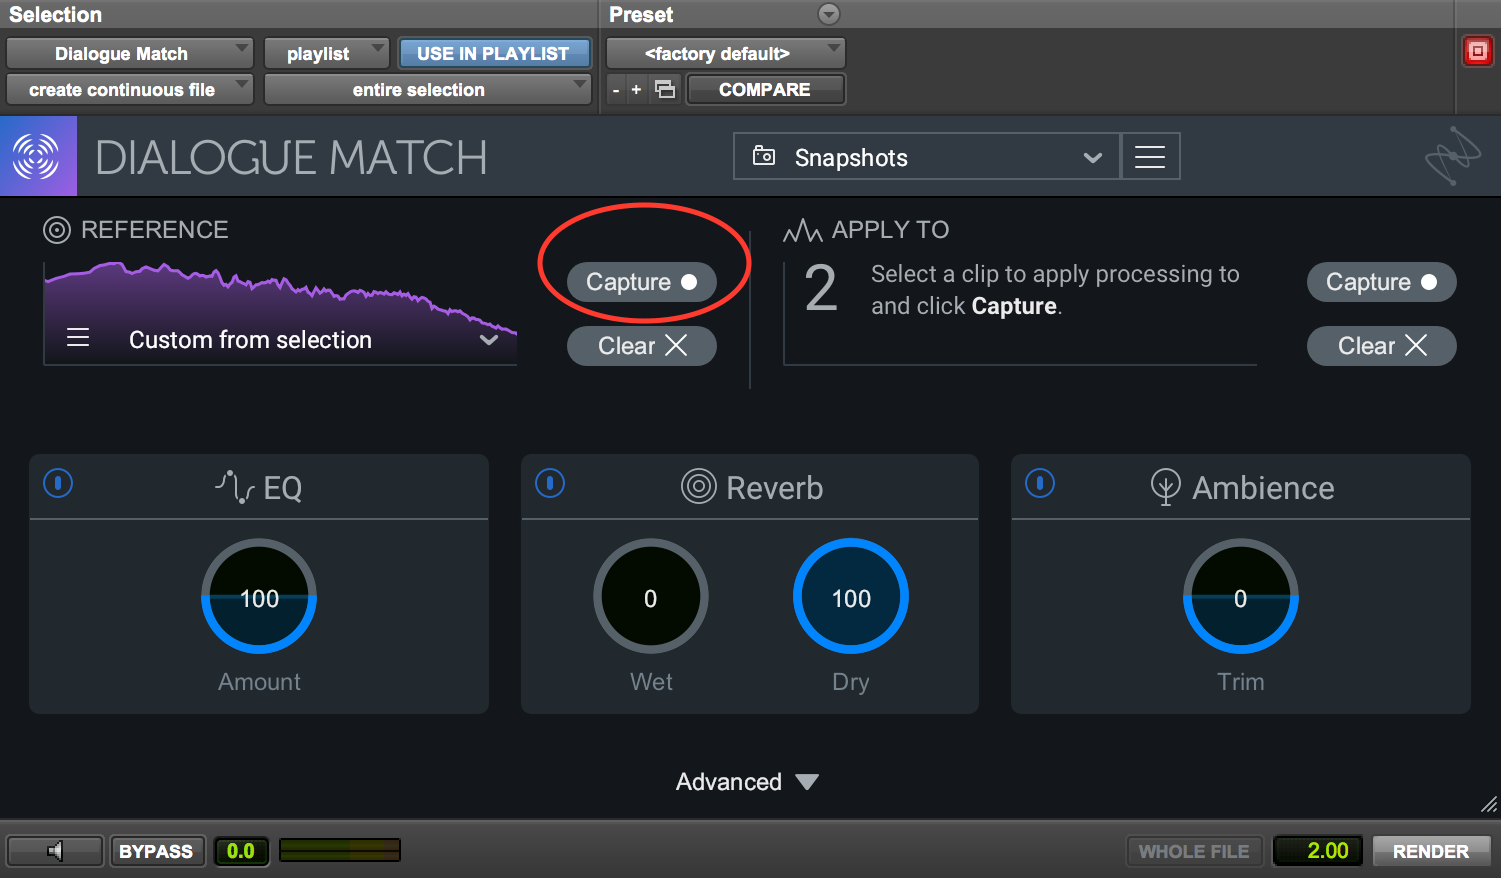
Use Capture in Dialogue Match to obtain a sonic profile of your first recording.
To apply these settings to the audio you want to change, highlight the to-be-matched track and hit the Capture button in the Apply To section:

Dialogue Match lets you apply the sonic profile of one audio file directly to another.
When you’re done, hit “Render” as you would any AudioSuite plug-in in Pro Tools. Using the data gathered from each sonic profile, Dialogue Match will configure EQ, reverb, and ambience settings to match the second audio file’s acoustic environment to that of the first.
For podcasting, I recommend you leave the reverb at a modest setting, or even turn the module all the way off. Most podcasts don’t have reverb, so a minimal or completely dry reverb setting will likely yield the best results.
If you don’t have Dialogue Match, never fear. Within Ozone 9, the Match EQ module can be of service in matching the EQ profile of your source, though it won’t match the ambience or reverb profiles.
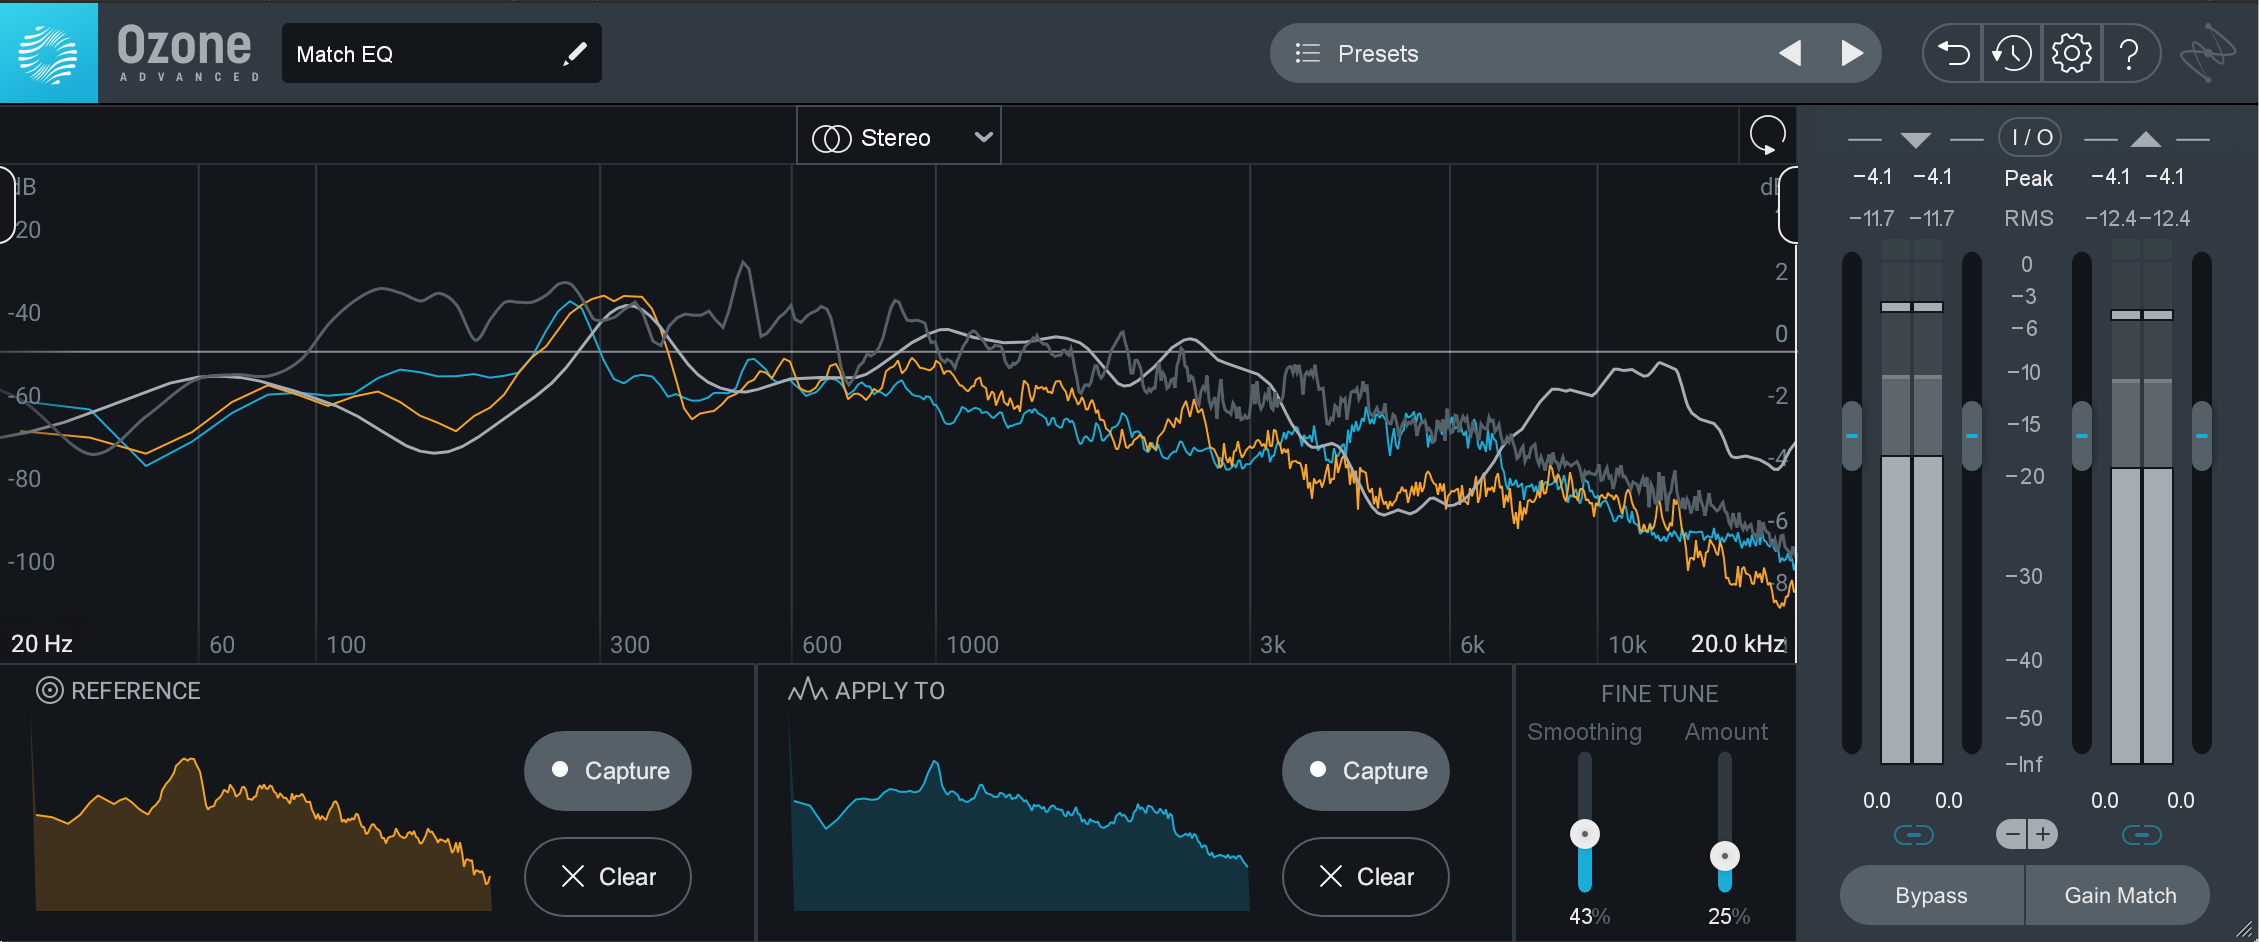
Match EQ in Ozone 9
The same goes for RX 7's EQ Match module—however, you might need to capture ambiance from the previous audio with the Ambience Match module.
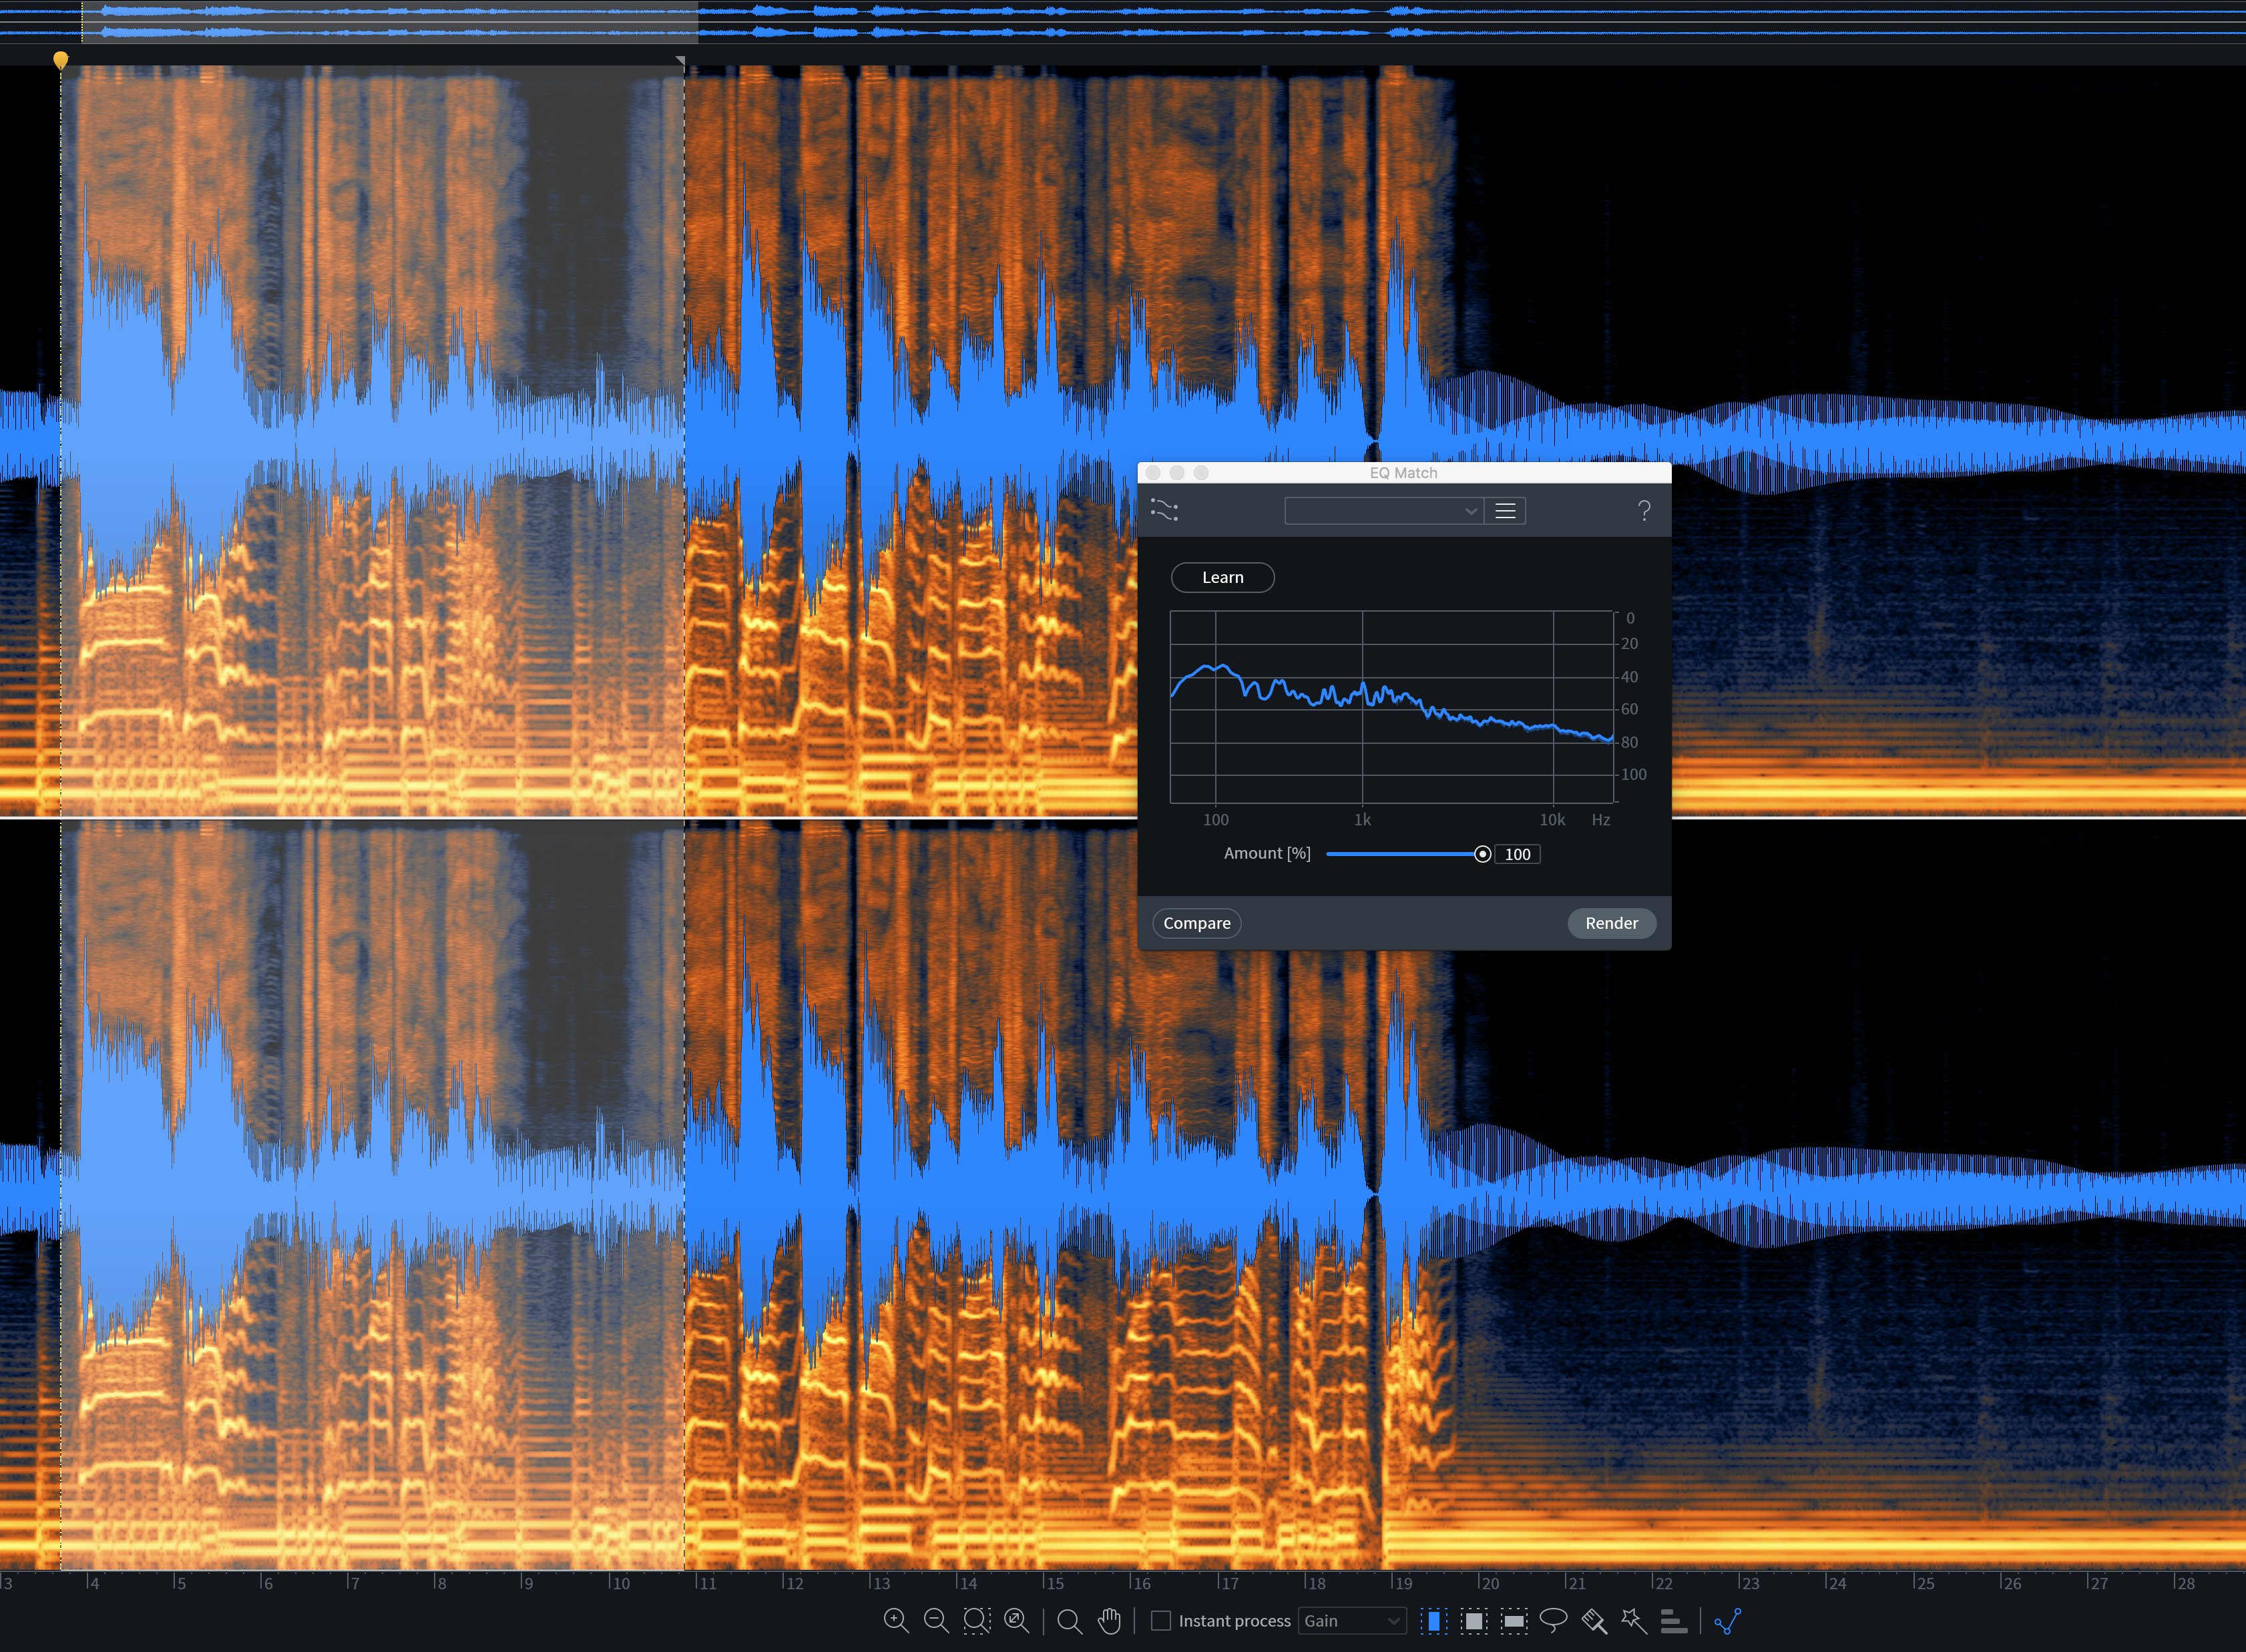
EQ Match in RX 7
Even if you’re planning on de-noising your takes, you should still use Ambience Match first. Otherwise the de-noised clips will sound too different from each other.
If you’re not getting good enough matches with these tools, you’ll have to use your ears to make the final touches. Even these great processors still need your ears to take you over the finish line. If they didn’t, what use would an engineer be?
It may take a moment, but the process isn’t hard: once you’ve run your audio through one of these tools, use any equalizer to dial in boosts and cuts, referencing the old audio all the time. Sometimes it helps to do this in an entirely different EQ after a matching EQ—a clean GUI for tweaking on top of the matched curve can get you there faster.
2. The room tone has frequency characteristics that need to be tamed
Even the best podcast companies can utilize subpar locations for recording. This is also true for home recordings.
Sometimes you may have room tone with horrid resonances—resonances which broad-spectrum de-noising can’t fix. De-humming also takes too much away, and the attenuation in Spectral Repair attenuation will cause too many artifacts for this long-form purpose.
In my exploits, I’ve found the following works well in these cases:
Load the vocal into RX 7 and identify the frequency range where the room tone is the worst. You can do this by analyzing the spectrogram, and using frequency-selected playback really helps.
Hit R on the keyboard, and now you can draw boxes throughout time and space—this will help you hone in on the worst resonances, the ones you want to tame. Draw a box around the area where the resonance occurs and open up Spectral De-noise.
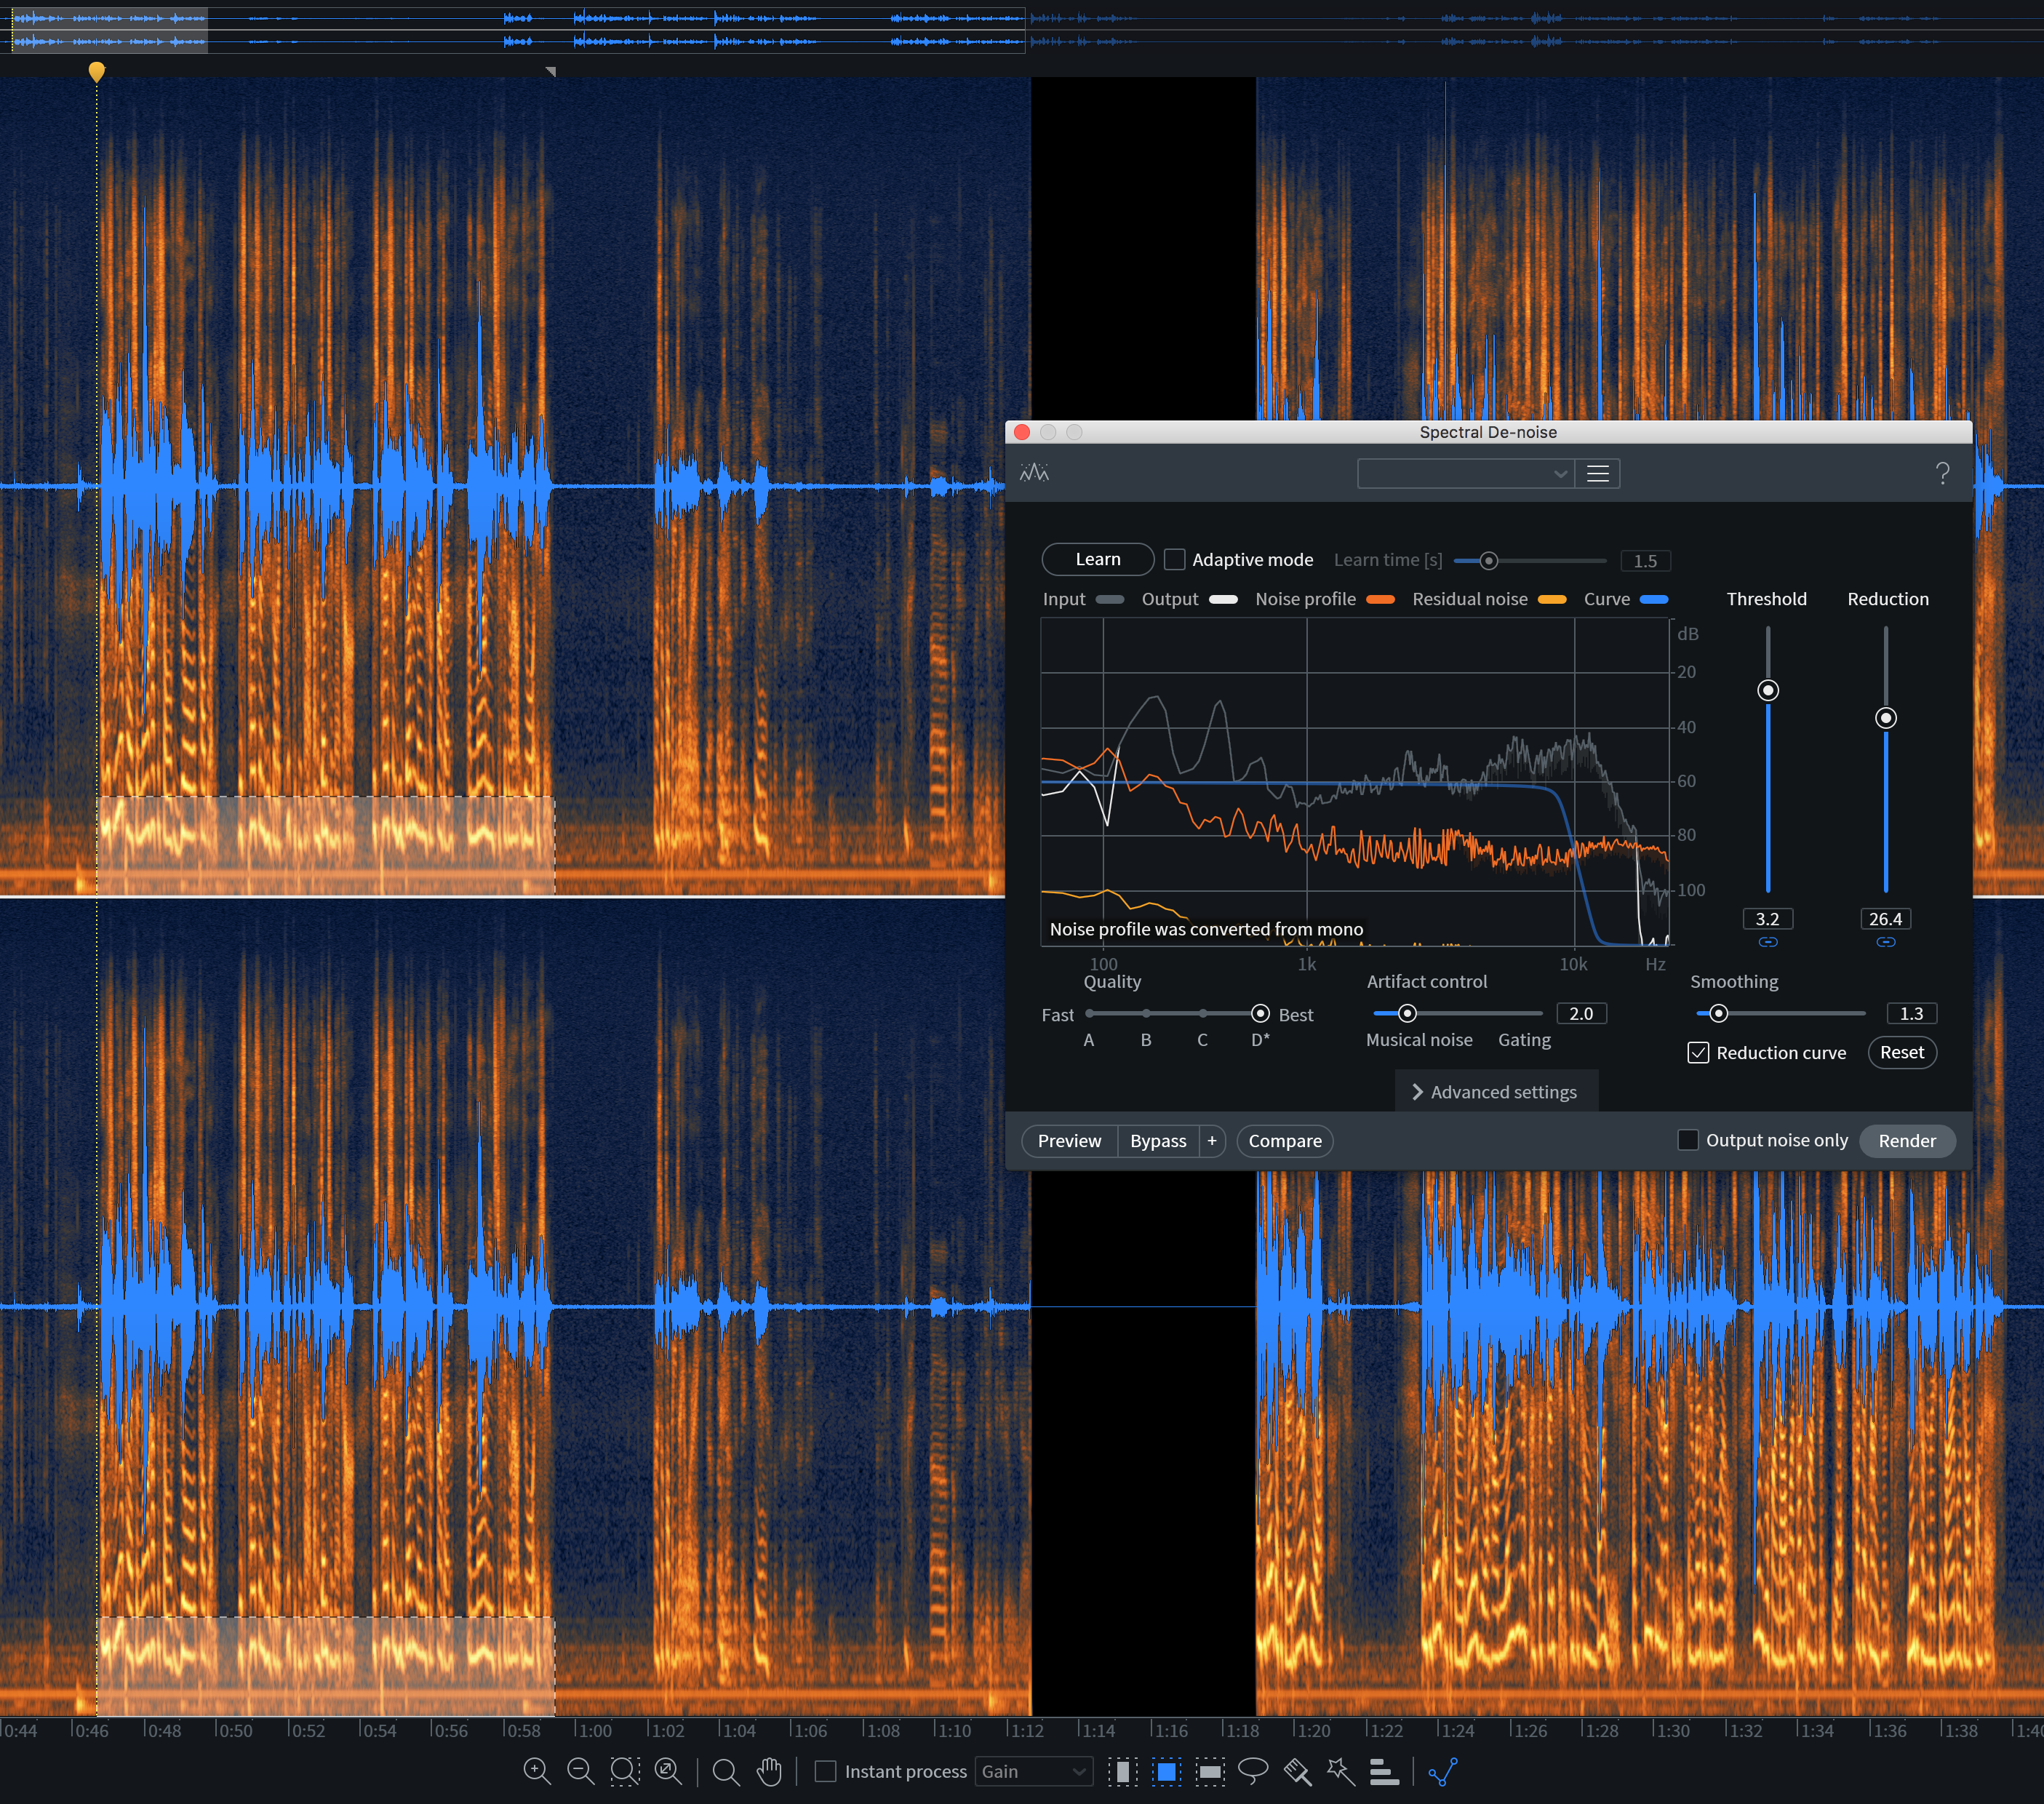
Spectral De-noise in RX 7
Tick the box for “Output noise only” and use the sliders to isolate that horrible resonance while you preview your audio to make sure you’re not capturing any of the vocal. If you’re hearing the vocal with “Output noise only” engaged, you’re doing too much. Back off the processing.
Next, tick that box off and give a listen to the result in Preview mode. Make sure it doesn’t sound unnatural, then hit Process.
If the room gave you this particular issue, it probably has others. Further isolate your vocal with a pass of either Voice De-Noise or Dialogue De-reverb and free yourself from the room tone. Not sure which to use? Read on...
3. I don’t know if I should use De-noise or Dialogue De-reverb
RX 7 gives you two excellent tools for salvaging good vocals trapped in a terrible room. One is Voice De-noise, and the other is Dialogue De-reverb.
How do you know when to use which? Well, listen to the vocal and ask yourself three questions:
- Am I hearing a horrible room tone somewhere in the background?
- Am I hearing vocals bouncing around this horrible room—almost like a really short echo?
- Am I hearing both?
The solution to problem #1 is Voice De-noise. If you answered yes to question #2, go with Dialogue De-reverb—and I shall share with you a preset that really works for me, especially for people with nasal, high-pitched voices.
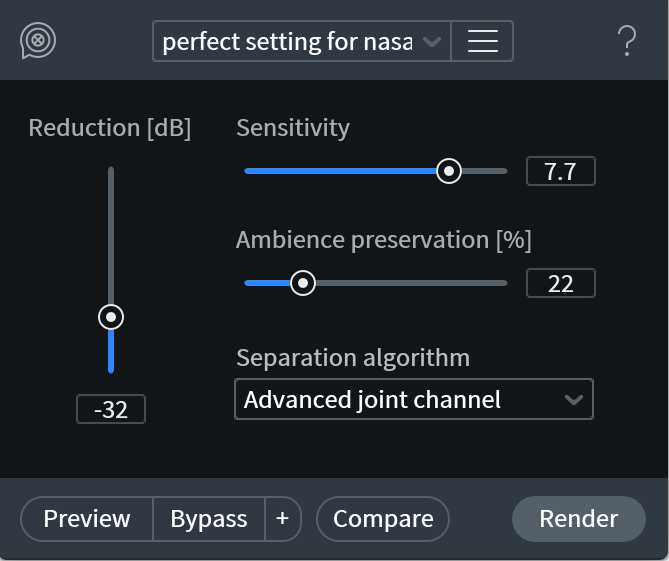
Dialogue De-reverb in RX 7
If it’s both, use a subtle amount of Dialogue De-reverb first, then follow that with a subtle amount of Voice De-noise. Addressing the file’s reverb before its noise helps you avoid unseemly artifacts in the final result.
4. The vocal sounds harsh—and the de-esser doesn’t help
Sometimes a person just has a harsh, strident voice—and you’ll know it because you’ll want to turn them down, or fast forward through any moment where they are talking. A de-esser used as a deharsher doesn’t seem to work on them, and neither does a dynamic EQ, nor a multiband compressor.
In this situation, I often turn to two recent iZotope tools: Sculptor in Neutron and Spectral Shaper in Ozone.
Say we’re doing a podcast about Romeo and Juliet (it’s the only applicable audio I have on hand right now not under an NDA, so bear with me). Let’s suppose we have a harsh vocal which sounds like this:
This article references a previous version of Neutron. Learn about 

Neutron 5
We can use the action regions of Sculptor to target what’s bothering us.
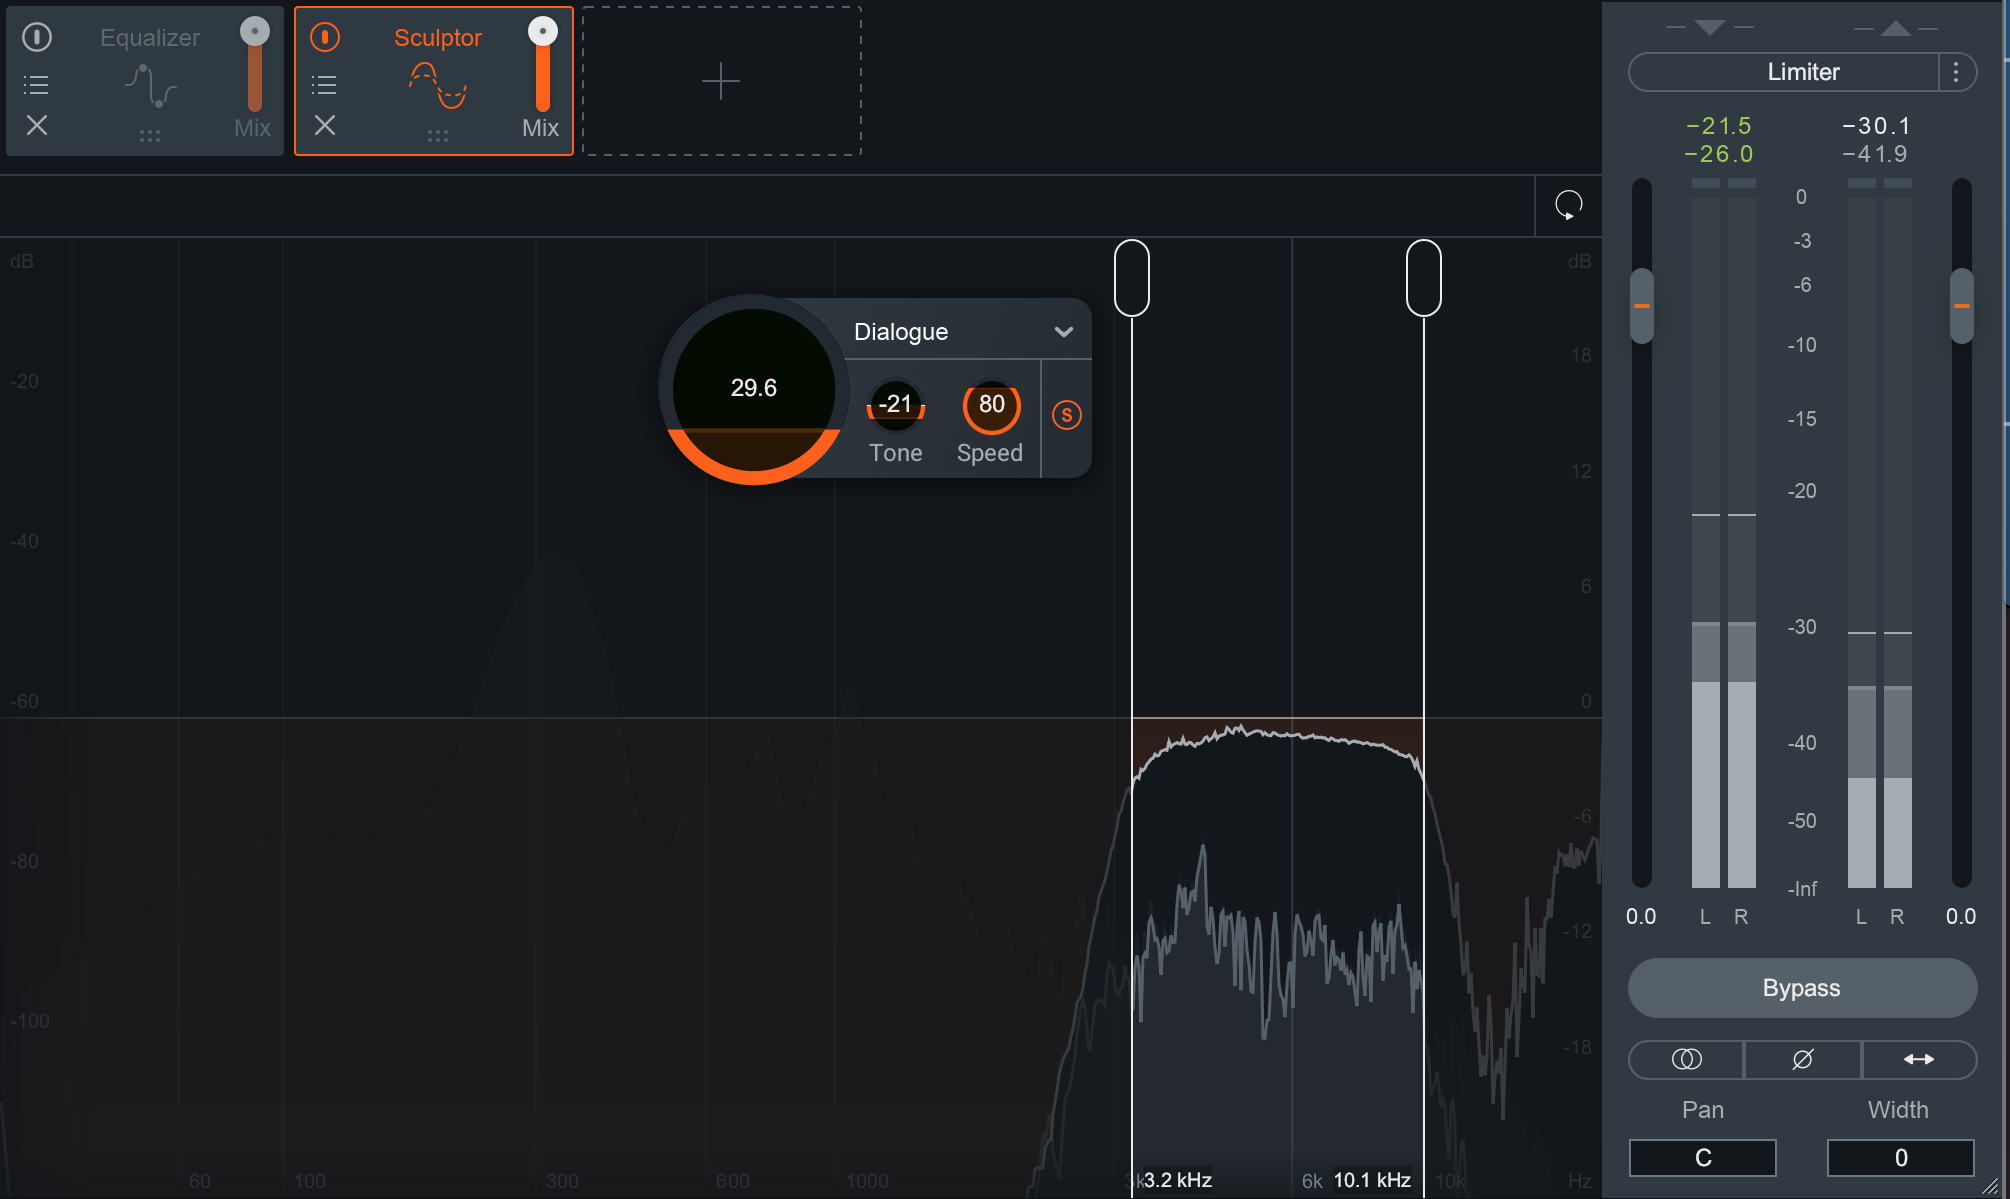
Targeting certain frequencies with Sculptor in Neutron 3
We then can dial in the appropriate parameters—in this case I’ll go with what I have above—and wind up with something better set up for further processing downstream.
If we wish to use the Spectral Shaper, the operation is similar: we seek out what we want to tame, which we can do by auditioning solo’d frequency ranges:
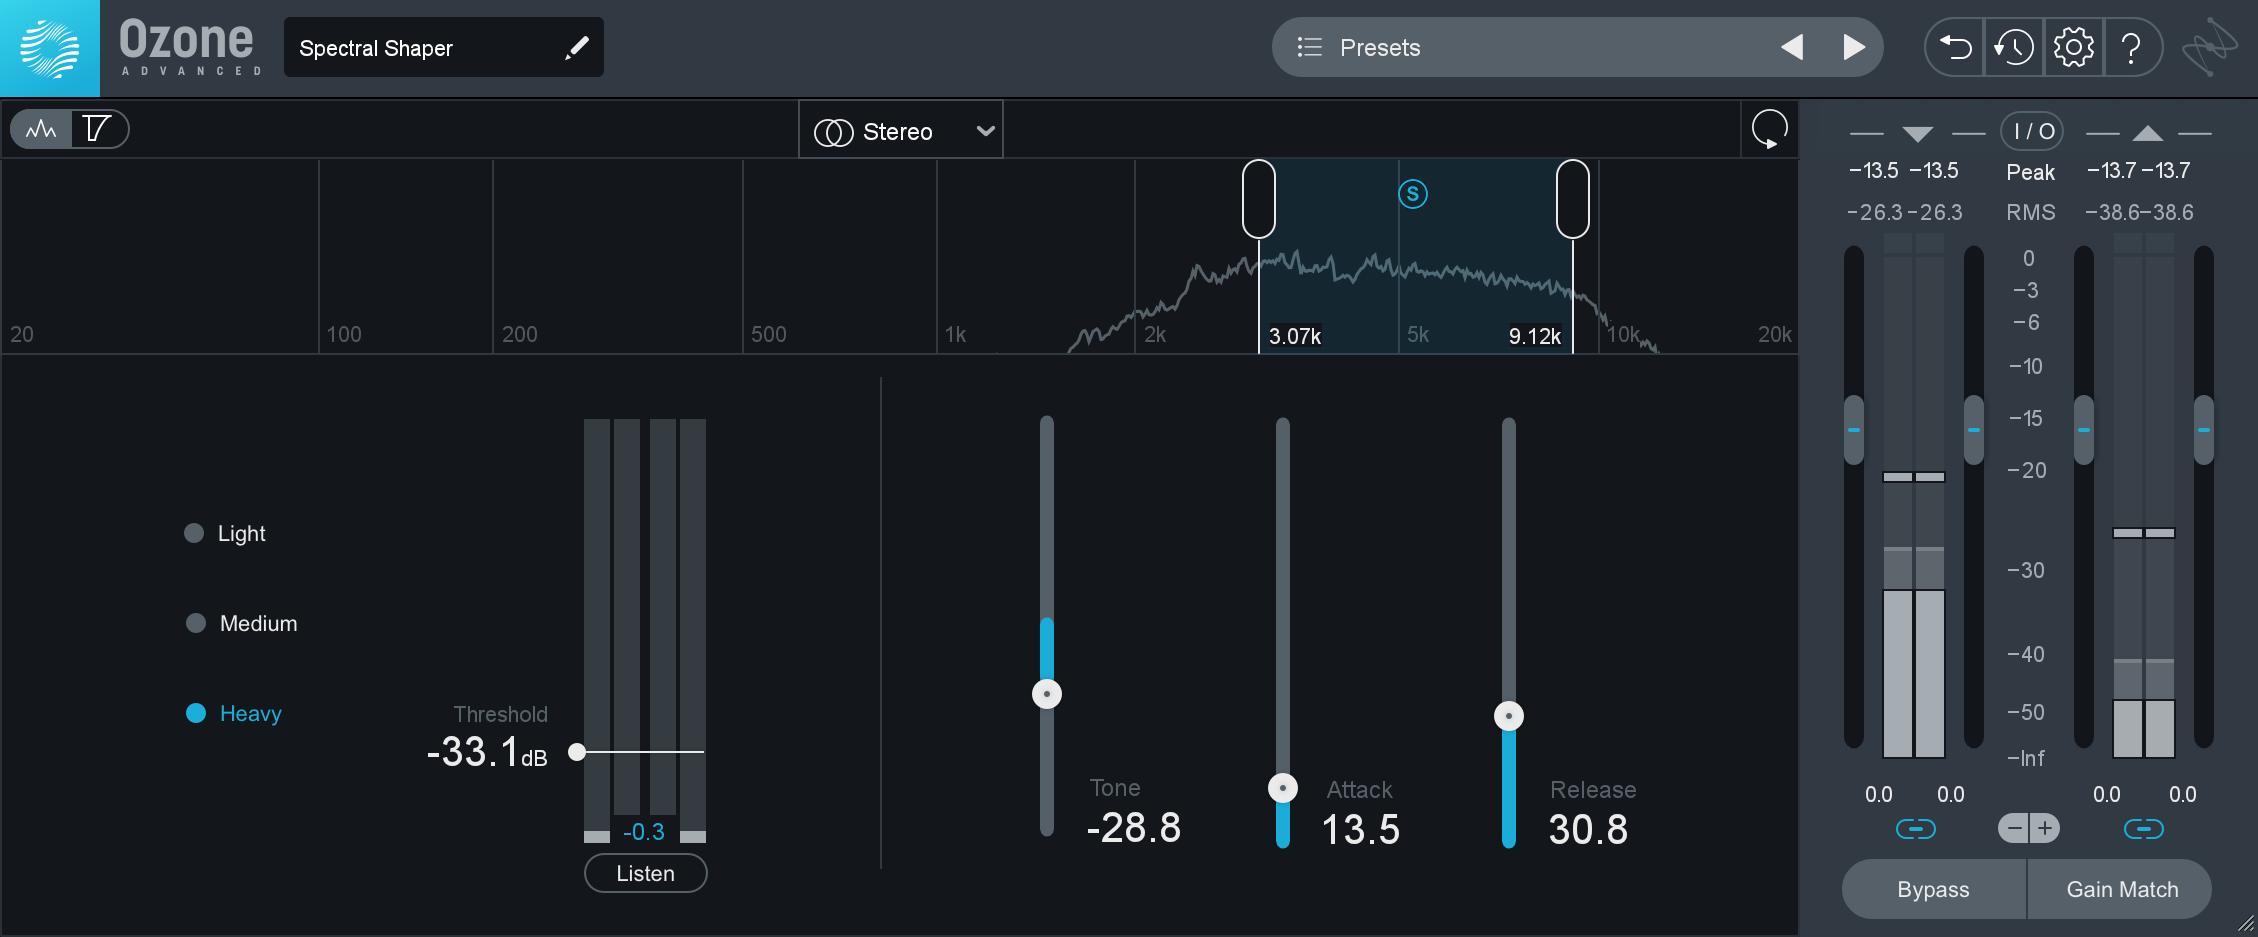
Spectral Shaper in Ozone 9
We tune the parameters, paying careful attention to “Tone” as we cycle through a phrase; this parameter has a profound impact on the timbre.
When tamping down resonances like this, you’ll often find negative values work better—often, but not always. I’ll go with the parameters displayed above, and wind up with this:
5. Somebody distorted the mic!
Sometimes people distort the mic, frequently because they’re yelling or laughing. This might seem irreparably damaging to the file, and maybe it is—but if you have RX 7 you can rectify the problem to a listenable degree, as long as you can spot it in the spectrogram.
Maybe someone distorted the mic by being too loud, too saturated, such as this fellow from a podcast I mixed:
Open that up in the spectrogram, and we can see this distortion before us.
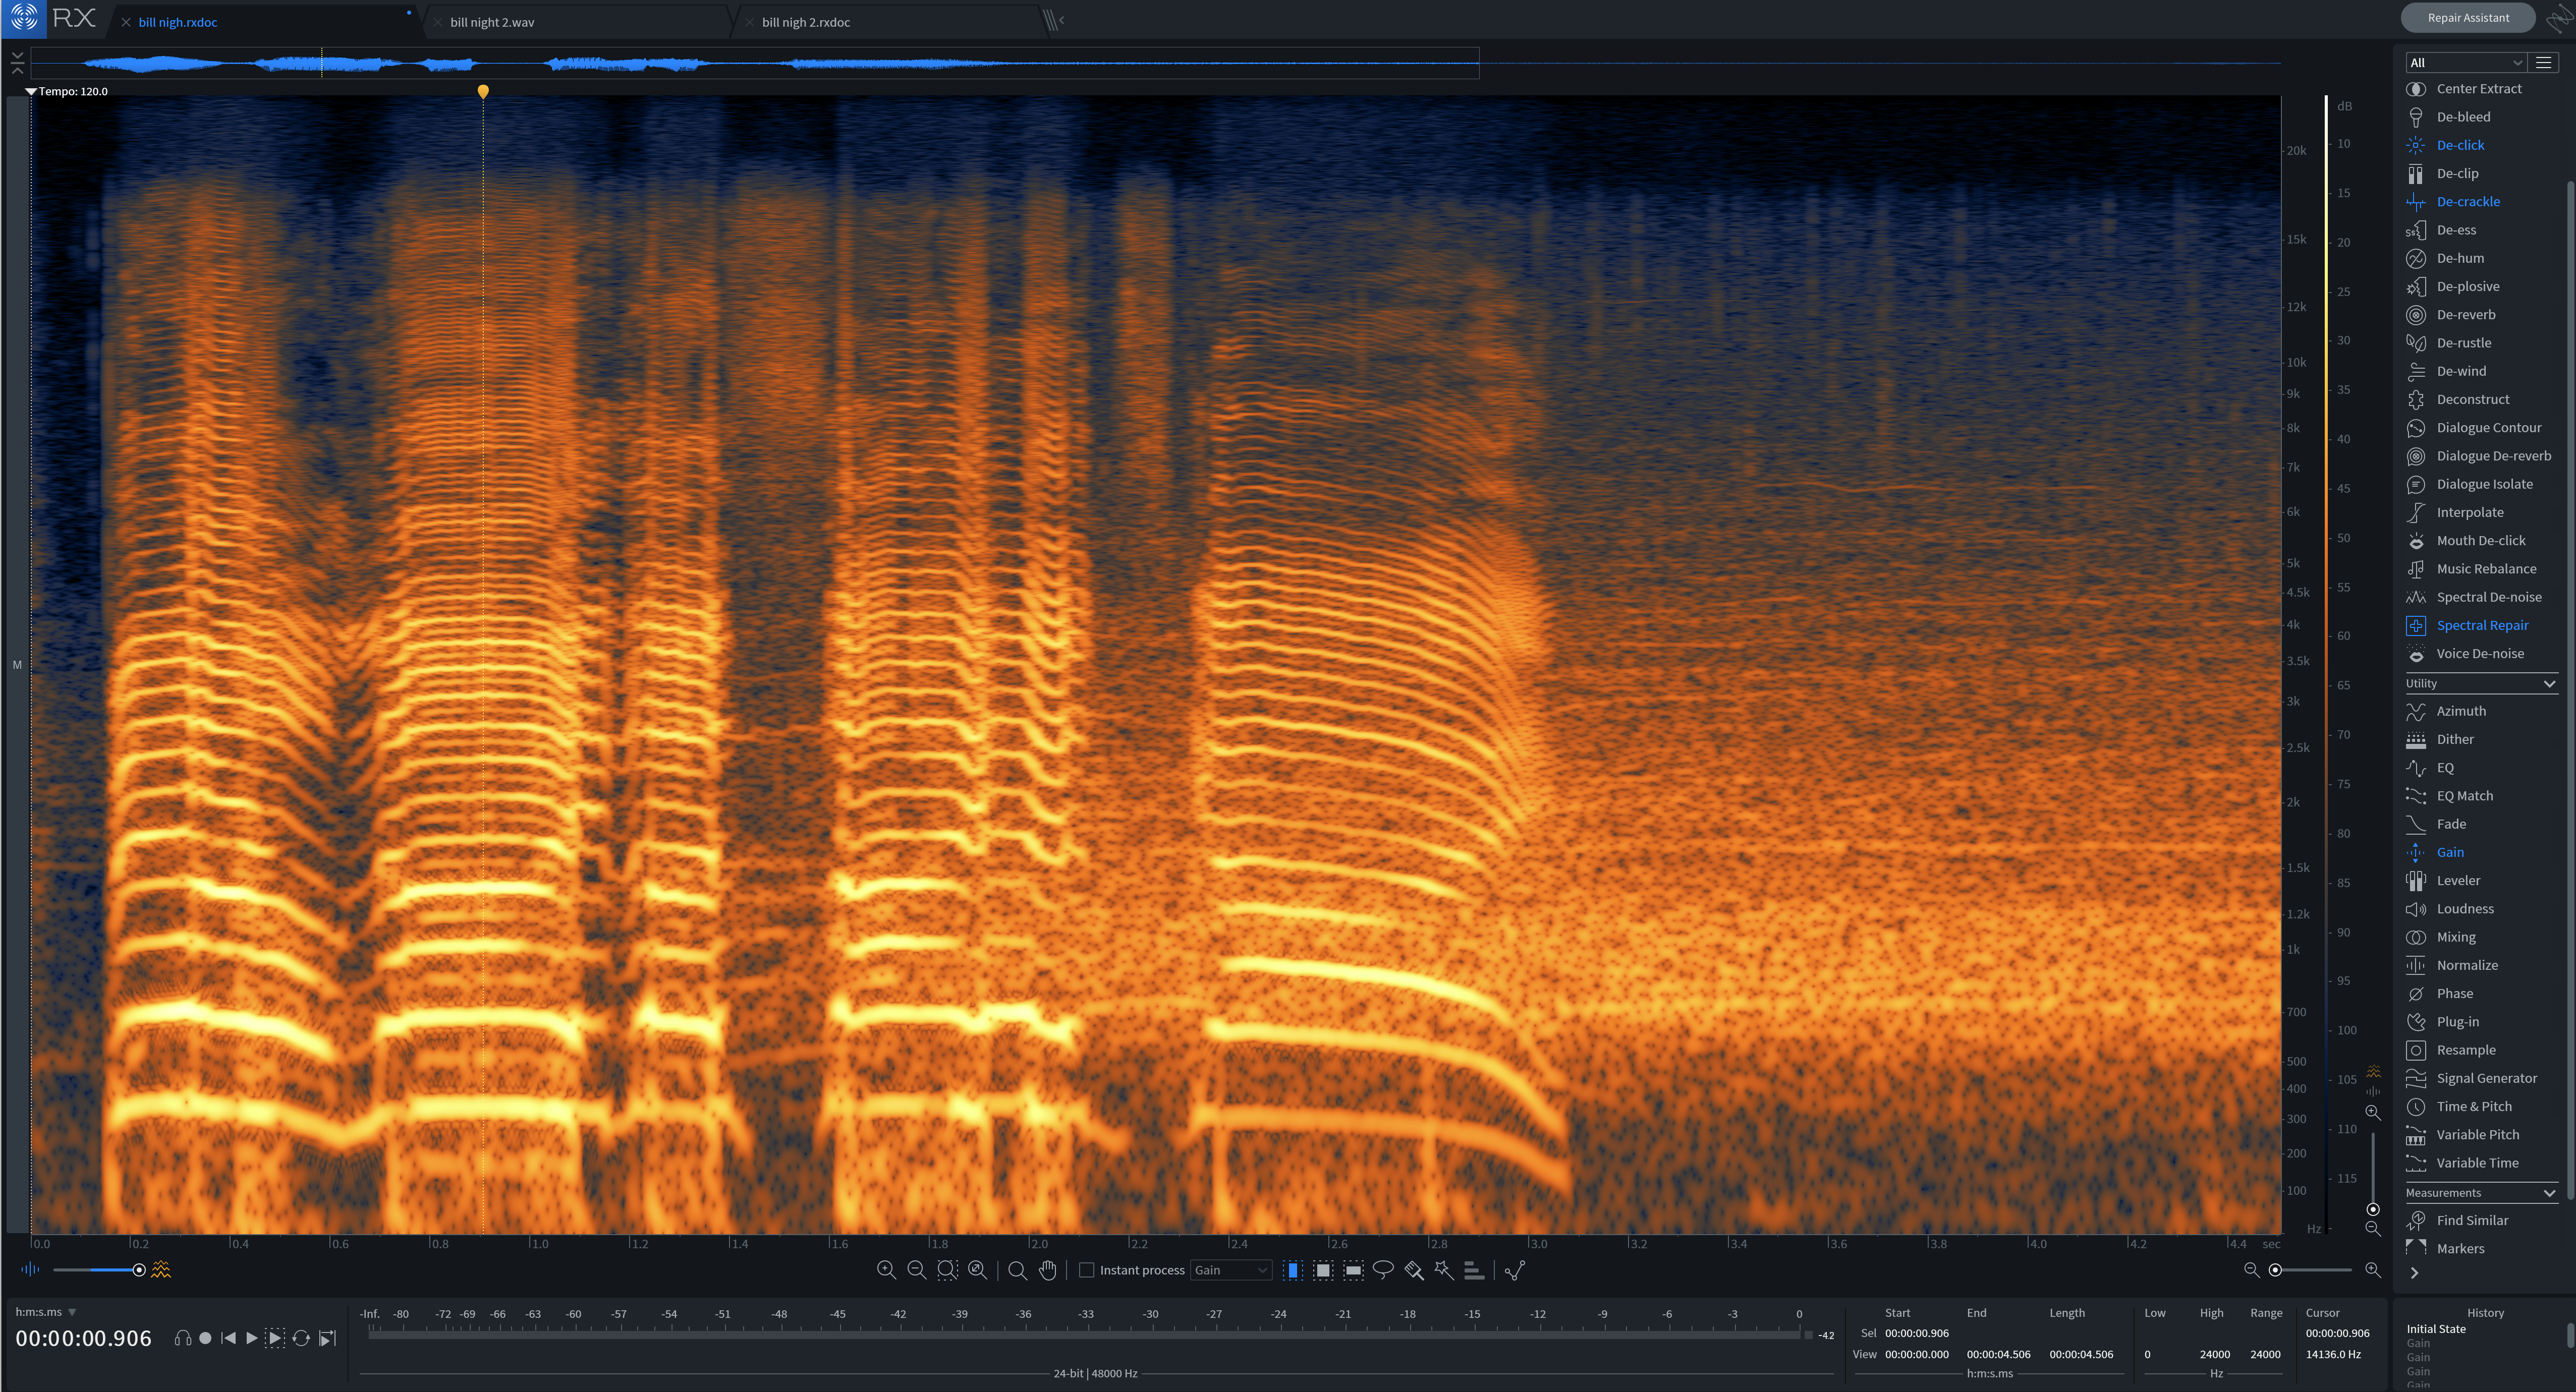
The Spectrogram in RX 7 helps visually identify distortion in your audio.
The following selected bits are the fundamental and overtones of the speech:
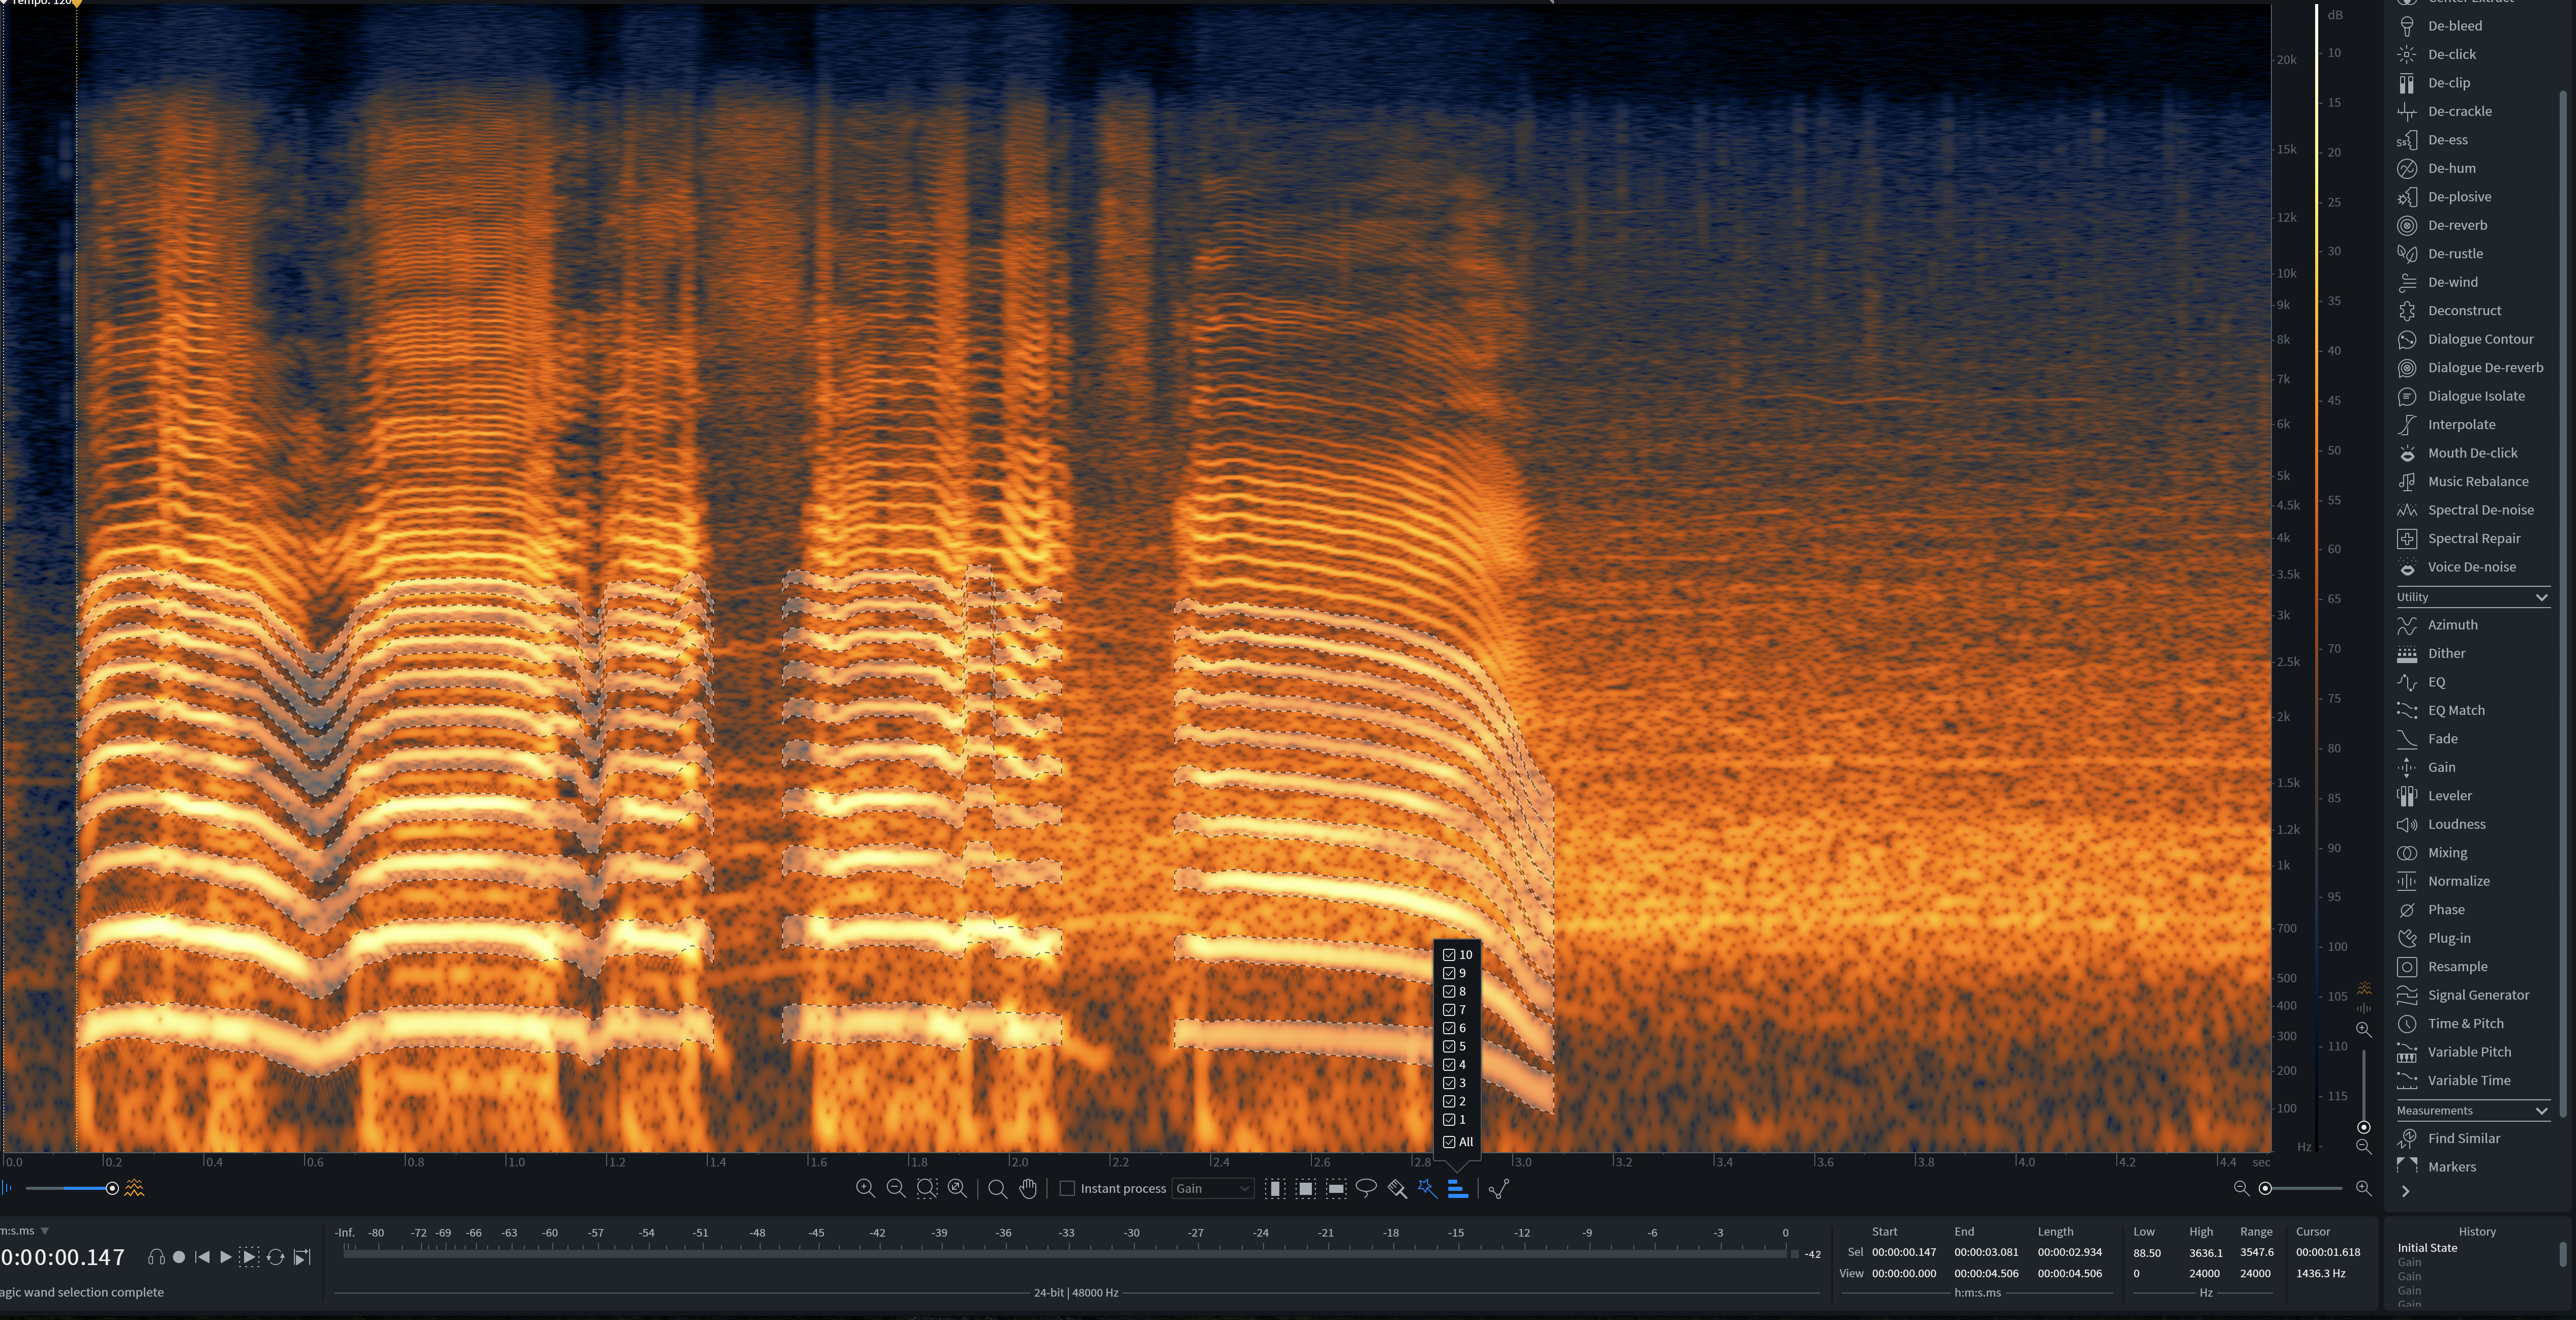
Use the Spectrogram view to target fundamental and harmonic frequencies.
This next selection, highlighted in the screenshot, is some of the distortion itself:
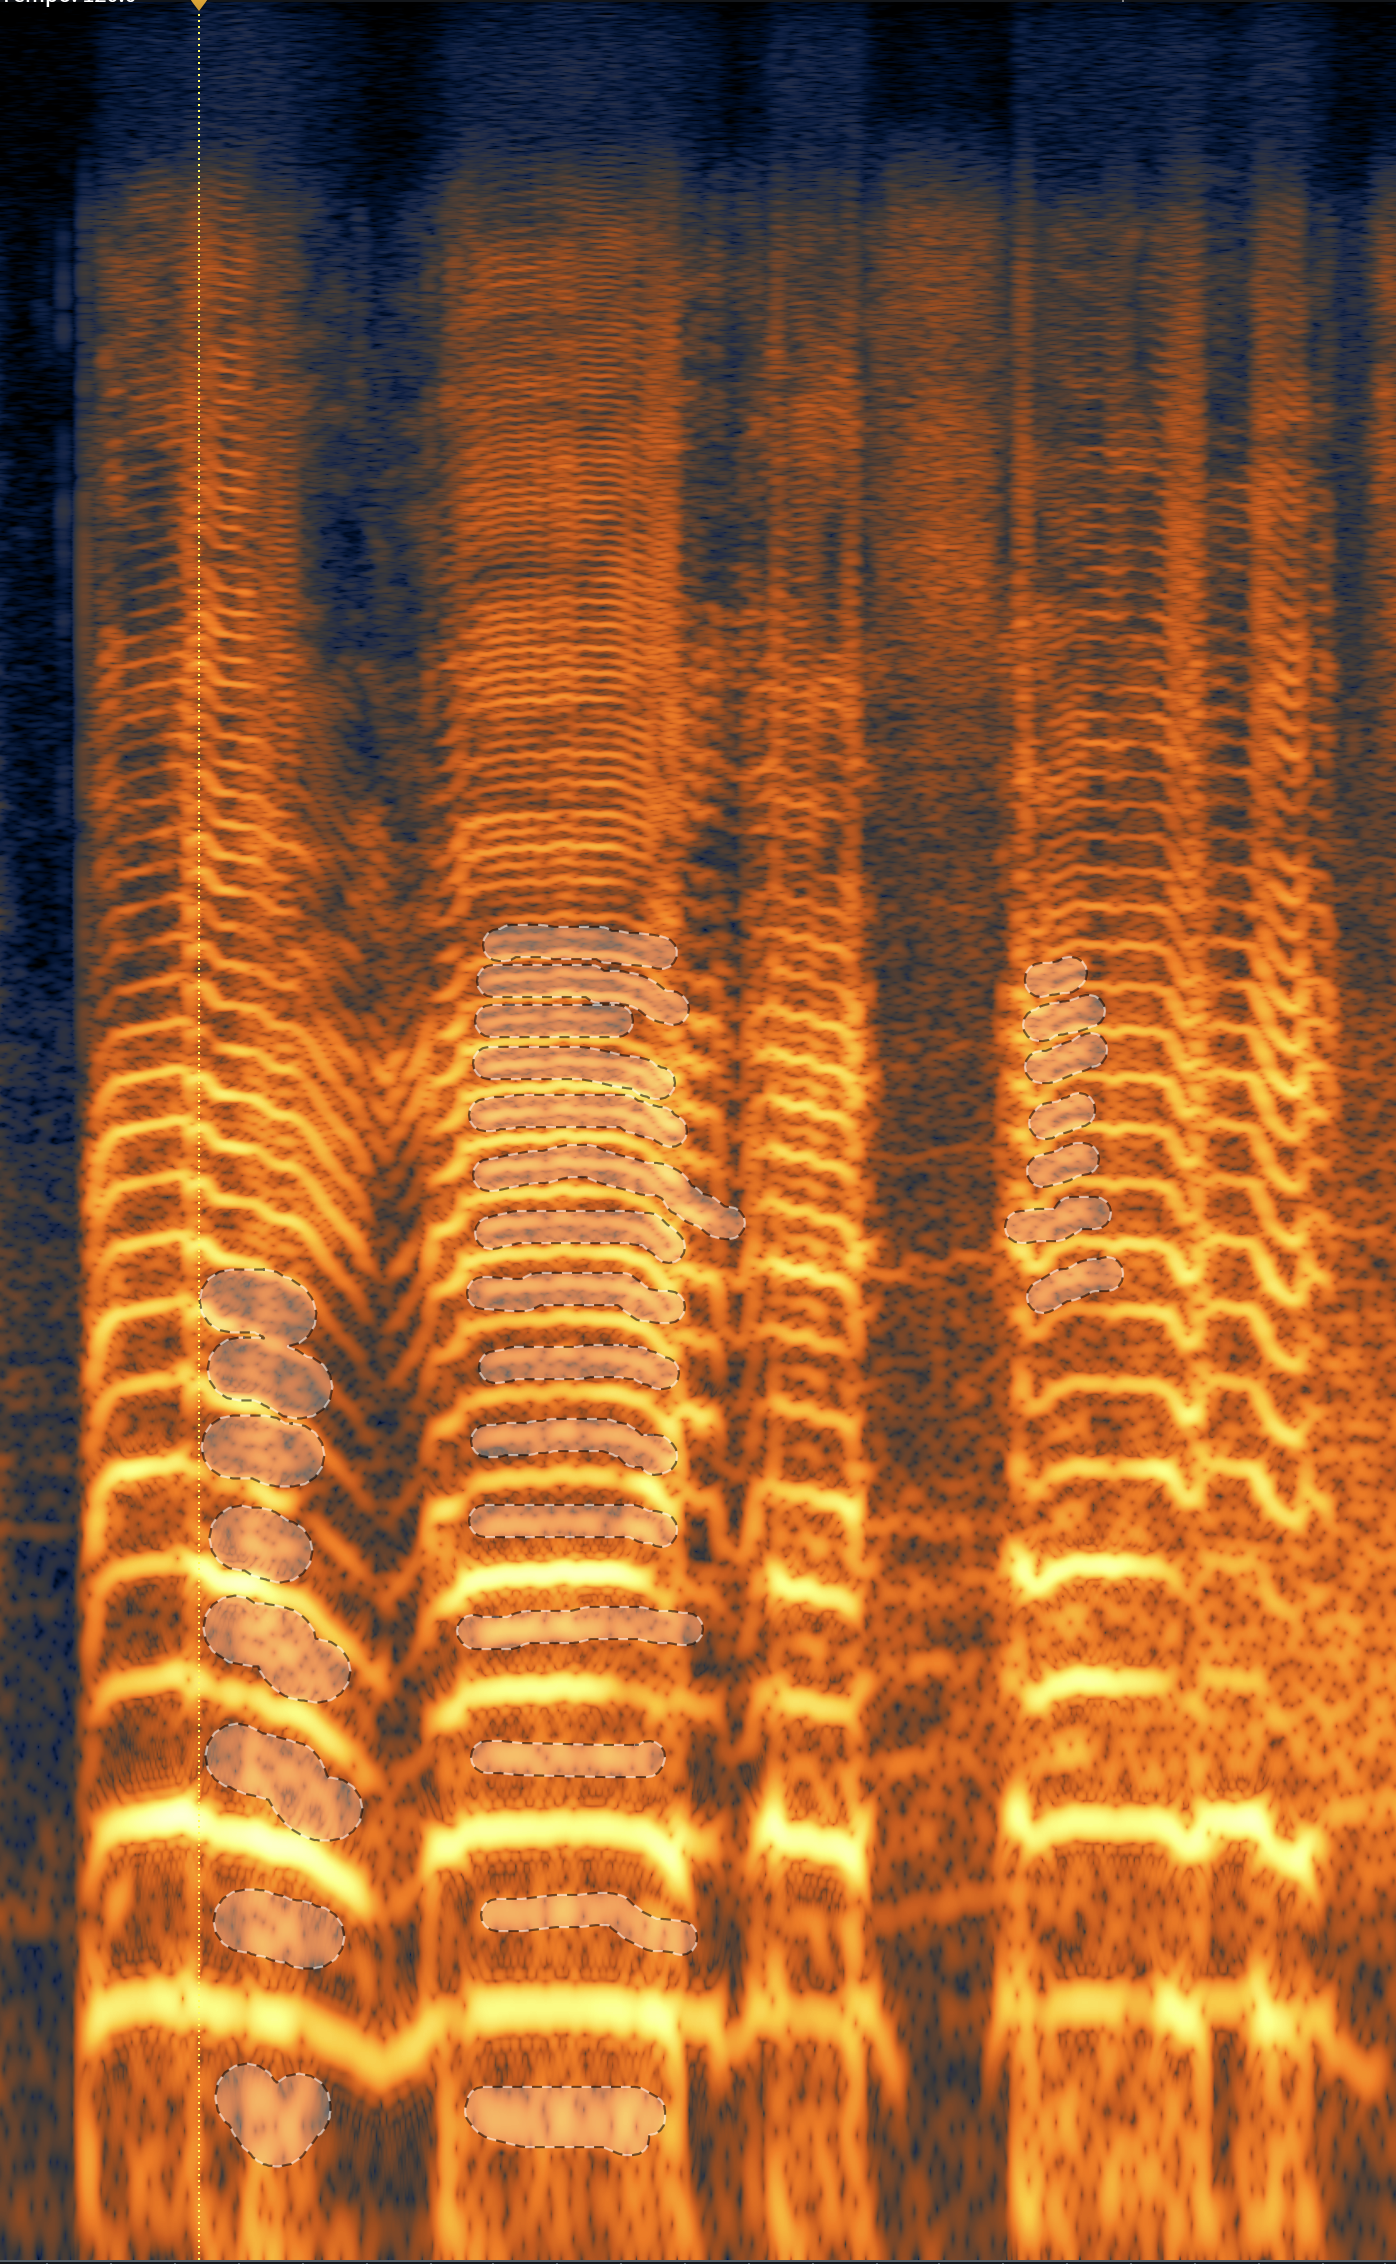
Distortion shown in the Spectrogram
You can recognize it because it doesn’t follow the pattern of the speaker’s fundamentals or overtones—it is atonal to everything else going on. We call this enharmonic distortion, and once selected, we can either decrease it with the Gain module or attenuate it with Spectral Repair.
For something this complexly distorted, we’re going to need to use our eyes and the Play Selection button in RX to identify moments of distortion.
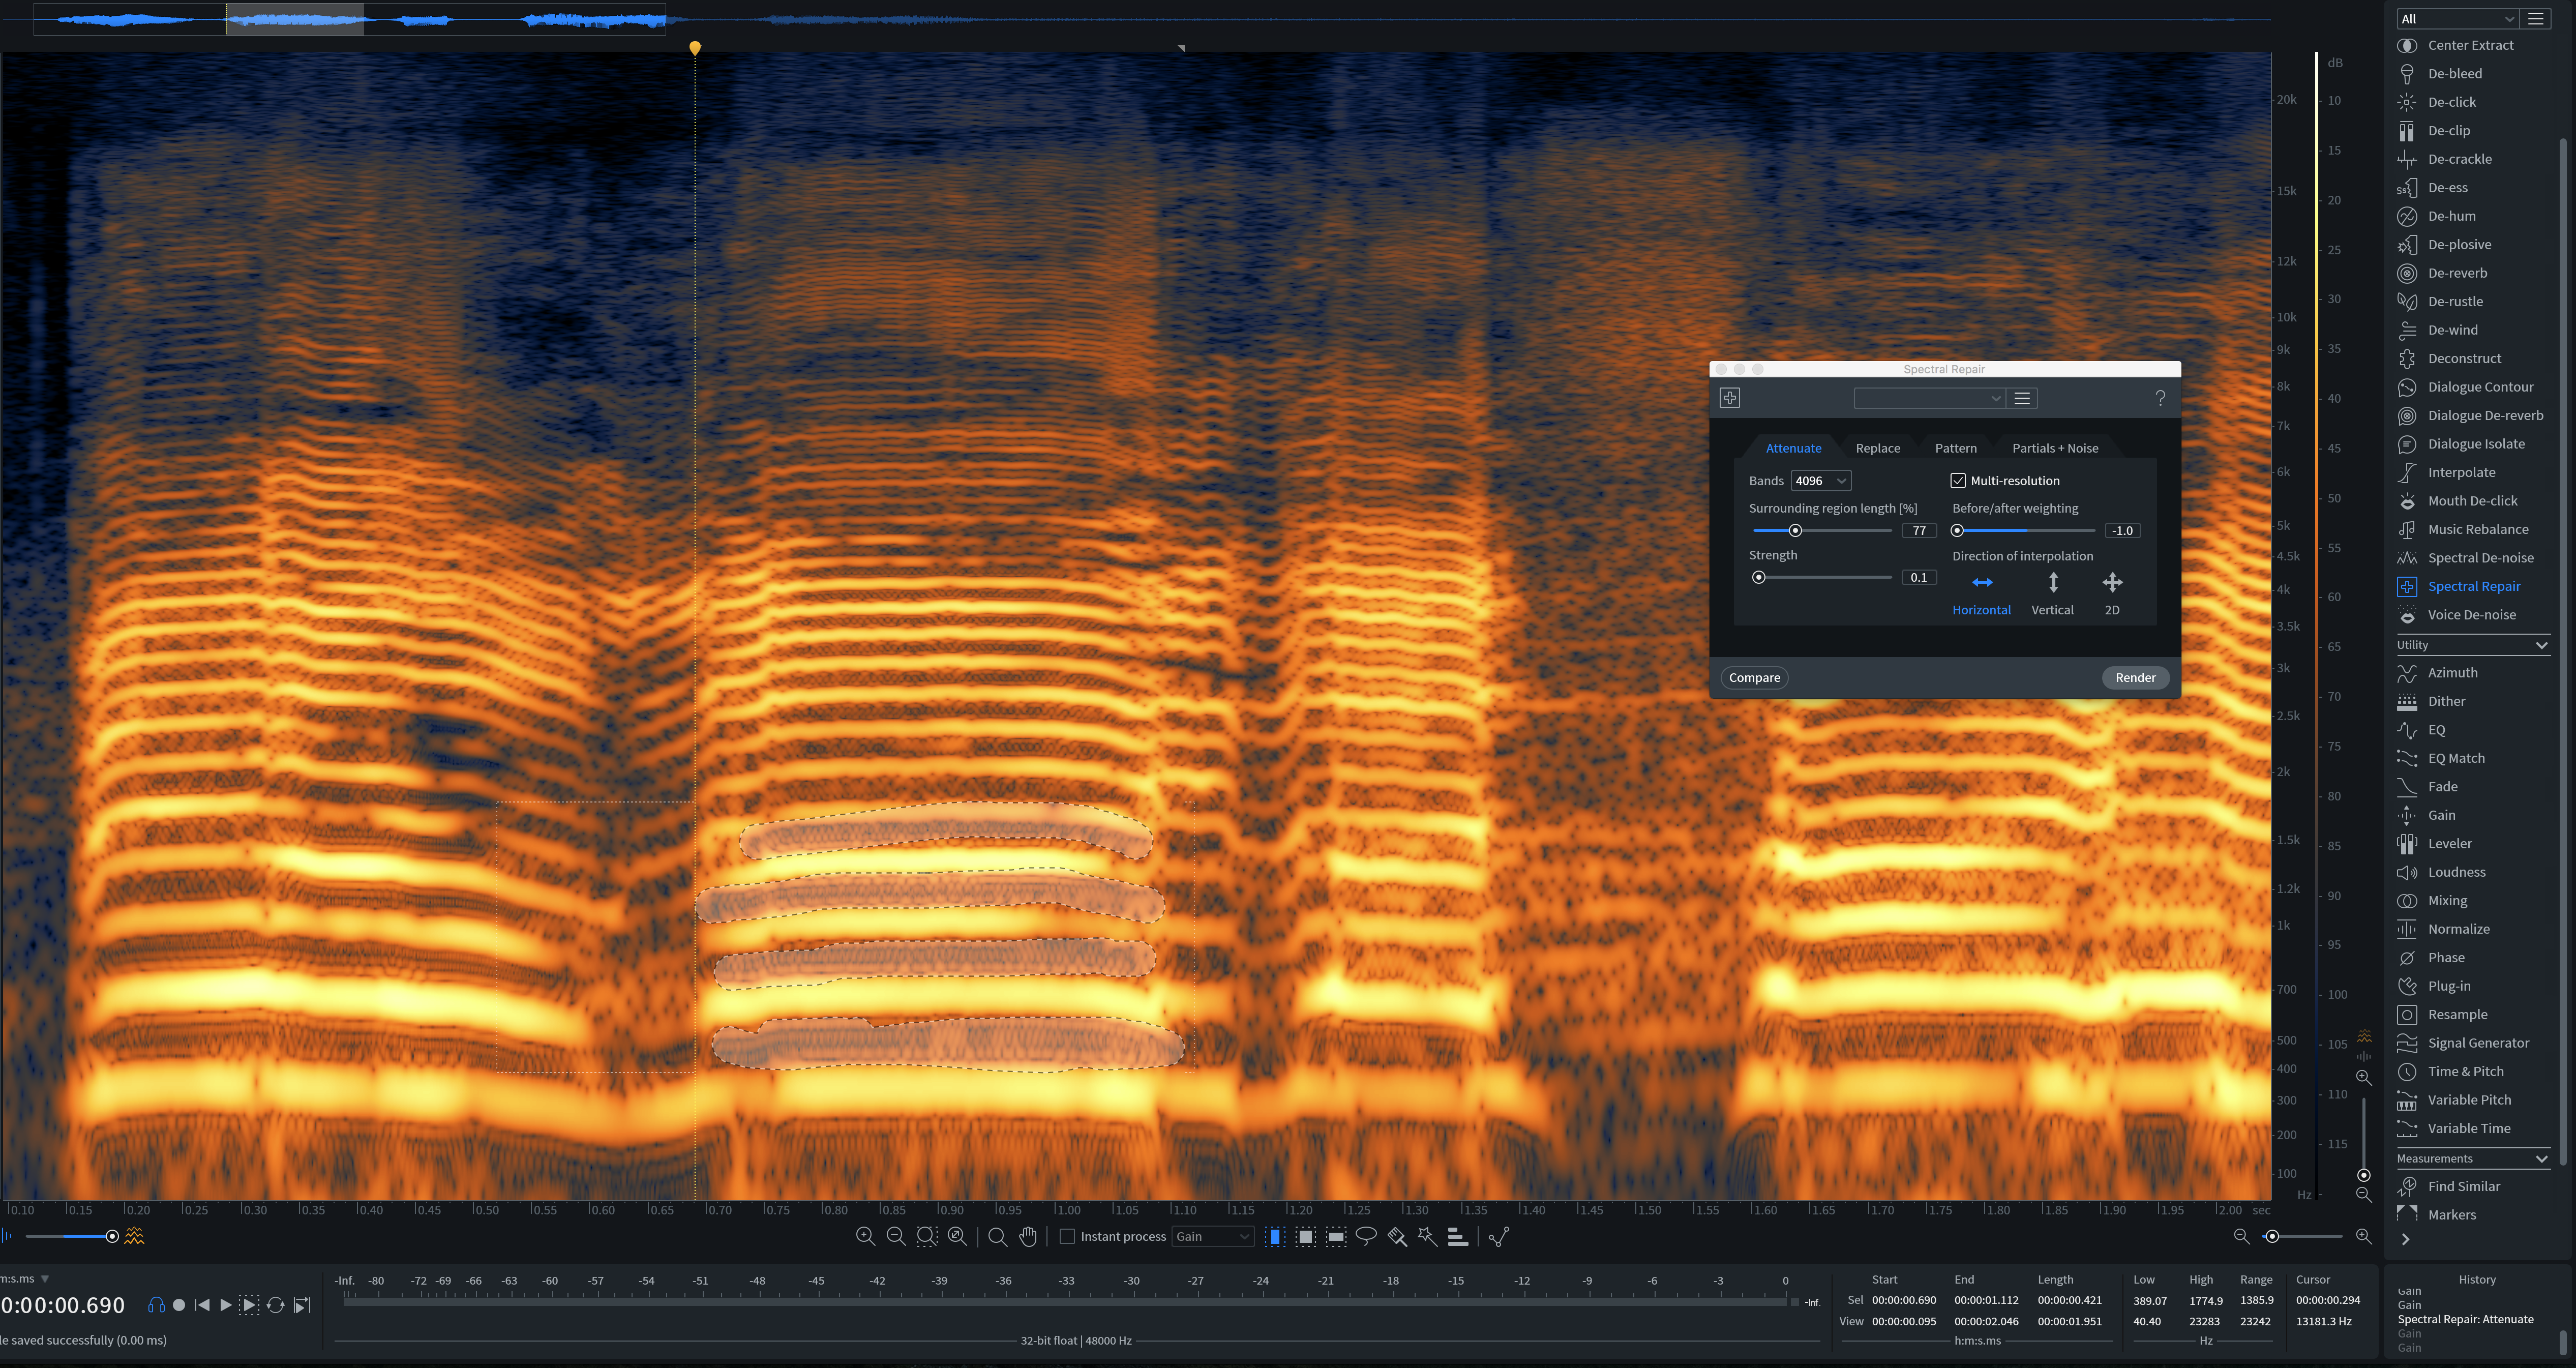
Identifying distortion in RX 7
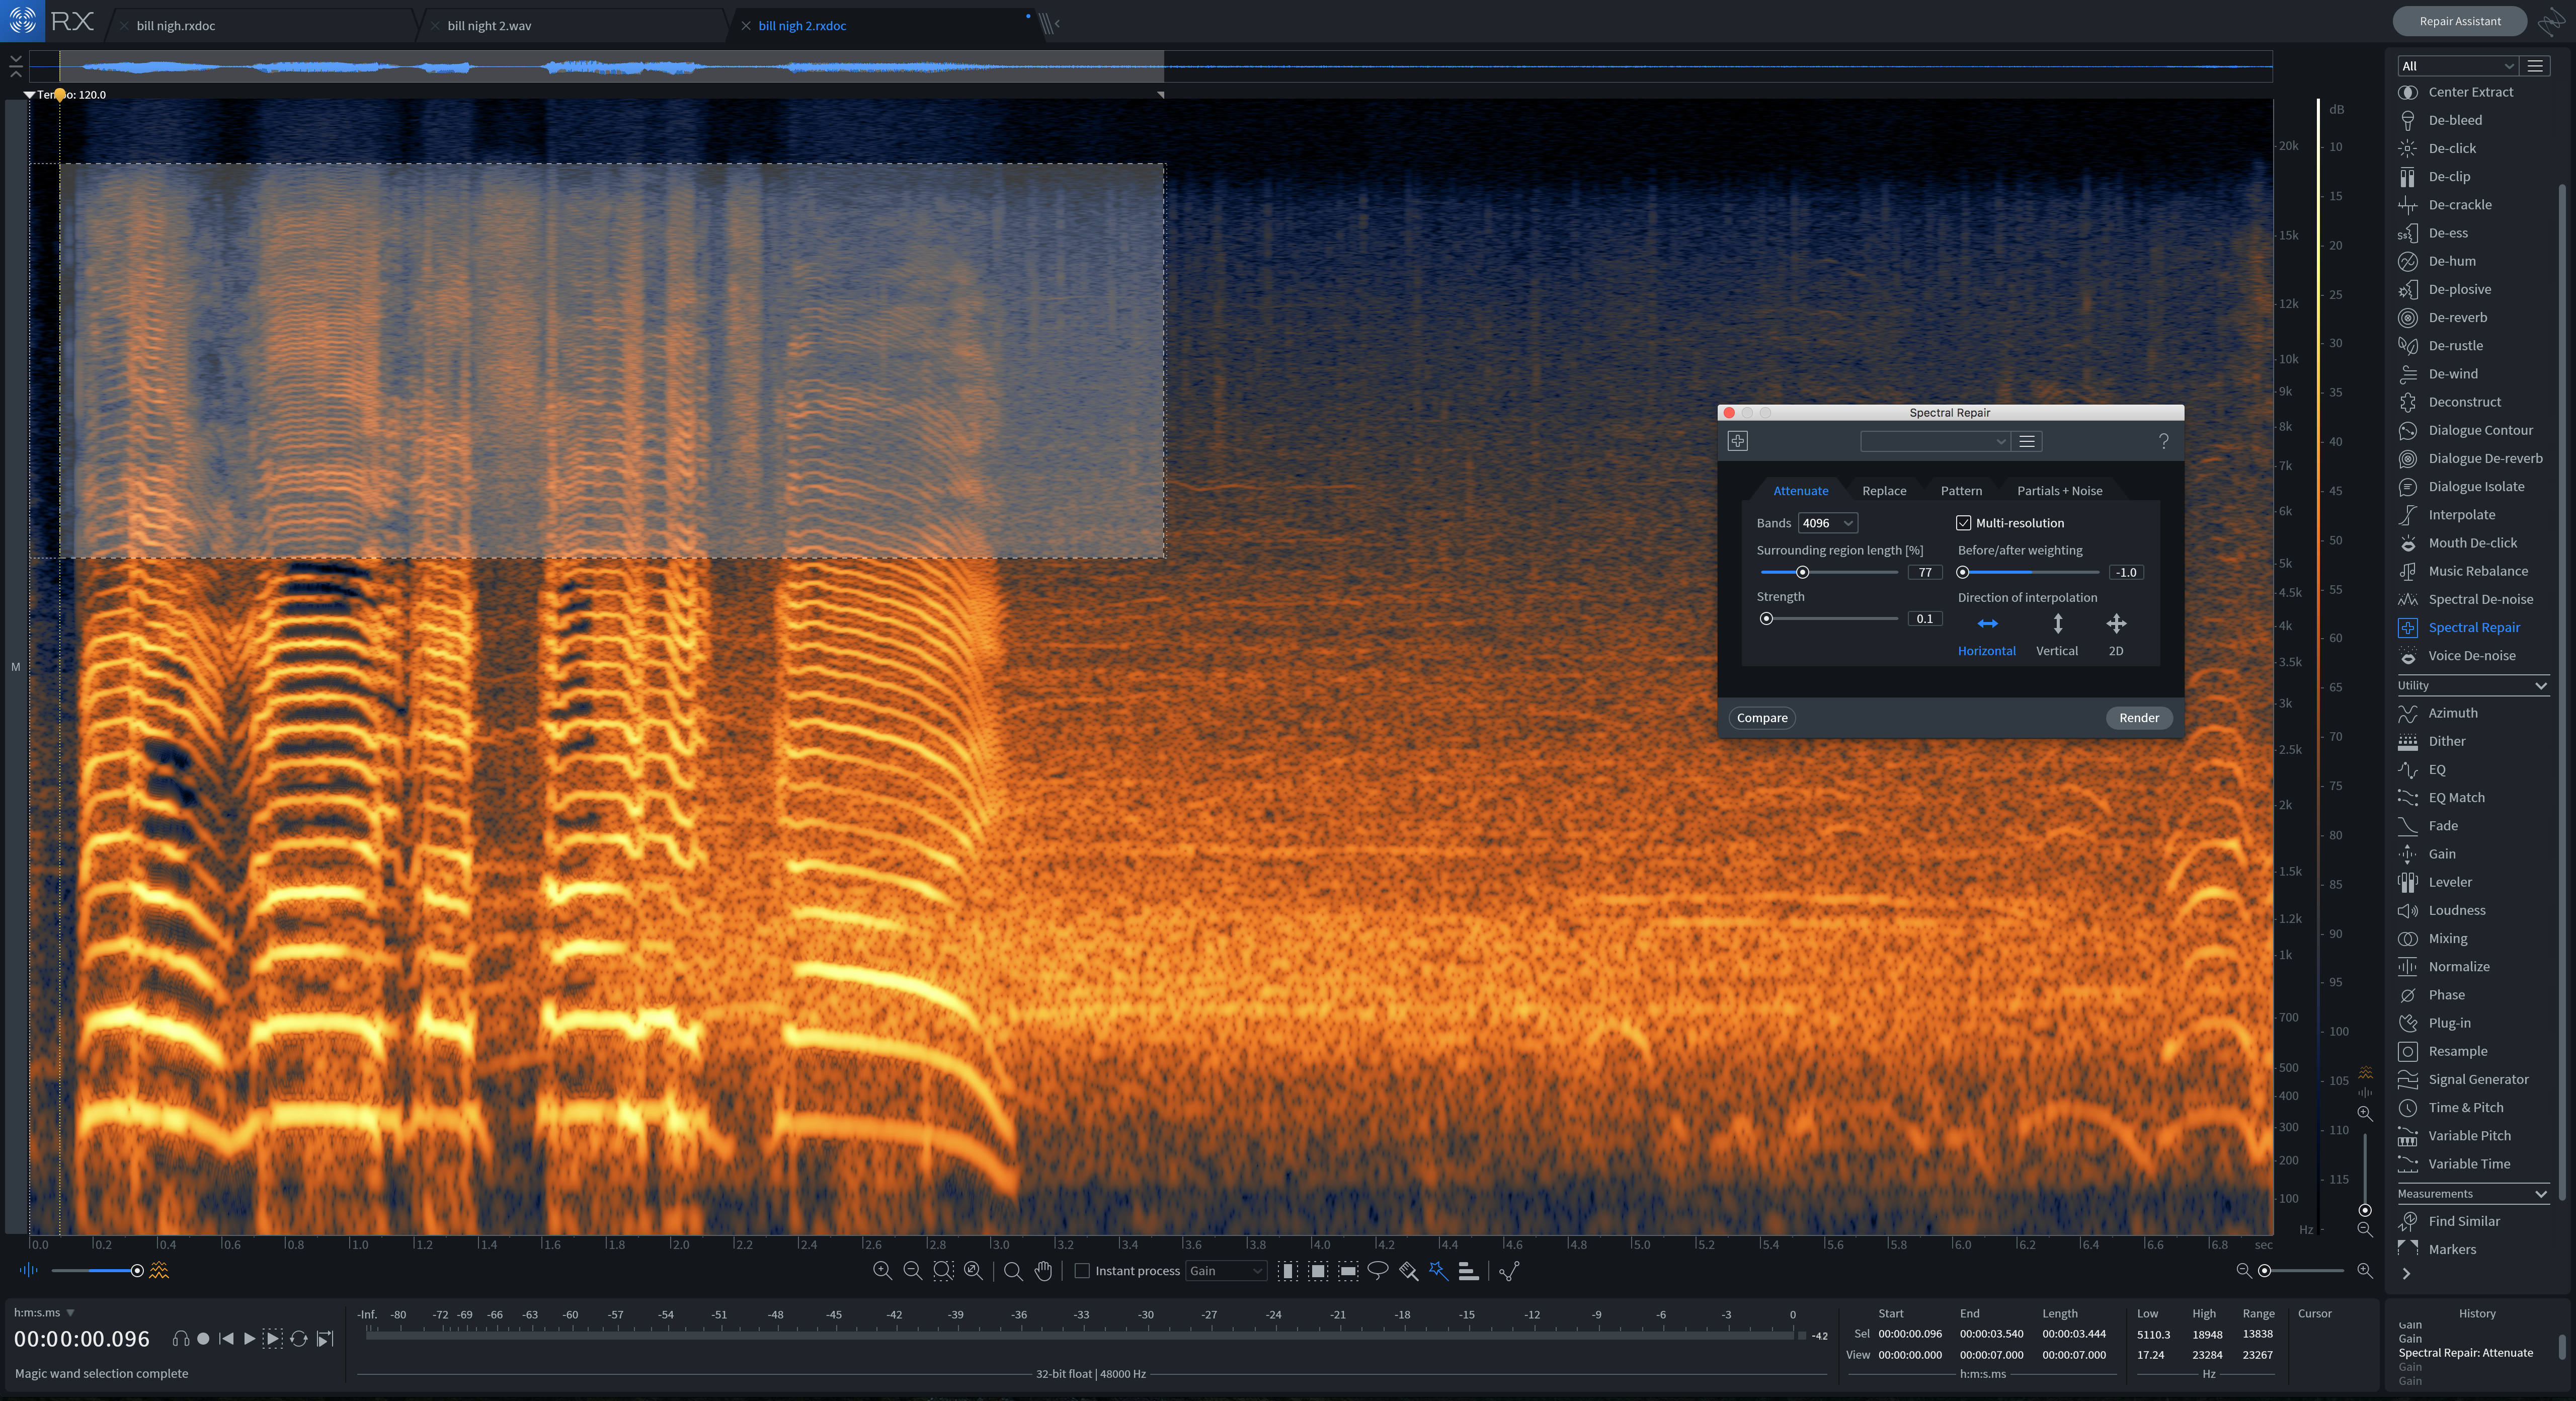
High-frequency distortion in RX 7
We also need to highlight heavily shaded bars of material—even if they’re in the fundamental or overtone ranges of the voice—and gain them down a bit to decrease distortion.
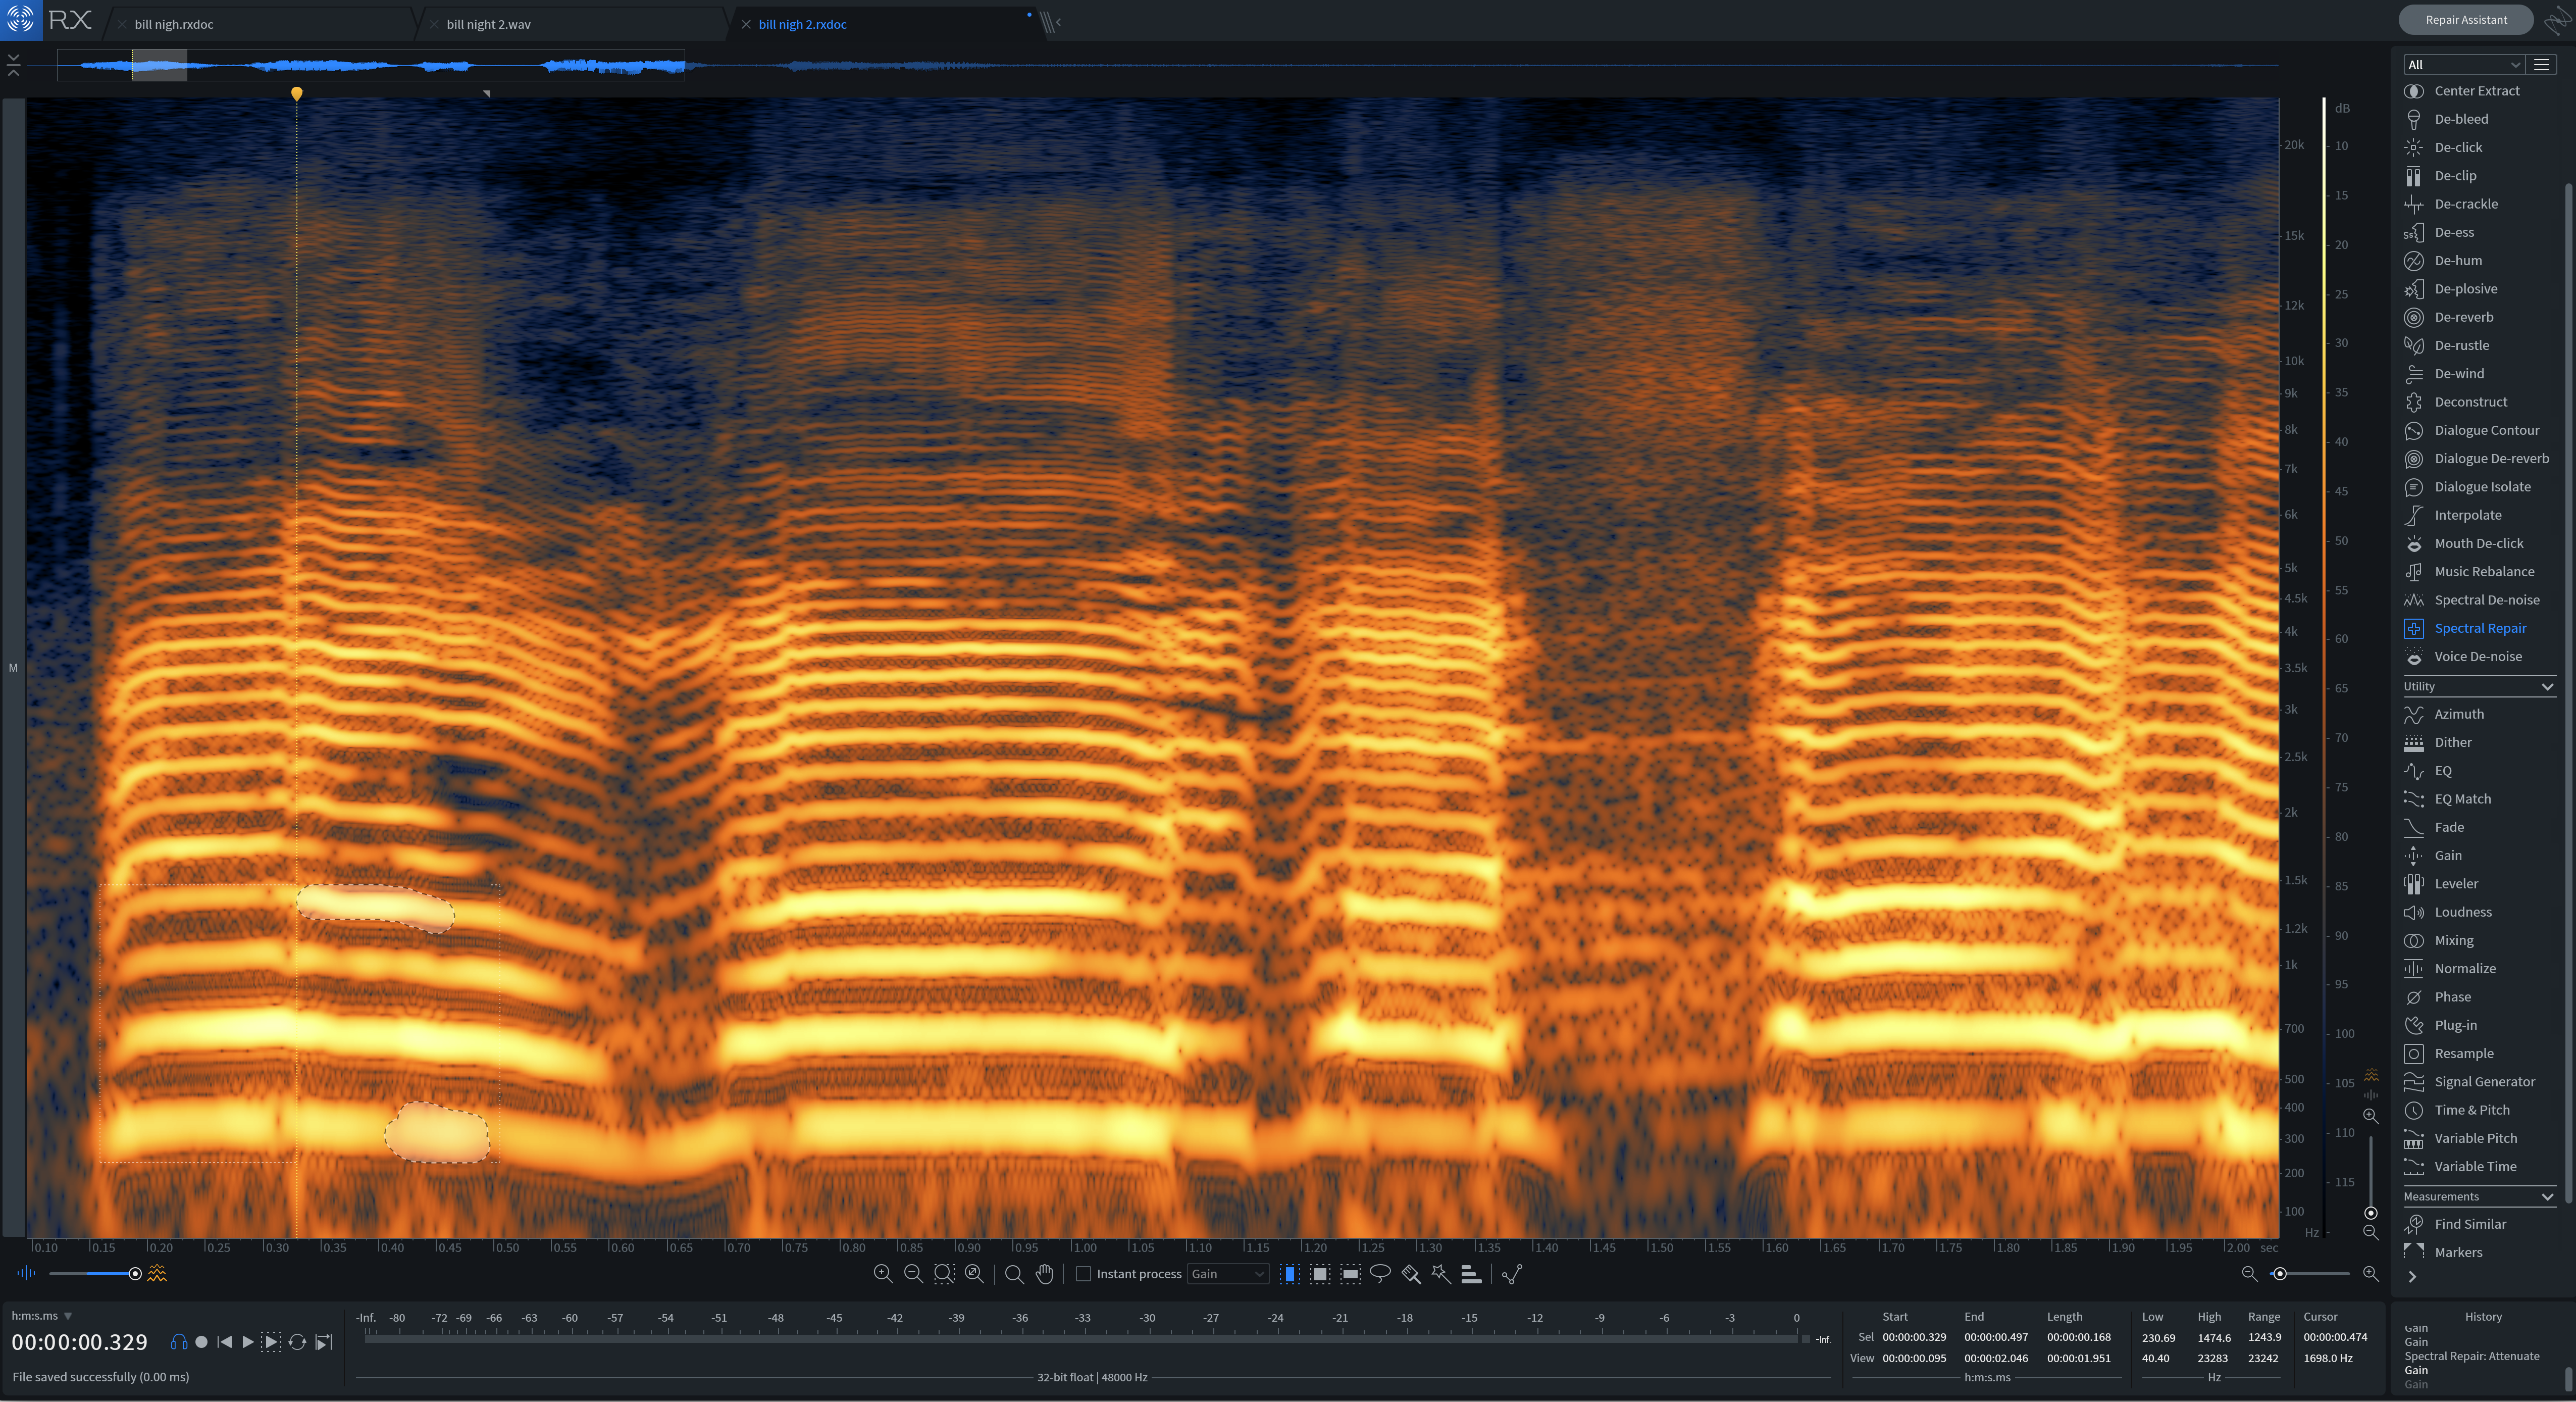
Spectrogram display after attenuation
This gets us most of the way there:
But then we can use De-click to catch some clicky, high-frequency artifacts, De-crackle to tame the midrange, and finally, De-clip to resolve digital distortion. The result?
It’s not perfect, but it’s much more listenable.
6. The music bed conflicts with the vocals
You may need to counterbalance music with narration, especially if you’re going for an investigative reporting vibe with frequent underscore. You must diligently ride the level of the music to ensure that the vocals can always be heard. There are three ways to accomplish this:
Automation
Use automation to draw volume dips when you need to hear the guests speak. It’s customary for music to take us to different segments or different virtual locales, so you might draw in automation for a boost in volume on the music track. This creates the illusion of swelling after the ending of a phrase.
When people start talking, you need to find the right balance between dialogue and music, and it’s here that automation gives you ultimate control. You can do multiple passes with either Latch or Write commands, then cement the automation in place once you’ve got it just how you want.
Ducking:
Automation may take too much time, so you can opt to duck the music instead. Ducking is an old radio term for putting a compressor on the music and assigning its sidechain input to the narrator or host. That way, when the host talks, the compressor “ducks” the volume of the music.
For this to work, you must get the timings just right. You’ll likely want a slow release, because you don’t want the music to pump like a dance track. You just want the music to go down in volume and stay down only until the vocal disappears. You’ll also need to finagle an attack speed that allows for smooth ducking of the music. There is no set prescription for this—the effect is entirely dependent on the audio being processed.
Multiband ducking
You can duck individual frequencies in the music that mask the vocal. A dynamic equalizer or multiband compressor is ideal, as long as it has a sidechain input.
Assign the sidechain’s input to the vocals and use the Neutron’s Masking Meter to ascertain where the big conflicts are. You’ll often find one in the low midrange and another one in the high midrange—the meat and the presence of the vocal, respectively.
With a dynamic EQ, it might look like this:
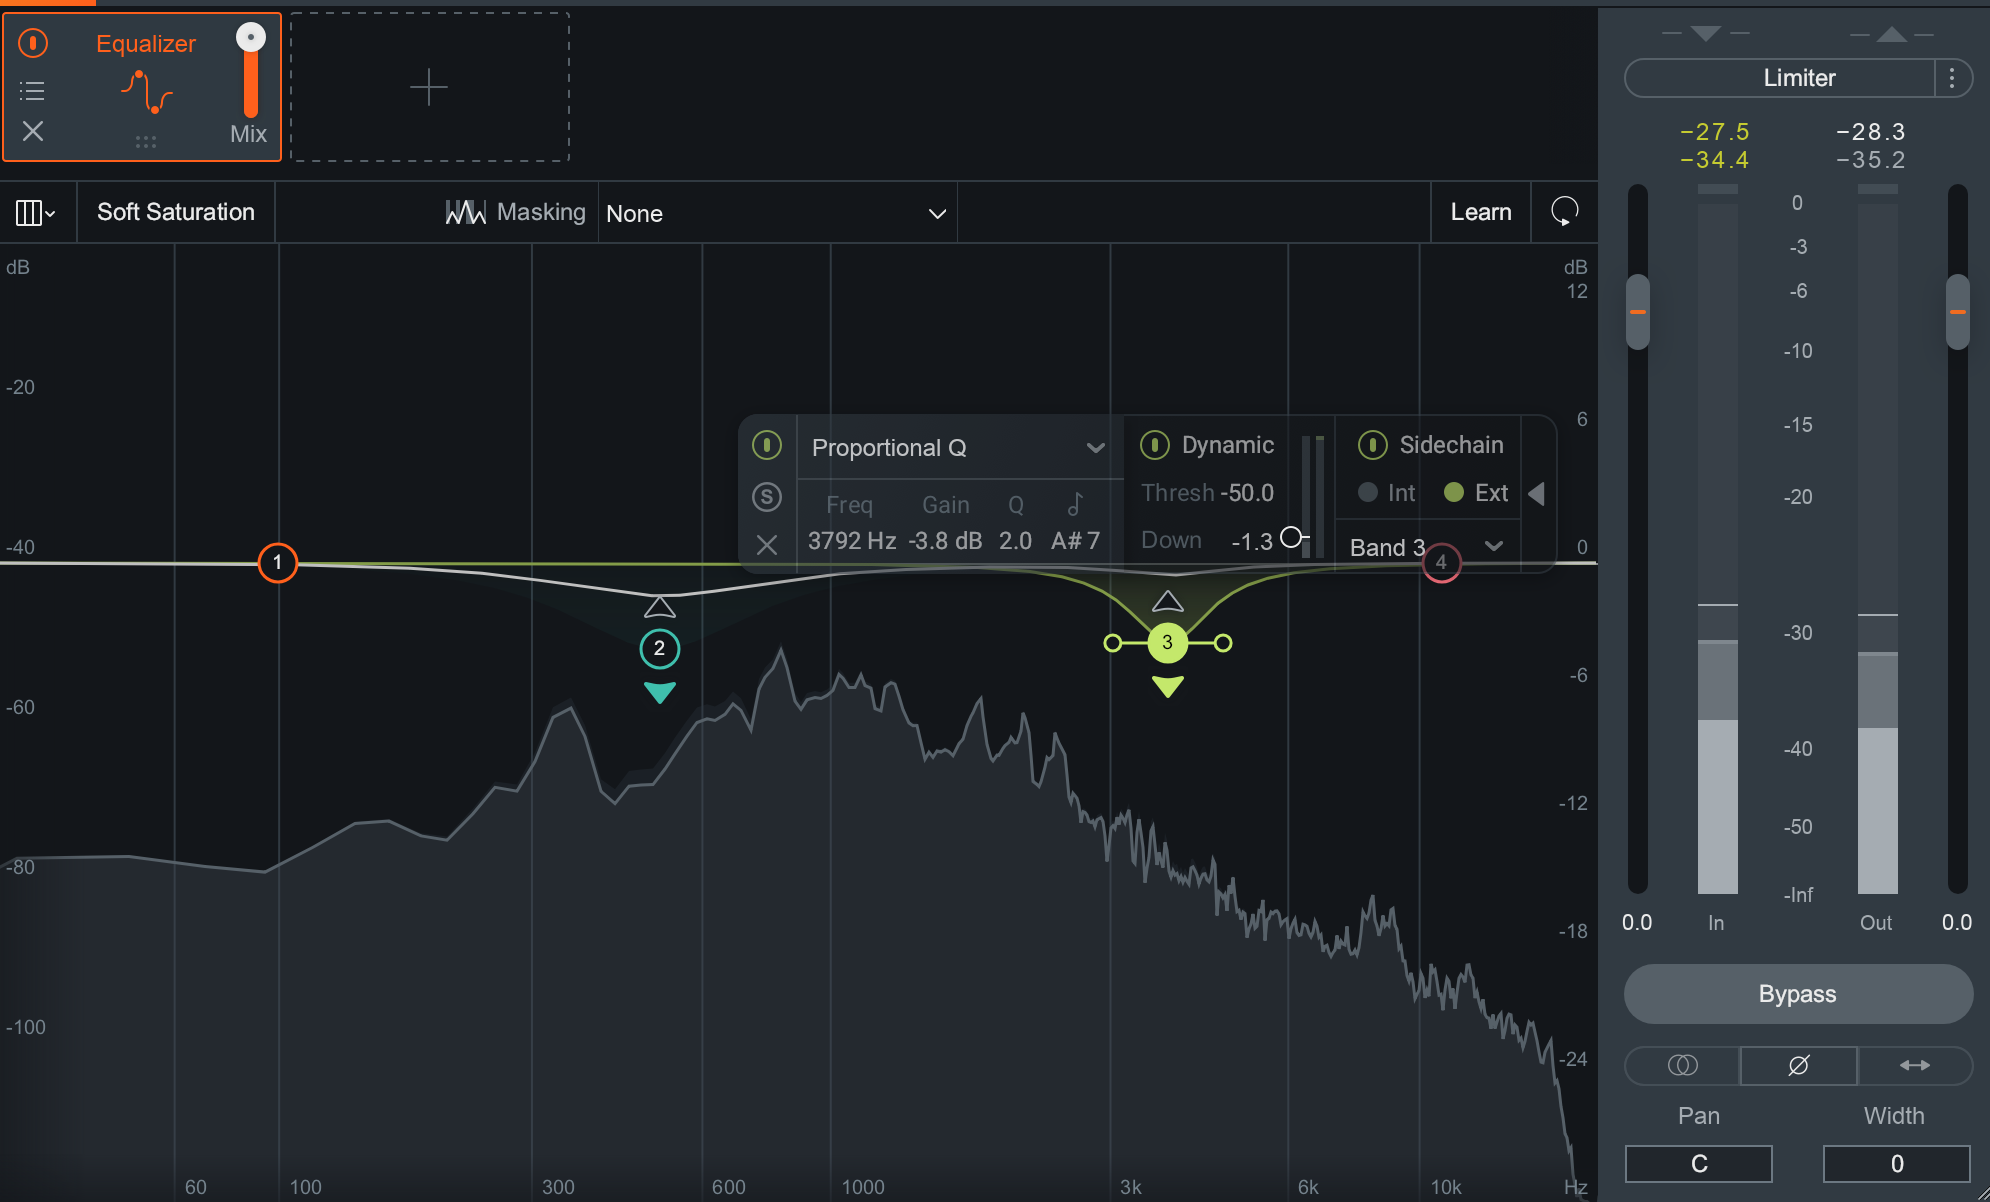
Dynamic EQ nodes in Neutron 3’s Equalizer module
The biggest benefit to this method is transparency. A listener may identify traditional ducking by ear, but this method is harder to detect.
In my experience, I frequently need to combine two of these approaches. Usually I’m automating levels with the fader, then ducking out frequency conflicts with a dynamic equalizer.
7. When I get to the mixing stage, I realize I’ve de-noised too much
You don’t always need to de-noise. Sometimes you de-noise during the editing process, only to realize you’ve made things worse during the mix. Other times you think background noise isn’t an issue, then change your mind mid-mix: all the compression, EQ, and automation you’ve added is making the background noise unbearable.
So how do you know from the beginning whether or not you need to de-noise a piece of audio?
Here’s what I do:
I set up a bus called the “edit bus”. On this bus sits a compressor and a limiter to get my audio to the desired loudness target.

Ozone 9 offers several modules for controlling the loudness of your master.
I’ll make my best guess as to whether or not de-noising is required, then audition my results through this roughly-set edit bus. The compression won’t be subtle. It will be unmusical, but it will serve a purpose: it will show me what works and what doesn’t.
This process reveals whether my decisions are too audible when I reach my final loudness target. It will also show me if any edits have been done sloppily—something that doesn’t always seem apparent until compression reshapes transients, and until EQ spotlights different parts of the signal.
8. You want it to be as loud as possible, but don’t know what that means
“How loud should I make my podcast” is a question I’m asked all the time. It’s also one I frequently ask myself: when I’m hired, my first question is whether or not the podcast has any loudness standard.
Half the time I get a specific LUFS target, and that’s great. The other half of the time, the answer is “make it as loud as it can be” and this is not so good.
Recently I took the question to my listserv of broadcast and podcast engineers based here in New York. I asked, what do you do when a company advocates for something to be as loud as possible? The rough consensus was to deliver a file with an integrated loudness of -18 LU.
However, some networks ask for -16 LU, and some have asked me for even higher.
So what should you do? Aim for -18 LU integrated, unless you want it to be loud. Then I’d recommend -16 LU integrated. If your podcast needs to compete with music on the radio, all rules go out the window, but you tread at your own risk.
Getting your podcast to be loud without sonic trade-offs can be a bit of a pain. Telling you how to do it requires more space than I have at present. Which brings us to:
Conclusion
We have much, much more to cover, both for esoteric situations and for your usual, run-of-the-mill issues—EQ, asset management, etc. In addition to practical advice, there is much to be said about the work itself. Eventually you’ll be dealing with deadlines, payment, and other issues that come up when you do this for money, but these tips should serve you well for any technical issues you’re encountering.
Again, please let us know if you want to see anything like that. Till then, go forth and cast with confidence.
