iZotope RX and Sound Design: 13 Tips with Matt McCorkle
Sound designer Matt McCorkle shares tips for creating soundscapes with iZotope RX, including how he captures ambience profiles and his tips for effective EQing.
I drove to one of those weird Brooklyn neighborhoods that might just be Queens, and I’m sitting in Matt McCorkle’s studio, my body alternatively pummeled and soothed by an array of Genelec SAM monitors hung about the room. Matt himself is nowhere to be found; the man who engineered the sound of the T. rex’s roar for the American Museum of Natural History has left the building in search of coffee.
I suspect this is a ruse, one meant to show me the studio’s goods—and the ruse is working. He had handed me an iPad, its screen labeled with various selectable moods. Each mood changes the sound palette completely, a driving beat transmogrifying into a wash of subtle, prickly sounds depending on the mood I choose. The lighting of the whole room changes its color with each passing mood, all in concert to the music. Matt has crafted this whole setup to elicit a visceral, emotional response—even the chair is meant to do that, with its built-in sub-harmonic transducer vibrating what, I’m guessing, are my chakras.
It’s an impressive display, but what I’m here for is even more impressive: Matt is a fellow who turns whales into synthesizers for a living—whales he’s recorded himself. Not too long ago, he created the roar of the Tyrannosaurus for us not only to hear, but to feel. RX is a vital part of his workflow, and he uses it differently from how most do: watching him paint away extraneous sound out of a flock of flamingos is a lot like watching Bob Ross put a tree wherever he damn well pleases.
Over the course of our two hour conversation, I learned intricate tips for using RX in the context of sound design. I’m going to share them with you now. Interested in using RX for your next sound design project? Give it a try free for 10 days below.
Jump to a section below:
1. Capture ambience profiles in each recording
2. EQ the noise profile of your sound within RX De-noise
3. Push the threshold and reduction higher after EQ
4. Automate threshold and reduction of De-noise
5. Double-up important elements with isolated copies
6. Listen to a frequency-specific selection
7. Listen to a frequency-inverted selection to check up on your work
8. Simply cut stuff you don't need
9. Rebalance the harmonics and fundamental
10. Embrace your inner painter
12. RX before Melodyne or pitch-shifting
13. Use RX in-line at first for speed, and then in standalone for accuracy
1. “Silence for RX!”: Capture ambience profiles in each recording

Recording natural elements for use in sound design can be an oar-deal.
Whether he’s paddling a canoe into the Pacific with his mixer-recorder, or recording Foley in his own studio, Matt always records a bit of atmosphere. But this is not room tone, per se.
“I have this thing where I say into the microphone: ‘wait for RX—silence for RX!’” Then he waits. He says this is important to do, regardless of the audio recording, “no matter where you are.”
Why is this important? For one thing, many RX modules learn profiles from selected slices of audio. This helps them do their job. Ambience Match is a great example of this, where learning the noise floor helps to inform the module of the information contained in the recording’s atmosphere (a technology similar to that of Dialogue Match). For another, using these profiles to clean the audio helps in processes that go beyond conventional use-cases. We’ll get into some of this in the next tip.
2. EQ the noise profile of your sound within RX De-noise
Whether using the Spectral or Voice De-noise module, Matt often does something quite specific:
“I EQ the noise profile,” he tells me, as I watch him do his magic on a Pro Tools session.
“First I’ll give it a little listen,” and upon saying this, Matt presses play on some solo’d flamingos croaking away—yes, flamingoes croak. “First, I want to make sure that I don’t lose the integrity of what [these flamingoes] are talking about.”
He listens to the clip and says. “I want to get rid of that high-frequency stuff.” Then, he drags the band in the de-noiser—in this case, Voice De-noise—to ensure he’s sucking out the pesky highs he wants to suck out. Doing this type of EQ move within the de-noiser itself allows him to accomplish a further useful goal, pushing the threshold and reduction without incurring as many artifacts.
3. Push the threshold and reduction higher after EQ
If you push the threshold and reduction sliders too high, you’ll probably incur unforgiving artifacts that sound terrible. However, EQing the de-noise modules obviates this to some extent.
So when I notice how he had the threshold and reduction sliders set, I’m taken aback—until I realize his RX EQ choices have made a palpable difference. “Huh,” I remark. “You've EQ’d the noise profile by hand, so you can go higher on the threshold and reduction without incurring so many artifacts.” “Exactly!” Replies Matt. “That—that is a fantastic note to put in there!”
This workflow allows him to work fast. “But in that quickness,” says Matt, RX “allows for a lot of control. A lot of times, when you open up my iZotope session, the threshold and reduction are slammed. But if you look at it, it’s really only slamming a very specific frequency range.”
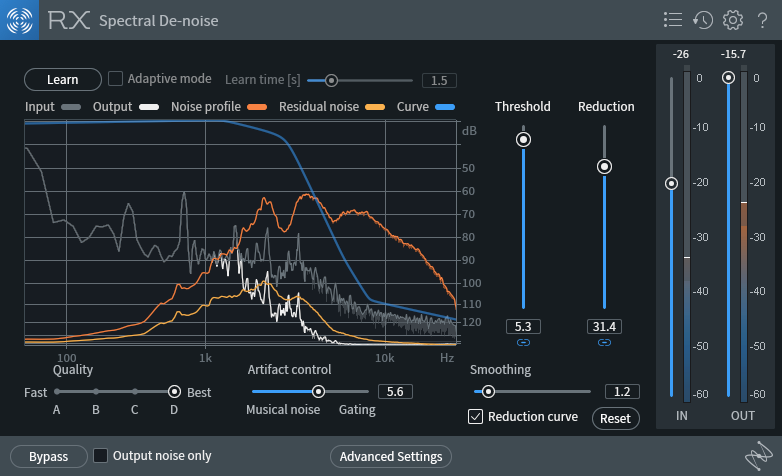
Matt's ridiculously high yet effective sliders!
That’s why Matt has the following message for us: “I would tell all your readers: don't be shy.”
4. Automate threshold and reduction of De-noise
This is something I began doing only recently, with the touch of someone who believes what he’s doing just might be wrong. That’s why, when I heard Matt talking about it, I was thrilled for the validation. “A lot of times,” Matt says, “I'll automate the threshold and reduction.” “I just started doing that!” I interject. “Yeah! It’s really great!”
We calm down over the general geekiness of loving the tools we use, and Matt goes on. “If I’m out in the field and I turn this way,” here he turns his head away from me, “we’re dealing with a completely different noise profile than we were a moment ago.”
This necessitates automating the parameters of threshold and reduction—and sometimes, even the EQ. Automation allows for, as Matt puts it, “some fun creative expression. You can suck in all the noise of a room, and it’s really in your face, and then maybe you let the room reverb go out a bit.”
5. Double-up important elements with isolated copies
Matt will isolate a bit of audio to its core—say a plaintive whale chant—and take out all extraneous atmosphere and noise. Then, he will layer that recording on top of the original to reinforce the element.
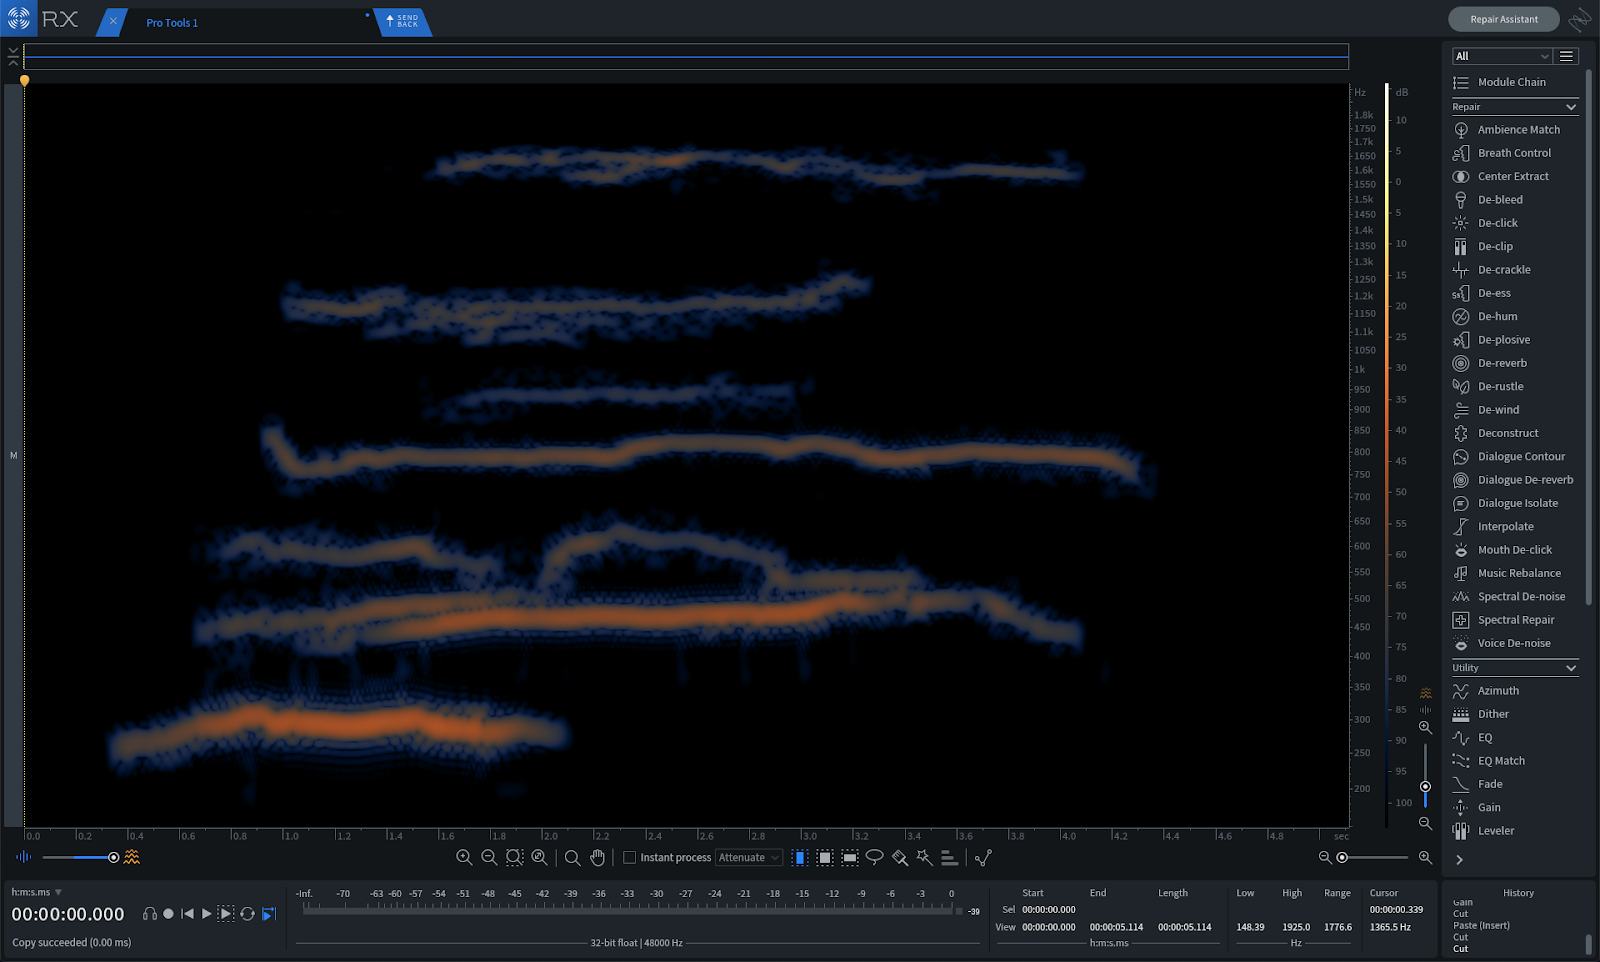
Matt's isolated whale chant
This will bolster the element in question giving it more presence within a scene or bit of sound design. “If you’re doing a scene with sound design,” Matt says, by way of example, “if someone has footsteps or something, you could bring out those footsteps with [this trick].”
Don’t go about using this tip with dialogue, however—it may cause some phasing issues. Instead save it for “the natural stuff,” as Matt calls it: animal calls, footsteps, and other elements of sound design.
6. Listen to a frequency-specific selection
This little feature is a hidden gem in RX 7. If you didn’t know it existed, and you’re a regular RX user, you’re about to thank me profusely. Let me set the scene: Matt was telling me about how he “paints” extraneous audio away in the standalone RX 7 Spectrogram (this will be covered later).
Almost to myself, I wondered, “Don’t you wish there was a solo button—just something to play the thing you highlighted?” Matt didn’t miss a beat.
“There is! It’s right here! There’s a play button and a play frequency selection button—but you actually have to go in and physically click it.”
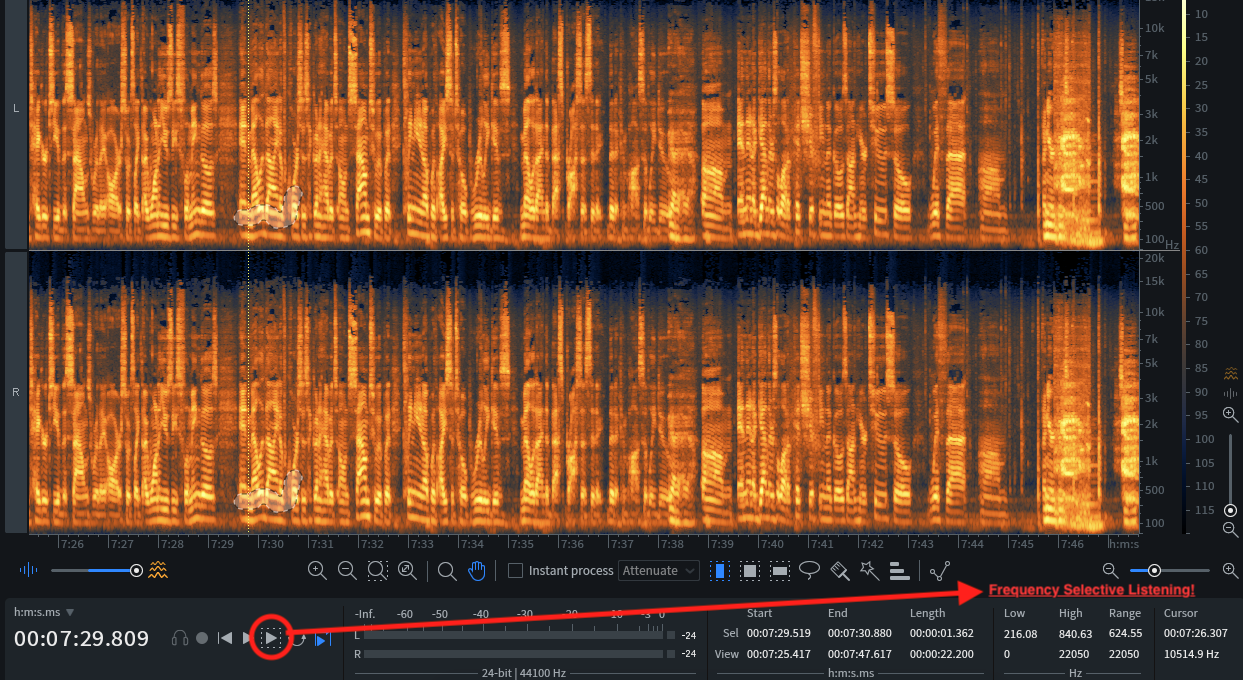
"Play Frequency Selection" button in RX
“Actually, if you could write about anything,” Matt tells me, “that is the biggest tip!”
You can use this any time you want to hear exactly what you’ve selected in RX standalone. This has since proved invaluable to me. Whether I’m trying to find the distorting in a vocal or a bit of ambience I want gone, I now select the secondary play icon.
You can also make use of another tip, which we shall enumerate presently:
7. Listen to a frequency-inverted selection to check up on your work
Matt showed me another useful process: frequency-inversion selection. The key command is Shift+command+I, and it turns this:

Spectrogram selections
into this:

Spectrogram selection with the frequency inverted
This comes in handy when you’re not sure if you’ve caught every bit of necessary audio when doing highly detailed work in the standalone application. If you’re hunting for every last bit of whale-song—for every overtone possible in the whale’s cry—use this tool to see if there’s anything left in that which you’d want to strip away.
8. Simply cut stuff you don’t need
I work in RX standalone a lot—I find that the time I spend cleaning audio up in the spectrogram helps me work faster in the mix, because I don’t have to do as much within my session.
I’ve often come across frequency-specific issues I wanted to lower in volume. Perhaps some low-end rumble, or maybe a high, piercing shrill. I used to gain that stuff down with the Gain module. Sometimes I'd use Spectral Repair to attenuate the issue. Matt gave me the guts to try something faster and bolder.
“What I'll end up doing is just cutting all that out,” he says. “Just command+X—Just cut that up and just get rid of it.”
If your offending audio is at the bottom or top of the frequency range—or if it’s just abutting the selection you need—just cut it out. Command+X, and it’s gone.
9. Rebalance the harmonics and fundamental
You can select fundamentals or overtones of any sound in RX, either with the wand tool, or by hand if you can spot them. They may look like this.
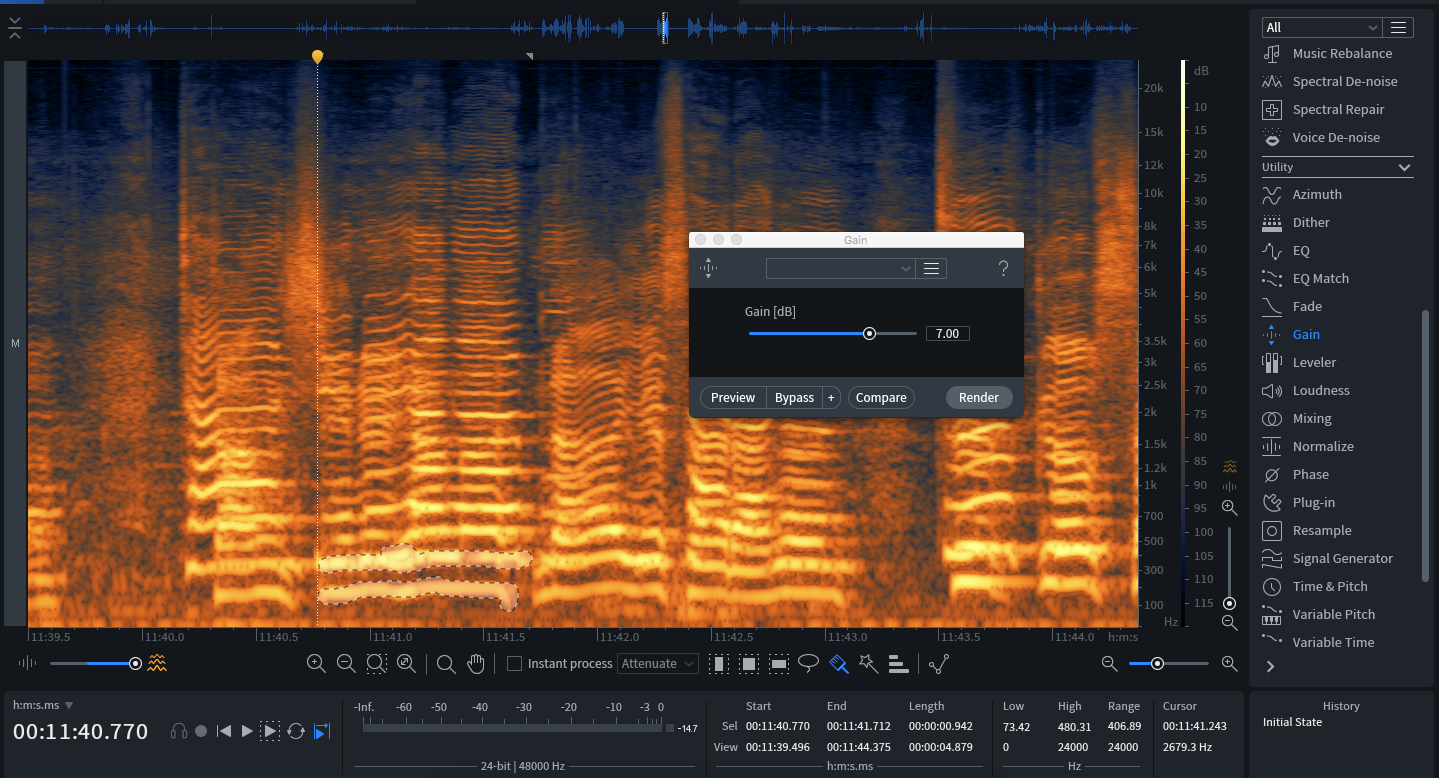
Selecting fundamentals or overtones in RX
And, once you’ve gleaned the right slice of audio, you can alter the gain.
“Obviously the Spectrogram editor is just incredible,” says Matt, “being able to go into the Spectrogram editor and control dynamics with it? Gaining things up and down, gaining down fundamentals.” “That’s like the best De-clipper!” I interject. “It’s amazing!”
The biggest use-case in my setups is a guard against horrendous distortion. Say a vocal phrase is too saturated. I can save it by highlighting its fundamental, or maybe its first overtones depending on the type of distortion in question, and gain that down. Sometimes, having trained my eye, I recognize resonances that are distorting the signal. I highlight those and gain them down.
Matt advises us to be creative here—“to get some wild tones out of stuff, maybe bringing down that fundamental and bringing up a third, bringing down a seventh.”
To him, it’s a way to engage the listener. “A lot of the work revolves around going to places, getting these sounds, but then doing really weird things with them to captivate people. And a lot of times, you can do that by reorganizing the harmonic structure—not in terms of placing it in different pitches, but going through and bringing out this specific harmonic structure. Then, maybe on the next hoot or call, or whatever’s going on, readjusting it.”
10. Embrace your inner painter
By now it should be clear that Matt sometimes likes to get granular.
“When I really want to do it, I'll go in and really paint stuff.”
I watched him do this: he pulled up a recording of some whales, took out all the surrounding atmosphere and preserved only the sound of the whale song and its harmonics. He used many of the tools I showed you above—frequency-selected listening, inverse listening, cutting, using the paintbrush, adjusting the gains of overtones, and more.
He zoomed into specific frequency ranges in the Spectrogram, narrowed and widened his painting tool. Many of the screenshots in this article were snippets from his sessions. This is what I meant when I alluded to Bob Ross earlier.
11. De-ess a soundbed
Matt will use the De-ess module in RX in his Pro Tools sessions—but not with a vocal. He likes it for reigning in natural soundscapes.
“Let's say you're out in a field and you're getting this beautiful grass sound,” he tells me. “Like, long grass, but it's just a little prickly. iZotope’s De-ess is my favorite thing to take prickliness away, but still keep the integrity of the sound.”
I press Matt about how he uses the De-ess module. “I'll usually use it in classic mode,” he replies. “Classic is pretty much just spot-on.”
12. RX before Melodyne or pitch-shifting
Matt does a lot of weird things with Melodyne and other pitch-shifters. He’ll pitch animals down an octave, tune and elongate their calls, and even blend them with synthesizers. However, these types of processes don’t respond well to noisy audio.
“Melodyne is good, but if there’s too much noise in there? Melodyne is going to be like ‘whoa man, what the fuck is going on?!?” His impersonation of Melodyne’s freakout carries over to a tool like Varispeed in Pro Tools, which will be “changing the speed on whatever you feed it—and I don’t want a change in the noise as well.”
So, Matt commits his in-line de-noising if he’s going to affect the pitch or the speed. “Otherwise,” he says, “you end up with these weird noise profiles.” This can cause problems later on.
“I want to keep the integrity of the sounds where they are. I want to use these flamingos and Melodyne, of course, is going to have its own sound to it, but cleaning it up with iZotope really gives Melodyne the best process that it can possibly do.”
13. Use RX in-line at first for speed, and then in standalone for accuracy
“Once I feel good about the effects I add after this,” he says, referring to an in-line De-noiser, “ I'll go back and actually pull up the spectrum analyzer, and do it all in a really proper way. But this allows me to just—bam! Get it done.”
Although Matt concedes that, “Sometimes I don't come back to it and I just leave it at this. It’s fine!”
Conclusion
Matt is a fireball when it comes to talking about his process, so of course, I couldn’t fit everything in here that I would’ve liked to include. Nevertheless, I hope that his creative process with RX 7 has opened your eyes to some new ways of using RX in your next sound design project. I know it did for me!
