Why Terra Naomi and M.G. O’Shea Chose Digital Mastering Over Analog on New EP
Audio engineer M.G. O’Shea shares how he mastered Terra Naomi’s latest EP using Ozone 8. Plus hear from Naomi on why she no longer assumes mastering has to be done with analog equipment to be high quality.
This article references previous versions of Ozone. Learn about the latest Ozone and its powerful new features like Master Rebalance, Low End Focus, and improved Tonal Balance Control by clicking here.
Analog versus digital mastering—it’s a debate that’s as old as, well, as old as digital mastering solutions have existed. Some audio engineers swear by analog gear; others have stepped fully inside the box.
To be sure, great results can be had with either (or a mixture) of both approaches. But today we’re highlighting one detailed perspective on using solely Ozone 8.
We recently spoke with Terra Naomi, a classically-trained, LA-based indie singer-songwriter, and her engineer about using Ozone on her new EP. They were kind enough to take a deep dive into the process. If you want an in-depth look at how to master a record with Ozone 8, read on!
Terra Naomi on finding the right mastering solution
“I recently recorded a new album at Wilco’s studio in Chicago with their producer Tom Schick after crowdfunding $50,000 on Indiegogo. It was a costly project, and I wanted the mastering to reflect the quality of the recording. In the past I've handed over my mixes to several top-tier mastering engineers and I assumed this project would need to also be sent to analog studios with big name mastering engineers, and that's what I did for a few tracks from the album.
“When my engineer friend Michael Greer O’Shea heard an unreleased master of a track, he asked if, just for fun, he could give it a shot in his digital mastering studio. A few days later, I received a Dropbox link to an A/B test of one of my songs. There were three tracks in the folder (one of the masters was a duplicate to make guessing harder) and it was my job to determine which was the analog master and which was Michael's digital master.
“I listened first on my headphones, fully expecting the results from digital mastering to be obviously lower quality than the results that I'd had done in an analog studio. All three tracks sounded good to me—warm, round, dynamic. I couldn't believe it, but I wasn't hearing a difference. So I went out to the driveway and listened in my car. Still couldn't hear a difference. Came back inside and listened on my studio monitors. I went back and forth for about 45 minutes, focusing on individual drum hits, syllables, bass notes. Two of the three masters seemed to have a little more bass extension to my ear, which I liked, but it was so slight I couldn't tell whether the difference was real or imaginary.
“I was shocked. M.G. O'Shea had done the master using only iZotope's Ozone 8 plug-in and I barely heard a difference compared to the one done in a high-end analog studio. I asked Michael to master the "Nothing To Hide Remixes" EP, and needless to say, I no longer assume mastering has to be analog to be high quality!”
M.G. O’Shea on mastering Naomi’s EP with Ozone
“Below is the Ozone 8 Advanced signal chain I used for this EP and use for most of my mastering projects.”
Vintage Tape - EQ - Harmonic Exciter - Multi-band Compressor - Maximizer - Post EQ - Insight

“The Vintage Tape module gives a certain je ne sais quoi to the sound that I really like. I’m extremely gentle with it and don’t push it much so that it remains a subtle, subconscious effect, but it helps to imbue a bit of the gritty warmth that people love and tend to associate with analog gear. It’s especially useful on sources that have been recorded with really clean, neutral preamps and produced all in the box, like most electronic tracks. I run everything through it first so that I’m making decisions on EQ, compression, etc. with that effect already applied, as if the sonic characteristic it imparts were already part of the source material.
“EQ was key in completing this project. Cohesion between the tracks was the big challenge since there were four entirely different producers in different studios using different gear and doing different electronic sub-genres for a four track EP, which is really unusual. Because they were remixes, it was same source material for Terra Naomi’s vocals and any acoustic parts from the original track (all of which fortunately sounded amazing since it was recorded in Wilco’s Chicago studio “The Loft” by their producer Tom Schick), but almost all of the remixes primarily used their own instrumental productions, which each had a different aesthetic.
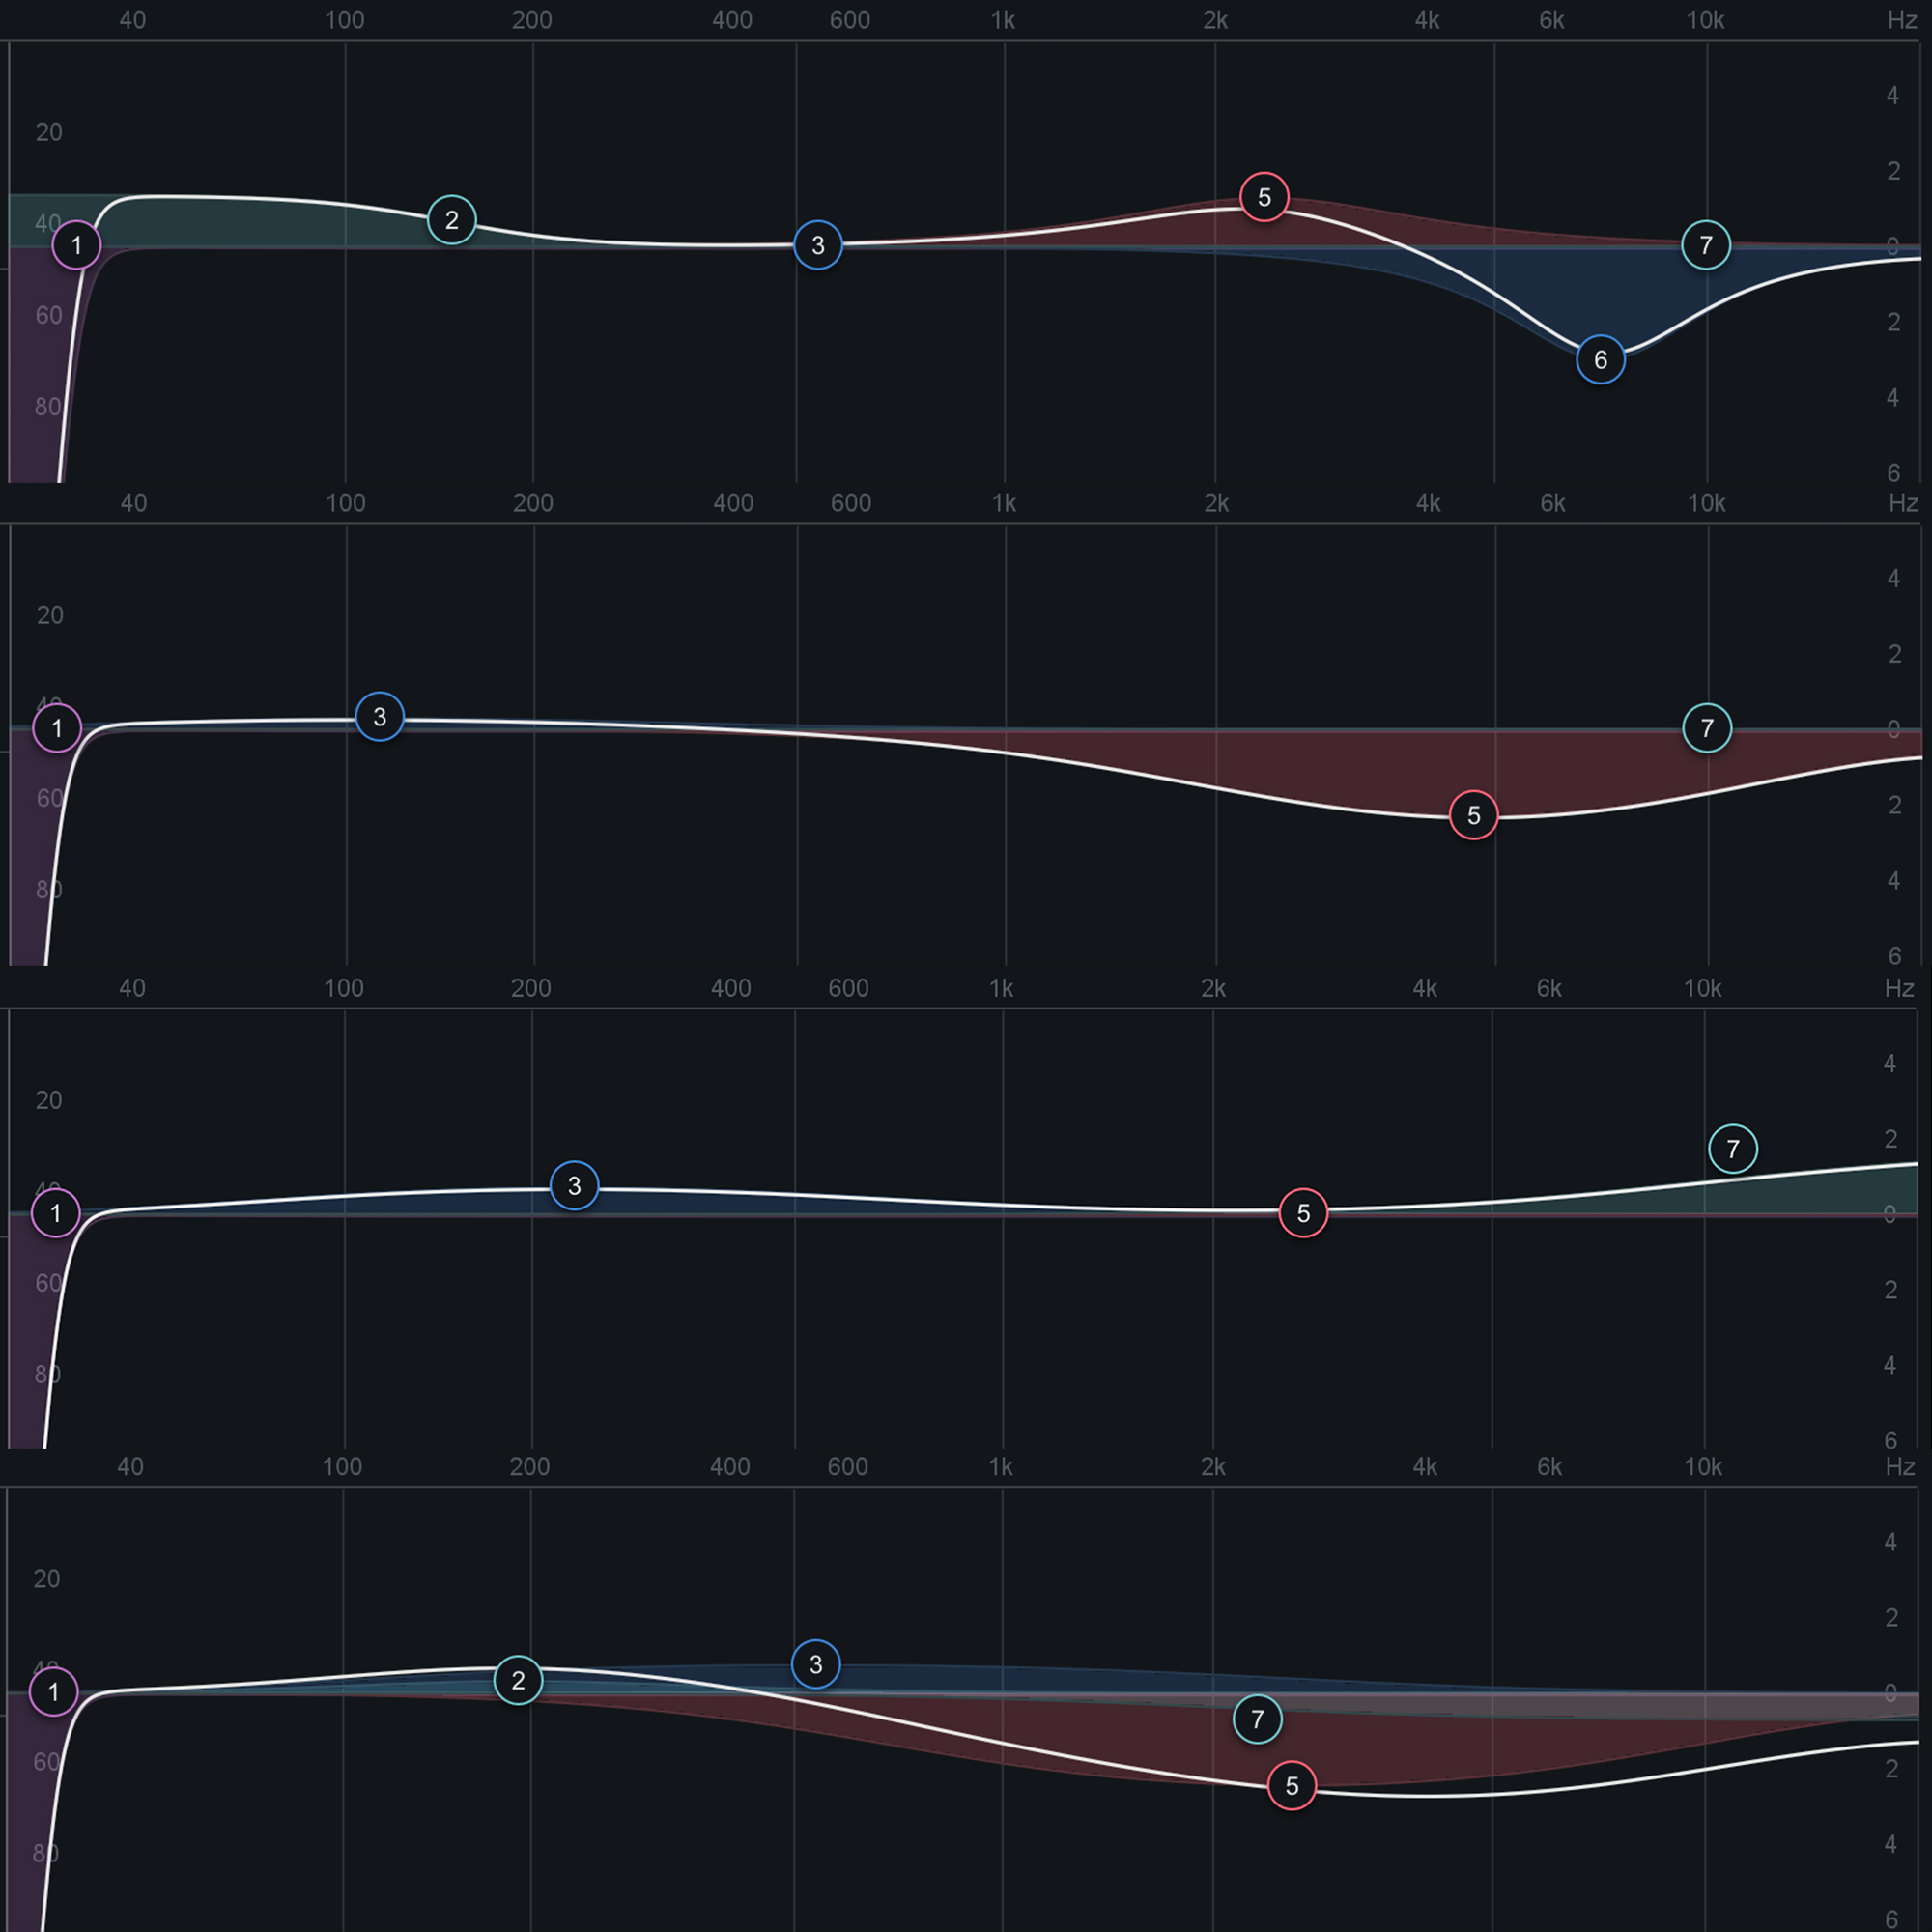
"Everyone thinks of mastering as “making tracks loud,” which is, of course, important, but I think EQ is an overlooked aspect that’s more important for imprinting a sonic signature than people think. At the mastering stage you’re far more limited in how you can affect a track’s overall sound than at the recording or mixing stage, but the subtle use of EQ and harmonic excitement can really alter the feel of a track. The best way to make sure all these disparate tracks had a similar feel and would sound cohesive next to each other was to make sure that the EQ curve for all of them after mastering was similar. This required very different equalization applied to each of the four tracks, as you can see below.

“As much as possible I used the same settings on the tracks in all the processing modules, except the Equalizer. I used the same settings for Vintage Tape, Exciter, and Maximizer, and the same attack/release/ratios in the Dynamics module. By limiting the amount of variables I was dealing with to primarily the EQ, which I felt was the most important aspect for creating a cohesive sound, I was able to more quickly get everything matching correctly.
“One thing you might have noticed is that the one continuity between all the tracks is a low-cut filter. I’m going to take this as an opportunity to make an aside about bass. I really love bass, so it’s important for me to get that frequency spectrum right. Most engineers find bass the most challenging frequency range to work with and I wouldn’t disagree. It’s a pain to work with, but I love it and you have to get it right. My solo electronic project Kinjac is known for having really dense mixes with a ton of layering and really huge sub bass. It’s a nightmare to mix, but people often seem impressed at the clarity and the room I’ve been able to carve out for every element to breathe. I’m going to let you in on my secret to great bass. It applies to mixing and mastering and is going to sound really strange. Ready?
“It’s high-pass filters.
“Ironic, right? The secret to huge sounding bass is cutting bass. Seems weird, but it makes sense if you think about it. Bass frequencies take a lot of acoustic energy to reproduce. They’re huge sources that can be really unwieldy. Too much and you’re overloading everything and they take up too much space and cause mud. For tight bass that really hits, you’ve got to carve it out and make sure you’re not wasting any bandwidth on acoustic energy you don’t want. For instance, things too low for humans to hear. If your source has sonic information down below around 25 Hz, you’re not really hearing it and almost any speaker isn’t reproducing it or is having trouble doing so. What you are hearing, however, is the mud that it’s causing and the unnecessary strain on all the other components in your signal chain. Your compressor and maximizer can “hear” sub-bass down there are indeed responding to it. This is exactly why I staunchly support putting a high-pass filter in the EQ before and dynamics processing. I usually set my high-pass at 27 Hz with a 48 dB/octave roll off in the analog setting.

“By cutting those unnecessary frequencies before compression, the compressors are free to respond only to the focused bass sounds that they should be working on. I use this same approach when I’m mixing and my default settings for Alloy and Neutron (which are my go-to mixing plug-ins) have a high-pass filter already applied because I use one on almost every track. Even though you might not hear extraneous low frequencies on an individual track, it can really add up if you’re laying tons of tracks and start causing an indistinct muddiness in your mix, which is why it’s a good to get in the habit of throwing high-pass filters on tracks when you’re mixing.
“Like the Vintage Tape module, the Exciter is also super useful for for adding some intangible audio goodness to tracks. Once again, subtlety is key here, but tastefully using harmonic excitement can really make digital recordings sound like they have that quality that people love and think only analog gear can provide.
“My personal favorite is the “Tape” emulation setting and I usually keep it to a low amount (subtlety!). I used the same setting and amount across all the whole frequency spectrum and that’s my typical approach. I used the module in Stereo mode for these tracks, but for some material using it in Mid-Side mode with different emulation settings has given me really great results.
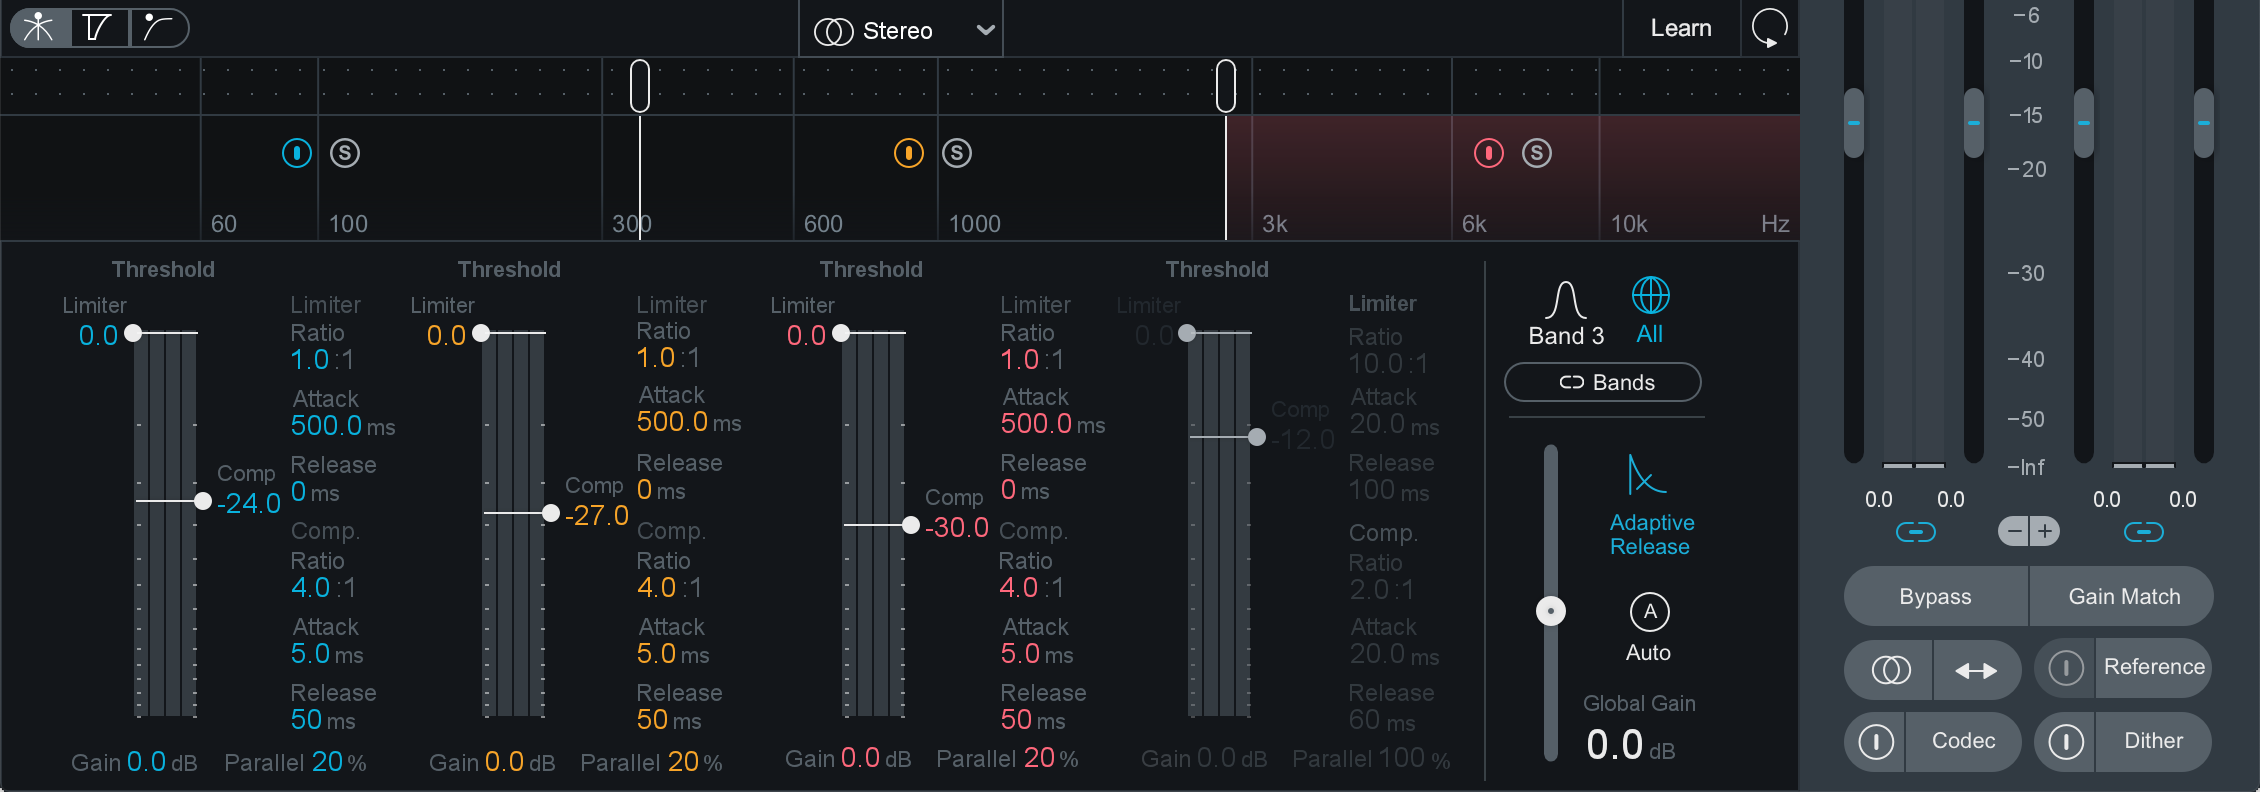
“I like to use the same attack/release settings across the board in the multi-band compressor and almost always use it in stereo mode. If you look in the “Matching” section of the Equalizer, you’ll see “Pink Noise” and “6 dB Guide” as target spectrum snapshots. Basically, the EQ averages should generally be flat up to 1 kHz and then start rolling off. It’s a rough guide, but it’s a good thing to keep in mind. I apply this same principal to how I set the thresholds for my multi-band compressor. I keep the thresholds of the first two bands (which range from 20hz to usually around 2 kHz) the same and then make the threshold of the next band lower and then the highest band usually lower than that. If you’ve properly EQed your track before multiband compression, then it should already be following a similar curve. This means that if you left all your compressor threshold settings flat, the low side of the spectrum could be hitting the compressors too hard while the highs weren’t even being compressed. This is why it’s really useful to have a multi-band compressor. You want to be able to apply compression to the whole audio source, but in a way where it’s more evenly distributed over the frequency spectrum.
“Since all of the tracks were coming from different sources, they were all at slightly different levels, which meant I needed to set the thresholds at different settings to get similar compression amounts. With my workflow it didn’t matter what the thresholds were because I simply made sure that the compression amount was similar and then used the Global Gain function to makeup the difference so that all of the tracks were leaving the Dynamics module at similar levels.
“Since all the tracks were now leaving the Dynamics module at similar levels, I was able to use exactly the same Maximizer settings for all of the tracks on the EP. I’m personally a fan of the IRC IV “Modern” setting. That’s what I almost always use and what I used for all of these tracks. I wanted them to all have a similar perceived loudness as well as a similar sonic characteristics, so it was important to get things evened out before the Maximizer. This way it was affecting them all similarly so none of them sounded like they’d been significantly more compressed than the others.

“The tracks are all well matched in terms of loudness and EQ curves, but since harmonic excitement and loudness maximization were exactly the same, and multi-band compression was at very similar levels, what comes through is more in line with the intent of the producers and their decisions on how compressed elements of the track should be. By keeping as many settings as possible the same between the tracks, I was able to be more neutral and transparent with my masters and my goal with mastering is always to amplify the intent of the artist. This is exactly why I love Ozone so much for mastering--it doesn’t try to color the audio and put its sonic fingerprint all over it. It simply magnifies what’s going on within the track and lets the listener hear deeper into the music. I love using gear that really colors sources for recording and mixing (whether that’s using broken guitar amps, old ribbon mics, or plug-ins like Trash by iZotope), but mastering should be transparent and let the music that’s already speak for itself, just with more clarity and presence.
“An important thing to note is that I kept the Ceiling setting on the Maximizer at -1.0 dB. This is to prevent the uncompressed file I export from having any clipping when it is inevitably converted into an MP3 or other compressed format for distribution and streaming. Leaving around 1 dB of headroom is recommended in the “Mastered for iTunes” guidelines and leaving at least 0.5 dB is an important practice in my opinion. You don’t need to slam your levels to 0 dB or peaking to make the track sound loud.
Post-EQ:
“One of my favorite features of Ozone 8 is their EQ module. Just having a realtime hi-def visual display in the primary EQ is an invaluable tool, but the matching section is an unsung hero to me. Being able to take snapshots of the EQ averages over time was key for getting these tracks to sound cohesive. I was able to take a snapshot of a section of the tracks that should have a similar sound. It was particularly useful to compare the largest sounding sections where the vocals and all the instrumentation were playing. I’d find a snippet where the whole frequency spectrum was filled out (vocals, drums, sub bass synth, melody lines, etc.) and take a snapshot of that with the matching function.

“By using the Equalizer to get those sections of each of the four songs to a similar frequency curve within the Post-EQ, it gave everything a similar vibe. All of the tracks have a good sub range extension, but none of them overpower any of the others. They have good presence in the upper ranges, but none of them sound harsh or overly bright next to the others and they all roughly follow the Pink Noise/6 dB Guide EQ curve.
The way I use Post-EQ, it’s doing absolutely nothing to the actual signal. It’s purely a tool to see what’s going on after all my processing. Despite it doing nothing to change the signal, I still consider it invaluable in my signal chain, which should tell you something. Unless you’re mastering in an acoustically perfect room with perfectly flat monitors and have ears that never fatigue (trust me, this will never happen), it can be really useful to have visual feedback and numbers to reference. Which is a great segway to the last piece in my signal chain, which always comes after Ozone: Insight by iZotope. That’s another unsung hero in my opinion. Having a great metering tool at your disposal so you can get some real, objective numbers to back up your perceptions is really important. Insight is almost always open and running in the background so I can quickly reference levels while I’m mastering.”


