Unmasking Your Mix with Neutron
Learn how to clean up a muddy mix and how to make space for your instruments with the new Unmask feature and other unmasking techniques in iZotope Neutron.
Frequency masking is an auditory phenomenon that can occur when two or more sounds sharing similar frequencies are played at the same time. In the range where the frequencies overlap, the louder of the two sounds will often partially or fully block out the competitor.
Masking can make it difficult to discern audio that needs sonic separation or space. In general, masking can be either encouraged or problematic (but not bad) depending on its context:
Encouraged masking: when two sources blend there is likely some overlap in a frequency range, and therefore some amount of masking happens. This is similar to the use of distortion in mixing.
Problematic masking: when two sources blend, but their frequencies obscure rather than compliment each other. This can make it difficult to listen, analyze, and understand where tracks compete across an entire mix.
Masking occurs in all styles of mixes, and, when it comes to problematic masking, can result in muddiness in the lows, bloating in the mids, and pinging madness in the highs.
In this article, we’ll walk you through how you can easily fix frequency masking issues and create space for instruments in your mix with the new Unmask Module in


Neutron 5
Let’s explore how to use the new Unmask module and other features in Neutron, like the EQ Module and


Visual Mixer
Already own a copy of Neutron? Log into your iZotope account for special loyalty pricing.
1. Minimize frequency masking with smart arrangement
The more you add to a mix, the greater your risk of masking. One of the best defenses against masking issues is thoughtful recording and arrangement. Being mindful of how many instruments will occupy specific frequency ranges, can be hugely beneficial in minimizing masking during the mixing stage.
For example, we’ll often talk about bass and kick drum as two sources of masking that compete for attention in the low end. If you want to minimize masking between these two instruments, you can begin by selecting sounds that occupy their own space in the frequency spectrum. Starting off recording with the idea that you want the kick drum to be more sub bass focused (20-60hz), and your bass guitar a bit more focused in the range above that (60-150hz), will help dodge masking issues from the get go.
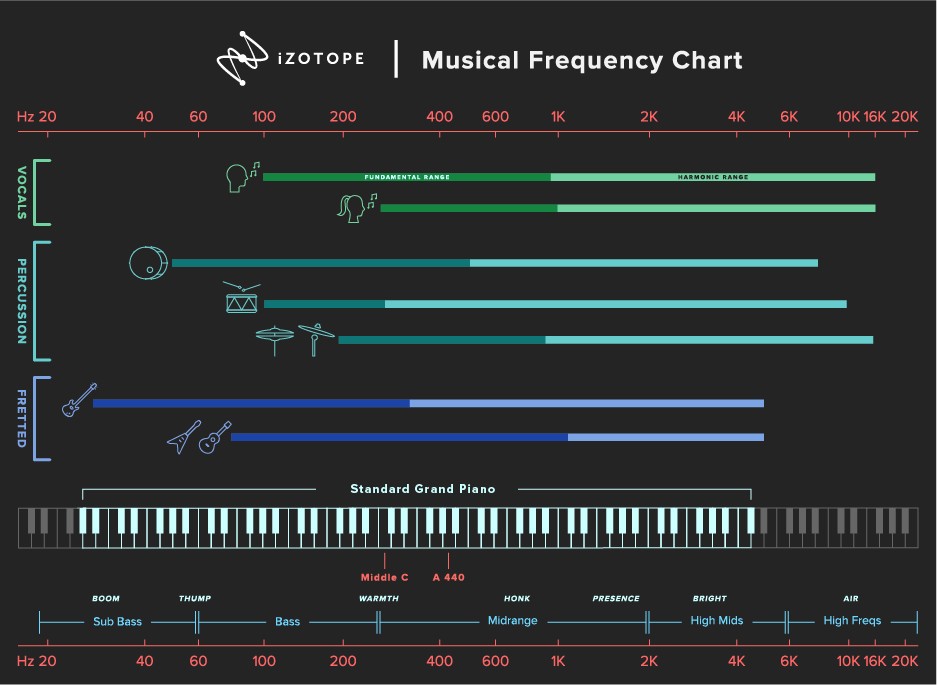
Musical frequency chart
2. Unmask the most important elements of your mix first
It’s important to note, a bit of masking can help your tracks feel cohesive, or “glued” together. Your tracks are definitely going to share frequency content between them, but an abundance of masking can become overwhelming.
So where do you start—and stop—unmasking? I find it makes sense to start with the most important element and often centered (panning) elements of the mix, like the vocals, drums, and bass. You want lead elements to sound clear and powerful, so reducing the amount of masking occurring with them is crucial.
Once you handle these main sounds, it's easier to make decisions about what else needs unmasking and what doesn’t. We can start unmasking these main mix elements by using Neutron 4’s new Unmask feature.
3. Auto-unmask your mix with the new Unmask feature
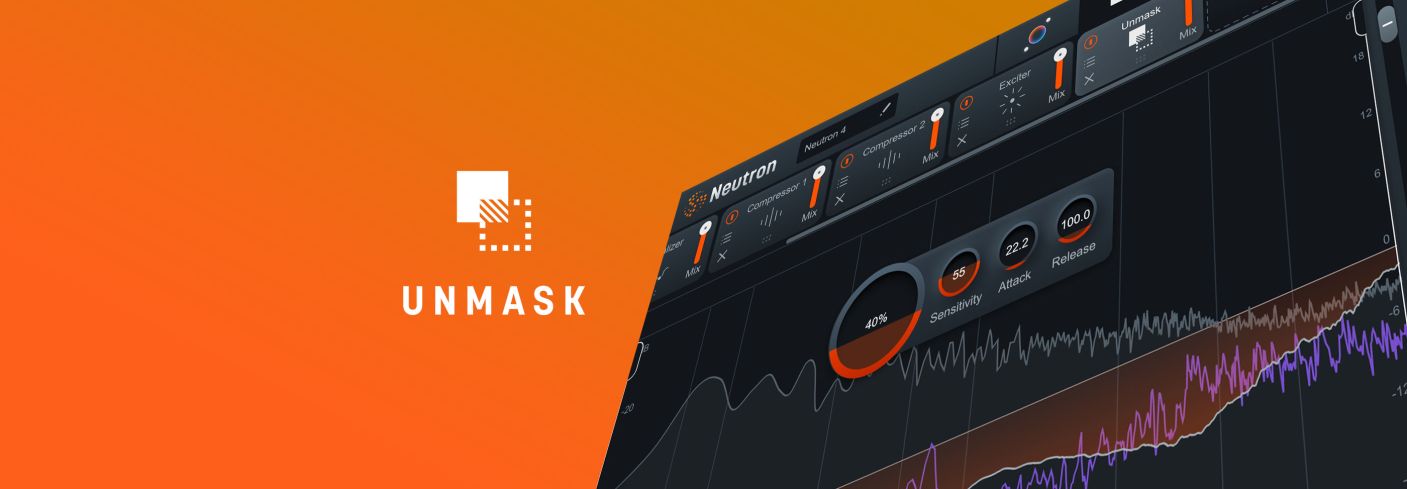
The new Unmask feature in Neutron 4 is a tool that offers a fresh perspective on dynamically unmasking frequencies between tracks. To put it in technical terms, Unmask makes auto-demasking possible by combining iZotope’s Masking technology and a process known as spectral shaping, which is a way of applying dynamics processing across the frequency spectrum.
Unmask’s adaptive technology goes through two processing steps:
- Detects the frequency ranges where masking is occurring between two sources
- Uses a sidechained signal to trigger gain reduction wherever masking is occurring
The only thing you have to do is dial in the amount of gain reduction you want to apply to the masking source’s signal.
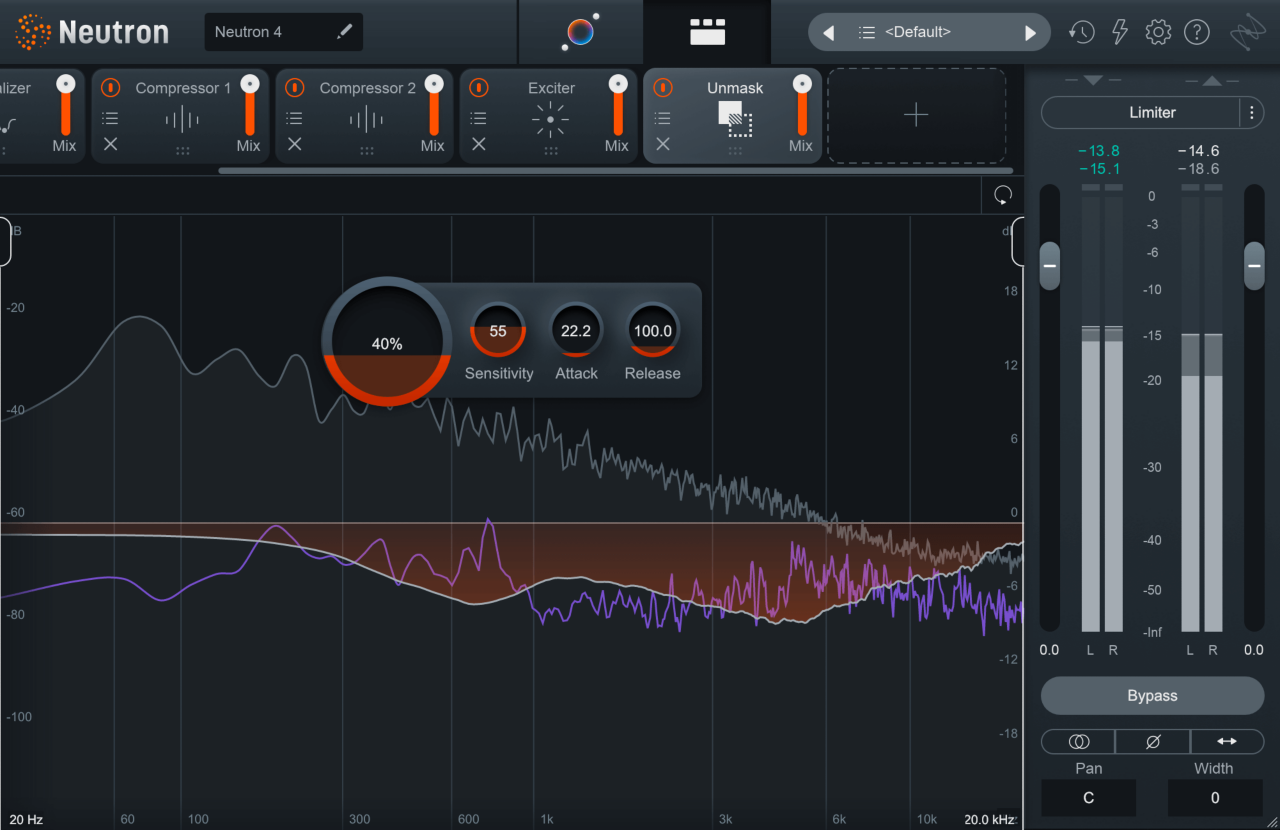
Unmask in Neutron 4
In the example above, you can see I’ve loaded Unmask to my bass track, with the goal of giving the kick more space in the mix by clearing out conflicting and problematic information in the bass.
To get going, navigate to the top right corner of the plug-in and select the kick drum as your sidechain input in the bass track (in Pro Tools, selected top left from an incoming pre-fader bus send from the kick), select the frequency band you want to work on with the left and right sliders in the main window, and you’re ready to start unmasking that area.
The meter will show you where your track’s frequency content overlaps, with the gray line as the bass, and the purple representing the kick. The orange curve below the horizontal center line shows the attenuation happening. This information informs Neutron where gain reduction will occur.
The Unmask Module has a few controls that help you dial-in how gain reduction behaves on your track:
- Amount determines the amount of gain reduction applied to the masking frequencies. As you increase the amount, you’ll notice the Difference Meter line dip to reflect the amount of gain reduction being triggered by the sidechain input.
- Sensitivity determines the level of masking at which gain reduction begins. At low sensitivity, only regions where significant masking is taking place will be affected. At high sensitivity, Unmask will be more reactive to frequency masking and will apply gain reduction to a larger frequency range.
- Attack determines how quickly unmasking is applied when the sidechain signal is active
- Release determines how quickly unmasking stops once the sidechain input falls below the threshold.
- Filters establish a boundary in the frequency spectrum where the unmask Module works
The Difference Meter will display the amount of gain being removed by dynamics processing to create space for the sidechain input you selected (in purple).
Here’s the difference Unmask can make:
Unmasking with Neutron
For more information on Unmask, see Neutron’s help guide.
Now that you’re seeing and hearing Unmask working, you can start to understand the magic in this module. Unmask Module’s adaptive intelligence reads and adapts to every frequency in your selected region, as opposed to reacting to a broad stroke fixed band like in other similar tools. All the other similar processes have their use, but Unmask might be the way of the future for dynamic unmasking between tracks.
4. Unmask your mix with Masking Meter
If you want to get a bit more surgical with your unmasking, You can also unmask your mix with the EQ Module in Neutron. In your DAW, drag a copy of Neutron’s EQ onto a lead element and press the drop-down menu next to “Masking,” which will show you other instances of Neutron that can be brought up in the same window. The plug-in is capable of bringing up other iZotope plug-ins, too.
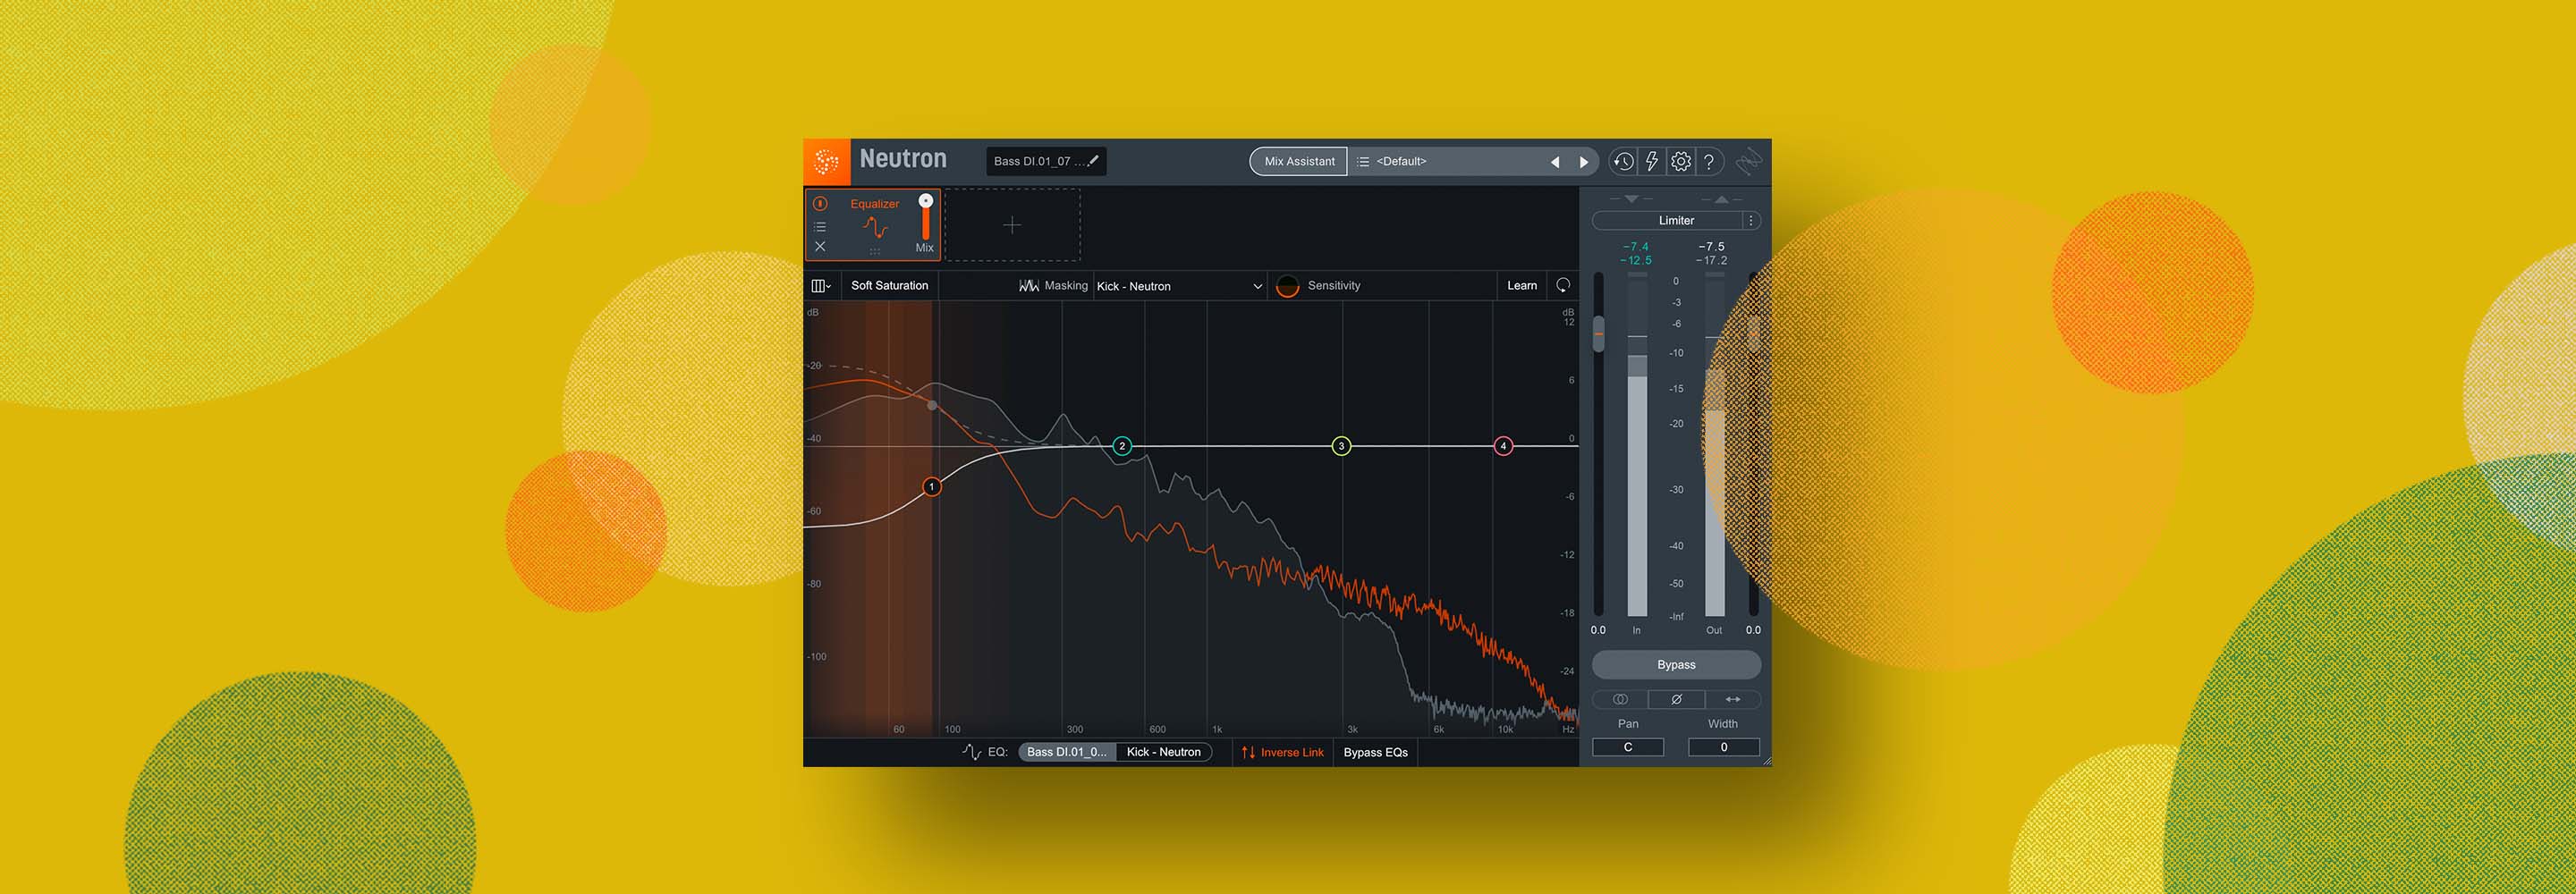
Once you make a pick, Neutron will display the frequency spectrum of both signals and reveal where masking is taking place, represented by the Masking Histogram (the orange bars) at the top and the highlighted areas on the Masking Meter. The highlights of the spectrum indicate where there is momentary masking (loudness loss) in the frequency domain. The brighter the highlights, the more masking is occurring in that area.
You can also use the “sensitivity” control to highlight more or less masking. In this case, you can see significant masking between bass and kick drum from about 150 Hz and below.
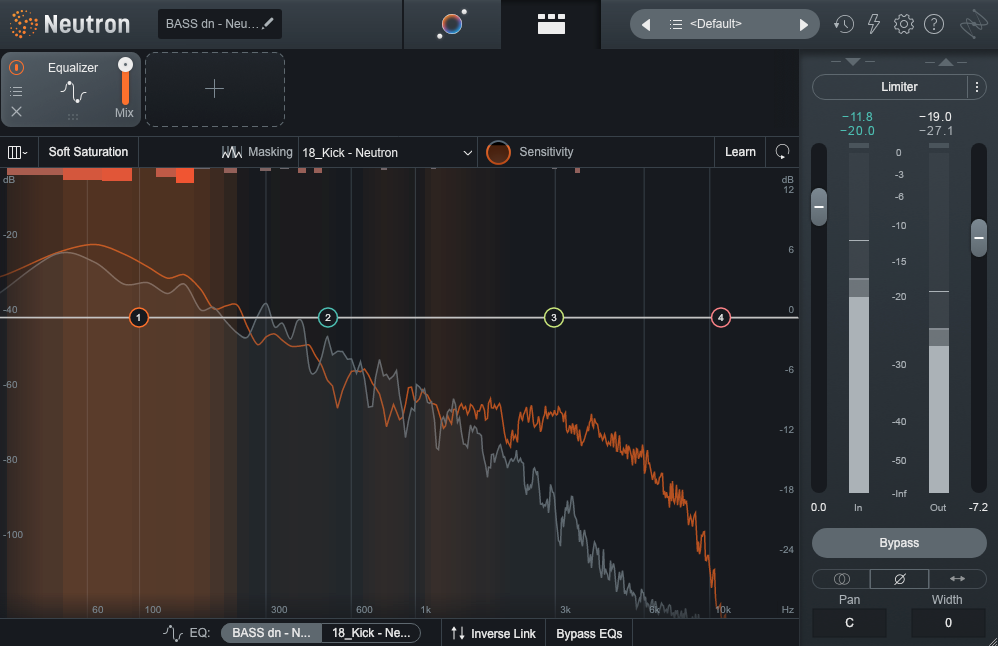
Masking between kick and bass in Neutron
It's up to you and your ears to determine which element you want to sculpt with EQ or use the new Unmask Module to reduce masking. If the drums already sound great, it could make sense to chip away at the instruments around it. In the screenshot above, I’ve decided to make a manual EQ cut to the bass, because I can see the overlap, and I feel like the low end of the bass is covering up my desired low end from the kick drum.
5. Pan instruments to give them their own space
As you start to create the balance of your mix, and find potential masking issues, it’s important to start thinking of your stereo image early on. Tracks that may seem like they have masking issues while sitting together in the center, may be a lot better when you start panning them into place. For instance, guitars or keyboards with lots of low midrange might conflict with your drums and vocals that are more focused into the center, but pulling them out further to the sides may reveal less masking issues you need to deal with—and ultimately save you from cutting out warmth from your mix.
Panning also proves useful as a masking remedy when the mix has a lot going on. A mix can easily become overloaded when every element is in the same center position. You will get a better sense of clarity and separation by keeping the most important sounds in the middle and pushing secondary and tertiary sounds to the sides. Be sure to consider effect buses position too—if your guitars are pushed to the left, should the reverb follow it? Or does ambience sound better panned to the right, filling up some space there?
Try panning with the


Visual Mixer
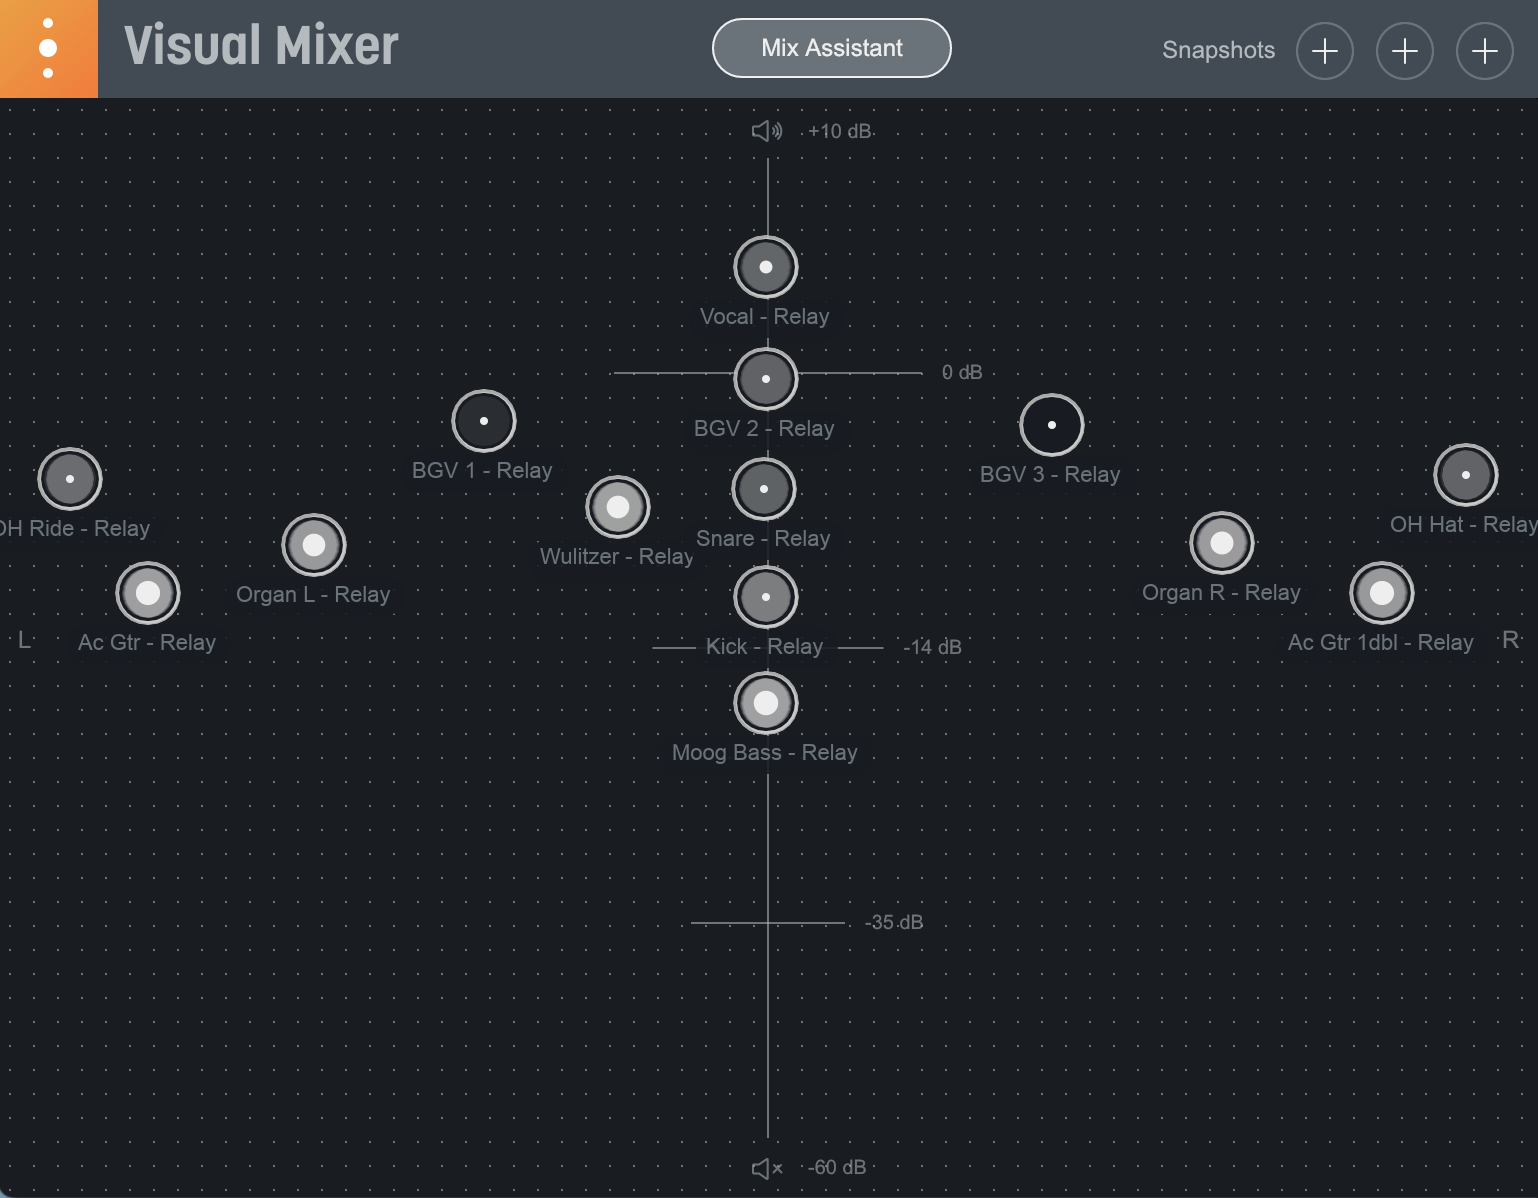
Mix Assistant in Neutron
6. Use Inverse EQ for subtle boosts and cuts
One of the most useful and fun features in the Masking Meter is the Inverse Link option, which applies complementary EQ settings to the instruments being analyzed. This means that a cut of 1 dB at 300 Hz on one instrument will produce an automatic boost of 1 dB at the same frequency on the other. Just click Inverse Link at the bottom center of the window to activate the feature.
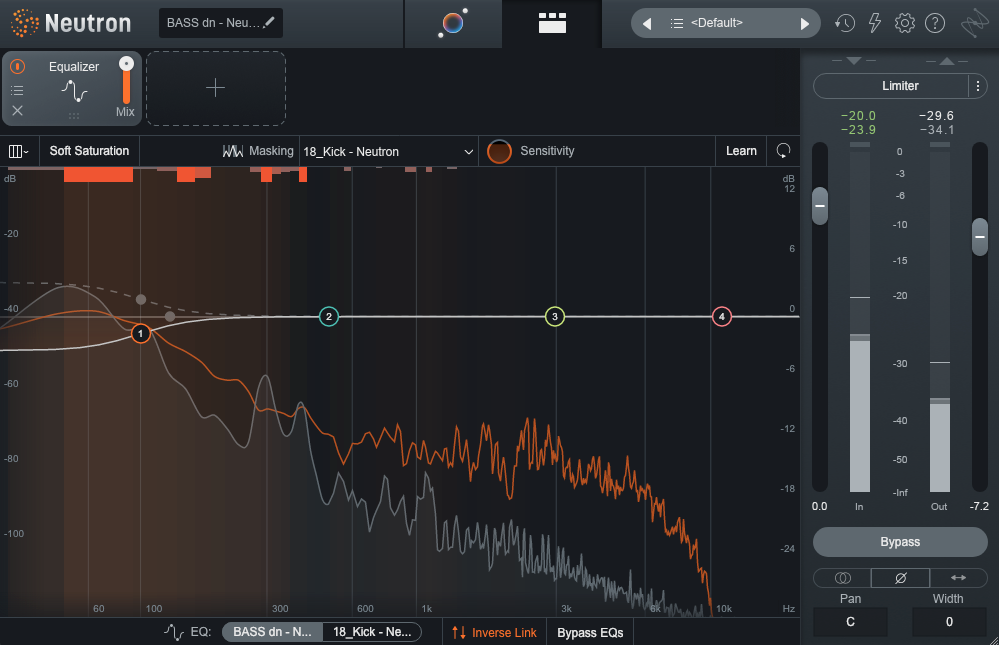
Neutron EQ Inverse Link feature
This way, you can make cuts and boosts knowing they will not aggravate frequency masking further. If your synth needs a boost at 4 kHz, Masking Meter will cut that same frequency on the drums to avoid nasty collisions. In the screenshot above, the “inverse” cut is represented by dashed lines. You can switch over the second instrument and make changes there too.
If you turn Inverse Link off, the node position will remain unchained, and you can now shape each curve independently with manual moves, like widening the Q, bringing up the gain, and so on.
7. Check your levels
If you come across masking issues, one of the first things you want to do before EQ’ing and panning is to check the level relationship between your channels. Sometimes, frequency masking happens simply because one channel is too loud and overpowering other elements in the mix. Or conversely, an element fails to cut through the mix because its level is set too low.
As you’re setting your level balance, use your ears and Neutron’s Masking Meter as a visual guide to help carve out the right space for each track in the frequency spectrum. You can even use Neutron’s Mix Assistant in Visual Mixer to help set levels in your mix.
Let’s talk about how a level issue might influence masking. A common mistake is to leave kick drums being left too high in the song. To bring the mix to a more balanced state, pull down the level of the kick until it sounds “in the pocket,” but still somewhat messy in the context of other bass and mid-range elements. Then, place Neutron on the kick and other low end elements and follow the Masking Meter visual, carving away space on the instruments where the competing frequencies are inessential. Combined with the tips above, you will soon find your kick can breathe and sounds punchy.
8. Move swiftly with Relay


Relay
Here’s one scenario: Say you put together the perfect effects chain for your guitars, but now that you’ve brought in the keyboards, you’re hearing frequency masking. Place Neutron on the keys and Relay on the guitars—this way, Neutron will be able to read the frequency information of the guitar track, so you can see where masking is occurring (in blueish green) and make the necessary changes to the keys without altering the guitar sound.
Inter-plugin communication also allows for this same setup with


Neoverb


VocalSynth 2


Nectar 3 Plus


Tonal Balance Control 2


Ozone Advanced


Insight 2
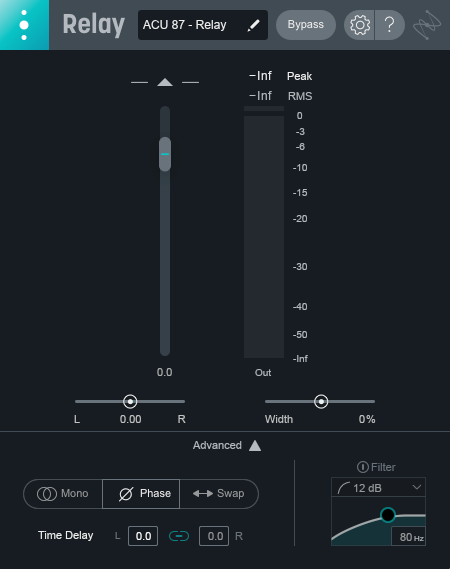
Relay inserted on a track to interface with other iZotope plug-ins
Relay offers a quick, CPU-friendly option for frequency masking issues across any track in the mix. It also has panning, stereo widening, and high-pass filtering options for additional surgical adjustments.
Start cleaning up your muddy mix with Neutron
Masking occurs in just about every mix, and with


Neutron 5
If you have the right relationship with the person sending you their music, you may want to suggest edits to the arrangement—mute a part here, swap a kick drum there, etc. It might be just what the mix needs. Through it all, you have Neutron’s new Unmask feature and the Masking Meter as a trusty second set of ears.
