How to Record and Mix Clean Vocals at Home
Recently, more people have needed to record and mix vocals at home. In this article, learn how to capture and produce quality vocals from your home studio.
Recording vocals at home can seem overwhelming: a lot of things go into getting a good, clean vocal sound.
While it might feel overwhelming, great sounding audio at home is possible, and we’re here to show you how you can achieve it. Room treatment, gear selection, proper voice care, mixing considerations—read on for useful tips on every step of the process.
1. Decide on your tools at the outset
When you first choose to record your vocals at home, there’s an immediate fork in the road. On the left, there’s a USB mic. On the right, there’s a conventional microphone and all its accoutrements: cables, audio interfaces, and everything else that goes into making audio work in the non-USB world.
Now, you need to make a choice.
USB mics: A USB microphone will be easier, but you’ll be handicapped by qualities endemic to USB mics, including the built-in DAC—digital-to-analog converter—whose quality can be questionable. This is changing all the time, with companies like Apogee and Antelope making stellar USB mics with professional quality. Keep in mind that it can be annoying to integrate a USB mic into an analog setup if you augment your setup with outboard gear.
XLR mics: The XLR route is more expensive up front, but opens up many more possibilities for outboard equipment. It may be more costly, but you can always integrate a traditional XLR-based setup into any existing studio. This means that you can take your own mic chain with you if and when you decide to record outside the homestead, maintaining a consistency and control that you wouldn’t get otherwise.
There is no right answer here, especially when gear has never been as powerful and accessible as it is now.
2. Establish a consistent recording environment
A good sound is nothing if it’s not consistent. In the world of audio, consistency means a good sound every single time. This principle extends to your room: choose the best space to record, and always work there.
In your house, the best recording space is a balancing act between various factors. It should be quiet, devoid of air conditioners, machine noises, and ambient sounds from the outside world—at least, as much as possible. It should also be free of unwanted resonances or reverbs, so we can rule out the bathroom. Finally, it should be out of the way of other traffic in your house. You may have to choose one of these facets over another, hence the balancing act.
Learn more about consistency in recording environments, and how to set up your space in the video below.
3. Treat your environment as much as possible
Let’s say you’ve established which room in the house is best, and the exact location within the room where you should set up your mic. Now, you must treat the room to minimize any noise.
Many rooms exhibit a phenomenon called flutter echo, which is a horrible and quick echo that sounds like metallic “chatter;” it’s quite easy to hear after a handclap in an untreated room with parallel surfaces. Perhaps there is an unwanted boomy quality in the low end within your room, or resonance at a different frequency.
These are all common, and luckily, treatable problems. Once you identify them, you can treat these issues with whatever material your budget allows. For the cheapest—though the least effective—solution, you can use thick blankets or duvets, mounting them on mic stands and creating a make-shift, cave-like vocal booth.

A makeshift vocal booth
Radio list-servs and broadcast studios often recommend this approach for people recording themselves at home on a budget, and it’s easy to see why: it can have an immediate and noticeable effect on the room ambience, bringing a quality of deadness that is welcome when mixing recordings. However, the effectiveness can vary depending on your particular setup, the materials of the blanket used, and other factors.
If you have the budget, look into securing absorption panels, which are pretty good at minimizing reflections in high-midrange frequencies. Mount these throughout the area you’re recording in, both before and behind the mic if possible. The ceiling is also a great place to hang this treatment—it can do wonders for the final sound.

703 fiberglass acoustic paneling
This is, of course, a general guideline. If you have measurements of your room on hand, you can send them to many room treatment companies, where a trained acoustician can suggest products for you to buy, and places in your room to mount the products. If you’re the kind of person who likes a DIY project, you can build these panels yourself.
4. Quiet your environment as much as possible
Now that the room is relatively deadened, you want to make sure it’s quiet. If you’re getting noise from a fridge, unplug the fridge during the recording. Same goes for air conditioners, and believe it or not, lights. If you find yourself hearing something you can’t quite pinpoint, try turning off the lights in the space for re-recording.
If your computer is making noise—fans, for instance—turn it off and record into a hard-disk recorder. Yes, I know that it is frustrating. If you can’t go that route, always record ten or fifteen seconds of “silence” for RX to handle during noise-reduction (we’ll dive into this later).
Silence your devices
It may seem obvious, but make sure your email alerts, phone notifications, or anything else that could ruin a take are all shut off. Also, make sure your phone isn’t disrupting the recording signal with weird noises, as can often happen. Even the best, most expensive studios I’ve worked in have had the occasional problem of collecting interference from cell phones.
Any material you’re using as a prompt to remember lyrics or a script should be within reach and free from noise: don’t keep paper stapled; it’ll make noise when you turn a page. Make sure your tablet is in some sort of “always on” mode so you don’t have to make noise unlocking it.
Clothes can be loud too!
Finally, make sure your chair isn’t creaky, your clothes don’t rustle, or your floor doesn’t squeak when you shift weight; if the surrounding environs make noise, the mic will pick it up. You can resolve issues with WD40 or a carpet. Take great care in what you’re wearing, not because anyone can see you, but because the mic can pick up things like jewelry noise, zipper clicks, etc.
5. Learn to identify a good vocal sound, then go for it
I’m a big believer in matching to a reference. I believe it increases credibility rather than hampers creativity. I do it in mixing, mastering, and recording as well: you can identify what you want in a vocal and go for it as best you can. Look to acapella recordings, classical recordings, podcasts (to reference spoken word recordings), and other media that prominently features a vocalist.
Listen to what makes that vocal sound desirable and attractive, and try to pin down those qualities in words that you can emulate with your actions. Is the sound full and resonant, or thin and reedy? Obviously, you’ll have to ignore things like reverb and delay, if present in your reference. Those are frequently added in mixing, and we don’t expect you to uproot yourself and set up in a church just for the ‘verb. Instead, turn your attention to the sound itself and try to match it.
In the next tip, I will show you some ways to use the microphone to your advantage while recording. I’ll also share some tips about how to set your equipment. But still, always keep a vocal reference in mind when you’re playing with these techniques. See how close you can get to that sound right off the bat, in the recording phase, simply by how you’re dialing in your performance and your gear. The closer it sounds on the way in, the less you have to do in the mix.
6. Use the mic to your advantage with good mic technique
The microphone is an instrument all its own, and as such, requires proper technique for best results. Here are some general rules of thumb to get you started:
Placement
The farther you stand back from the mic, the more room tone you’ll hear in the resultant recording. The closer you stand to the mic, the more low-end and low-midrange information it will pick up. You’ll also have greater chances of overloading the capsule, which can result in distortion. Sometimes this distortion is desirable (the saturation of a soul singer, for instance); sometimes it’s horrible, as it can lead to unwanted digital or analog clipping.
The proximity effect
The emphasized bass and low-midrange of close-mic’d source is called “the proximity effect,” and you can use it to your advantage. If you have a naturally thin voice, you can use the proximity effect to emphasize chunkier, beefier frequencies. I recommend standing between 4–6 inches away from the microphone to achieve this effect. Sometimes I go closer: the more familiar you are with your own voice and your chain, the closer you can tread, so long as you know how to control your voice in accordance with the chain’s settings.
As you can control the tone of your voice to some degree with the proximity effect, you can also control the degree of sibilance when recording, especially if your mic has a cardioid polar pattern (which is the one you ought to try first in a home or project studio). If you speak or sing directly into the capsule, you’ll incur horrid sibilance.
However, if you address the capsule from a diagonal angle, you’ll minimize this sibilance to some degree, though you’ll also likely lose a bit of high-end presence. Experiment in finding the best compromise by saying a word over and over with lots of sibilance in it—such as the word “sibilance.”
Keeping these guidelines in mind, it’s up to you to experiment in honing your technique. I recommend engaging in regular practice sessions where your aim is to get the best possible sound, regardless of any professional or aspirational recording session. Just experiment until you’re comfortable with your mic technique, and always mind your reference sound while you do so. Finally, pay attention to your mic chain’s levels and settings; it’s not all about the mic. Which brings us to our next point:
7. Avoid clipping
Clipping is the term we use for distorting the signal. Sometimes clipping is desirable—the saturated soul singing we spoke of earlier often relies on a kind of clipping, wherein a voice is so powerful it harmonically distorts the mic’s circuit and pleasantly overloads the audio capture. But when you’re just starting out, it’s best to avoid clipping, because most clipping sounds objectively terrible—especially the digital kind.
If you’re a home-recording newcomer, chances are you’re not using a fancy tube mic or a preamp known for its character. You’re more likely using a USB mic, or a budget mic with a cheap recording interface. This means the clipping you’d incur will probably sound bad, as these devices aren’t known for their inherent character. Maybe they will be, someday, when the sound of the 2020s is in vogue. But for now, avoid the clipping.
8. Avoid overprocessing on the way in
Perhaps you’ve inherited a choice preamp, a compressor, or an equalizer. If this is your first go-round with “outboard gear,” avoid doing too much on the way in. Since the effects will be permanently applied to your recording audio, try not to make any decisions that can’t be adjusted later on.
Say you want a sweet, polished high end in your vocal sound, so you add a bunch of 12 kHz on an equalizer while recording. You are now committed to whatever happens—you cannot change the fact that when you decide to compress the vocal later, the exaggerated frequencies will make it harder to treat dynamics in your mix.
Say you want a saturated sound, so you hit the preamp really hard. Sounds good for the arrangement you got, but in future consideration, you decide to go with a more stripped down, acoustic, intimate arrangement for the tune. Now your vocal doesn’t match the production at all, and you can’t correct for the saturation—it’s baked-in, and it sounds out of place. You’ve just added a bunch of time to your project, because you’ll have to re-record.
Perhaps the worst offender is overcompression on the way in. From my own experience, it’s hard to judge the right amount of vocal compression while engineering and performing your own vocals. I’ll become so attuned to the performance—so grateful I’m not peaking on the loud notes—that my ear will gloss over the lifeless, stepped-on, clamped-down quality of overcompression. And then I’m stuck.
So in general, it’s best to use only a little of whatever you think you need, to give you the push you want to aid the performance, and to save your future self a great deal of heartache.
Now for some tips about vocal performance at home, regardless of whether you’re singing or speaking:
9. Do proper vocal warmups
Your voice is an instrument. Playing an instrument is like playing a sport. These two statements lead us to our next tip: take good care of your voice—it is an instrument found within the body. There is all the potential in the world for injury if you don’t treat it right.
One could write a whole article on vocal warmups and not exhaust the topic. At the very least, I shall say this: it’s always good to start with a glass of room temperature water, drunk slowly. A nice, comfortable breath before singing is good conditioning for the resulting exercise. Some coaches recommend sighing a few notes, comfortably, from a high pitch to a low pitch, before going into scale warmups. Almost all of them recommend lip trills before going into scales.
If you’re singing, incorporate some gentle scales and intervallic jumps in your practice routine. Start in a comfortable register, where there is no tension. Don’t go too high—you want to warm up your voice, not overextend it!
If you’re speaking, work on some tongue twisters. Recite a poem. You want to aim for a resonant tone, one that feels like all the morning cobwebs have been shaken off without stress or taxation.
10. When recording, don’t go for the hard stuff right away!
Most tracks have an obvious climax. A pop tune, for example, typically has a section or two where the singer pushes near the top of their range for an emotional sound. When recording, don’t go for these sections right away; work up to them. If you attempt them at the outset, you may ruin the whole recording session and blow out your voice.
Instead, go for the easier, softer, or lower sections—the comfortable ones. Even if the song starts with a gripping, high-pitched hook, go for the easier stuff first. You may not keep the first takes you do—that’s fine. Consider these easy takes the first throwaway pancake of a delicious breakfast of vocal comps. Work out the kinks with the easy-to-reach material, and you’ll find you grow confident as you head toward the harder stuff.
If you work in this manner, approaching the hard stuff incrementally, you may find that you reach a level of sustained good tone: you hit the high notes, then realize your voice is in truly great form, and you go back to do a full take from the top. I know I work this way, and often those takes are the one that I use. However, keep the next tip in mind:
11. Figure out the best method for you and stick to it
Everyone’s voice is different, and thus, each approach must be tailored to your particular cords, or those of your vocalist. Some people love to track one take and call it a day, warts and all. If that’s you, great. Some people like to sing all the quiet stuff first and then go for the loud parts. Some go phrase by phrase, comping as they go. Learn what works for you, and develop a solid routine.
12. Record on headphones, comp on speakers
Obviously, you should track while wearing headphones, as this is the simplest way to avoid a ton of mic bleed when recording your voice. Some people hate headphones, and there are techniques for positioning the mic in such a way that it won’t pick up too much audio from the speakers. But really, the simplest and most efficient way to record bleed-free vocals is doing so while listening through headphones.
Here’s the counterpart: when you’re editing your vocals, work on speakers. It is far easier, at least for me, to identify when a singer is pitchy on the monitors than when their voice is blasting directly into my ears. This goes double when I’m comping my own voice.
If you find yourself needing to employ Melodyne or some other pitch correction, the above holds equally true: speakers, in the context of your room, in the context of your mix, are often a better forum for judging how much pitch correction to use.
This article references a previous version of RX. Learn about 

RX 10 Advanced
13. Use RX for light processing
If you have bits of unwanted room noise or room ambience in your audio file, you’re going to need to clean them with some light RX processing. Now, what do I mean by “light?”
Here’s a vocal that has too much room tone.
Here it is processed too steeply with the Voice De-noise module. This module specifically excels at reducing noise in vocal recordings. We’ll push it a bit too far here, with the following settings:
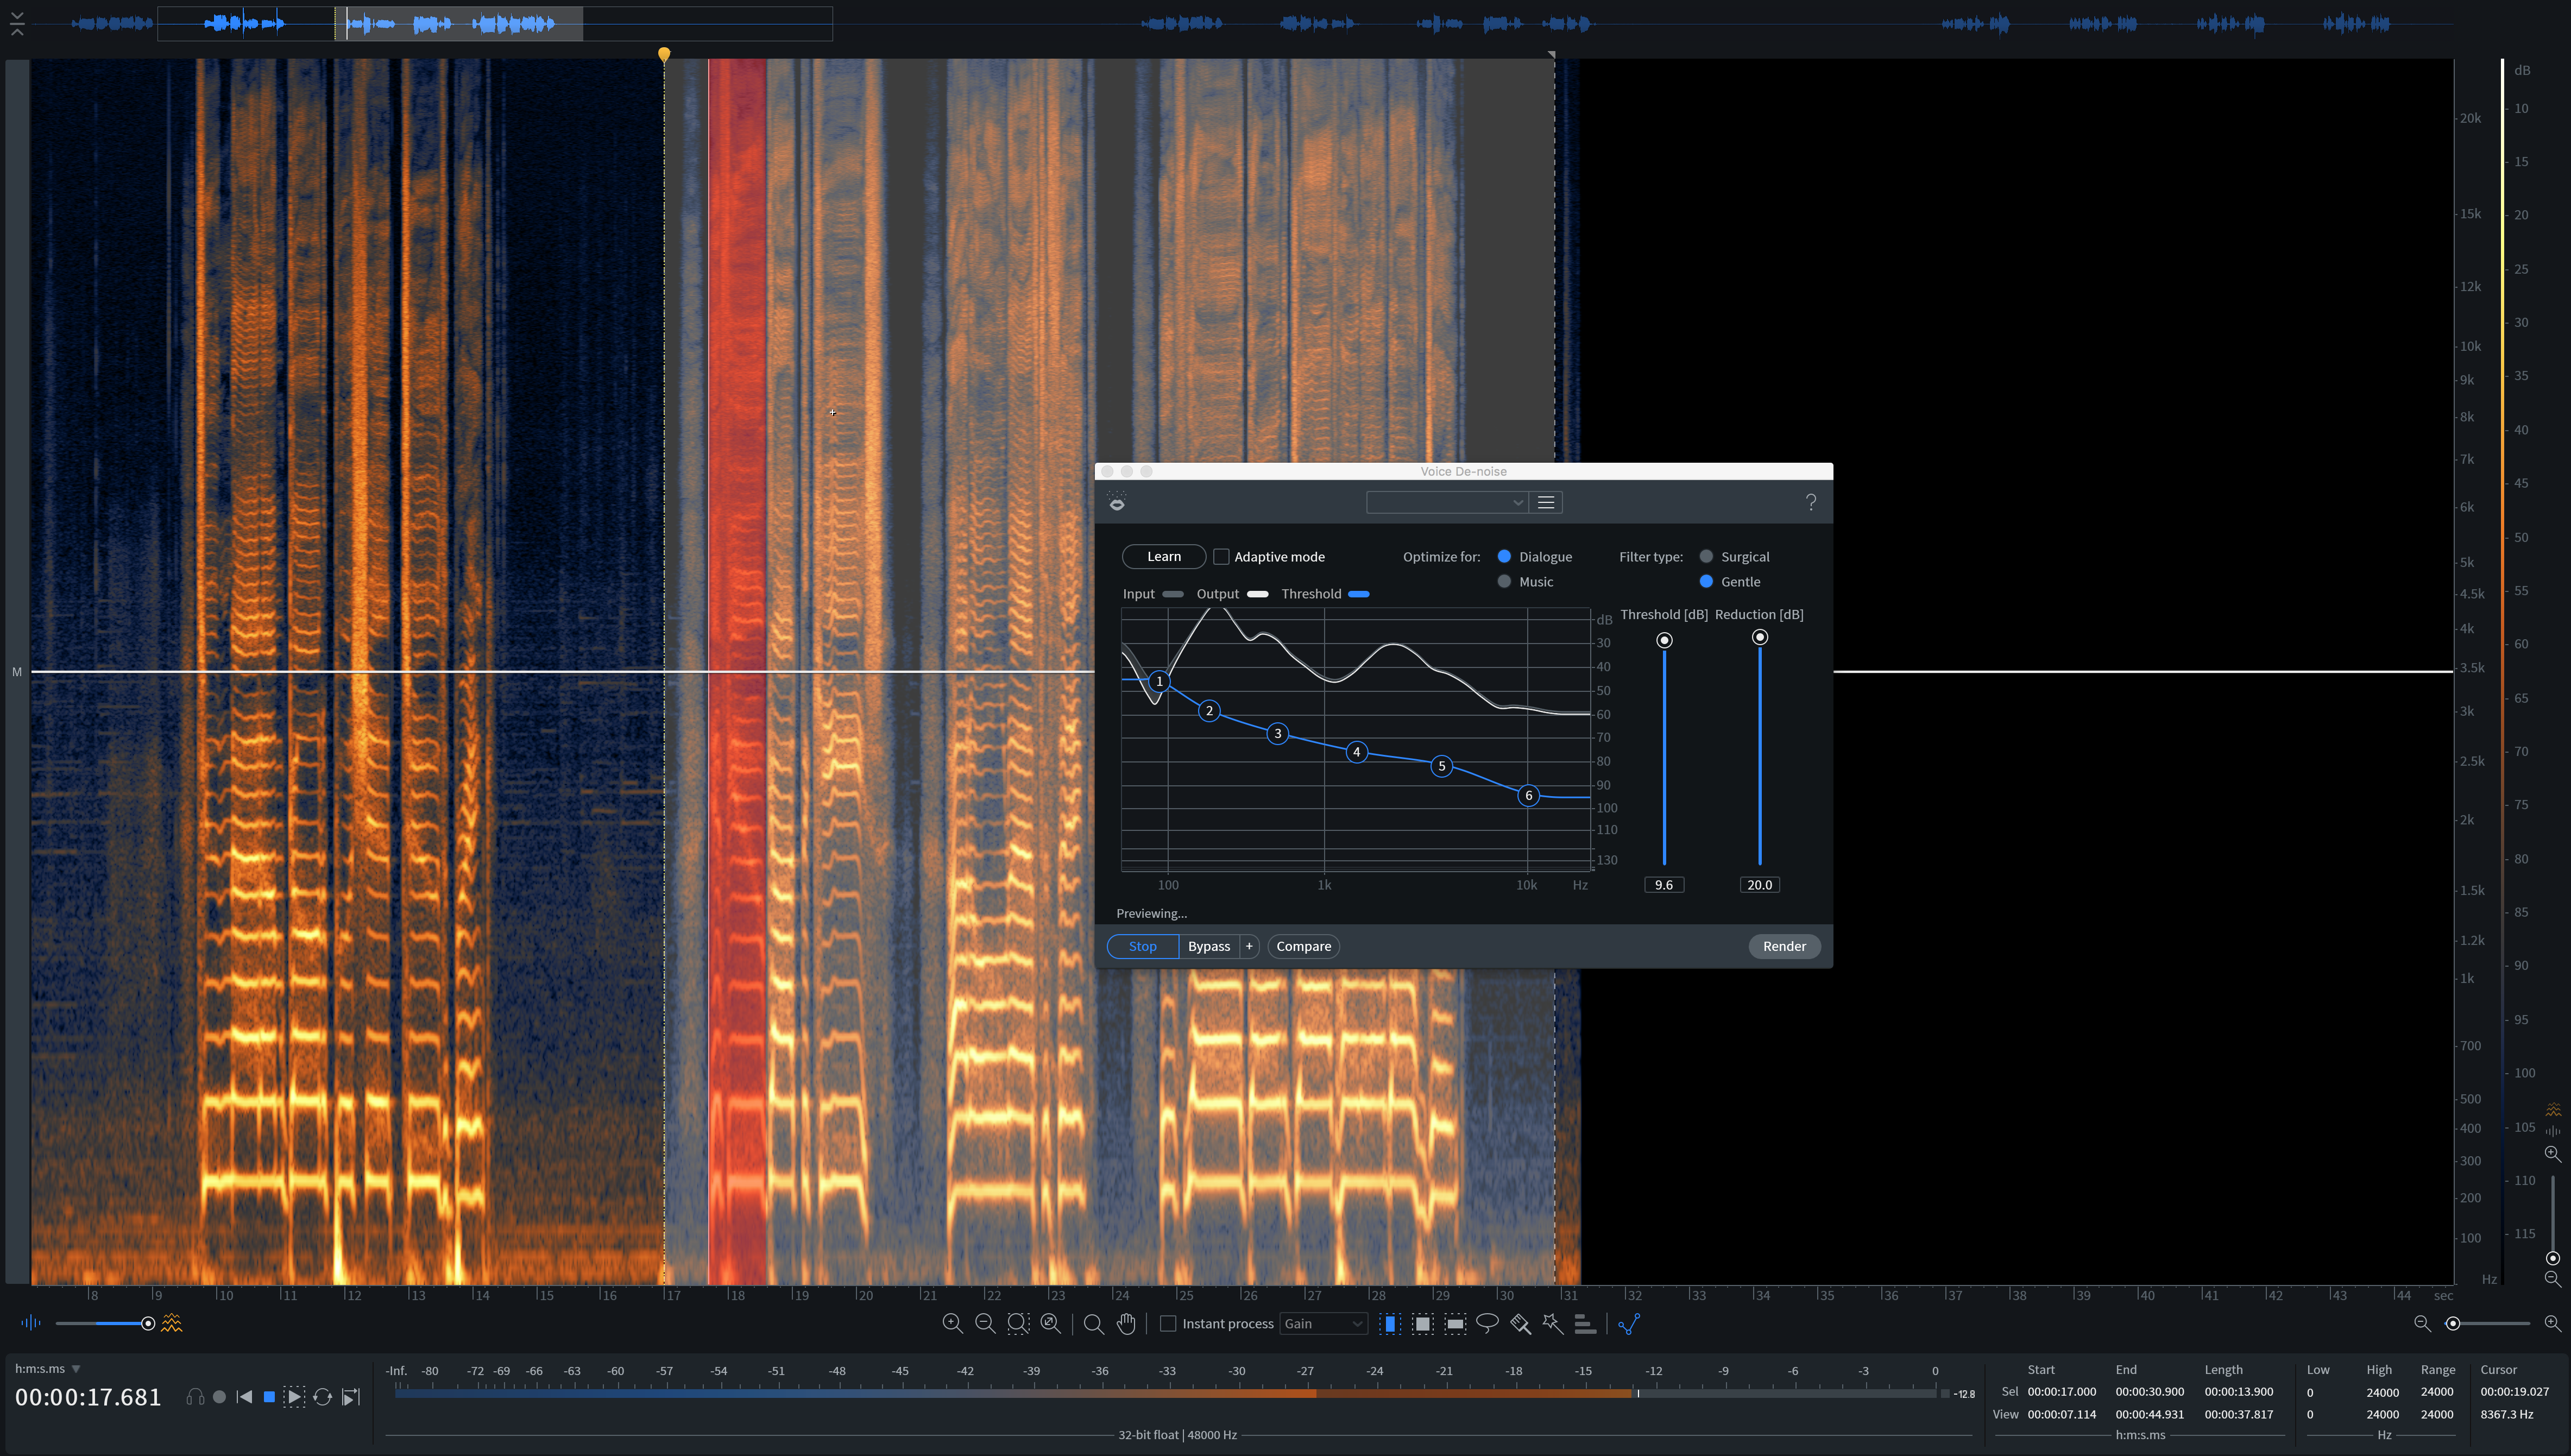
Too much RX processing
I don’t need to go this hard to get the results I want. If I back off the sliders, carefully listening to before and after comparisons, I can come up with the right settings, like so:
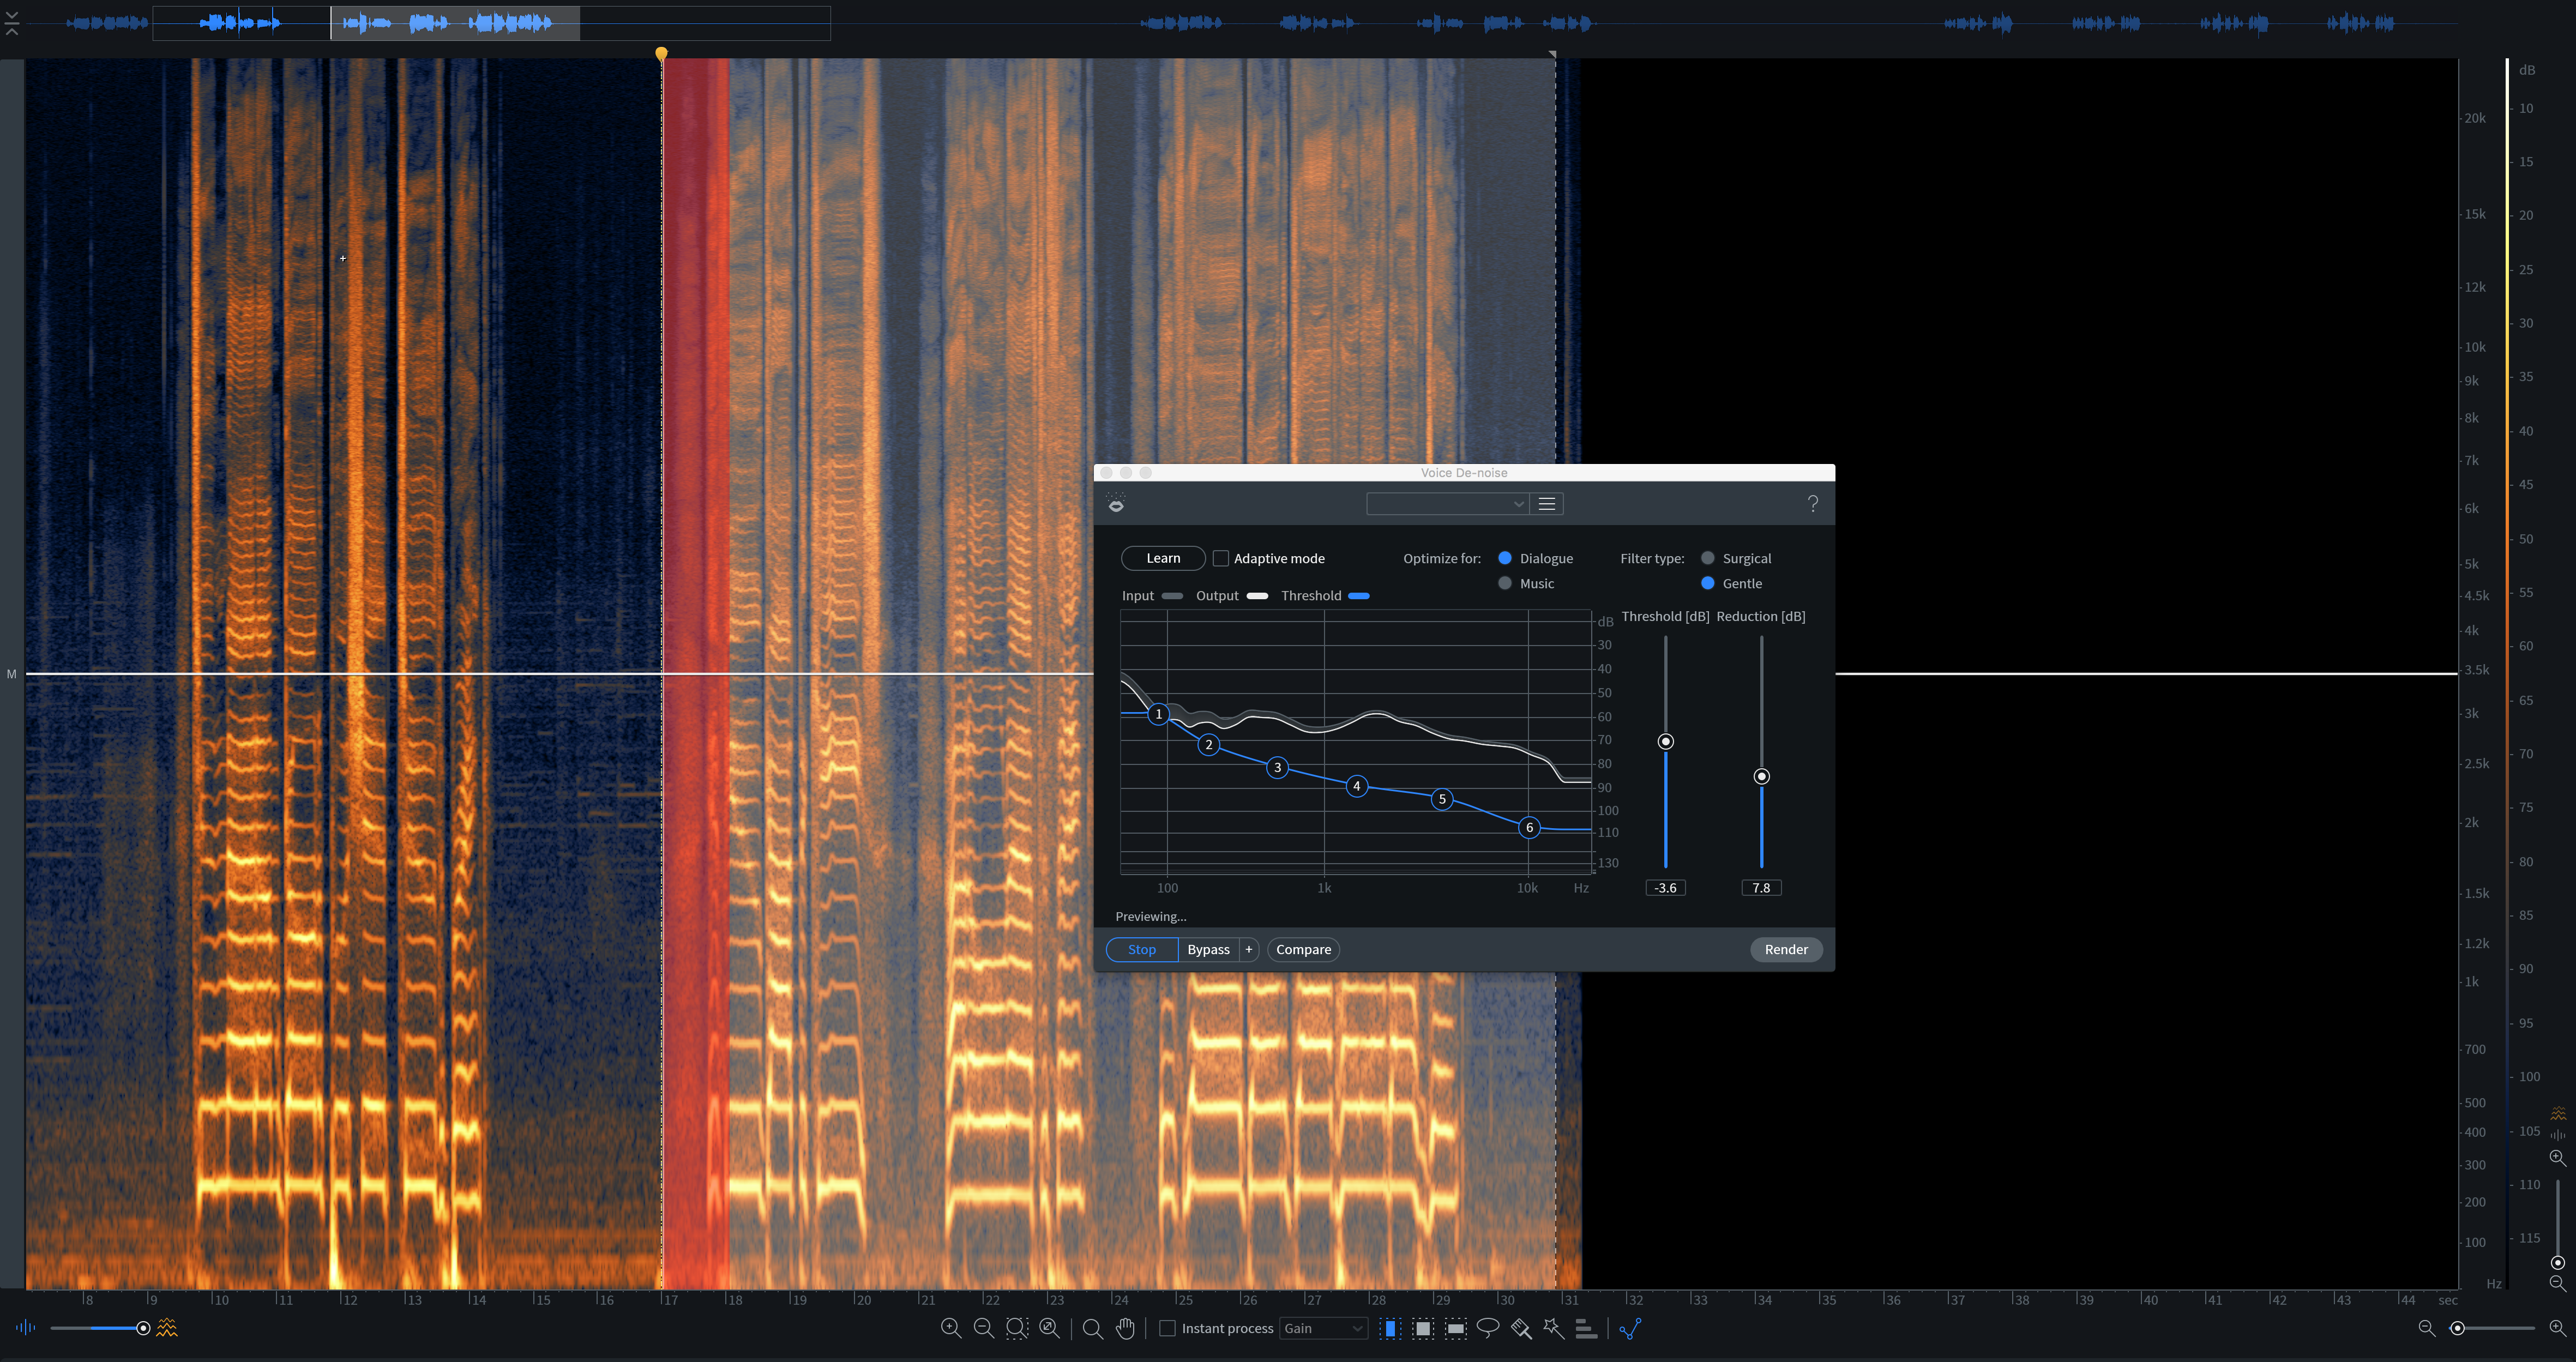
A healthy amount of RX processing
In general, I find it best to take the time and work through necessary cleanup on a phrase-by-phrase basis. This gives me the most control. Thus, I prefer to work with the RX Audio Editor standalone application, and I couldn’t recommend the process enough, either through the use of RX Connect (when working in Pro Tools) or by using RX as an audio editor in a DAW like Logic Pro X.
I may have a wayward vocal noise in the take, and need to run Mouth De-click. I may have pulled back from the mic and gotten too much room reflection in the resultant sound; here I’d turn to Dialogue De-Reverb to quiet down the room ambience. Whatever needs doing, working phrase by phrase in RX Audio Editor provides an efficient and thorough workflow.
14. Develop your own personal mixing preset
I’ve been recording my vocals for more than 10 years, so I’ve learned a few things about my voice. I’ve learned, for instance, that no matter the microphone, I have to pull out some 300-Hz and 700-Hz content. Because of a space in between my two front teeth, I need to run two de-essers focusing on two different frequency ranges. Since I have my mic, pre, and compressor chain dialed in, I know that an opto-style compressor is probably going to work best in the mix. I often record background vocal stacks, and I know which compressors and settings add the glue I need to hold them together in the mix.
These are mental presets I’ve made, due to experience over time. They are also actual presets in my DAW.
When working with your own voice, or with a frequent collaborator, take note of the things you always need to correct in the mix; take note of which compressor settings you gravitate towards and what EQ moves you make to flatter this vocal. Chances are, they will be consistent from project to project—and you can always build upon your initial sound to try another style if need be. However, having this knowledge and saving it in the form of a preset will save you time, and help you realize your finished goals that much more quickly.
The takeaways
These are basics for recording your voice from root to fruit, soup to nuts. I’d like to leave you with one final consideration:
You can fix timing, you can fix tuning, but you cannot fix intention. If the note is late, you can nudge it earlier. If it’s out of tune, you can bend the pitch. But if it sounds tentative in its very execution, there’s nothing you can do to make it sound right.
Keep this in mind when you’re working with your own vocals, and be ruthless in the recording, editing, and mixing phase.

