8 Pesky Problems RX 7 Standard Will Fix in Your Mix
RX 7 Standard can make all sorts of previously impossible fixes to audio issues. Today, we’ll discuss eight mix problems that are no match for RX.
You’re a smart cookie: you probably know the standard uses for RX 7. If you can hear the room surrounding a vocal, you know to use Voice De-noise to tamp it down. If you’ve got a quick moment of clipping in a track, you know how to reconstitute it with De-clip.
However, RX 7 can go beyond these use cases and help out in all sorts of ways, ways you may not have discovered yet. The spectral repair tools are particularly useful, if you know how to use them.
Enter this article to open your eyes to the world of RX 7 Standard in the music studio. Today, we’ll look at eight mix problems that you can fix with RX 7 Standard.
1. Paint out distortion in the Spectrogram
We often think of De-clip, De-click, and De-crackle as the go-to modules for removing distortion, and they often work just fine. However, we sometimes get a certain kind of saturation—particularly in vocals—so exaggerated that it can sound cheap. Here, this holy trinity of modules often falls short in handling the problem.
So what do we do, give up? No! We open up the Spectrogram view in RX 7 and look for any visual indicators of where we might find distortion.
Observe the saturation on the word “stop” at the end of this phrase:
This is the kind of vocal that needs to sit right on the edge of clipping. For the most part, the engineer has it right, but on the word “stop,” we can hear this cheap-sounding distortion. We can see where the issues are using the Spectrogram.
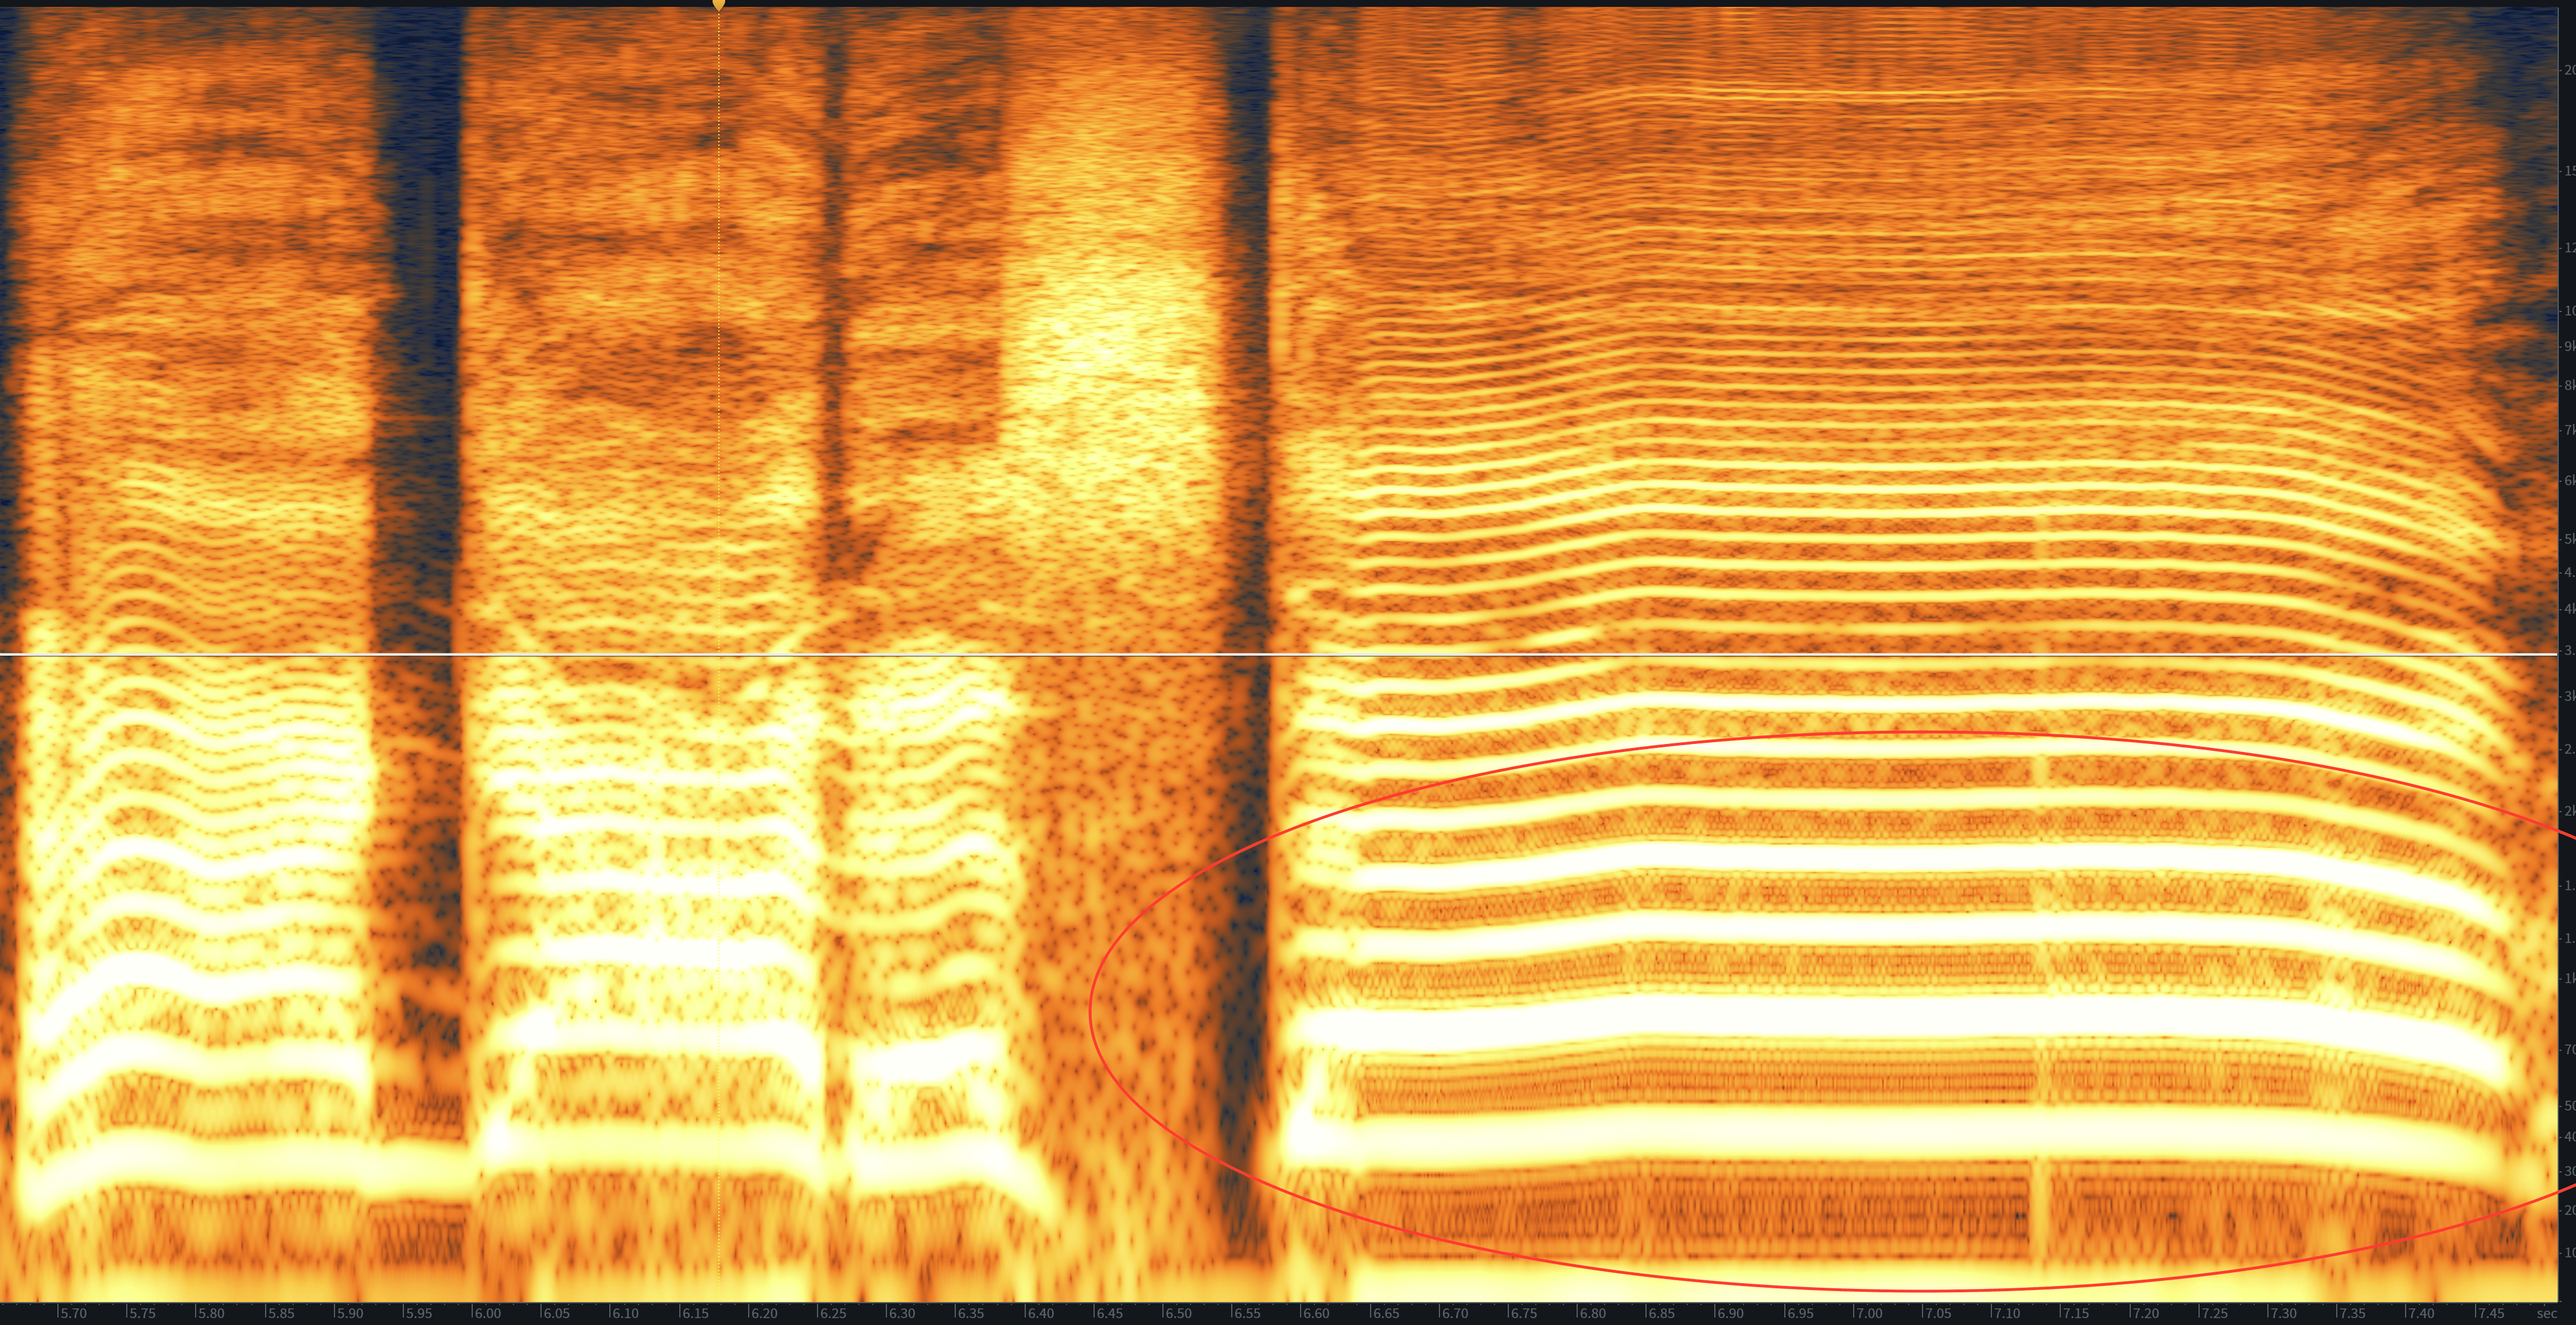
Distorted low and low-mid frequencies in the RX 7 Standard Spectrogram
Look at the circled area in the bottom right corner of the screenshot above: these are our fundamental pitch and overtones, and they are quite strong—so strong that distortion is pouring out of them in the form of a weird, dotted pattern. You can see these dots hovering below the fundamental and the first overtones.
This distortion is not beyond saving, however. We can help it along by selecting the fundamental frequency with the Magic Wand tool, opening up the overtone menu to select the first two overtones, and gaining these elements down 2.5 dB with the Gain module. This will ameliorate the distortion while preserving that “almost clipping” vibe the vocal demands.
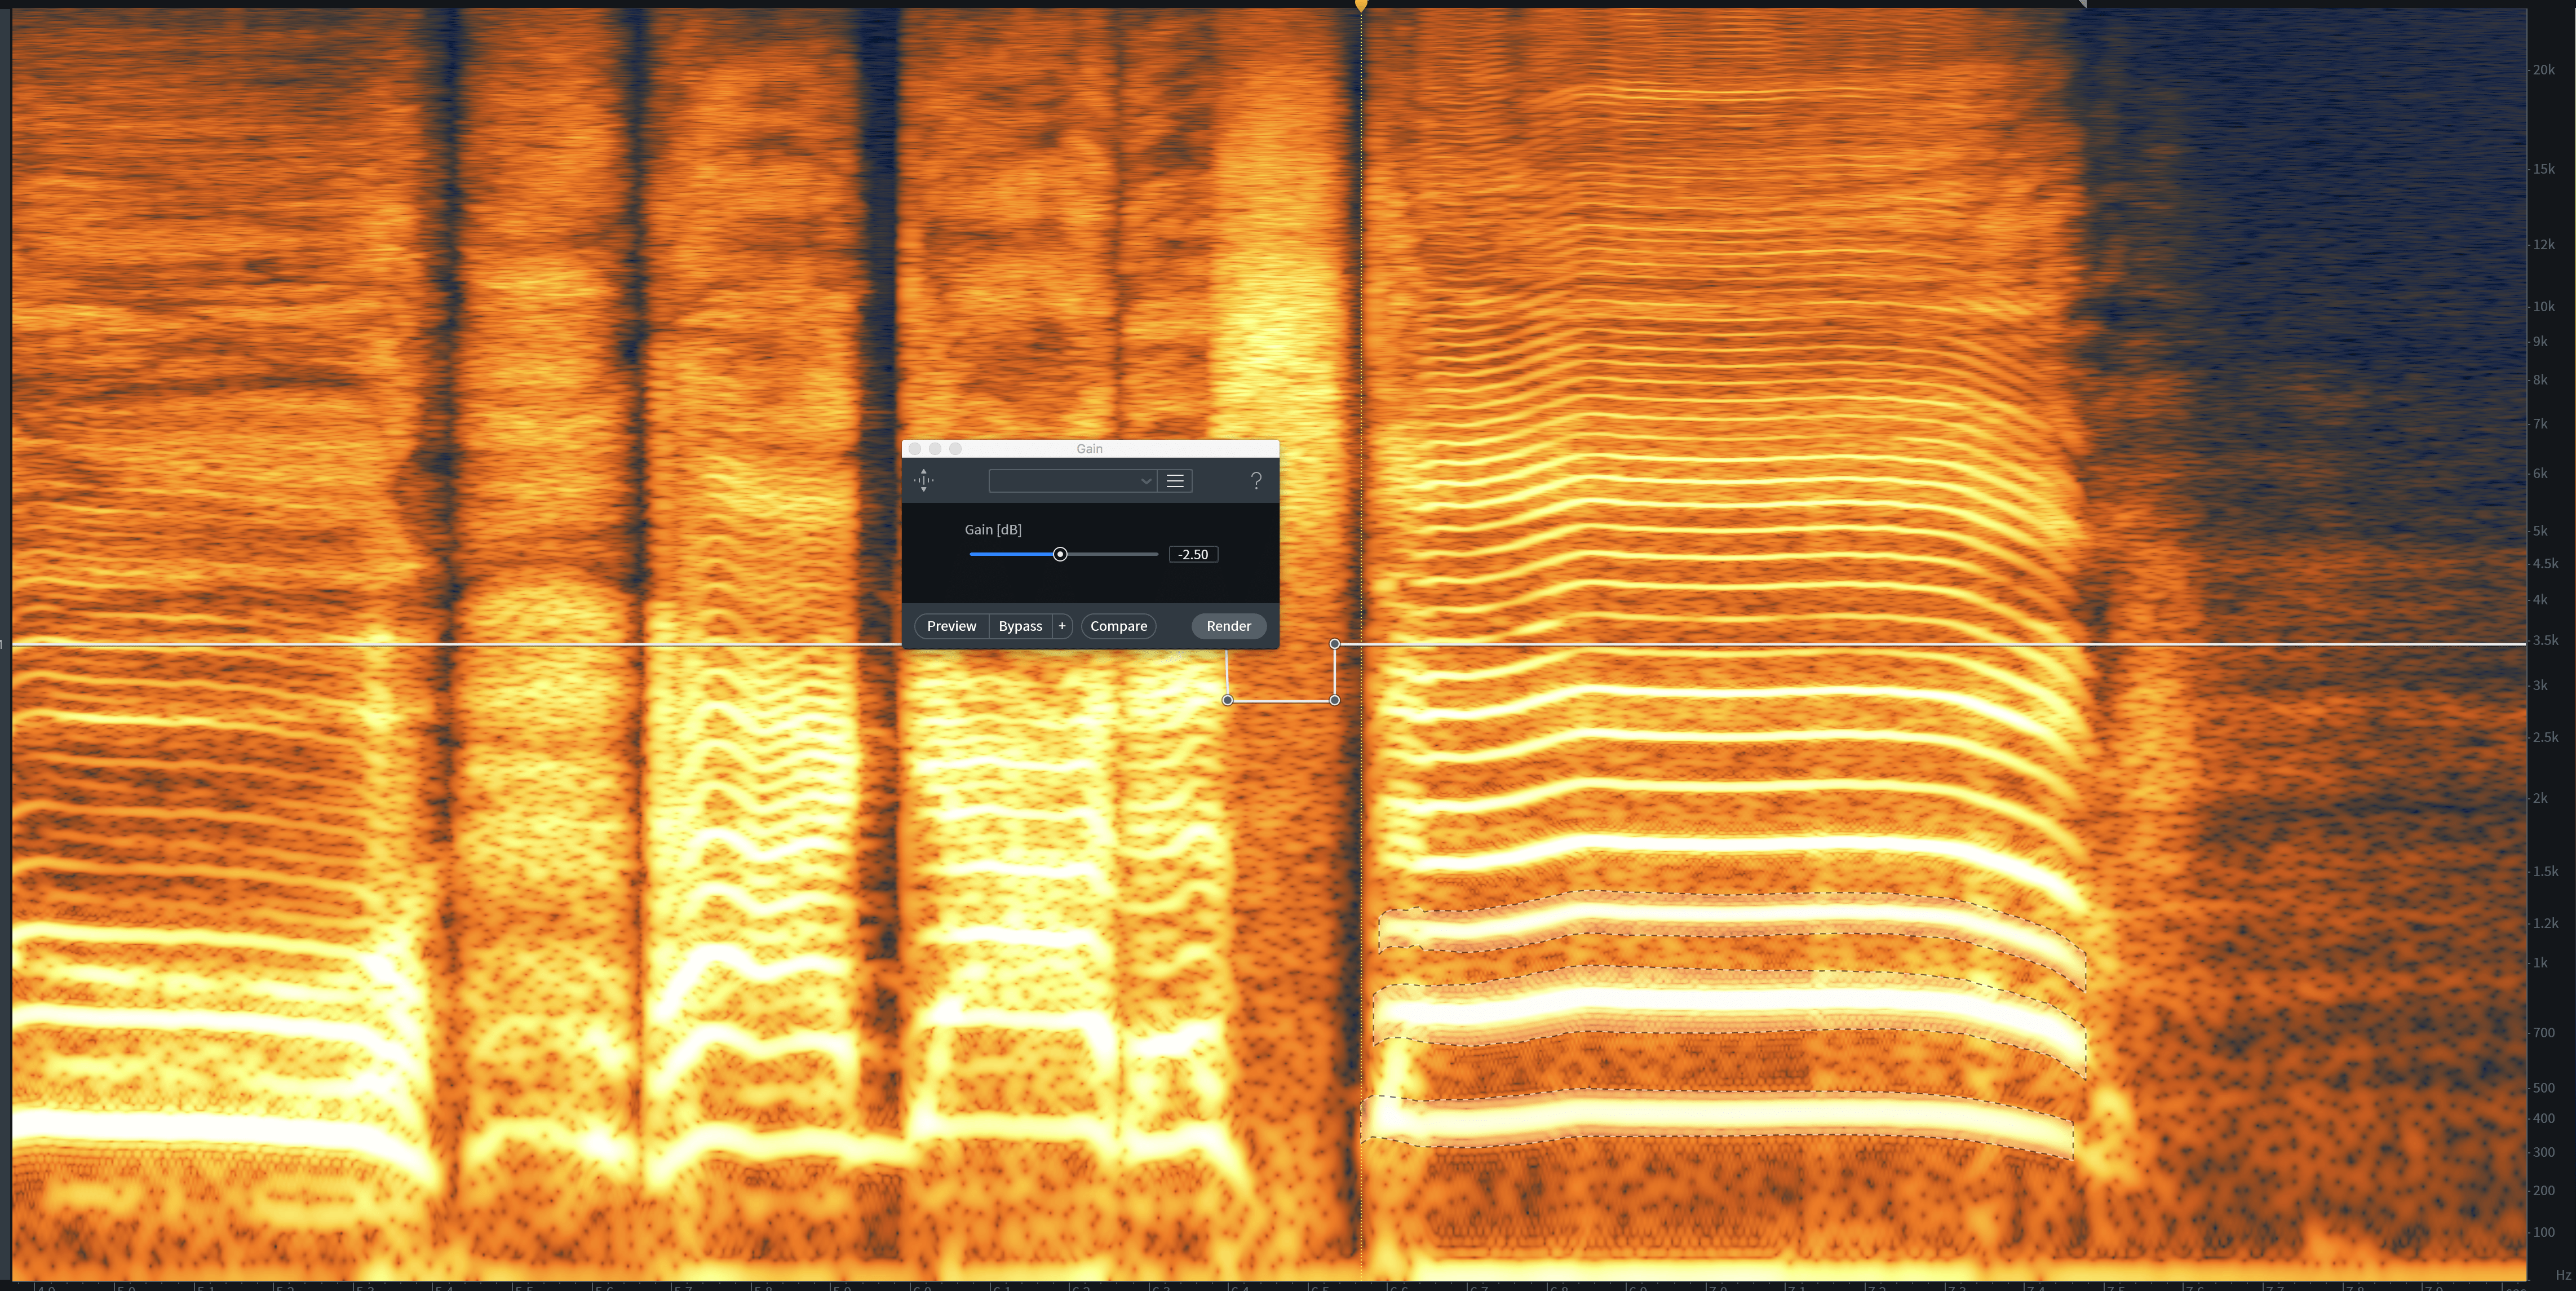
Reducing distortion with the Gain module
This looks like a time-suck, but I find it’s actually faster than other ways of dealing with distortion: if there is distortion, it will manifest visually, and once I know what it looks like, I can take it out.
Sometimes distortion will appear as heavily shaded, heavily concentrated bars that sit under our fundamental, or in between the fundamental and the overtones. You can recognize it because it will appear disjointedly, suddenly, out of nowhere. This is enharmonic distortion—saturation that is musically irrelevant to the signal.
The operation for taking it out involves highlighting it, with either the Magic Wand or Brush tool. Then, you select the Attenuation mode of Spectral Repair module, choosing horizontal analysis rather than a vertical implementation. This will pretty much nullify the offending distortion—it’s amazing how well it works.
2. Calm aggressive DI bass down with De-click
Oftentimes, a bass recorded via direct input might come your way with a pick attack that’s too aggressive. Take this audio, for example: this is a bass with far too much attack in the recording.
If we run De-click with the following parameters first in the bass’s effects chain, we can fix this issue to a great degree.
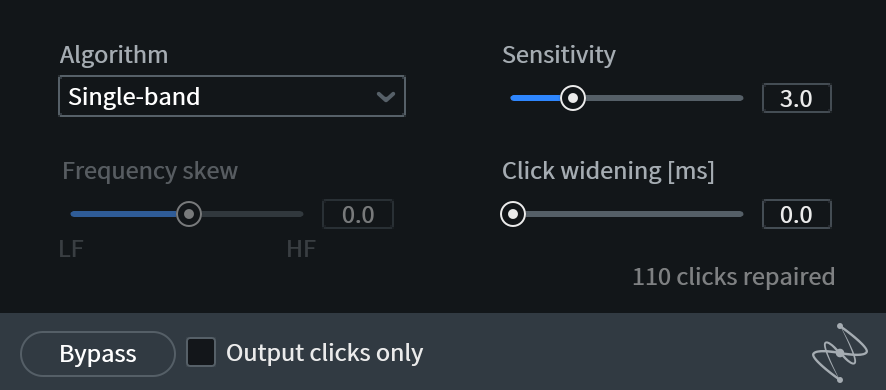
Fixing a clicky DI bass with the De-click module
Now we can treat it with all the processing it needs to be a worthy part of our mix, instead of telling the engineer to re-record the part!
3. Use Spectral De-noise to de-hiss a noisy recording
The issue here isn’t noise in the conventional sense—we’re not trying to mitigate room noise here. This is all about hiss, a phenomenon all too prevalent when musicians embark on the journey of home recording.
Sometimes you get recordings that are hissy. The hiss can’t stay if the genre is meant to be anything other than lo-fi. Making matters even worse, hiss is common in recordings of acoustic instruments, which must retain a natural quality. When the artist hands you hissy material and a track with sparkling, pristine highs, you know you have your work cut out for you.
Here’s where Spectral De-noise comes into play. You can EQ the de-noising effect itself, just as we talked about in our article with Matt McCorckle. Observe this acoustic guitar:
It’s pretty hissy, and yet, it’s a lead part, so it cannot be. First, we’ll “learn” some of the silence around it using the Learn button. Then we’ll EQ the resulting profile to target more of the high end while leaving the mids and lows alone. After tuning Spectral De-noise in this manner, we can push the algorithm even harder and reduce the hiss without causing undue harm to the file.
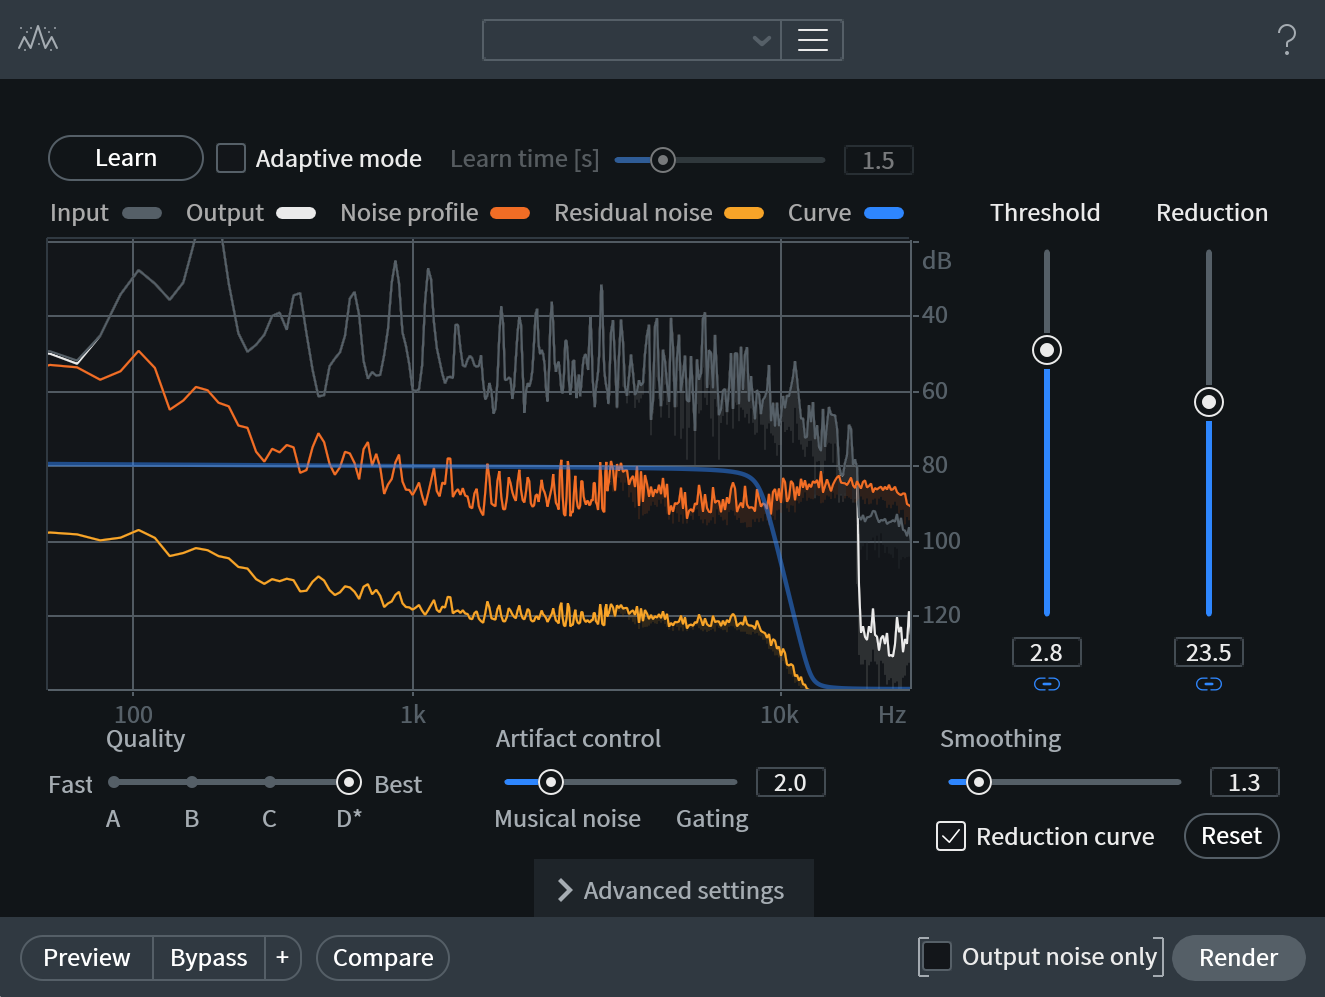
Dialing in Spectral De-noise settings to clean a hissy guitar
It winds up sounding like this.
This is good; we can get away with this in a recording.
4. Use the De-ess on vocals and harsh instruments
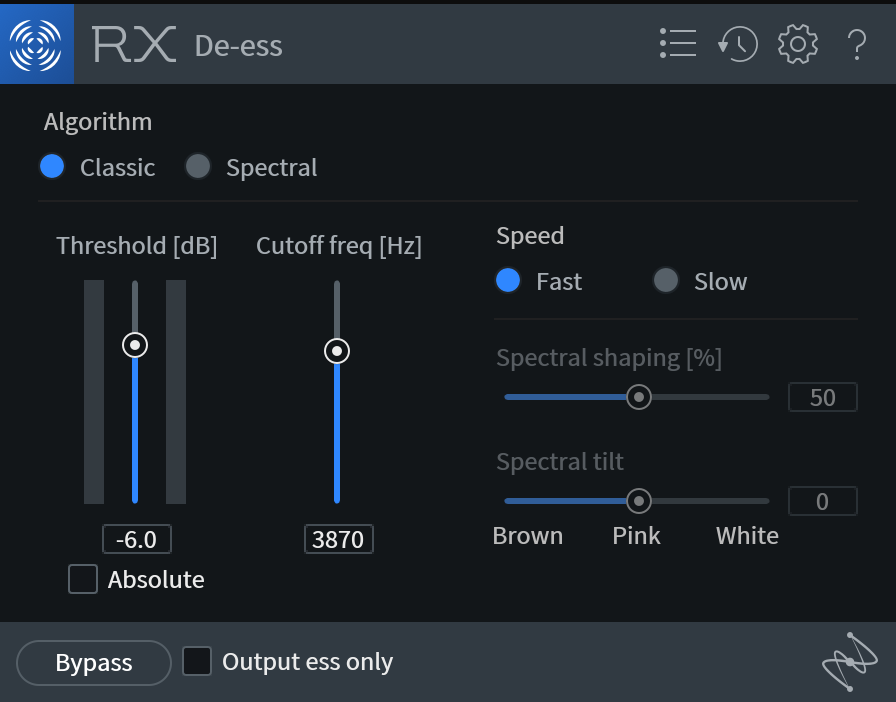
De-ess is an extremely effective RX 7 module, particularly in Classic mode. Run it in-line, tune its parameters correctly, and it does wonders in reducing vocal sibilance quite naturally, almost as though you’ve gained the sibilant regions down. Notice what it does to this particularly peaky vocal. Here’s the before example:
These are the settings we’re going to use:
Vocal mangling with VocalSynth 2
And here’s the processed version:
You’ll likely need to play with the parameters, of course, to get the desired effect, but there are so few parameters that it isn’t too hard to tune your ear to the process. The “Output ess only” button also helps in this regard, letting you check what the De-ess module is identifying as sibilance.
In addition to vocals, you can tune the de-esser to take out abrasive harshness from other material, such as electric guitars.
It’s particularly effective on amp simulators. Amp modeling software has come a long way since the dawn of emulative tech, but even the best ones don’t get 2 kHz and up quite right, in my experience. They can often benefit from some taming in the high midrange. Observe this guitar part, run through the S-Gear amp simulator by Scuffham Amps:
It sounds good, but it might be a bit too shrill in the mix. We could use an EQ, but this might dampen the life out of this vital range. Let’s try De-ess tuned to the following settings:
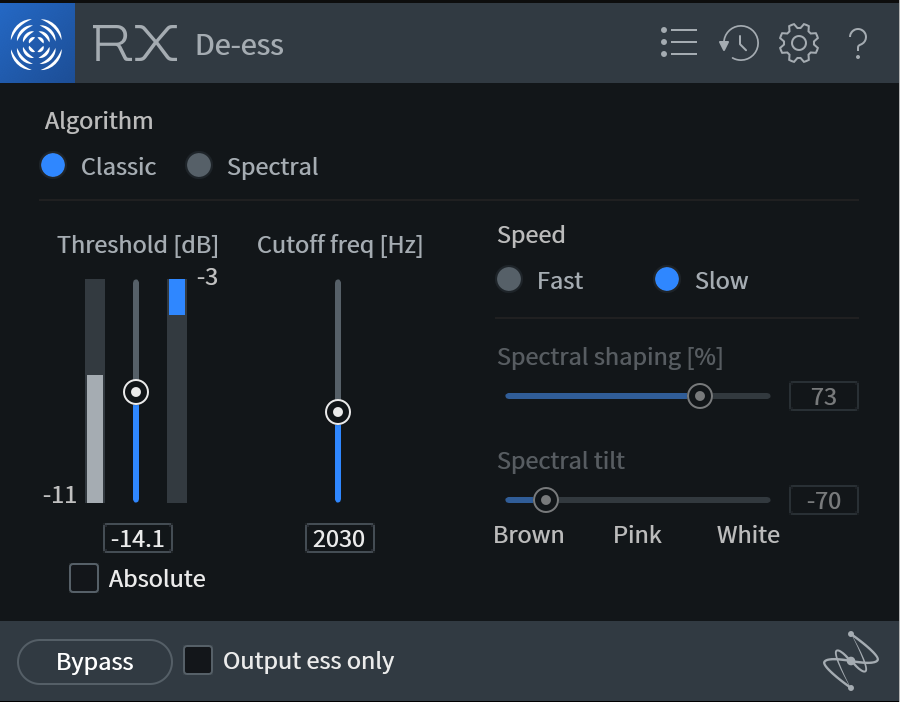
De-essing an amped guitar with the De-ess module
That sounds like this:
And this, my friends, is workable.
5. Mitigate string noise with Spectral Repair
Sometimes an acoustic guitar exhibits too much string noise. The sound of fingers sliding around the fretboard can become fatiguing to listeners, especially as we add compression and EQ to the guitar.
Gating the string noise out might appear unnatural. This is especially true if the string noise occurs in the middle of a sustained note, like this:
So, let’s load the guitar recording in the spectrogram and try to spot the noise visually. In this case, the squeak looks like this:
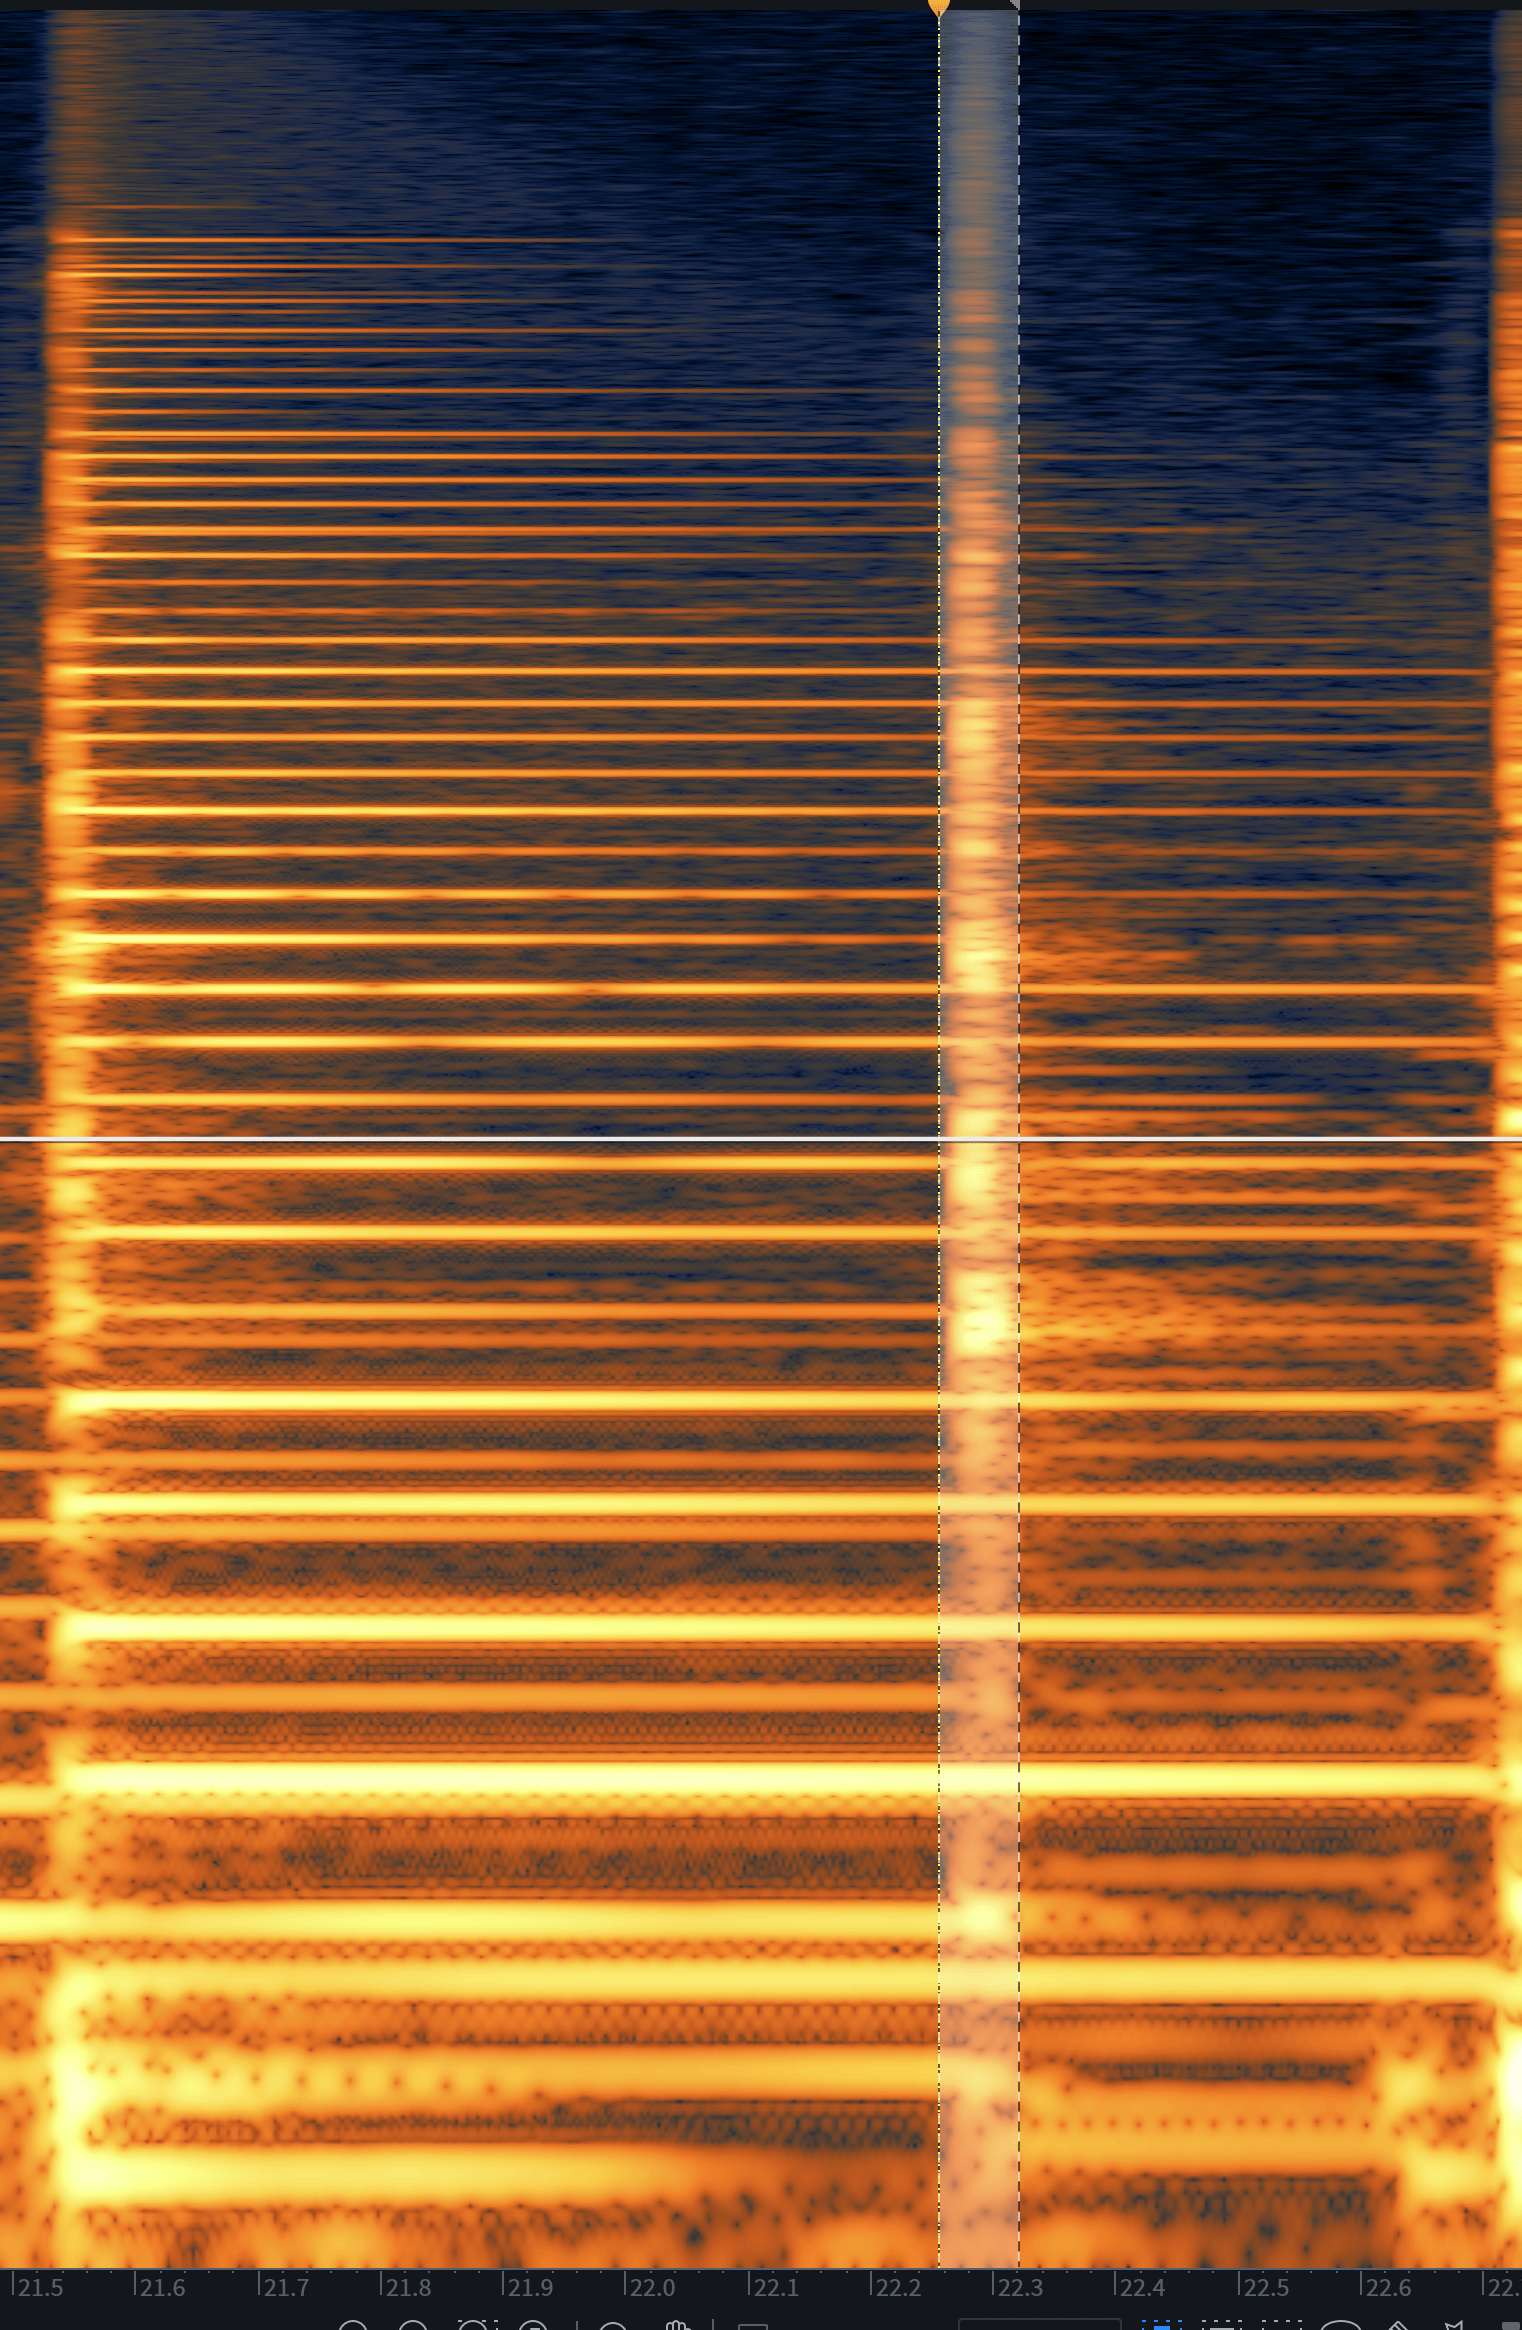
String squeak in a guitar recording
Fixing such a complicated squeak is a multistep process, and it may never be solved completely. But we can certainly keep it from becoming severely annoying.
First we must isolate specific issues with the Brush, then attenuate them with a medium number of processing bands. Keep in mind that we can hold Shift while using the Brush to highlight non-contiguous regions.
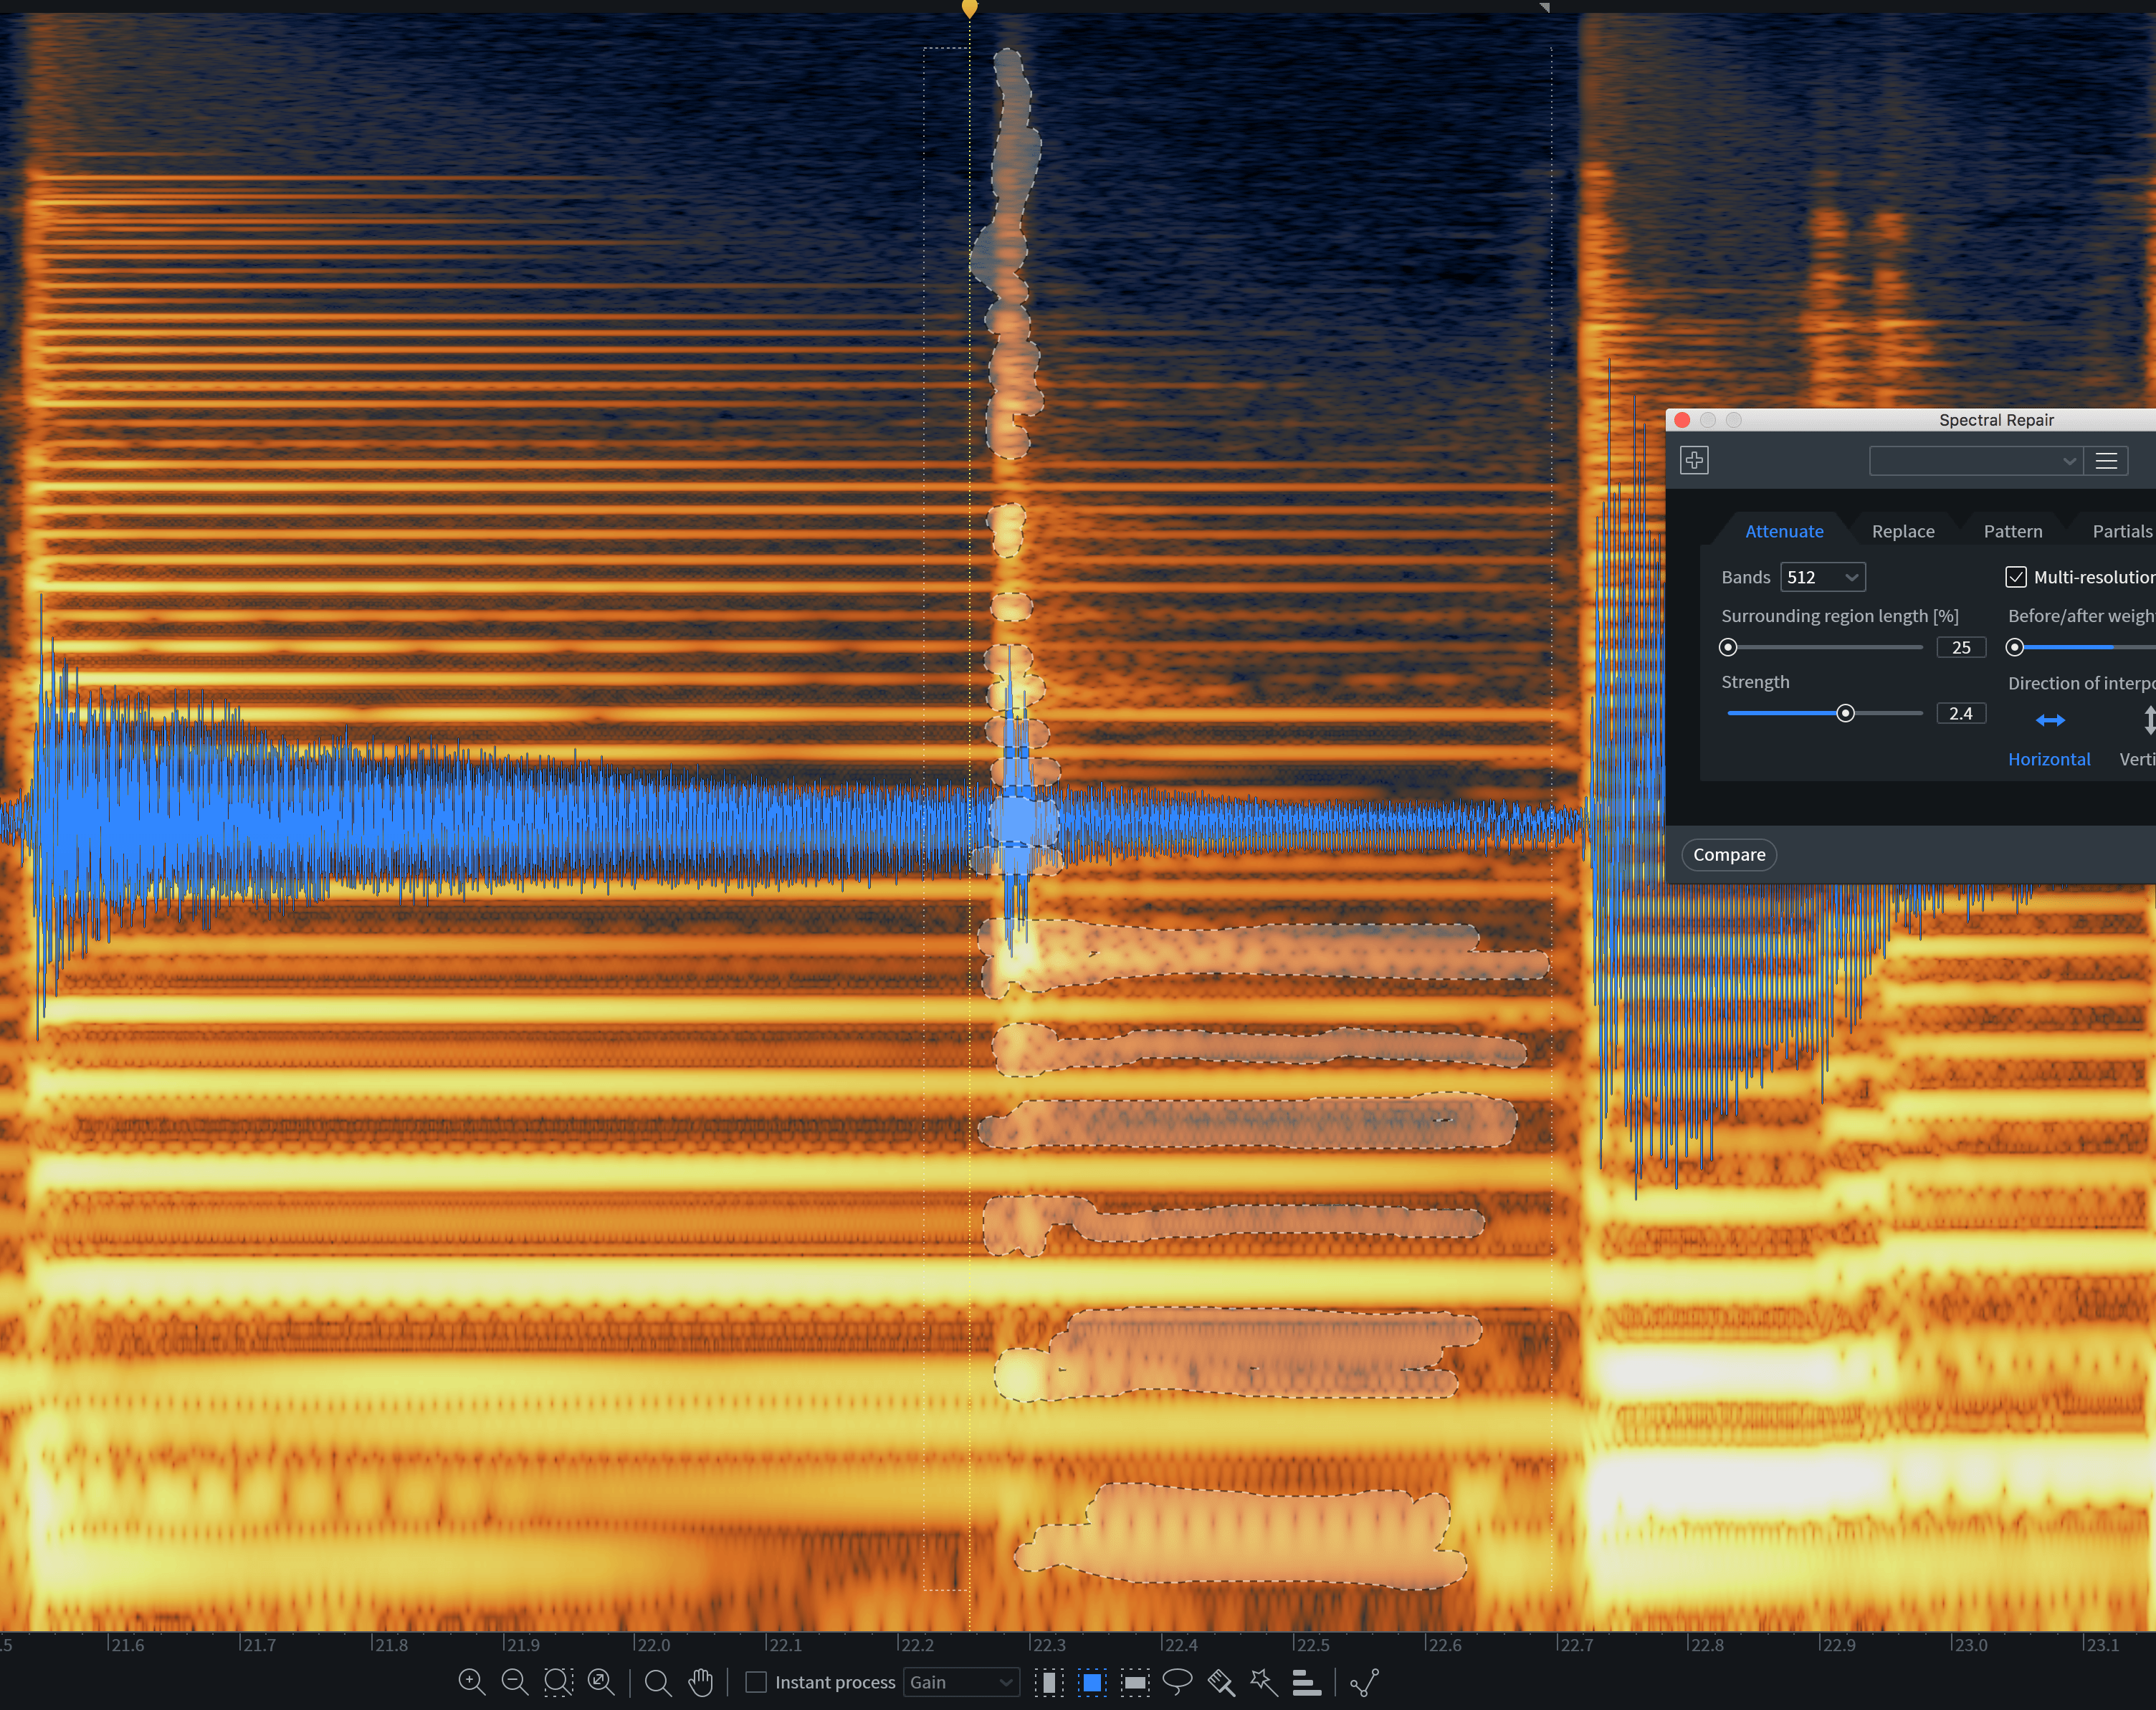
Isolating audio problems with the Brush tool
Then, we hit R so we can put a box around additional issues. We’re going to select the obvious offenders left over after the spectral attenuation, being very careful only to select these offenders and nothing else.
The Replace tab of Spectral Repair is extraordinarily precise, so we must be equally precise so as not to cause more problems than we can solve. Choose a smaller number of bands, as shown in the screenshot below.
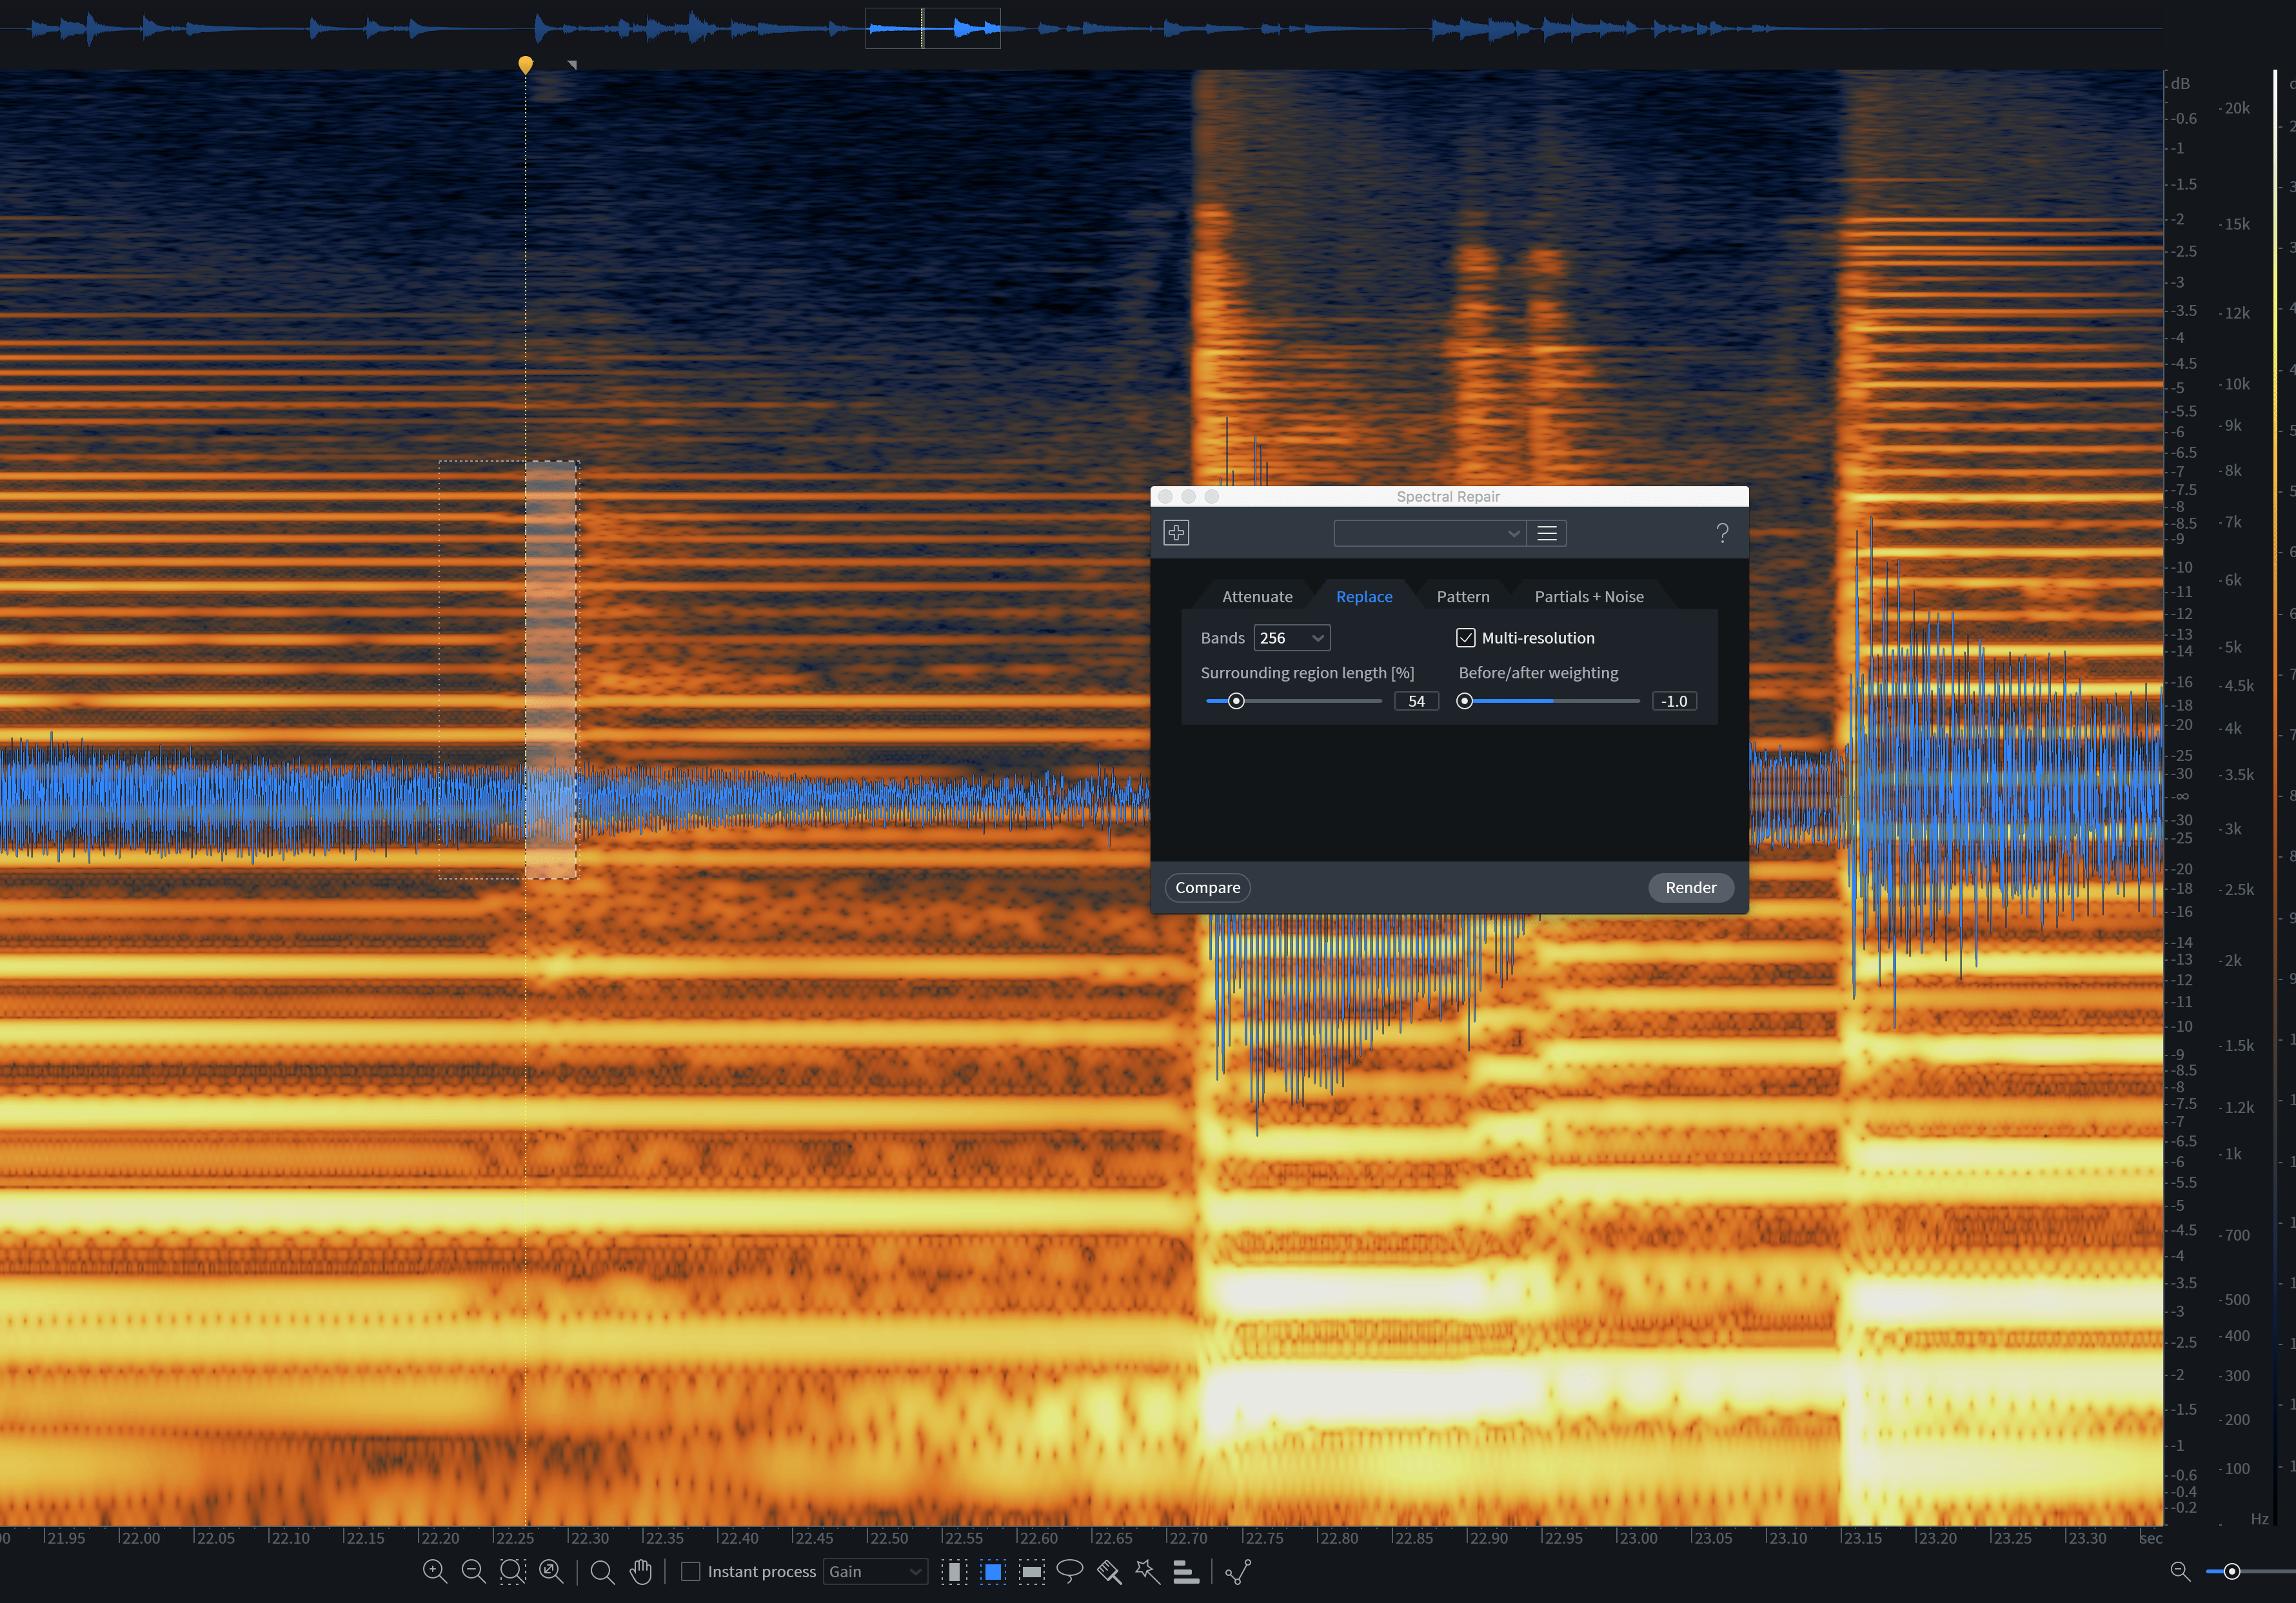
Choosing a low number of bands in the Spectral Repair module
We process the sound, and listen back.
It’s a lot of work—the kind of thing you’d have an assistant do if you employed such a person—but it just might rescue a project.
6. Getting your session into the same sample rate with Composite View
Sometimes you receive elements recorded in different studios. As much as we want all engineers to be as fastidious and consistent as possible, that doesn’t always happen. In fact it rarely happens, in my experience.
Say the bandleader built the demos at home, took the drummer to a studio, and sent the track to a vocalist, along with an impeccable vocal chain. Say this bandleader forgot to tell the various players what the sample rate was. You could easily end up with guitars, bass, and keys at 44.1 kHz, drums at 48 kHz, and vocals at 96 kHz.
What do you do? Don’t use your DAW for resampling—I’m sure it’s fine, but RX is better. Many mastering engineers rely on RX for going from higher to lower sampling rates, working at 96 kHz and down-sampling for CD formats. The presets for changing sample rate in the Resample module are generally quite good as well.
If you’re faced with varying sample rates in a single project, choose the highest one; it’s better to save all the down-sampling for the very end. Use the Resample module to up-sample the relevant tracks. You can even load all of the tracks you must resample, combine them in Composite View, and up-sample them in one go.
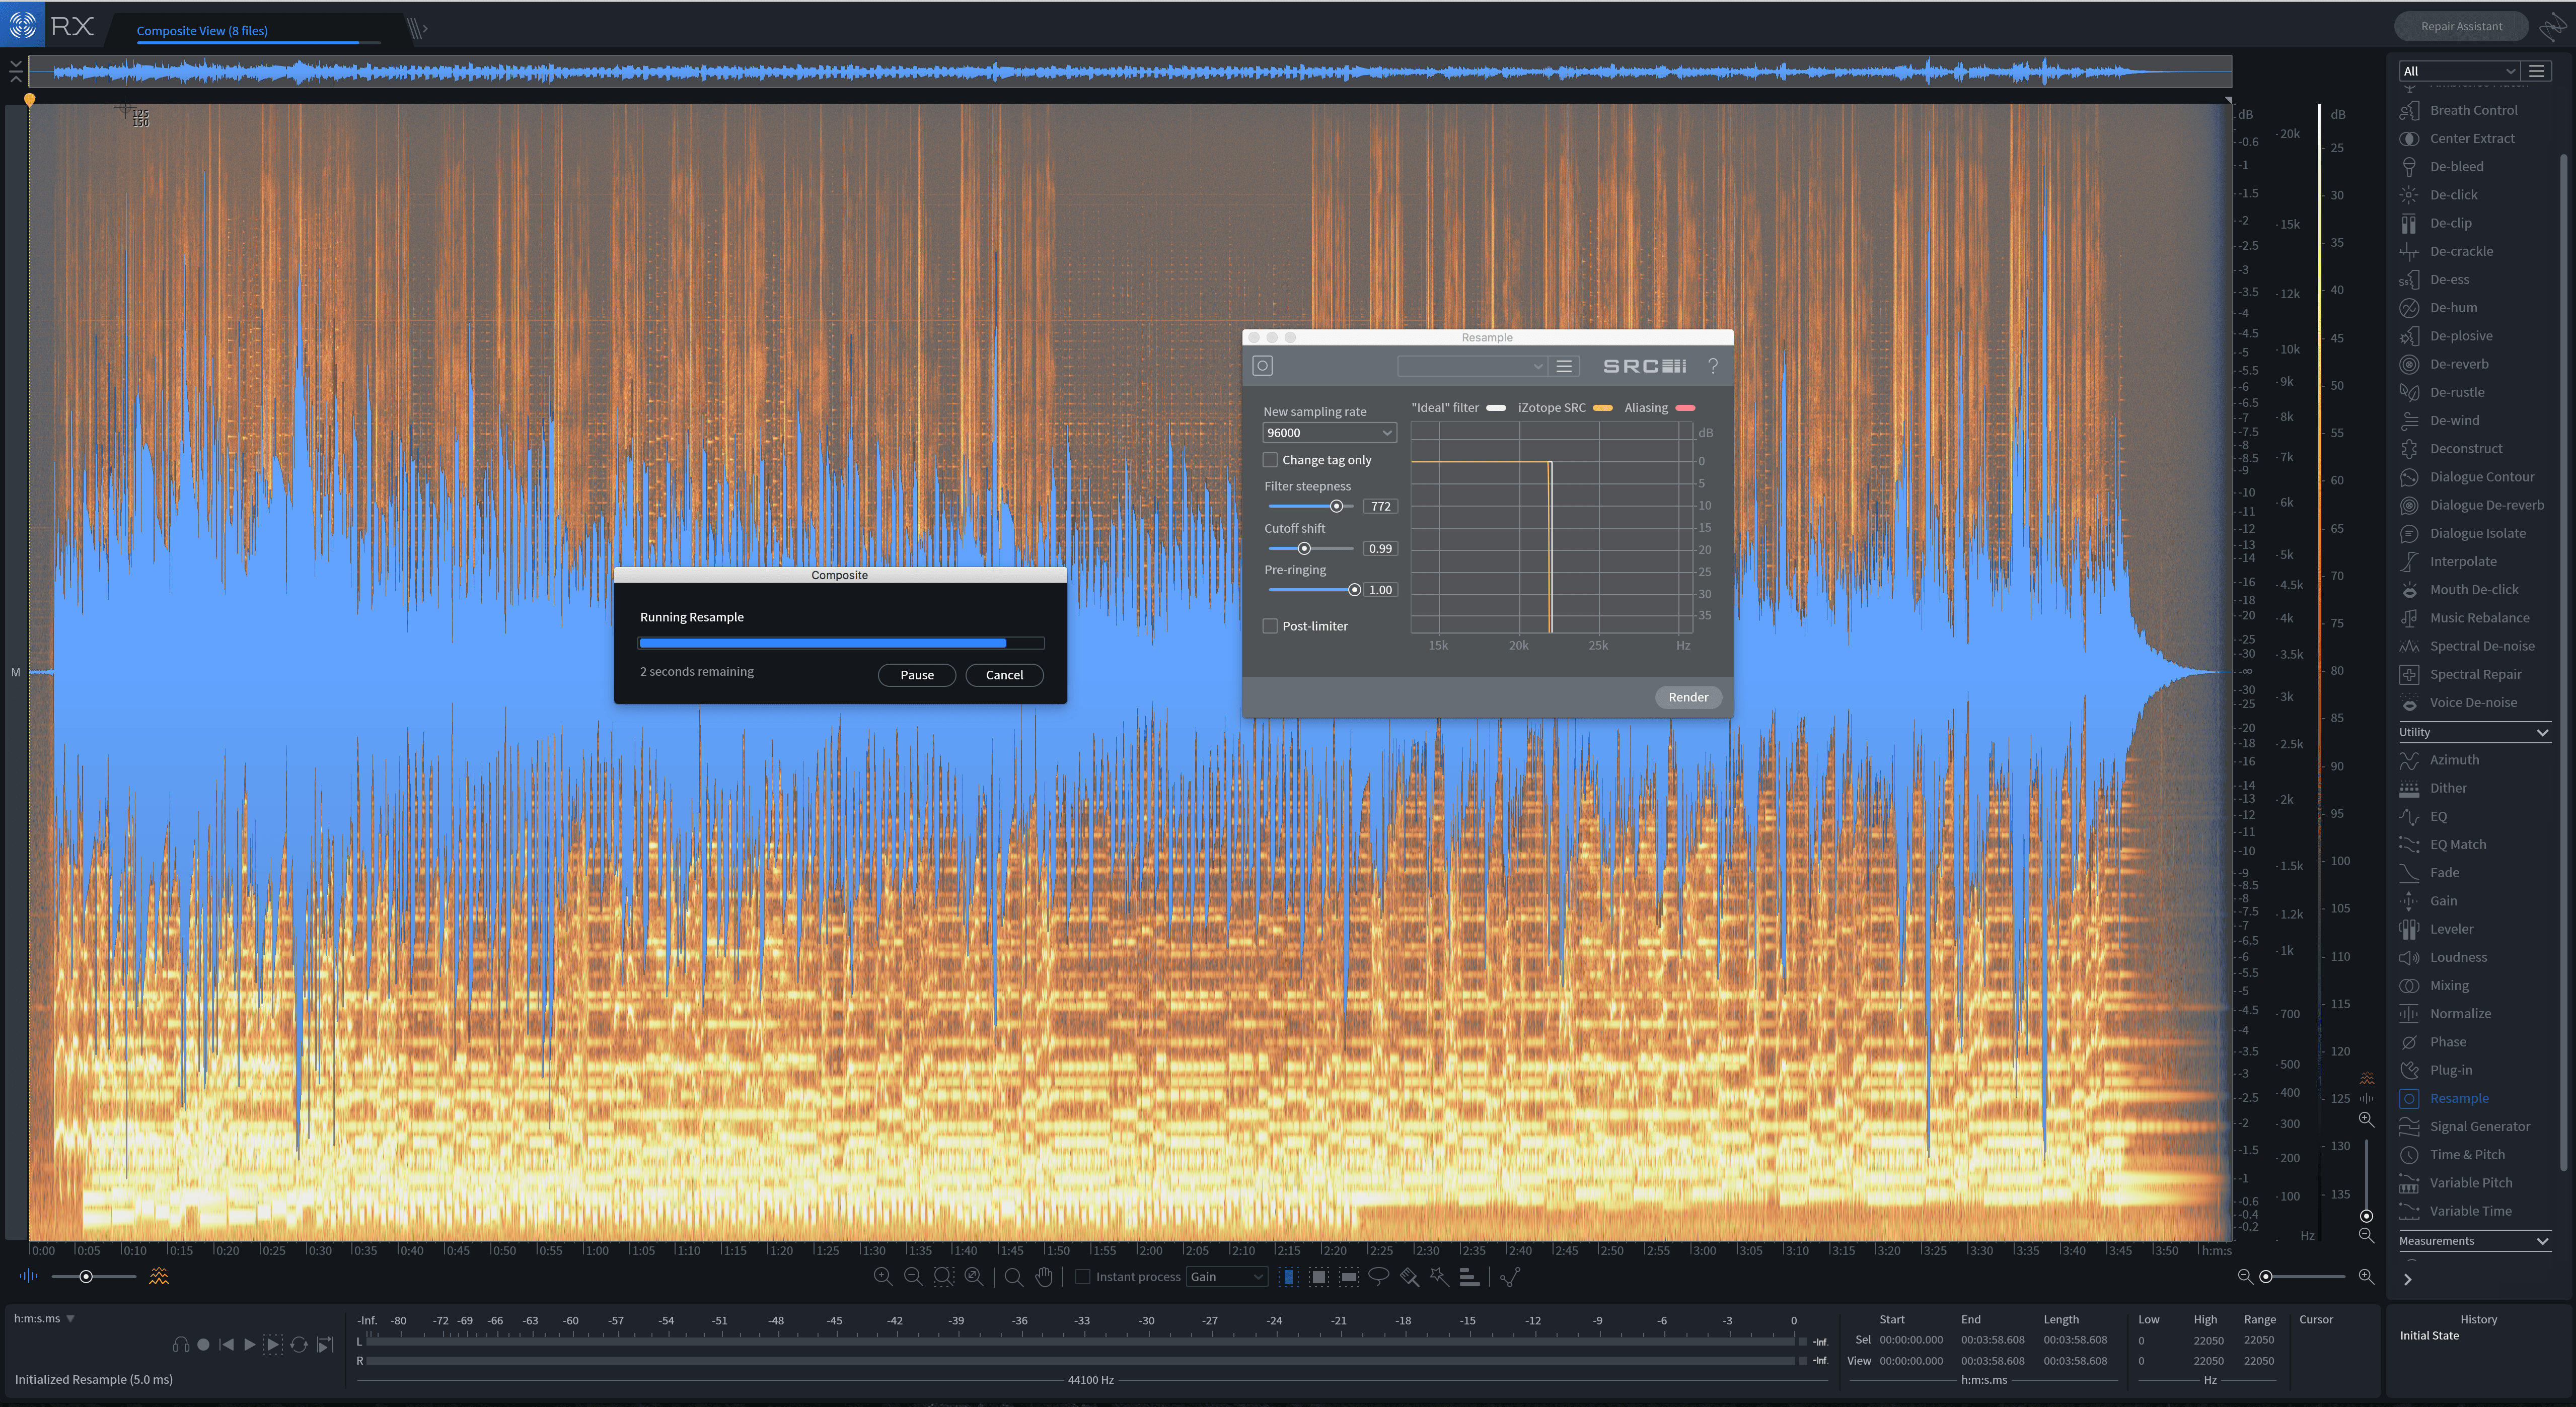
Upsampling with the Resample module
Export the tracks in one action, and you’re ready to load everything in the session.
7. Painting out low-end rumble
Sometimes a recording exhibits annoying low-end rumble. Take this vocal:
The singer has moved around, jostling the mic a bit. The mic picks up this jostle in the form of a low rumble, which looks like this in the spectrogram:
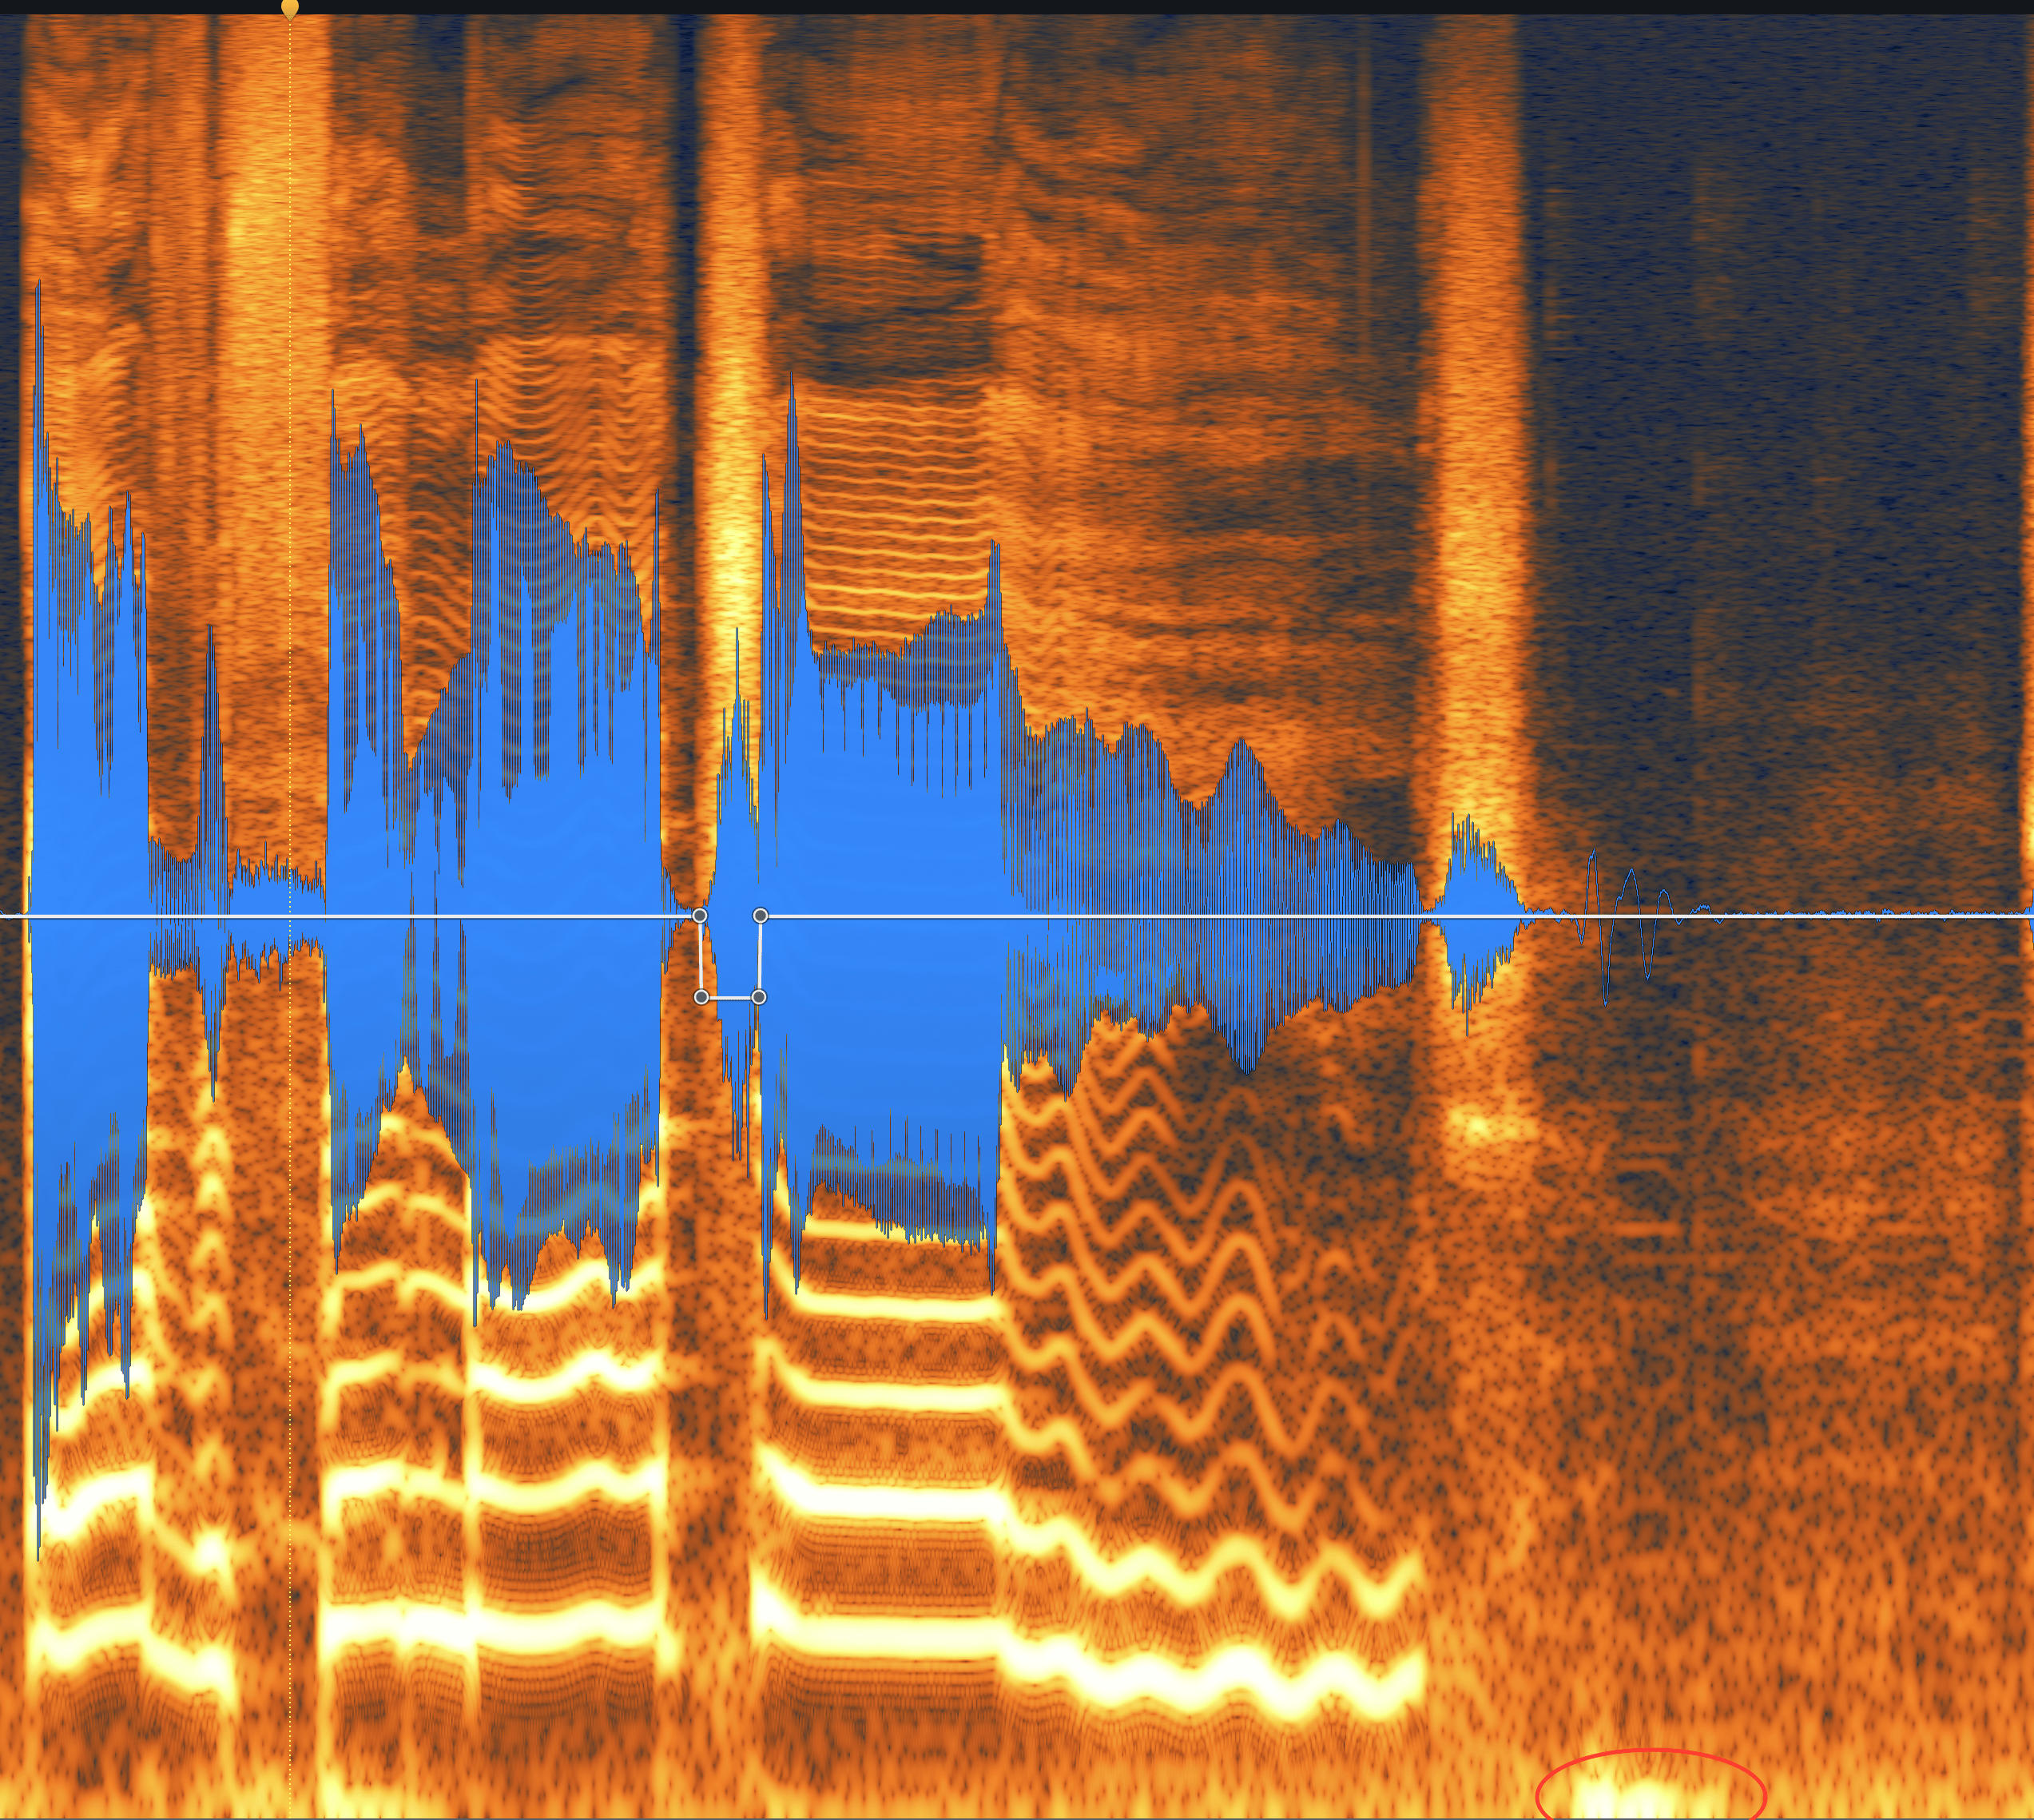
Rumble in a vocal recording
If you’re already in the spectrogram, you can ameliorate this problem by painting it with the Brush.
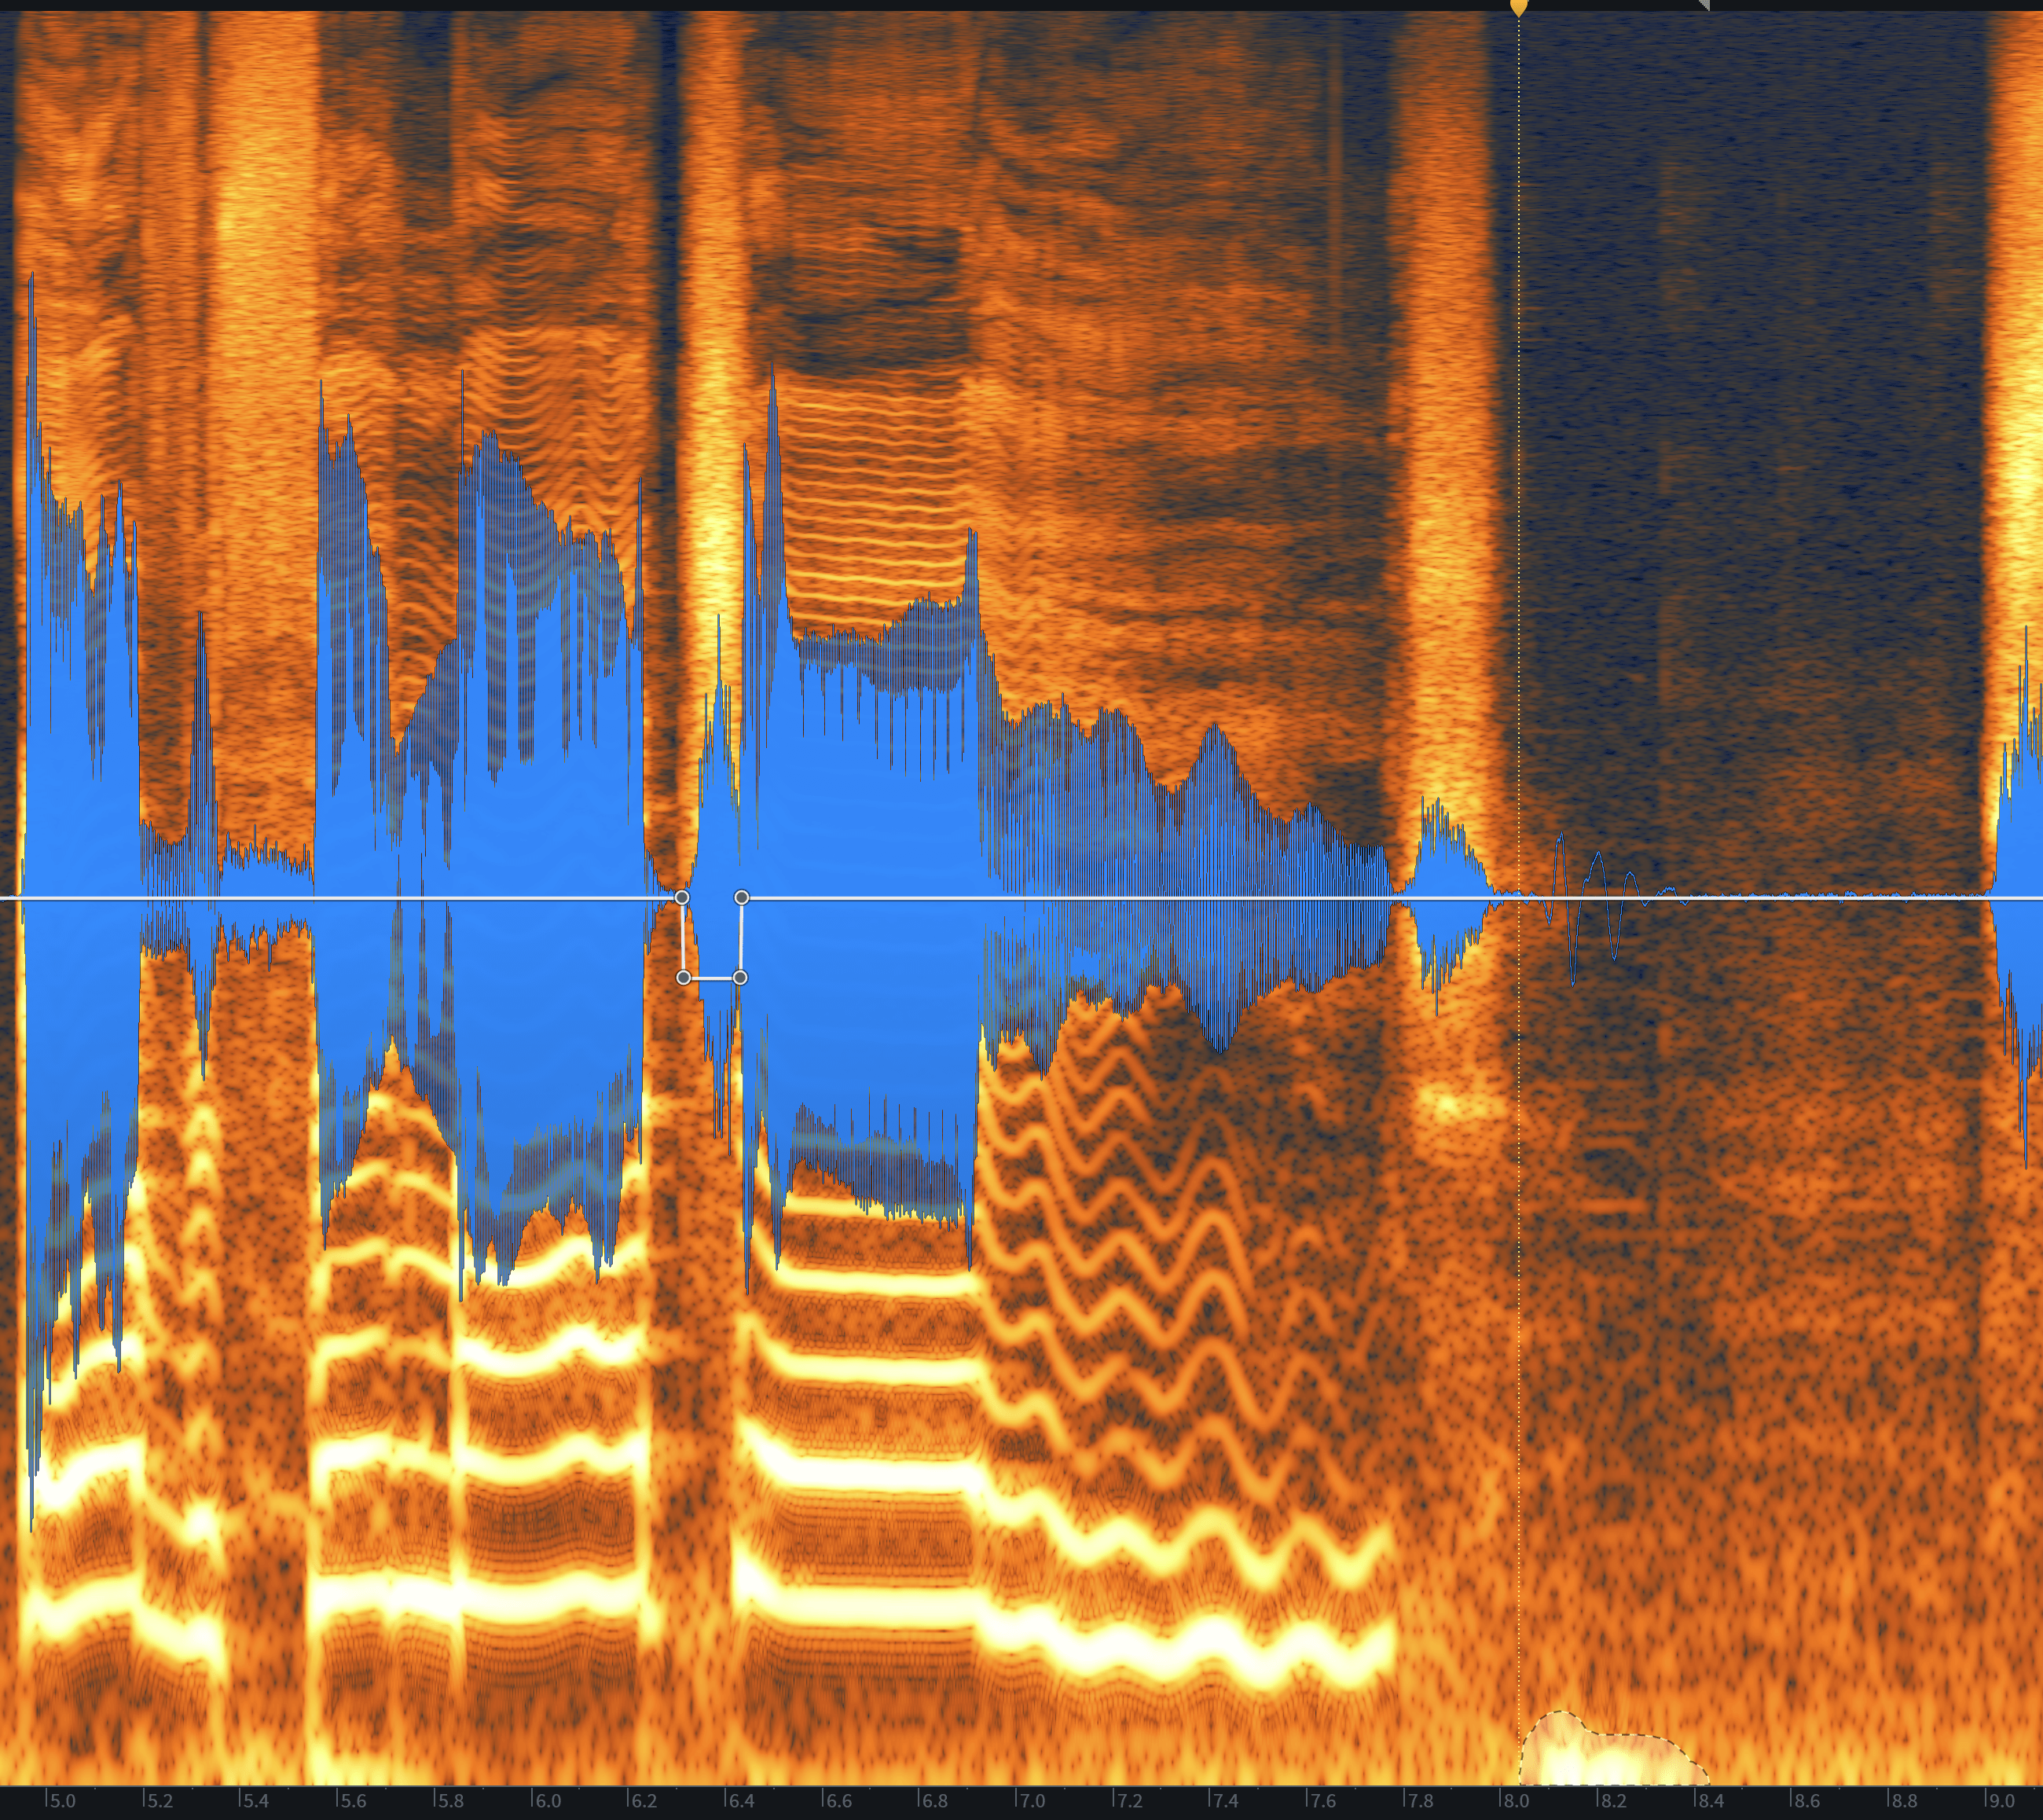
Selecting the rumble with the Brush tool
From here, you can crop it out with a simple Cut command, which looks like this:
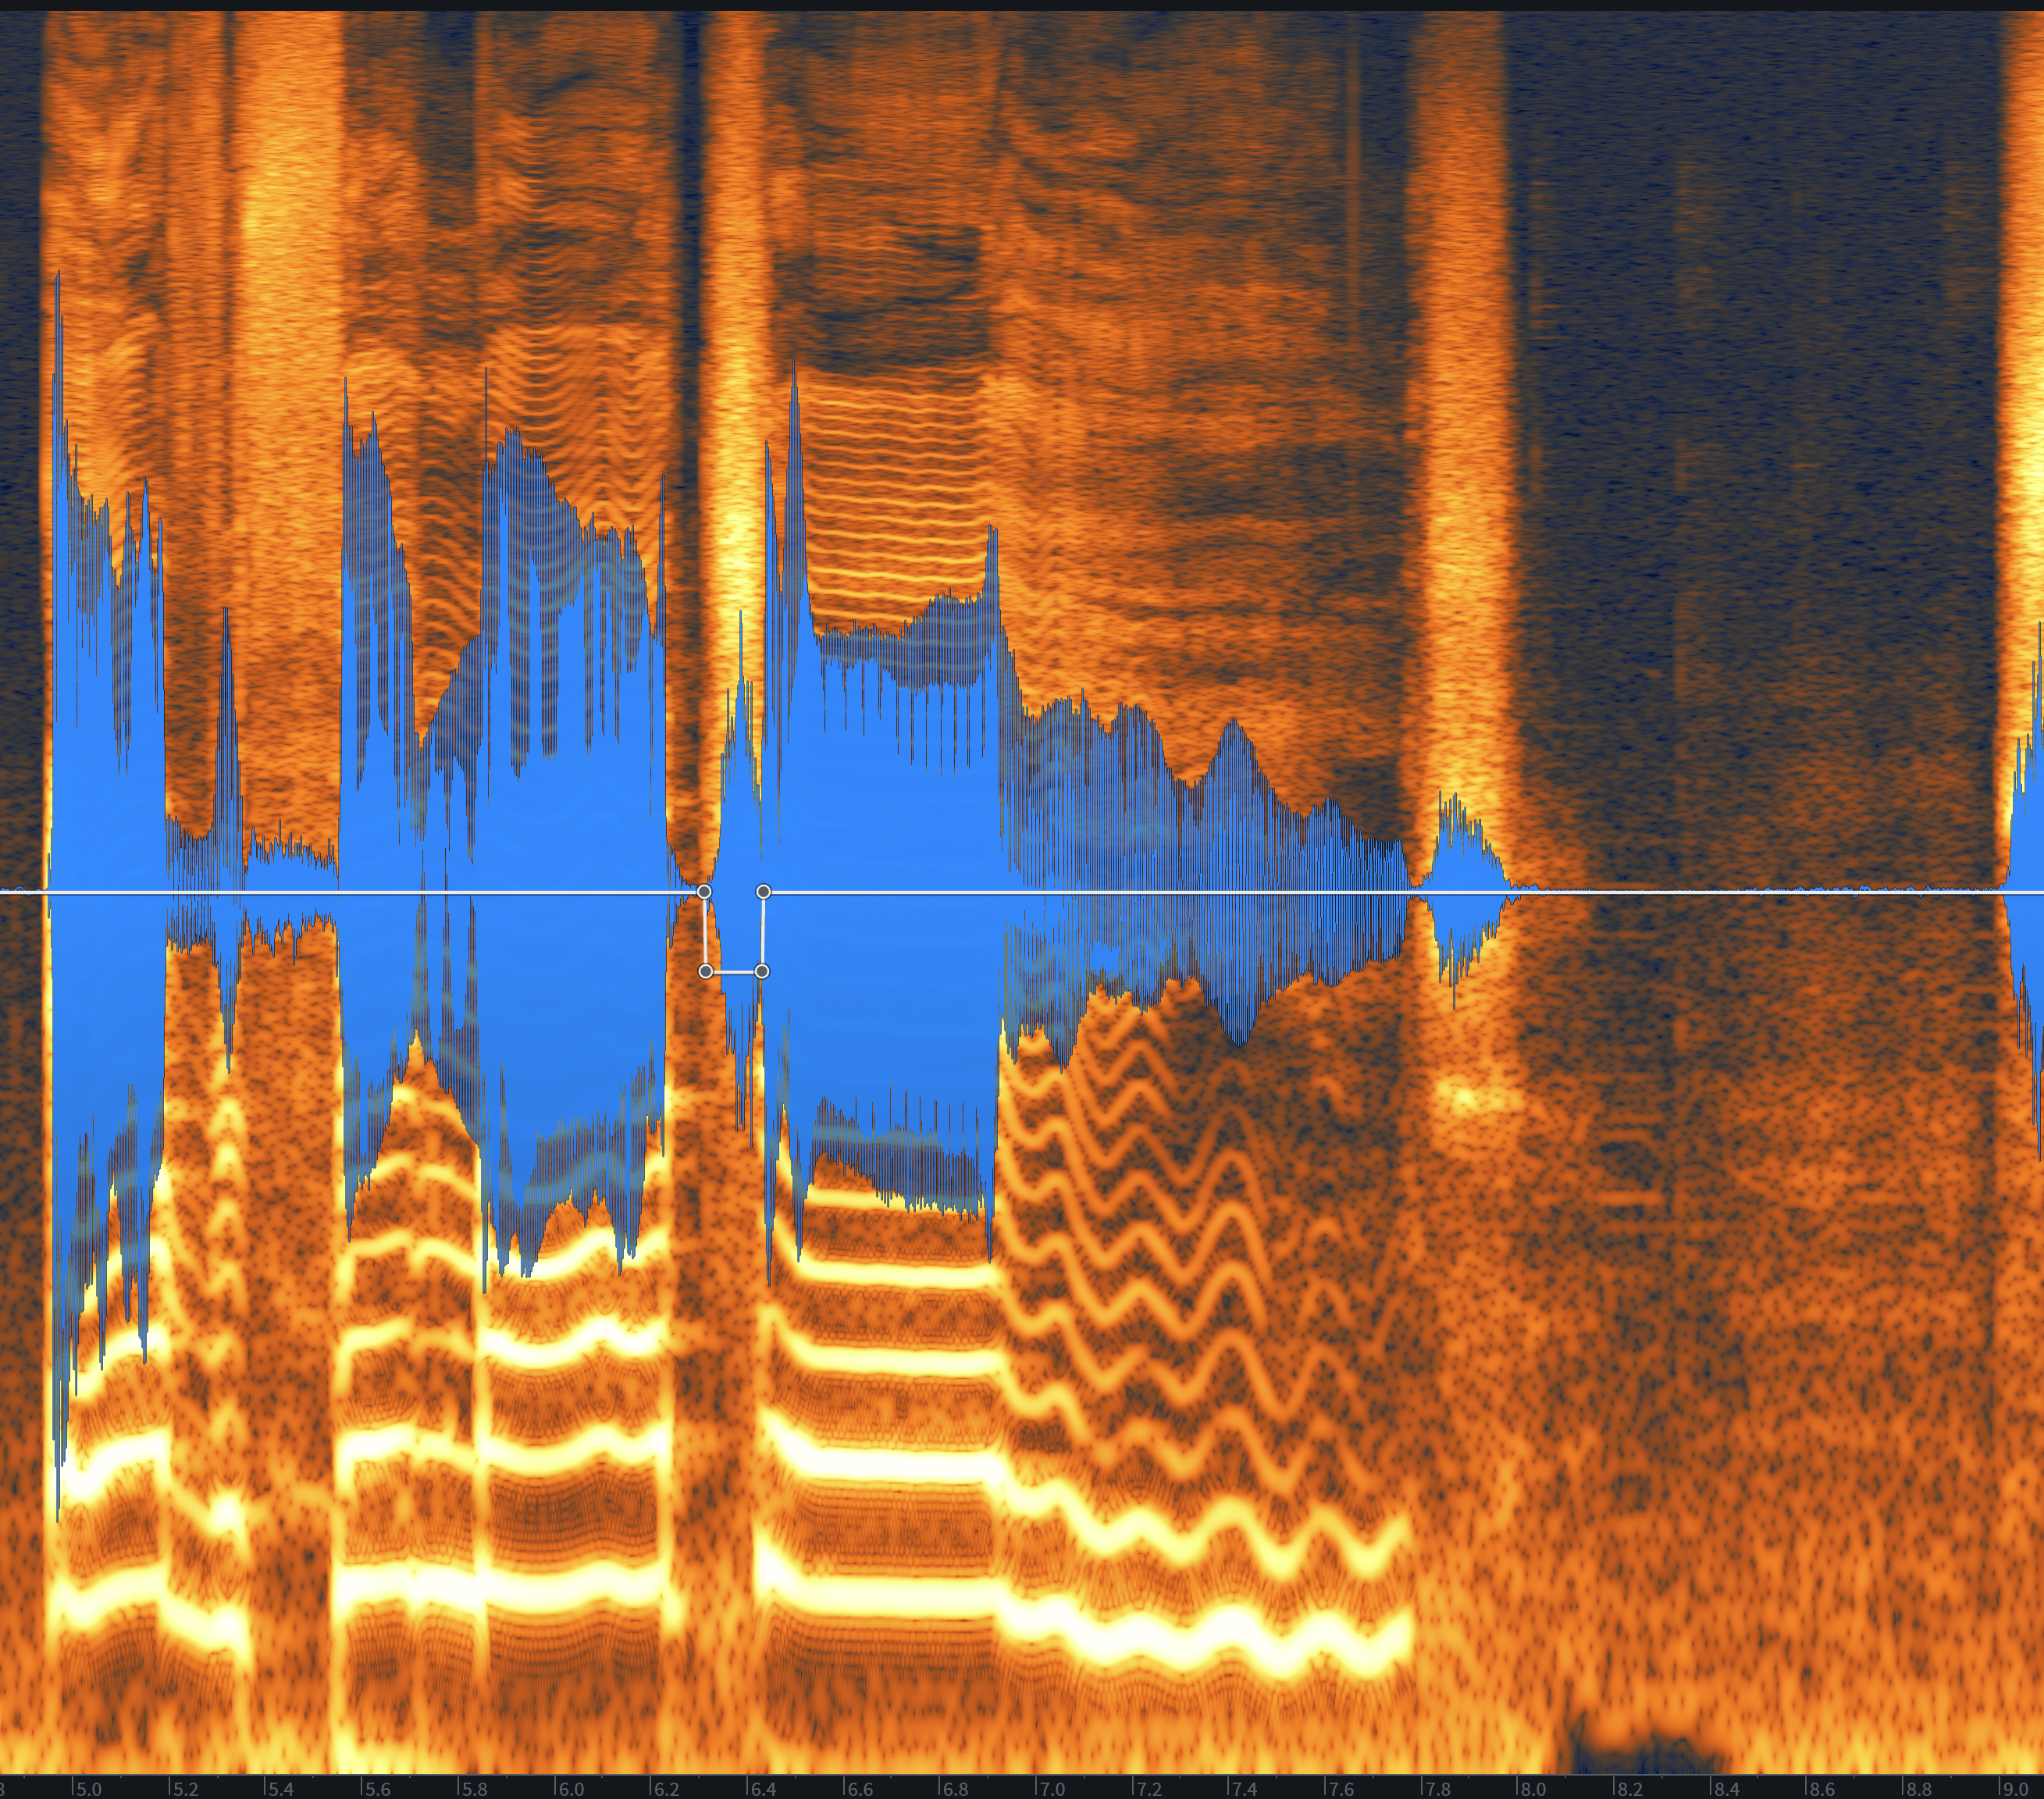
Low-end rumble taken out
Or, you could blend the element with its surroundings using the Attenuation algorithm in Spectral Repair.
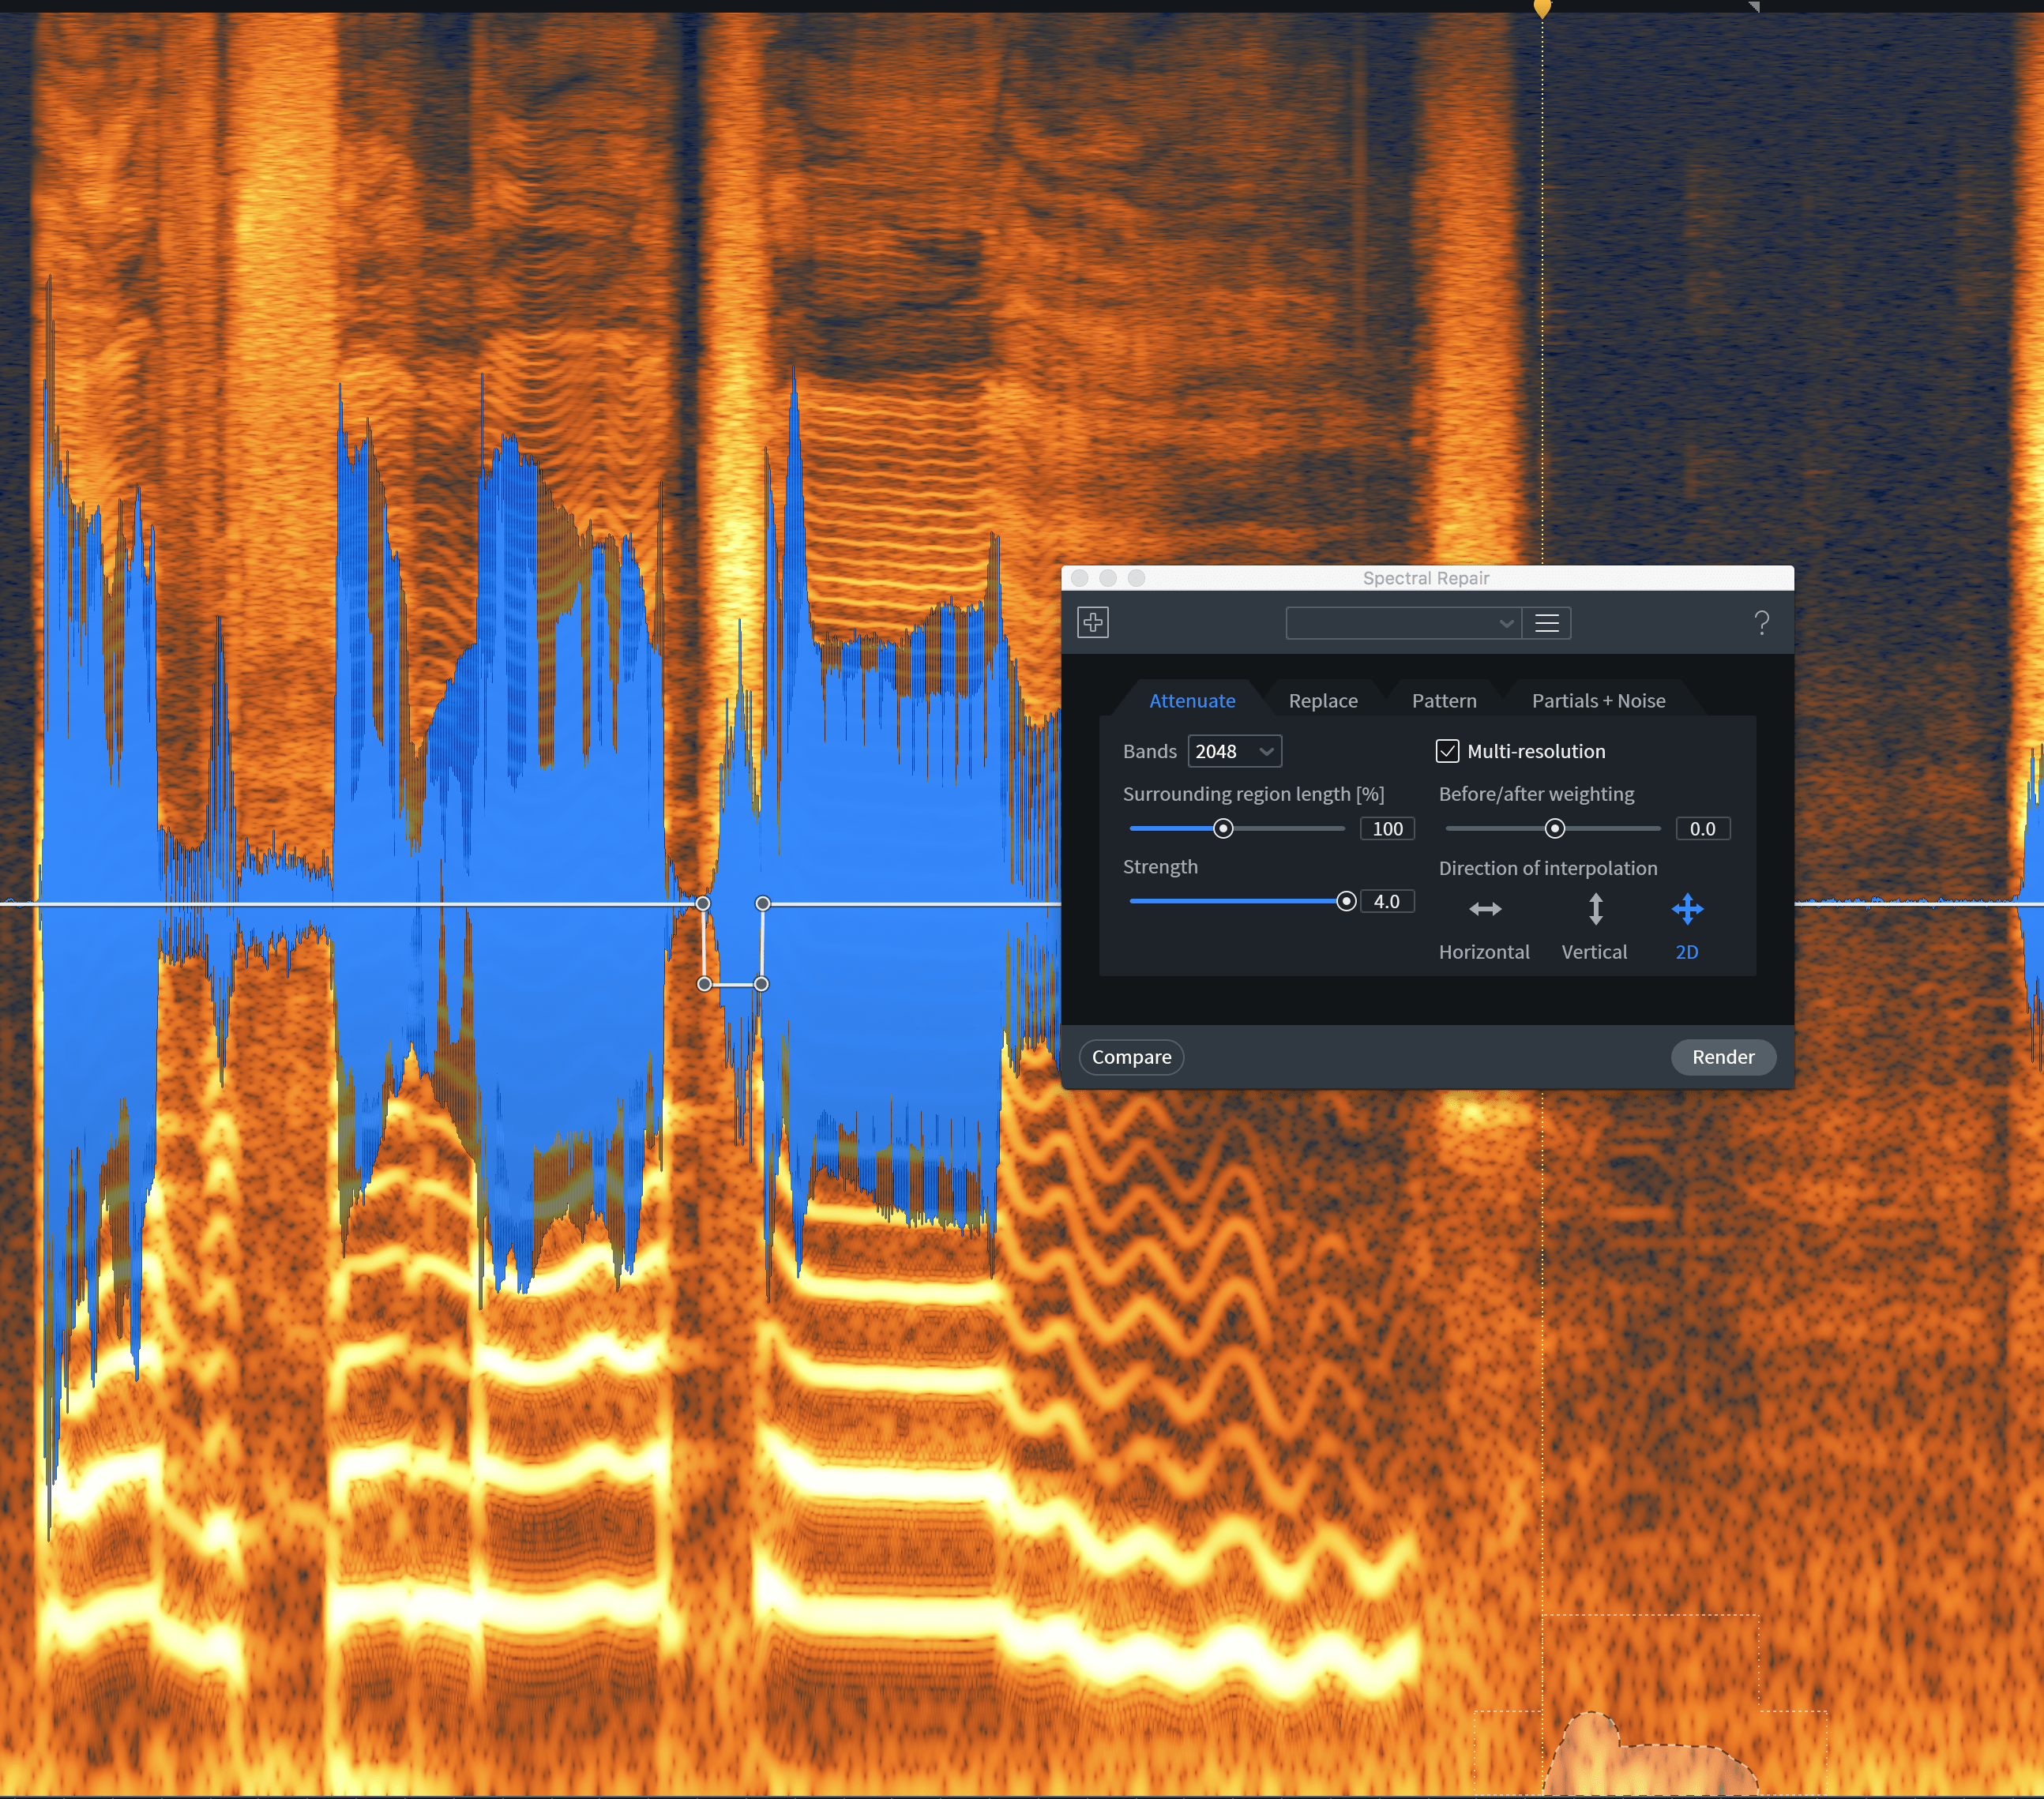
Blending the rumble into the surrounding audio with the Spectral Repair module
Either way, you can dispatch these elements quickly using your eyes and the spectrogram, without high-pass filtering (if you want to avoid the filter).
8. Rebalancing samples
If you’re working with a sampled loop, or if the producer has only provided you with a stem of some instruments summed together, you could run into issues.
Perhaps the bass within the loop will be too loud for the bass in your mix. Maybe you’re building something off an acoustic guitar and vocal recorded at the same time, and the vocals are too loud.
If this sounds familiar, RX 7 has a lovely tool at your disposal: Music Rebalance. Consider lowering the offending element by 1 or 2 dB.
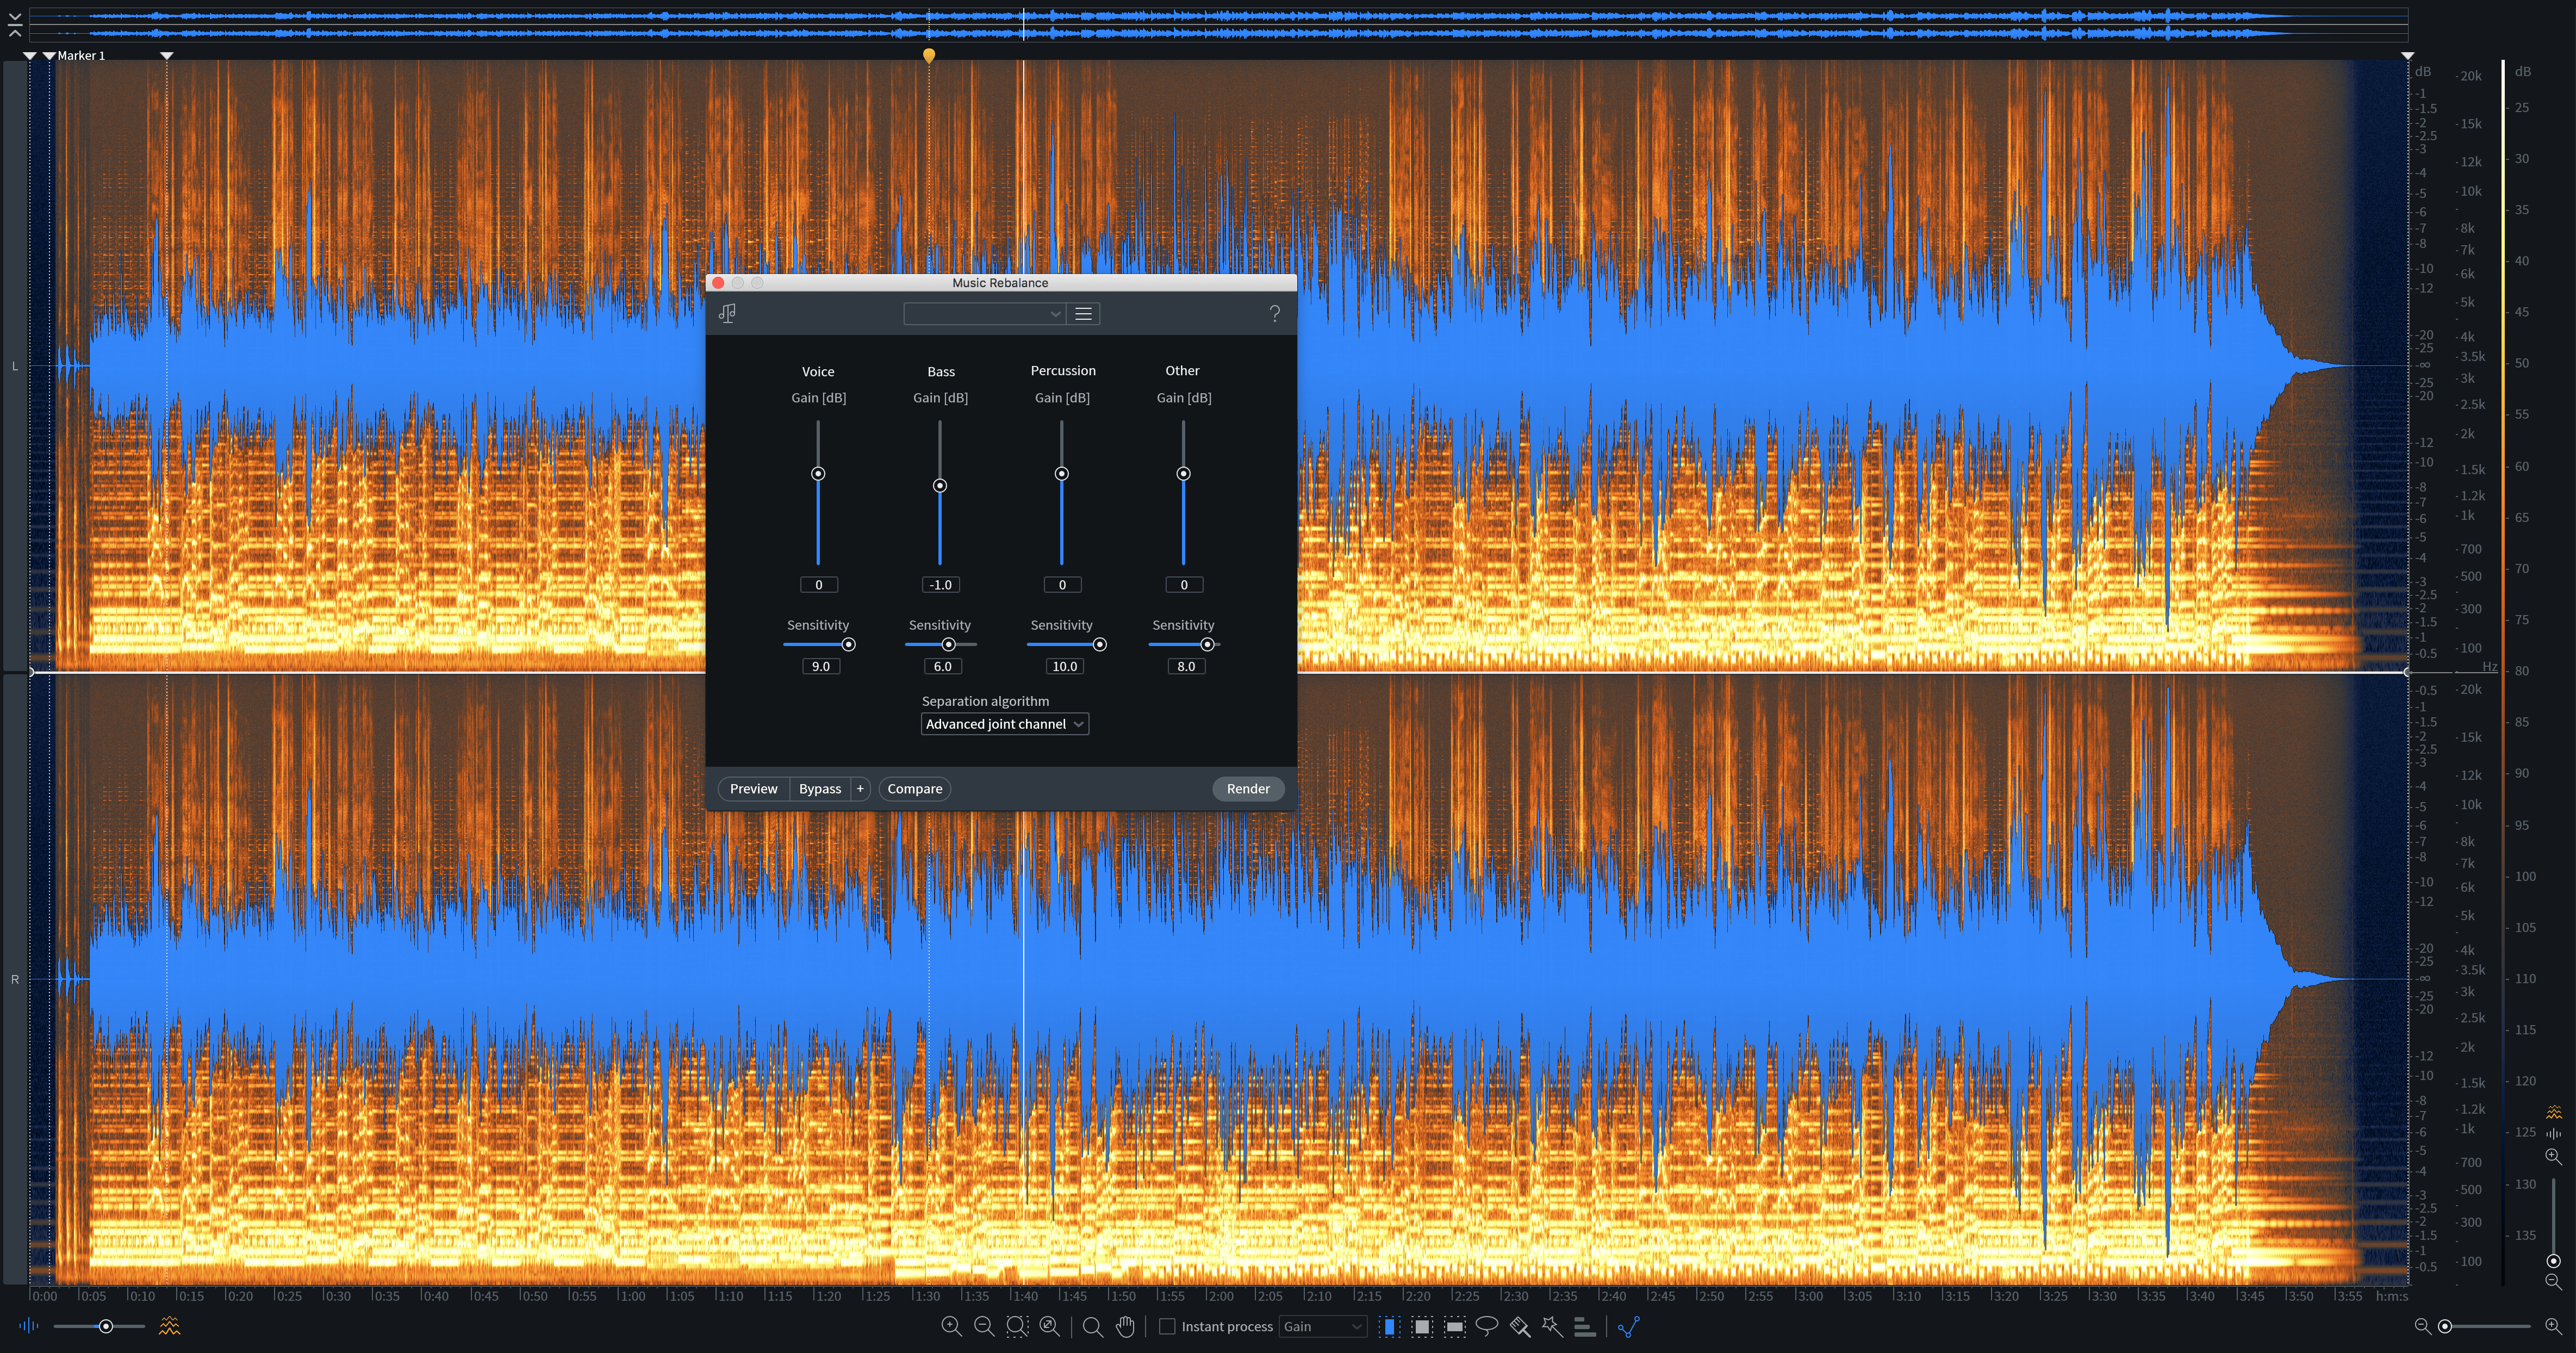
Lowering a loud mix element with Music Rebalance
If an element needs to be brought up, consider how to implement that change. Sure, you could raise a bass that’s too quiet, but you can lower the level of the other elements. Audition both possibilities and go with your gut as to which sounds better.
Conclusion
No fewer than three out of the eight tips provided involve the Spectral Repair module, and should tell you something of Spectral Repair’s power in the editing realm. When combined with the frequency-selecting tools, Spectral Repair is especially powerful, useful in anything from vocals and individual instruments to full mixes that came your way for mastering.
And if the Spectral Repair module doesn’t solve your particular problem, you can lean on the dozens of other tools in RX 7 to buff out any rough audio in your mix. Happy editing!
