Nectar or Neutron? When to Use Which in a Mix
Nectar for vocals and Neutron for everything else, right? Not necessarily. If you think outside the box, you can get a great mix combining both channel strips. Learn how to use both plug-ins on key mix elements.
This article references a previous version of Neutron. Learn about 

Neutron 4
What if we mixed a tune with only Neutron 2 and Nectar 3 for the job? Would we still use Nectar on vocals and Neutron on everything else? I say no—Neutron has great applications on vocals, and Nectar sounds awesome on many instruments.
I’ve walked into unfamiliar studios and found myself limited to stock plug-ins and third-party modules. The work I do in these situations can be rewarding, as I work creatively within the confines of this restriction.
If a studio only had Neutron 2 and Nectar 3, undoubtedly we’d get a pro sounding mix with the right techniques. It has everything we need—multiple styles of EQ, dynamic processing, distortion, and some great effects.
But how would we go about getting a pro sound? How would we know when to use which module?
Read on to find out.
Kick drum: Neutron 2
When you’re working with a kick drum—or a kick sample—you’ve got two things to keep in mind. First, you must communicate the power of the instrument by embracing its gut-punching low-end and its high-midrange attack. But you also need to make sure it plays nicely with the bass instrument, so that you don’t have frequency masking and a muddy mix.
Here two features of Neutron 2 are very helpful: the Masking Meter, and the ability to sidechain both multiband compression and dynamic EQ to other instruments—and even other instances of Neutron 2.
Load Neutron 2 on the kick and set the Masking Meter to the bass. Now you have visual indications of how one conflicts with the other. What’s more, you have the ability to affect both of them at one time within this plug-in, as shown below.
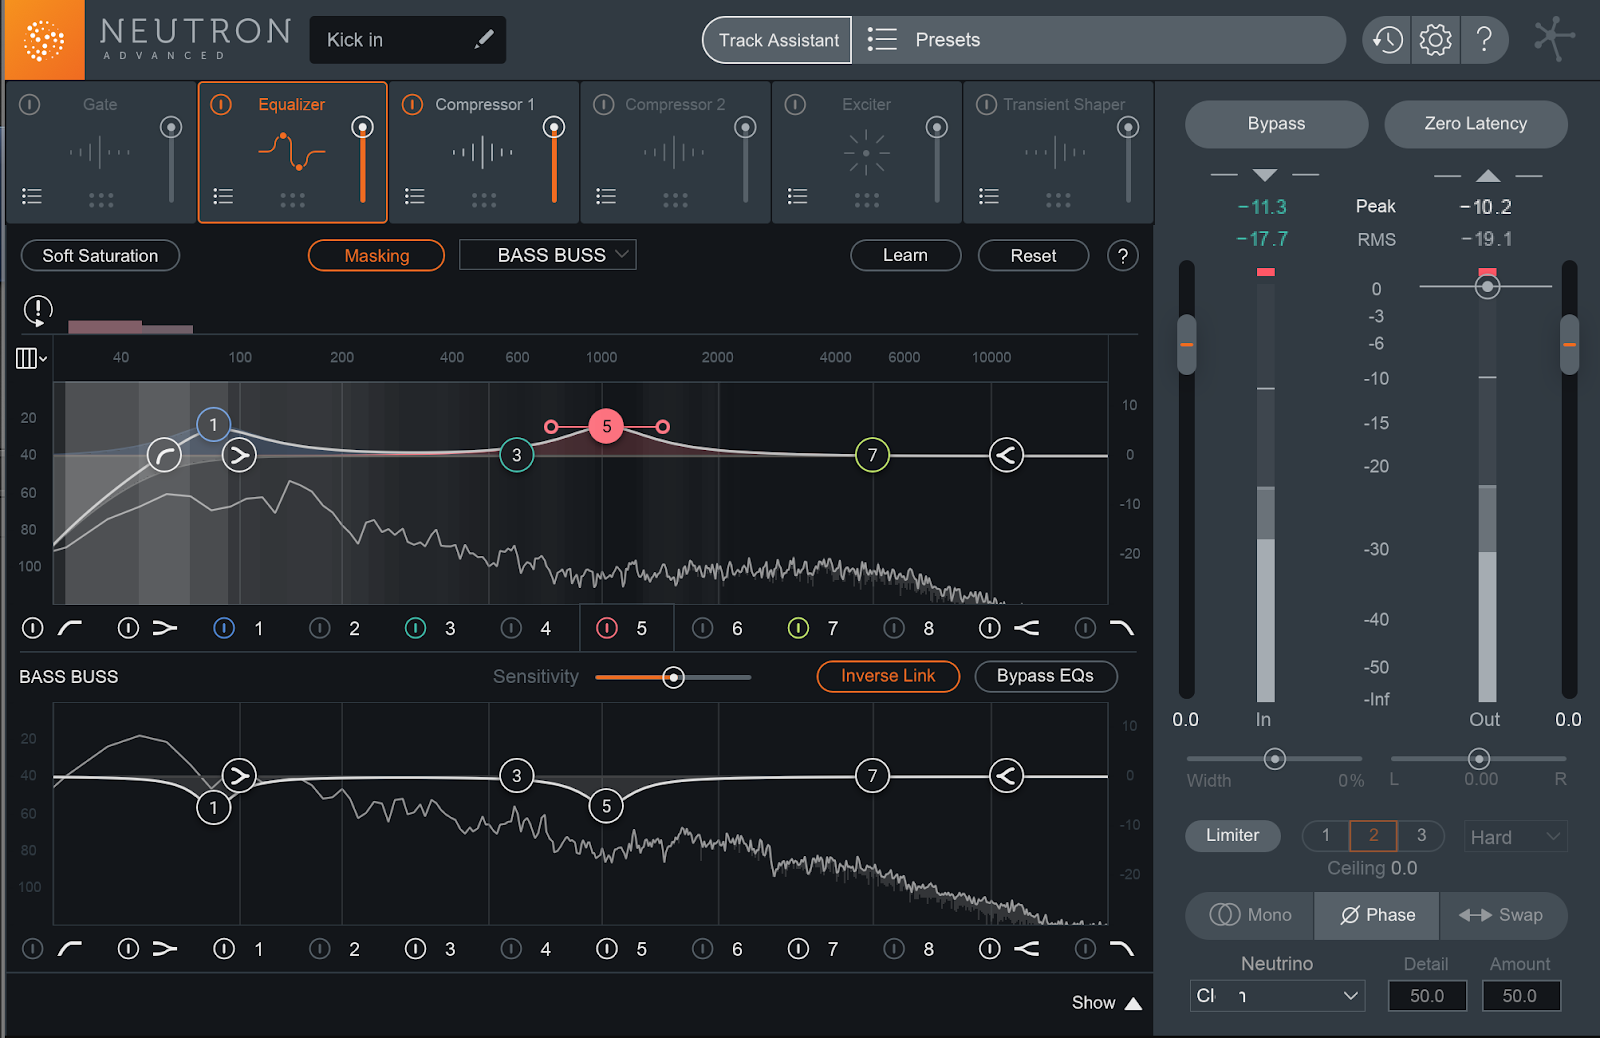
Neutron 2 Masking Meter
From here, work on elements that help the kick cut through the mix, such as a boost at 1–3 kHz, followed by compression (if needed) or transient shaping (again, if needed).
I don’t often use multiband compression or transient shaping on the kick; I feel it distorts the original frequency representation, smears the transients, and just makes the sound of the kick feel less real.
I may use the exciter to add some distortion, but this I will do in multiband, as I may want a different flavor for the lows than the mids.
I have no hard or fast rules, but my order of modules for kicks in Neutron 2 tends to be the transient shaper, followed by the EQ, then the compressor, and lastly, the exciter. I start processing with the EQ and introduce other elements as needed.
Snare: Neutron 2 and Nectar 3
Load up Neutron 2 and try Track Assistant here, as it eliminates pesky snare ring quickly. You may find that you like Track Assistant’s gating, compression, or other attributes. You may not, and that’s fine. Below I’ve outlined a typical use case for Neutron and Nectar, one you might well use in your sessions.
A template for mixing snares with Neutron 2 and Nectar 3.
- EQ first: Go into the EQ, make sure that your corrective curves sound good, and add meat and attack frequencies where you see fit.
- Transient Shaper: After EQ, your options change depending on what you want to get. You could have an even player but a snare that only thwacks, and never lingers. Here you can use the Transient Shaper to bring out some sustain, especially if you use it sparingly.
- Compressor: If you have a player who gives you inconsistent snare hits, a compressor is your friend, with an attack slow enough to let the transient through, and a release quick enough to allow the snare to recover between hits. Refer to the technique in this article for how to set up the compressor, and go full band over multiband when possible.
- Dynamic EQ: You may find that dynamic boosts of EQ can help you fill out both the meat and the crack of the snare. Experiment with setting a band around 150 hz or so, and another at 1 kHz or thereabouts, and having them expand with fast attack and release times. You may find this does wonders for the sound.
- Exciter: A sprinkling of Neutron 2’s Exciter in the high-mid and air bands could really add some crack and sparkle—but be careful not to overdo it.
- Distortion: The distortion algorithms in Nectar 3 sound different from those in Neutron 2. They’re often subtler, with a more meaty sound rather than a high-end sizzle or a fuzzy low end. Try driving the saturation very hard so you really hear it, and then inching the parallel slider down. Or, go for something more felt than heard with the amount parameter.
- Time-based effects: While we’re in Nectar 3, we can do a variety of time-based effects which might help the atmosphere. Try a delay that filters out all the lows and adds some distortion to the highs. Time this delay to the least amount you can get away with. The reverb is also worth checking out while you’re here.
Hi-hats: sidechain with Neutron 2
The less I do to high-hats, the better. Often high-pass filtering into the midrange is enough. I may use dynamic processing, however, if there’s too much bleed from snare, or the part isn’t grooving enough.
With Neutron 2 you can sidechain the hat to the snare. When the snare hits, the hi-hat will duck, solving the bleed problems. Play with the attack and release to change the feel of the high-hat; it’s a magical trick that adds a subtle swagger to otherwise lackluster hats.
Toms: Neutron 2 on toms, Nectar 3 on the bus
More than other elements, toms can require a staging of processing, and it pays to think of all the toms as an individual instrument within the drum kit.
A template for mixing toms with Neutron and Nectar
- Track Assistant: load an instance of Neutron 2 on the highest tom. Again, run the assistant, if for nothing else than the automatic elimination of nasty frequencies—Neutron 2 is good with resonant transient-heavy instruments.
- EQ: If you forego the Assistant, try to make some very specific things happen with EQ: cut out all the mud you don’t need with a high pass filter or a notch, if it’s in the low mids. Emphasize the low-mid resonance you like with a little boost, and boost some high-mid cut so the attack pierces through mix.
- Copy settings: Note that if each tom sounds similar—as in, if each tom clearly sounds like a piece of the same shell kit, miked in the same way—you can often copy the high-tom setting to the other toms; just adjust the specific frequency ranges you’re EQ’ing for each drum, as they’ll be lower in pitch.
- Transient Shaper: After you work on EQ, you may play with Transient Shaper in single-band to bring out some more attack if necessary, and possibly a little sustain too, if you’re not getting that from the overheads. Single band compression can also be useful in sculpting transients, with the same philosophy applied that you used on the snare.
- Creative effects: Now, route each of the toms to the same bus, and put Nectar 3 on that bus. Try a bit of tape saturation—just a bit—followed by some subtle reverb in parallel. The reverb can really help glue the tom sound together into something that feels more like a record. Another instance of compression, before the reverb, could also add to the tone. Try the Vintage or Opto modes, with slow attacks and fast releases, shaving off a dB or so.
Overheads: Neutron 2
For overheads, I’d favor Neutron 2. You’ll note from this article that I often advise people to get as much from the overheads as possible. This involves a light touch in the EQ department, and a heavier touch in the dynamic modules.
I don’t often high-pass the overheads, because I like the way the kick sounds as they pick it up. I may gently attenuate some boxy frequencies and cut some harsher high end (500 and 4–6 kHz, respectively).
I don’t add brightness to overheads until I’m certain, within the context of the whole mix, that it will help. If I’m going for a vintage or affected drum sound, the overheads are where I begin to sculpt an EQ signature that befits the vibe. Here, for instance, you can do interesting things like sidechain the attenuation of a high-shelf to the boost of a snare drum frequency; the harder the snare hits, the less bright the overall signature becomes, and this can give you a tape-saturation effect.

Neutron 2 Masking Meter
I also tend not to process each individual overhead EQ. I’d rather treat it as one stereo source. The exception is any particularly harsh cymbal hit. In that instance, I may automate a cut at 4 to 6 kHz during some unruly crash moments.
You can use Dynamic EQ to achieve character compression effects. Increase your ratio as high as it will go, and use attack and release for a pumping, “all-buttons-in” sound; then, edge down its blend till it’s manageable in level. Conversely, play with the sustain in the Transient Shaper to bring out the room ambiance more. You can get creative and fun here, so long as you don’t wind up with something that destroys the integrity of the transients.
If you’ve mixed the overheads for five minutes at a reasonable monitor level, and you feel your ears are fatigued, chances are you’re using too much processing. Dial it back.
Room mic: Try Neutron 2
On a drum room mic, try playing with the Transient Shaper to emphasize sustain, as well as the compression, for the previously mentioned “all-buttons-in” effect.
Here’s a room mic track with nothing on it.
Here it is with transient shaping and compression, with the following settings:

And here’s what it sounds like:
With this kind of processing, you can enlarge the roominess of your drums without resorting to artificial reverbs. Not a lot of EQ is required on well-recorded room mics, I find.
Auxiliary percussion: Neutron 2 with a side of Nectar 3
For most percussion instruments outside the drum-set category, I would favor Neutron 2 for two reasons: distortion and sidechaining.
The kind of distortion that helps percussion cut through is better found in Neutron 2. You have more control over it (it’s multiband, after all), and it tends to be brighter, which helps with cut.
Also, it’s often helpful to sidechain rhythmic elements to other rhythmic elements; it aids in creating sonic spaces, as well as groove shaping, and EQ carving.
Bass: Neutron 2 with a side of Nectar 3
Load an instance of Neutron 2 on the bass instrument, and start with the EQ. Set up the Masking Meter with the kick and make sure they play nice with each other. Then, ask yourself what you want to achieve from your bass, and work with the techniques provided in this article to get there.
Some techniques, like using a little bit of chorus, might work better in Nectar 3 than Neutron 2. So go ahead and fire up Nectar 3, and try the chorus, flanger, phaser, and even harmony modules—so long as you operate in parallel!
Guitars: Nectar 3
I tend to favor Nectar 3 over Neutron 2 for guitars. Why? The EQ’s clickable bands come in handy, for one. Unless there’s a real issue in the track, I prefer broad sculpting for guitars, almost the way you’d tweak a tone-stack on an amp (the bass, mid, and treble knobs). In Nectar I can easily click in three, big, broad bands and move them around; just grab a frequency and pull. Sounds good? Grab another. Am I done? Chances are yes.
The saturation in Nectar 3 is great for guitars, because of the qualities I mentioned earlier: the subtler, meatier, often darker sound, as well as the broadband application of Nectar’s saturation. I can drive the guitar in a uniform way more quickly in Nectar 3.
I also like the automatic leveling here—Auto Level Mode (ALM)—evening the dynamics without compressing the guitars works well for an instrument already compressed by virtue of its tone (in the case of electric guitars, anyway).
Finally, the modulation and time-based effects are right there to marry themselves to the original sound, which I often prefer to do for guitars.

Pianos and keys: Nectar 3 and Neutron 2
For a well recorded acoustic piano, the less you do, the better. The best thing I can tell you is to fit pianos into the track as subtly as possible. Curtail any frequency blooms that get in the way of vocals or other important instruments, and reign in any dynamic issues. But do this as cleanly as possible, using Neutron 2’s Masking Meter if you need to, and keeping a single-band compressor in modern mode.
Of course, you might be working with a sampled piano—which is essentially a well-recorded piano. So the same applies. Don’t fall into the trap of applying processing just because it’s a clean track.
If you want to do esoteric piano effects, load up Nectar 3. Go to town with crazy filtered sounds; automate them as you would in this article; just make sure to do it in parallel, or on a parallel aux track.
For other keyboards, Neutron 2 with some Nectar 3 tweaking is probably the way to go, with the notable exception of the rhodes. This instrument often inhabits the same range as a clean acoustic guitar, and you can frequently treat it similarly, with broad EQ adjustments and saturation rather than excitement.
Synth leads: Nectar 3 and Neutron 2
Here I’d recommend starting with Nectar 3 first, for the clickable EQ bands, saturation possibilities, and effects. modulations, time-based augmentation, unison-doubling, and even the pitch section can be used to treat synths in interesting ways.
Start sculpting EQ, slap on broadband saturation, mess with the pitch, experiment with unison doubling and shape the EQ all in Nectar 3. Then, move to Neutron 2 for things like transient shaping, crispy excitement, and width.
Vocals...a toss-up
If you come to this blog—you already know we’ve got tons of great articles on vocals. From editing vocals before mixing, to crafting vocals that cut through the mix, to seeking out a professional sound, we’ve got you covered. Looking to work in a particular style? We covered lots of styles in articles like this.
All these articles use Nectar 3 and Neutron 2 to make their points, so they’re all useful primers for the topic at hand. But no article on achieving a pro-sounding mix would be complete without a word on vocals.
So if we had to choose between Nectar 3 and Neutron 2, you’d think I’d go with Nectar 3, right?
Not necessarily. Even though Nectar 3’s billed as a vocal channel strip, you shouldn’t count out Neutron 2. Remember that Neutron 2 has internal sidechain capabilities. Keep in mind that Neutron 2’s exciter sounds inherently different from Nectar 3’s saturator. You may prefer one assistant over the other (I happen to prefer Neutron 2’s, for example, but you may differ).
They are complementary: you can get broadband tape saturation from Nectar 3, and then really drive the point home by sidechaining a dynamic high-cut to a midrange boost in Neutron 2.
Who doesn’t like a wide doubled vocal? You can get that by harmonizing in Nectar 3 and widening further with Neutron 2.
In achieving a pro vocal sound with these two products, identify your intentions and chaining your modules in a beneficial order. Vocals have different intentions, and each necessitates a completely different chain. It’s about picturing the sound in your head, and using the tools to get there.
Conclusion
Know your tools as best as you can. Neutron 2 and Nectar 3 are both powerful tools with complementary feature sets, and between them, you can get pretty much anything done. And remember, no two mixes are exactly alike. Specifics will always vary. Practicing a mix with only two tools at your disposal can better teach you how to deal with those specifics, as you’ll learn the guts of each plug-in. So plug away, you’ll be glad you did.
