Vocal Editing 101: Your Guide to High Quality Vocals
Learn how to take your vocal mixes to the next level with our comprehensive guide on editing vocals. From vocal comping and level adjustments to pitch correction and de-essing, we'll show you the techniques you need to create professional-sounding vocals in your mix.
Vocal editing is one of the most important steps in the process of audio production, especially when dealing with vocal driven music. The vocalist in a song is often the protagonist, drawing the listener in. The vocal defines the melody, narrates the story, and hopefully evokes an emotional response. At least that is the goal, right? All of this begins with a singer, a great performance, and a quality recording, however, once this is accomplished, what do we do next? We edit!
In this article we will learn how to edit vocals by breaking down vocal editing into specific steps, all of which are important, and none of which should be overlooked. At first the task may seem daunting, but it does not need to be! And when done thoroughly and thoughtfully, the work pays off ten fold to get results like these:
Vocals Before & After Editing
Follow along with this article using iZotope


Nectar 3 Plus
What is vocal editing?
Vocal editing is the art of piecing together the best overall vocal performance from multiple recorded takes, fixing any technical problems like background noise, adjusting the timing of phrases, compensating for level discrepancies where necessary, removing silence, adding crossfades, and tuning. It is both a technical and a creative endeavor.
Depending on the quality of the original recording, some of these steps may need more attention than others, but regardless of how often and to what degree you need to employ any of these skills, having them at the ready is important as every project brings its own unique challenges.
Vocal editing steps:
1. Make a “composite” of the best takes
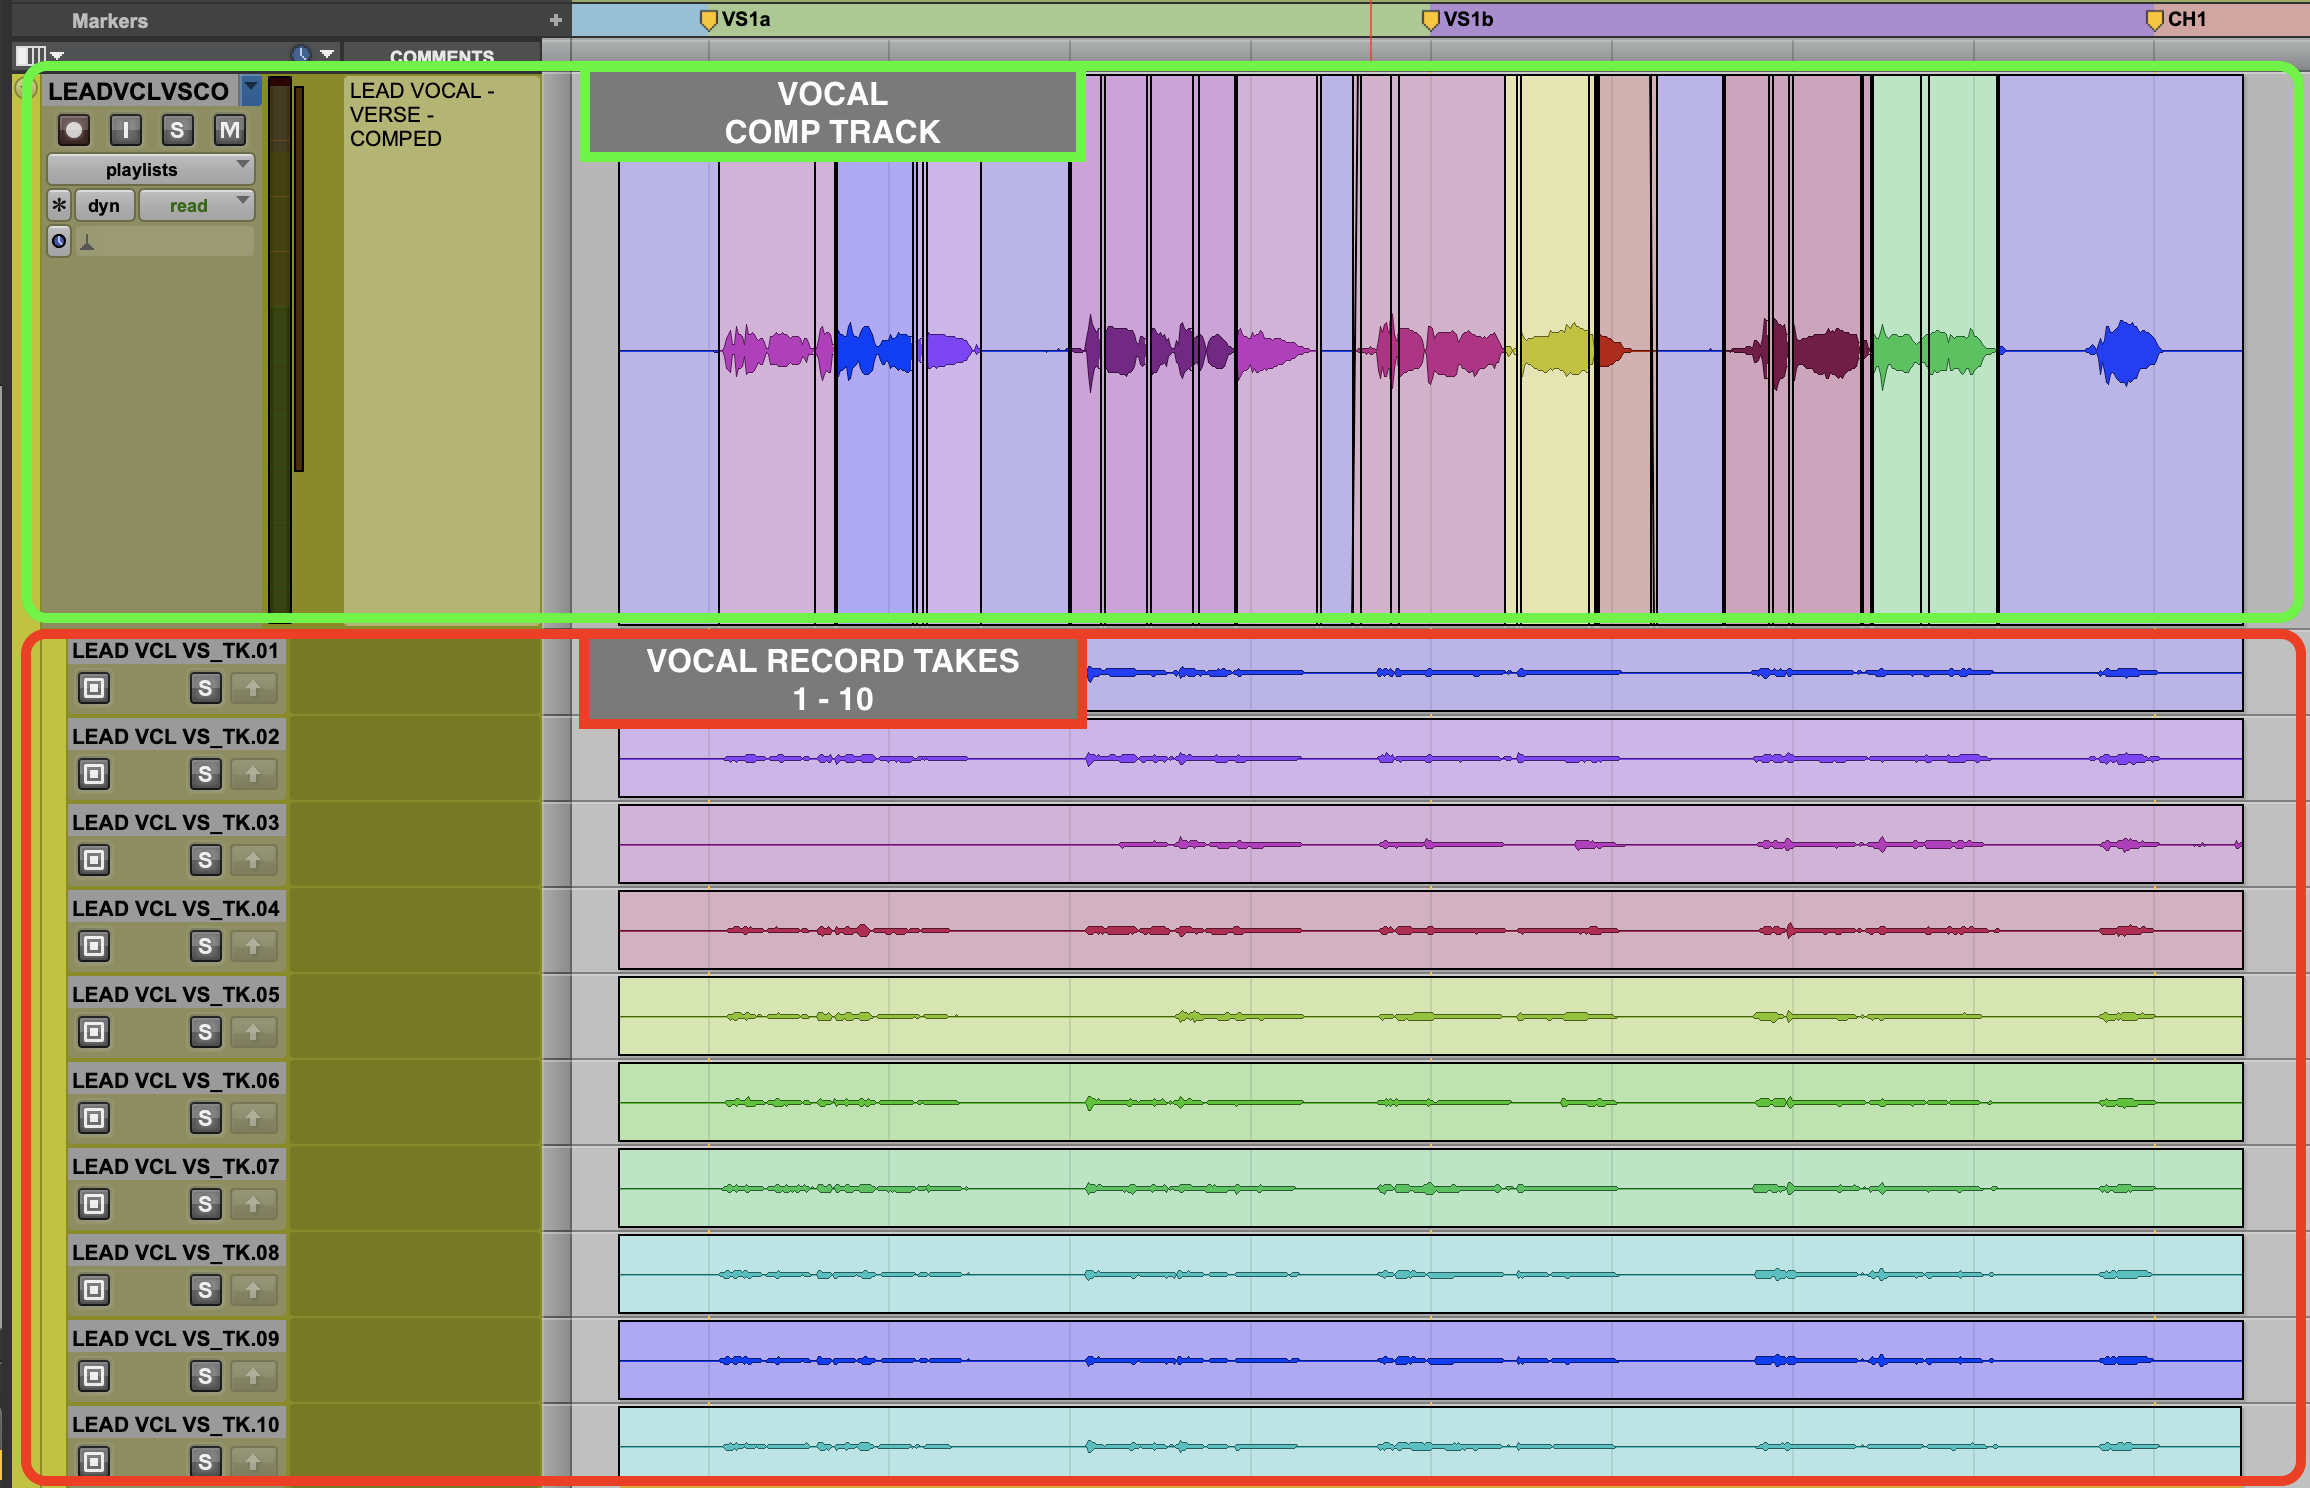
This is what we refer to as vocal comping. In this first step of editing vocals, we piece together a new performance using the best parts from each recorded take.
- Create a “Comp track.” This is the track where you will create your new performance or, “comp to.” How you do this will be specific to your DAW. In the example below we are using Pro Tools.
- Identify the best overall vocal take and place it on your “Comp Track.” This will now be the main take that you “edit to.”
- Identify any weak words or phrases in your chosen best take and replace them with better ones from other takes.
In many cases, the person making these decisions will be the producer or the artist. Often some words or phrases from different takes are not any better or worse, but instead offer a different character. This could be in the phrasing, the emotional intensity, or even just how the vocal cracks on a particular word, therefore, this part of the process is as much creative as it is technical.
Vocal comping
If you are involved during the recording process, keep a lyric sheet with you and make a note of the best phrases or words from each take, as you go. Find a rating system that works for you and stick to it. This will speed up the comping process later and also inform you of when you’ve recorded everything you need so you don’t miss anything, don’t waste time recording things you already have, and avoid overworking the vocalist.
If you are the one making the decisions about the vocal comp, always go for the take that has the most emotional impact and serves the overall creative objective of the production. Slight tuning and timing issues can often be fixed later, emotion cannot.
I would also suggest comping the vocal performance right away—on the same day if possible—while everything is still fresh in your mind.
2. Adjust gain on the vocals
After we have made a composite of our vocal, we will want to make any necessary level adjustments.
This step does not involve the channel fader/slider and is not related to volume automation. Here we are affecting the audio clip itself, before any plug-in processing, and before the volume fader/slider. The tool for this will be specific to the DAW that you use.
Adjusting the gain allows us to compensate for any dynamic differences that may exist between the different takes that we have comped together. It also lets us turn up any individual words or phrases that are a bit quiet and may be getting lost while also turning down any individual words or phrases that are too loud and therefore stick out in a distracting way.
In the following example we have a single phrase from a verse that has been comped together from three different takes.
As we listen to the audio example, note the following issues.
- One of the performances was significantly louder than the other two.
- The timing of the performance could be better.
- The phrasing between the combined takes does not work.
- There are a couple of pops and clicks in the audio.
- There are some pitch problems.

Vocals before gain adjustment
It is clear that this vocal performance is in rough shape and is in need of a fair amount of work. If re-recording it is not an option, then we will need to do some serious editing. Let’s get to work!

Vocals after gain adjustment
You will notice that by adjusting clip gain, we now have a more even performance. We were able to bring up individual words, like “lose,” and “I,” that were getting a bit lost, and also turn down the line, “find my way,” which was too loud and distracting.
It’s important to remember that a vocal performance is meant to be dynamic. The idea here is not to make every word the same level, but rather to address the extremes where a word is completely lost, a word is way too loud, or you are trying to splice together multiple takes that were recorded or performed at different levels.
Another thing to consider is that added intensity on a word will emphasize it. Be careful not to rob the relative level differences of words within a phrase as they were intended by the vocalist/artist. Removing the intended emphasis of a word by bringing down the level too much, or adding emphasis to another word by bringing the level up too much, can change the meaning or focus of a lyric.
3. Adjust timing and phrasing
From a technical standpoint, adjusting the timing of a vocal performance may be necessary when you have comped multiple performances together and they simply do not match up rhythmically.
From a creative standpoint, shifting a vocal phrase forward to be on top of the beat can evoke a sense of urgency, whereas shifting a vocal phrase back a bit, just behind the beat, can evoke a sense of relaxation, laziness, or sensuality. There is no right or wrong here, there is only what makes sense for the creative objective of the project.
Let’s listen again to our earlier example. This time, focus on where there might be some timing issues.
To my ears I notice two major issues.
- The overall performance feels a bit rushed. It is on top of the beat.
- Due to a comp of different takes, there is a gap between the words, “I’ll,” and “find,” at the last line, “I’ll find my way.”
Let’s fix these issues by shifting the performance back just a bit so it no longer feels rushed, and connecting the last phrase to make it cohesive.

Vocals with timing adjustments
Now the performance sounds more glued together and suits the timing of the song.
4. Clean up vocal clips and add fades
Cleaning up clips and creating fades is crucial and must not be neglected. It is a technical task that can be a bit tedious, but with a bit of practice it can be accomplished fairly quickly.
At this point we will want to perform the following steps:
- Remove any audio where the singer is not performing. This will take care of any background noise, breathing, coughing, water drinking, page turning, etc., that may be hiding between phrases or at the start and end of takes.
- Add fades-ins at the beginning of clips, fade-outs at the end of clips, and crossfades where two clips join together. This will take care of any undesired clicks and pops.
Let’s listen again to our earlier example. This time listen for any pops or clicks.
Let’s fix these issues by adding fades.

Adding crossfades to vocals
When adding crossfades, try to add crossfades in spaces between words. If you need to, you can also crossfade across s’s and f’s. And If there is too much space between two words, a crossfade may not be possible. Instead, delete the extra space between the two clips, add a fade-out at the end of the preceding clip, and a fade-in at the start of the following clip.
If you feel like you need too many fades to remedy issues like clicks and pops, even mouth sounds and lip smacking—this can be done with iZotope RX.
5. Consolidate your vocals
Now that we have our vocal comped, gain adjusted, time adjusted, and we have added our fades, we can consolidate. Consolidating is the process of committing our composite of multiple takes and all of our editing work into a single audio file.
Consolidating vocals is important for the following reasons:
- It frees up computer processing power since our DAW is now playing back a single audio file instead of the multiple audio files that made up our original composite.
- When consolidated to the beginning of a session It allows for easier transfer of files between different DAW’s.
- It eliminates the chance to accidentally change any of our edits that we spent so much time perfecting.
- It makes an otherwise dense, possibly messy looking session cleaner, easier to look at, and more pleasurable to mix.

Vocals before consolidating

Vocals after consolidating
Before you consolidate your edited vocal comp, make a duplicate copy. This way you can easily go back to the original edited version and make any adjustments that you may have missed or deem necessary later on.
6. Pitch correct your vocals
Even a great singer can hit a sour note from time to time, and as we mentioned earlier, capturing the best performance with the greatest emotional impact will always be more important than perfect pitch, within reason of course.
This is where pitch correction comes into play, and we have tools at our disposal to help us with this. There are many plug-ins available to accomplish this task, however, whichever one we choose is not as important as how well we are able to use it.
If you are new to tuning, iZotope Nectar is a very intuitive vocal mixing plug-in with pitch correction that is extremely effective and a great place to start.

Nectar Pitch Correction module
Let’s listen again to our earlier example. This time focus on any tuning issues. Then let's listen again after we have applied pitch correction.
Vocals Before & After Pitch Correction
7. De-ess your vocals
In a vocal recording, it is common for sibilant consonants like s’s and t’s to be overly present. Even if they are not distracting at first, once compression and reverb are added, they often become overtly audible and unpleasant. This is where de-essing can come in handy.
Although de-essing is typically addressed at the mix phase, it is worth mentioning here as there are two ways to approach this.
- Manually using clip-gain. This option is extremely precise and gives you total control over how much you bring down the level of each individual sibilant consonant. It is time consuming, but yields excellent results.
- Automatically with a de-esser plug-in. This option is common and widely used. It is fast and effective. It may not be as precise as de-essing manually, but if you take the time to dial in the perfect settings it can work great!
There are many de-esser plugins to choose from, but again, this is where Nectar comes in handy. It is intuitive, easy to use, and sounds great!

Nectar De-esser module
Let’s listen again to our audio example without de-essing, then let's listen after applying Nectar's De-esser module.
Vocals Before & After De-essing
When de-essing, the frequency of sibilant consonants is typically found somewhere between 5 kHz and 10 kHz. Be careful not to excessively de-ess a vocal or it will sound strange, very unnatural, and the meaning of words can be lost.
And if you choose to de-ess a vocal manually, do not forget to add crossfades. Even though you are not splicing different takes together, the crossover point of a gain-reduced clip can still create a click or a pop.
Finished, edited vocal
Let’s compare what we started with to the final result, at a proper level in relation to the mix, and with a bit of reverb. Here’s the before and after:
Vocals Before & After Editing
What a difference vocal editing makes! Our vocal track now has the best takes that have been comped, consolidated, pitch corrected, and de-essed to fit cohesively in the mix, bringing out the best possible performance from the vocalist.
Before you start editing your own vocals, I leave you with a few last parting thoughts:
- Edit your vocals without listening to any additional effects like delay or reverb for an accurate representation of your work in progress.
- Whenever possible, complete all editing and pitch correction of the lead vocal BEFORE moving on to background vocals. In order to record vocal stacks of doubles, triples, and harmonies, the phrasing of the lead vocal and its pitch center must be established first.
Start editing your vocals
As I hope you now realize, vocal editing is both a technical and a creative process. It has many steps and can take a fair amount of time depending on the specific vocal you are tasked to work with. Even so, it is a necessary step and cannot be avoided. With practice it will become easier and you will learn to work faster and more effectively. Even the most gifted singer and a perfect take will only get your 95% of the way there. The last 5% is in the details and you have to work for it!
And if you haven’t already, demo iZotope Nectar for free to use powerful de-essing and pitch correction tools on your vocals.
