Meet the iZotope Assistants
Many iZotope plug-ins come with Assistant features that analyze audio and set you on the right path. In this article, we cover which is right for which job.
Many iZotope plug-ins come stocked with Assistants—machine learning tech that analyzes your audio and sets you on your way, loading up customized settings geared toward your particular tracks. In this article, we'll to cover which assistants are right for which jobs, and how to use each of them in your mix.
This article features older versions of iZotope Assistants. For the latest product versions of our AI-powered Assistants, check out our product page.
Neutron's Mix Assistant


Neutron
All three editions of Neutron give you assistive tech in Track Enhance, which generate bespoke processing chains for your individual instruments one by one—but Advanced and Pro offer a useful, extra arrow in your assistive quiver: the Balance option, which can generate a great static mix for your project.
Both of these are powerful tools for mixing, especially if you’re a beginner. Even if you’re a professional, these assistants can come in handy; they’ve helped me out of binds many times in the face of deadlines.
Let’s start with Track Enhance. Based on some initial guidance from you, this guy listens to a particular track in your mix and handles the grunt work of cleaning up resonances and smoothing out dynamic inconsistencies. To launch Track Enhance, you click the little “Mix Assistant” button in the Neutron GUI, and you’re presented with these options:
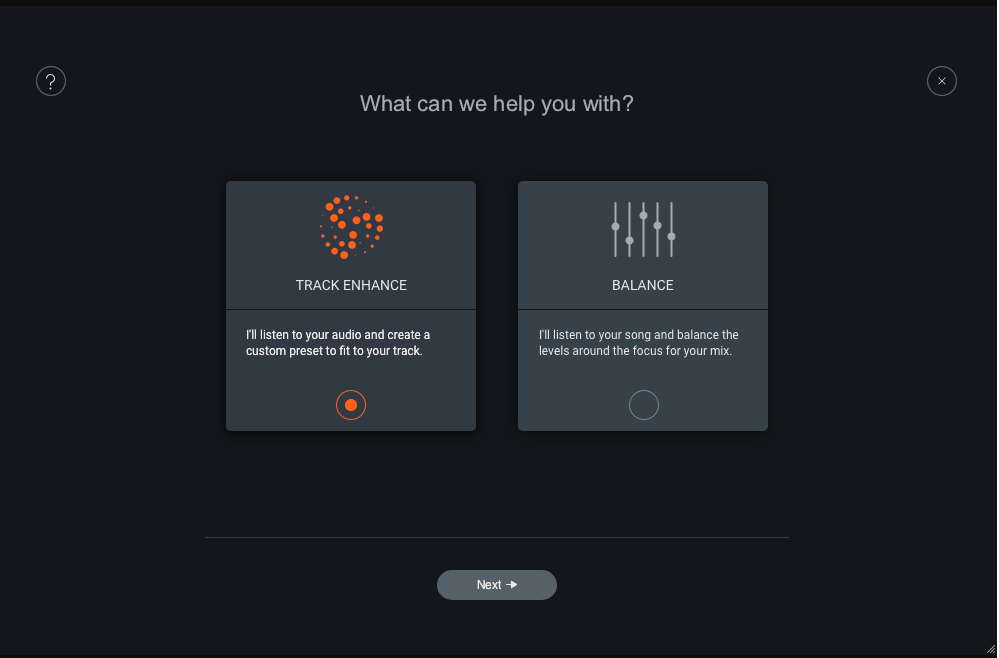
Neutron's Mix Assistant, Track Enhance and Balance options
From here, you click Track Enhance (this will be your only option if you have Neutron Standard). You’re then presented with this screen:
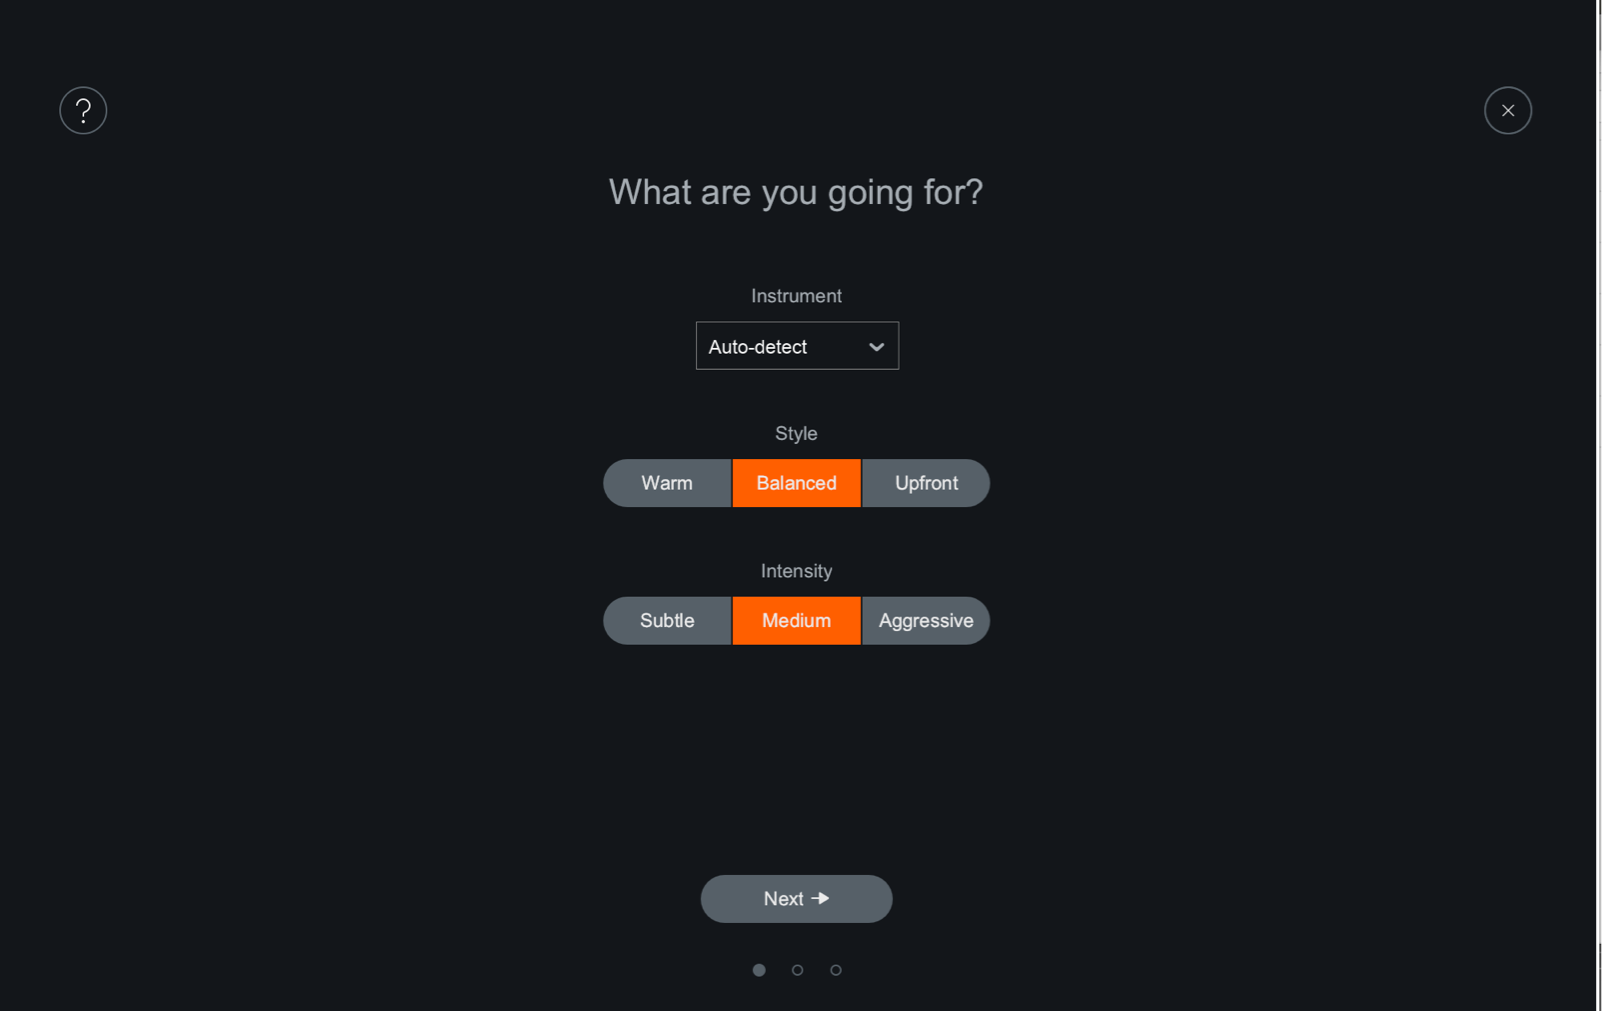
Track Enhance, initial guidance
It’s pretty self explanatory: Neutron can auto-detect the instrument at play here (though you can select it yourself), and based on the adjectives you select, it will generate a custom setting for you.
Frequently, Track Enhance will provide an equalization stage that corrects resonant issues, or ameliorates harsher moments with dynamic choices. It will often offer compression settings that tame dynamic range issues.
These are generally pretty effective settings. If you’re just getting into mixing, you can actually study them to see why they’re working—in this way, the assistant is a learning tool. While it runs, you can actually see a list of all the things the Assistant is doing to your audio.
Track Enhance will make other choices as well. It may add saturation via the Exciter module, or tweak tone with the Sculptor module, or apply heaps of color with additive EQ. Think of these as suggestions and inspirations: don’t feel like you need to stay wedded to them. Instead, know that they are possible.
Of course, Track Enhance can only really examine one track at a time. It has no idea what the other tracks are doing—and mixing is all about building a balance. This is where the Balance option in Neutron Advanced and Neutron Pro comes in handy.
Essentially, Balance builds static mix for you, one that keeps the track relationships stable, preserving headroom all the while. Think of it as a rough level mix that gives you a balanced starting point for all the fine-tuning that you’re going to do.
The order of operations is important in setting up Mix Assistant’s Balance mode:
Load Relay (included with Neutron) as the first insert on every track in your DAW. Then, put Neutron on the stereo bus. Click the Mix Assistant button, and then the Balance option, and you’ll see a list of the tracks in your session with instances of Relay/Neutron/Nectar on them, like so.
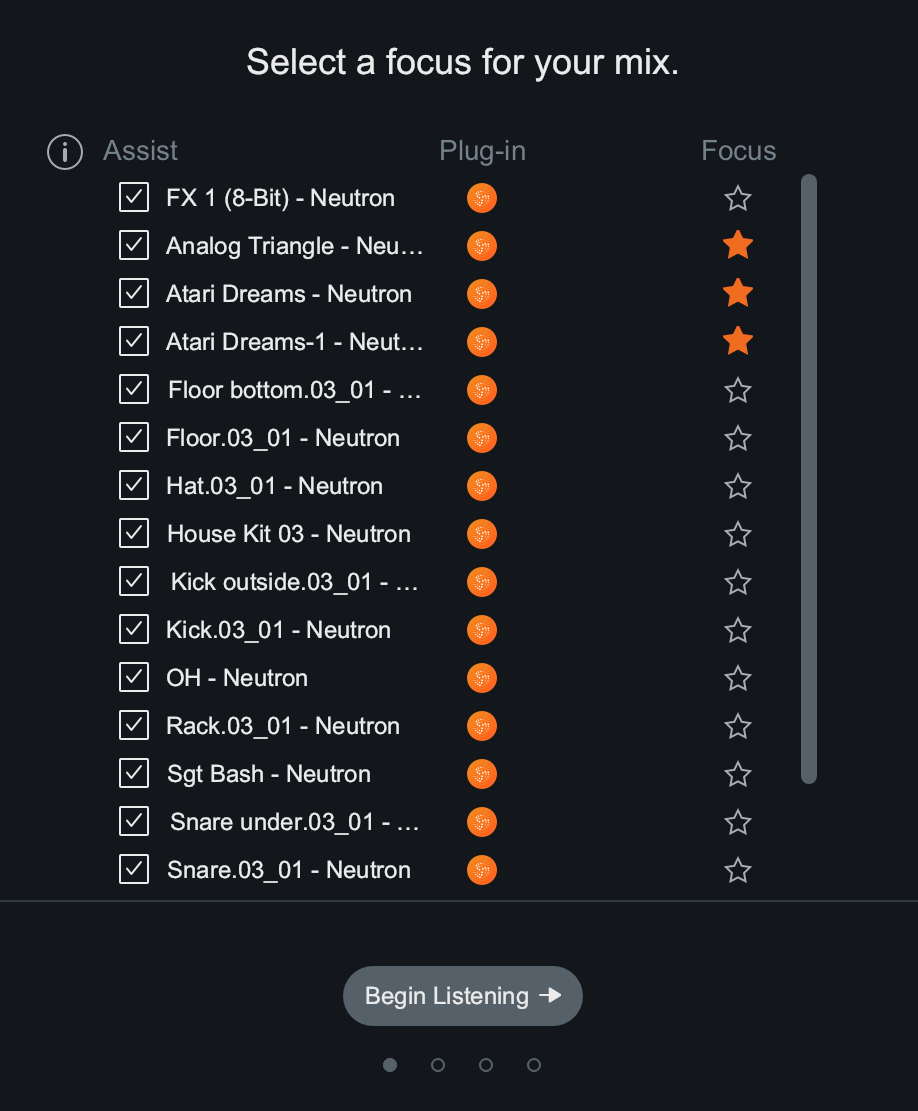
Balance, Focus list
The stars under the Focus column are your “focus” tracks, which Neutron will read as extra important and place further forward in the mix. You can choose multiple foci, but if everything is the “focus,” nothing is, so save these for your vocals or instrumental melodies.
Hit “Begin Listening,” and Neutron will analyze your mix from beginning to end. Go grab yourself a minute coffee, or take a sec to stretch, as Mix Assistant needs to hear the full track in real-time.
When it’s finished, you’ll have the option to adjust elements broadly, by category:
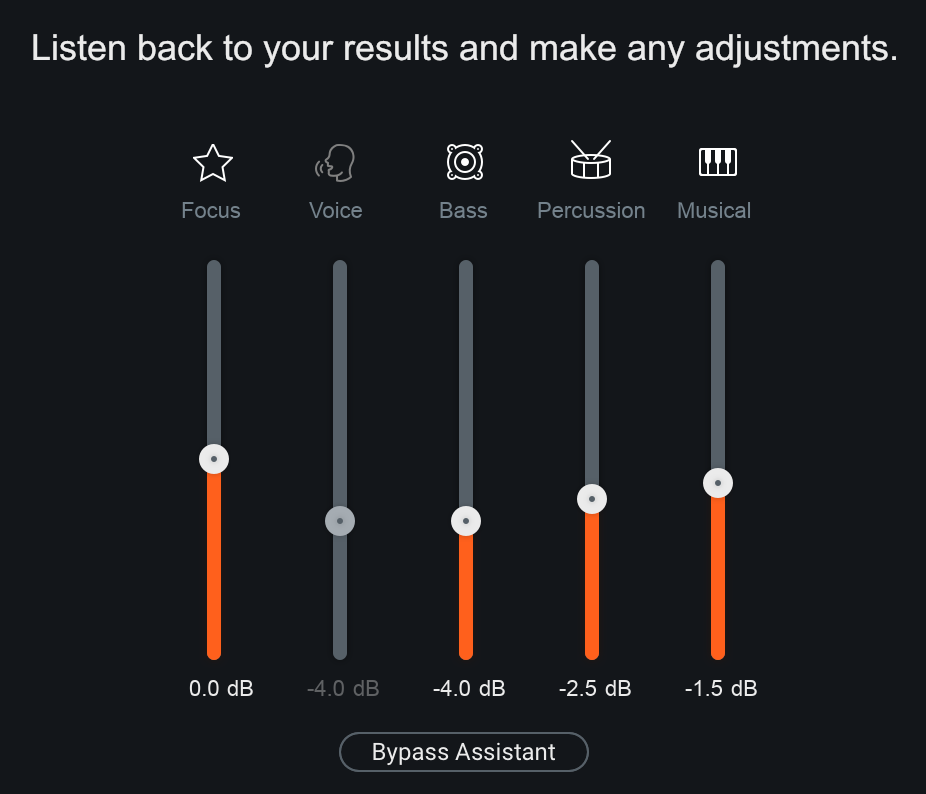
Balance, group sliders
Note that if you have Neutron Advanced or Neutron Pro, we recommend you begin with Balance to sort out your track levels, and then use Track Enhance on a per-track basis from there.
When Mix Assistant is finished, and you’ve accepted its changes, all the faders in your actual DAW mixer will remain at unity (0 dB), but the gain parameters in those instances of Relay/Neutron/Nectar will change to reflect the balance Mix Assistant sought.
Assuming you didn’t have super loud stems and that you didn’t boost a bunch via the adjustments view in the screenshot above, your mix will still be quiet enough to provide you plenty of headroom, and tons of resolution on your faders: You won’t have to labor along with every track at -12 and a smaller degree of resolution on the fader itself. You can work at a sensible fader level in your DAW.
Note: You can also run Mix Assistant Balance from Visual Mixer, which is also included with Neutron Advanced and Neutron Pro. In this instance, you’d place Visual Mixer on the stereo bus, which also allows you to utilize the Visual Mixer environment for mixing if you so choose.
Nectar's Vocal Assistant
Neutron can help to get your mix started, generating ideas all the while. It can even do wonders for vocals, but iZotope has a special tool that goes beyond Neutron’s channel strip duties and applies effects often reserved for the voice—things such as reverb, delay, modulation, and de-essing.
Yes, for your vocals,


Nectar 3 Plus
Like Neutron’s assistant, the Nectar variant starts with a window asking you what you want to accomplish:
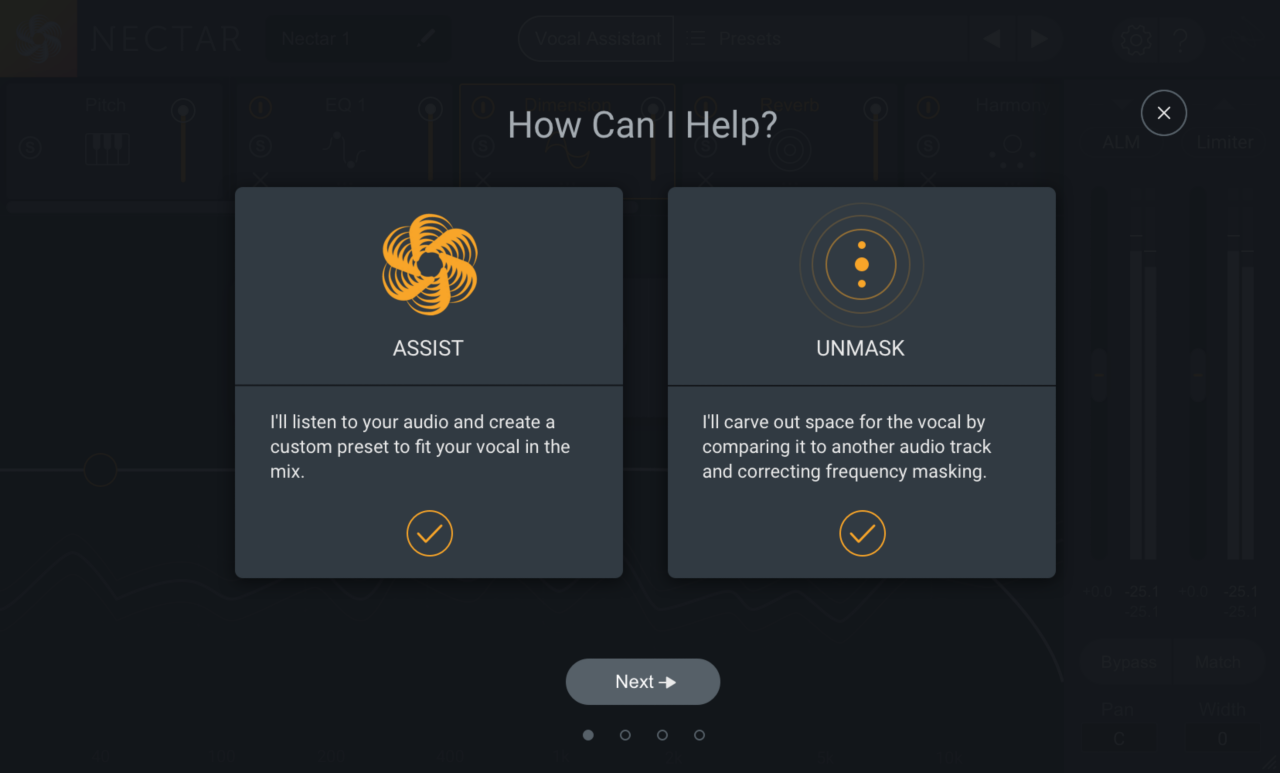
Nectar's Vocal Assistant, Assist and Unmask options
You can think of Assist as the Nectar version of Neutron’s Track Enhance, since it creates a custom processing chain for your individual vocal. The Unmask option, like Mix Assistant Balance, relies on Inter-plugin Communication to function, which we’ll touch on shortly.
For now, let’s choose Assist. From here, Nectar will ask you a few more questions:
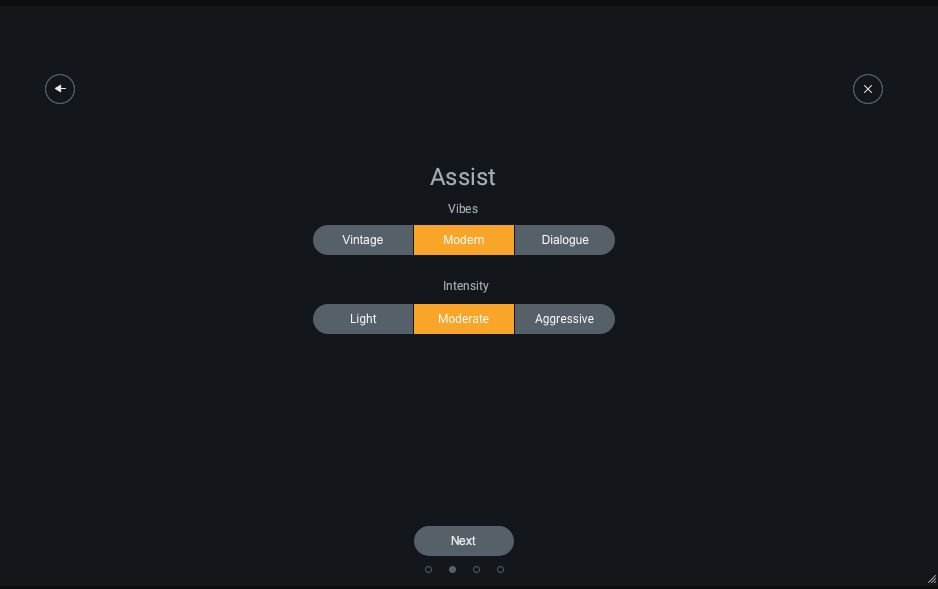
Assist initial guidance
Again, you’ll be asked to play audio so Vocal Assistant can analyze your audio. And as always, you end up with a processing chain tailored to your specific track.
In my experience, Vocal Assistant shines in two ways: it applies processing to achieve an optimal level for your vocals at all times, preserving intelligibility of phrasing; it also suggests creative EQ ideas to inspire you to move directions you hadn’t previously considered.
For beginners, the Unmask option is also particularly useful. It uses iZotope’s Inter-plugin Communication to speak to other tracks in your mix, so long as they have Relay, Neutron, or Nectar instantiated. Unmask will tell those other tracks to get out of the way and let the vocals shine through, by attenuating key vocal frequencies on those other tracks.
Unmask aims to do this with a subtle hand—it can even apply a Dynamic setting to make sure unmasking only occurs when the vocals are happening, leaving tracks alone when no one is singing.
Nectar Pro features
Vocal Assistant now can do even more in Nectar Pro, with real-time interaction and more creative control for a smoother workflow and more personalized results.
- Use the new Intensity slider to control the strength of Vocal Assistant's processing.
- Set the Tone of your audio for specific vocal sounds with new “Tone Cards,” giving you nearly unlimited combinations of different vocal sounds to play with.
- Vocal Assistant can now operate in real-time, and remembers your audio—no need to re-run the assistant to find the sound you want.
- New audio detection for setting the right effects for sung, rapped, and spoken vocals.
- Improved processing and EQ decisions to match your creative input.
Learn more here.
Neoverb's Reverb Assistant
At a certain point in the mix, you want to start to dial in reverb—and iZotope offers a hell of a tool for that in


Neoverb
This part might sound familiar: Reverb Assistant listens to your audio and comes up with a unique preset, including pre- and post-reverb EQ curves for the track.
When you first use Reverb Assistant, you get a simple screen with simple directions. There’s a prominent Size parameter, which anyone who’s ever put on pants could understand, and a Dry/Wet standard on many plug-ins. Also, you’re offered a Style slider and Tone options, which dictate how lively the resulting reflections will be.
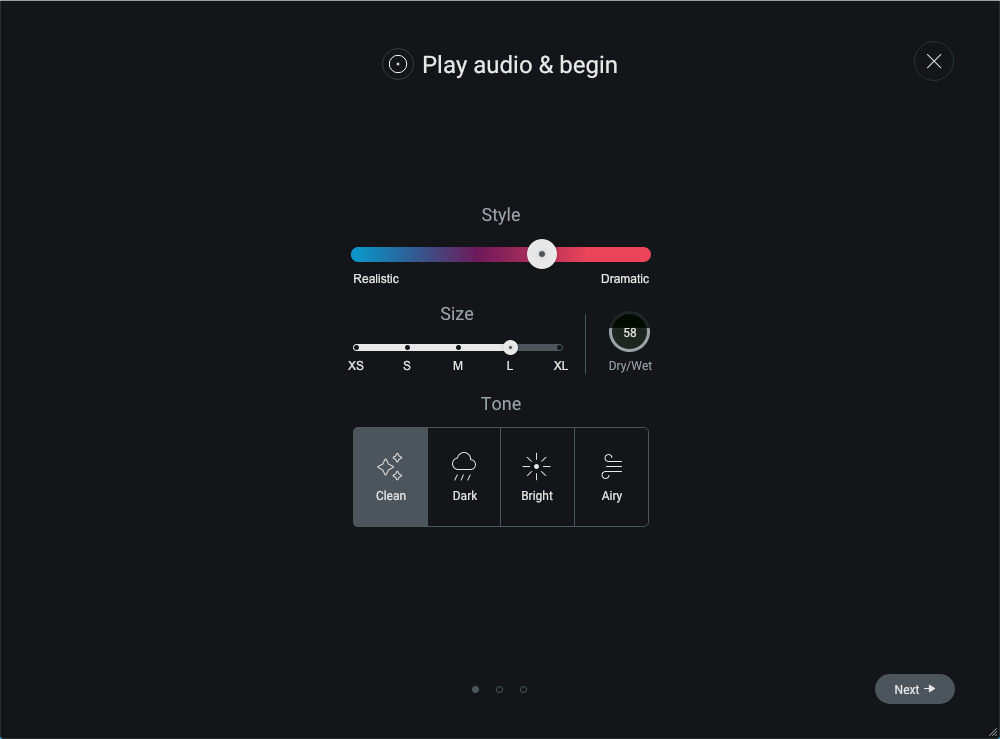
Reverb Assistant initial guidance
You play your track through the Reverb Assistant, and as it analyzes the input signal, it provides a little insight into what it’s doing:
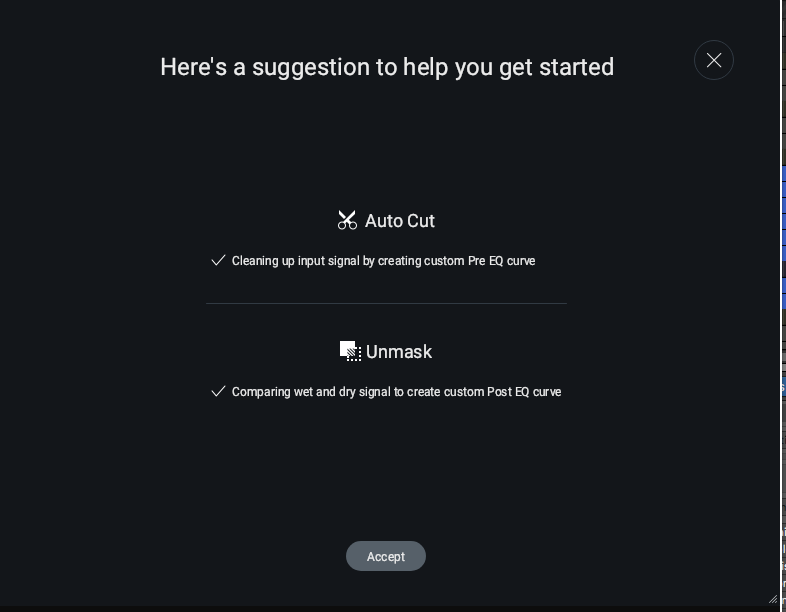
Reverb Assistant running
And, when it’s all finished you’re presented with a personalized starting point for your reverb.
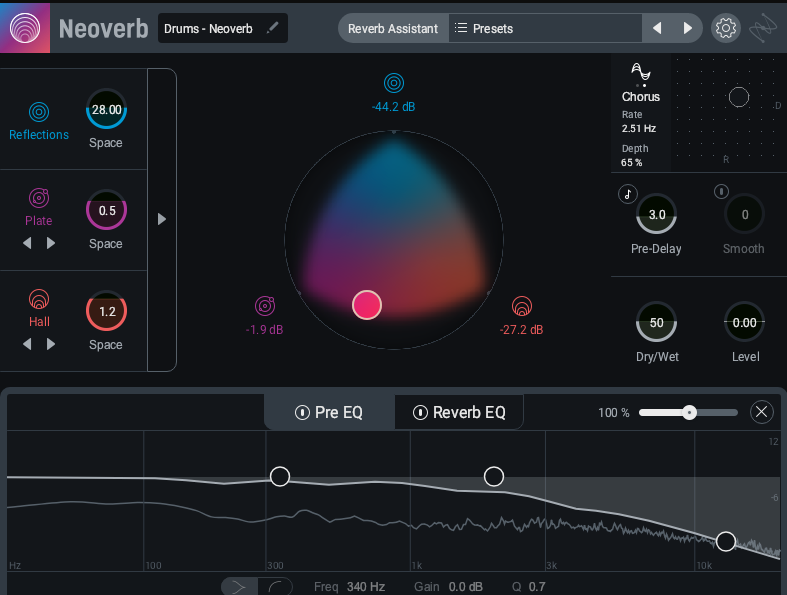
Reverb Assistant results
Tweaking from here is simple, thanks to the way Neoverb is laid out, with its three-way blending pad, obviously labelled EQs, and more.
RX's Repair Assistant
iZotope first introduced Repair Assistant in RX 7, giving their flagship for audio repair a means to help you figure out which processing to use when repairing “bad” audio. Much like the other assistants, this one provides a sequential workflow for easy processing—though it does offer a helpful twist:
First you select the audio you want to repair in the


RX 11 Advanced
However, rather than give you one solution to all your noisy woes, RX’s assistant provides three possible solutions to the problems at hand, each using a combination of RX’s numerous tools and features. The solutions are progressively more heavy-handed, from a light to touch to a real down-and-dirty treatment of noisy audio.
In effect, having the RX assistant on hand is like having three separate mixing assistants at your beck and call, each one contributing their own idea.
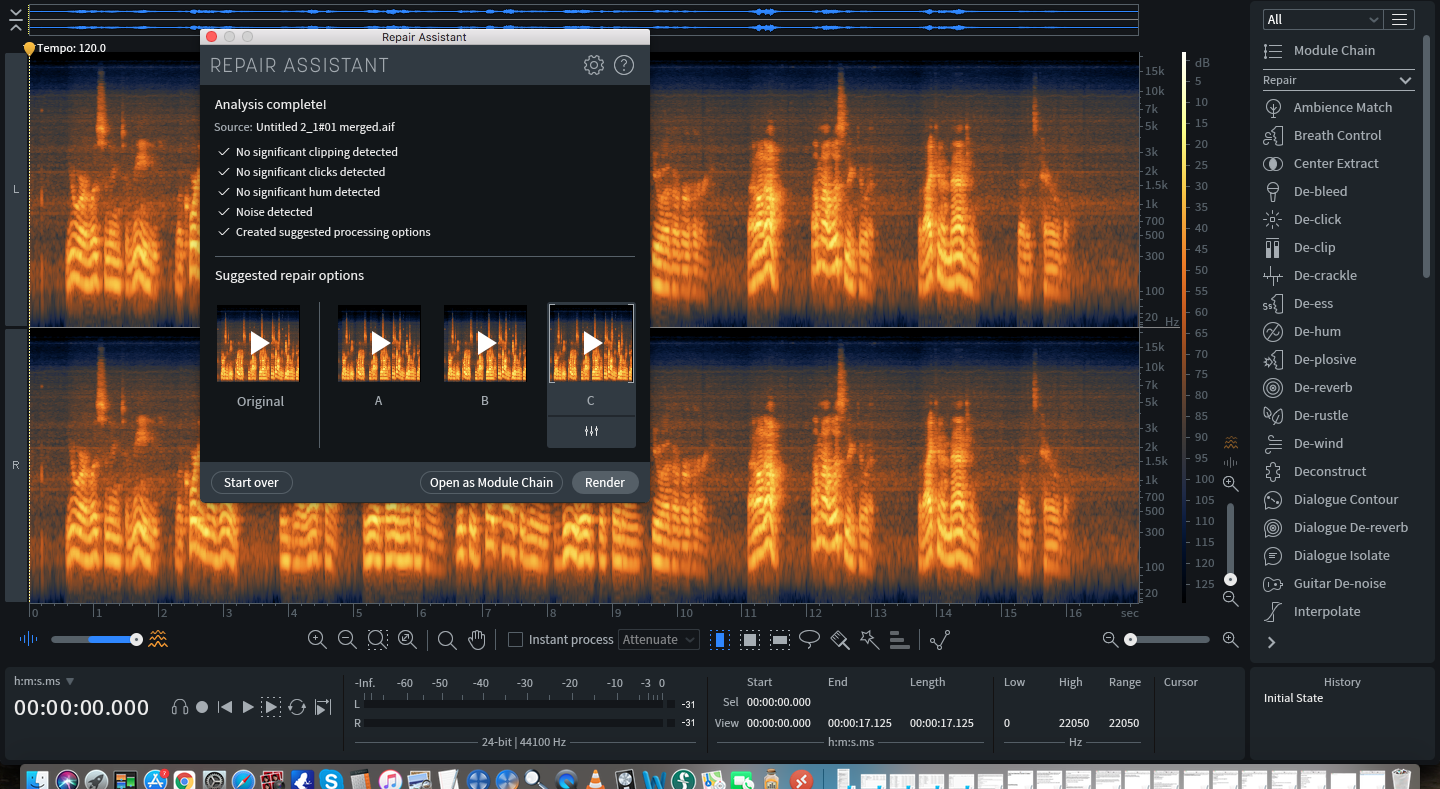
RX Repair Assistant options
Let’s say you’ve got a really noisy, badly-recorded line of a podcast to treat. You may have your intuitions of where to begin in rescuing this audio, but you may also have a deadline nipping at your heels. Time becomes an issue: you can only move in one direction at once—pursue one idea at a time—and if that idea is wrong, you don’t get that time back to make it right.
Repair Assistant gives you a window into the results that three different ways of handling the audio would give you, giving you a plan of attack to tweak.
For example, in the screenshots below, you can see in the Module Chain windows that option A uses Dialogue Isolate and B uses Voice De-Noise and Gain.
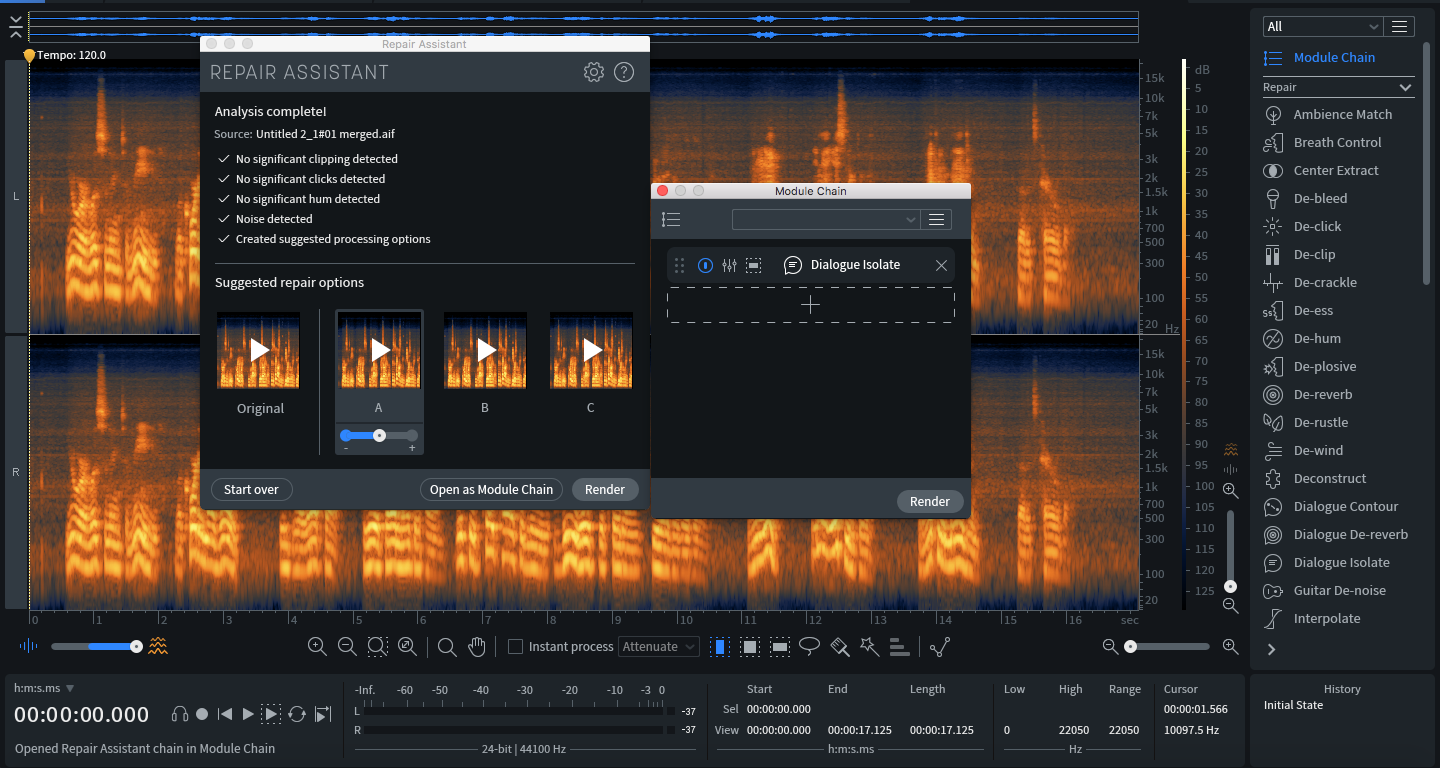
Option A
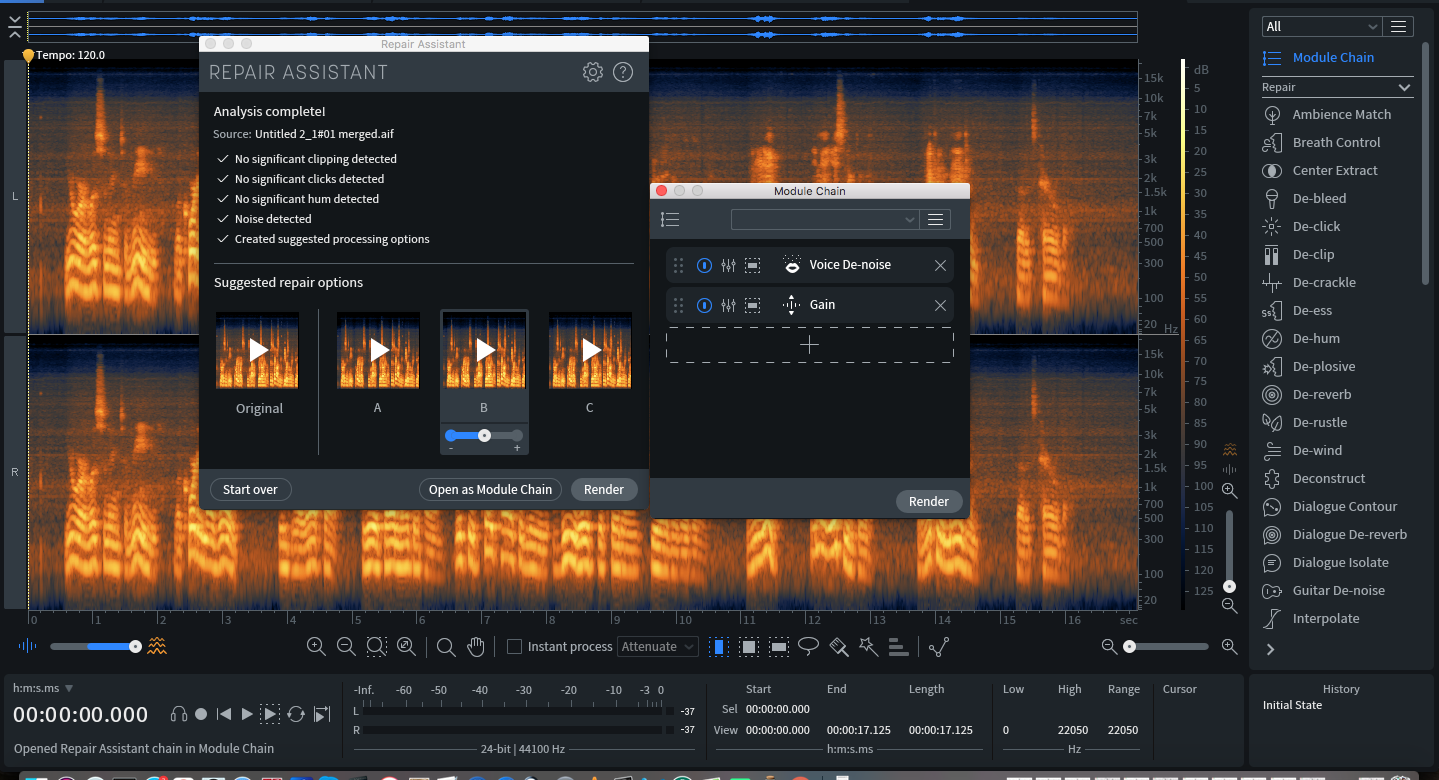
Option B
I find this invaluable. Repair Assistant has shown me multiple approaches before I even touch a module. I can audition which one sounds the best, use the adjustable intensity sliders to dial in the perfect amount of processing, and analyze the chains of modules the Assistant chose to use. I can tweak each one, and further tailor the processing to my specific needs.
It isn’t a matter of letting RX do the repair work for me; I’m still very much hands-on. It’s two other helpful additions to my process that make Repair Assistant invaluable: the saving of time, and the corroborative process between me and the plug-in, one that approximates having another pair of ears in the room.
Ozone's Master Assistant
When you want to see how your mix might play out in the real world, you can use the


Ozone Advanced
The goal of the Modern mode is simple: to take your mix to something like the final product, doing so as subtly as possible.
At the outset, it will ask you what you’re going for:
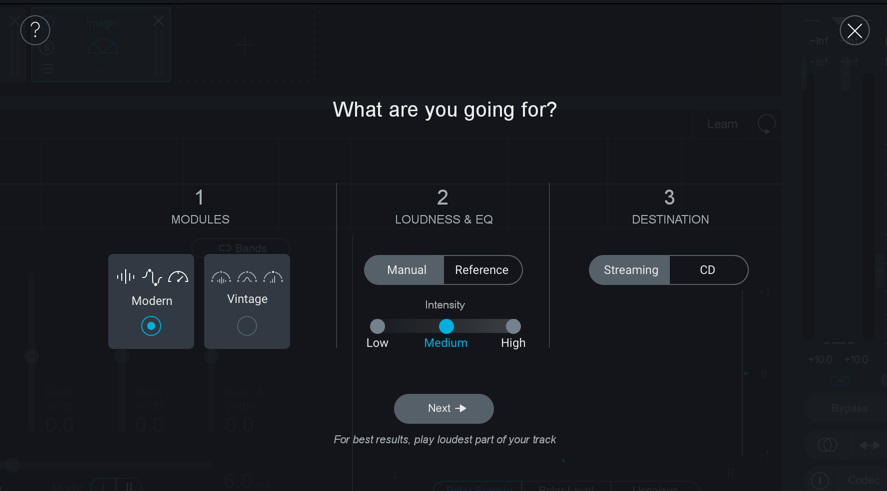
Ozone's Master Assistant, initial guidance
You’ll be able to select the intensity of processing and dictate the final level (for streaming or CD, respectively). If you wish, you can import a reference track, and Ozone will train its sights on the file, trying to make your mix stack up pound-for-pound against the reference in terms of EQ and loudness.
You’ll note that Modern mode won’t do anything especially crazy to your mix: the EQ will trend toward broad shelves for little lifts here and there; compression will wind up bypassed most of the time—and for the mixes where it isn’t bypassed, you’ll find it mostly applied in multiband, controlling the lows.
It really tries to stay invisible. For more of a heavy-handed, flavorful touch, there’s Vintage mode.
If you choose to use Vintage Mode, Ozone will make use of its Vintage modules to process your audio, which will add some coloration. Your mix will forego the multiband compressor for the vintage one. It will receive a lift from the Vintage EQ, and some density from the Vintage Limiter, which has its own characteristic sound.
Imagine it this way: with Master Assistant at your command, you have two different mastering engineers at your beck and call. One you can count on to be more invisible, the other will add a distinct personality. And, you can endlessly compare these engineers against each other, without hurting their feelings, as they are both machines.
Maybe someday you’ll hurt their feelings, but at that point, you’ll have a lot more to worry about than mastering… I kid, but it brings us to a topic worth exploring:
Ozone Pro features
Master Assistant is now even smarter in


Ozone 11 Advanced
The takeaways
At first thought, it may seem like an affront to both God and music production to have such powerful tools at your disposal, but a closer examination debunks that intuition:
None of these tools will actually finish the task for you. Each Assistant is simply a tool for a producer or engineer to streamline their work, not a replacement for that producer or engineer. For example, Master Assistant is not going to be able to check for errors in the mix that can only be detected by ear, nor will it properly sequence your EP or add metadata, or export the files to all the formats you need for the various options out there. And it certainly can’t operate a lathe to cut vinyl, as it has no arms and legs.
You could take your headphones off, slam on Master Assistant, and upload the result to a streaming service, but then you wouldn’t have that extra set of ears on quality control. These tools are just designed to take some of the tedious work off your plate so you can stay focused on the subtle creative tweaks that only you know to make.