Master Faster: Tips Learned from 5 Years Using Ozone
Learn tips on how to streamline your audio mastering workflow with Ozone, plus download free presets to get started.
Whether you’re using the standalone version, the plug-in mothership, or individual components,


Ozone Advanced
Maybe you’re trying to get a quick master ready for that gig or live stream in 30 minutes, or perhaps a friend or client has asked if you can help them get their song ready for release the next day. In either case, time is of the essence. That’s where these tips come in, helping you streamline and speed up your mastering workflow in Ozone.
Before we start: free presets for you!
I’ve included a few of my personal Ozone presets for download at the bottom of article. To load these presets in Ozone, follow these steps:
- Ensure you've updated to the current version of Ozone through Product Portal, otherwise presets may not load correctly.
- Download the compressed .zip file and unzip it.
- Once the preset file has been unzipped, drag it to the following directory on your computer. This article includes an EQ module preset and two Maximizer module presets, so use the “EQ Presets” and “Maximizer Presets” folders.
For Mac:
Macintosh HD/Users/<username>/Documents/iZotope/Ozone/Presets/[Module] Presets
For Windows:
C:\Users\<username>\Documents\iZotope\Ozone\Presets\[Module] Presets
- Launch a session in your DAW of choice, add Ozone to your master channel.
- In the Preset Browser, navigate to the folder with the preset name you downloaded and select it.
Work smarter, not harder
I’m sure you’ve heard this saying before, but it’s as true in mastering as it is anywhere else. If there are certain things you find yourself doing every time you open Ozone, or every time you open one of its modules, create a preset that captures the changes you always make. In fact, you may even want to go a step further and save it as the default preset.
You can do this by opening the preset manager, right-clicking on “<Default>,” and selecting “Save current state as <Default>.” Now, every time you open Ozone, or a specific module, it will load your preferred starting point so you can get right to work with it. Do note that if you want to save a default for just an individual module, you’ll need to do that in the preset manager for that component plug-in, while default presets for the standalone app or mothership plug-in apply to the whole chain.
These are a few of my favorite things
Let’s take a look at a few of my personal defaults and how they fit into my workflow. First up is my Equalizer default, which you can download at the bottom of this article.

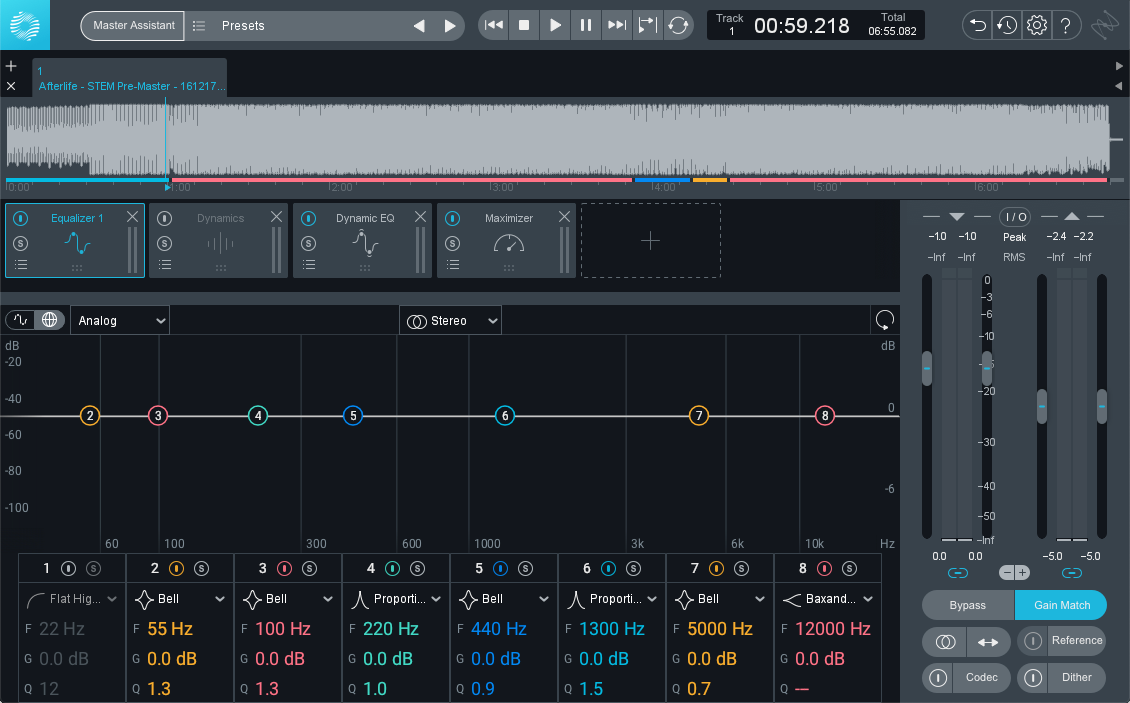
Ian’s Starter EQ default preset
If you’re thinking, “Wait a minute, that looks ruler-flat!” you’re absolutely right. That’s because I never know what sort of EQ a song will need without first listening to it. However, I do know that I’ll often end up wanting to make some adjustments around at least a few key frequencies, and that’s exactly what I’ve populated in this preset for you. Here’s a quick cheat sheet on what the different frequencies tend to be good for.
- HPF: I’ve left this off by default as, more often than not, a high-pass filter can be too aggressive. When I need it though, it often ends up at 12dB/octave, somewhere between 18 and 35 Hz. Use with caution.
- 55 Hz: Boost to add some real weight to a kick drum, cut to reduce rumble.
- 100 Hz: Boost to add some chesty thump to kicks or weight to bass harmonics, cut to reduce crowding in the low end.
- 220 Hz: Boost for a little added warmth, cut reduce “hootiness.”
- 440 Hz: Boost if things are feeling scooped or hollow, cut to reduce boxiness.
- 1.3k Hz: Boost to enhance snare drum “knock” or vocal forwardness, cut to reduce a nasal or “pinched” quality.
- 5k Hz: Boost for presence or brightness, cut to reduce harshness.
- 12k Hz: Boost for air and shimmer, cut to tame an overly bright or fatiguing top-end.
Two more presets I use all the time are for the Maximizer. I often use more than one limiter, but 19 times out of 20, one of the two following Maximizer presets is in the final slot or two. Again, you can download my presets at the bottom of this article.
“Maximizer Starter” is my go-to to shave a few final dB off a master. I’ll often subtly tweak the Character and Transient Emphasis Amount parameters, but I’ve found that it works great as a jumping-off point.
“Maximizer Low Latency TP Protection” is my go-to for final True Peak level control, when needed. I like separating the thresholds for sample peak and True Peak limiting, and this preset allows you to just dial down the threshold to use only as much True Peak limiting as you want or need. It’s designed to go after a preset like “Maximizer Starter” which has a lower threshold and ceiling.
I also have to give a shout-out to the Low End Focus module. It’s so quick and easy to use that I actually don’t have a default preset for it. While you could potentially achieve similar results with EQ and low-frequency compression, it would take a lot of tweaking, even for an experienced engineer. Low End Focus puts all this in just a few controls, and gives you a better result in the end. My usual workflow is:
- Solo the input signal to set the low and high cutoff frequencies.
- For transients, use Punchy mode with positive values to accentuate, or negative values to tame, and adjust gain to taste.
- For sustained elements, use Smooth mode in a similar fashion.
Put that assistant to work!
While we can’t all afford to hire a studio assistant, with


Ozone Advanced
If you’re more seasoned at mastering, it can be easy to write Master Assistant off—but you really shouldn’t! Even if you want to take EQ, compression, and limiting into your own hands, the way it sets up Dynamic EQ should not be overlooked. Even if I intend to set parameters myself, I will often run Master Assistant, save the Dynamic EQ settings as a temporary preset, and then load them as a standalone module before my limiting chain. Once that’s done I can go ahead and remove the full mothership plug-in.
Keep yourself honest
With all these ways to master faster, the last thing you want to do is fool yourself or let mistakes slip through. Ozone has two tools that are great for helping prevent these types of mistakes.
First, the Track Referencing panel is a great way to compare some of your favorite tracks to the song(s) you’re currently working on. These could be previous masters you’ve done that you know you’re really happy with, or they could be commercially released tracks in the same genre as the song(s) you’re working on. Either way, it’s a great idea to develop a folder of reference tracks that you can quickly and easily load into Ozone when needed.
Second, the automatic Gain Match feature is a great way to make sure that you’re not falling prey to the old “louder is better” phenomenon. Just click that Gain Match button, and then when you click Bypass, Ozone will automatically offset the gain difference so that you can focus on only what your processing is doing. When you’re done and satisfied that you’re making meaningful improvements, just don’t forget to turn Gain Match back off.
The takeaways
Working quickly has some real benefits besides just the time savings. It’s a great way to stay objective and prevent ear fatigue or habituation. By implementing the strategies we’ve laid out in this piece, you can set yourself up for faster, more effective mastering sessions, so let’s quickly recap.
First, figure out where you can save time. Anything you find yourself doing repeatedly can—and should—be turned into a preset and potentially your default. Second, find a way to make Master Assistant work for you. I personally love it for creating a custom Dynamic EQ preset, but maybe you’ll find you also like using it with reference tracks, or in the Vintage mode that uses the Vintage EQ, Vintage Compressor, and Vintage Limiter modules. And third, don’t let yourself get fooled. Make good use of the referencing and gain matching features included in Ozone to ensure you’re not letting mistakes slip through, or leaving anything extra on the table.
Hopefully this has given you some creative ways to think about streamlining your mastering workflow and maximizing your efficiency. Until next time, feel free to download a few of my personal presets, and happy mastering!

