5 Tips to Add Movement to Your Mix with Stutter Edit 2
Stutter Edit 2 is a creative tool for real-time remixing and sound design. Learn five tips to use Stutter Edit 2 to add movement to your mixes and productions.
Rejoice ye fans of glitchy goodness: iZotope released an update to Stutter Edit, the comprehensive sound-design powerhouse! But with its namesake “stutter” effects and sputtering, glitchy, squeaky sounds, this plug-in is only for techno and EDM, right?
Of course not!


Stutter Edit 2
I was lucky enough to demo the plug-in during a mission-critical circumstance: I had to deliver a mixed and mastered record of esoteric electronic music to a client, and Squarepusher was one of their references. I could use Stutter Edit 2 to achieve more glitchiness, though I would need to be subtle—the producers already made the music; it’s my job only to enhance it.
With examples from my own mixing practice, we’ll go over some things you can do with Stutter Edit 2 to enhance your mixes.
Note that I’ll be using Auto Mode for most of these tips. For more on MIDI Mode, read this article.
1. Beef up a thin percussive hit with Stutter Edit 2
Sometimes you receive an electric snare with a fantastic sense of cut—a presence that helps it slice through mix. Nevertheless, it could use more meat to fill out the midrange. Observe this snippet of a mix, and pay attention to its unprocessed electric snare:
You can hear what I’m talking about: we’ve got cut, but I want more body. So, I employ the standard tricks on a channel strip, and I use some reverb and delay to fill out the sound. The results are fine...
...but I’m still craving the beef—the snare continues to lack midrange.
This often happens in mixing: you’d think the obvious trick will solve the problem, but reinforcement needs to come from somewhere other than the usual suspects. Let’s turn to Stutter Edit 2 and see if it can get us out of this jam.
I’ll route my electronic snare to an aux track and add Stutter Edit 2 as a plug-in, choosing Auto Mode for this purpose. Let’s start with adding a little distortion from the Effects Section.

Using the Distort module on the snare
Turn your attention to how we’re modulating the wet/dry blend of the distortion: the amount of distortion is first rising, and then falling as playback progresses. In the screenshot above, you can see the curve that the wet/dry balance is following, and the engaged Palindrome button which causes the distortion to fall after rising. So far, so good, but I want a trashier sound out of this snare reinforcement. Perhaps Lo-Fi will come to the rescue.
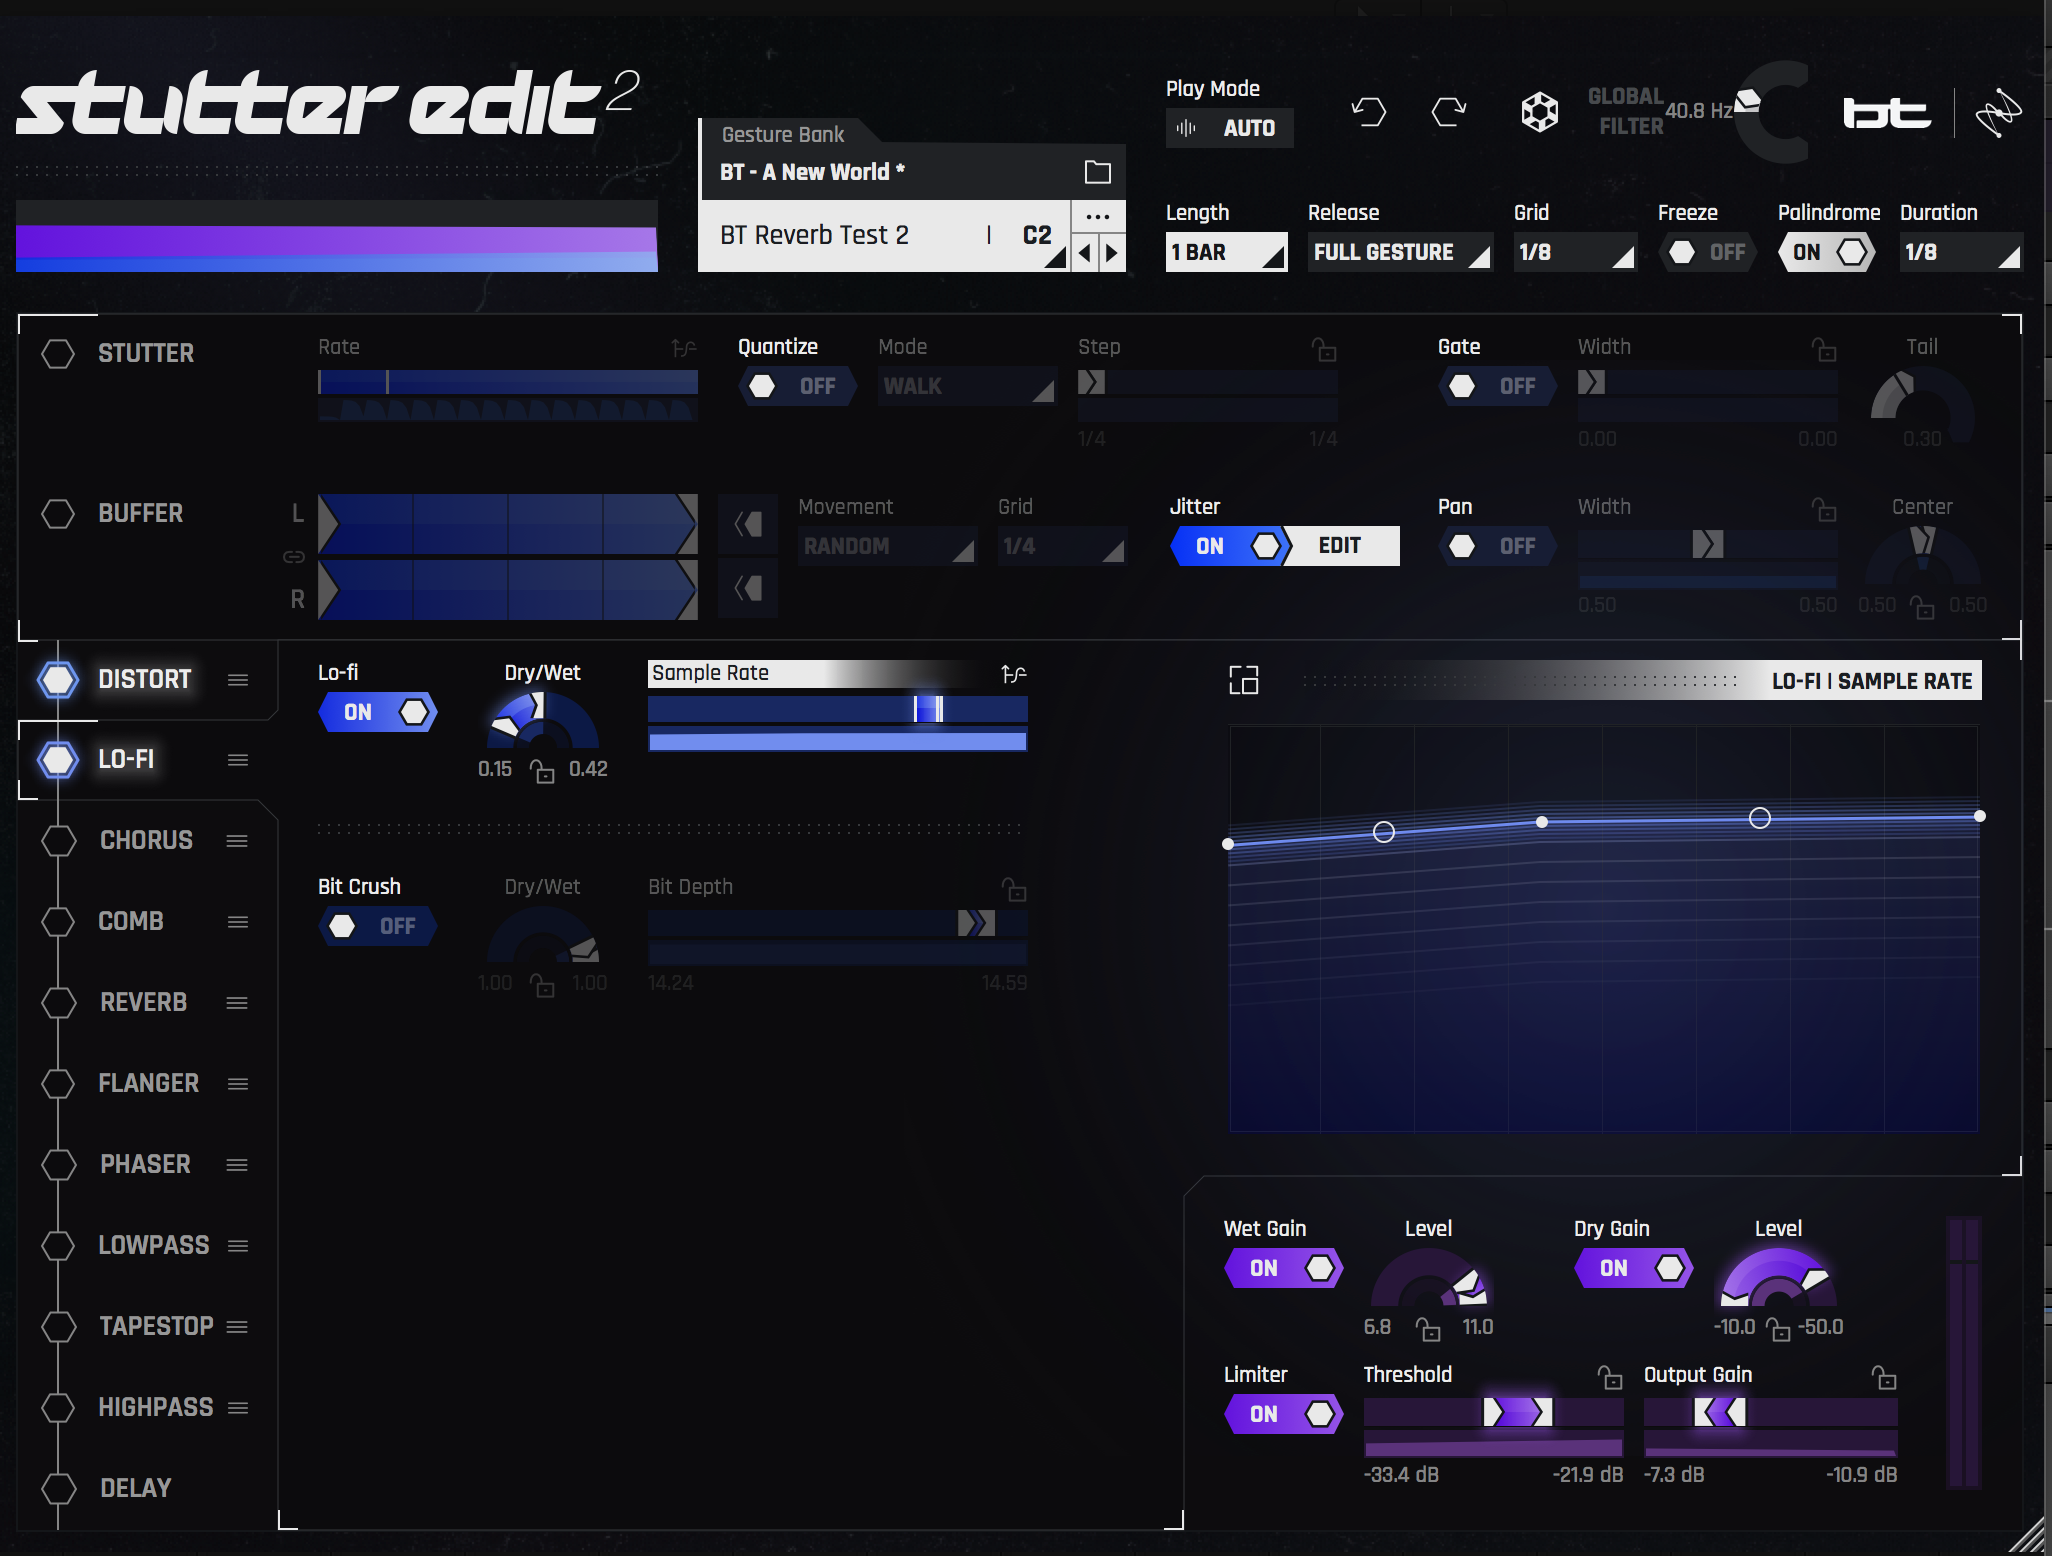
Using the Lo-Fi module on the snare
I’m liking that a lot. It changes over time, and it sounds interesting and hefty. Again, the dry/wet blend is dynamic, but take a look at the sample rate control: the sample rate is also shifting ever so slightly, which contributes to the sound.
When you’re reinforcing a midrange sound and EQ isn’t quite doing the trick, frequency-based modulation can be very effective. Such modulation could even involve emphasizing frequencies we wouldn’t normally consider appropriate for a snare sound. Having “incorrect” sounds rub up against the original signal can counterintuitively solve issues like this.
In that spirit, let’s see what happens when we add some comb filtering.

Using the Comb module on the snare
You can see that the frequency is shifting over time, but the blend is kept very low—it’s only blending a little of the “incorrect” frequency modulation, providing a rub against the distorted sound.
You’ve been hearing the solo’d aux channel at full force. Let’s bring its fader down to -24 dB and hear it with the original snare, as well as its delay and verb:
Now, let’s listen in the context of the mix:
Suddenly we have a fleshed out, full-sounding electronic snare! What’s more, we added this fullness in an interesting manner with Stutter Edit 2, one that’s constantly on the move. This movement piques your attention and adds dynamism to the sound: because the snare is always changing, the ear is drawn to it.
2. Add extra movement to a delay with Stutter Edit 2
Taking our principles of dynamism and change in another direction, we can use


Stutter Edit 2
In this mix, I have a synth stab in the left channel, to which I added both reverb and delay, panning those effects to the right as a counterbalance. It sounds like this:
Again, it sounds fine, but I find it a little boring on its own, particularly for esoteric music such as this. Let’s see what happens when I slap Stutter Edit 2 on top of my effects. I’m only using the Stutter effect, nothing else—no verb, no distortion, nada. Just Stutter, with the following rate dialed in based on one of the plug-in’s preset curves:
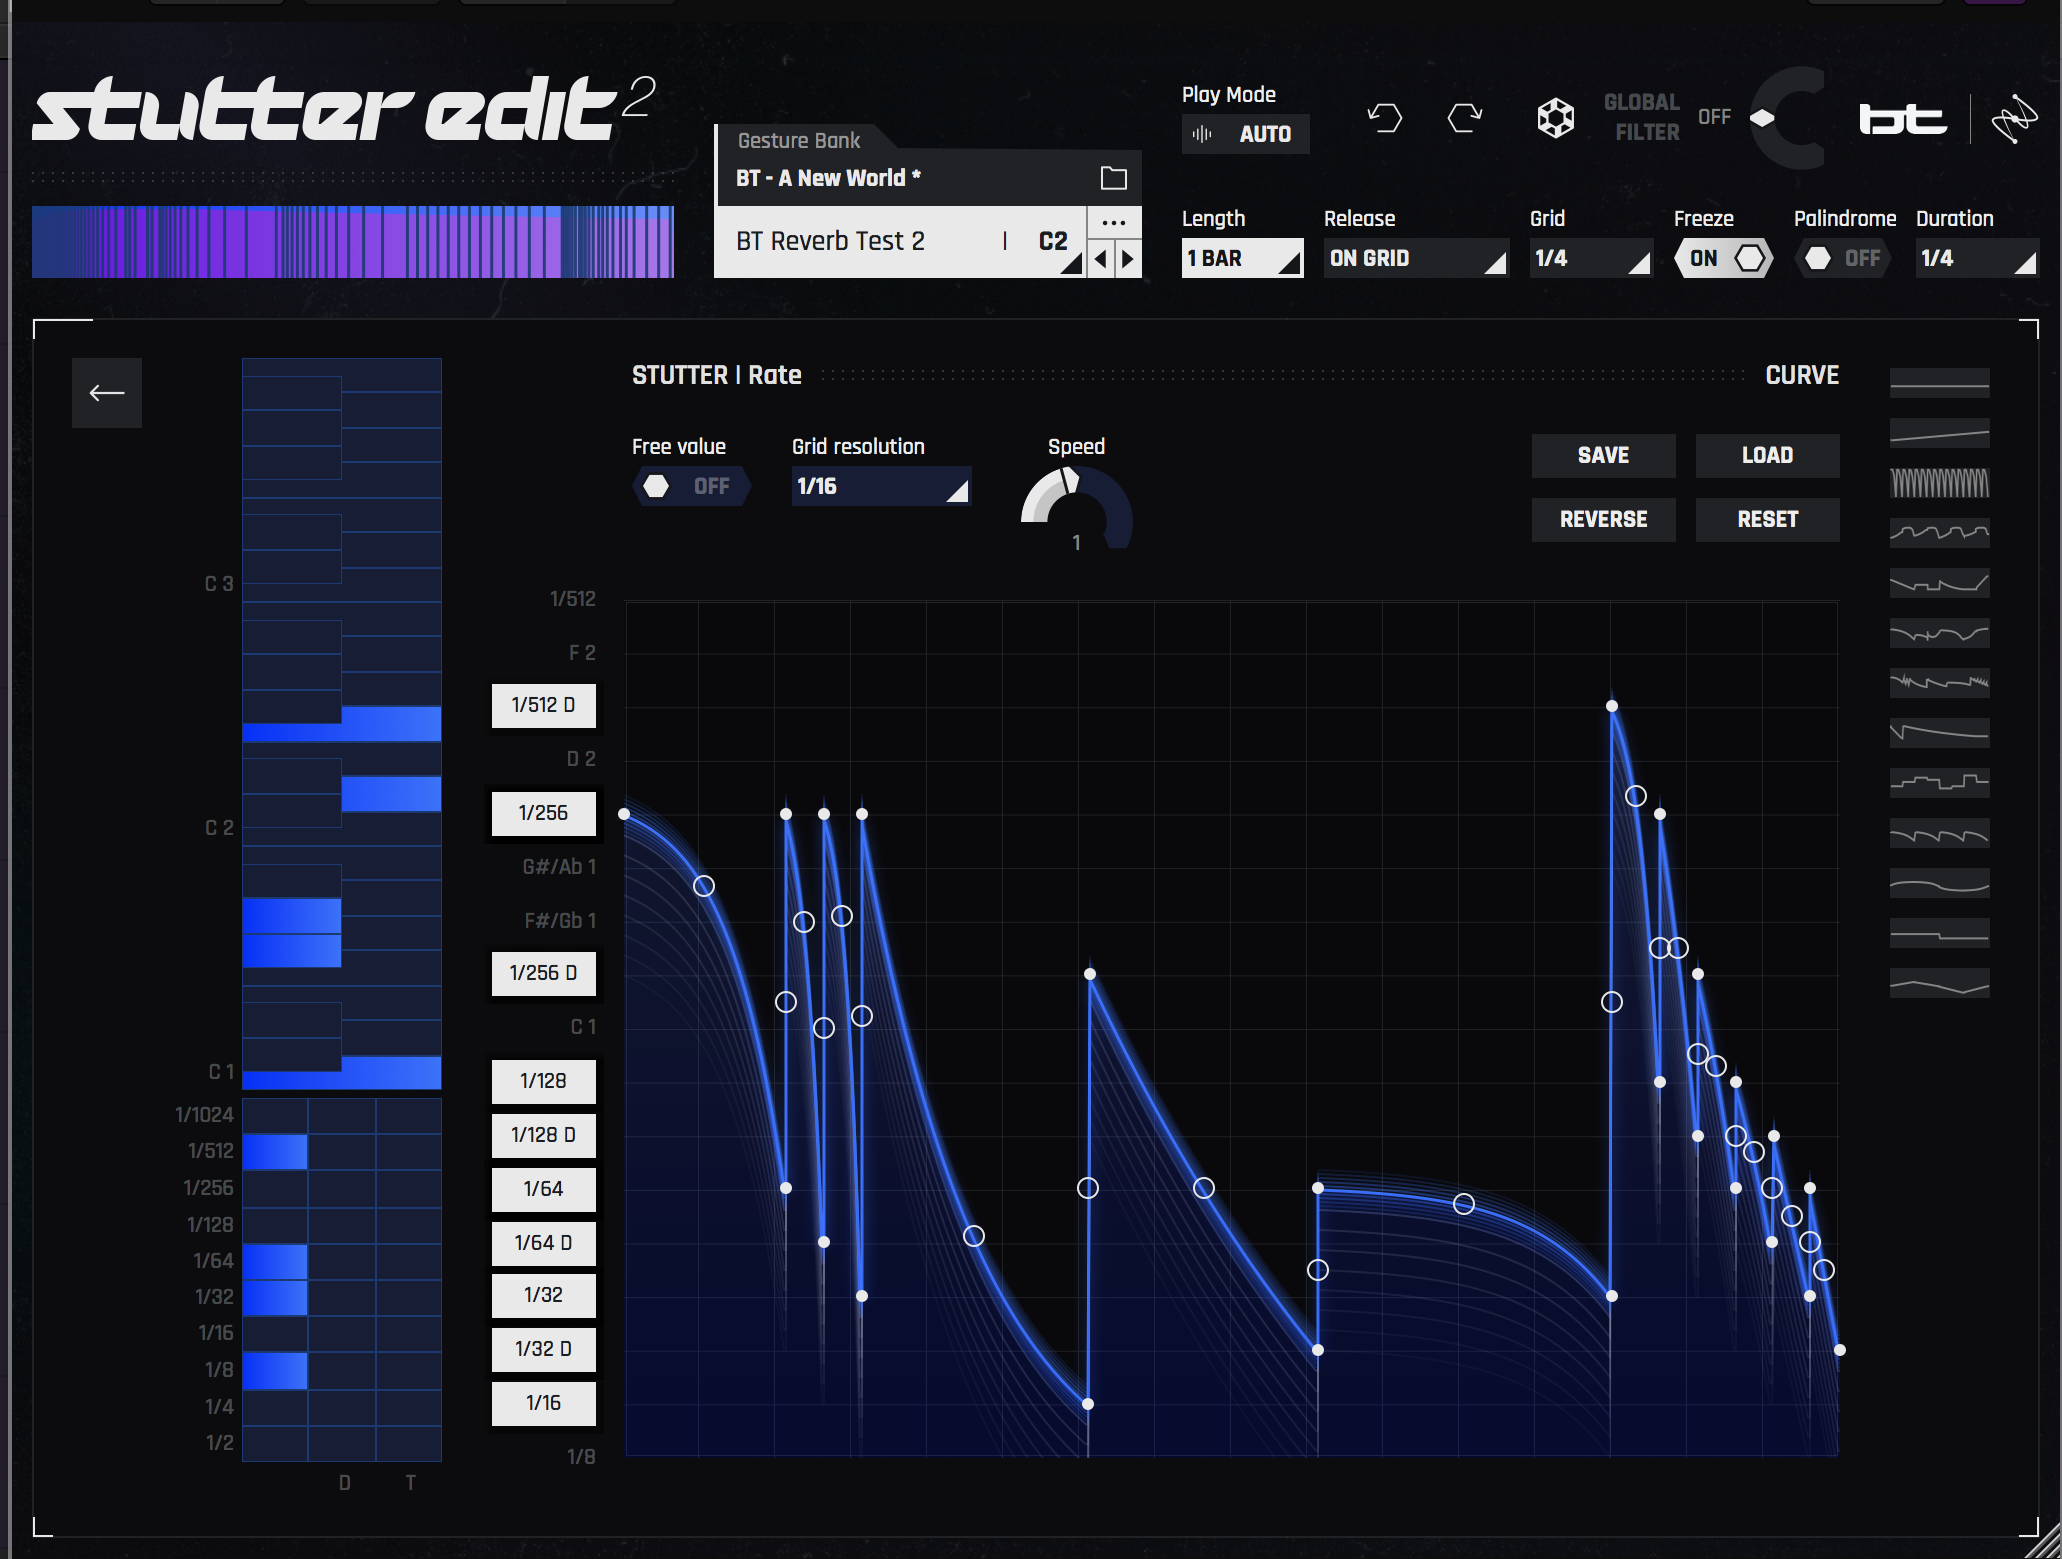
Modulating the rate of the Stutter effect on a synth
After tweaking the curve a bit, I changed the length and duration parameters, and turned off the Palindrome button so that the pattern is only moving forwards, rather than reversing when it reaches the end of a sequence. How does it sound?
It sounds really weird, glitchy, and interesting, but at its present level, it’s too overwhelming, and we’ve lost the original echo. Let’s dial the dry tone into the mix, and modulate the wet/dry balance for a greater degree of subtlety:

Static global Dry level
As you can see, my Dry parameter is all the way up, but the amount of Wet signal is constantly in flux. Let’s show you the specific curve I’ve drawn in:
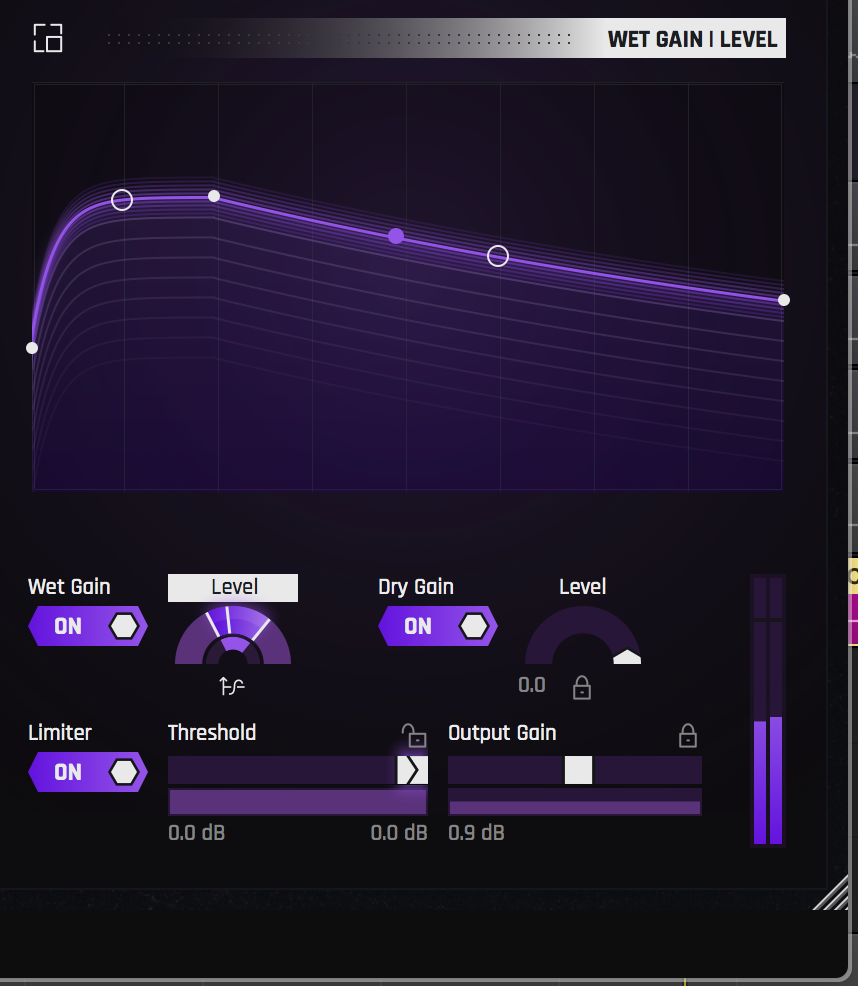
Modulating global Wet level
Here’s what it sounds like when all is said and done:
We have our original effects chain, but there’s also something new on top—something that adds flare to the effect, blends rhythmically with the track, and accomplishes two other important things:
It saves CPU resources, and it saves time.
Both resources are paramount. If I had tried an effect like this before the days of Stutter Edit 2, I’d have to automate the effect with a variety of plug-ins, which would take up valuable production time. This method saves me that time so I can move on to polishing the rest of the mix.
3. Add presence to bass in unusual ways with Stutter Edit 2
To make a bass feel truly one with the mix, we often need to emphasize its high midrange presence so that it cuts through the other elements. If we focus solely on a bass’s bottom, it might get buried in dense mixes, and may disappear on narrow-range playback systems.
In the past, I’ve recommended parallel limiting and modulation techniques to help the bass cut through. Now I’d like to turn your attention to


Stutter Edit 2
With this plug-in, you have tons of different ways to add that much-needed presence to any bass. Observe this synth:
Sounds good, but in a dense mix, it could easily get lost. Let’s see what happens when we add Stutter Edit 2:
Our bass is thoroughly transmuted, but fear not: this is only the tone we’re going to blend in parallel with the original bass. This tone is made up of a phaser feeding a high-pass filter, which are all being distorted.
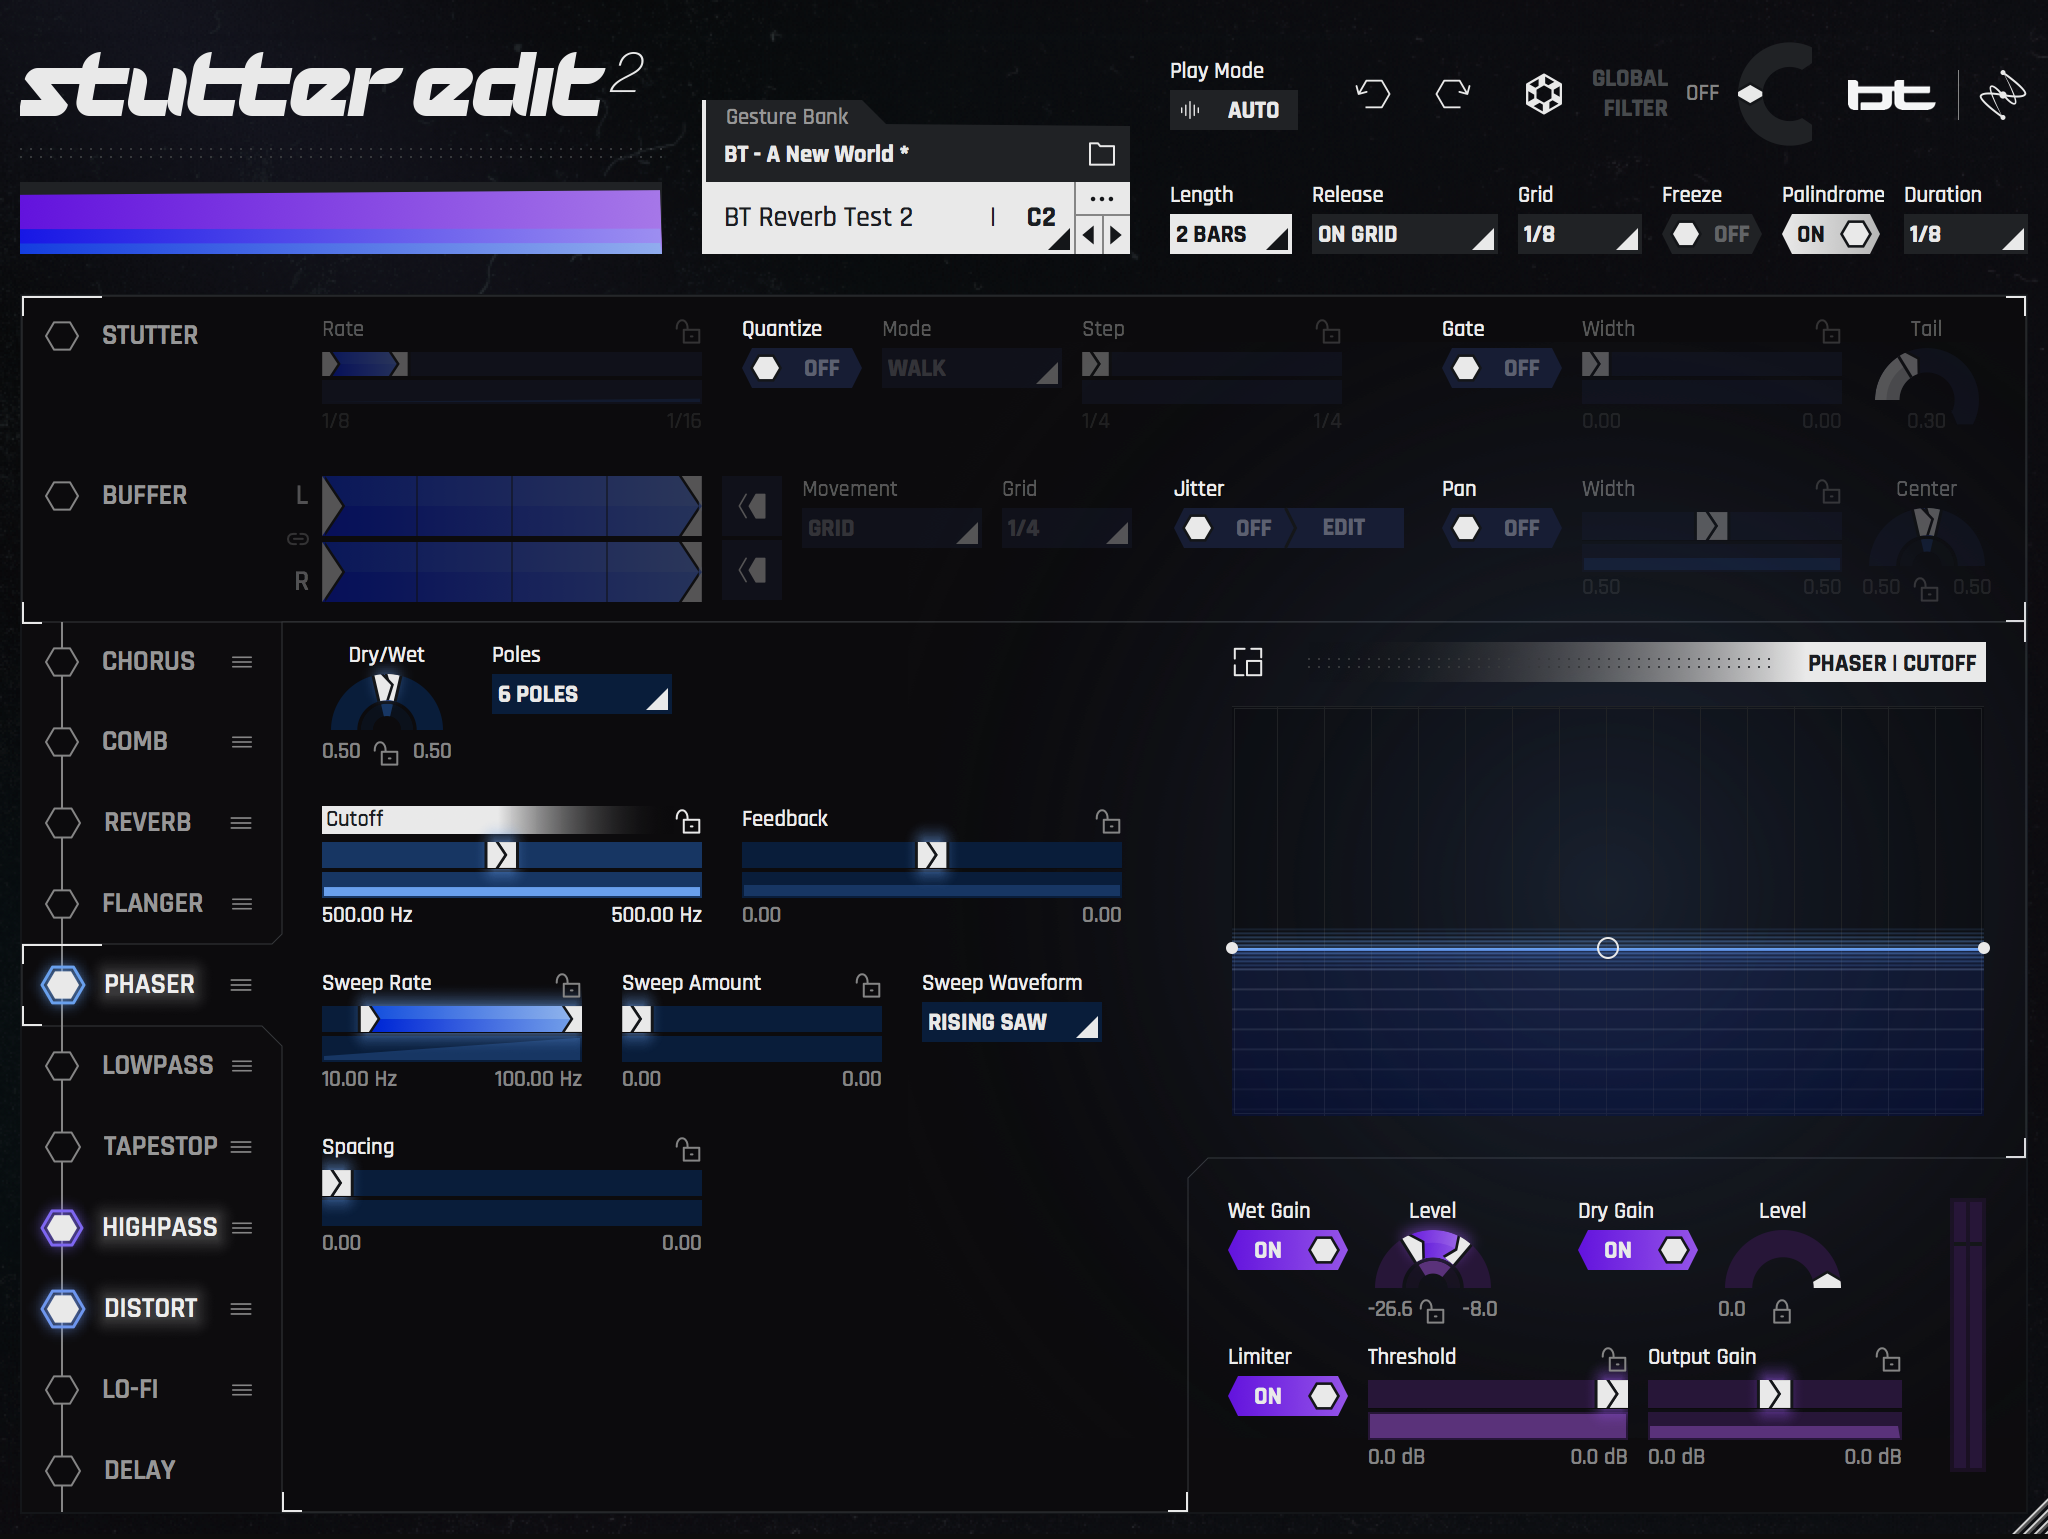
Phaser, High-Pass, and Distort modules in series on a bass
Many of the parameters are in flux. The sweep of the phaser, the cutoff and resonance of the high-pass filter, the blend of distortion—all of these are moving around. This causes the overall blend to modulate, as you’ll hear:
This parallel cut doesn’t sit in static space, but instead spindles its way into your ear as it cuts through the mix. Here’s the curve showing how the effect blends into the dry signal:

Increasing Wet level on Stutter Edit 2 to blend with dry bass
It’s just a simple rise, executed in time.
Now, all of this was tweaked from a preset—but the tweaking was extensive. Distortion was moved to the end of the chain, and reverb was shut off completely. Most importantly, I fiddled with two global parameters: Length, which changed the pattern from 1 bar to 2 bars, and Palindrome.
Changing the Length allowed the pattern to rise over two bars, which worked better for the groove. Palindrome forces the pattern to retrace its steps once it gets to the end. By checking this off, I ensured the pattern is always rising, until it cycles abruptly to the beginning.
This gives an anticipation and feeling of tension to the bass. Keep this technique in mind when you want to use the presence of a bass to address the emotionality of the tune.
4. Play your mix with a keyboard through Stutter Edit 2


Stutter Edit 2
In MIDI Mode, you can trigger presets or “gestures” straight from your keyboard. If you’ve ever used keyswitches to program a sampled orchestra, it’s a bit like that.
MIDI Mode typically lends itself to production and composition, because it immediately impacts the sound. All the squeaks, squelches, time hops, and jitter you’d commonly associate with glitchy EDM and Techno? That’s what MIDI mode can help you accomplish easily.
Still, we can use MIDI Mode in the mix. In the middle of a mix, one of the dry synths in the breakdown section sounded like this:
I wanted to add some background glitch to this synth, so I routed my MIDI signal to trigger Stutter Edit 2.
Since the routing is different from DAW to DAW, the plug-in tells you how to do this in a step-by-step guide. I used Logic Pro X for this mix, and here’s what the plug-in showed me:

Stutter Edit 2 showing how to set up MIDI Mode in your DAW (Logic Pro X in this case)
Once I had the routing set up, I was able to switch between presets by pressing different keys on my MIDI controller—of course, I could tweak the presets as well.
I’d play the mix like an instrument for a moment with my keyboard, then settle on a pattern, switching between tweaked variants of “BT Pitch Blur” and “BT The Filter Bend”. I did this by alternating between keys on my keyboard, playing in time. The results sounded like this:
Of course, I’m the mixer, not the producer, so I can’t just change the sound—I need to augment it for the betterment of the mix. That in mind, I proceeded to blend this effect against the dry synth. On the processed track, I went one further: I added a second instance of Stutter Edit 2 to help me with some creative panning.
5. Take old tones to new heights with Stutter Edit 2
In one tune, I had a clean guitar that sounded pretty good with a little basic mixing:
I wanted something more though—again, everything needed to sound different and strange for this project. I wanted the axe to be doubled and modulated, so I doubled it with a standard doubler plug-in:
I wasn’t satisfied. It sounded pretty, but I wanted it to sound new and different. I wanted it to sputter a little bit, maybe modulate a little over time with a chorus effect, with hints of filtering that the ear couldn’t necessarily discern:

Modulating the guitar, here showing the curve controlling the Stutter module’s Rate
The image above shows the curve for the Stutter Rate. You can see that I also added chorus, comb filtering, and some high-pass filtering. Most importantly, I specifically dialed in Stutter Edit 2’s overall wet/dry balance over time.
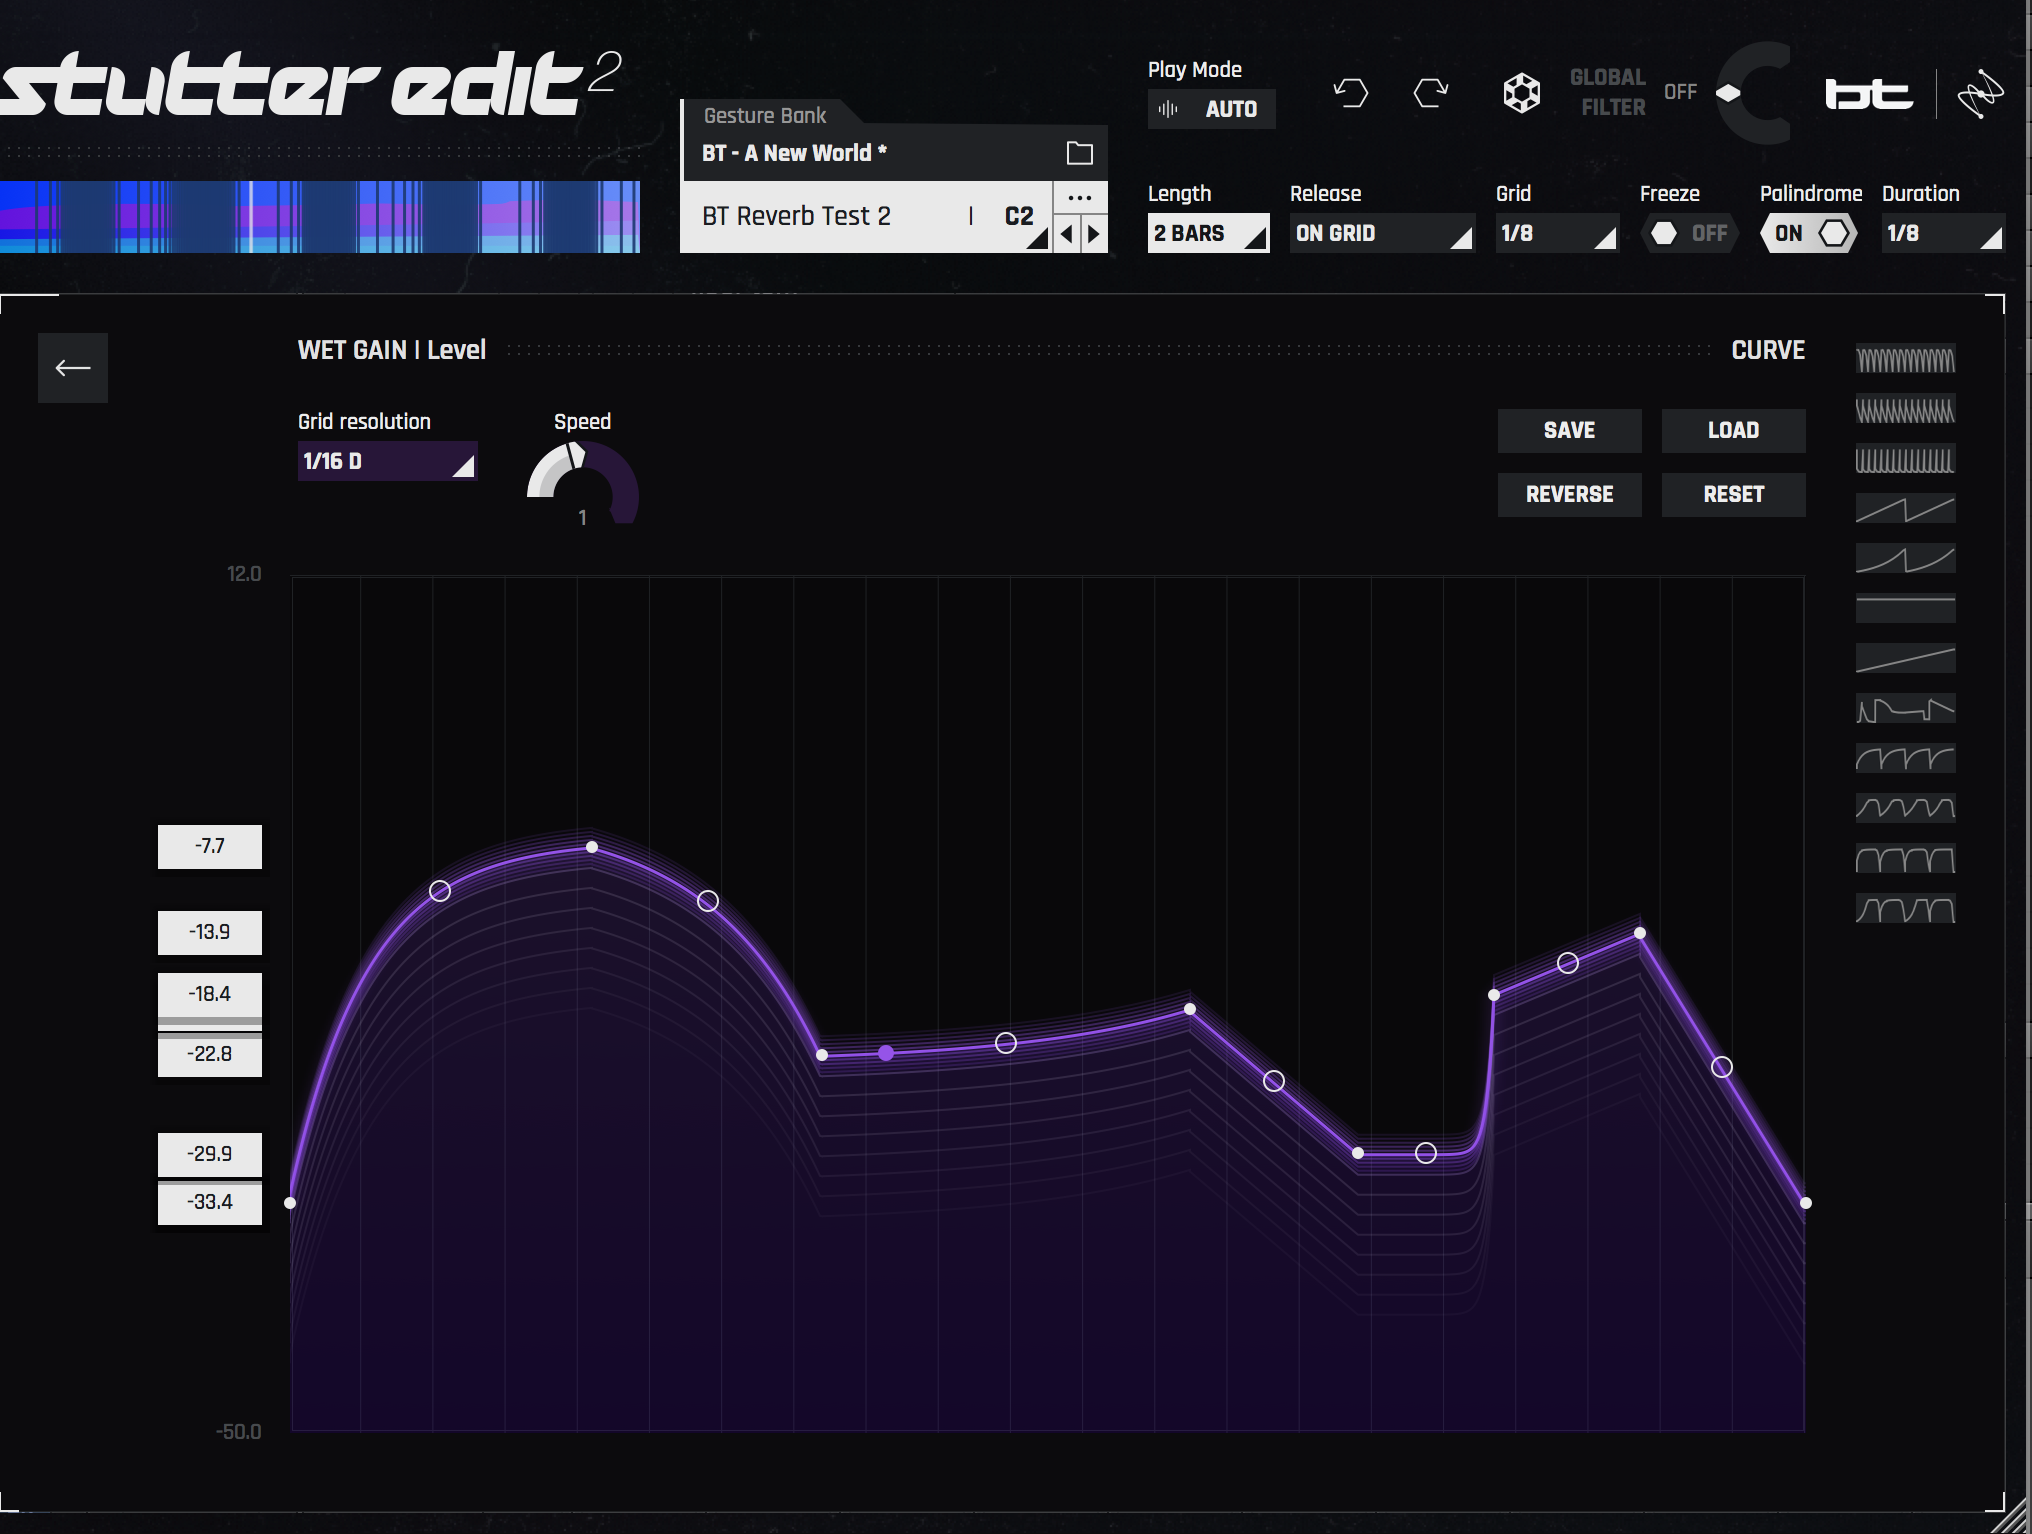
Modulating overall wet/dry balance on guitar
This was all done on a parallel aux which, when solo’d, sounded like this:
Against the guitar, this is what we had:
And in the mix:
I think it sounds cool for this weird, forward piece of music.
The takeaways
We’ve only scratched the surface of what


Stutter Edit 2
When it comes to things like time and resources, you never want the process to stay in flow. You want to keep a buffer between your creativity and time-sucking tasks, and to avoid that kind of cognitive stuttering and jittering at all costs. Forgive the pun...
