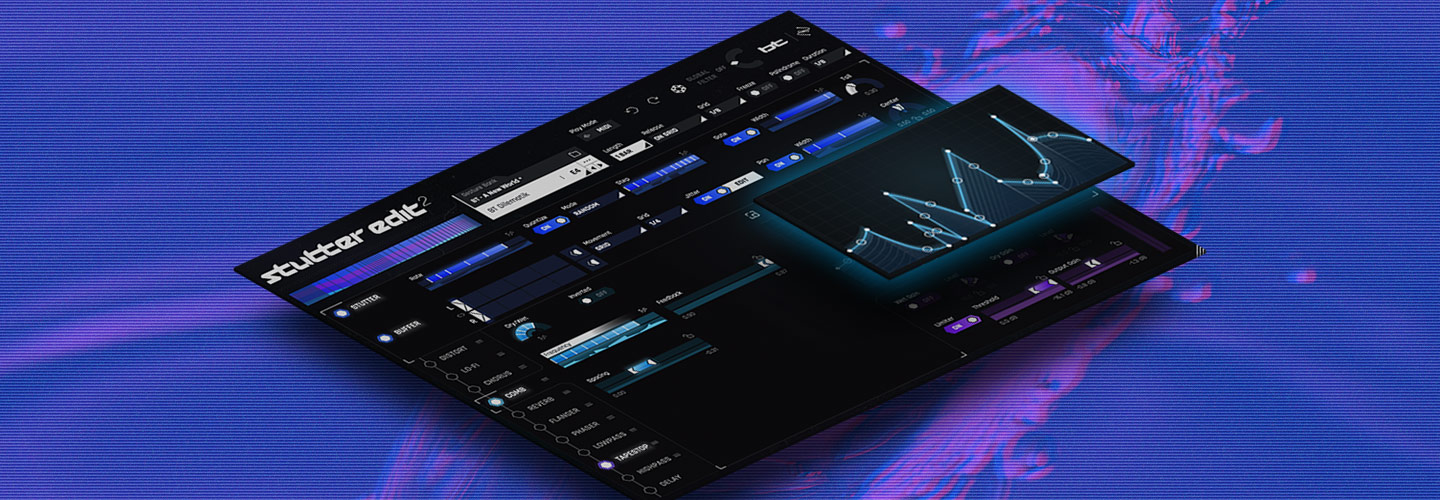
8 Tips for Designing Synth Patches with Stutter Edit 2
In this piece you’ll learn how to use Stutter Edit 2 to add elements of sound design to your synth patches and sample loops.


Stutter Edit 2
Here we’ll give you eight tips for sculpting your synths with Stutter Edit 2. The first three tips will help you learn how to use the plug-in, the next three apply to individual instruments and techniques, and the final two tips are more philosophical in nature. Let’s begin!
1. Understand the Range controls in Stutter Edit 2
Stutter Edit 2 is a comprehensive and customizable modulation plug-in, but there’s a key to figuring it out quickly. Whether you’re messing with the wet/dry balance of a reverb, the feedback of a delay, the rate of a chorus, or the DC-offset parameter in the Distort effect, you’re sure to come across this little range control:
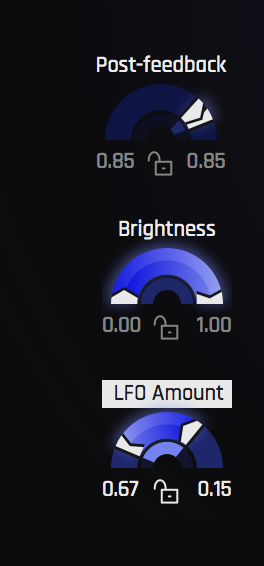
Stutter Edit 2 Range controls
On a small scale, these blue sliders control the range of any parameter you wish—but you can click into each parameter to access a treasure trove of a window called the Time-Variable Modifier—or TVM—a curve editor brand-new to Stutter Edit 2 that allows you to draw envelope movement with extreme precision:
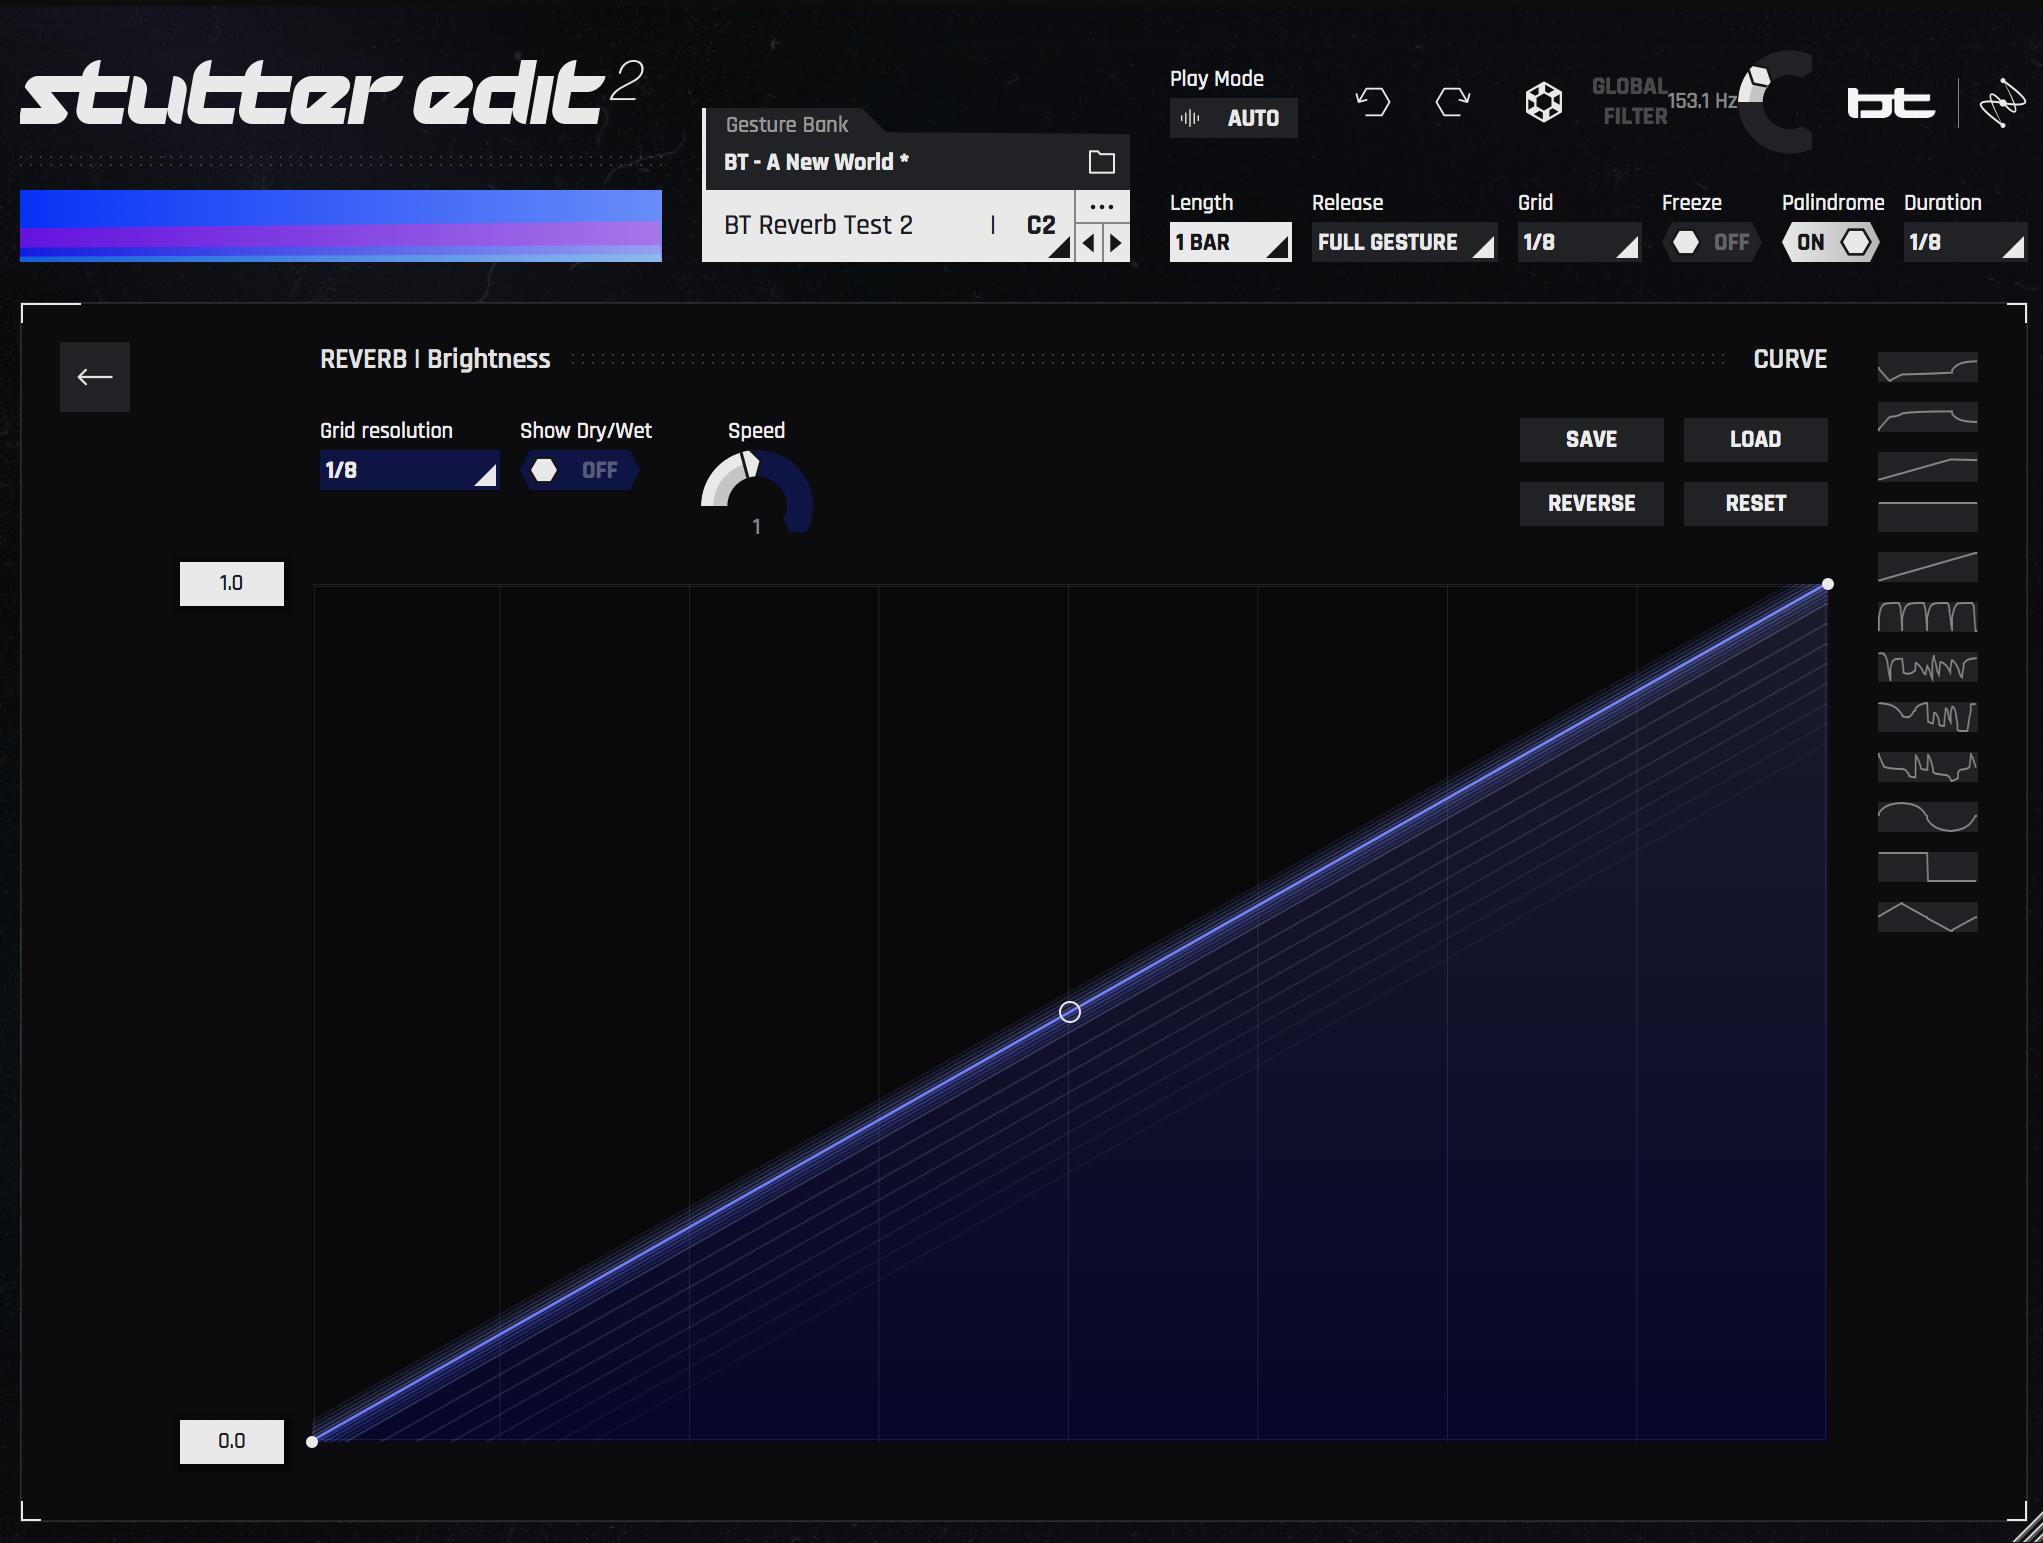
Extended view of the TVM window
Here you can select pre-drawn curves, or create your own. They can snap to a grid and move linearly or along arcs. You can dictate the speed, change the resolution of the grid (quarter notes, half notes, triplets, dotted, etc), and more.
When you consider that you can open a window like this for nearly every parameter of every effect in the chain, you begin to understand the power at your grasp, but it doesn’t end there. You’ll also notice the list of new effect modules on the left side of Stutter Edit 2:

Stutter Edit 2 FX chain
These effects can be reordered however you wish, except for Stutter and Buffer, which sit at the beginning of the chain, and Delay, which sits at the end.
Learning how to manipulate these range controls will help elevate your synth sound design. However, you should also become familiar with two global modes, as these modes change the operation to a startling degree.
2. Get familiar with the two Global Modes in Stutter Edit 2: Auto and MIDI
Stutter Edit 2 offers two global modes: Auto Mode and MIDI Mode, each of which completely changes how you work with the plug-in.
- Auto Mode is more like a traditional mixing effect. You can put Stutter Edit on an insert or an auxiliary channel and mix with it using Auto mode.
- MIDI Mode is much more direct and hands-on—think of it as a compositional tool.
Let me show you, rather than tell you. Here’s a dry drum loop:
Now, listen to the loop processed with a preset in Auto Mode, as a traditional effect.
Sounds great, but not quite out of the realm of “normal” processing, considering this one preset—called a Gesture—applies a consistent stutter in Auto Mode. Perhaps it sounds like automated effects in a series of plug-ins, but it still sounds like an effect on top of an instrument, rather than a transmutation.
MIDI Mode is going to sound much different. Here’s an example that cycles through a few Gestures in MIDI Mode in real-time, as though I were playing an instrument:
How did we make this sound? Well, after routing MIDI data to trigger Stutter Edit 2 via MIDI Mode, you then play your MIDI controller, switching among individual Gestures with each key. In effect, you’re now performing brand-new, glitched-out sounds on the fly.
If you’ve ever composed with a sampled string orchestra, you’ve come across keyswitches, individual keys that change the articulation of the instrument. I found MIDI Mode quite reminiscent of these traditional keyswitches.
With each effect being highly customizable, and with two completely different ways to utilize the engine, it’s going to take a minute to learn how to design synth sounds with this plug-in. Here’s a tip that will help speed up the learning process:
3. Use Stutter Edit 2 presets as teaching tools in MIDI mode


Stutter Edit 2
But as MIDI Mode works differently, here’s another tip to super-charge your quest for a Stutter Edit education. This tip involves presets—specifically, the AMPLITUDE FX BASICbank of presets.
First, load up that preset bank, which you can find here.
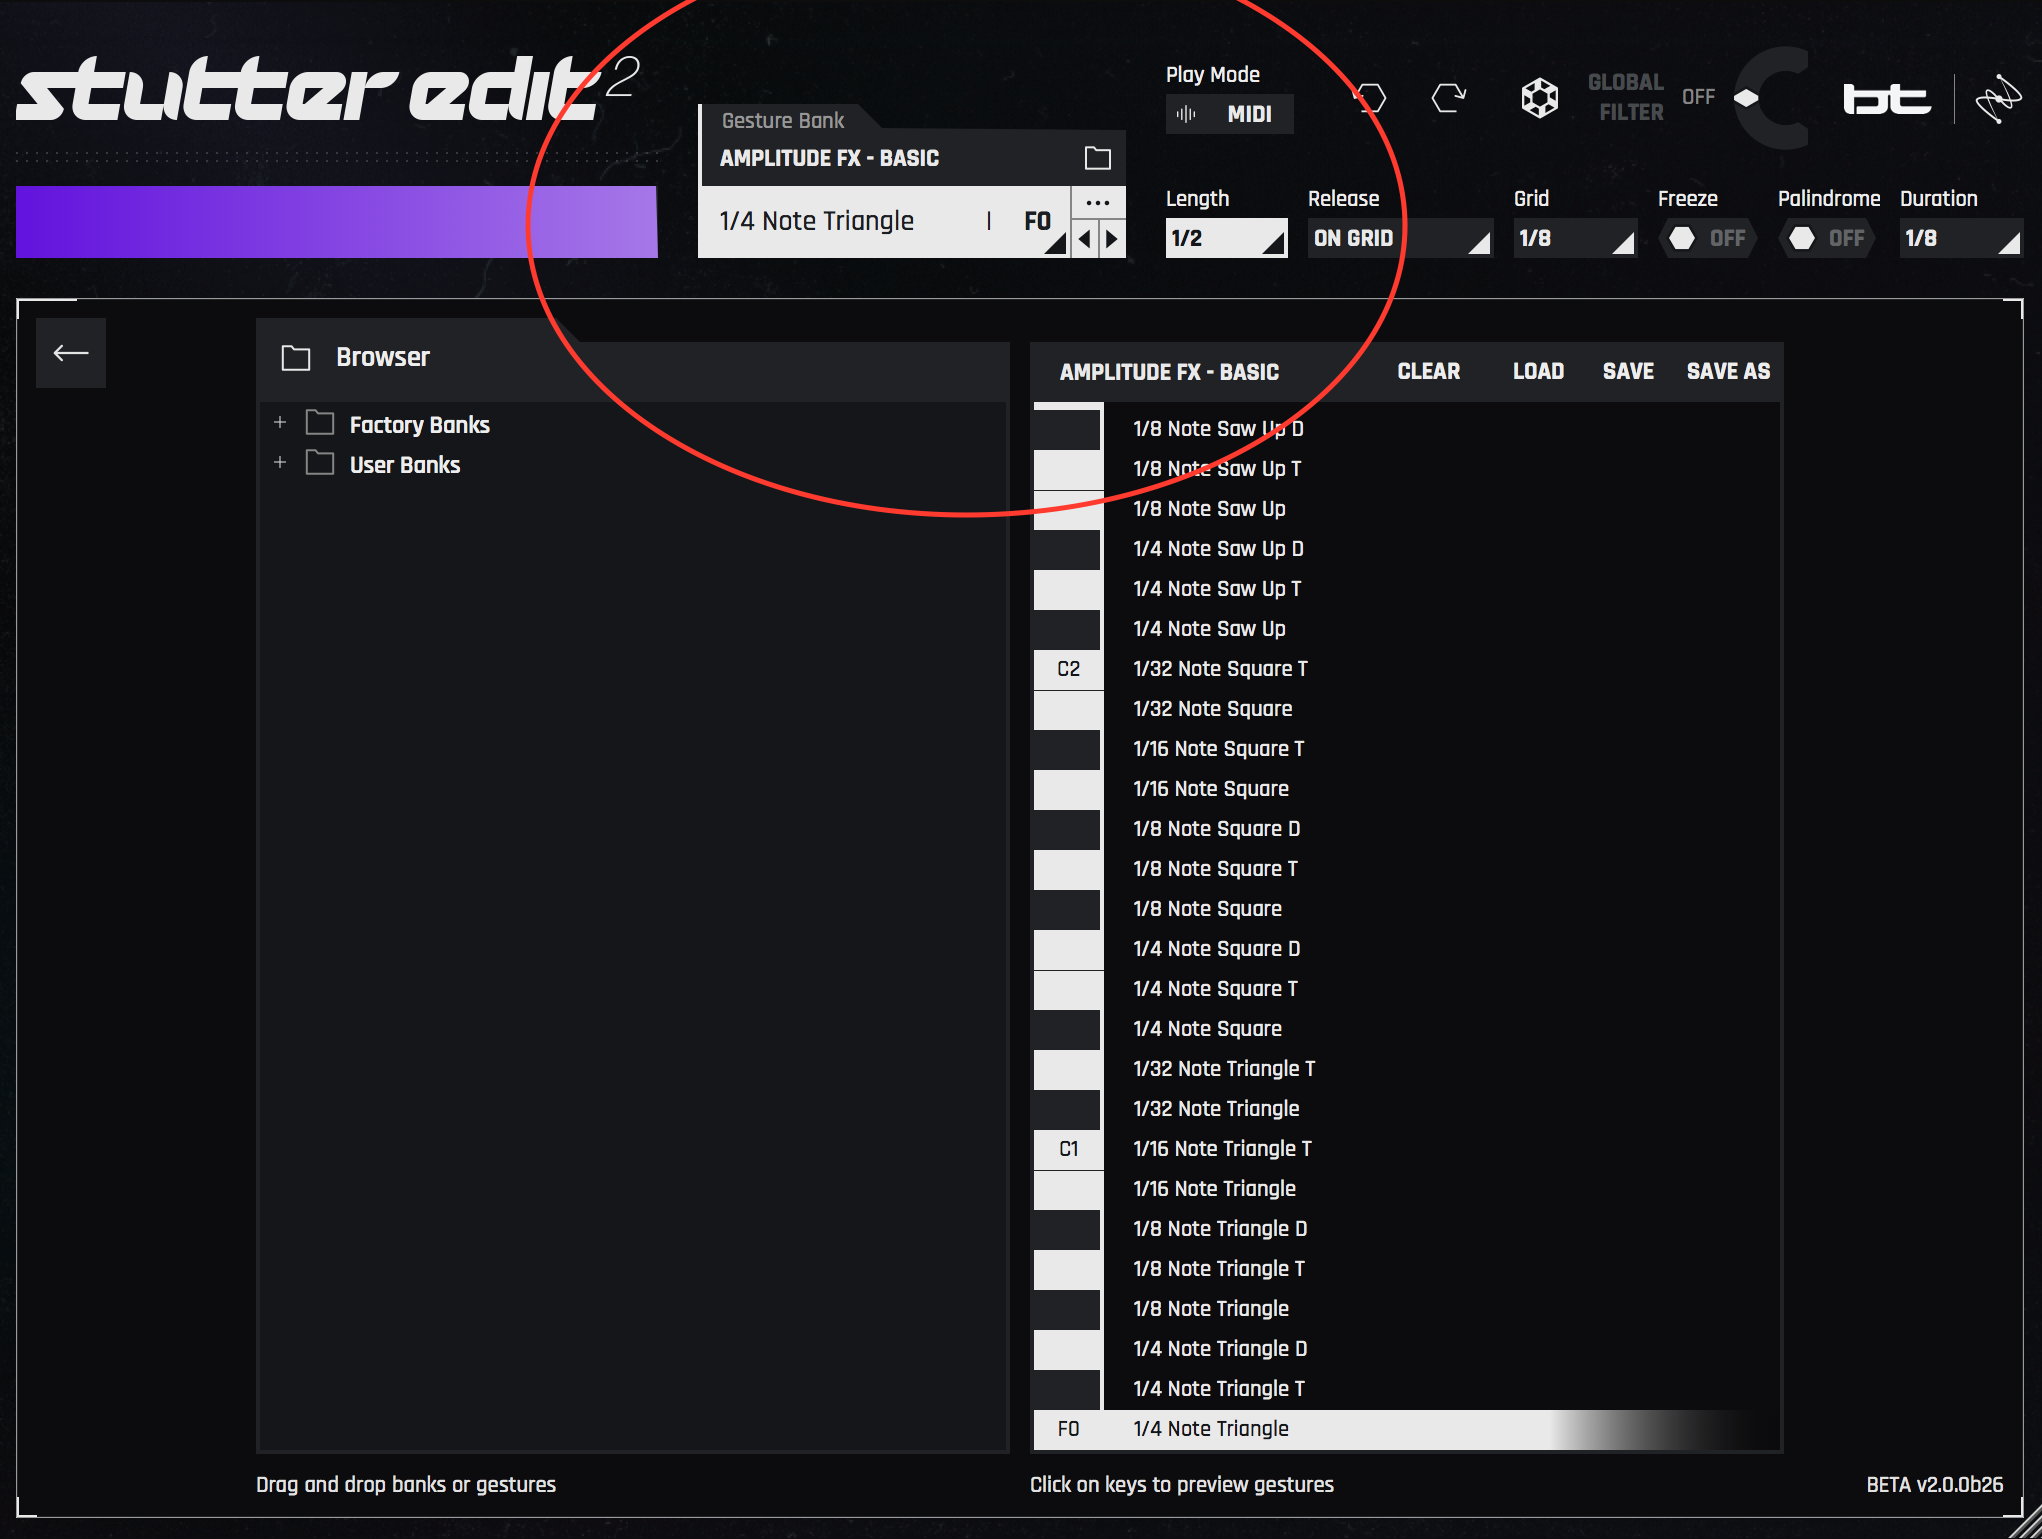
Amplitude FX Basic
Next, program or drop in a percussive loop into your DAW. I’ll use the same one from before:
To set MIDI Mode up, first click under “Play Mode,” which will toggle Stutter Edit 2 between Auto Mode and MIDI Mode. With MIDI Mode up, you’ll see instructions for proper routing in your DAW. Route the loop into Stutter Edit 2, as per the instructions. I use Logic Pro X for programming, so here’s what it shows me:
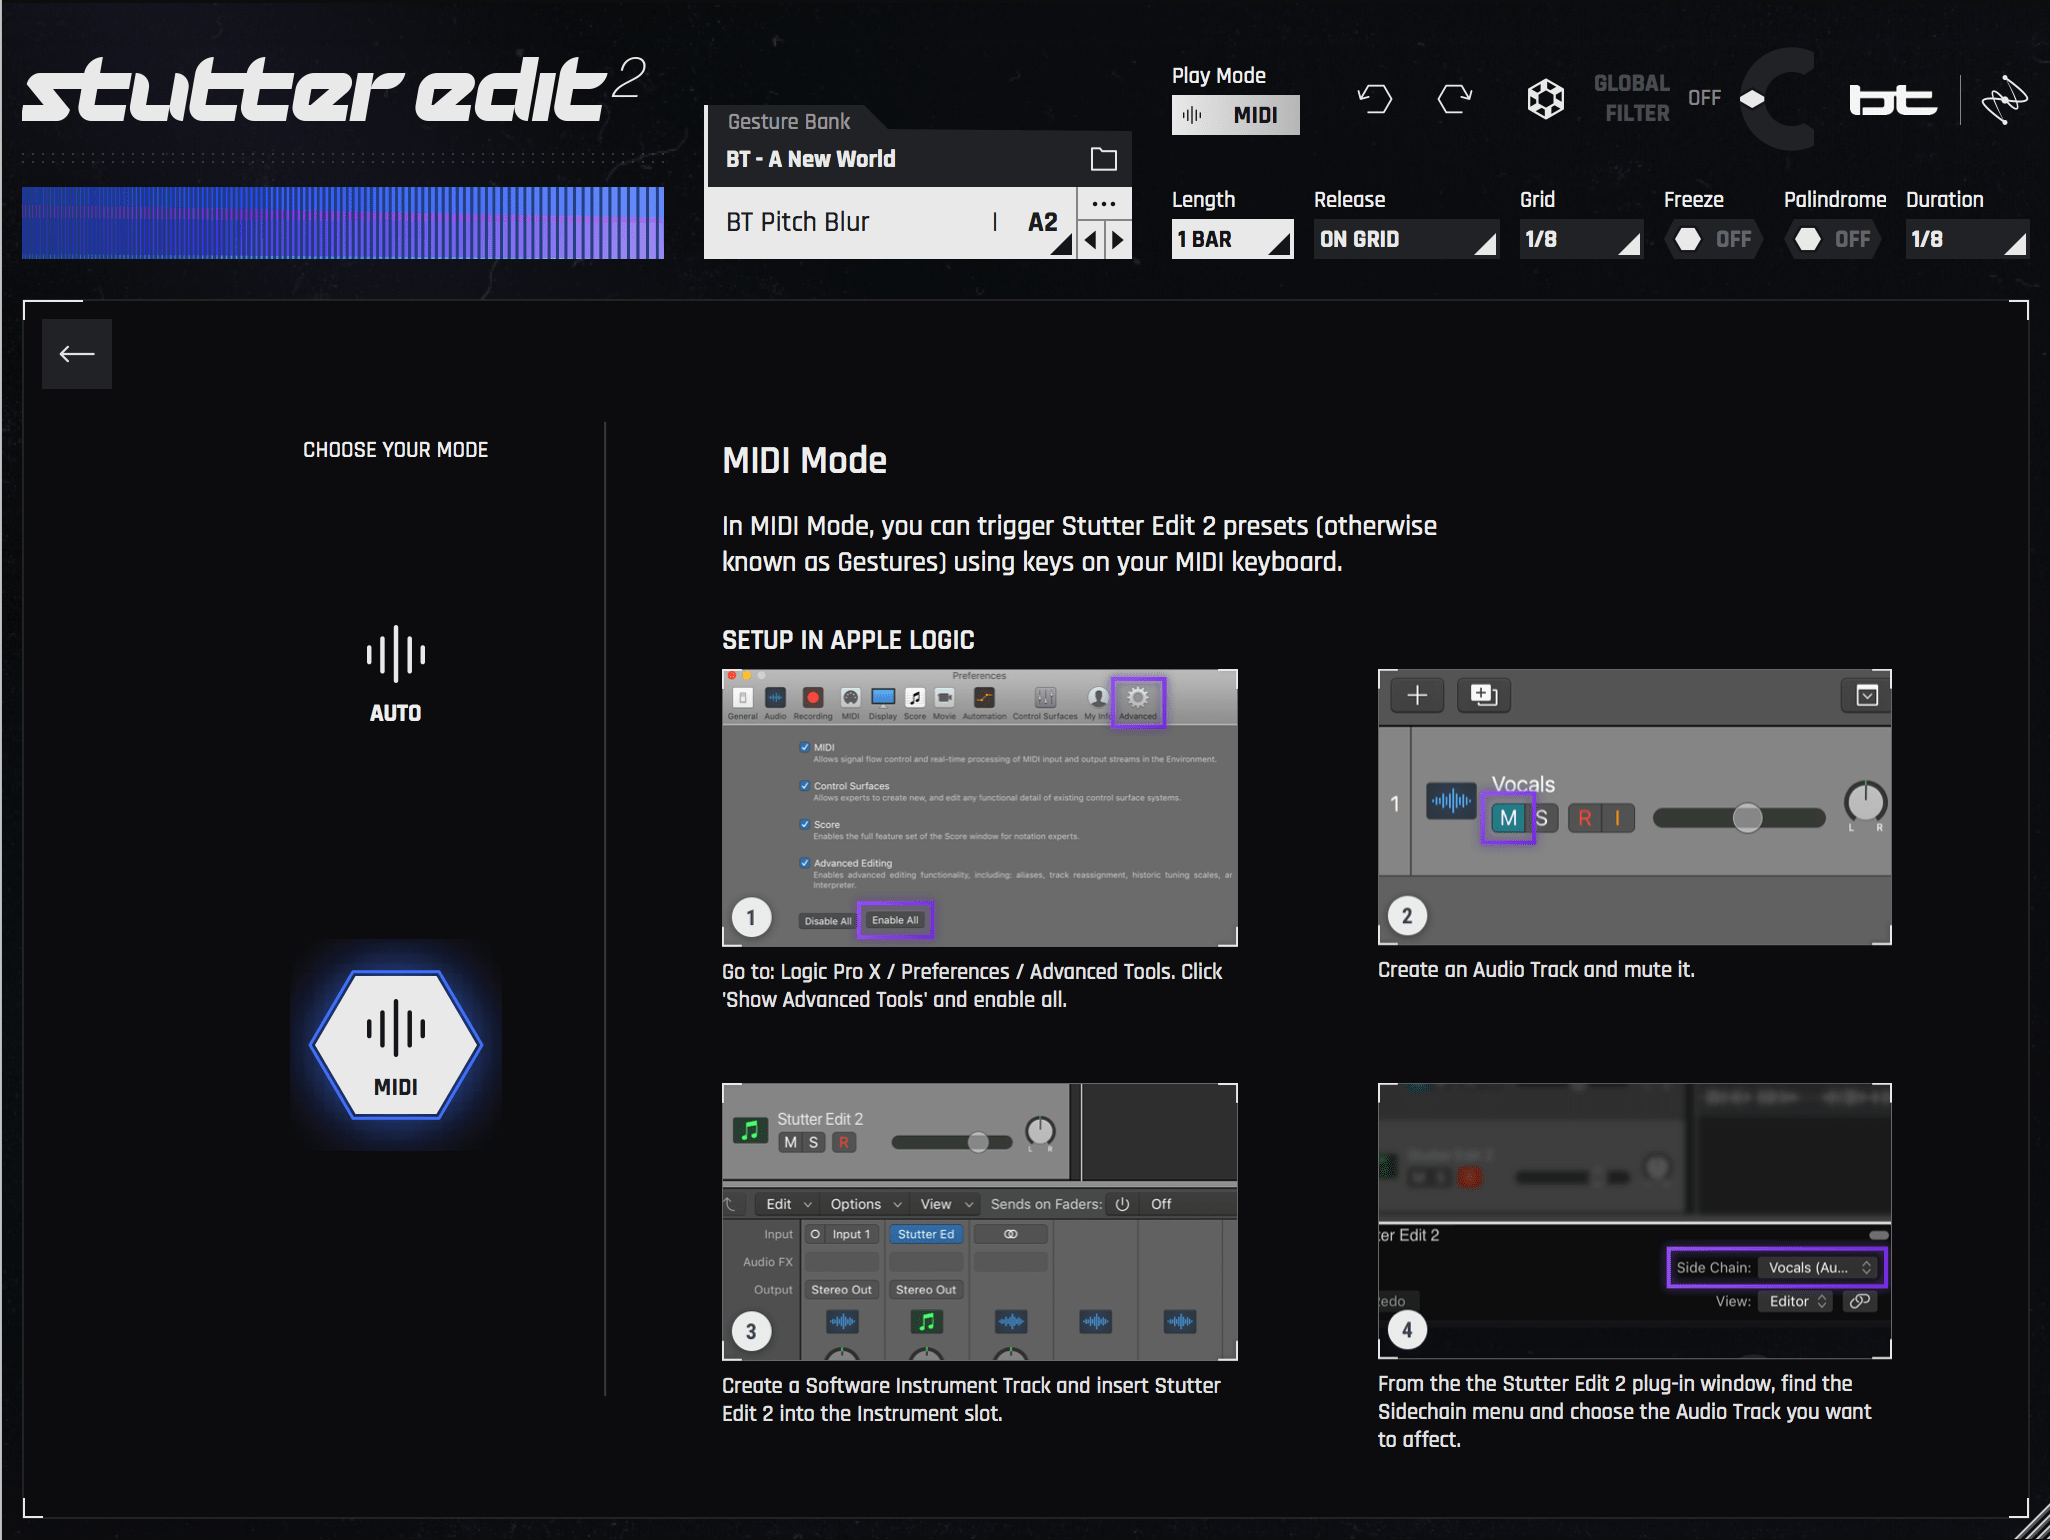
Setting up MIDI Mode in Logic Pro X
Now we can start playing our keyboard as the loop progresses. In this example, I’m hitting keys in rhythm with the loop, and the results sound like this:
Here’s the most important part, which I can’t really show you in a screenshot: Keep the GUI open as you’re playing your keyboard, and watch what’s happening on the screen. Pay close attention at first to the name of the Gesture you’re triggering at any one time. It displaystwo key bits of information: the note value of the effect you’ve selected (eighth note, sixteenth, etc), and the modulation shape (saw, square, etc). Open up the Curve Editor and watch the action as it happens.
By default, Jitter parameters are pretty much the only controls switched on in this bank of presets. As you’re playing, turn on Stutter and Buffer on some of the presets, and you’ll begin to hear the distinct differences between these effects. This will help you associate what your ear notices with what your eye sees. You’ll find this cuts the learning time of the plug-in down significantly.
The combination of looking at the screen and hearing what you’re doing will instill key concepts of the synths. “Oh,” your brain will say, “that’s what an eighth-note rise with a saw sounds like!” Over time, try narrowing down to one or two Gestures at a time, and study what’s happening within them.
Now that we’ve covered some of the basics, let’s move on to concrete, instrument-based sound design tips.
4. Create a sense of movement with processed delays on hi-hat patches
We often delay percussive elements in time to make a groove feel more expansive. Electric hi-hats often benefit from delay to reinforce the feel.
However, Stutter Edit 2 lets you take the groove to the next level by giving you the ability to be dynamic in your choices. It also lets you take your next level to an even higher level with its two avenues of approach.
Let’s explore two ways to delay an electric hi-hat: one in Auto Mode, the other in MIDI Mode.
Auto Mode
My original hi-hat patch sounds like this:
I can then set up a typical groove delay in Stutter Edit 2, like so:

Stutter Edit 2 static delay
Note that almost every parameter is “locked in,” as represented by the little lock icons. What we have here is a simple stereo delay that reinforces the hi-hat for deepening the groove. It sounds like this:
It’s fine, but boring. Let’s add some dynamism to the delays.
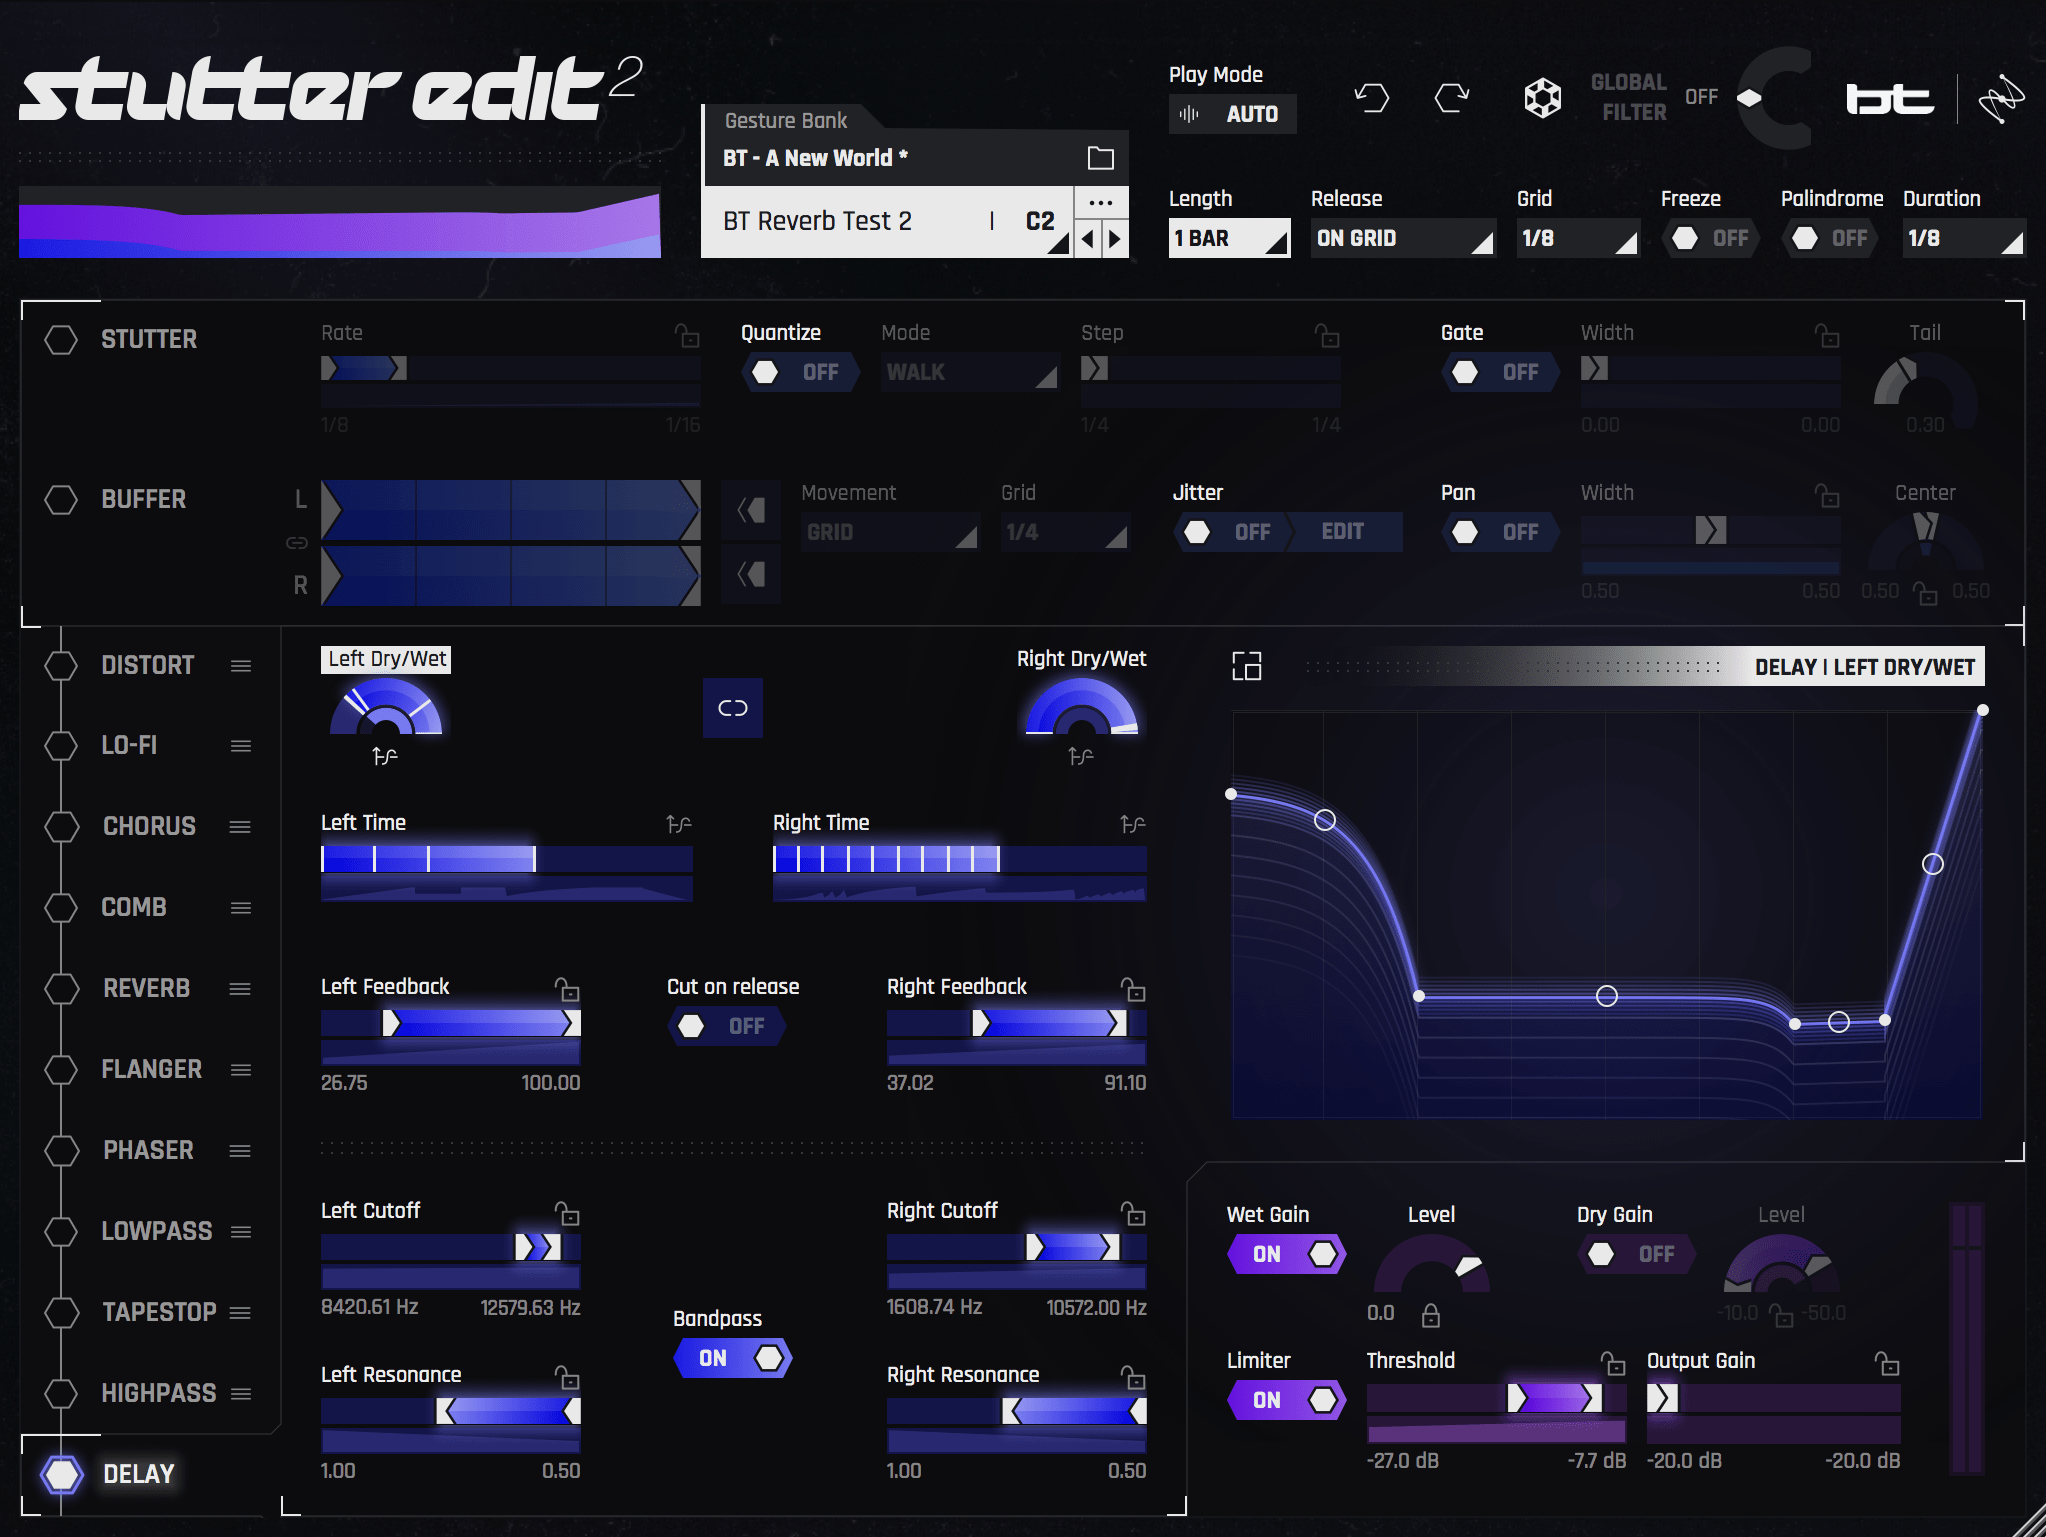
Stutter Edit 2 modulated delay
Notice that all the parameters are now moving in time. I’ve tweaked some curves to give us ear-catching sounds, and already it’s doing more to grab your attention than before. We can also feed other effects into the delay:
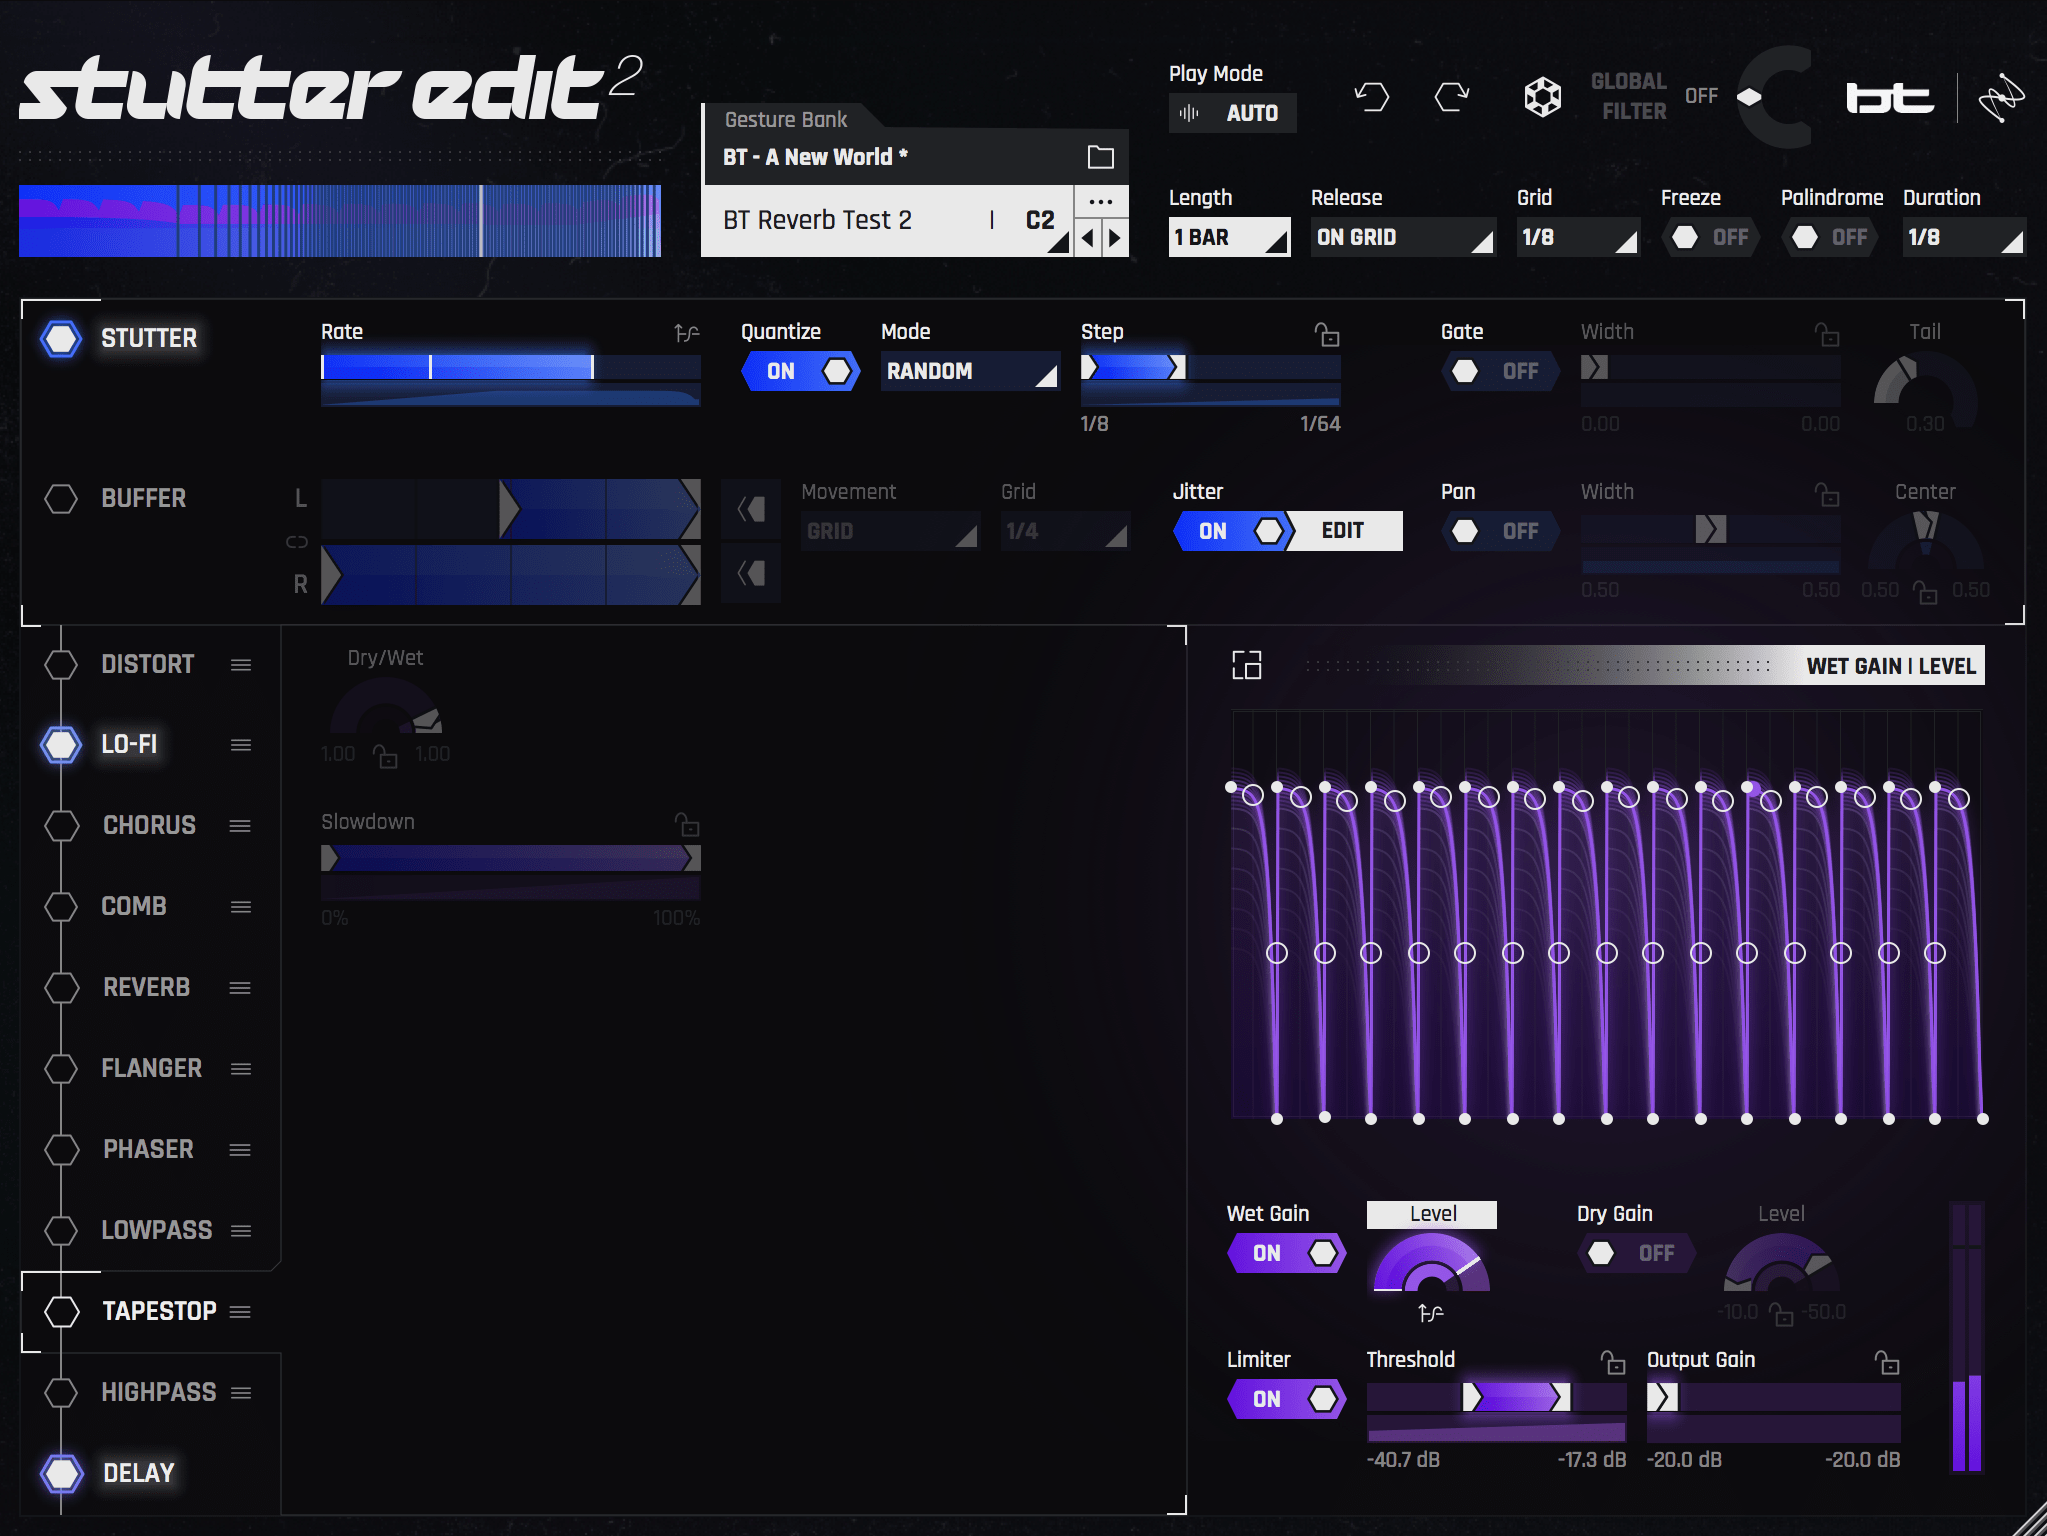
Stutter Edit 2 Delay and FX
We’ve got a significant stutter and sample-rate/bit-depth modulation feeding the delay. Here’s the final result:
That’s Auto Mode, which is but one avenue of approach. The other is to play—here, meaning to perform—the effect into our hi-hat by routing it via Stutter Edit 2's MIDI Mode.
MIDI Mode
How you set up MIDI Mode changes depending on your DAW, but once that’s done, I’ll load up the preset bank AMPLITUDE FX BASIC again. Then, I’ll arm Stutter Edit 2 in the transport and record MIDI information into my DAW. When I perform the preset bank by “playing” Gestures with MIDI, it sounds like this:
Conversely, I could go for something weirder, like the BT SIGNATURE GATE AND SIDECHAIN preset bank, for something like this:
Blended with the original track, it would sound like the tracks below, depending on which bank I choose.
This tip goes beyond hi-hats: any percussive element can benefit from this kind of sculpting. Use Auto Mode for subtler effects, parameters that you want to change gradually, or repeating gestures and phrases. MIDI Mode, on the other hand, can be much more forceful and expressive. Both are exciting new ways to add flourishes of sound design to existing percussive sounds, no matter the genre.
5. Try modulated reverb on pads in Stutter Edit 2
Pads are frequently vital, treasured parts of a mix because they help establish tonality while subtly hovering in the background. They also provide opportunities for sound design: a pad can establish mood not just by its notes, but by its filters and effects.
Pads are often rhythmically static—they don’t have overt percussive elements. However, there is no law relegating them to an immovable prison. Mixing engineers and sound designers alike often add flare to their pads, and with


Stutter Edit 2
Here’s a pad I drummed up from a synth I had lying around:
Sounds evocative already, but we can change and enhance the pad through rhythm. One relatively unobtrusive way to do this is through the use of the Reverb section, where you can dynamically change key parameters over time, such as Space (i.e., reverb size), Brightness, LFO Modulation, and the overall Dry/Wet blend.
Let’s see what happens if we apply a reverb and draw in a simple pattern to change the Size parameter over time.
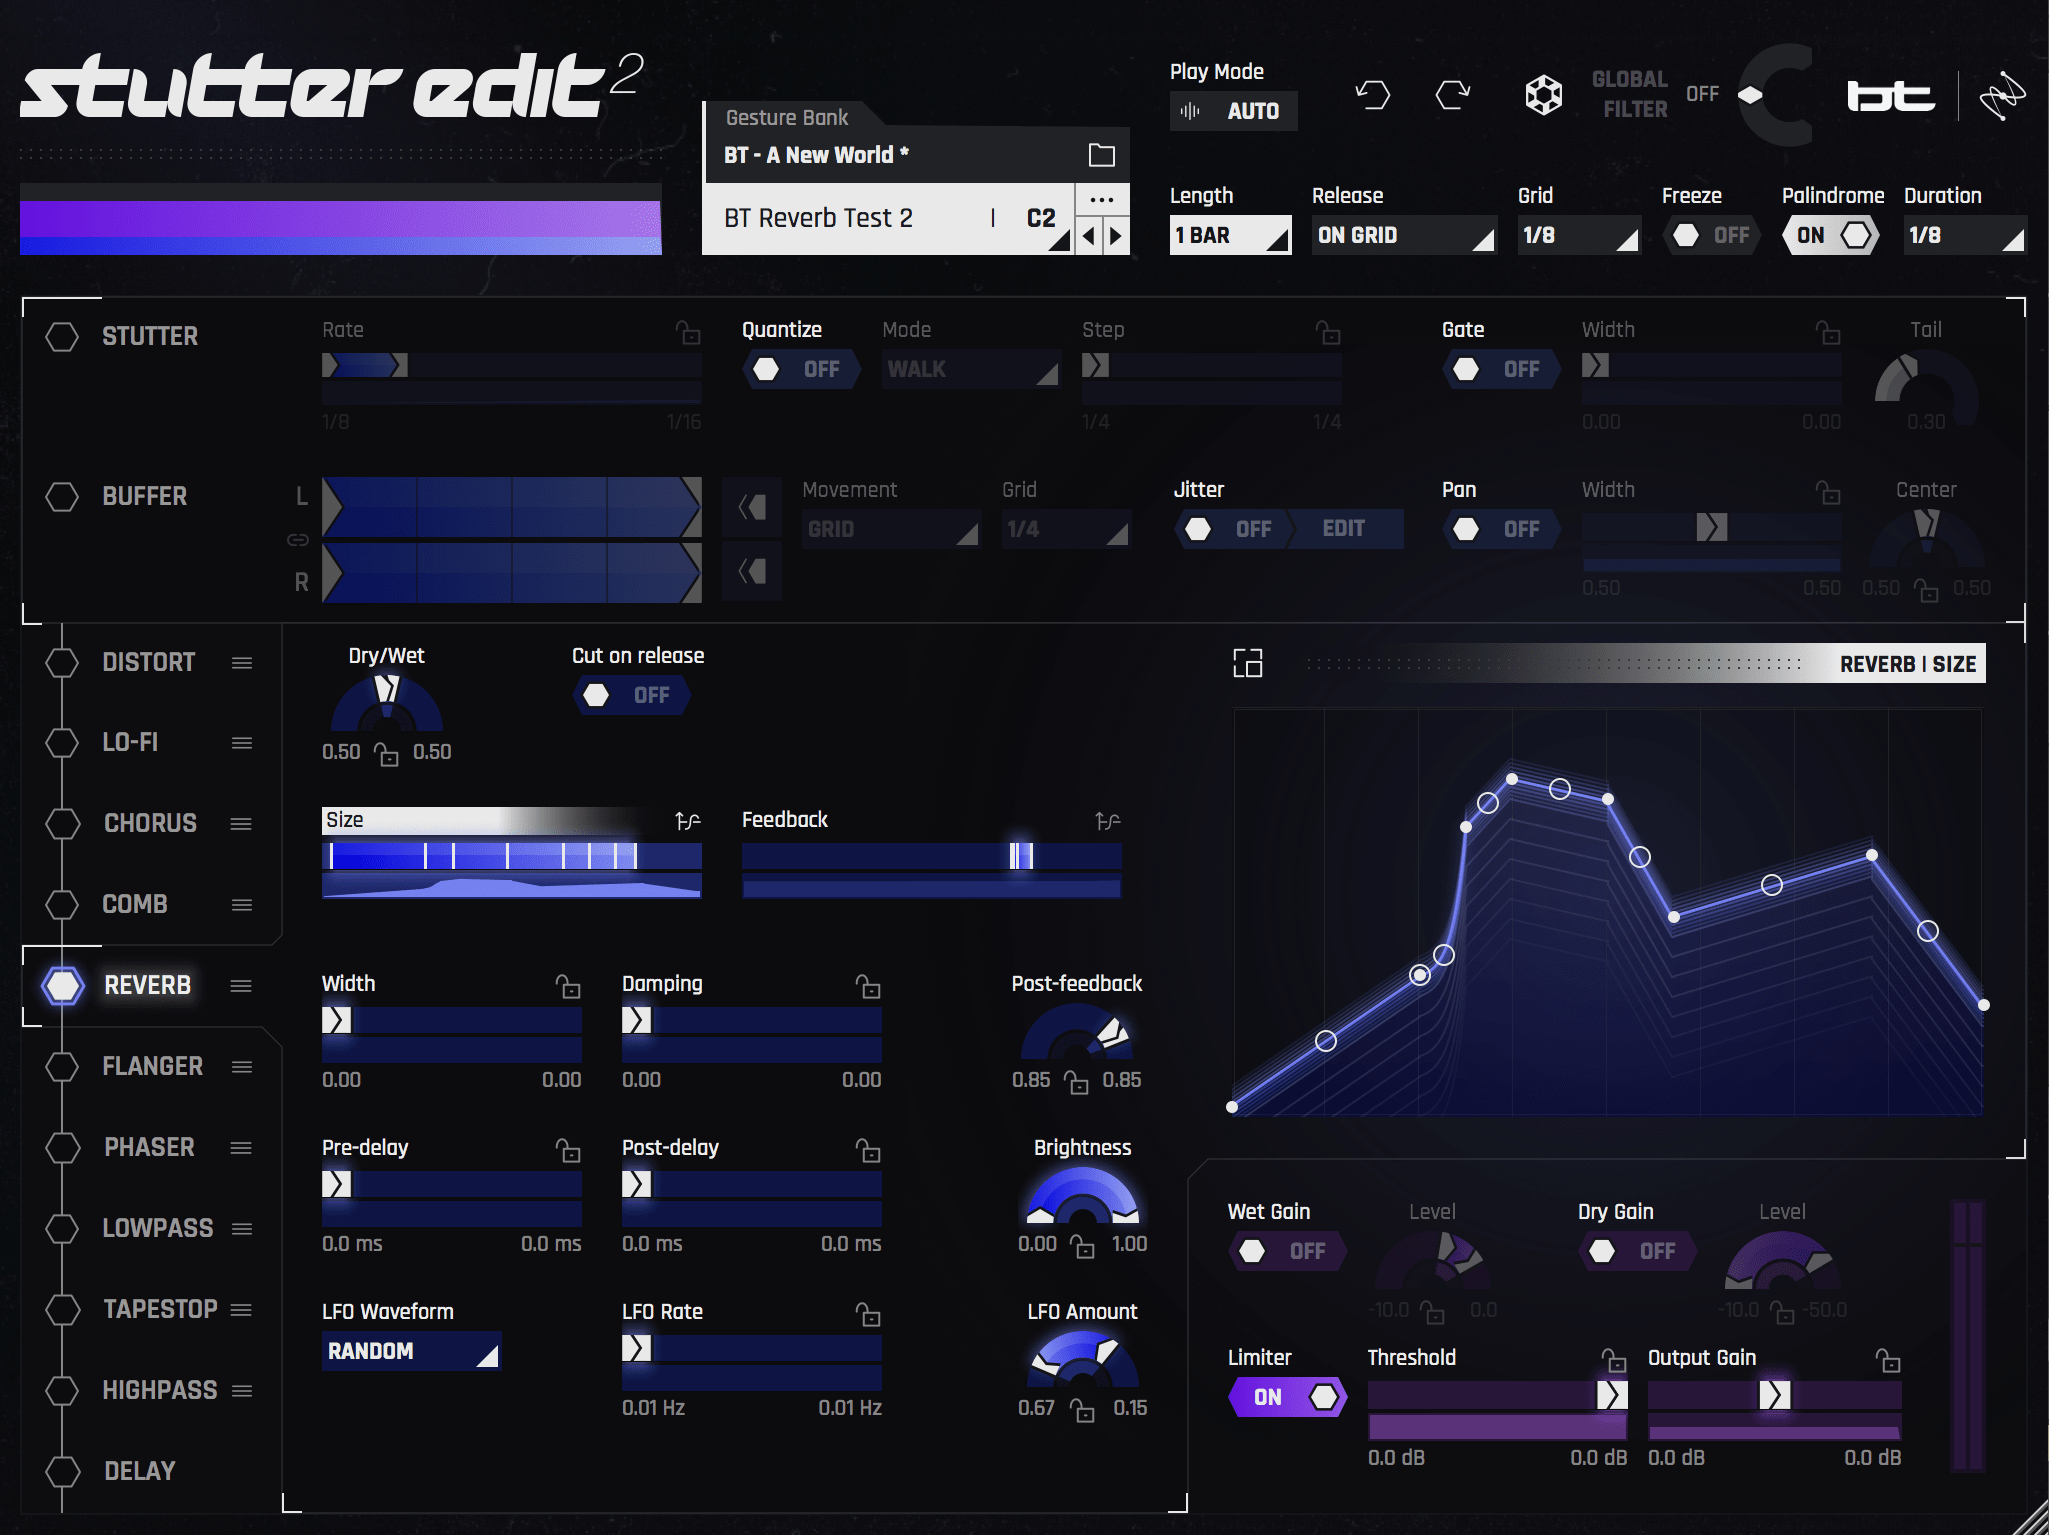
Pad with Reverb effects
We hear the pad warble rhythmically, whooshing as it moves through a jumpy rise-and-fall pattern. This isn’t so much a reverb reinforcement as it is a blast of rushing, filtered noise, like tonal wind. The Brightness parameter and LFO Amount, pictured in the bottom-center of the screenshot, are having a dramatic effect on this sound. Flatten these out, and the reverb doesn’t bloom as much.
Now, let’s try something else: we’ll keep the Size parameter static, but influence the Dry/Wet blend with the following curve:
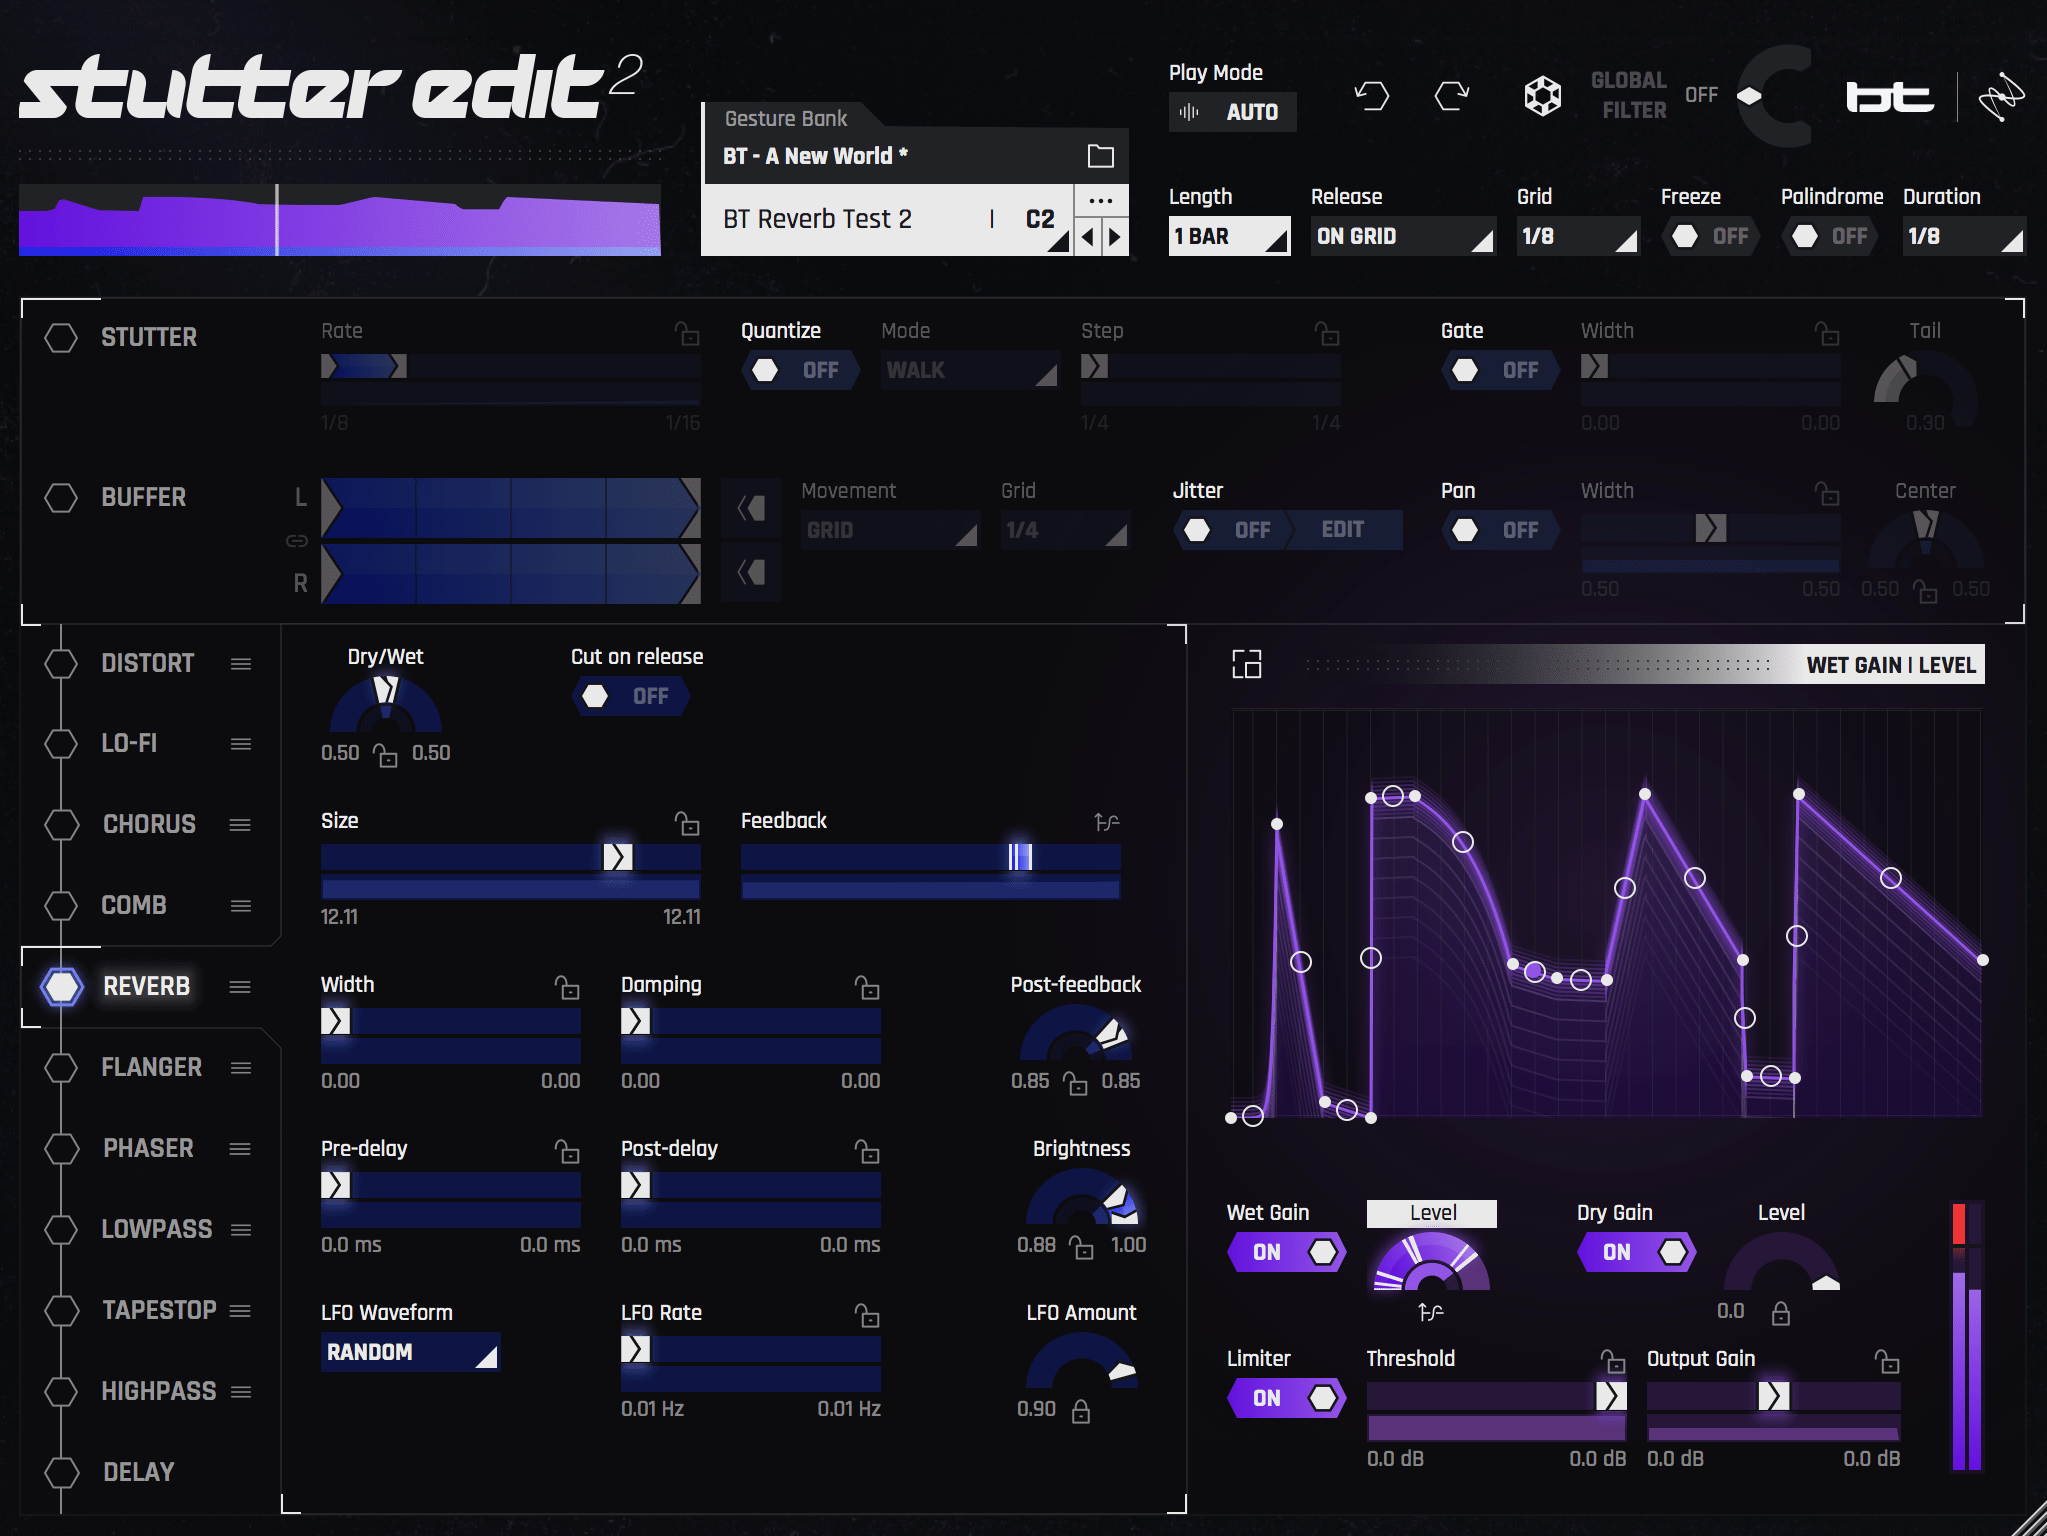
Pad with modulated Dry/Wet
Our pad now sounds like this:
We have no “whoosh” now, just rhythmic punctuations of reinforced sound. Since the Wet/Dry blend keeps shifting, we don’t hear the tails; we just get crazy moments of reverberation.
Whether you’re being subtle or heavy handed, using Stutter Edit 2 to affect your pads brings exciting and new possibilities to the sound.
6. Add comb filtering and other effects to lead synths
Here’s another way to embrace the subtlety of


Stutter Edit 2
Adding comb filtering is one way to deepen a sound. It can also deepen a lead synth. Observe this synth, played without effect:
Sounds good, but let’s see what comb filtering adds with the following settings:
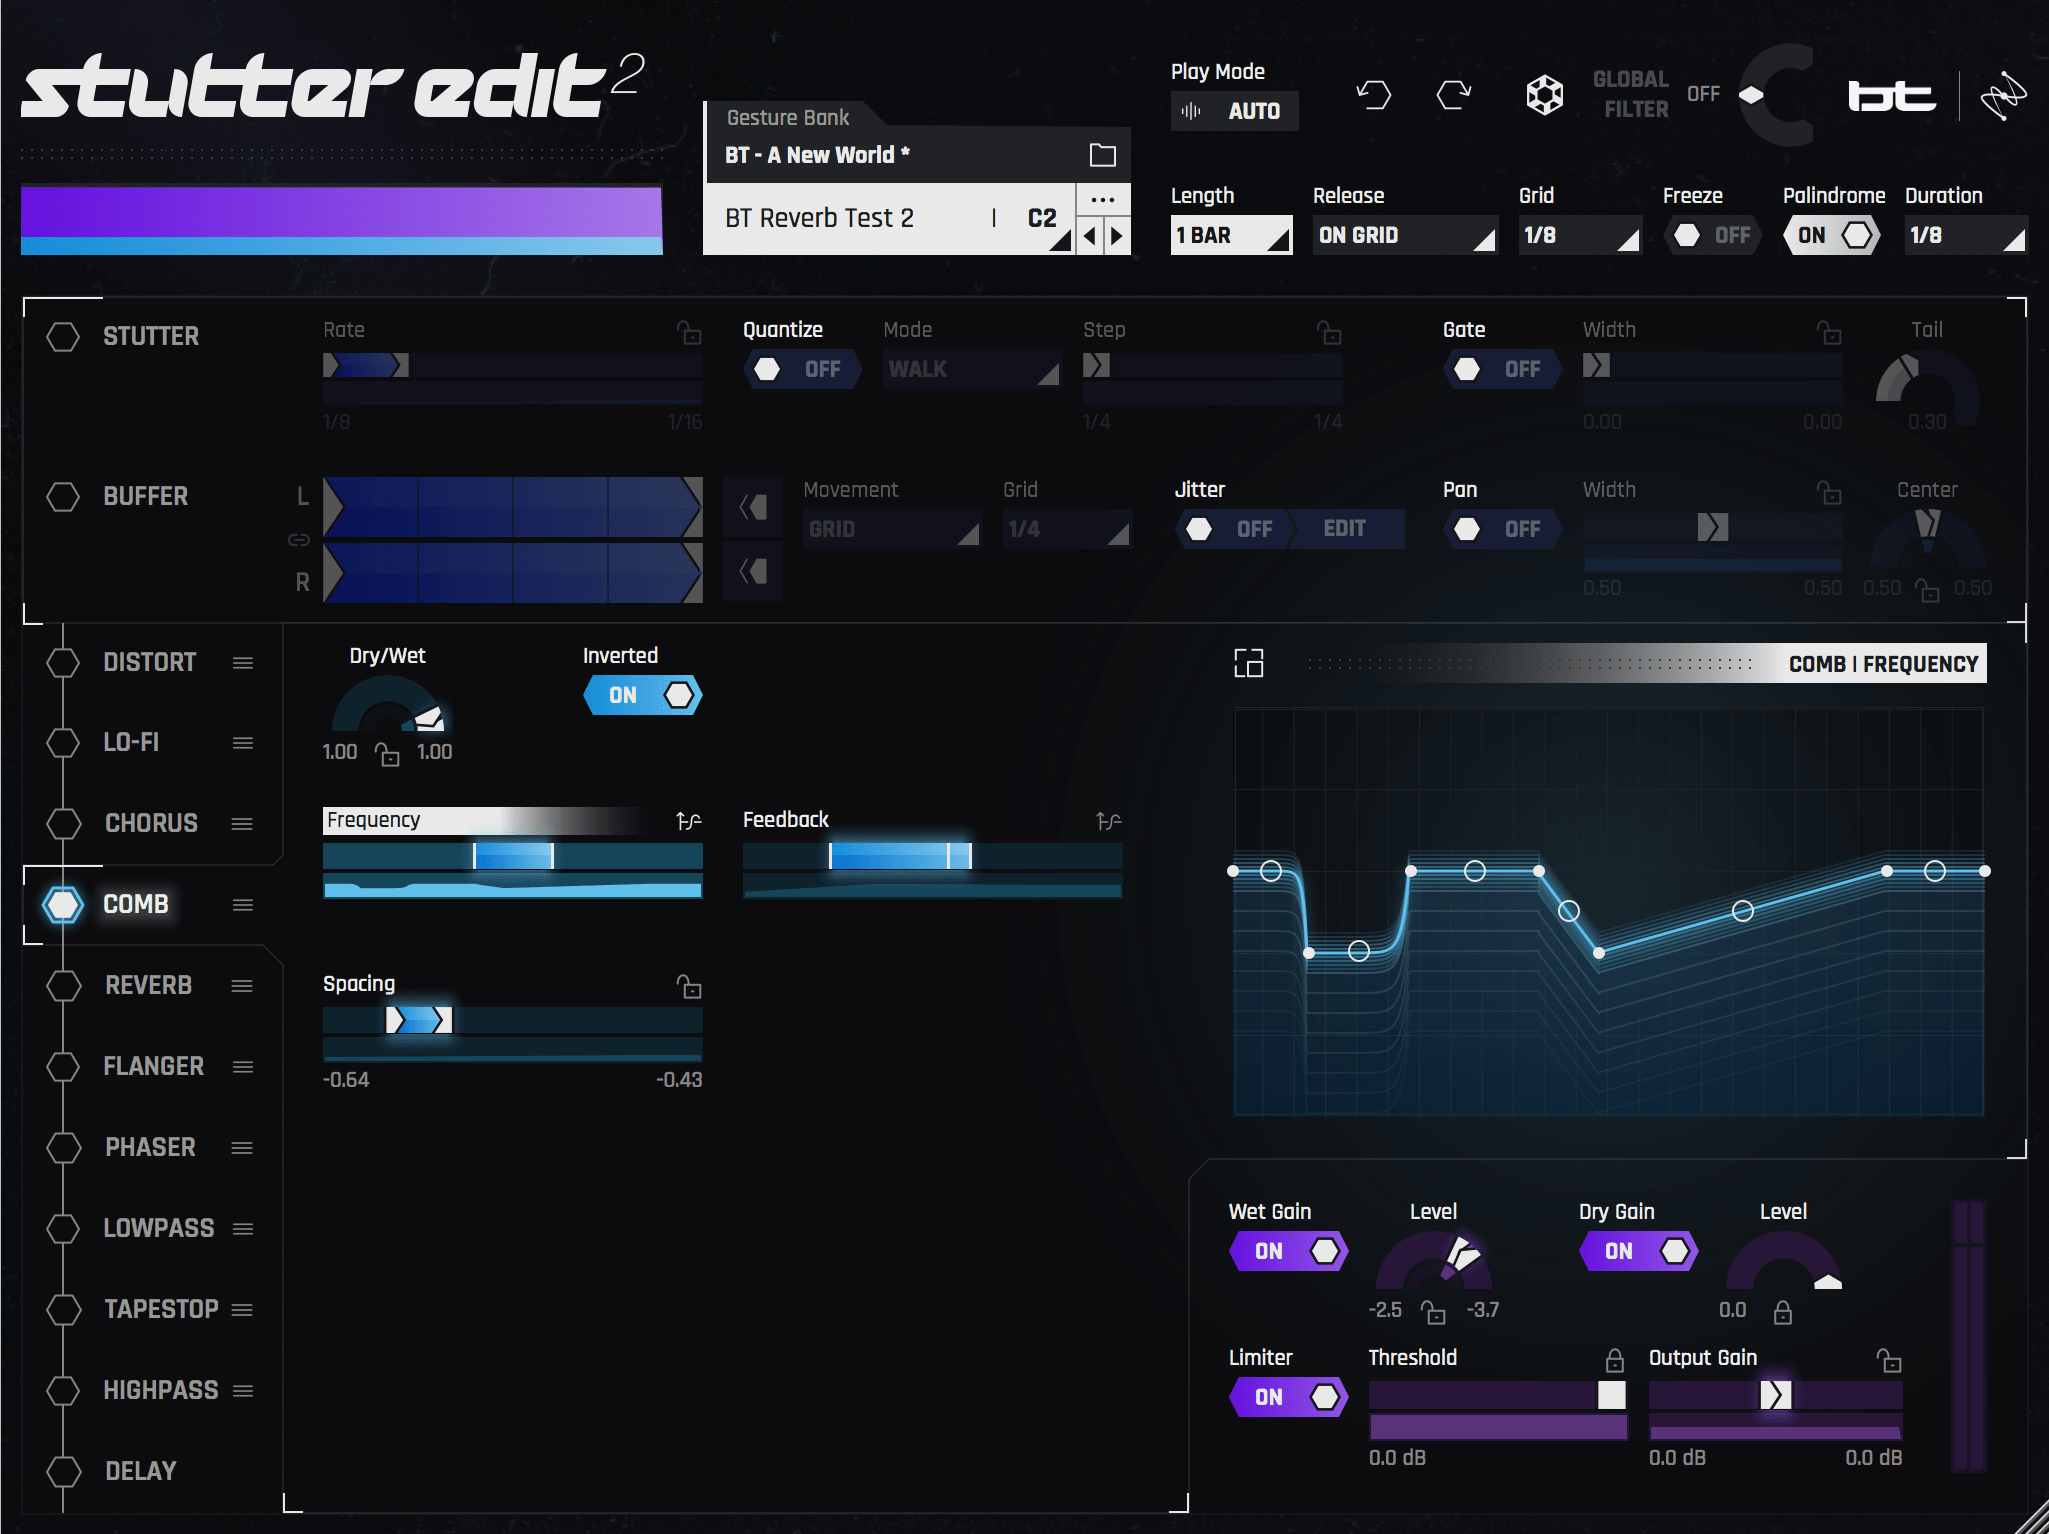
Lead synth with modulated Comb effect
We hear a weird sound—almost like the flurry of insects—blended with the tone, and again, this blend evolves over time. This dynamic evolution is adding to the dimensionality of the synth.
Of course, you don’t have to use this part of Sutter Edit 2; the plug-in provides multiple modulating modules. For example, here’s what Chorus does:

Lead synth with modulated Chorus effect
And—my favorite in this instance—here’s what Flanger does:

Lead synth with modulated Flanger effect
If these examples don’t make it clear, take the time to explore what Stutter Edit 2 offers for the purpose of deepening a lead synth—you won’t regret it!
7. Set up an instrument to trigger Stutter and your synth simultaneously
Going back to MIDI Mode, let’s consider that you can set up your DAW to play both a synth and an instance of


Stutter Edit 2
Here’s how to go about setting it up: configure your synth in your DAW, which in my case is Logic Pro X.

Setting up MIDI Mode in Logic Pro X
Then, you route your synth track to an auxiliary channel. I’m choosing bus 1.
As this is Logic Pro X, I’ve got Stutter Edit as a MIDI Effects HostTK on an abutting track, and I’m routing Bus One to the Sidechain input.

Sidechain setup in Logic Pro X
In total, the routing looks like this:
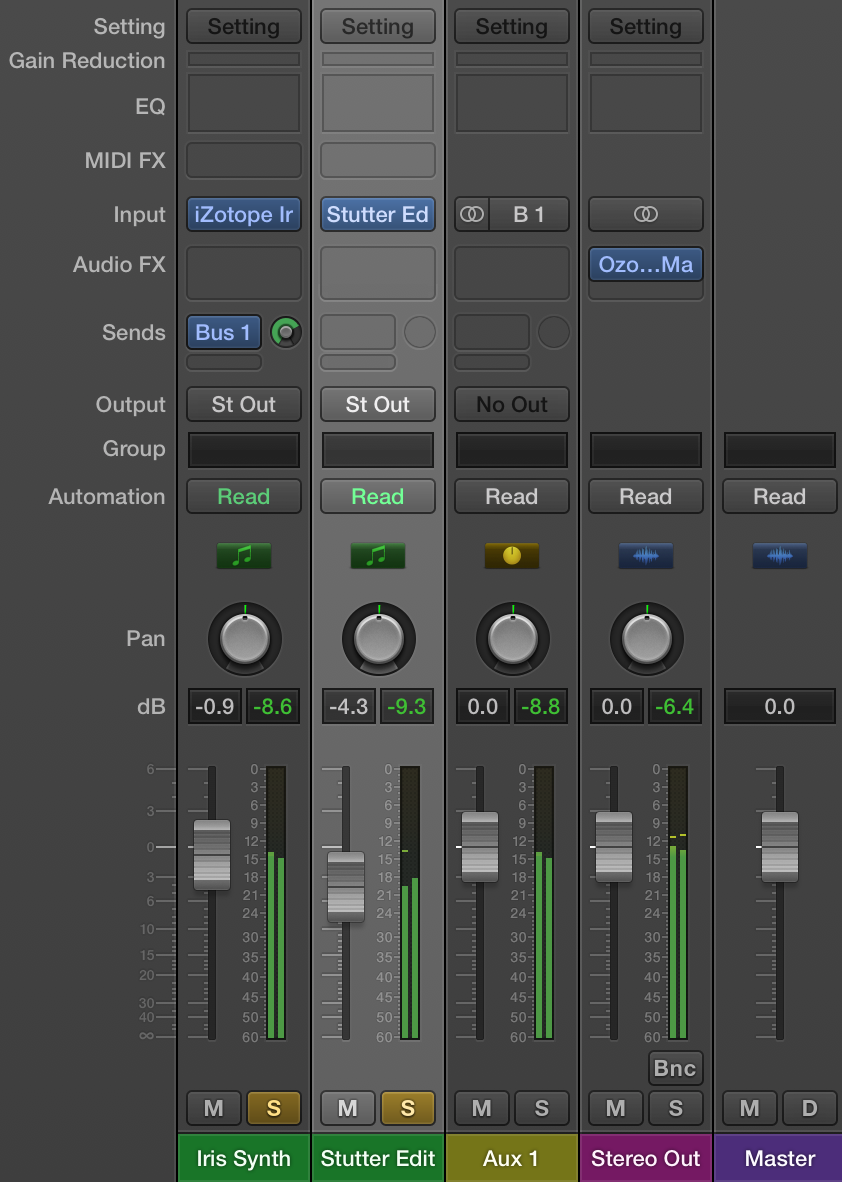
Routing Stutter Edit 2 in Logic to play it at the same time as Iris 2
I can now play both Stutter Edit and my synth at the same time. To do this well, I have to either program and load in my own patches that are tuned for what I want to do, or spend time preset-diving for Gestures that fit my composition.
For this example, I’ve chosen the preset bank Buffer Madness, and I’ve tweaked the wet/dry balance of one parameter for a more pleasing sound.
What does this get me? Well, here’s a line played with just the synth—in this instance, iZotope’s Iris 2.
Important notice: Iris 2 is no longer available for purchase from iZotope. We are continually developing new products, services, and solutions to enable and innovate on journeys in audio production. We occasionally need to retire older products in order to focus our resources and development efforts on building new, innovative products and features. Support for this product will remain in effect for 12 months from your date of purchase up through October 27, 2023.
Now, if I only recorded the sound coming out of Stutter Edit 2, it might sound quite strange:

Stutter Edit 2’s Buffer Madness preset bank
But if play both together, I can secure myself something interesting indeed:
This is an exciting way to compose music—in fact, you can use this technique for extensive and personalized sound-design creation, which brings us to our next tip.
8. Use Stutter to create bits of sound design for other projects
In a previous article on producing EDM, I interviewed Andrew Eisele, who advocated for having sound design sessions where you mess about with synths to create interesting, unique effects for use in your productions. You can also do this is


Stutter Edit 2
Now, I can take this audio and bounce it to a file, a file I can load up in my DAW for further tweaking through Stutter Edit 2. I chose to load up some untweaked presets—though of course, you can make your own Gestures. Here are 16 bars I’ve settled on after looping the measures in my DAW:
Pretty crazy, but let’s see what happens if I now use this as my sound design palette further.

Bringing everything together
I’ve taken my 16 bars and chopped them up among several tracks. One is panned left, another is panned right, and a third consists of low hits that I’ve kept centered, and EQ’d for more low-end heft. All of them have some transient shaping via Neutron. I’ve also put strategic slow downs on some of the hits for a crazier sound.
Lastly, you’ll note the green MIDI track at the bottom: this is Stutter Edit 2, fed by an auxiliary track made up of all three of these parts. Taken together, I’ve created this:
The takeaways
You’ll note that many of my tips have avoided advice on how to add glitch. That’s because


Stutter Edit 2
Instead, I’ve focused on tips that might make your sonic elements deeper, more substantive, more toothsome for those who’d listen to your mixes more than once. I hope you found these tips similarly toothsome too.
