Loudness Metering and Visualizations in Mastering | Are You Listening? Season 2 Episode 3
Learn why loudness metering and visualizations matter in mastering, and how they can help keep the subjectivity of human perception in check.
Today, we’re talking about loudness metering and visualizations in mastering. We’ve all heard the phrase “Don't use your eyes, use your ears,” and there's a lot of truth to that. We need to listen carefully to accurately evaluate what we’re hearing and make decisions.
That being said, the visualizations we get from a loudness meter give crucial confirmation that we're actually hearing what we think we are—allowing us to address audio issues at the edges of our hearing. Meters help us make better decisions regarding levels, frequency content, stereo spread, and dynamic range. For example, if your monitoring environment doesn't clearly reproduce low frequencies, a meter can reveal issues so you can address them to ensure they’re not creating a problem for you downstream.
Watch the video below to learn more about the importance of metering and visualizations in mastering.
What is a loudness meter?
To navigate the task of mastering, it's helpful to understand what these visualizations are showing us, so let’s cover some quick definitions for the most common types of meters. There are two basic kinds of measurements that we consider with most amplitude meters: peak level and RMS level.
Peak level
Peak level is the highest signal level that a selection of audio achieves as it’s playing along. It’s important to pay attention to peak level because if it exceeds the maximum allowable level (0 dBFS in most digital cases, or +24 dBu in the analog world), the system won’t be able to reproduce signal at this amplitude, and audio will clip and distort.
Audio will usually reach peak level during loud transient material, like the kick and snare drums. Below, you can see the top of the meter moving very quickly, responding to the fast-moving parts of the kick and snare signals. On the top of the meter, there’s a reading indicating a peak level of -0.5 dBFS, below the 0 dBFS maximum. That tells us we’re not distorting, so you can continue on with the next step in your work.

RMS level
However, peak level doesn't really tell us anything about perceived loudness, because our brains need a bit longer to evaluate pitch or loudness. This is why we measure the RMS (root mean square) level, which measures the average loudness over a window of about 300 milliseconds. As a result, the RMS level will generally show how loud a song will appear compared to others. This more closely matches how our brains perceive loudness.
The peak level is inevitably going to be higher than the RMS level because signal will usually only spend a short amount of time at the peak level. RMS level averages these peaks with the rest of the audio. Between these two measurements, you can quickly understand the presence and persistence of your audio (RMS) and its relationship to distortion (peak).
Crest factor: the difference between peak level and RMS level
The difference between peak level and RMS level is called the crest factor. By measuring the difference between the maximum level and the average level, we get a good idea of how dynamic a track is.
Depending on the genre or intended vibe of your master, we may sometimes want a higher crest factor to emphasize a dynamic arrangement. Sometimes, we may want to reduce the crest factor to increase the perceived loudness, so we’ll turn to solutions like limiting, compressing, or gain riding. Regardless, there is no single peak-to-average relationship that works 100% of the time.
Oasis’ (What's the Story) Morning Glory? is one of the loudest records ever made (somewhat controversially loud), and has a very low crest factor. If you look at it on a meter, you'll see almost no movement on the meter. The average level sits up very high, very close to peak.
On the other hand, Beyoncé’s “Partition” has a very wide peak-to-average relationship, which corresponds to the dynamics in the musical arrangement.
LUFS / LKFS
Our brains and ears are not equally sensitive across the frequency spectrum. If you were to play a 1 kHz tone back at -20 dBFS, and then play a 50 Hz tone at -20 dBFS, you’d notice that the 1 kHz tone would sound nearly 10–12 dB louder. In both cases, however, the meter would be reading -20 dBFS, which doesn’t really reflect our perception of the audio.
Therefore, we often use the LUFS (Loudness Units to Full Scale) measurement (sometimes called LKFS, but they’re essentially interchangeable). This measurement takes into consideration that we take an average measurement across about 300 ms to register loudness, and are more sensitive to certain frequencies. As a result, LUFS is a useful system to measure perceived loudness.
You can use LUFS to quantify why some tracks sound louder than others, even if they’re mixed at the same level. However, because the LUFS system takes perception into account, it isn’t used for purely technical level measurements, like in setting the threshold of a compressor.
Types of LUFS measurements
There are three different kinds of LUFS measurements. The first two, momentary and short term, are reasonably similar in definition and use. The third kind is called integrated. Let's take a look at how these different measurements interact.
Momentary loudness
Momentary loudness (measured on the right in LUFS in Insight 2) is averaged over about 300 ms. Short term loudness on the left is measured over a period of about 3 seconds. As a result, the two often measure pretty closely to each other, but short term loudness will measure a bit lower because it’s averaging over a longer window.

Momentary and short term loudness measurements are often close to one another
This three-second window for short term loudness tells us a bit more about the persistence of the sound, or a more general impression of the loudness of a track. Both momentary and short term loudness measurements are perfectly viable ways to measure average loudness in a track.
To understand integrated loudness, however, let’s dive a bit into the history behind it.
Integrated loudness
If you're watching TV, and a commercial plays where the advertisement’s audio is suddenly much louder than the show’s audio, it can be really jarring. Advertisers may do this intentionally to get your attention, but this is problematic for you, the viewer. To prevent this, standards for broadcast audio associated with video were set to limit the level of audio across an entire program, both shows and advertisements.
This measure of level across a full program is called integrated loudness. If you look at the integrated loudness value on Insight 2, it changes much more slowly. This is because it’s averaging the entire length of the recording. In the United States, The Calm Act was brought into law to set a target integrated loudness for broadcast audio. In the United States, it's -24 LKFS. In the EU, lawmakers chose to set up specs and industry regulation with the EBU R128 spec with a target loudness of -23 LUFS. If a program isn’t at these levels, the mix will be turned up or down to conform.
So, why should we care about integrated loudness in music? Most music streaming services now implement loudness normalization, in which integrated level is measured, and a song is conformed to a playback standard.
You can use an integrated LUFS measurement to measure your mix and understand how it might be affected on different streaming services, depending on their playback standards.
Considerations
When you’re mastering, integrated LUFS should be the last thing you’re thinking about. It’s much more important to mix and master music so it sounds and feels good, not so it hits some target.
If you’d like to check your track’s integrated loudness, you can use a tool like Insight 2 and play the track all the way through. Or you could use something like RX, which has a window called waveform statistics, which will give level information for a full recording or a selection of a recording. But again, this is something that you should only worry about when you're done with your master.
Working with a meter
When metering, you’ll generally work with peak and average level. This gives an idea of the remaining headroom and the general loudness of the track. If the average loudness isn’t high enough, you can experiment with things like limiting to push the average level higher.
The mix in the screenshots below hasn’t been mastered yet. You can see there’s a bit of headroom (peak level isn’t at the maximum) and that average level is between -13 and -16 dB. Since the track here is a rock track, we’re going to need another few dB of loudness to satisfy the genre standards and the artist.

Headroom in a rock mix in Insight 2 (note the peak level)
Increasing the level would bring our peaks above 0 dB, so let’s use Ozone’s Maximizer module to achieve this extra loudness. We can see on Ozone that we’re just limiting the peaks a bit (the kick and snare), with only a dB or two in gain reduction.
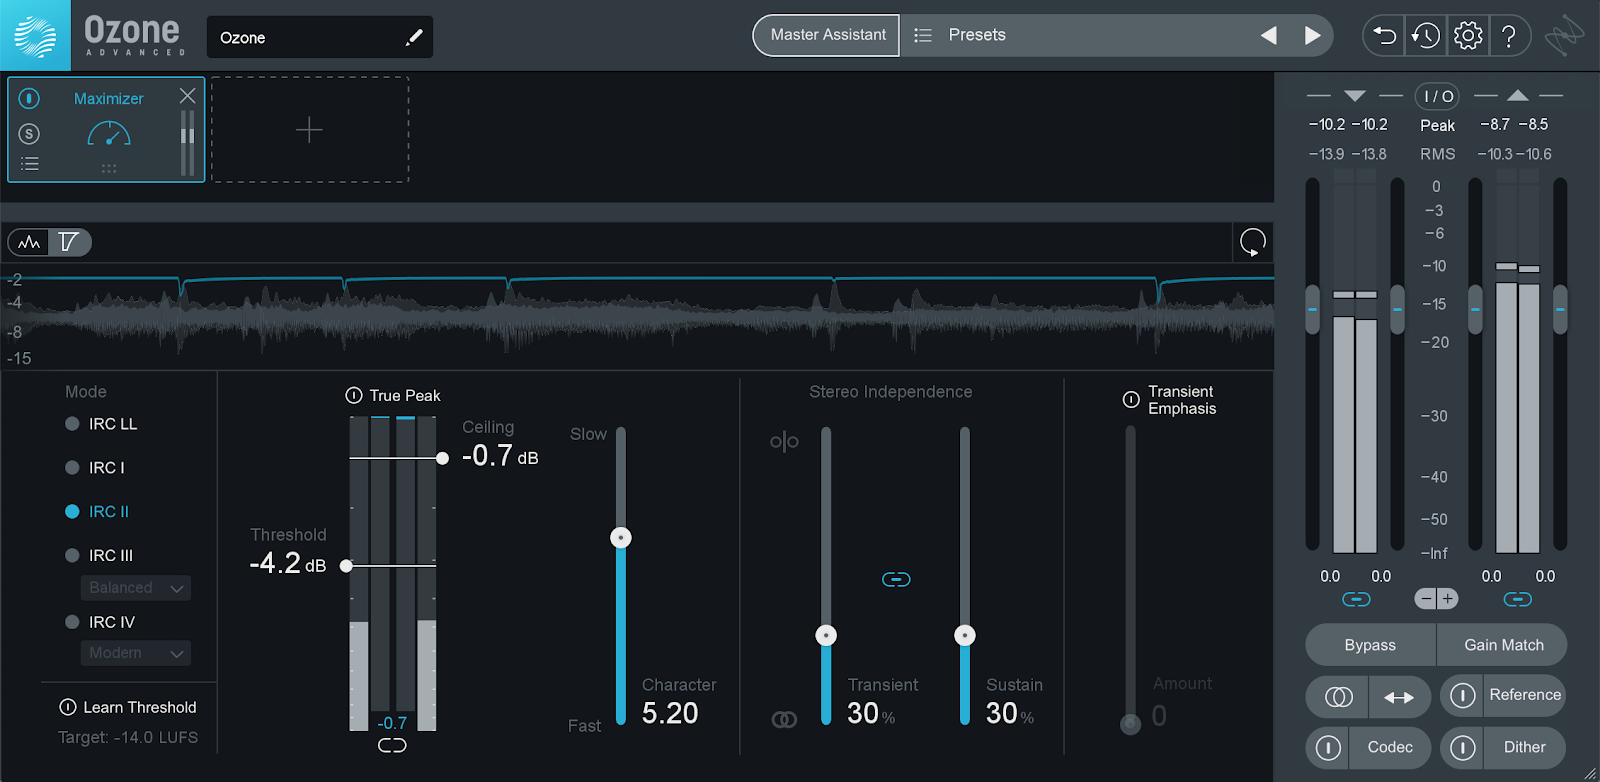
Limiting peaks with a few dB of gain reduction with the Maximizer in Ozone 9
Look at the meters on Insight below—the average level has now come up. This will be closer to the loudness the artist wants given the genre (rock), and we know we’re not distorting because our peak level is below 0 dB.
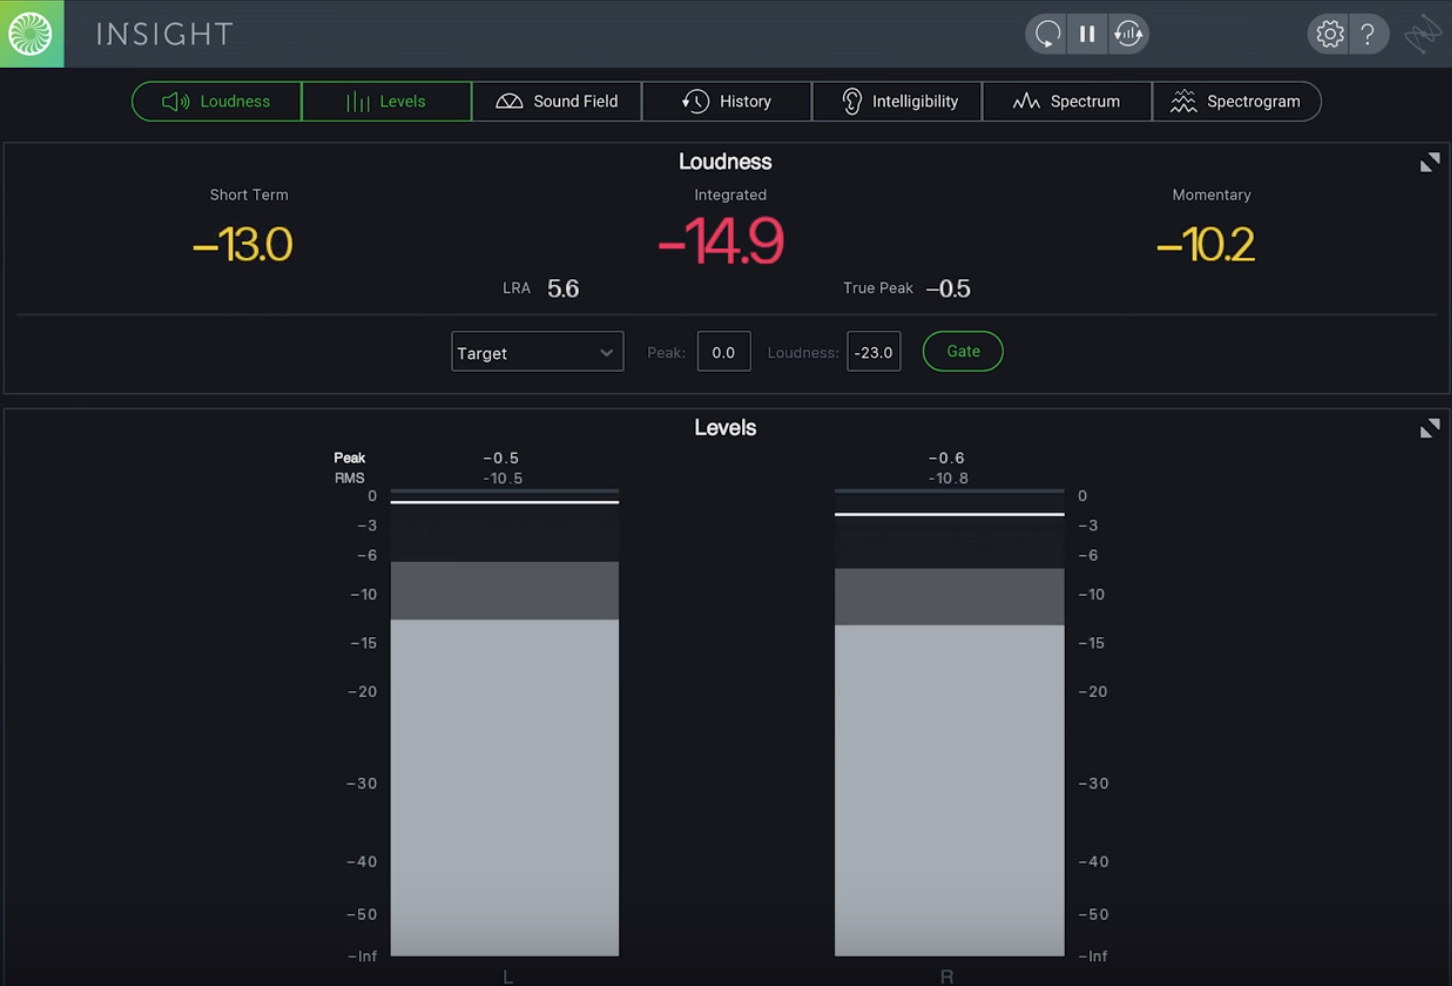
Insight 2 meters after limiting peaks in Ozone
This obviously doesn’t cover the full range of mastering decisions, but the peak to average relationship—crest factor—is a really important aspect of the mastering process.
Other important visualizations for mastering
Most of the visualizations we’ve discussed so far deal with amplitude, but there are certain visualizations that help us address frequency more directly.
Tonal Balance Control crest factor meter
Because we’re less sensitive to lower frequencies, lows need to be at a louder level in a mix, so they often take up more headroom than any other area of the frequency spectrum. Peak content in the low end often belongs to the kick drum, while the bass will drive more of the average low end level.
A loud kick drum will eat up a lot of headroom in a master and make it challenging for us to hear the bass, or for us to have the headroom to push the track louder without distorting. On the other hand, if the kick drum is buried underneath the bass, we lose a sense of drive that we get from the low transient of the kick.
The crest factor meter in the upper left-hand corner of Tonal Balance Control shows the crest factor of the low end to help us better understand this kick-bass relationship. In the screenshot below, you’ll notice that we have a fairly high crest factor. This tells us that the peaks are a bit loud compared to the average level in the lows, which could mean that the kick is a little hot. We may want to find a way to control the level of the kick drum, using EQ, compression, or even Low End Focus.
Spectrograms
We can also use a spectrogram tool like the one in RX to see parts of the signal we can’t hear very well. See in the spectrogram below that there are some strong pulses between 10–20 Hz. While we may not hear this very well, it is taking up headroom. We could roll off a bit of that inaudible low end to free up headroom and allow us to bring the whole track up, without a noticeable difference in the lows.
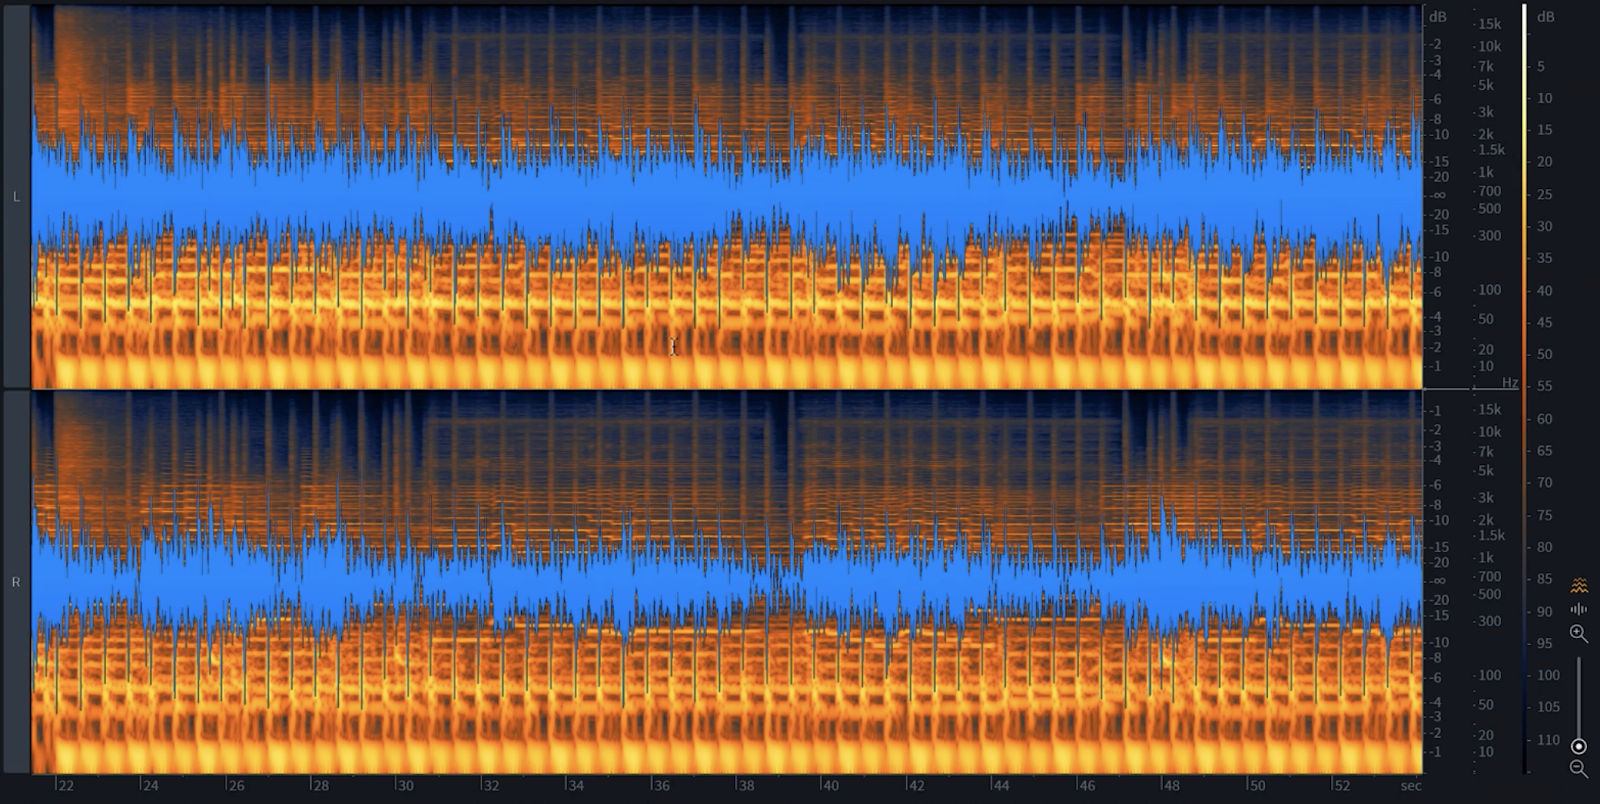
Strong pulses between 10–20 Hz in the spectrogram
It may be tempting to use a high pass filter to take this out, but high pass filters also create their own issues. A low shelf can be a gentler, less problematic tool for EQing audio. We can also use a spectrogram to investigate high frequency content, another place where we’re less sensitive. This is a great way to find noise, clicks, pops, and other artifacts we can’t hear as well.
Conclusion
Proper visualizations are a great safeguard against our own flawed sense of subjective perception. If you can’t trust your ears all the time, you can at least trust your meters and visualizations to be a gut-check for listening. Whether you’re working with Peak level, RMS level, crest factor, or any of the three types of LUFS measurements, knowing your way around a meter and why metering can make or break a mastering session will set you up for success with your next project.
