7 Tips for Making Dialogue More Believable with Exponential Audio Reverbs
Learn how Exponential Audio reverb plug-ins can make dialogue more natural and believable in post production scenarios.
Reverb is a powerful tool in post-production—it can suggest spaces both real and suitably imaginary. Need to transport a character to a spaceship? A reverb will help you. Need to simulate an open cornfield on a line of looped, inserted dialogue? Reverb can help you sell that ambience.
But reverb on its own is just a part of the battle. A reverb, just like any other tool, must be massaged into place to convince the audience. What follows is a list of tips to help you place a character in an appropriate location, first using reverb, and then tweaking elements around that reverb to get the point across.
We’ll be using Exponential Audio reverbs in these examples. These are high-quality, exceedingly tweakable reverb plug-ins (and new to the iZotope family!). They are algorithmic verbs, rather than convolution-based, but don’t let that influence your decision to use them in post-production—you can get a lot out of these tools precisely because of how tweakable they are.
1. Choose the ambience that best fits your scene
A scene can be set anywhere. It may seem obvious, but this presents a whole bunch of work when matching reverberations to the subject matter. A character might be standing in a closet. Maybe they’re on the street. Maybe they’re on the moon. Each location presents a different set of acoustical conditions, necessitating different reverbs.
One should always tailor decisions for the specific location of a scene. An empty plaster room has an identifiable sonic signature. A tiled bathroom has its own sound too. A street sounds different depending on the buildings, the cross streets, the width of the avenue, etc.
Look for reverbs that transmit the quintessence of these sounds, doing so first by broad category (i.e., preset diving), and then by tailoring the parameters for what you’re seeing in the shot. Is the bathroom large and roomy, like a suburban house? Or is it cramped, like a New York City apartment?
The way you massage these settings together is relatively simple. Let’s take the following scene, where a woman is standing in the middle of a field. Here’s the raw audio of her voice.
It’s pretty noisy, but the field-recording provided sounds quite different from the noise on the recording.
Together, they sound like this:
You can hear the two don’t blend well. So we de-noise within reason, not trying to incur artifacts:
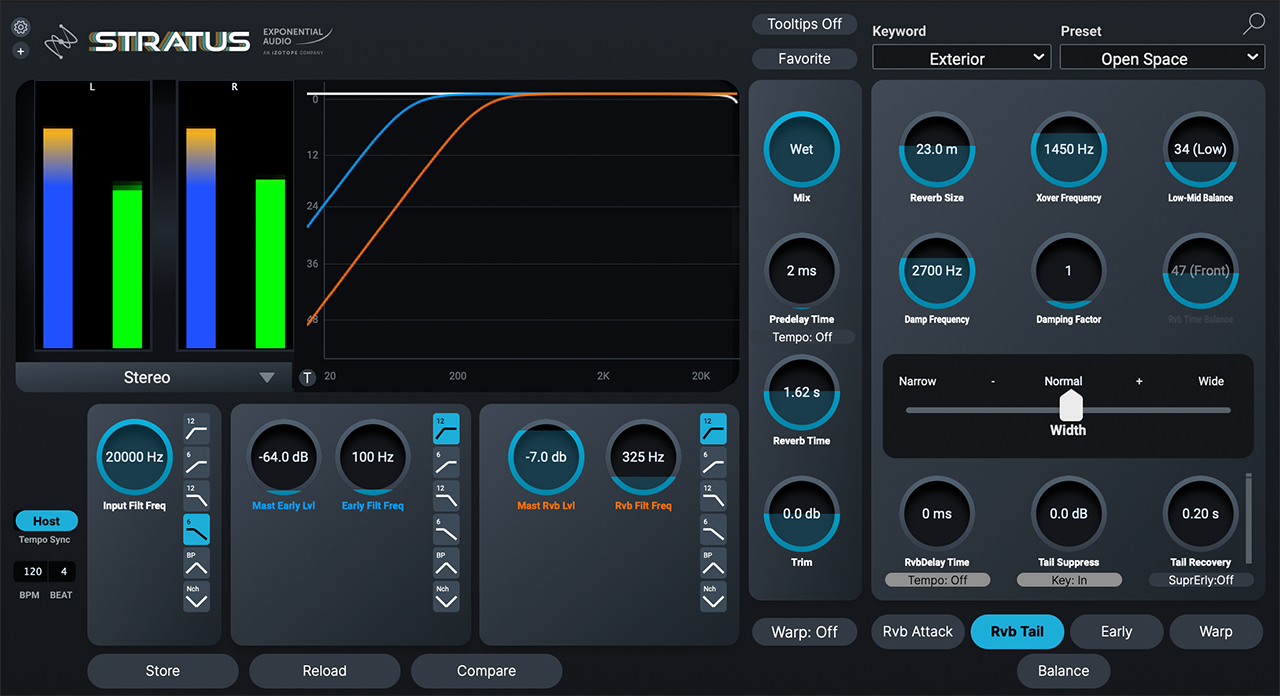
Now we hear the issue of congruence even more—the vocal doesn’t sound placed; it doesn’t sound grounded in the scene. So this is where we use reverb to our advantage. For the purposes of this piece, we’re using Stratus, a powerful reverb with stereo and surround functionalities. We see, in the preset browser, a classification of keywords by space, and we choose exterior.

Stratus Exterior / Open Space preset
From there, we choose the right kind of exterior space. I’m not providing video, so you have to take my word for it, but this character is standing in a wide open field with only a few trees. So let’s select a preset that fits with an open field. Open Space seems like a good place to start. That verb, on full blast, sounds like this.
As it is, the preset is too echoey and too dark for our purposes—dark when compared to the room tone—so we back off on the early reflections where the echo is most prevalent.
We’re also going to back off on the pre-delay time, because that adds to the echo. If we were standing far away from this woman, we might hear her voice echo a bit; but the shot is tight, and the echo changes the vibe of the scene, so we turn it down.
Finally, we increase the tail’s filter frequency from 100 Hz to 325 Hz, so that less of the body of the vocal is emphasized, and it’s a bit brighter. That looks like this:

Stratus with reverb filter frequency at 325 Hz
Now it sounds like this:
It’s a subtle difference, but it makes a difference when it’s edged into the scene:
2. Add original ambience back in wherever you can
You might notice that the first time you heard the voice against the background (Example 3), the ambience surrounded her entered abruptly as she spoke—it came in right as her voice did. In terms of timing, this didn’t match with the ambience that was provided.
But in the last clip, that issue had gone away completely.
Here we used editing to our advantage: luckily, she doesn’t speak for a good few seconds, and the ambience plays on. I copied her silence to the beginning of the track and crossfaded it with the start of her line. Now, her ambience is a constant addition to the sound—you don’t notice it coming in if it was always there.
Little editing tricks like this go a long way toward fostering congruence and believability.
3. Feed a little room tone to the reverb as well
You may notice, in the previous audio examples, that it still doesn’t feel 100% real—we’re missing some interplay between the room tone and the speaker. It’s as though we’ve fed the speaker to a dedicated reverb and slapped some room tone over it.
It’s exactly like that, actually, because that is exactly what we’ve done.
To marry the two together, try feeding a little bit of the room tone to the reverb as well. Be careful, however, as you need to be exacting in the amount you send to the verb, or else it winds up sounding even worse. This is a believable level, I’d wager:
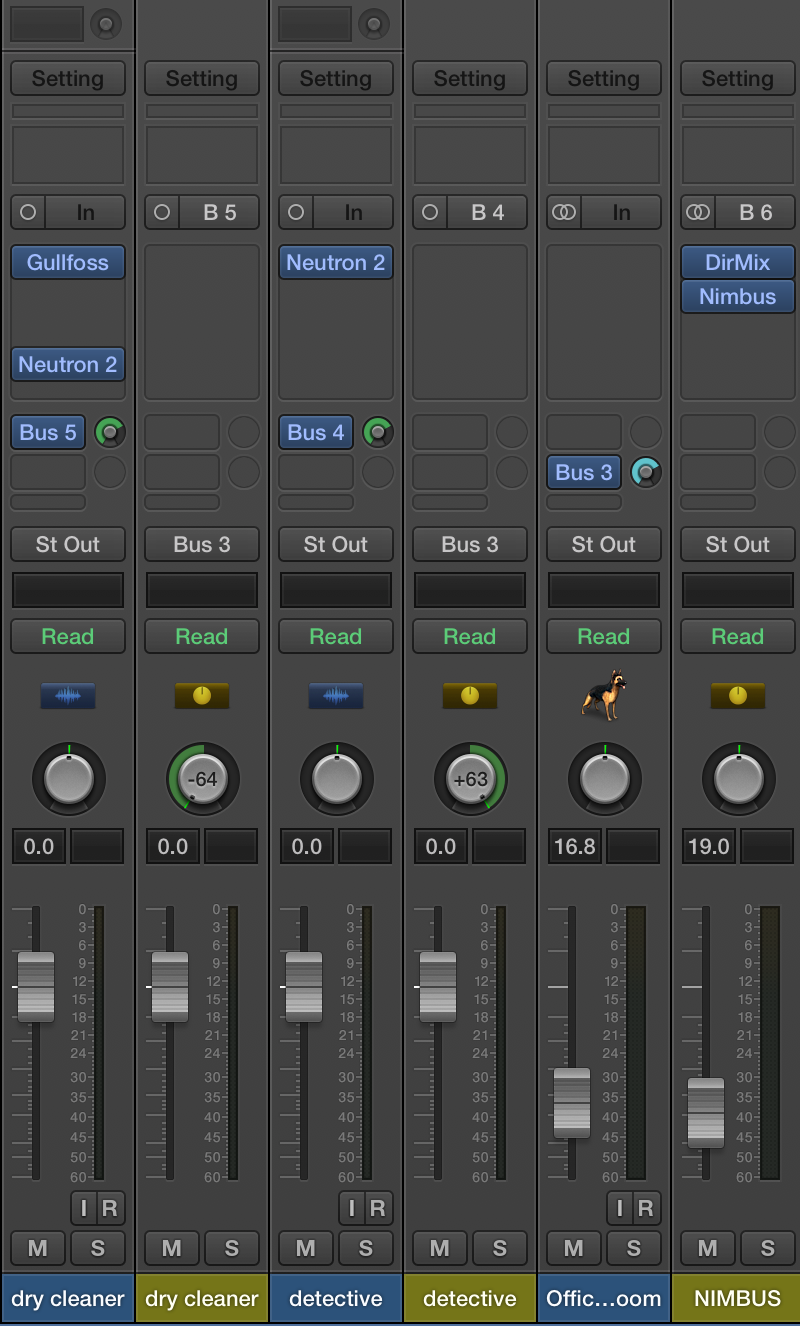
There’s another alternative that give us a more believable result, depending on the scene: route the room tone (in this case, field noise) as well as the vocals to a dedicated bus. Then, slap the reverb on this bus. After that, we mess with the Wet/Dry mix to blend the wet signal in as needed—a dab will do you, but this can also cohere the track.
That might sound like this:
In rare instances, it might be wise to combine both techniques: send the vocal to its own, controllable, dedicated reverb; then copy this reverb to the aux channel and dial back the Wet/Dry blend from 4% to 10% or so.
4. Let your ambience follow the movement of the scene
Not all scenes are static. A scene could move through rooms; as scene could comprise two people talking over the phone, each in their own house. You must account for this in your reverberation choices.
Consider that a person moving from one room to another might necessitate two different reverbs, each set to model their own room, and each blended into the scene dynamically. You would need to use automation here. Perhaps a character walks from their living room to the kitchen, where the surfaces are different, and the shapes of the room also change.
One way to make this feel more real, especially when a lav is used (and might block out the natural ambience of the room), is to automate the living-room reverb down the closer the character gets to the kitchen, while simultaneously raising the level of the kitchen verb as they approach.
Of course this would be need to be done subtly; you might get more mileage setting the reverb return tracks quite low, and automating the level of the sends themselves so you have more room to work with.
Do keep in mind that with a well-recorded character picked up by a boom, you might not need to employ this technique, because room tone will already be married to the voice. In an audio drama, fictional podcast, or otherwise auditory/literary medium, you might need to use this trick more audibly than you do in film work, because sound is all you got, and that stuff tends to be recorded in studios that don’t represent their ambiences.
5. Consider the location of your character in a shot
In stereo mixes, we often pan our characters right down the middle, especially if there are two of them, and if they are relatively centered in the shot. Why do we do this? Because not doing it rather annoying to the listener, especially if they’re not dead center in the listening position. This “rule” can be creatively broken if the character is far enough afield to warrant repositioning through panning—and breaking the rule is especially effective if the character moves from the far left or far right to the center.
Regardless of these safe panning schemes, we can emphasize a character’s positioning through subtle reverb trickery. I’m not advocating panning the reverb itself to the left or right—the reverb represents the whole space, and we need to keep that in mind. Instead, try positioning the inputs to the reverb of two characters to represent their locale.
Say we’ve got two people relatively close to the center.
One’s a little to the left, and the other’s a little to the right. They sound like this with no panning:
We’ve decided we want to use reverb to make them feel more positioned in a locational space. We create a reverb bus, but we shouldn’t send these characters directly to that bus. First, we’d send them to an intermediary bus, one that we could pan, and then assign the output of this panning bus to the reverb. It might look like this.

Panned intermediary bus
And sound like this, on its own:
But in the scene, it sounds like this:
Don’t be overly dramatic with this technique—use just enough to suggestion reality.
6. Consider room reflections in relation to where a person is placed in the room
You know all those things we’re trying to get out of our rooms as audio engineers? Room reflections, flutter echo, and the like? We hate them, but real people live in them. Thus, scenes in real locations exhibit the tonality of these undesirable acoustical phenomena.
Nothing makes a room sound cheap like a flutter echo, for instance. Not surprisingly, introducing a flutter echo into the reverberation of a character will make a character feel like they’re in a cheap room. This works effectively well if the scene takes place in a cheap room.
A flutter echo is build up of exceedingly short delays, so putting such a buildup into the reverb might communicate this flutter echo. We can do that within Exponential Audio reverbs themselves by playing with the Early Time of the early reflections (try going very quickly, like 11 ms), and by changing the amplitude of attack (with the Early Attack parameter).
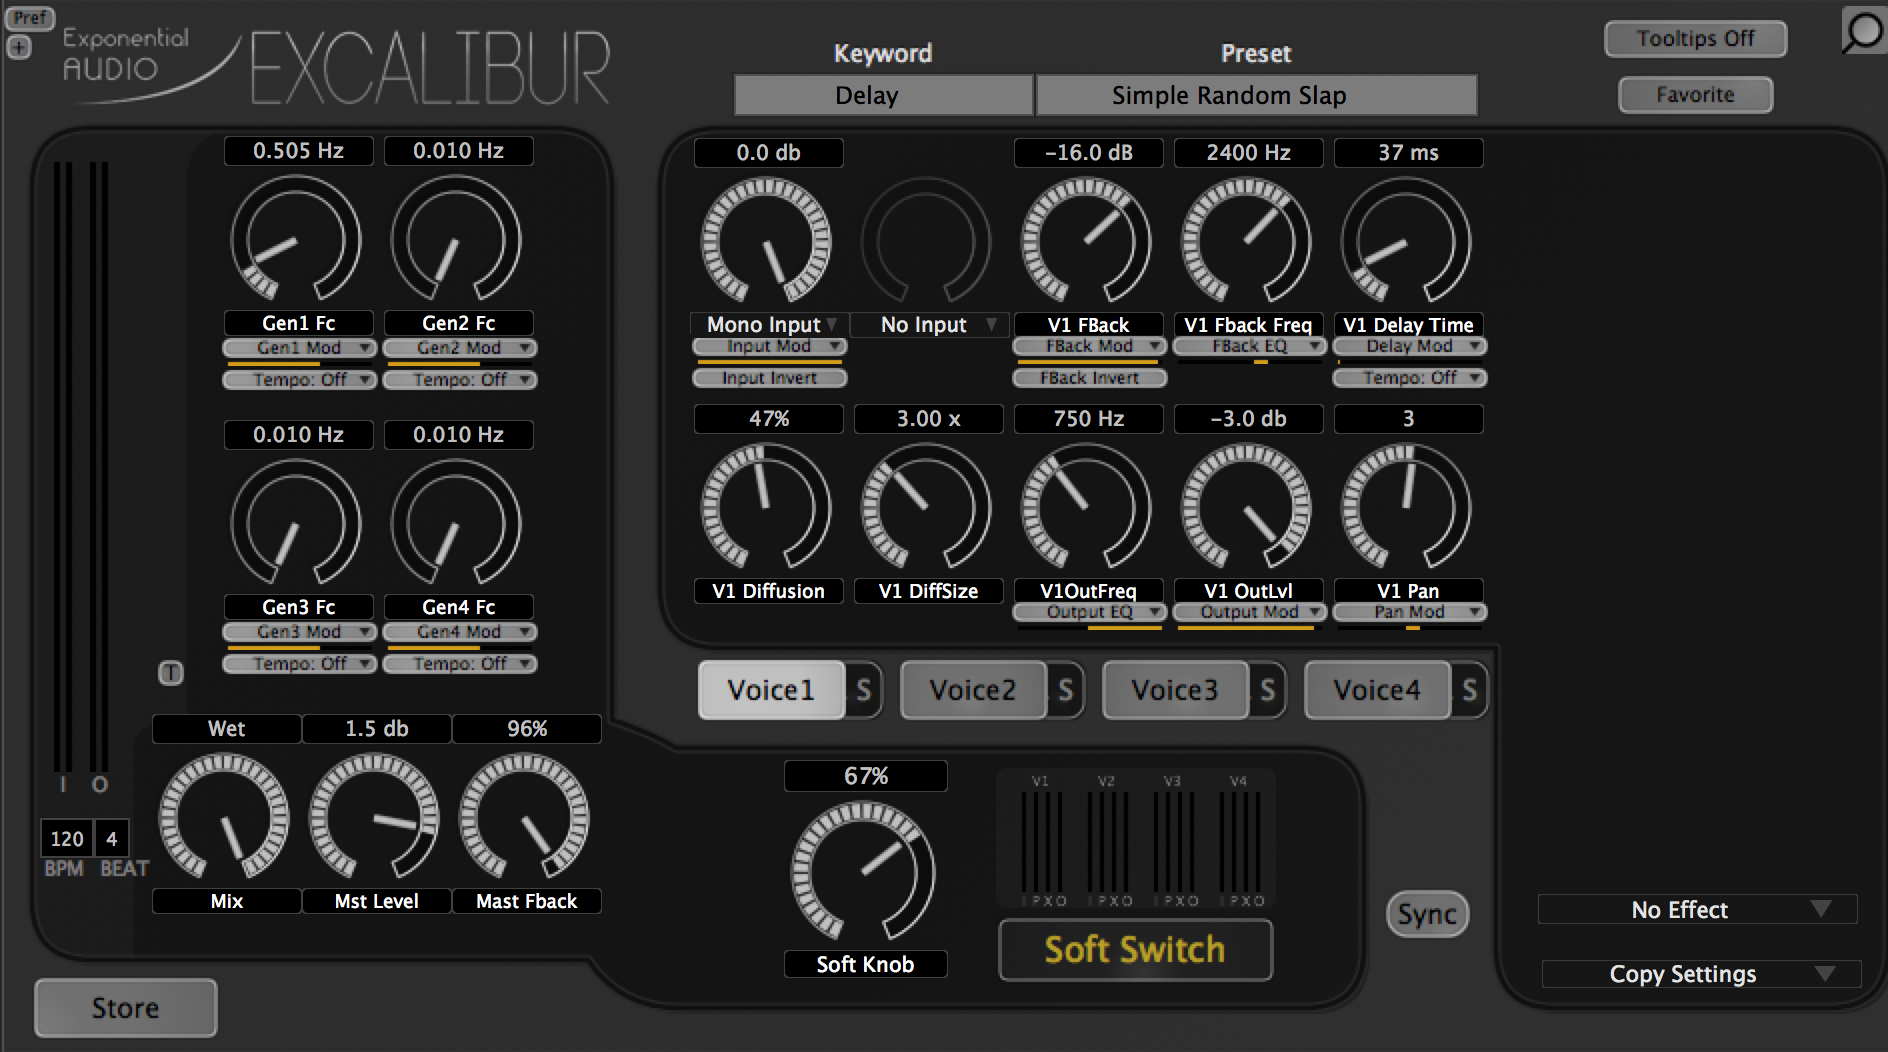
But we can excise even more control by instantiating something that gives us time-based modulations. Exponential Audio makes a plug-in that will fit the bill nicely: Excalibur*, a modulation plug-in that we can put before Stratus.
We know we’re looking for a sort of short, randomized delay—and luckily, we find this preset: Delay (keyword), and Simple Random Slap (preset). We manipulate panning, change the feedback frequency to the high midrange, and bring the delay time really fast, to under 20 milliseconds. The result sounds like this:

Excalibur with 20 ms delay
Sounds awful! But we can dial back the mix, and feed it to Stratus, where it sounds like this:
In the context of the scene, it sounds like this:
I use the example of flutter echo to demonstrate how necessary it is to use acoustical drawbacks to bring out realism.The practice isn’t limited to rooms: outdoor locales often involve long, singular echoes. Consider walking outside and hearing an outdoor concert—you often hear it bounce back, one distinct time, from a point in space opposite its origination. Use this to your effect in outdoor scenes as well. It can emphasize loneliness elements of the script as well, particularly longing and loneliness.
Of course, these reflections need to be placed in reference to where your character stands in the shot. If they occupy the far-left of the frame, and are panned as such, putting a little bit of echo in the far right might reinforce the outdoor location.
*Important notice: Excalibur is no longer available for purchase from iZotope. We are continually developing new products, services, and solutions to enable and innovate on journeys in audio production. We occasionally need to retire older products in order to focus our resources and development efforts on building new, innovative products and features. Support for this product will remain in effect for 12 months from your date of purchase up through October 27, 2023.
7. Automate for positions in the shot
We often see the pattern of shot/reverse shot/shot, where one character is talking to another in a scene. Here’s an example:
Say, in the shot, both characters are facing each other, and they’re both standing off-center. These are over-the-shoulder shots, so when we cut from one to the other, suddenly they’re occupying diametrically opposed panning positions: the character on the right is now the character on the left in the reverse shot.
But if the ambience stays the same for each shot, this could be a sonic break from reality.
As I write this sentence, I’m sitting under a central AC’s vent. If I whip my head to the left, I’m experiencing the sound of the cooling system in my right ear, but upon whipping my head to the right, it’s coming into the left ear. If I were to represent this on film without automating the panning, it could feel weird.
So here’s what you can do: in such instances, flip the stereo orientation of the reverberation itself for the shots. You can do this with an automated utility plug-in after the verb, or with the swapping function of Relay. Finally, if the file is stereo, flip the stereo orientation of the room tone itself, either with automation or with cutting between two different room tracks. Time it right, and this will go a long way to establishing realism.
Conclusion
Establishing realism has been in the goal of these tips, but perhaps that is an ill-fitting word. We’re really shooting for believability. We don’t need the kingdom of Thor to feel “real” to us lowly humans—we only need to believe it exists. We can never be distracted by artifice, in other words.
These tips go a long way in establishing the believability of a scene, but if employed too drastically, they will fall apart. So, when applying these tricks—or really any tips—make sure your BS detector is on high alert. You often need to check yourself constantly. Rely on your gut, as this part of your being to fool than your mind. Bring in another person to view the scene in question, if you can. See what they have to say about it.
However you go about in post, remember that establishing this believability is key. It cannot be sacrificed at any cost.


