5 Snare Drum Mixing Tips for a Better Sound | iZotope
The snare drum plays an important role in a song’s groove. Here are five tips for mixing modern snare drums to get them sounding punchy, but not distracting.
Snare drums are one of the most commanding sounds in modern mixes, but also prone to become sharp with careless processing. It takes lots of practice to get a snare mix right. In this article, I’ll share some tips I use to bring snare drums to life, and help them cut through the mix in a pleasing way.
Jump to these tips on how to mix snare drums:
- Choose the right snare sound for your genre
- Clean up the snare with a gate or expander
- Get the snare drum frequencies to sit in the mix
- Add character to the snare drum with processing
- Add a sampled snare
Follow along with this tutorial using the tools in iZotope


Music Production Suite 7


Neutron


Ozone Advanced


Neoverb
1. Choose the right snare sound for your genre
One key to successful mixing is knowing the context of your song and working within it. This is true on a macro level, where we choose the right reference track for the whole production. But it also comes down to the individual instruments: having a reference sound for your snare will go a long way in dictating the treatment.
Snares take up different sonic spaces depending on the genre, the song, and the arrangement. One can get real specific here: early D’Angelo and early Red Hot Chili Peppers both owe a lot to funk—yet they’d sound completely at odds with each other; ?uestlove’s snaptastic snare would require different handling than Chad Smith’s ringy affair.
So, go after a reference in your head and say “that’s the snare I want.”
This is a roundabout way of saying you should listen to tons of music, so you have your references internalized and ready to go at a moment’s notice. Upon hearing the tracks you were supplied, you should instinctively know which snare reference the drums evoke in your memory. That’s the goal.
You could model your snare on a reference with Neutron. Say we wanted our snare sound to be reminiscent of the classic tone on Led Zeppelin’s Moby Dick.
Lucky for us, there’s a big drum solo in the tune. We’d drag it into our DAW, cut out a snare sample from the solo, save it as a file, and load it into the reference section of Neutron’s Assistant View. Then we’d use the assistive technology to match the snare sample.

Moby Dick Reference in Neutron Target Library
This could work—but you may want to be careful. You could wind up sounding a little odd to process your snare so drastically out of the gate; the snare, after all, comes through many different microphones at once. Still, this technique could make for an invaluable learning tool for those just getting started; it’ll give you a pictorial view of the kinds of moves you might need to make, albeit with more subtlety.
2. Clean up the snare with a gate or expander
Gating can be crucial in mixing the snare drum, but again, keep your genre and style in mind: most jazz and classical recordings aim to capture the nuances of musicians and their acoustic environment, and gating can go against nature.
Pop and contemporary styles of music, on the other hand, are less concerned with “real world” acoustics, and typically prefer each sound to be isolated for maximum sonic control. This is particularly true for the snare. Acoustic snares with lots of cymbal bleed can certainly make a mix sound messy.
Here, a noise gate or an expander will attenuate the signals that hang below the set threshold, making it an ideal tool to get rid of bleed. Be careful not to set the threshold too high though, as this will chop off an important part of the snare.
In Neutron’s Gate module, you’re given “open” and “close” controls that help tailor the threshold more specifically. I’ll show you how to use these snare gate settings in this video.
This is one way to gate a snare—but I’d also like to show you another way to do it, with an analog-modeled plug-in bx_console SSL 9000 from Plug-in Alliance.
Besides gating, another aspect of cleaning up snares is the phase relationship between snare mics and other mics.
For instance, the "before" audio example below features a kick, a snare, a bottom snare mic, the room mics, and the overheads. It sounds fine, but if we flip the polarity on the bottom snare—turning it 180 degrees out of phase—we suddenly have a fuller snare sound in the "after" example.
Bottom Snare with Flipped Polarity
In short, never sleep on that polarity switch when working with snares! Always check the polarity between the snare and the overheads, hi-hat, and bottom snare mic. If you’re not gating your kick drum, check the phase on that too.
3. Get the snare drum frequencies to sit in the mix
The way a snare sounds has a lot to do with its sonic relationships to other mix elements. This is true for all instruments, but since the snare is basically the next lead element after a vocal, it requires additional attention.
Here are some frequencies within the snare drum frequency range that you’re going to want to keep an eye on—and keep in mind these are all rough ranges dependent on the recording:
- 100 to 250 Hz: somewhere in here, the meat of your snare is going to reside.
- 800 Hz to 1.5 kHz: somewhere in here, you’ll get a nice crack out of the snare.
- 8 kHz and above: somewhere in here, you can get your snare to sound extra crispy.
But these frequencies all come with their drawbacks:
- 100 to 250 Hz: you might step on the guitar, bass, or other meaty instruments
- 800 Hz to 1.5 kHz: you can really rub against a vocal the wrong way here.
- 8 kHz and above: you might add undue harshness—and, the brightness could be totally unnecessary if your bottom snare mic is doing its job
- Any frequency whatsoever: you might encounter a random resonance that’s really annoying and needs to be carefully curtailed.
If you need to teach yourself how instruments might rub against each other in this context (also known as frequency masking), use the Masking Meter in Neutron’s EQ, or the Unmask module. It can show you how to keep the snare in the right places in the frequency range.
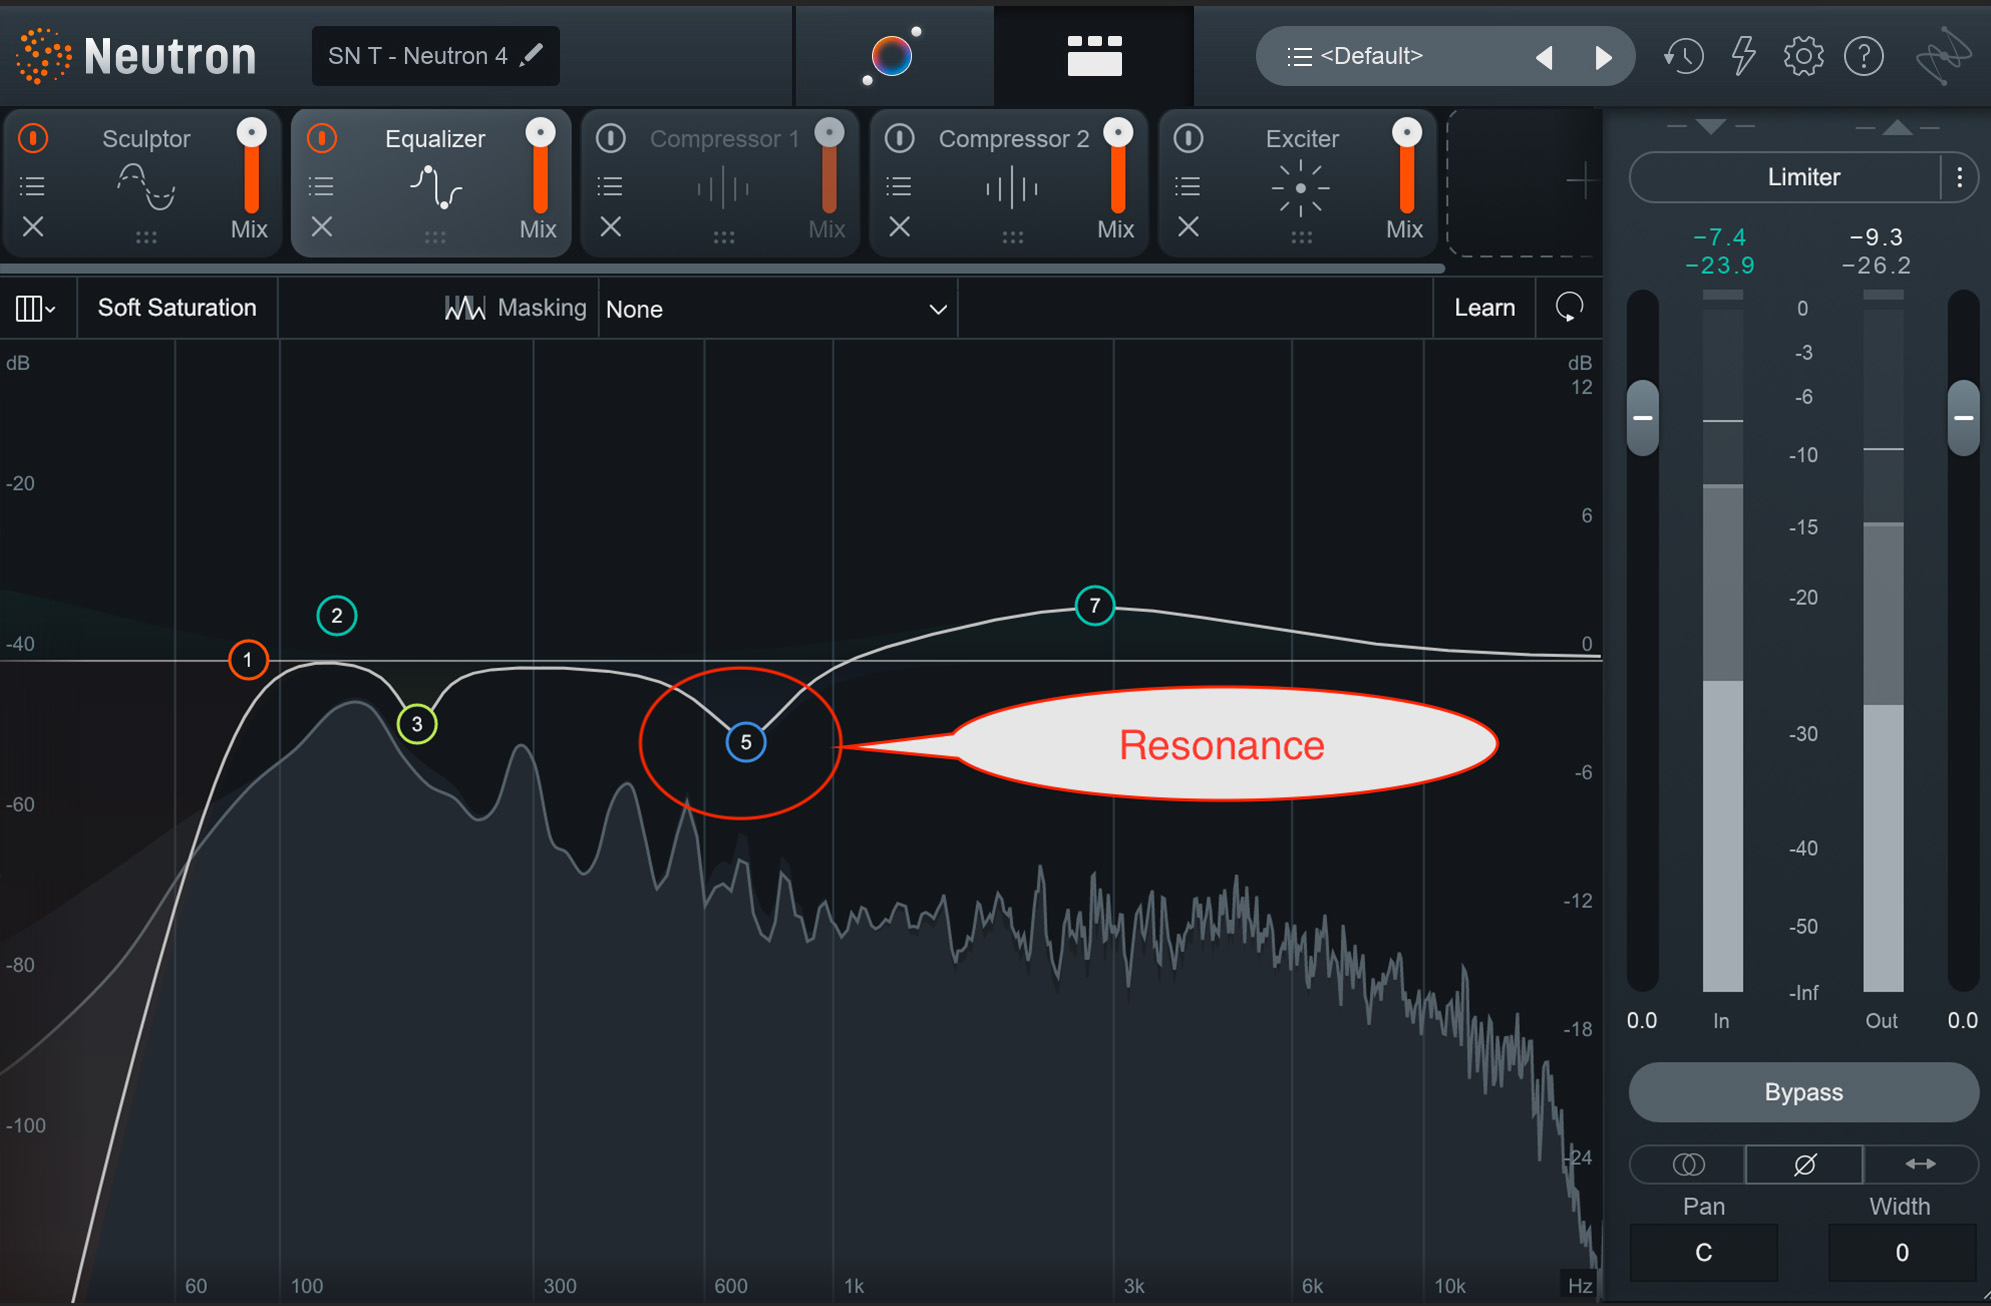
For resonances in a snare drum frequency, Neutron's Assistant View can show you where they are if you’re not used to hunting and pecking for them yourself. Run the assistant on the snare, and you’ll see something like this in your EQ module.

Snare resonance in Neutron
See that circled notch? That’s Neutron trying to take out some resonance. Audition it to see if it’s really a problem by selecting the band and pressing “alt” on a windows keyboard, or “option” on Mac.
4. Add character to the snare drum with processing
If you’ve followed the tips so far, you’ll have a cleaned-up snare that naturally doesn’t interfere with your other elements, and you’ll have a good picture in your mind of what you’re going for. Now, we can think about ways to add character to the sound.
Character can come from all sorts of places. Let’s start with some of what’s on offer in the iZotope universe.
Transient shaping
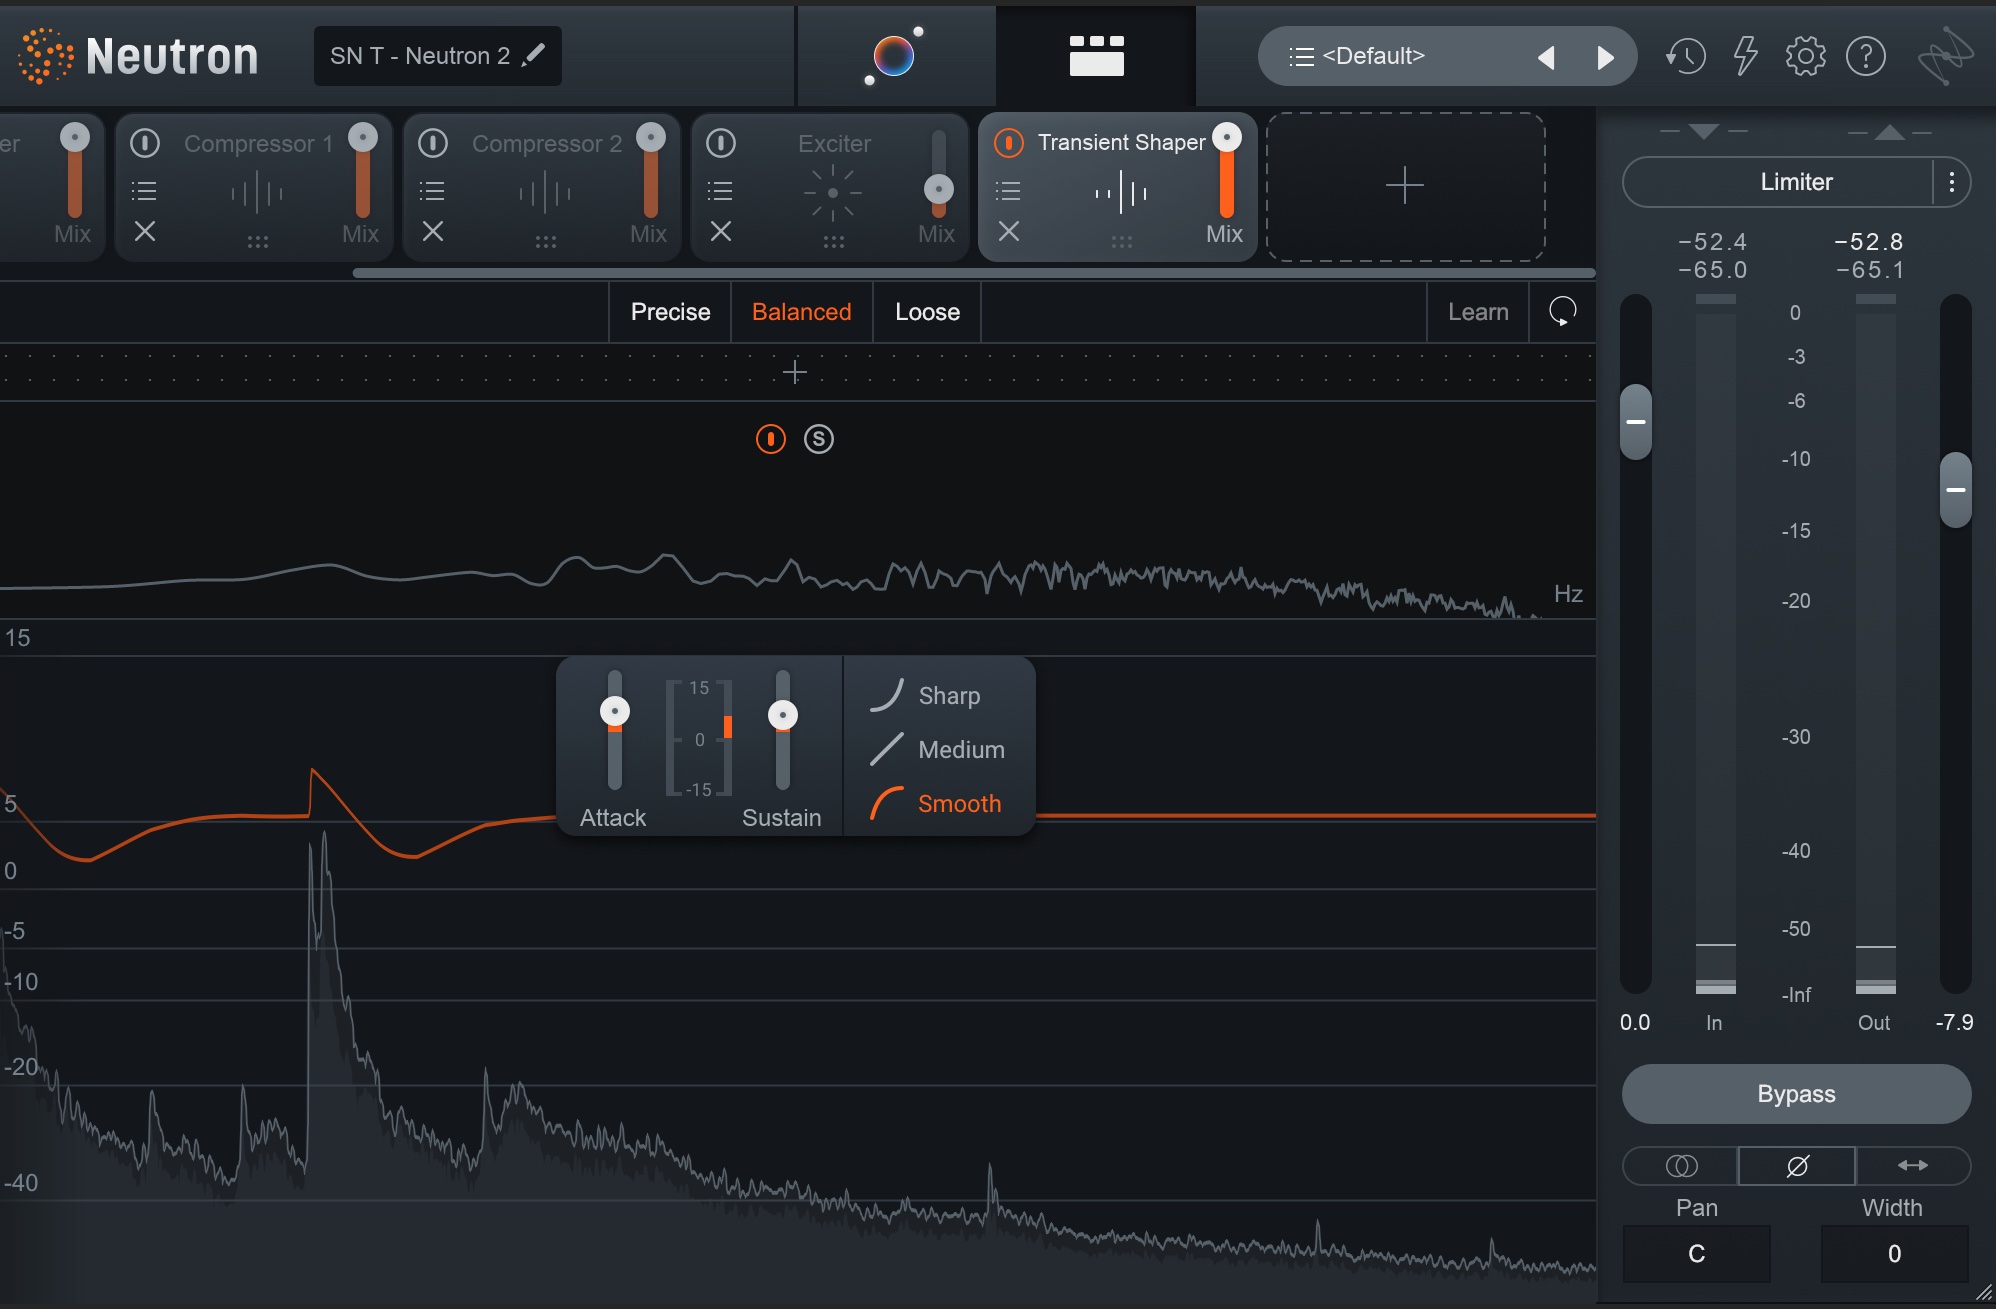
You can use the sustain slider in Neutron’s Transient Shaper to add more room and body, and the attack slider to add more thwack, doing so in a subtle way that can be subtler than highlighting those ranges with EQ, or emphasizing them with typical compression.

Snare with added attack and sustain via the Transient Shaper module in Neutron
Saturation
Grit, edge, fur—these are some of the adjectives we use to refer to one process: saturation. Neutron has a nice saturation section in its Exciter algorithm, and you can definitely do a lot of damage with it, especially in Trash mode.
Let's compare the sound of a static basic balance with an undistorted snare (before) and the same mix but with Neutron's Trash mode blended on a parallel aux (after).
Static Balance vs. Snare Saturation With Neutron

Trash mode on snare in parallel
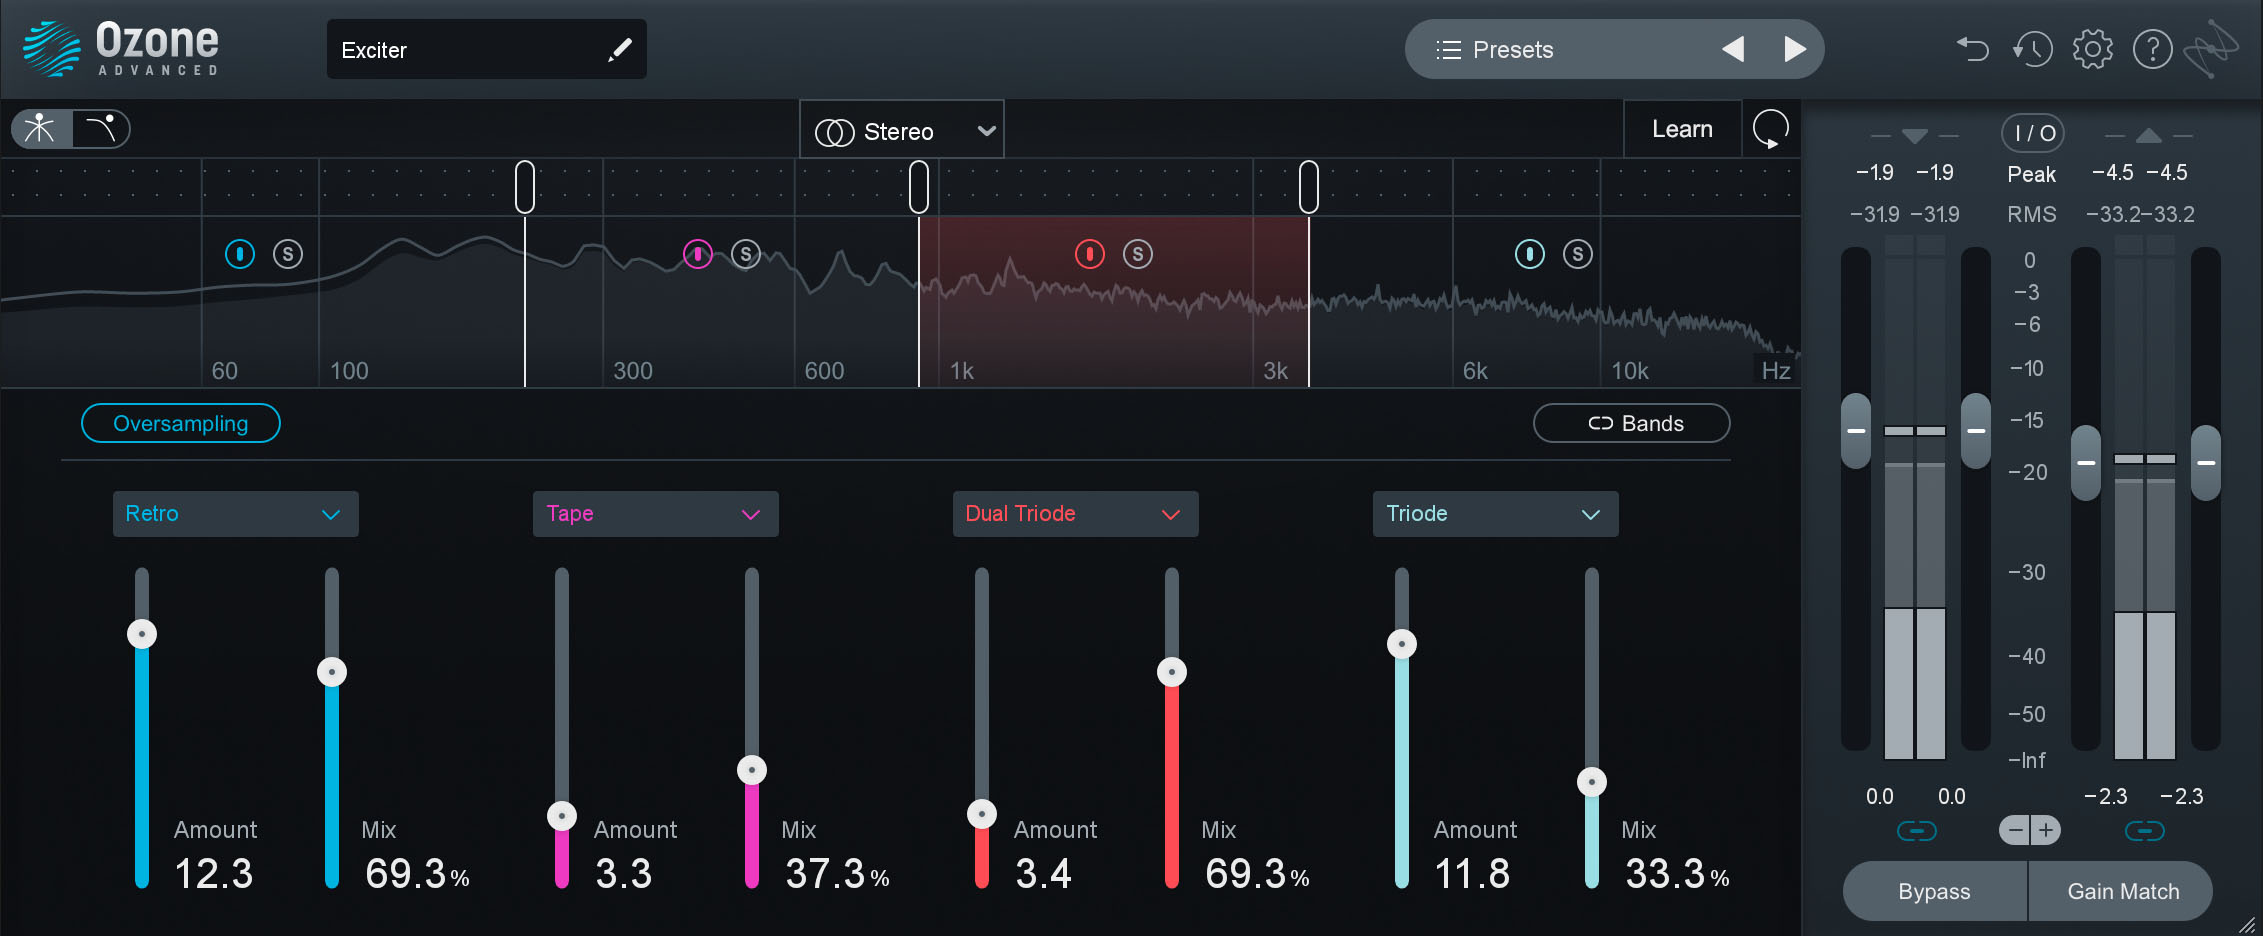
That’s a way of adding some sharp character. But if you’re looking for a subtler hand—and if you’re a Music Production Suite user—try Ozone’s Exciter. It allows you to really focus the saturation, to dial it in a more specific way, and it has oversampling to fight against aliasing.
Static Balance vs. Snare Saturation With Ozone

Snare with Ozone Exciter module
Compression
Compression is often used to even out dynamics—and we’ve many articles on how to go about how to use compression. If you need a primer, try using the punch compressor in Neutron to even things out.
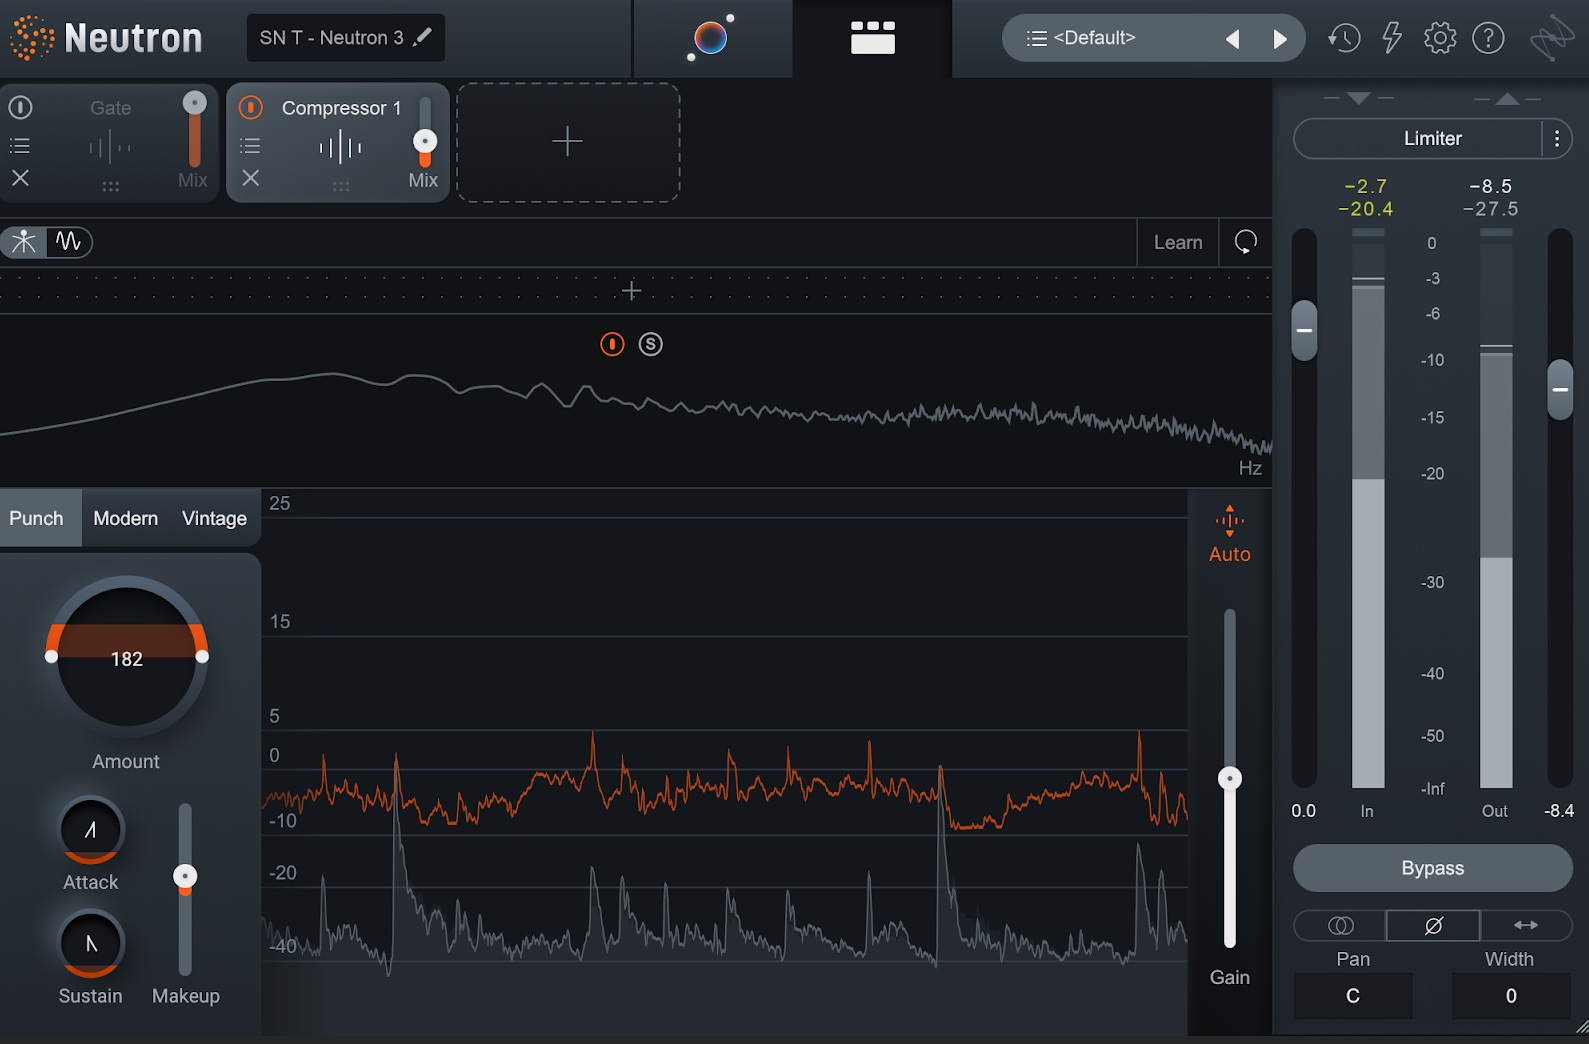
You can also use the Punch mode to add snappiness and character. Observe the following settings.

Adding snappy character to the snare with Neutron's in Compressor Punch mode
Note the mix slider at the top of the GUI. This brings us to our next section.
Parallel processing
Parallel processing can be a great way to get an aggressive sound in small doses. You can use the mix knob of a plug-in (as I did in the screenshot above), or you can route your snare to an aux track, place a compressor there, and blend it back in.
One of my favorites to use for this task is made by Native Instruments. GUITAR RIG’s tube compressor is a fantastic character-generating machine on snare. You can see me playing around with it here:
Reverb
Reverb can evoke emotion—and even bygone genres—like nothing else. It’s amazing how a different reverb on snare can take you back to the eighties or nineties with merely the instantiation of a plug-in.
Here’s a "before" audio example of Neoverb reverb plug-in slapped onto the snare to quickly give us that big, wet “adult contemporary” sound so prevalent in the non-grunge rock of the 90s. And if I just gate that verb aggressively, we’ve instantly gone further back in time about ten years in the "after" audio example.
90s Snare Vs. 80s Snare Sound
Now, note that neither of these verbs sound particularly good. Adding reverb to drums in any sort of realistic way is a subject that requires its own article. In fact, I wrote a tutorial on how to use reverb with drums.
5. Add a snare sample
Is it still a dirty secret that engineers use samples in their mixing practice? I don’t know. I certainly do, in all sorts of genres—and really, they can be a god send. Don’t think of them as replacing the original snare (unless you are absolutely up the creek otherwise). Don’t think of this as cheating, despite the clickbait subject header. Instead, think of adding samples as a tool to avoid compromise.
Need the snare to ring more, but can’t find a good ring in your original recording—one that won’t bring out undue floppiness or flubbiness? The right snare sample, phase-aligned and pitched correctly, can take care of that for you, all without undue equalization on the snare itself.
Wish your snare sound had more room tone to it? You might be surprised that sample augmentation can beat more conventional techniques.
The go-to tricks often compromise the original sound to some degree: crush those room mics and yes, the snare is doing what you want, but the cymbals and hi-hats make your ears bleed.
So you try routing the snare to a parallel track to make a crushed sustained sound, or a verb to add artificial room—and both of those don’t work as well as you’d think: the parallel track smears the image of the snare; the verb just sounds like, well, a verb.
But the right drum sample here, edged in and treated correctly, can do wonders.
Observe some drums from a different track. The "before" audio example is almost the sound I want—I just wish the snare was a tad roomier, and had just a little more attack.
I’m not going to mess around with transient shaping or EQ or compression or reverb; I already like the sound I have. Instead, I've blended in a couple of samples in the "after" audio example. You might not hear them, but I’m hoping you feel them.
Basic Snare vs. Snare Blended With Samples
Start mixing better snare drums
These are five tips to help you start sorting your snares. This is by no means a full directive on how to handle the snare drum, and again, snare drums are notoriously hard to pin down. There’s a reason a bad snare drum is a meme in audio-engineering forums. But with the tools included in Music Production Suite, you're on your way to getting there!


