9 Tips for Using Reverb with Drums
In this article, we’ll use Exponential Audio products to demonstrate how to give drums weight, depth, cohesion, and space.
Your drums sound narrow, dry, and small. You need them to sound bigger, so you send them to a concert-hall reverb. That’ll do the trick, right? Probably not. Now all you have are small, narrow drums surrounded by a lot of incongruous reverb.
It’s frustrating, drums and reverb should get along better than they do. But if you don’t know what you’re doing, reverberating drums can lead to a cloudy, washy mix. We don’t want washy drums, so here are some tips for achieving depth, thickness, presence, and a sense of space—all with reverb. For this example, we use iZotope’s Exponential Audio reverbs, but any high-quality reverb with independent control of the tails and early reflections will work.
Using reverb tricks, we’re going to see what we can do to add weight, space, and depth to this track. Here’s what we’re working with:
This track is a drum kit with almost no processing on it. It’s just a static mix, with a little EQ on the snare to cut any annoying ring. We’re going this unconventional route to demonstrate what you can accomplish with reverbs alone. When paired with customary drum techniques—equalization, compression, parallel expression, expansion, etc.—these tips can be even more effective.
But first, a question.
Do you use multiple reverbs or just one on drums?
Surely, using multiple reverbs with different settings is a one-way ticket to mudville. Perhaps, but consider the opposite approach: use one reverb alone and you can wind up with something like this:
Not very believable, is it? This reverb kind of sounds like an afterthought. So I postulate the following: it really doesn’t matter whether you use many reverbs or one, provided you know what you’re doing.
I’m going to give you a bunch of different tricks to try, and these tricks will apply all over the kit. These techniques will use different settings with different reverbs. But at the end of the process, we’ll have a big before-and-after reveal—and though I’m using multiple reverbs, you may be surprised.
How to use reverb on drums
1. Compress the reverb
Compressor before the reverb? This has to be a joke, right? There’s no way I’d seriously recommend this to you, right? Well, let your ears be the judge. The first example is the dry drums you heard before, with a little compression on the drum bus. And the second example is a reverb used directly on the drum bus, right before the compressor.
You may notice a thicker, more solid sound. Let’s go into the settings of the reverb to see what’s going on:

Medium, natural hall preset in STRATUS
It’s a medium, natural hall preset from


Stratus by Exponential Audio

Medium, natural hall preset in STRATUS with 9% blend
Most importantly, we’ve turned the blend down to 9%.
Want a more shimmering sound? Let’s play with the input filtering, change the early reflections to emphasize their later portions, and see what happens.

Medium, natural hall preset in STRATUS with altered input filtering and early reflections
Why does this work? It goes back to the point I made in this article: we’re using reverb as a character enhancer here. We want to marry the sound of this reverb to our drum track so that the compressor affects them both. We don’t want the reverb to sit back in the mix—we want it to be part of the sound. That’s why we use the insert approach here.
2. Add a reverb directly on toms
You may also find the insert approach works well with toms. A good chamber, married directly to the toms, helps reinforce both elements of the toms that we love to hear: the fundamental boom of the hit, and the snappiness that really makes them cut. With a good chamber setting, you can use the early reflections to target one aspect of the sound and the tails for another.
Here, I’d recommend routing your toms to their own bus and slapping one reverb on them as an insert. Observe:
That’s a tom fill in our track. We add the following reverb:
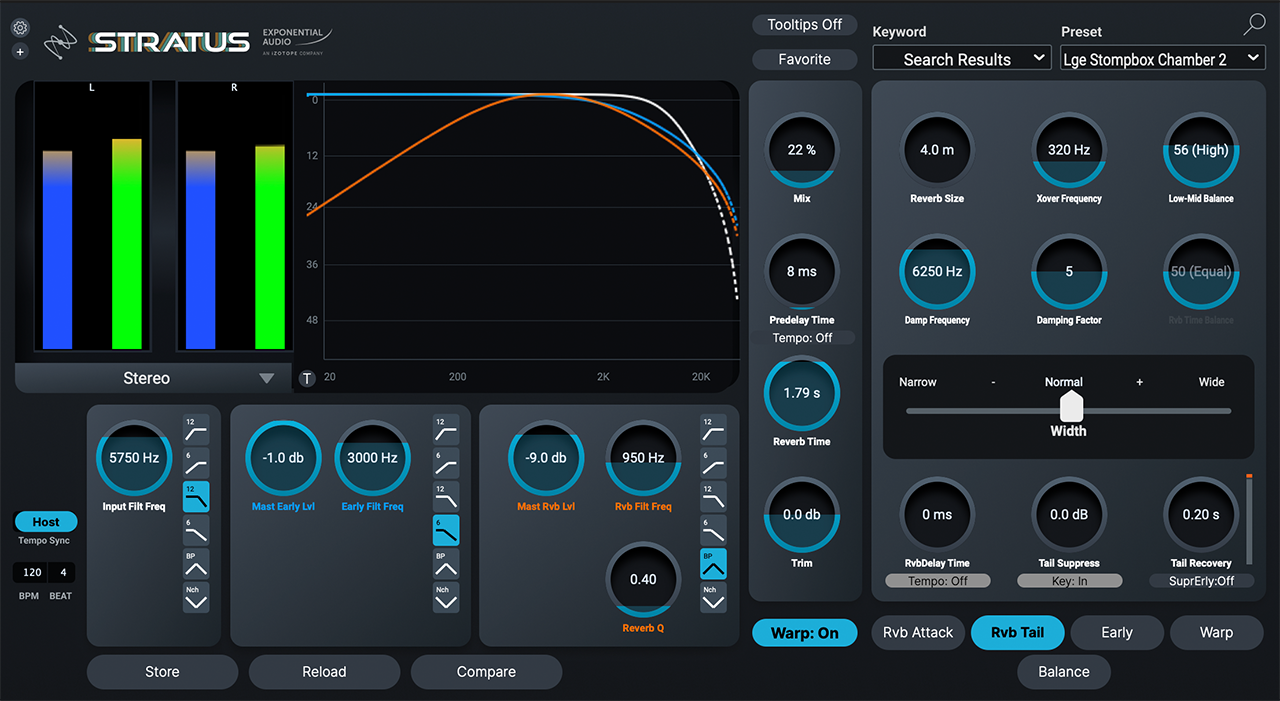
Large chamber preset in Exponential Audio’s STRATUS
It’s a large chamber. Note how the early reflections are louder than the tails; they’re also tuned with a low-pass filter, giving us more of the fundamental. The tails are band-passed filtered to target the crack of the tom.
It sounds like this:
But we keep the blend somewhat low, around 22% in this case. Within the context of the drums, it sounds like this:
3. Try a gated tom reverb to give them impact
We covered gated toms a bit in this article, but let’s talk about how they can thicken up a drum’s sound, rather than indicate their genre. Let’s say we take a large plate in


Stratus by Exponential Audio
This sounds a bit muddy, and it’s not giving the thickness and weight we can get from the gated trick. Let’s start by addressing the reverb. Manipulate the attack so that the later part of the signal hitting the reverb is stronger. This gives us a distinguishing feel to the reverb. Next, we put a bandpass on the early reflections to kill some mud, because we want the early reflections to reflect more of the crack here. Add a little compression and distortion through the warp parameter for good measure. Finally, we increase the room size for a bigger sound. We get this:
That’s still a bit much, a bit all over the place. So let’s place a


Neutron
We’ve gated the input, so that we only get reverb when the toms hit. Now let’s add a gate after the reverb, so that we can add a suddenness to the ending of the reverb. Make note of the hold and hysteresis times—these fight against artifacts.
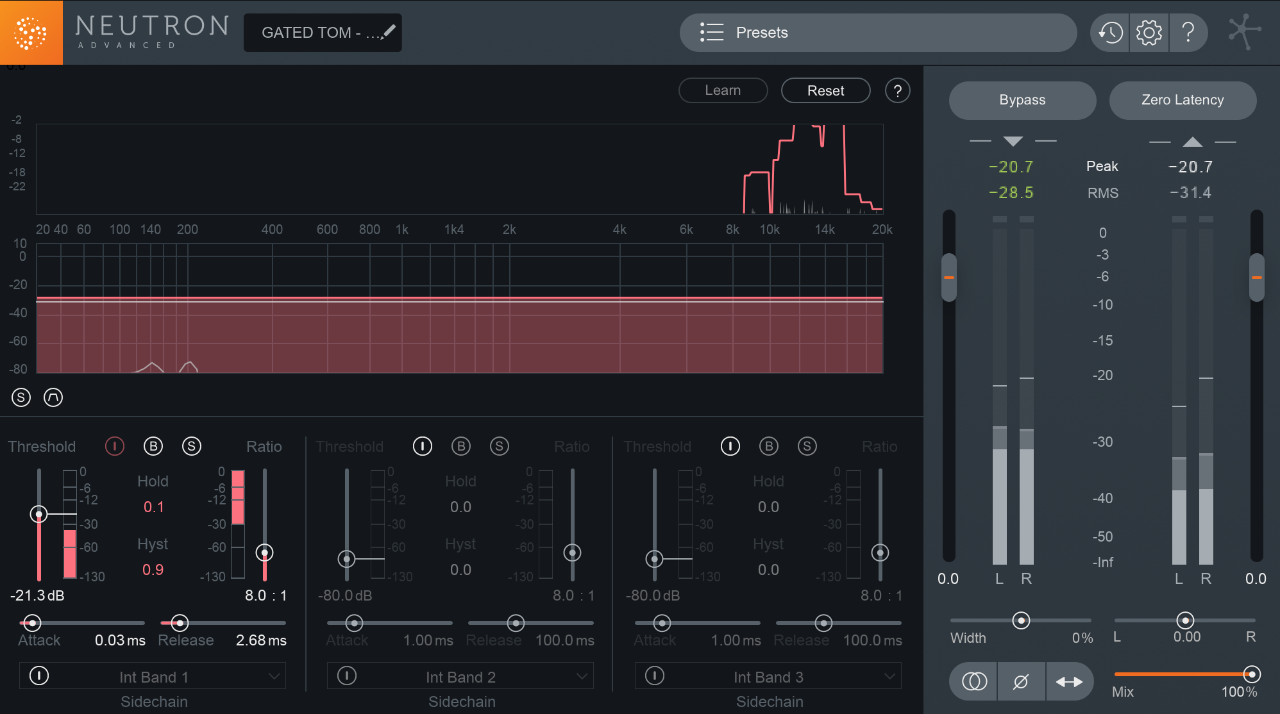
A gate in Neutron
This article references a previous version of Neutron. Learn about 

Neutron 5
In the mix, we have a tom fill that sounds like this:
Alternatively, we can use a gated reverb preset in


Stratus by Exponential Audio
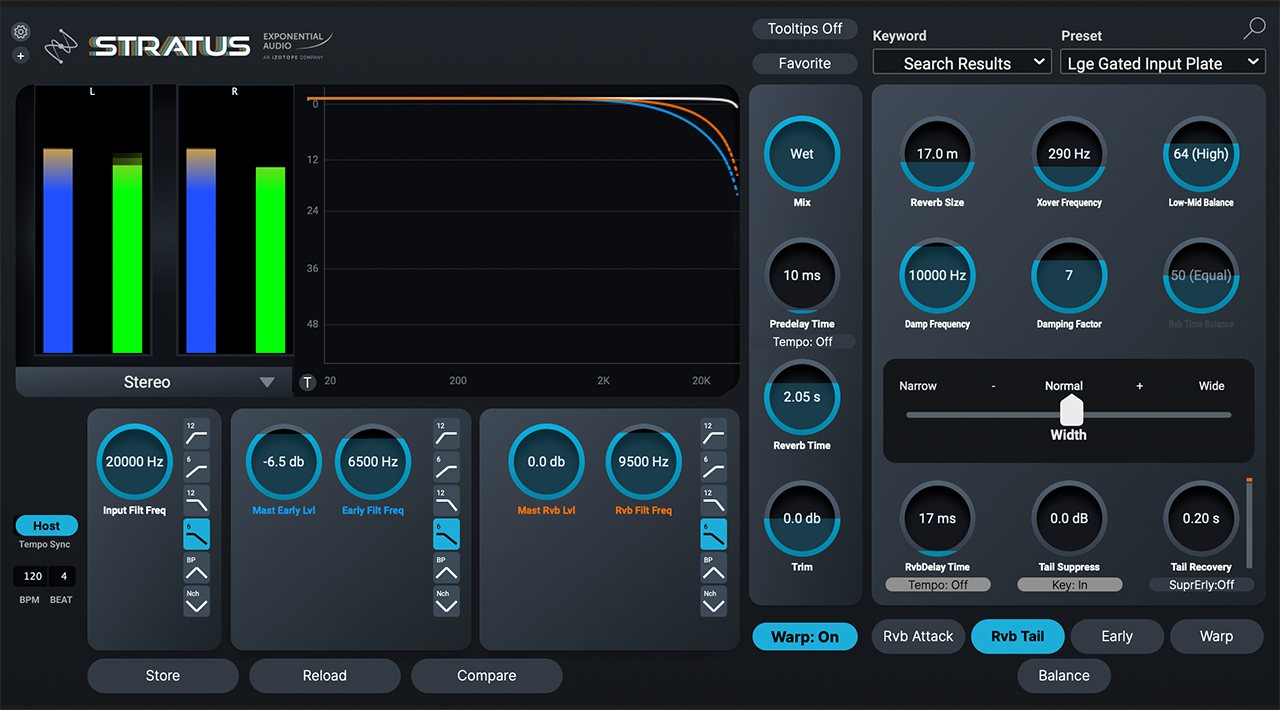
STRATUS gated input plate preset
Here’s our gated tom solo’d, and then in the mix.
4. Add reverb on overheads for sizzle
As a rule, I’m not a fan of sending a whole drum kit to a reverb (an insert reverb is a different story). But overheads by themselves can shine and shimmer with the right kind of reverb, this time as a send.
Here’s our overhead sound.
They’re pretty solid, but say we want some more treble out of them without inching up the brightness with EQ. Remember, there are guitars and vocals in this mix, we don’t want the overheads to fight those elements. So let’s try a reverb and see what happens.
We’re going with a hall from


Stratus by Exponential Audio
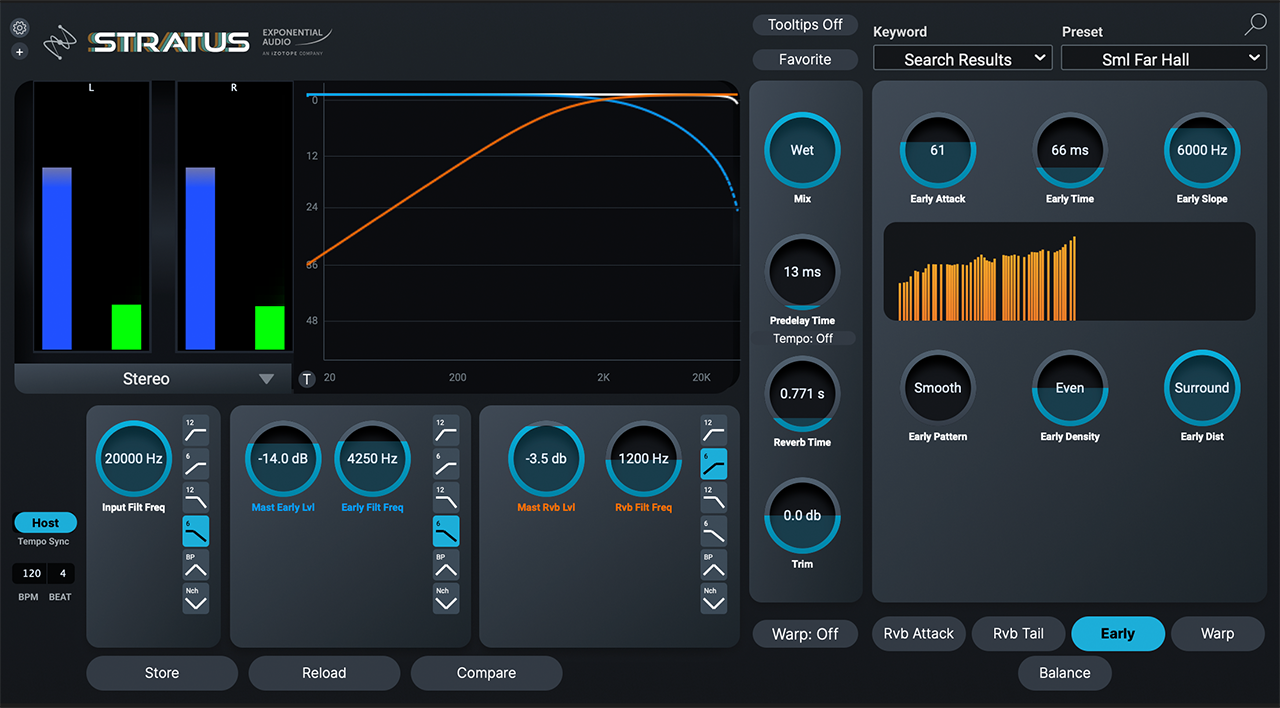
Exponential Audio’s Stratus reverb, with decreased early reflections
Note how the early reflections have been turned down in level, and also that we tweaked them so that they don’t hit immediately. Instead, they rise over time. This gives us a bit of space without elongating the pre-delay, which might complicate the groove.
Let’s look at the tails:

Exponential Audio’s Stratus Reverb, note the tail
We’ve timed the tails so they die down before each snare hit—now we won’t have any weird overlapping. You need to time the tails musically—at the very least, they should die down before the next snare hit, unless you’re going for something creative and weird.
Lastly, we’re using an EQ after the reverb. I didn’t like how much 1.6 kHz was left in the sound, so I nudged it down a bit. Let’s listen to what the reverb sounds like solo’d, and then again in the context of the mix.
We’ve emphasized the shimmer of the cymbals without tilting the EQ into harsh territory.
5. Pick a reverb types that works with your mix
Do not spend more than one extra second on a snare reverb you don’t like. When it comes to drums, this is going to be the most obviously-heard reverb in your mix. Don’t make it a loser. Put up the wrong snare sound and it always sounds tacked on.
Here’s an example of a bad snare reverb.
This is a medium, neutral, and it sounds bad on this drum. So I’m not going to waste any time with it. I’ll cycle through on a macro level until I find the right one:
And there it is. It sounds better, but it still sounds tacked on to the snare. A cheap gimmick.
The only way I know how to defeat the tacked-on, cheap gimmick feeling is to tweak everything within the reverb, both in timbre and in time, so that it gels. Check out this reverb:
It’s the same as above, but the early reflections have been turned down, while the early attack has been changed to favor the later portions of early reflection. The tail has been widened, and its timing has shortened. It fits in much better.
6. Try pitch shifting a reverberated snare
Yes, it’s a dangerous practice. But used well, it can add something. It can thicken up a really cheap-sounding snare, and it can help add a pleasant resonance to a good-sounding snare.
First, send the snare to a bus. Gate it, so that you’re only getting the strongest hits (you want to avoid the ghost notes). Now use a pitch shifter to bring the drum down in pitch. Use your musical ears here: you want something that fits with the snare drum and the key of the song. In this case, four semitones, give or take, lent a nice little something to the sound.
Next, try adding some harmonic distortion—or even amp emulation—to mangle the sound a bit; we want to divert the ear away from the obvious doubling, and distortion can help. Finally we add a well-timed reverb; the settings change depending on the mix, but here’s what we’ve got for this one:

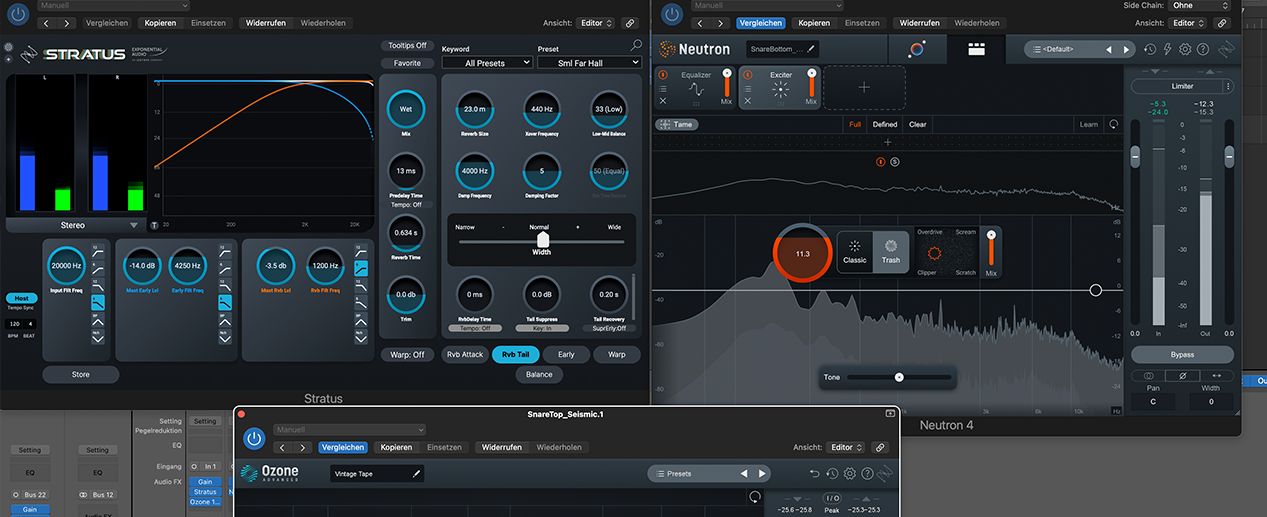
All our plug-ins in one window
Up against the snare, here’s how the effect sounds solo’d, and then in the mix, edged in at appropriate levels:
7. Try a delay and reverb combo on the snare
To add some crispiness to a snare reverb, try adding delay before the reverb. This isn’t pre-delay here—instead, you should feed the reverb with a normal snare signal and a little bit of delay; it’s a combination.
Ideally, you should apply this delay to the bottom snare track and mix that in with the top, like so:

Routing our delayed snare
The bottom snare is sent to an aux, upon which you add a slap. Route this delayed snare to a new aux, and here’s where you slap the reverb. You should, of course, feed your original snare to this aux. This can add dimensionality to the reverb not otherwise attainable. It can turn your snare sound from this first example to the second:
If you don’t have a bottom snare track, mult the top snare, high-pass it, emphasize the highs with EQ or distortion, and feed that to your delay—this, in effect, becomes your fake bottom snare. This trick was first shown to me in Bobby Owsinski’s book, and I’ve used it for more than ten years.
8. EQ and distort your snare reverb
Even the best reverbs need help from external processing—EQ and distortion especially. Take the reverb below for example. It has equalization and a bit of distortion mixed in. I’ve used Nectar, in this case, to turn the first example below (solo’d snare without EQ and distortion) into a wonderfully distorted and EQd snare.
9. Try a concert hall on the kick
Reverb on a kick? You gotta be kidding me! But it can work—particularly with the algorithmic halls provided by


Exponential Audio
It’s good, but a little lacking in the low end heft. Yes, we’ll address this with EQ. But for instances where EQ is not enough, reverb can come in handy on kicks to provide the illusion of low end.
So we’ll do that here with


Stratus by Exponential Audio
Here’s the kick reverb solo’d and then in the context of the kit.
Conclusion: the big reveal
Things we do here may seem a bit heavy-handed—reverberating a kick? pitch shifting a snare?—but consider the degree to which we’re processing everything: I told you I’d give you the reveal of a before/after with all the effects employed, and I’m not going to disappoint.
The first example is dry, with a little bit of compression, followed by the wet example with all reverbs included:
What you should notice, first of all, is that it isn’t so obvious. Our drums aren’t suddenly in a huge cavernous space, that’s not what this article is about. We’re talking subtle moves to help bolster a feeling of weight, depth, cohesion, and impact. Listen with those in mind and you can notice a few things: though the kit doesn’t sound obviously affected, there’s a weight to the low end now that wasn’t there before. It also has a larger apparent width, though you can’t see it in the Sound Field Meter in


Insight 2
This is achieved with smart selection of reverbs, tinkering around with settings, and most importantly, a subtle hand when it comes to balances. Indeed, in cases where we use reverb as inserts, the difference of 1% or 2% on the wet/dry balance has a drastic impact.
A final point to be made here: we’ve been showing you drums without music. We’ve done this to highlight what we can do with drums alone. However, you should not make any of these decisions without taking the other elements of the mix into account, especially the vocal. Mixing is relational, that’s probably why they call it “mixing.”
