4 tips for using upward compression in Neutron
Discover three unique ways to use upward compression in Neutron 5, with tips on enhancing vocals, drums, and creating atmosphere in your mixes.
In another article called “Expanding on compression” we covered unusual forms of dynamic processing, including upward compression. Neutron 5 offers no less than three ways to implement upwards compression, so we thought it would be useful to cover them in a little more detail.
Follow along with this tutorial using Neutron.
But first, here’s a little refresher on just what upward compression is and how it works.
What is upward compression?
Typical downward compression reduces your dynamic range, bringing signal above a threshold down in level. The amount of gain-reduction is controlled by the ratio parameter, and the speed of the effect is set by attack and release controls.
This is a broad generalization. Some of these parameters might not exist on all compressors, while others may boast additional controls. Still, the basic principle as described is accurate, and we can visualize the relationship of input level – on the x-axis – to output level – on the y-axis – as follows:
Downward compression transfer function
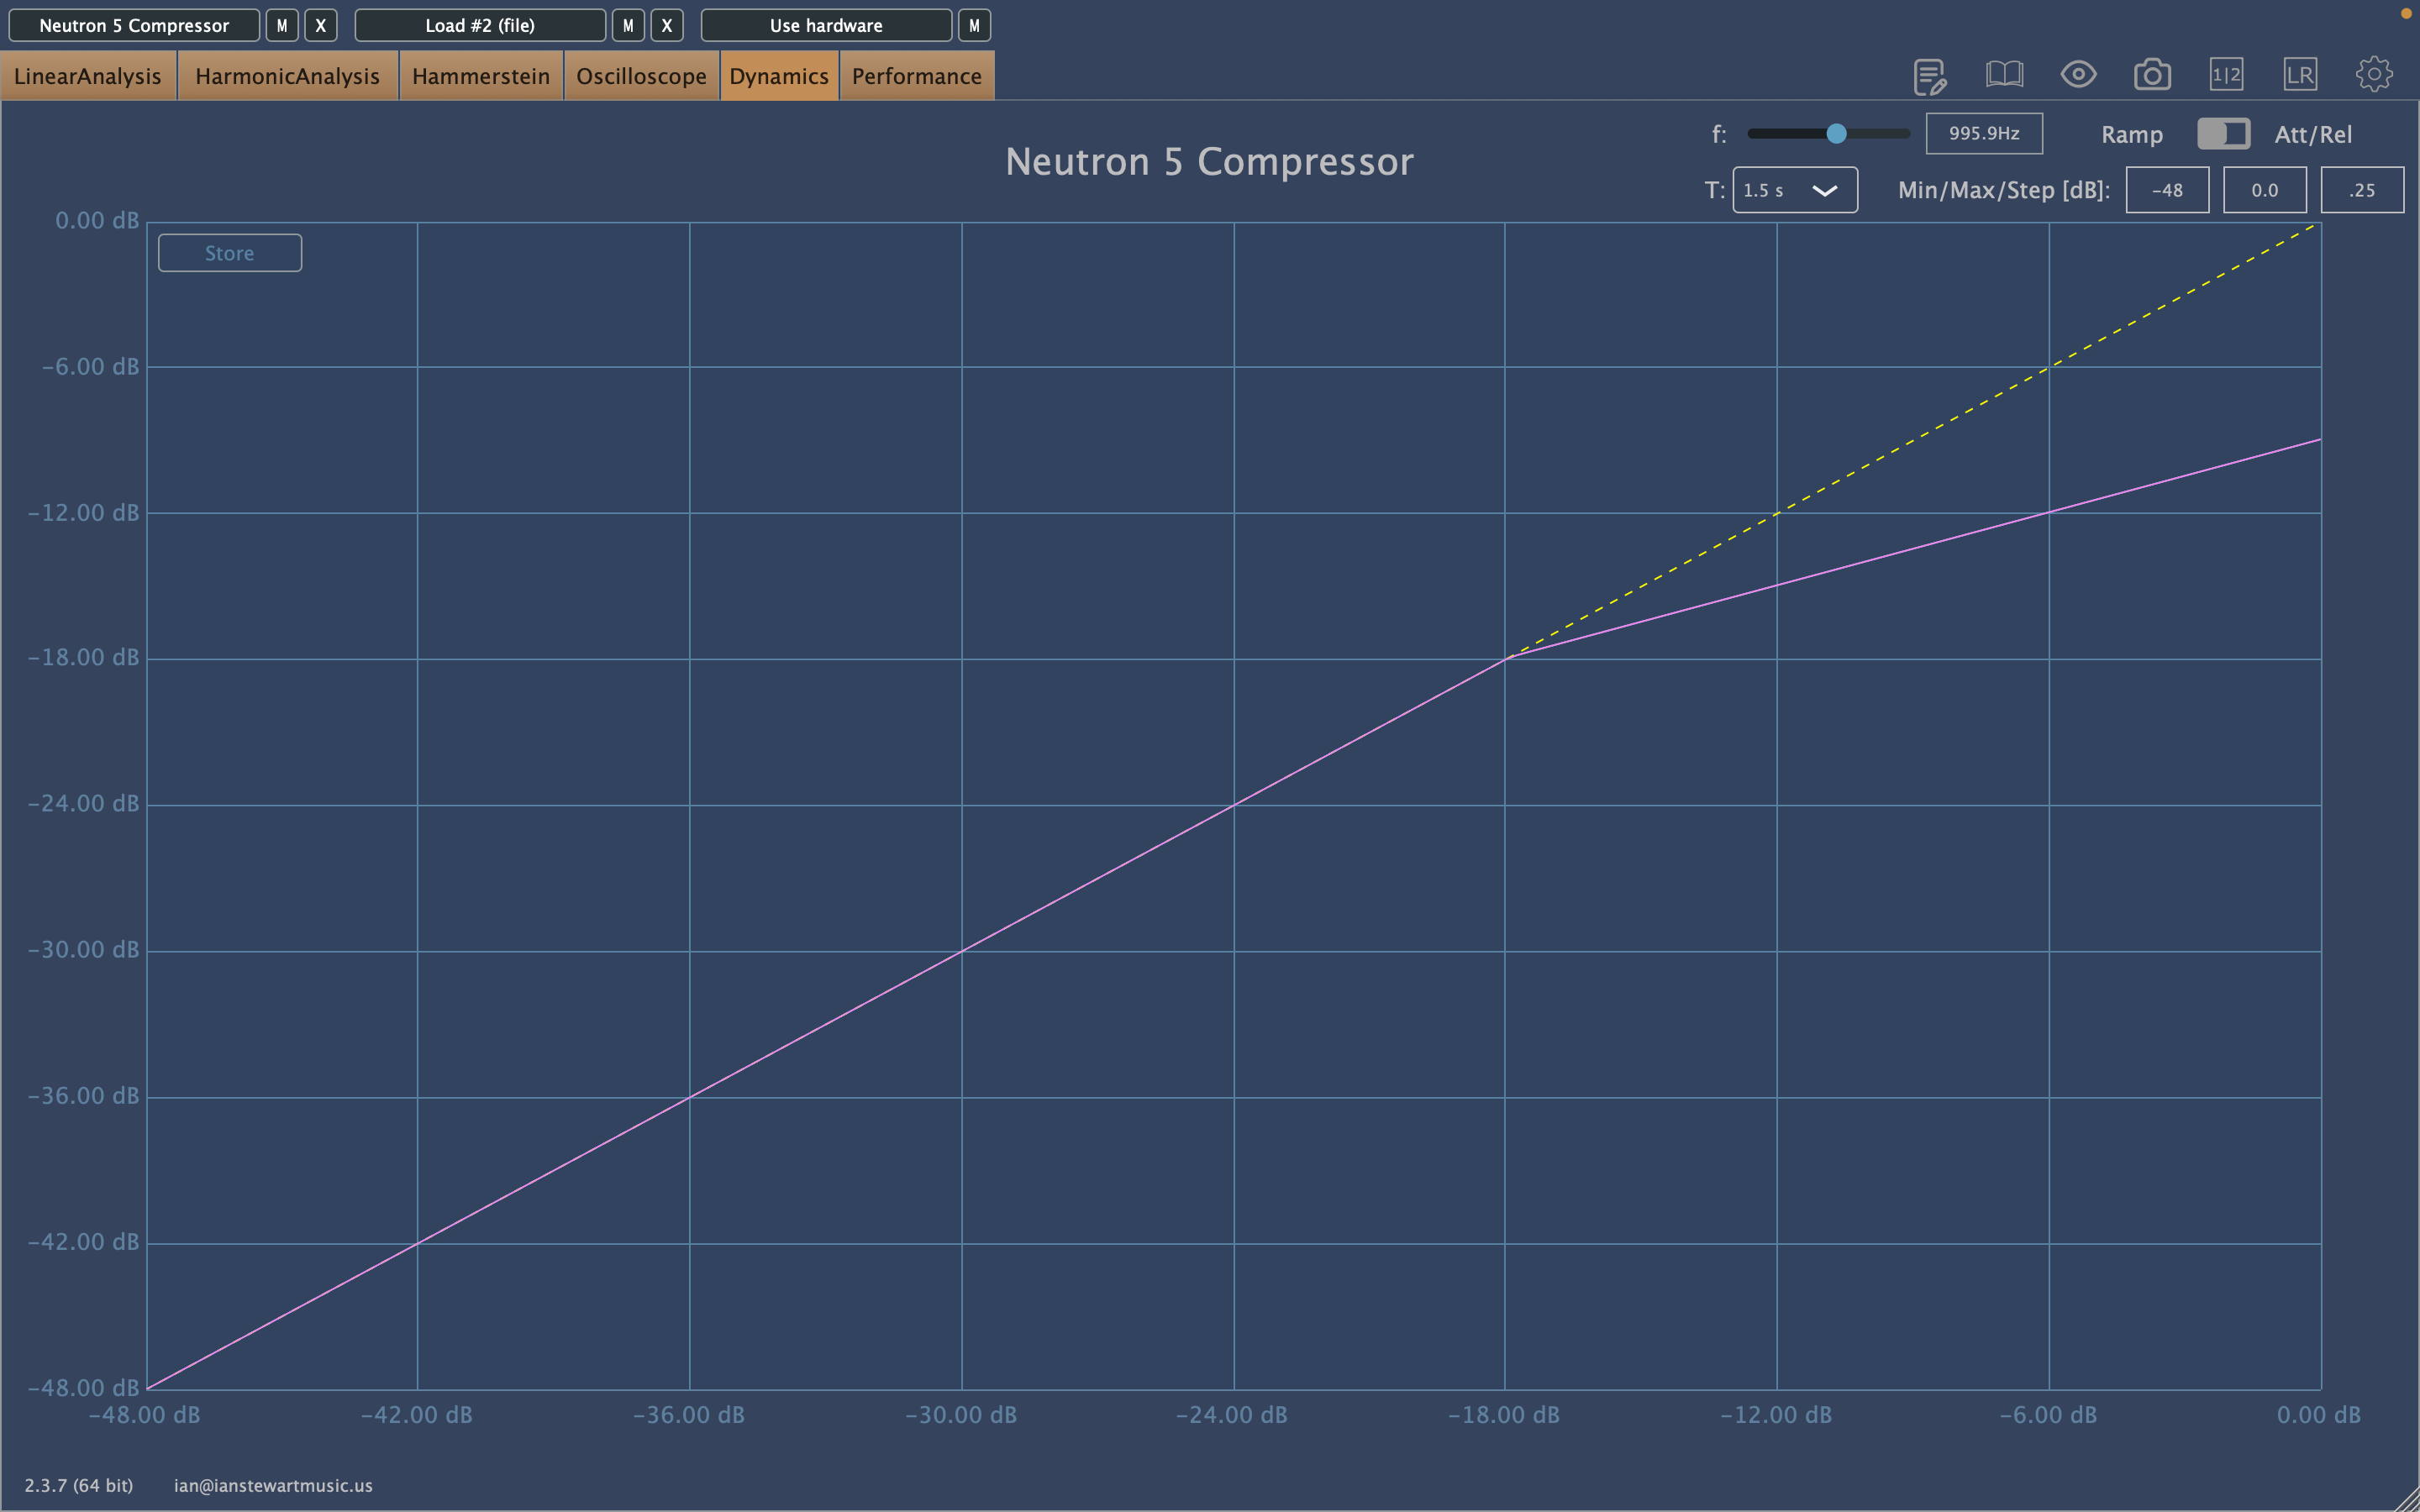
Upwards compression also reduces the dynamic range. All the controls are roughly the same – threshold, ratio, attack, and release – but one crucial operation is reversed: any signal below the threshold is brought up in level. That transforms our transfer curve – our graph of input to output – to look like this:
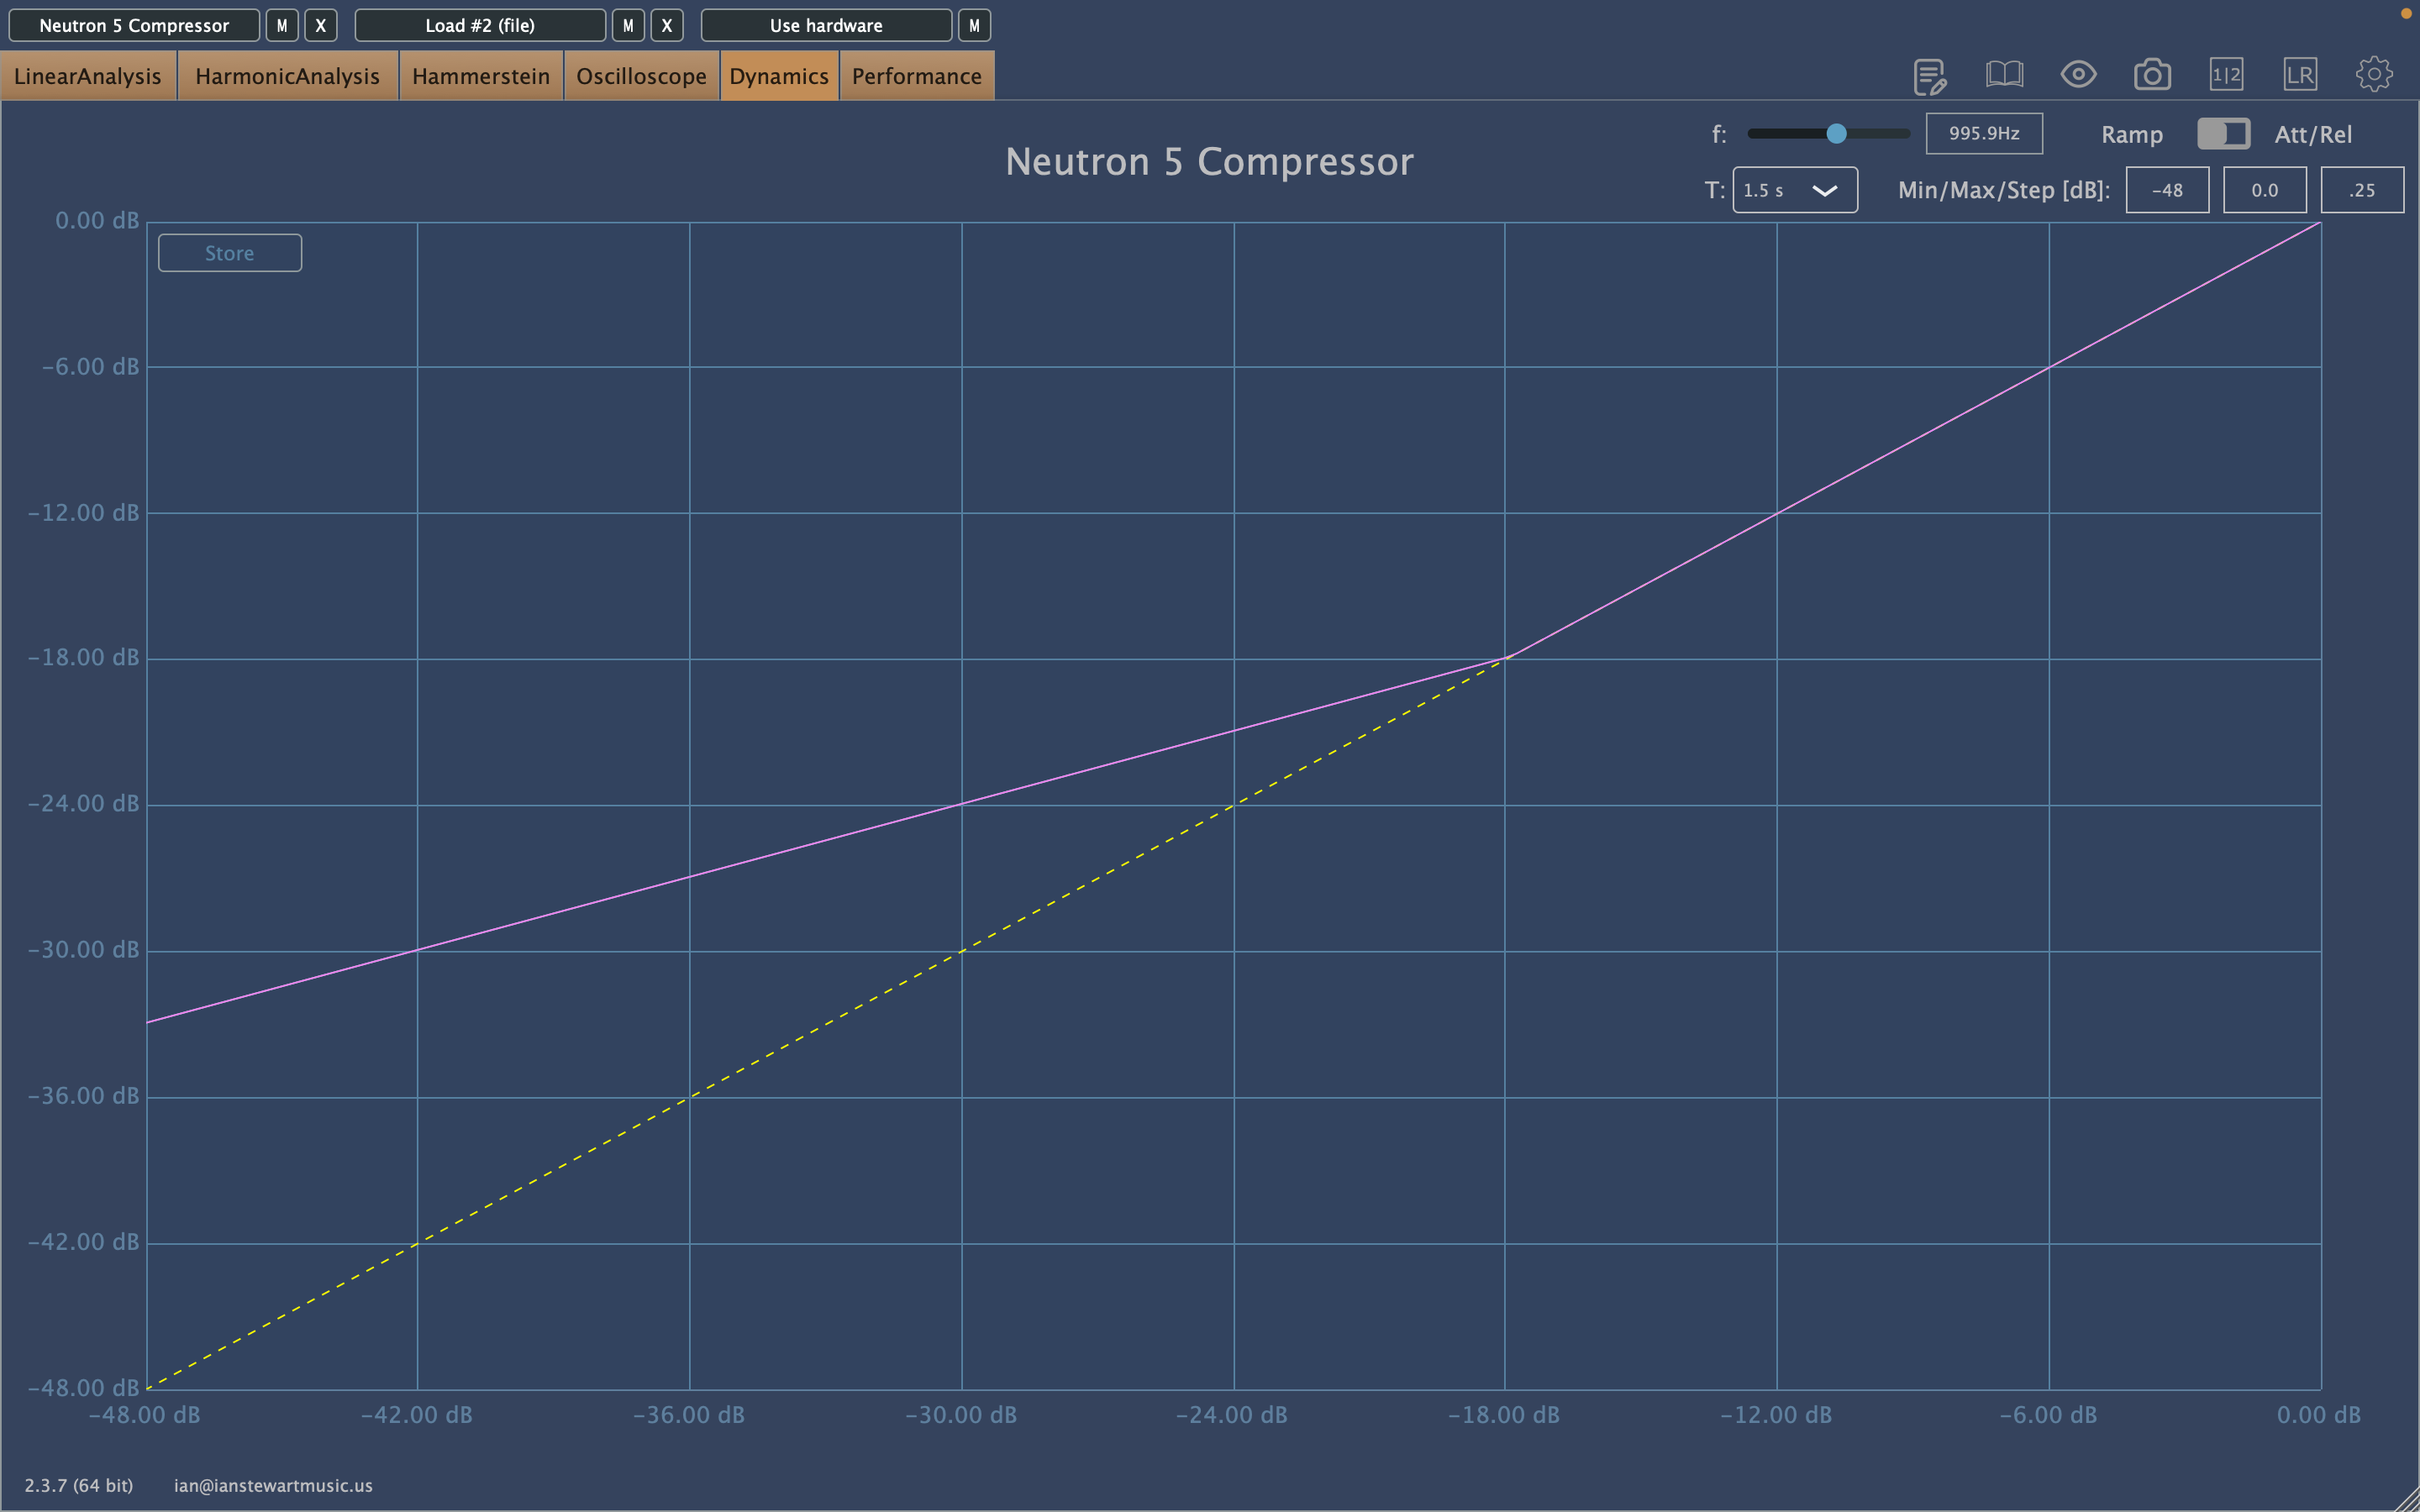
Upward compression transfer function
Neutron's unique upward compression
As mentioned earlier, Neutron offers three ways to achieve upward compression. Two can be found in the compressor module, while the third has a brand new module – Density – specifically dedicated to it.
In the compressor module, the ratio control is a little bit unique in that it supports ratios below 1:1. These look like 0.9:1, 0.5:1, etc. Any time you’re using a decimal-type ratio like this in the Neutron compressor, you’re engaging upward compression. In fact, this is exactly how the image above was generated. Yet another way we can achieve upward compression – or at least something that convincingly dresses up as upward compression – is by using parallel downward compression. More on this later.
The third – and easiest – way to use upward compression in Neutron is with the new Density module. The ratios will look much more familiar, making it easier to understand how much compression is being applied, the timing is simplified, and perhaps most importantly you have direct control over exactly how much gain can be added via the Range control. More on this, too, later.
What makes upwards compression unique in Neutron?
First of all, Neutron makes upward compression extremely easy to implement. I’m going to go out on a limb here: not a lot of software even offers true upward compression. Indeed, when Bob Katz talks about the process in his seminal book, Mastering Audio, he quickly refers you to parallel compression, the effects of which can have a similar sound, as the quieter bits of the signal can be raised in level.
Still, there is a difference in these two implementations. In the below screenshot we can see 6 dB of upward compression applied via Density in orange, contrasted with a similar amount of parallel compression in blue.

Upward and parallel compression compared
Notice that once you exceed the -18 dBFS threshold in Density, you are truly out of compression, while even 30 dB over the parallel threshold, the compressed signal is still contributing to the overall parallel sum. This isn’t just pedantic or visual either: we can hear a difference.
Here is a dynamic, crescendoing drum loop:
Here it is with parallel compression applied in Neutron:
And finally, here it is with upward compression via the Density module
If you’re having trouble hearing a difference, listen again and try to really focus on the sharpness and attack of the transient. Here are the parallel and upward versions again, this time alternating back to back four times.
In the parallel version, there’s a sharpness and explosiveness to each transient, while in the upward version the transients maintain their original sound. Each of these can be cool in the right context. If we’re looking for some of that explosion, parallel might be the ticket, while if we’re just trying to bring up softer elements, upward compression will do that more transparently.
But wait, there’s more! Neutron’s compressor sports both vintage and modern modes, and within each – as in the new Density module – the possibility of parallel and multiband implementation. All of these options allow for some serious sound-sculpting capabilities.

Upward compression in vintage mode and modern mode
This image displays upward compression in vintage mode overlaid with upward compression in modern mode. They don’t quite behave the same way, particularly around the knee of the threshold. Add multiband or parallel processing into the mix, and the possibilities multiply quickly!
So what can we use this stuff on anyway?
1. Even out vocals
Sometimes you have a vocal that may be too dynamic for the song or arrangement. Usually, we use downward compression to make the louder stuff quieter – but what if we’ve got a great performance where the louder stuff is working and it’s just a few softer phrases that are getting lost?
This may well be a case for upward compression, allowing us to bring the quieter bits of the vocal up in level.
Here’s the flat vocal.
That’s a ton of dynamic range in the space of just a few lines, but downward compression can easily sound unnatural, particularly on “hot head”. Instead, let’s use Density to bring the softer lines up.
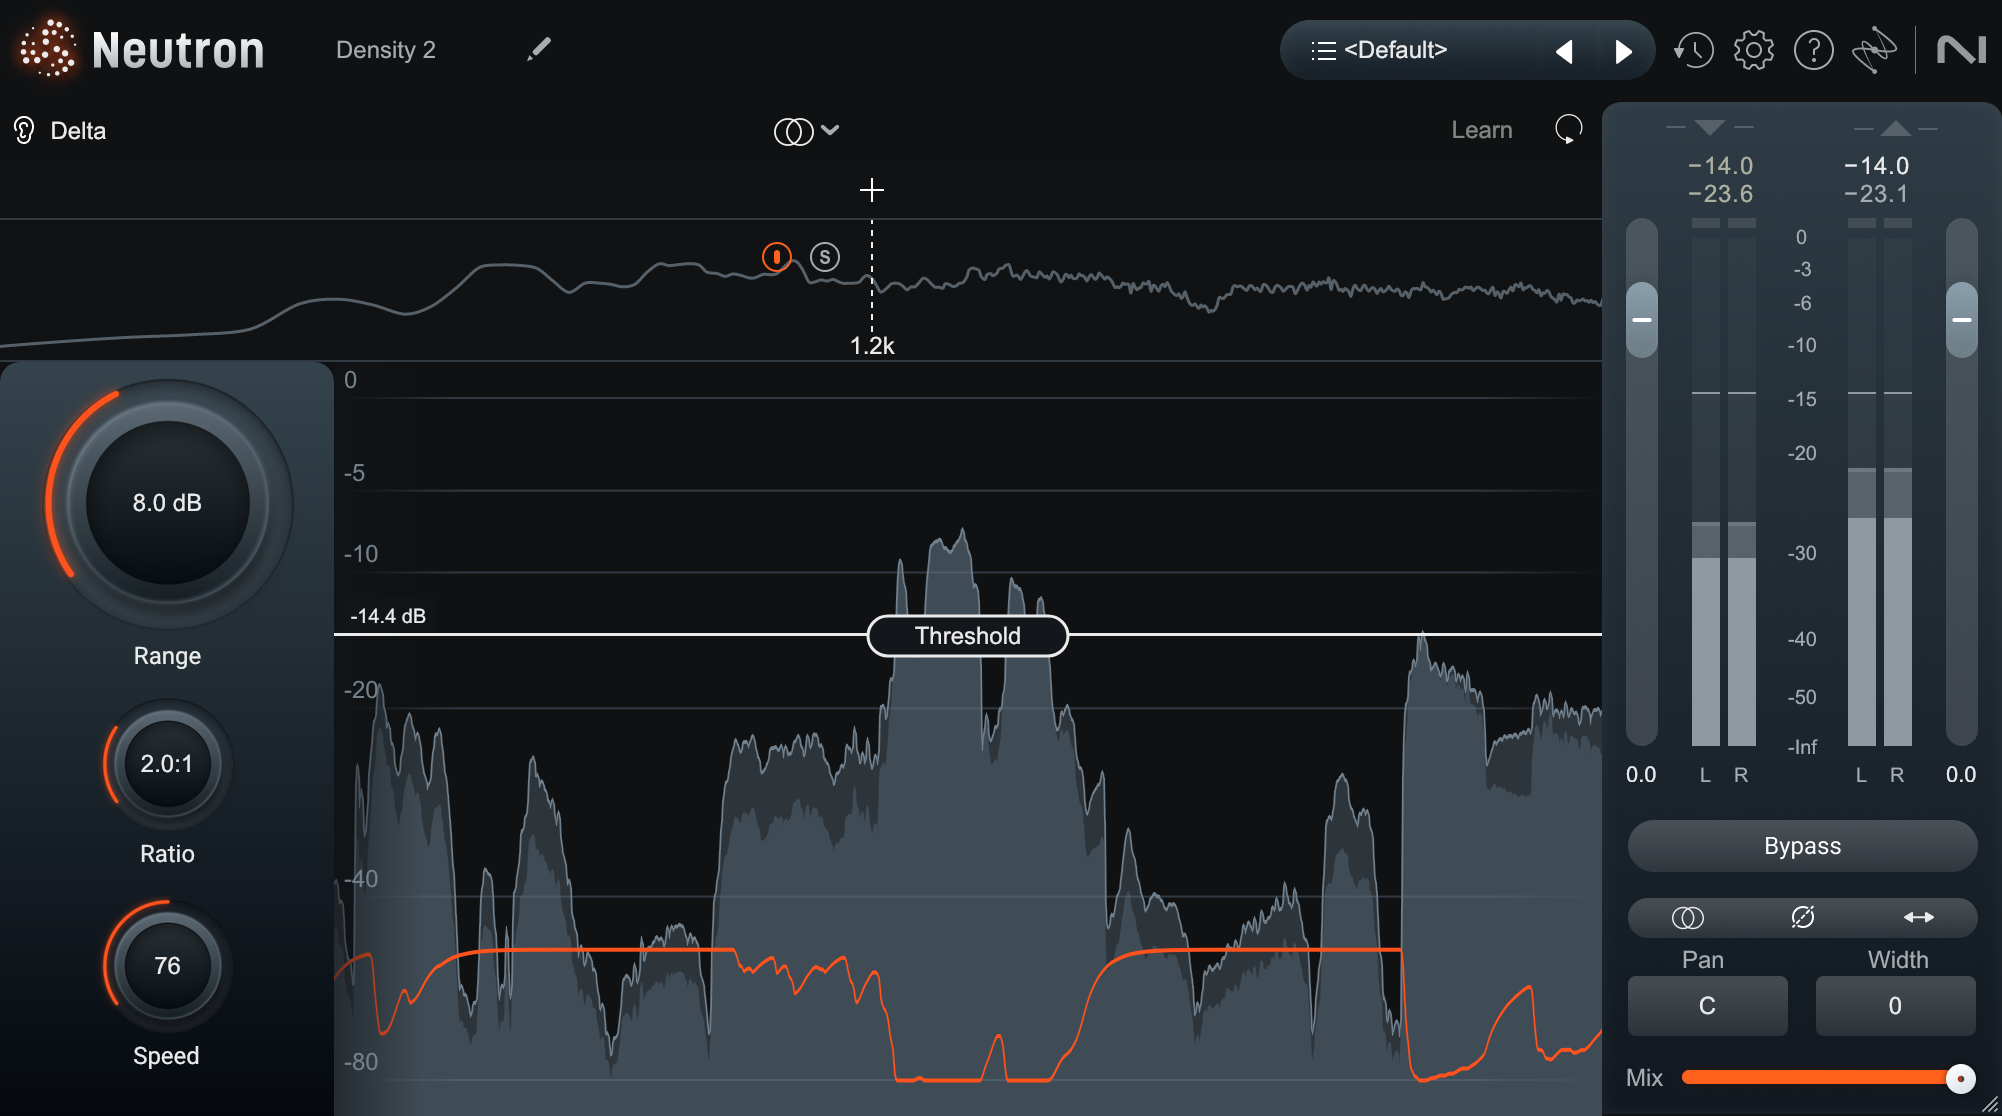
Bringing up soft vocals with Density
That said, if we still wanted to tame “hot head” a little more, we could follow Density with some regular downward compression in Neutron. Here I’m using Vintage mode with True detection, a 1.7:1 ratio, slow attack and release – 150 and 200 ms, respectively – plus some sidechain filtering to focus detection to between 625 and 4.4k Hz.
2. Enhancing ghost notes on drums
Check out how the snare sounds in this loop:
Boy do I love those ghosts notes – the snare rolls situated between the loud hits. I love them so much I want to bring them up.
Here’re the top and bottom snare in solo, with no compression:
I’m going to use Density again here, but this time in a multiband implementation. Since a lot of the sizzle and articulation of the ghost notes is up above about 1.5k and a lot of the body and tone is below it, I’m going to create a crossover there. This will allow me to bring a little more of the brightness and excitement forward without adding too much ringing. Here’s how I set up the top band.

Snare Density high band
However, I don’t want the tone to get too unbalanced so I’ll add some upward compression in the low band as well. Here, though, I’ll use a lower ratio, smaller range, and slower speed to make the effect a bit more subtle.
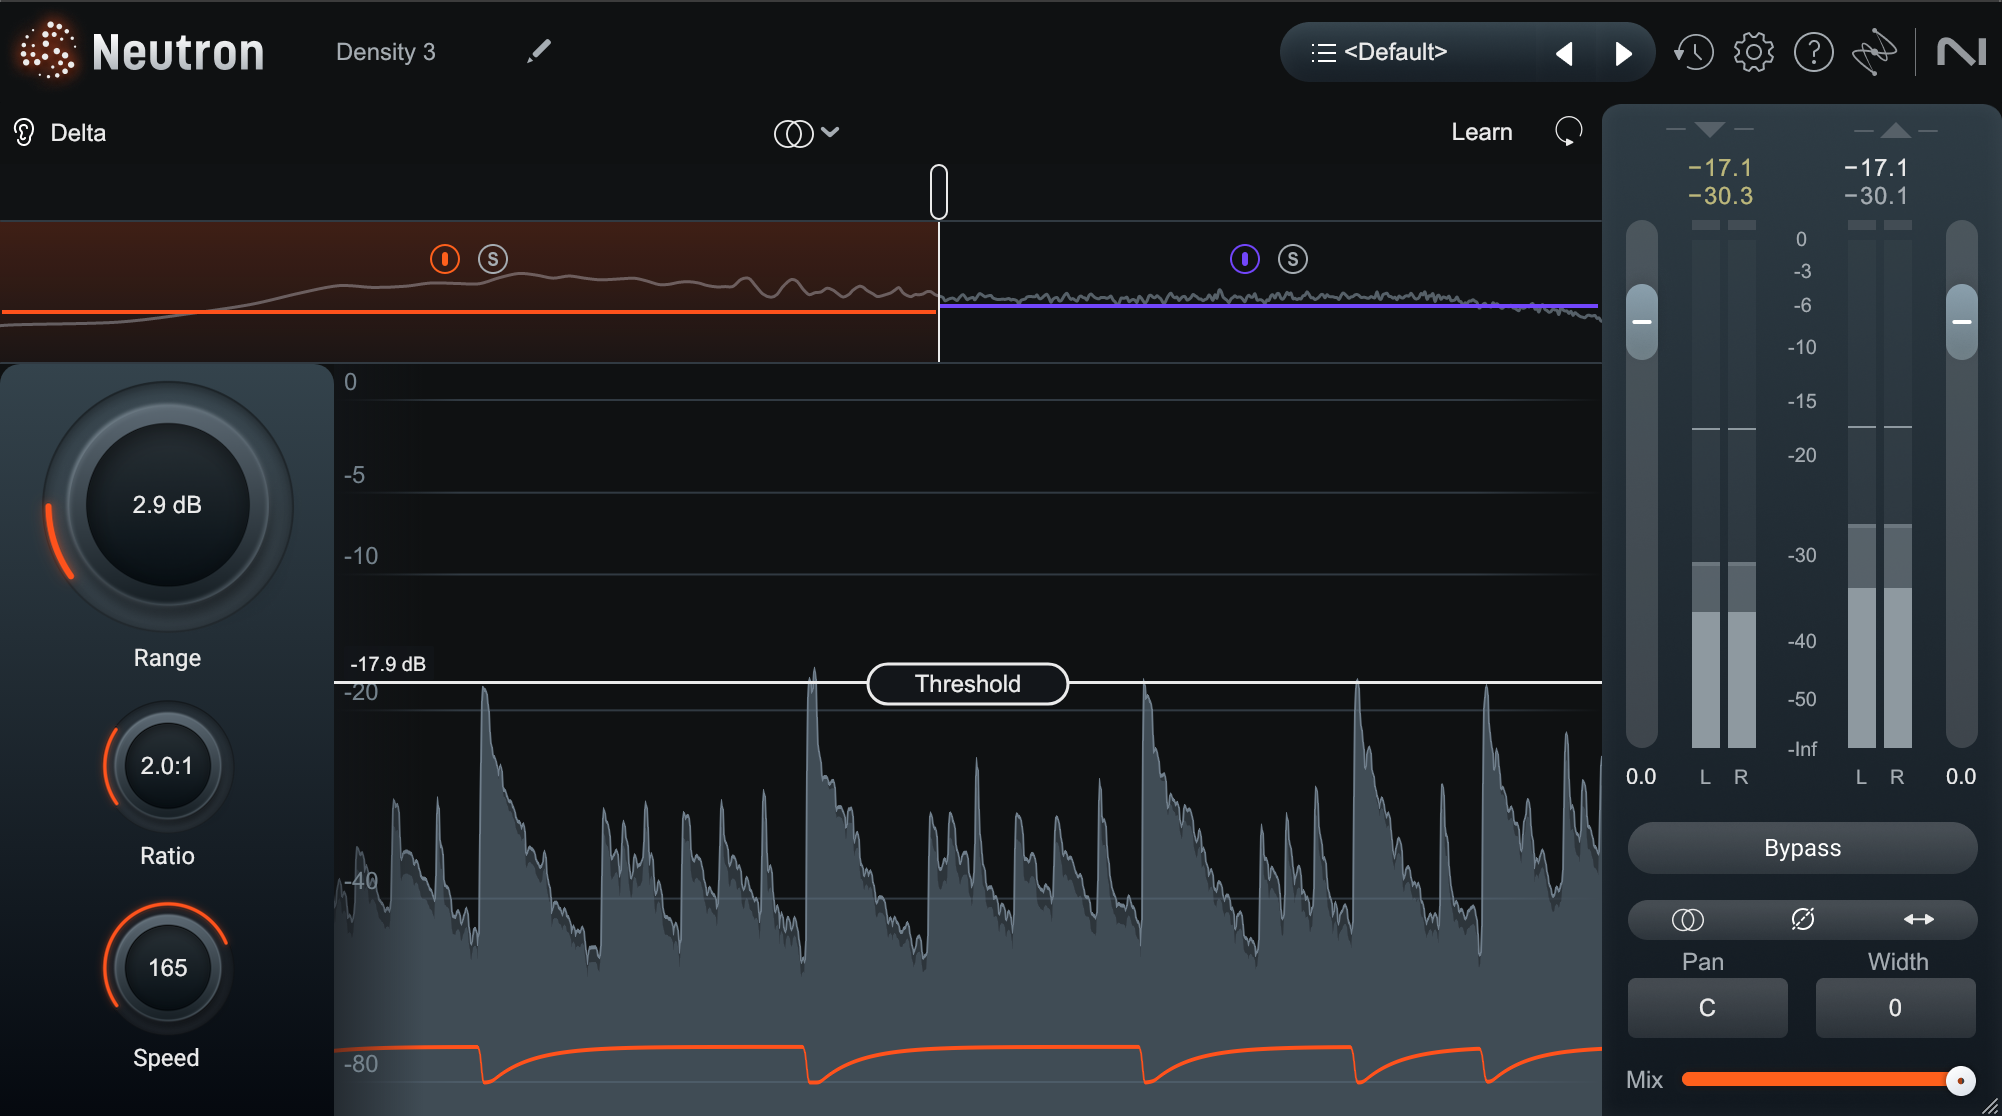
Snare Density low band
Put this all together and we end up with a snare blend that sounds like this.
Then, we can blend that in withEmbed: [08_snare drum.wav] the rest of the drum channels to get a drum mix where the ghost notes of the snare feel much more focused, without changing the impact or transients of the loud hits.
3. Faking room mics
If you’ve ever had to tackle an acoustic drum recording with no room mics, or perhaps just a kit that was recorded in a subpar space, this next one’s for you. Sometimes you can pull together an aux mix to send to a convolution reverb of a really great drum room, but as often as not, something can feel a bit off about this.
In other articles, we’ve discussed additional tools to address the problem, such as harmonic distortion, amp-style distortion, transient shaping, and compression. If we have a decent pair of overheads though, upward compression can give us another way to tackle the problem, often a little more natural sounding than the others.
Here is a drum loop, with no room mics in the picture.
Let’s solo the overheads and get a closer listen.
We’re going to send these overheads to an aux, and, operating in parallel, we’ll create a sort of artificial room mic. Let’s start by putting some upward compression on the overheads, again using Density.

Upward compression on the overheads
Notice the threshold is just tickling the tops of the transients, and we’re using a fairly low ratio. Here’s the result.
This sounds pretty good, and at first blush it might sound like something you’d get out of some crushed downward compression, but here that is for comparison.
They may not be worlds apart, but they each have their own flavor, and for me upward compression sounds a bit more natural and closer to something we might get out of a room mic.
From here, I’m going to add a few more touches to get it sounding a bit more “room-y.” First, I will hit it with a touch of downward compression – bordering on limiting – just to tuck in the tops of the loudest snare hits. Then, I’ll apply a little EQ to make it just a touch less splashy and rather warmer, and finally a touch of reverb – not too bright – to add to the size and decay. Here I’m actually just using the Nectar reverb!
All together, it sounds like this.
Finally, let’s blend this back into the drum mix – including the dry overheads – for a bigger, bolder sounding kit. Here it is before and after.
We haven’t exaggerated the level of the fake room mic. Instead, we’ve blended them roughly as they’d sound in a more traditional context. When comparing this example to the original loop, listen to the tom fill, and you’ll hear the extra beef this fake room provides.
4. Create atmosphere
Coupling upward compression with other processes – reverb and transient shaping come to mind – allows us to create complicated atmospheres where there were none before.
Maybe you’ve gotten a lovely acoustic piano recording, and you don’t want to alter the track itself. Maybe you have a synth lead that needs a little space around it.
In these cases, sending the instrument to a reverb can sometimes feel a bit sterile and predictable – like something we’ve heard too many times before. If we add upward compression to the sound before applying reverb though, we can twist its dynamics, alter its internal balance, and change what the reverb is reacting to and extending.
Here’s our original piano part for this example.
And here it is with a little reverb applied:
It’s OK, but again it feels like something we’ve heard too many times before, without adding any real character. Instead, let’s upward compress the piano on the aux return before feeding it into the reverb. Here’s what that sounds like on its own.
Then, if we add that exact same reverb to the compressed piano, we get something with quite a bit more character, where the reverb reacts to the transients and sustains of the piano much differently than before.
And finally, let’s blend it back in with the original sound.
By applying upward compression before the reverb, we were able to tease out the true feeling of this piano in a unique space. This is no polished grand piano in a symphony hall – this piano has some tactile, rough character to it; its decay more characterful and less predictable.
Use upward compression in your mixes
Hopefully these four approaches have given you some new and creative ways to think about upward compression. I would be remiss, though, if I didn’t warn you of some of the potential pitfalls, so let’s cover them quickly.
As with any form of dynamic processing, over-using or carelessly abusing it can be a surefire way to ruin elements of, or even a full mix. In particular, if you’re using the Neutron compressor with ratios below 1:1, it’s possible to bring very quiet sounds – like the noise floor of your recording – up by 20–30 dB or more, even with moderate settings.
The new Density module largely solves that problem with its range control, allowing you to place an upper limit on the maximum amount of gain that can be added. Still, careful listening is always warranted.
That said there’s no need to be afraid of it, so whether you’re using ratios below 1:1 in the Neutron compressor, the new Density module, or downward compression in parallel, now is a great time to start experimenting with upward compression if you never have before. And, if you’ve shied away from it in the past due to some of the unpleasant artifacts of upward ratios reaching down into the noise floor, you may just find Density is the tool you’ve been waiting for.
Good luck, and happy compressing!
