What's new in Neutron 5?
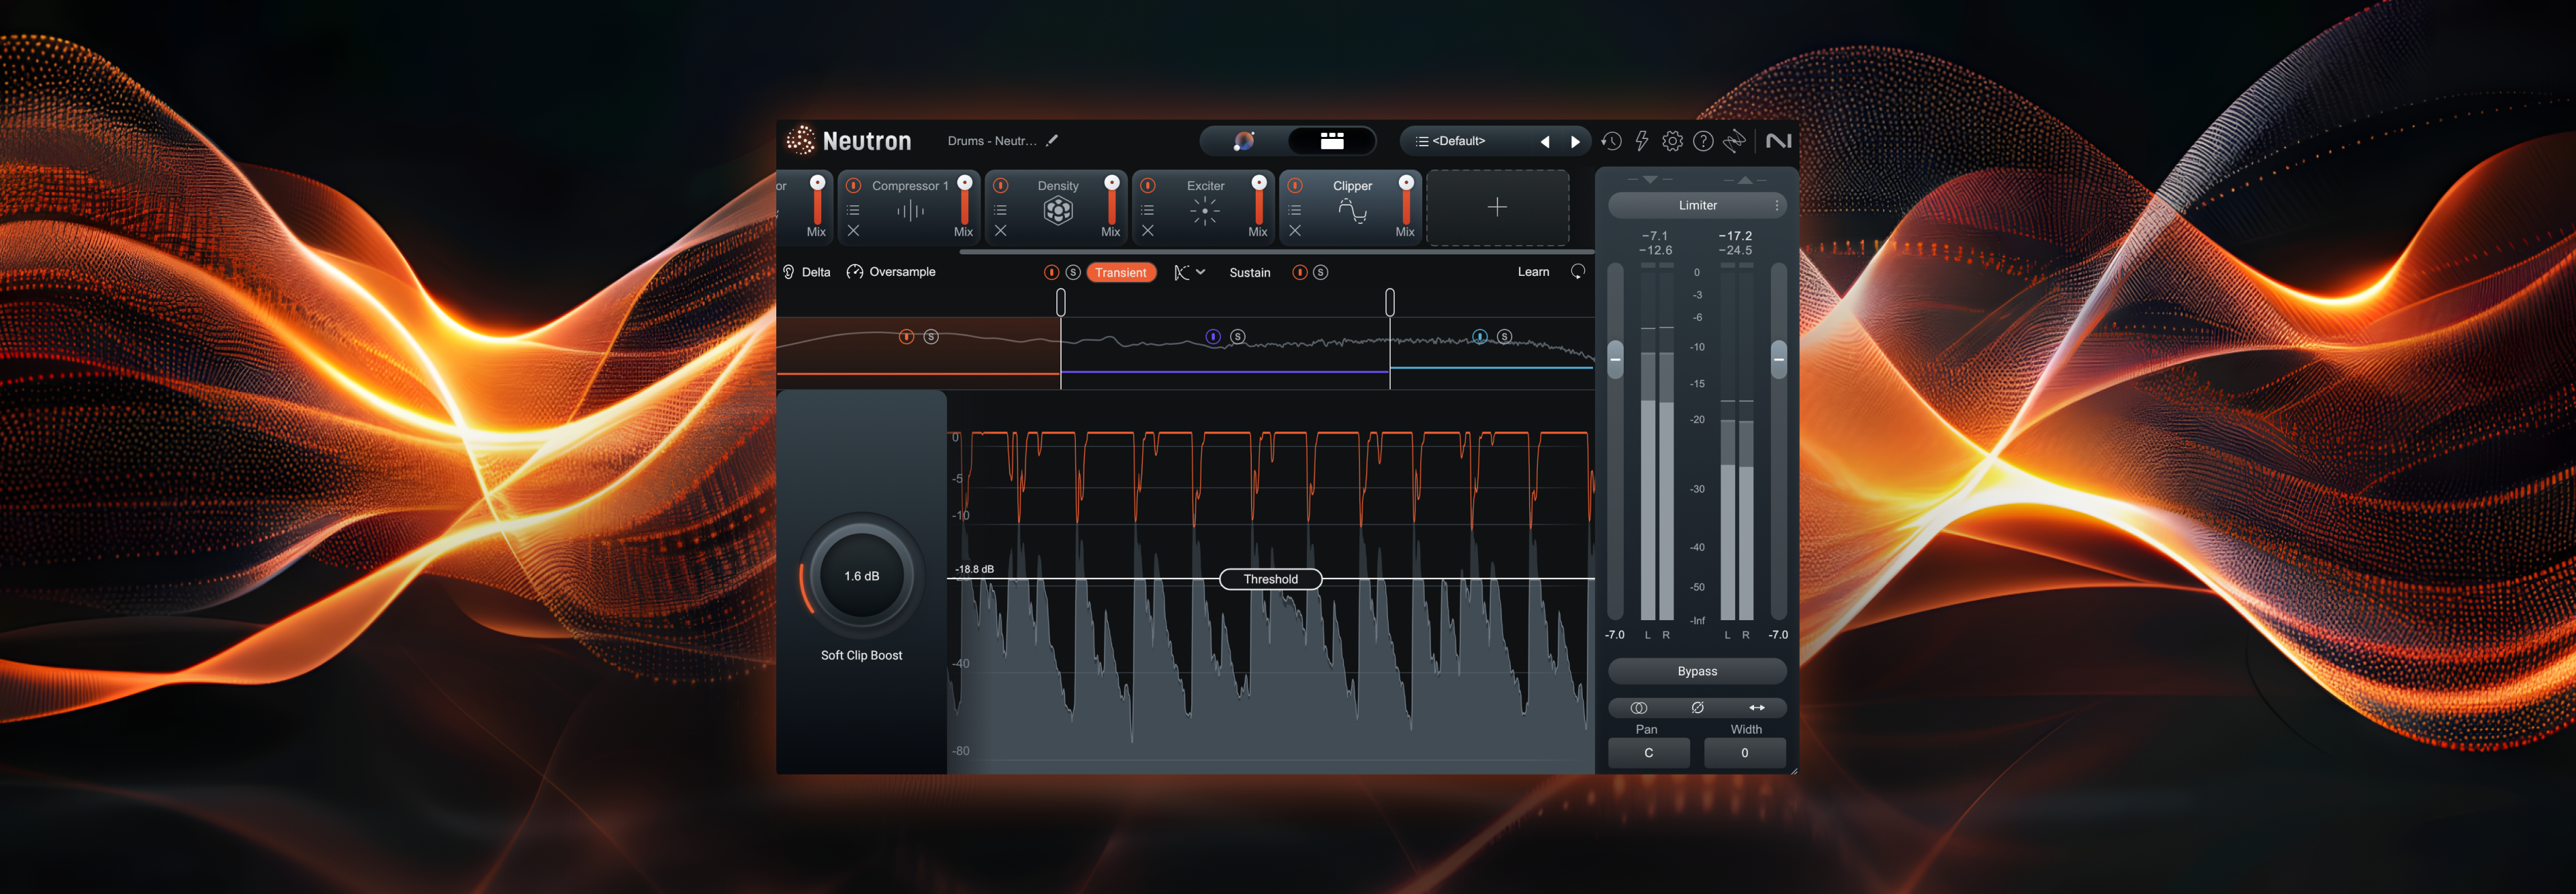
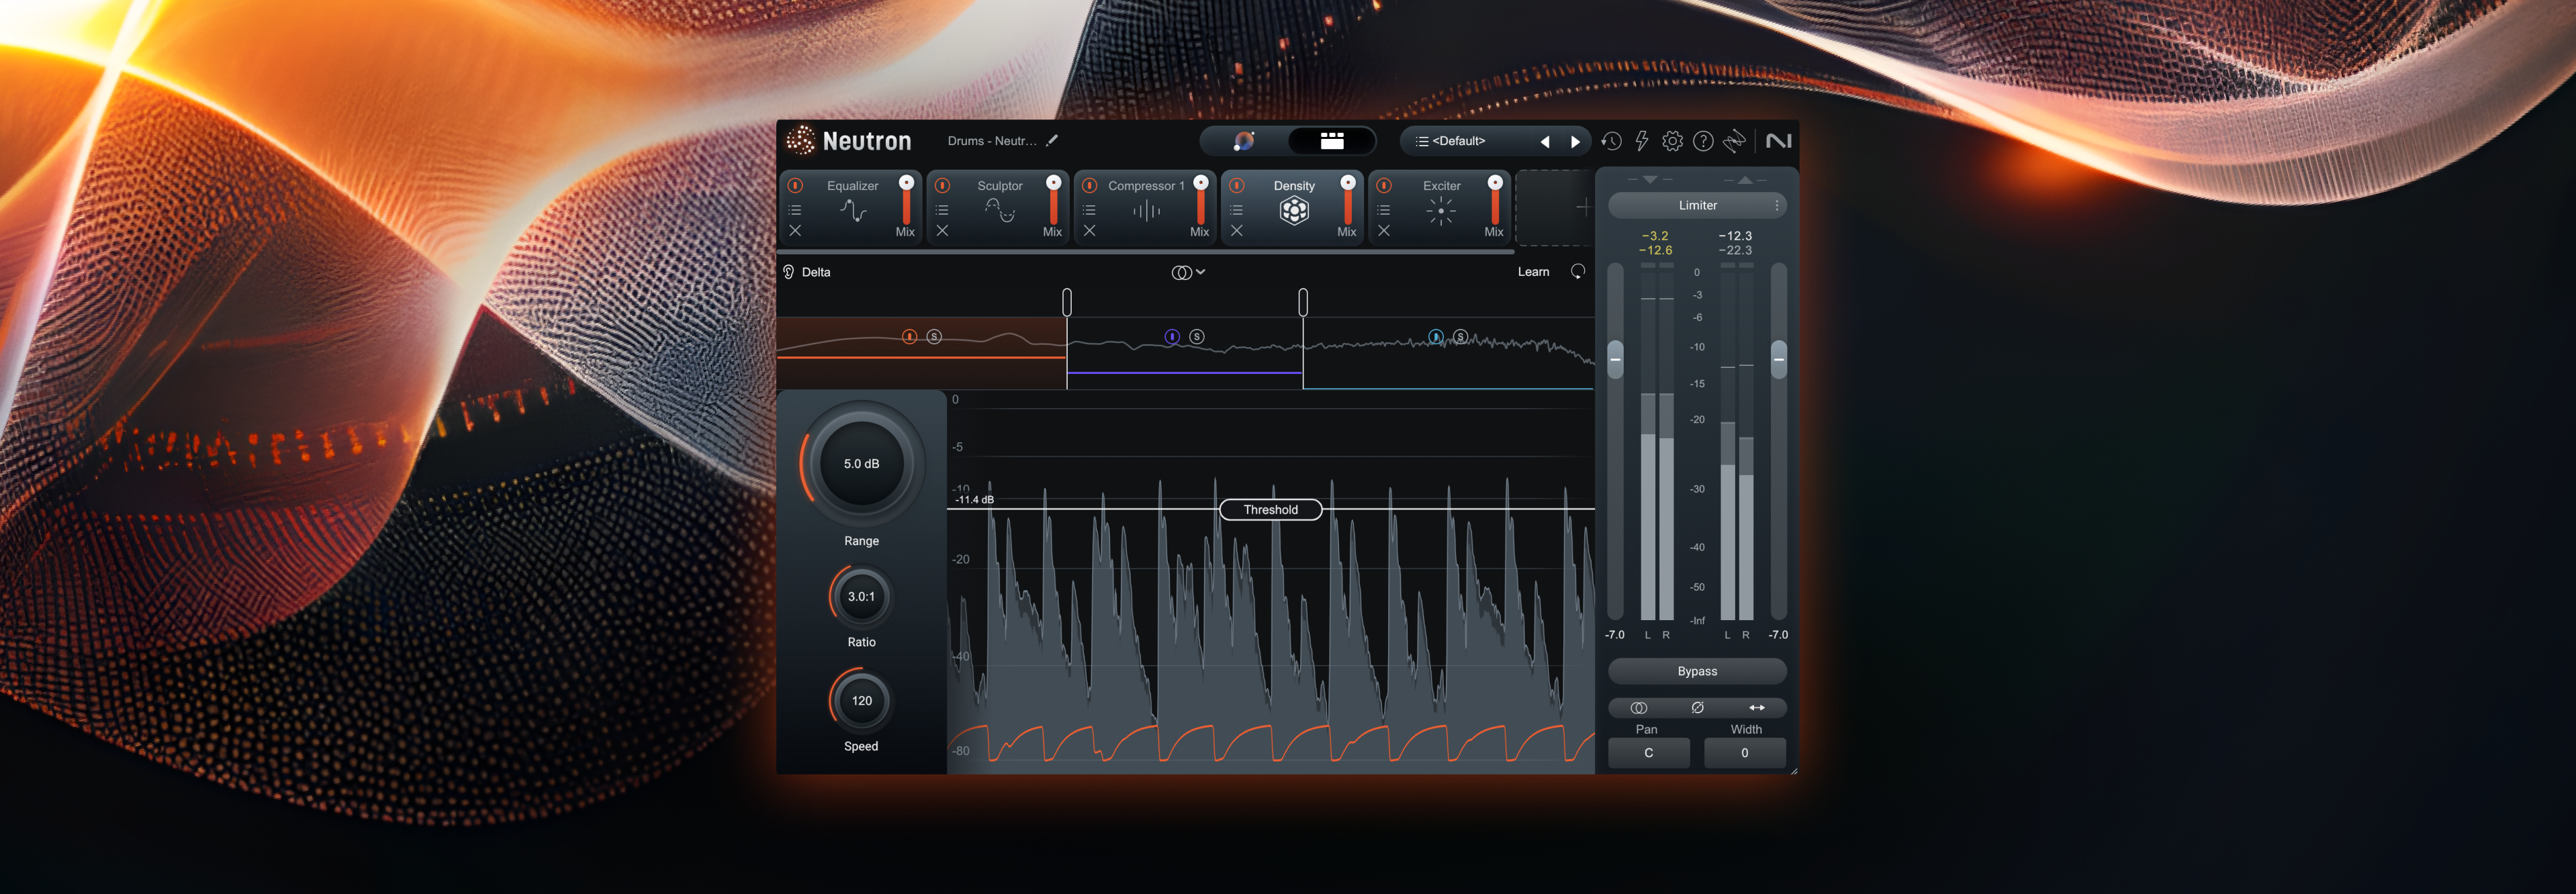
Neutron 5 is out now. With three new modules and an overhaul to the GUI, Neutron 5 is a modern-day, one-stop shop for all your mixing needs.
Neutron 5 has arrived! With three new modules, upgrades to the GUI, and much more, Neutron 5 is a modern-day, one-stop shop for all your audio mixing needs.
Let’s take some time to look at what’s new, starting with the Phase Module.
New Phase module
Meet the new Phase module, a tool for fixing many common phase and timing issues amongst tracks. We’re going to start with one that’s a little difficult to wrap your head around, but it’s super important, so I’ll explain it as easily as I can.
Phase rotation of individual tracks
Have you ever seen this before?

Waveform
In a DAW, this is a visual depiction of how a sound wave moves through the medium of air. You’ll note the centerline, the peak, and the trough. The peak is positive in value, and we call it a compression. The trough is negative in value. We call it a rarefaction. The centerline can also be called a zero crossing.
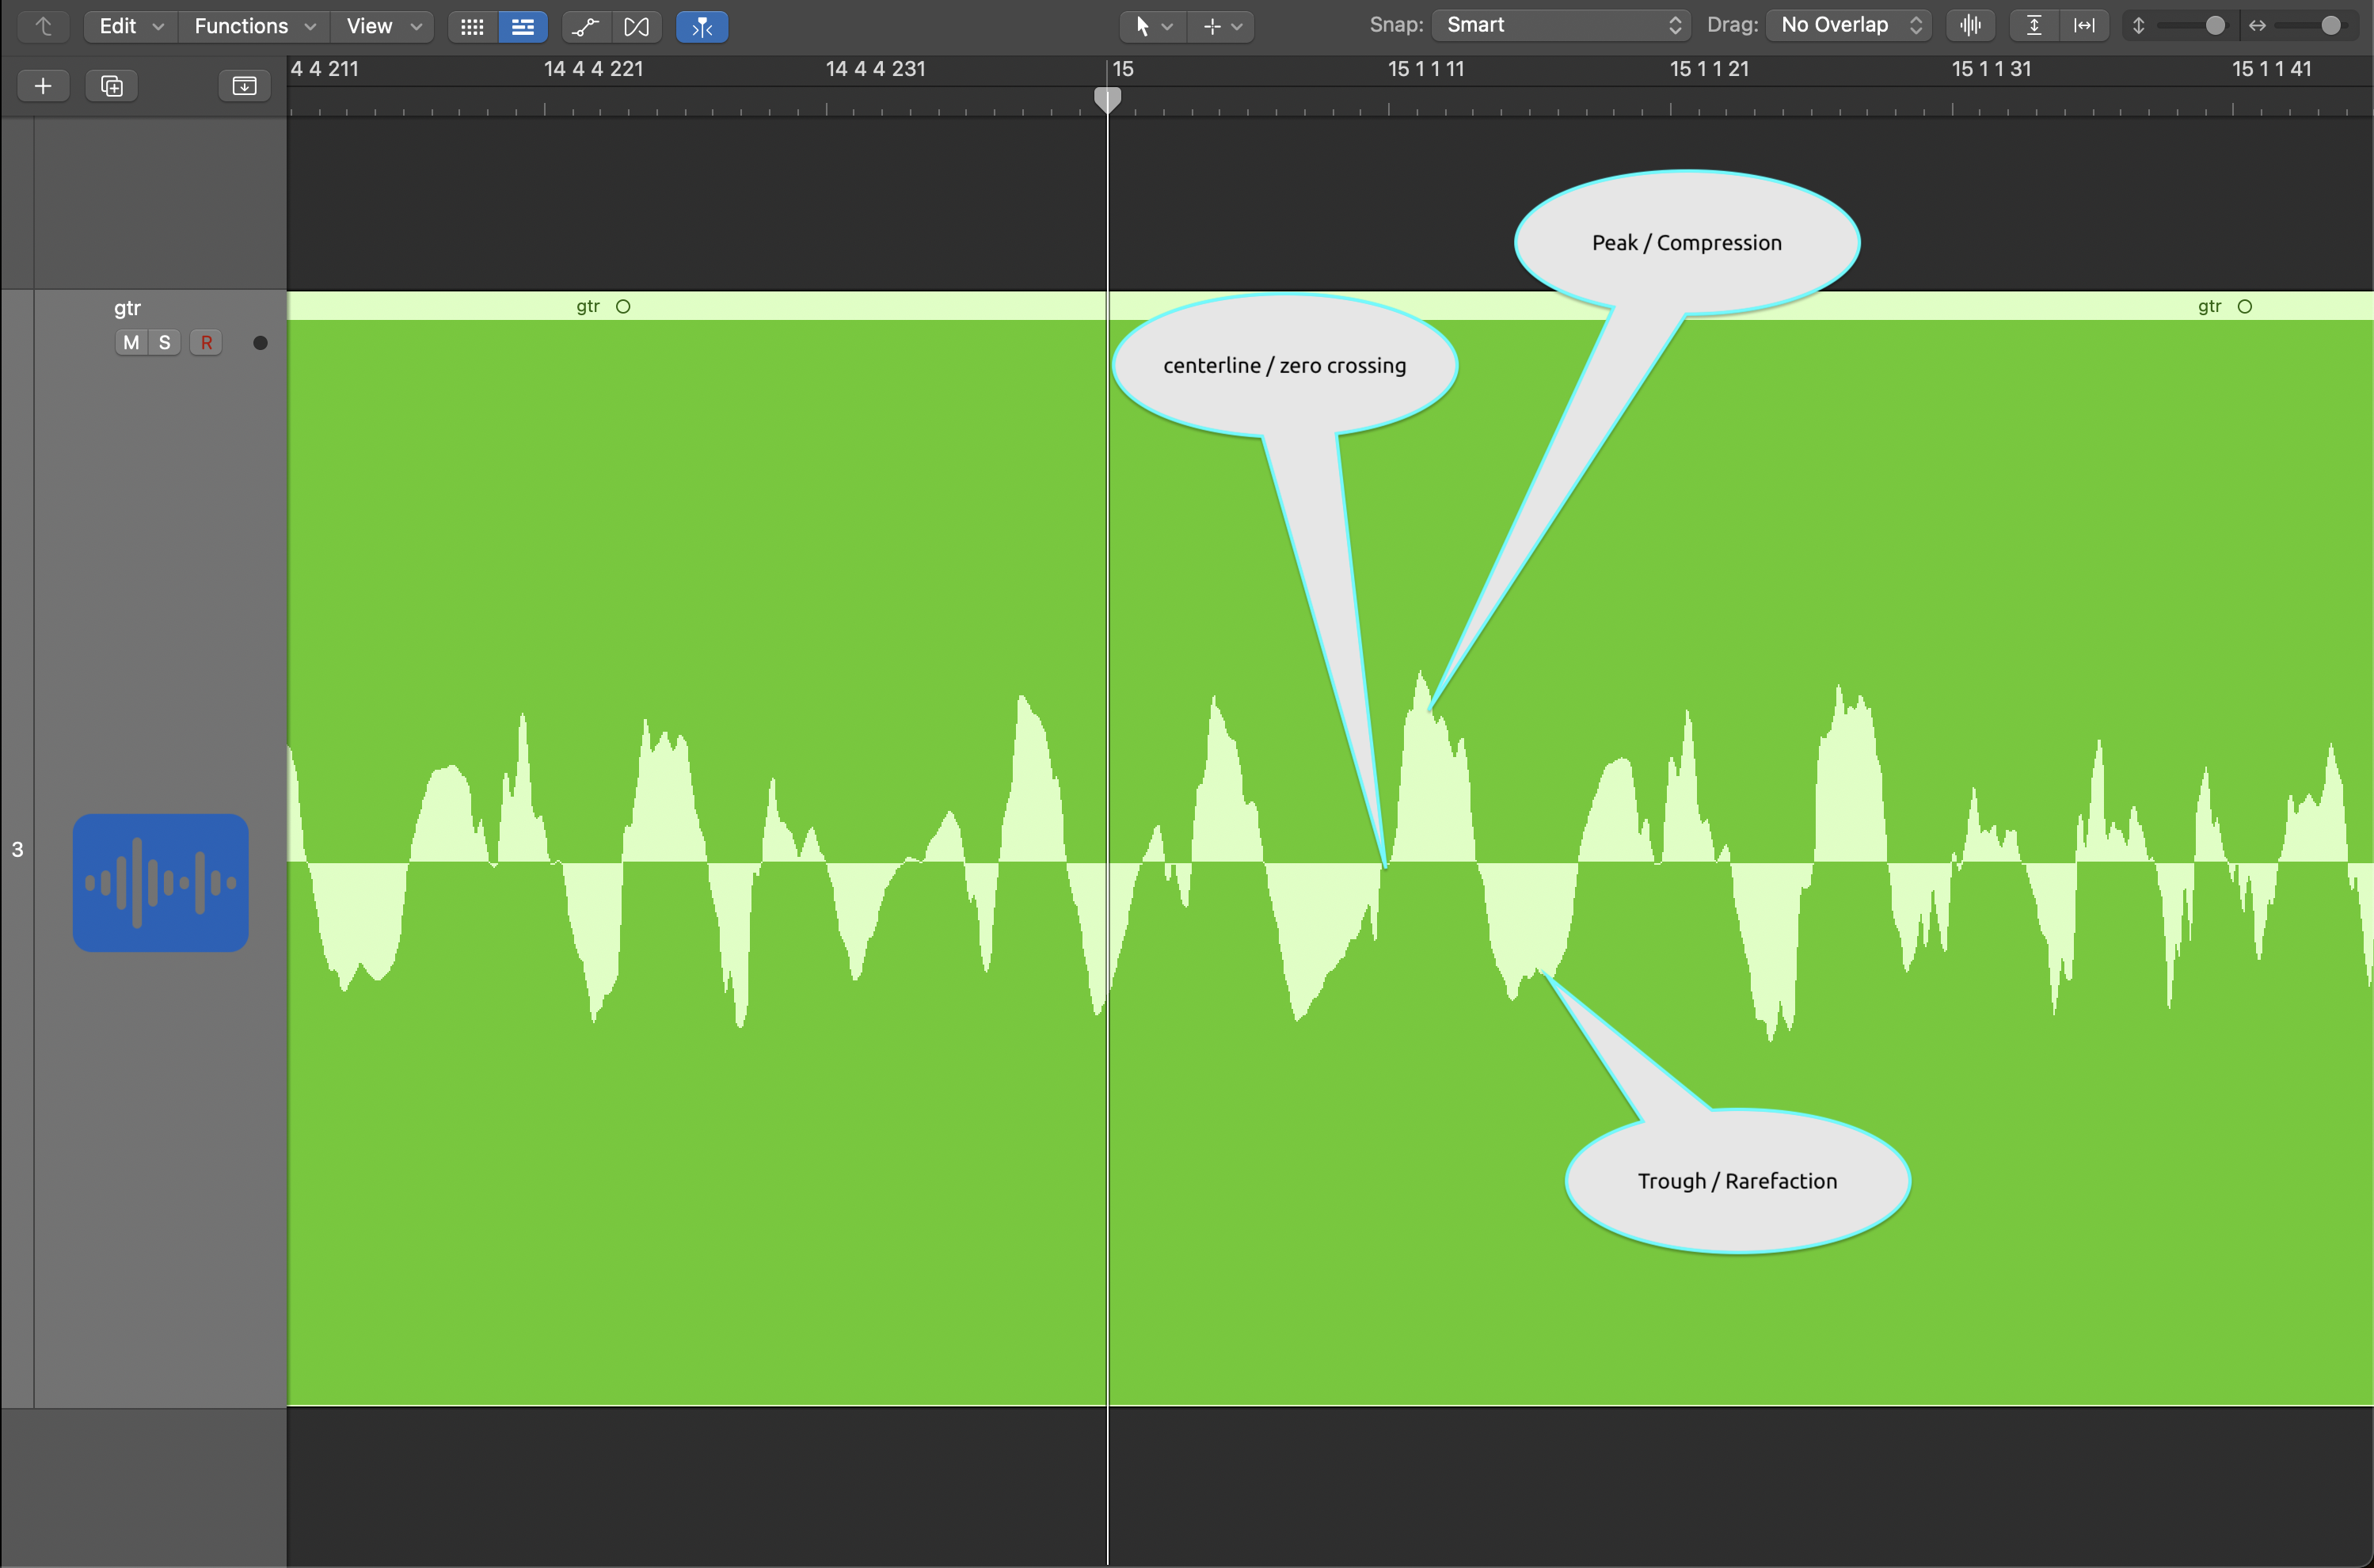
Waveform with labels
Now, here’s the next thing to keep in mind: the higher the signal goes in either direction of the centerline, the louder it will read on a peak meter.
Finally, we arrive at the core issue:
In the real world, many audio sources don’t rest neatly on the centerline. The audio might extend more into the positive range than the negative range, or vise-versa. We often call this phenomenon an asymmetrical waveform.
Since loudness exists on either side of that centerline, asymmetrical waveforms can gobble up precious headroom, even if they aren’t particularly loud. Put in other terms: they read louder on a peak meter than they sound to your ear.
If you correct the problem, and bring the whole waveform into a symmetrical place (going above and below the centerline in equal measure) the average loudness of the sound won’t change – but the peaks will measure lower. This results in more headroom. managing headroom is crucial in creating loud, commercial mixes.
Here’s an example of the issue playing out in the real world:
You’ve got a big sampled kick, but unbeknownst to you, the kick’s waveform is asymmetrical – so much so that it triggers the limiter at the end of your stereo bus to clamp down 3 dB whenever the kick hits.
With Neutron 5’s Phase Module, you can fix this issue quickly, using the prominent Learn button to automatically adjust the phase rotation of the signal.
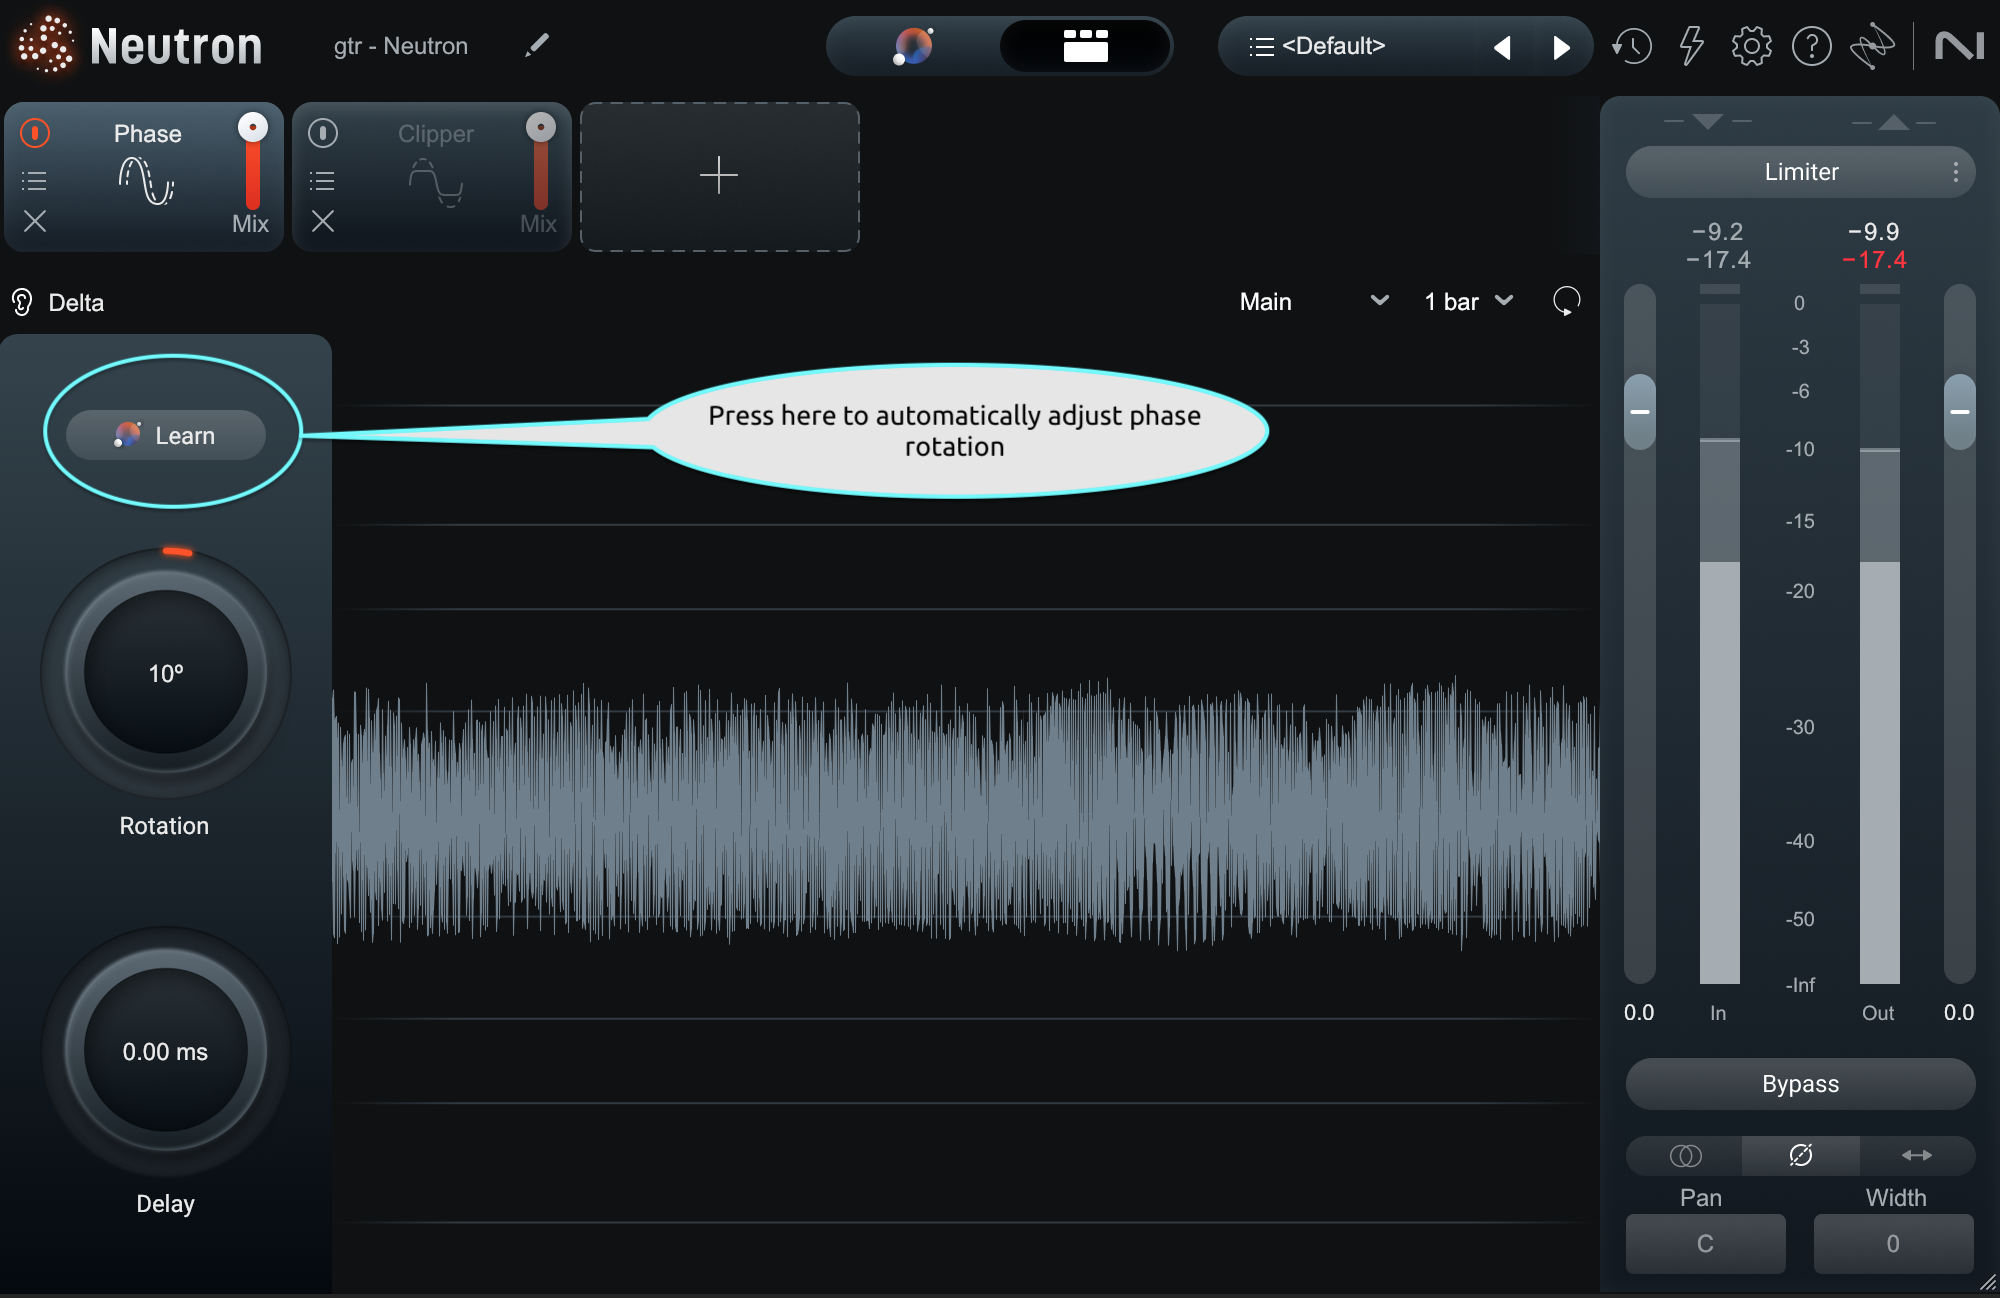
Neutron Phase, Learn
Simply play your sound, hit “Learn” and the Phase Module will iron out the asymmetry automatically.
Let’s say that you run the operation on this kick sample and wind up with a soundwave that measures 0.7 dB less in peak energy than it did before. Now, the kick sounds just as loud, but it only causes the limiter to clamp down -2.3 dB instead of 3 dB. That’s a big difference in the land of limiting. It could very well be the difference between a flabby, dull thump and a vibrant kick.
Whether you use the learn function in the Phase module or go by ear and meter, this tool is fantastic for working with synths, brass instruments, basses, guitars, vocals—indeed, many instruments. You buy yourself extra headroom to make your mix punchy and loud without actually changing the character of the sound. If commercial levels are a concern for you, this is a huge deal.
Now let’s cover other uses of the phase module.
Phase alignment
Say you’re working with a multi-miked drum kit, one recorded very badly. Here, phase issues can destroy the overall drum sound, making things sound washy and smeared and weak.
This is where the Phase module’s delay knob comes into play.
This control, coupled with the sidechain input (also circled in the screenshot), allows you to phase align multi-miked recordings quickly. You can do it automatically, with the Learn button, or you can do it manually, by meter and by ear.
Observe the static mix of this drum set:
In terms of phase relationships, the miking of these drums leave a lot to be desired. We have a thin papery kick, a weird snare, and a strange stereo image. This is a textbook example where phase-aligning drums can help us.
To be sure, phase-aligning plug-ins have existed for years. Here’s what the current industry standard plug-in sounds like on these drums.
But observe iZotope’s take on the matter:
Don’t get me wrong, the current industry-standard plug-in is very good. It’s also very easy to use: you load it on every track, play some audio, and after thirty seconds, it automatically aligns the delay of each mic to one of the drum tracks—usually the snare.
But listen closer to Example 2 and you might detect an issue: its greatest asset is also its greatest weakness. All the character of the recording is gone. All spatial depth has been obliterated. The sound is over-corrected, and everything feels too upfront and in your phase.
Listen to Example 3, and you’ll hear how everything retains a sense of depth—and that’s because iZotope makes it very easy to tweak things after the algorithm does its own automated cleanup.
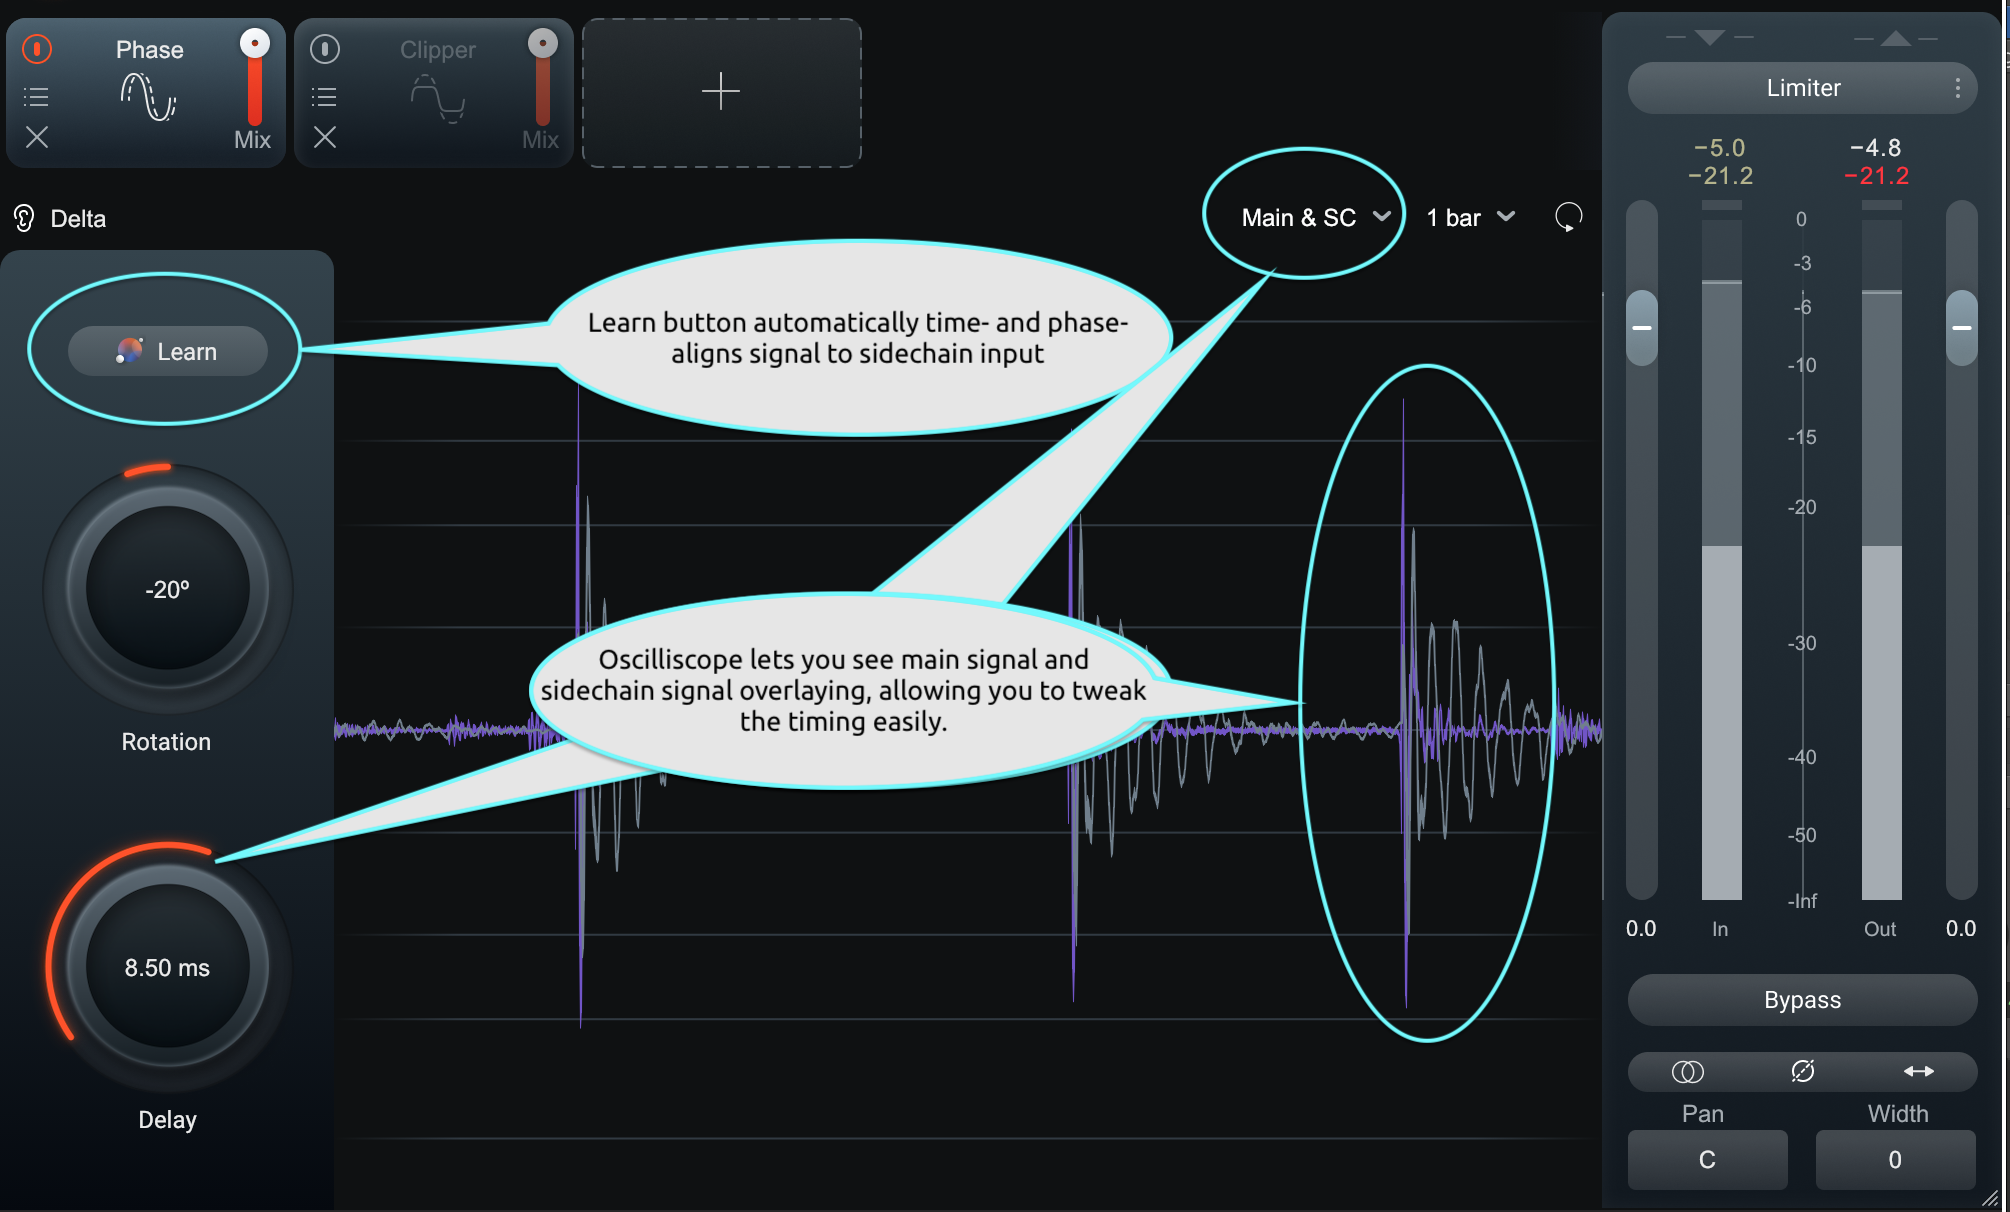
With the GUI provided, you can easily adjust things from “technically correct” to “artistically satisfying” by ear and meter. And you can always go back to your previous settings if you stray too far.
For more on this use case, I encourage you to peruse this article that covers phase in depth. Now, let’s move on to Phase’s final trick:
Sample alignment
Drums like the ones shown above still need help after phase aligning. They require sample augmentation to beef up the actual sound of the snare and kick drums.
But the sample of a beautiful kick drum might not be in phase with the original kick. It might not be totally out of phase with the kick either – it might lie somewhere in the middle, requiring a more nuanced solution for phase alignment than mere polarity flipping.
Neutron 5 is that nuanced solution. Using the sidechain, the rotation knob, the delay knob, I can perfectly align my samples to my original drums.
Observe our drum kit with sample augmentation on the kick and snare, left unaligned:
And here we’ve just used the learn function with their respective sidechains to align the kick and snare samples to their instruments:
Now we’re in a good place to start using other modules in Neutron to craft a great drum sound.
This use-case is also important for people working in synthetic genres, where various kick samples are layered to make a unified sound. If these samples aren’t phase aligned, they might sound thin and washy. Neutron’s Phase module can handle that issue with ease.
New Density module
Let’s now move to our second new module, called Density.
If you have a dynamic vocal that you’d rather not clamp with compression, Density is a good alternative. If you have an uneven bass part, density can help even out the notes without affecting the overall groove. If you want your signal to be louder without increasing its peak level – and without causing compression artifacts – Density can help in this regard. Indeed, this is where the name Density comes from: the module can provide a sense of density without adding unwanted compression side effects.
So what is this processor doing, exactly?
Density is an upwards compressor, made exceedingly useful in practice.
You might know how a typical compressor works, but upwards compression is a bit different: in upwards compression, the signal below your threshold is raised in level, making the quiet stuff louder.
Before now, upwards compressors came in two flavors: advanced/fussy affairs with finicky controls; or a single, over-simplified slider in a rather paltry user interface.
The finicky nature of upwards-compressors is why many engineers often avoid them, turning to parallel compression to achieve a similar effect. But parallel compression has its own issues:
Any time you run a signal in parallel, squash it, and blend it back with the original, you can cause phase problems, leading to a smeared image. If you’re using parallel compression with aux returns, your DAW might not play nicely with plug-in delay compensation, making this phase-smearing problem worse.
And let’s not forget blend knobs: though useful, they don’t give you a transparent control over the integration of dry and wet signals. Two independent controls for dry and wet signals are better – but most developers don’t go that route, as it can be confusing.
Density simplifies things enough to make upwards compression easy to use, without reducing the effect to a mysterious and uncontrollable mystery box.
For instance, consider the Speed knob. Attack and Release controls are typically what get people into trouble when dealing with upwards compression, as these controls influence the results quite differently in upwards-compressor land. So Density combined the two into a “Speed” knob that makes timing the effect effortless.
Furthermore, Density’s slick GUI can help you see exactly how the effect is working.
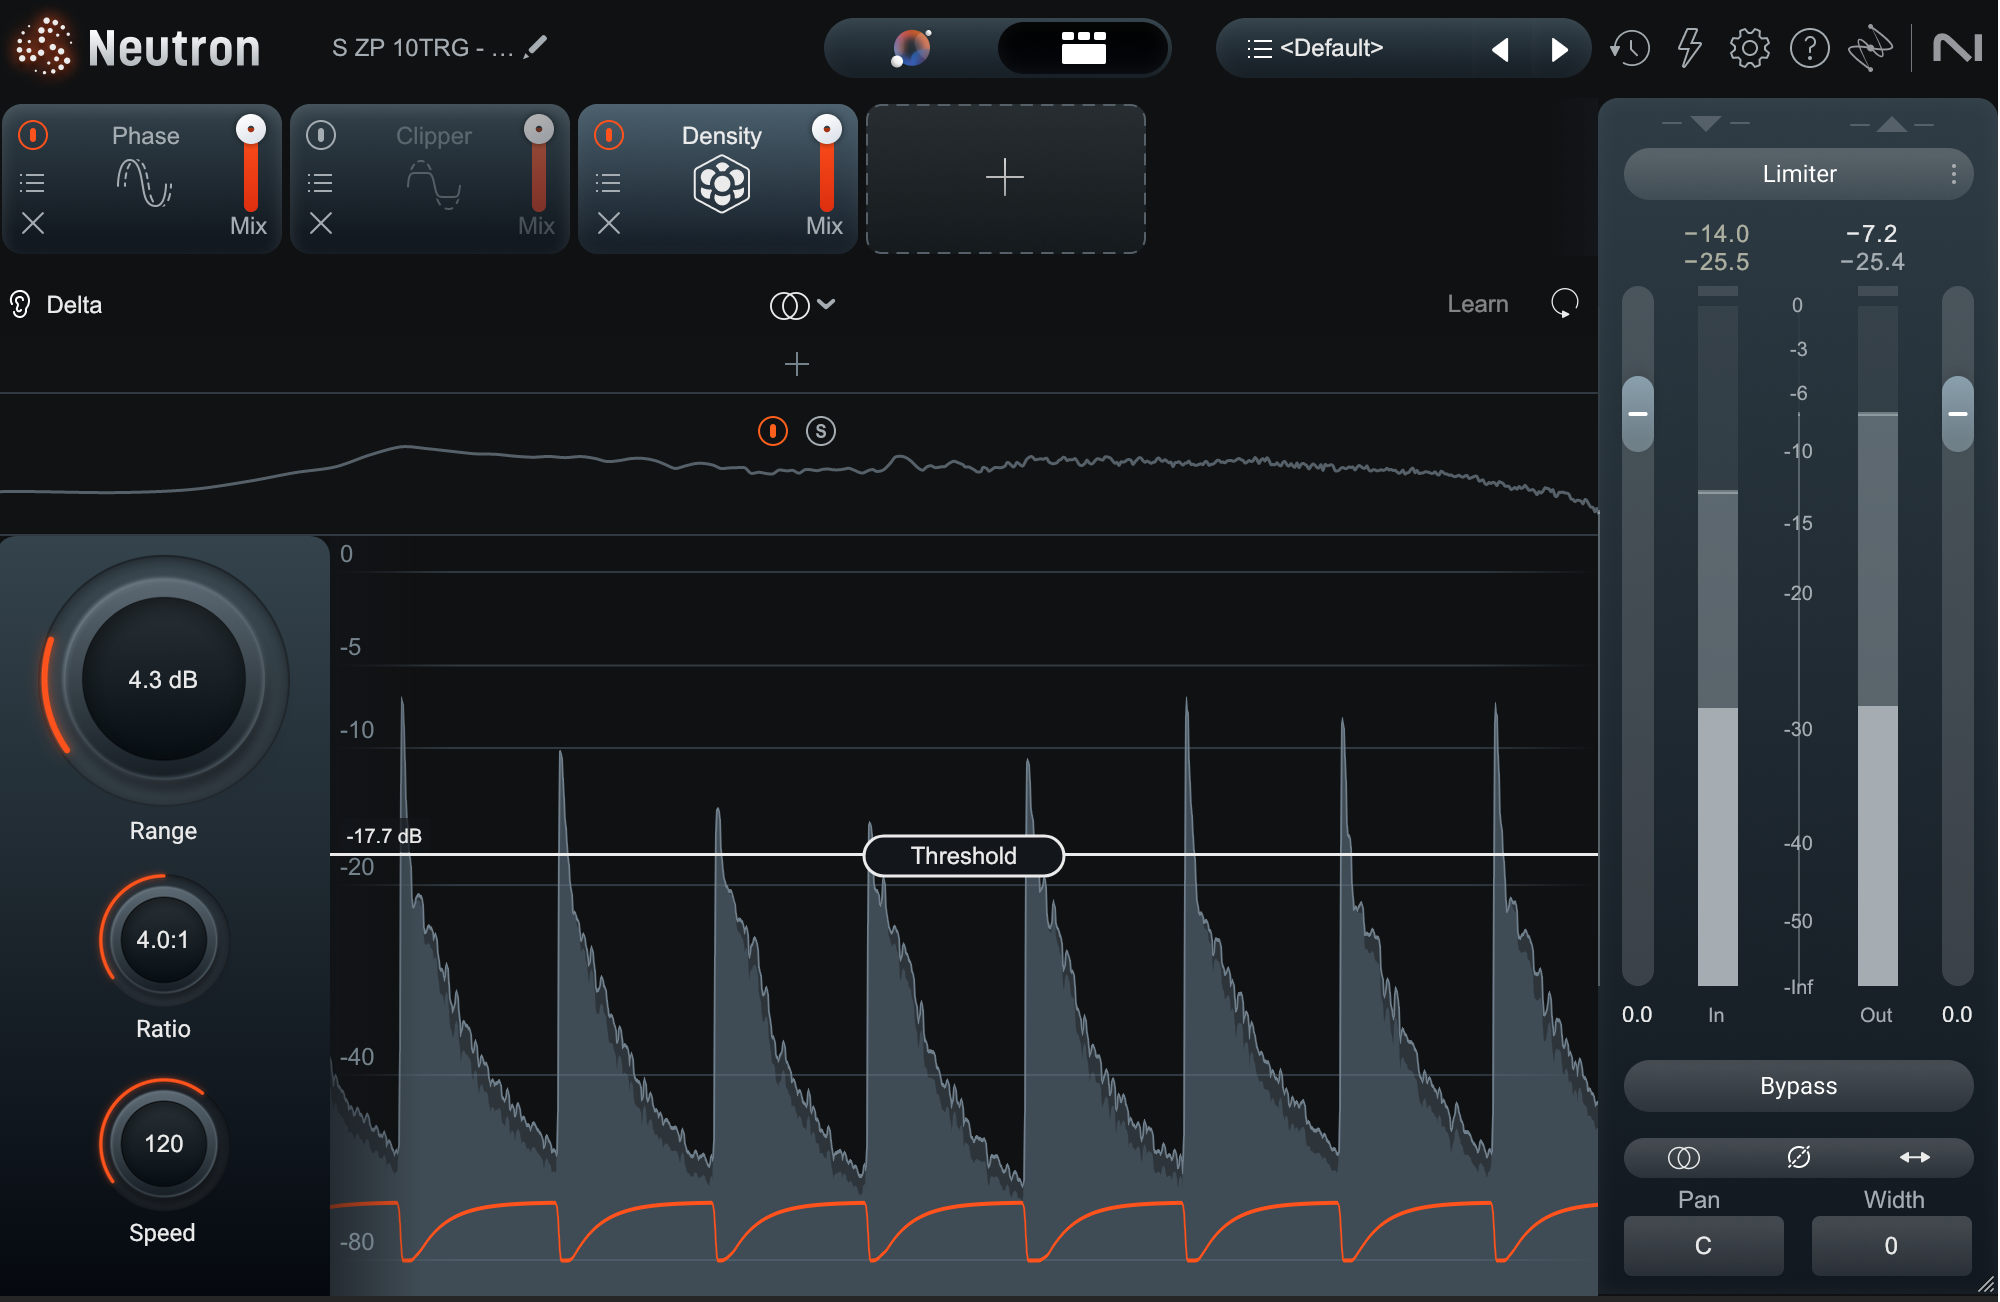
Density module in Neutron
Threshold is easily visualized. The range control shows you the maximum amount of gain the module will add below the threshold. The ratio control works just like a regular compressor, and the Speed knob handles all the timing effectively.
Of course, this being a Neutron module, you can run Density in multiband, which allows for all sorts of fun tricks. You can use multiband modes to boost air in a vocal without adding harsh sibilance, thanks to the speed controls (slow them down and they won’t grab those esses). You can also grab the mid-band of a drum set and bring out the sustain of cymbals and toms, making the drums appear roomier without changing their groove.
Indeed, let’s take our sample aligned drum set from before and see what happens if I use Density on the various tracks.
Here are our drums with phase alignment, sample augmentation, but no Density.
Now, I’ll place Density on the overheads, room mic, tom mics, snare samples, kick samples, and drum bus.
In fact, on the drum bus, I’m using Density in multiband, only emphasizing the cymbals while staying away from the drum shells:
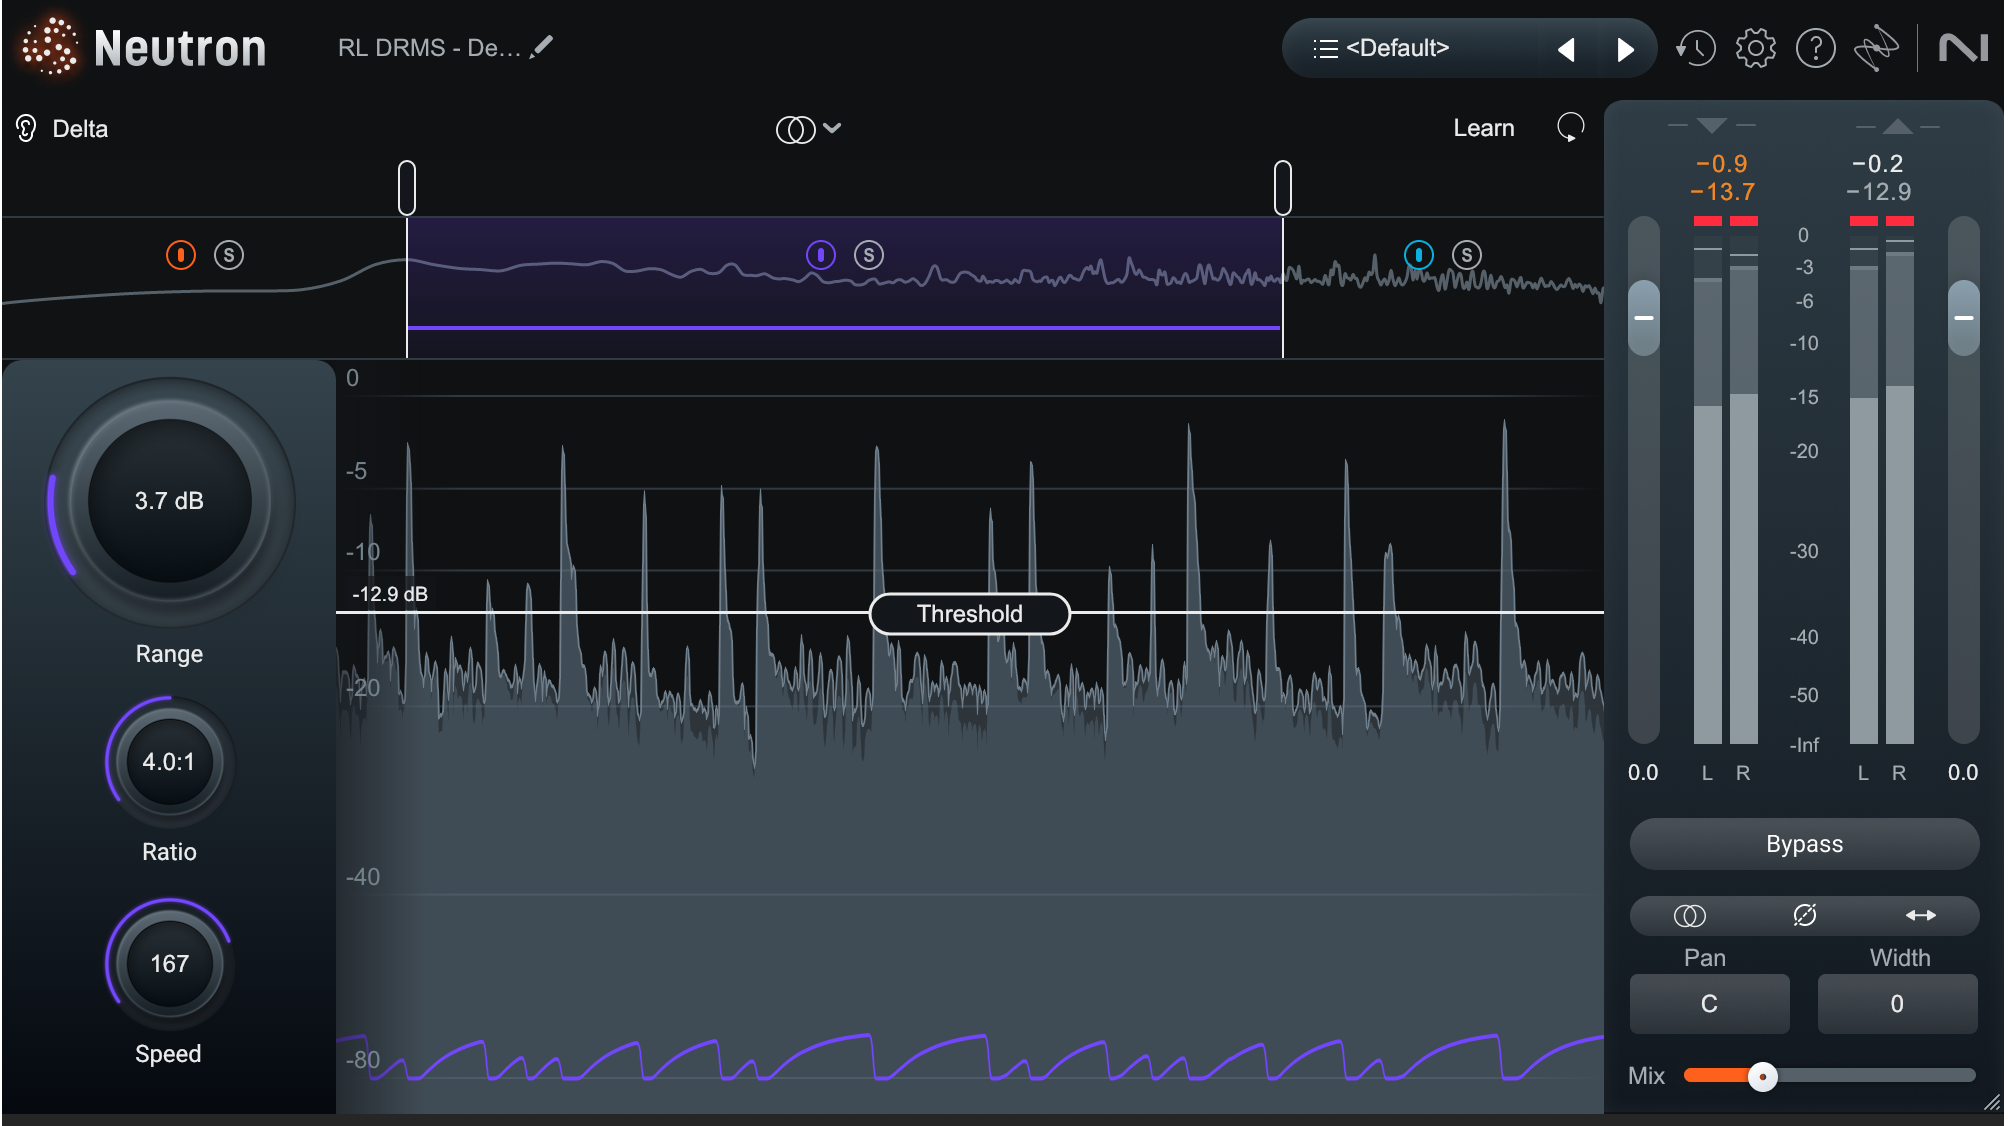
Density on Drum bus
They are now so much more impactful – but the groove hasn’t been affected, and the peak level is the same.
For more on Density, check out this article devoted to the plug-in.
New Clipper module
A clipper? In a mixing plug-in? Egads, why? Doesn’t clipping just make things sound more distorted?
Isn’t it literally distortion – in this case, the distortion from driving a digital system past its ceiling?
Yes.
Now, strap in for a controversial mixing topic that’s nevertheless ubiquitous and necessary to mixes in modern electronic genres, metal, and pop.
Engineers often clip instrument tracks and buses in these kinds of tunes. Why? Because it buys them headroom.
Remember the Phase module, how its rotation knob can keep a waveform from eating up headroom without changing its peak level?
Clipping achieves similar goals: without changing the instrument’s internal groove, we manage its peak energy, reigning it in to preserve headroom. This lets us get a louder mix without adding compression or limiting artifacts.
But Nick, what about all that horrible distortion?
First of all, used subtly, clipping distortion can lie hidden in the material: remember this is strictly for music that’s already distorted by nature. Any clipping artifact should be hidden within the texture of the music itself. If you’re using clipping on a classical sonata or a sparse folk tune, please reexamine your life choices.
Secondly, clipping distortion can produce a crunchy noise that is actually beneficial to certain electronic percussion. The horrid noise might be just the thing to kick the snare more crack, or the kick more click.
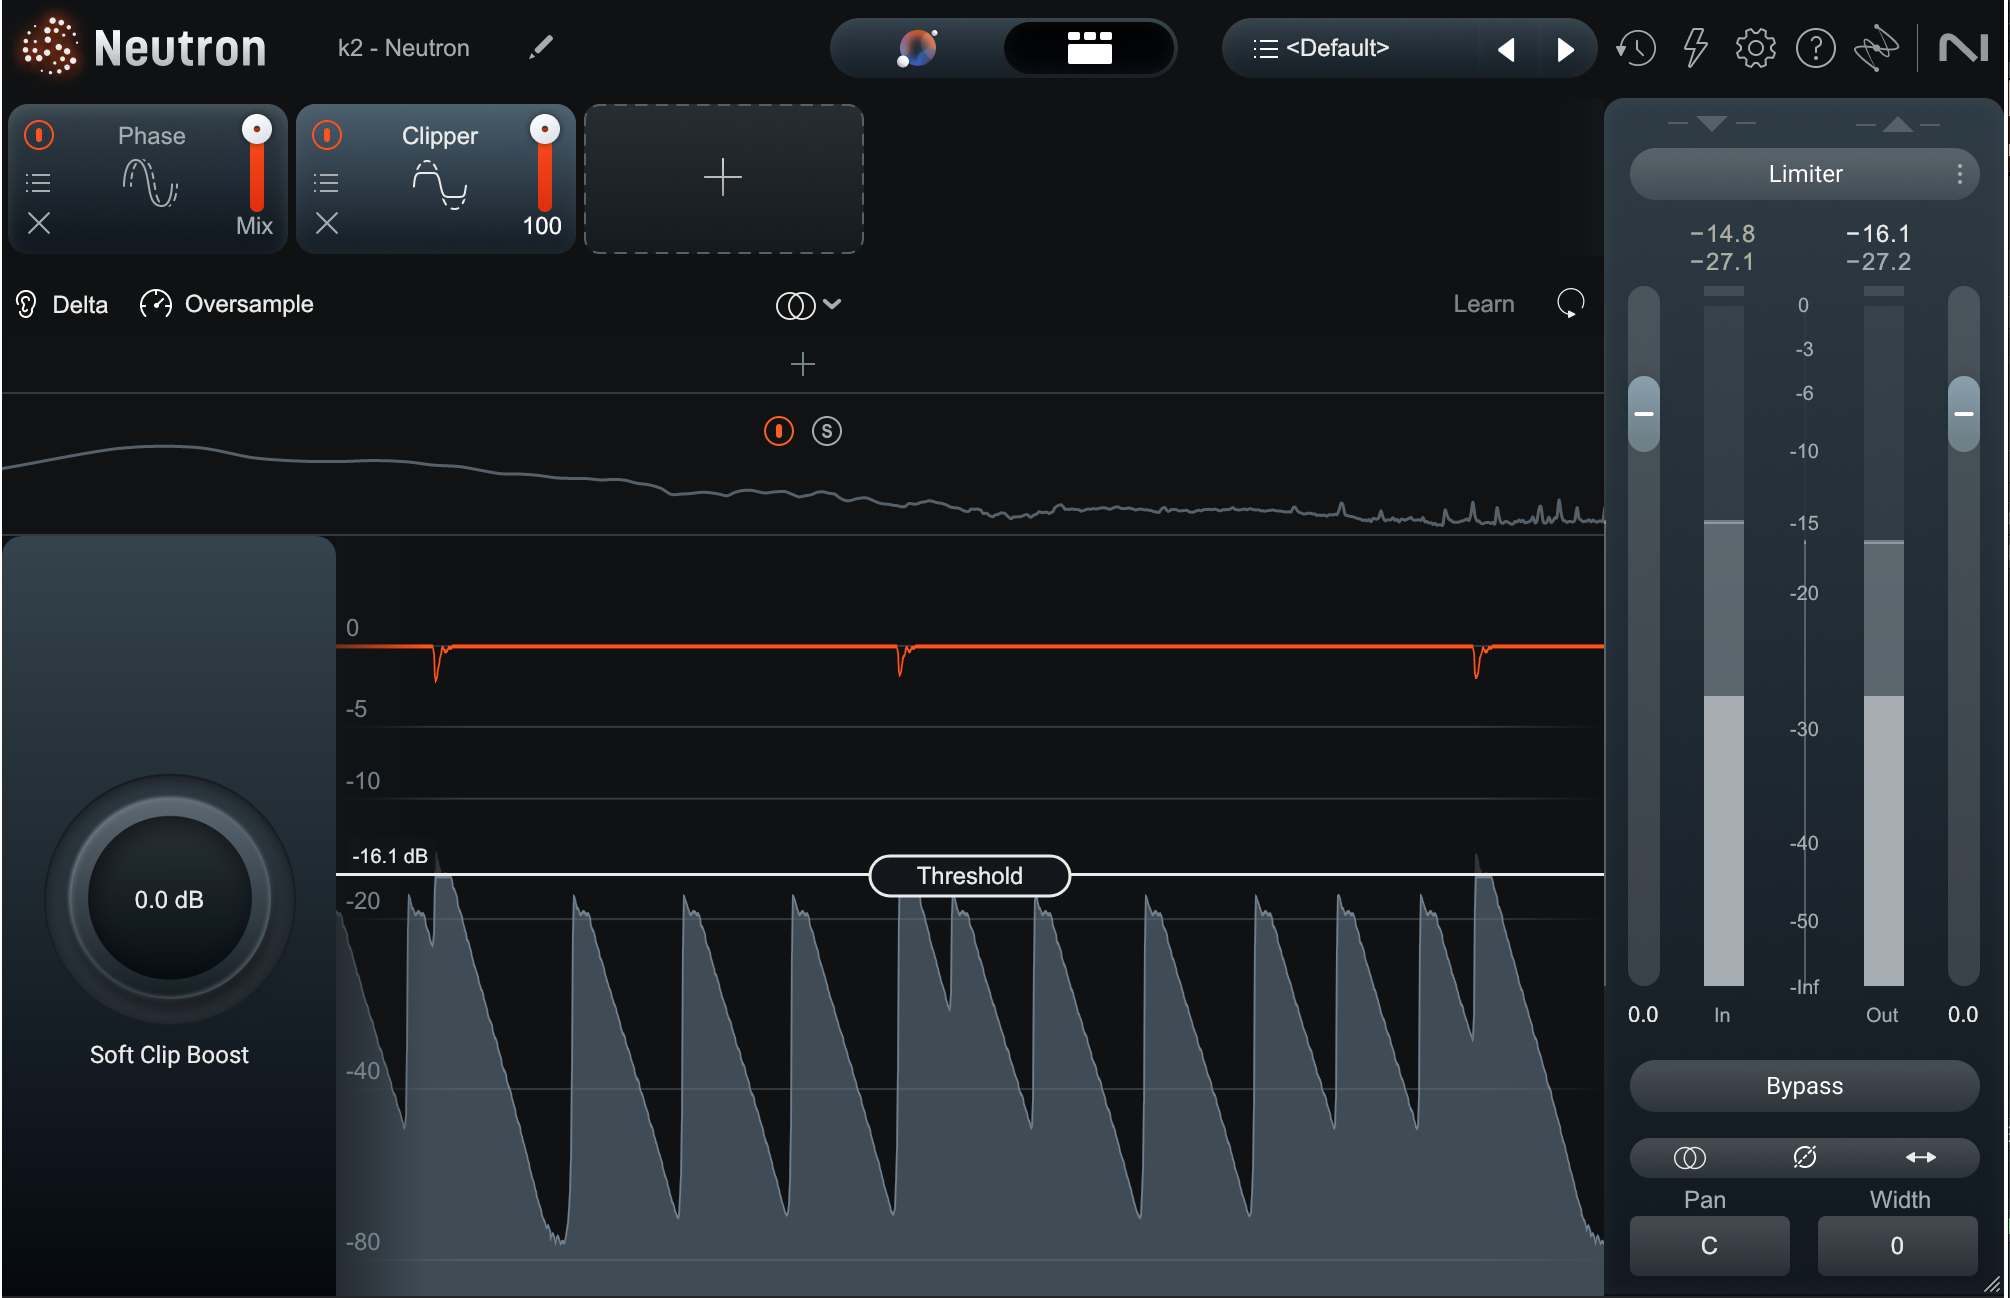
Now let’s have a look at Neutron’s clipper:
Neutron Clipper
You’ll notice it has a threshold control. This is our adjustable ceiling, above which clipping will occur.
Also note the soft clipping knob. I can best describe this knob as a mini-Density module for your clipper: it’s going to increase the apparent level of everything until the point of clipping.
Neutron’s clipper also gives you multiband operation, with very good hybrid crossovers between bands. When a multiband clipper sounds good, it allows you to have even more control over headroom, as you can clip low, mid, and high-end information at different levels.
It’s worth noting that multiband clipping is exceedingly difficult to make sound good in a plug-in. Previous to Neutron, I only knew of one plug-in that implemented multiband clipping with good results. Now there are two.
Finally, Neutron’s clipper can work in various orientations. You can use it in stereo, mid/side mode, or in transient/sustain mode. This is unbelievably helpful in achieving a transparently loud master.
By way of example, here’s a static mix of a sparse electronic tune from the artist P4NTL3R.
This static mix comes in at an integrated loudness of -18 LUFS, with a true peak of -2.57.
Here is the same mix presented at the same level, but with Neutron’s clipper on every track. I’m using multiband clipping on the bass (clipping the high end more than the subs), as well as the sampled cymbals. I’m also multi-band soft-clipping a secondary bass part to bring out its tone more, and soft-clipping the lead synth a little.
I’ve loudness-matched this example so that it comes in at -18 LUFS integrated. However, the true peak is -3.69 dB – more than a decibel lower. If both songs were normalized at -0.1 dBTP, the clipped version would be louder when it comes to averaged measurements like LUFS and RMS.
For electronic music, the combination of Phase, Clipper, and Density – in that order – are quite beneficial in a channel strip. I have my neutron’s default set exactly that way, with Clipper and Density bypassed, but ready to instantiate at the click of a mouse.
For a more in-depth look at the Clipper, please check out this article.
New processing modes
Have you ever played with previous versions of Neutron and wished for mid/side or transient/sustain options? Well, asked and answered my friend: every module in Neutron now has M/S routing, and many of them have transient/sustain routing as well. This comes in handy for your EQ, compression, and saturation modules.
Speaking of saturation modules: note the new controls here.

New Exciter controls in Neutron 5
The “Tame” button preserves the dynamic range of your signal, so the distortion doesn’t result in a pancake of sound. Oversampling eliminates aliasing at the click of a button – and it’s available on the clipper as well.
Delta for every module
In recent updates, Ozone gave us the ability to monitor the “Delta” signal for every one of its modules. Hearing the Delta is an absolute game-changer for people who are insanely controlling:
A Delta signal gives you the ability to effectively solo exactly what you’re changing when you add an effect to the original signal. You no longer hear the results; instead you hear only what the processor is bringing to the table.
This is such a phenomenal feature that iZotope has brought Delta monitoring to Neutron. With Neutron’s new – and somewhat advanced – modules, hearing the Delta is an absolute blessing.
Let me give you an example, using the Density module.
As covered in this article, we can use Density to add high-end sparkle to the side channel of instrument buses without adding harshness, and monitoring the Delta signal really helps us in this regard.
Let’s say we got this hard rock guitar bus:
If i Just add a shelving EQ to the sides, it’s going to be very bright and annoying, very quickly.
Density can help us bring up the brightness without adding harshness, but to really hear how it can do that, Delta monitoring helps us.
I will eventually land on this setting for these guitars in Density:

Multiband Density settings on guitar
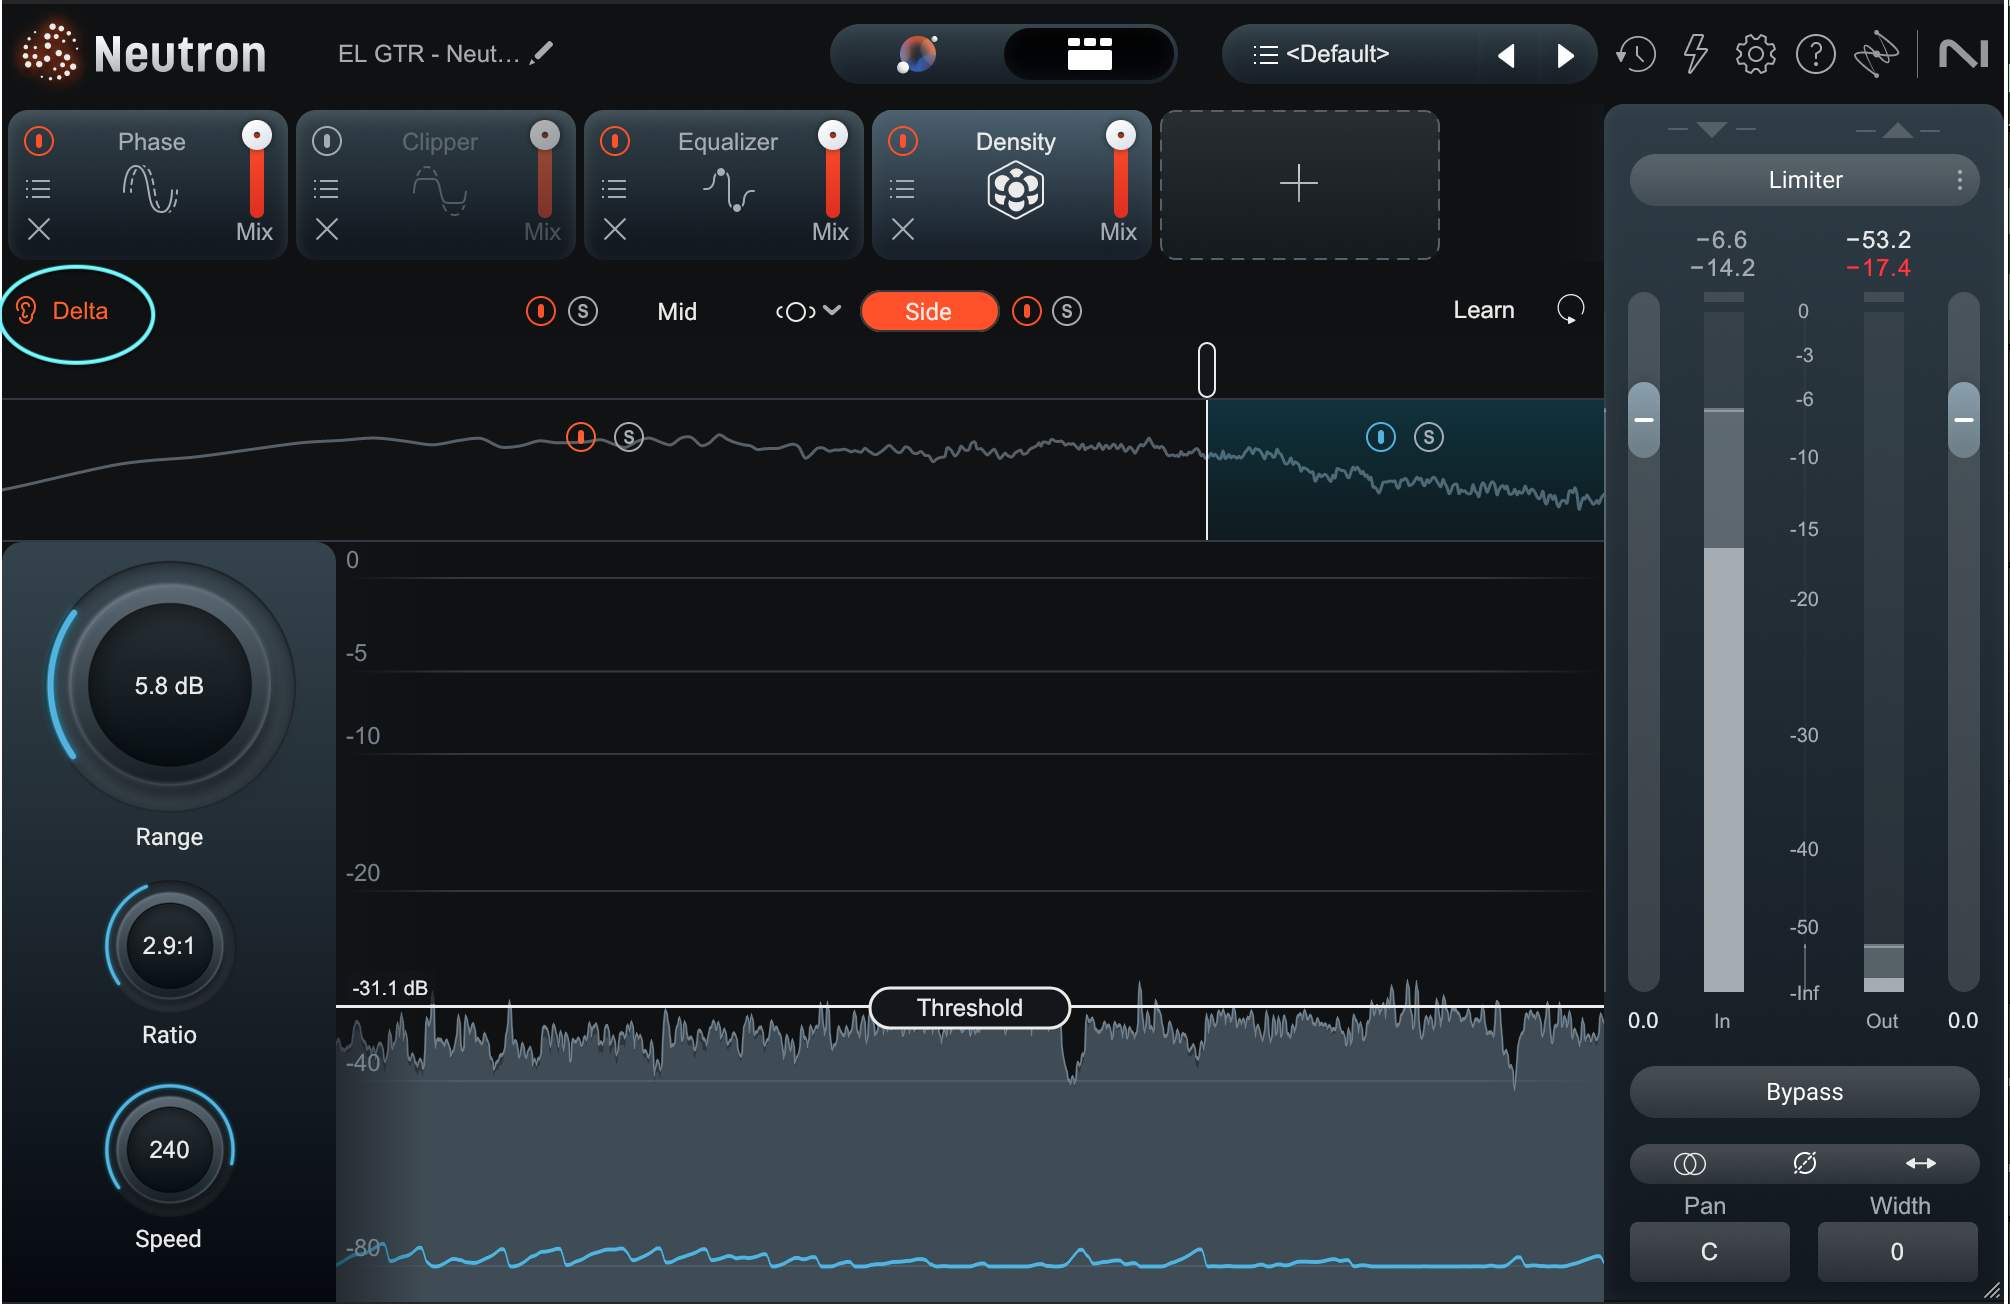
It’s a subtle brightening, and how did I arrive there? I worked with the Delta signal, heard here:
Delta
Hear that attack? When the guitars strum, the effect goes away. That’s why it doesn’t sound too bright. Monitoring the Delta is a great way to fine-tune speed controls in this regard
Updated GUI
The GUI has been updated all around, with a slick and more instantaneous feel to the EQ and other modules, making it easier to see what you’re tweaking on the spectrograph.
Frequency weighting is different too, with a much more comfortable range of frequencies under view. It’s now quite easy to see exactly what sub information is doing, for example.

Assistant updates
Finally, let’s cover what’s new in the assistant.
The assistant is still on hand to give you a personalized preset, and in many ways, it is an extension of the philosophies in Neutron 4.
Neutron 4 turned the assistant into a sort of macro adjuster for your sound, giving you one knob controls over all the various modules it chose to use after analyzing your track.
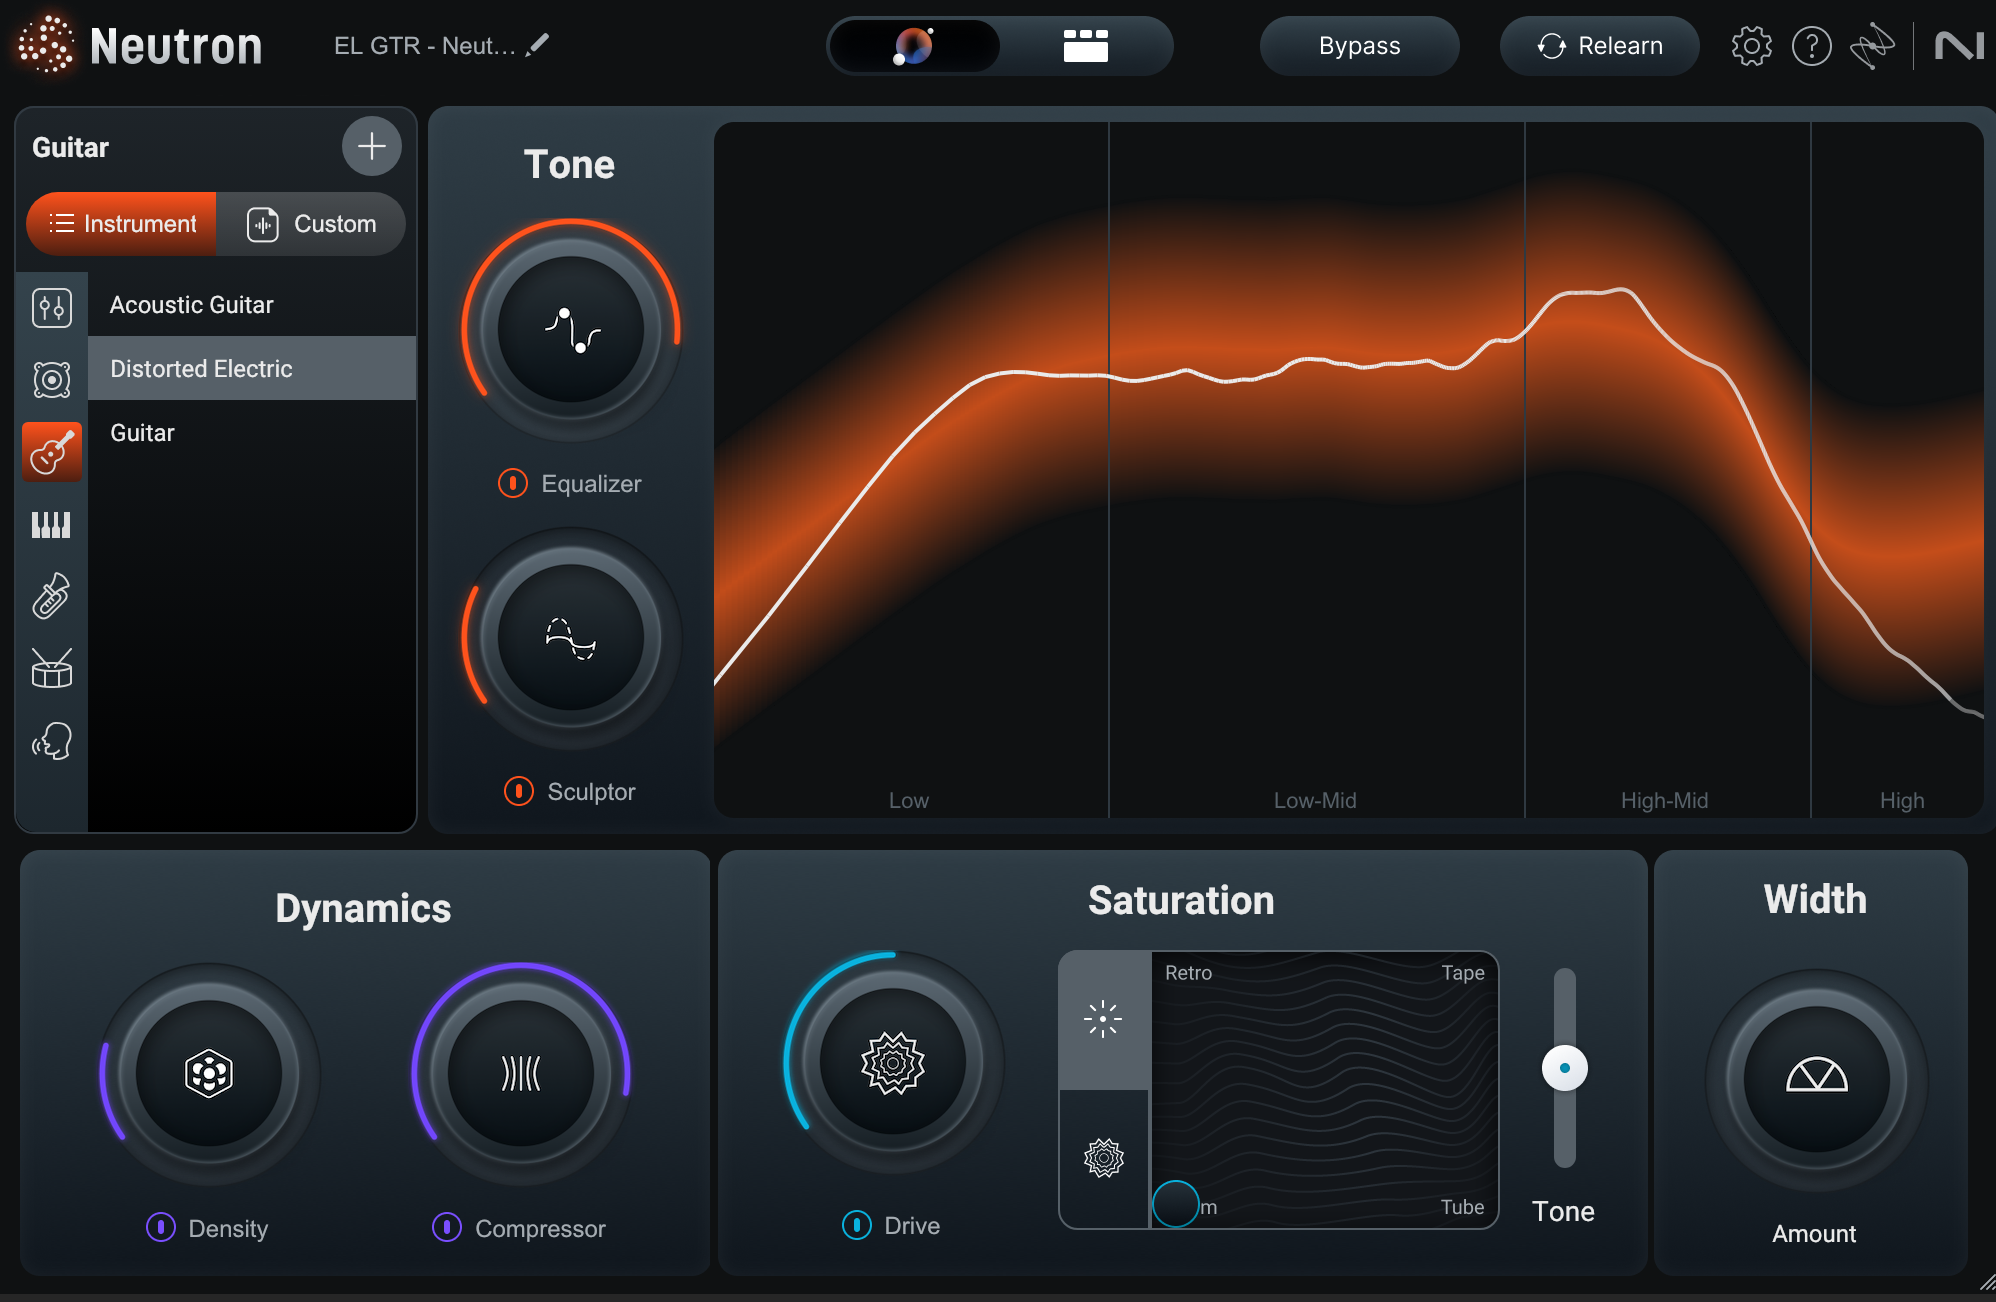
But in Neutron 5, you’ll find more options when it comes to tweaking the Sculptor and EQ in the assistant, with independent sliders for each:
Mix Assistant
As you can see, the new modules are also represented: a broad Density control is on hand, for example.
But for me, the prize-winning update to Neutron’s assistant is its speed. Neutron 5 offers its analysis twice as quickly as Neutron 4 on my machine, allowing me to move quicker into tweaking time.
Try Neutron 5 today
Ready to take your mix to new heights? Discover iZotope Neutron 5 and unlock world-class precision, intuitive tools, and flexible options designed to help you bring out the best in your sound. Get started with Neutron 5 today!
