How To Use the Free Vocal Doubler Plug-in on Non-Vocals
iZotope’s free Vocal Doubler plug-in works on much more than vocals! Check out these tips to get creative with doubling in sound design.
Doubling is a time-honored method of creating mixes that have more weight, presence, richness, and immediacy. From its beginnings as a literal “doubling” of parts through re-recording, doubling has moved into the world of audio hardware and software, providing music creators with quick and easy alternatives to the re-recording process.
In this article, we’ll first discuss where doubling comes from and why it’s important. Then we’ll point out the advantages and pitfalls of using artificial doubling techniques.
Using iZotope’s free


Vocal Doubler
So what’s a doubler?
Doubling isn’t rocket science: the same musical element played twice, in unison, will sound richer than it would on its own. For a long time, the only way doubling could be done was through re-recording, and some folks turned it into an artform: the song “I’m Not In Love” by 10cc got its distinctive backing textures from huge numbers of vocal overdubs, and new-age artist Enya achieves her unique vocal sound the same way.
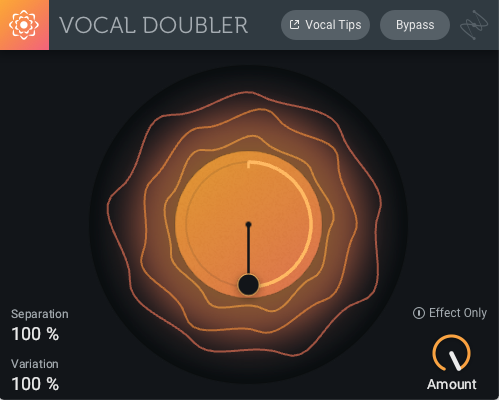
Vocal Doubler has a simple interface with only five controls, making it easy for any musician to use.
iZotope’s Vocal Doubler plug-in
As you can see from the screenshot above,


Vocal Doubler
The main graphic at the center of the plug-in contains almost all its information at a glance. The small black circle is the control you grab with your cursor. Move it out from the center to increase the Separation, a macro-control that creates spaciousness and stereo imaging, one of doubling’s essential elements. Move it clockwise to increase the Variation, a subtle (or not-so-subtle!) change in the pitch and timing of the doubled signal—another essential piece of the doubling puzzle.
The wavy lines around the outside circle are an animated representation of how the input signal is being processed, with more or less stereo spread and difference between the doubled voices. In the figure above, both Separation and Variation are maxed out to best show the effect.
Vocal Doubler allows the dry signal to pass through the plug-in, and the level of the added “doubles” can be set with the Amount dial. Note that this is only affecting the level of the doubles, and that the Separation and Variation controls will dictate character.
Because Vocal Doubler usually introduces some pitch fluctuations via the Variation control, we usually want the dry, original signal to drive the tonality of the resulting signal. It’s usually more subtle and musical to keep the Amount parameter under 100%, especially if you’ve chosen extreme settings for Separation and Variation.
But if you’re looking to do something more in the territory of special effects, then crank those dials to your heart's content!
Above the Amount dial is a switch labeled Effect Only; this mutes the original signal, only allowing the doubled copies to pass through. This can be useful in certain scenarios, like using Vocal Doubler as a send effect to apply different processing to the doubled copies. When this switch is enabled, the center of the diagram becomes a darker shade; hitting Bypass in the top-right nearly blacks out the display.
As you might guess from its name, Vocal Doubler is predominantly intended for use on vocal tracks, and there is no shortage of good advice for that application. Check out these two articles to get started:
Vocal Mixing 101 : Free Vocal Doubler Plug-in and Tips for Mixing Vocals
Double Tracking: 2 Basic Vocal Doubling Techniques
However, we’re here to talk about doubling non-vocals today—so let’s dive right in and get started!
Beyond vocals: thickening a guitar track
We’ll start with a very basic guitar loop, clean and dry, that wouldn’t work very well in most blues or rock mixes without some juicing up.
We’ll first listen to


Vocal Doubler
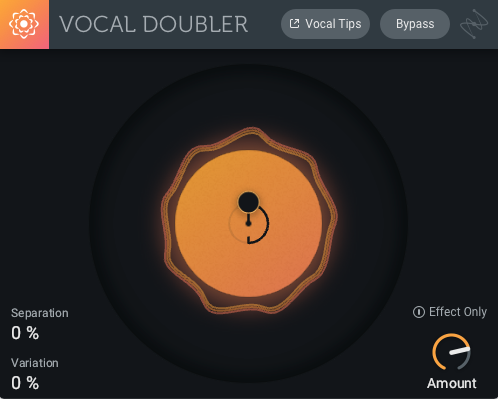
Separation and Variation set to 0, as demonstrated in Example 2
Here's the resulting audio:
As you can hear, even this minimal setting does quite a bit to liven up the loop and make it richer. But because we haven’t increased the Separation or Variation, we’re left with a bit of a narrow, phasing mass of guitars.
Increasing the Separation to 50%, while keeping everything else the same, will introduce some stereo separation between the voices, hopefully alleviating some of the phasing we ran into above.
By experimenting with these few settings, we can quickly find other musical results that might be suited to one type of mix or another. Here are two examples. The first has maximum Separation and minimum Variation, to create a very wide stereo image:
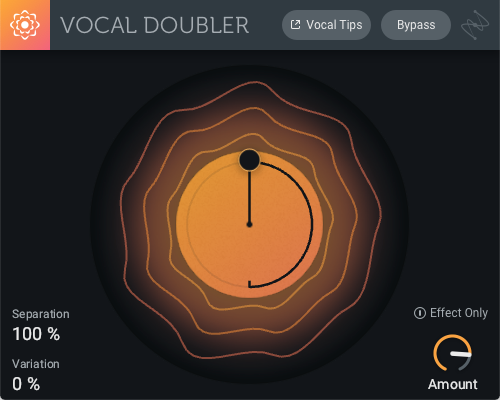
Separation of 100 and Variation 0 focuses the effect on a wide stereo spread, as in Example Three.
And it sounds like this:
Our last guitar example isn’t really something you’d do in a musical context as is, but demonstrates how easy it is to dial in a good sound. Once again the Separation is set to 100%, but as the loop plays, we increase the Variation from 0% to 100% to hear how it affects the timbre. In a practical application, we’d then dial it back to where it sounds best in the mix.
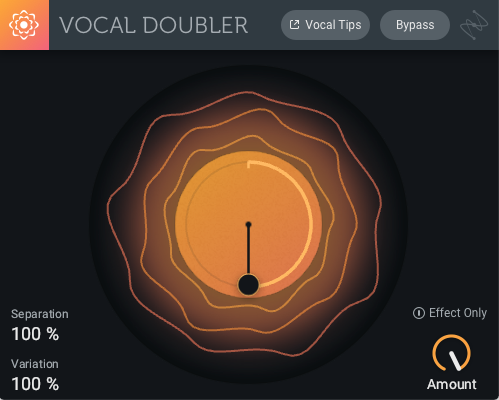
Separation, Variation, and Amount cranked all the way up! (Example 5)
And it sounds like this:
Again, remember that setting the Amount to 100% with such extreme Separation and Variation settings may be a bit jarring in most contexts, so dial that back to get the tone you want.
Beyond normal: creative sound design
All of Vocal Doubler’s parameters can be automated to add real-time movement to your sounds, but for really deep and rich sound design, here’s another easy trick to try—using two Vocal Doublers in series, with the second plug-in drastically magnifying the settings of the first.
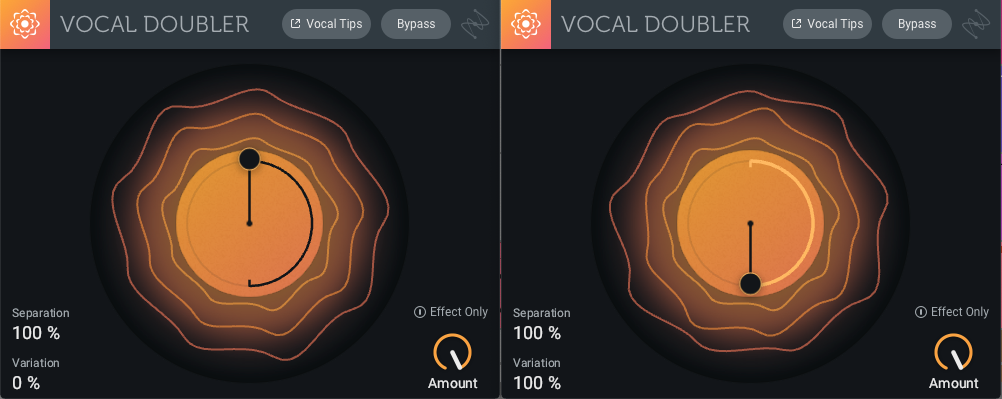
Vocal Doublers in series: first with Separation of 100, then with Variation set to 100 as well (Example 6)
The screenshot above and Example 6 show one example of this serial processing, used on a basic rhythm loop. The loop has a lot of motion, but aside from a bit of dynamics on the xylophone it’s pretty sterile. Not for long, though; we’re going to clobber it with the


Vocal Doubler
Listen to Example 6, where we start with 8 bars of the drums on their own, then add in one instance of Vocal Doubler (with maxed-out Separation and Amount), and then add in the second one (with maxed-out everything). We wrap up the example by playing around with the Separation and Variation in real time, producing a wide-open, glitchy rhythm that leaps out of your headphones!
Finally, Example seven illustrates one more trick you can do with serial instances of Vocal Doubler: using the Effect Only switch to pass just the doubled audio through to the rest of the audio chain. In this example, we augment what starts as a very simple bass synthesizer line using different combinations of Bypass, Effect Only, and plug-in settings on each of the two Vocal Doublers.
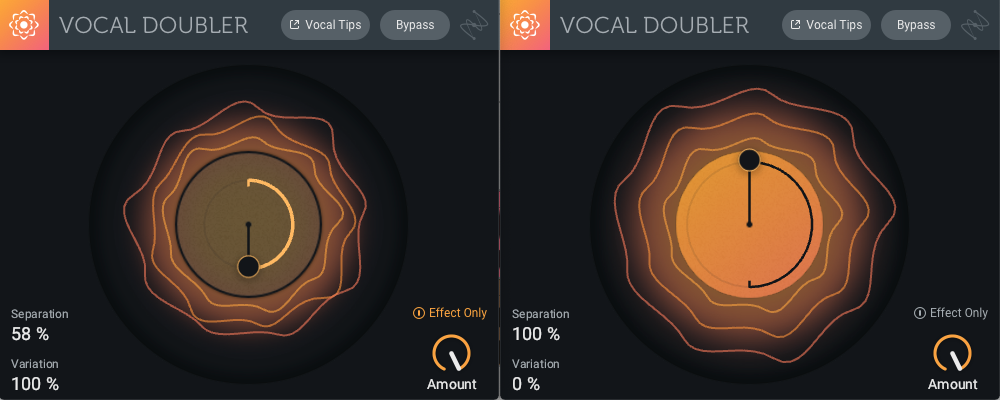
An effect-only Vocal Doubler feeds into one where the “dry” signal—actually a doubled one!—is processed.
The screenshot above shows a setting that brings out a bit of fundamental thump in the attack, almost like a kick drum. Example seven starts with the dry signal, then we switch on the two Vocal Doublers to produce the sound shown in the screenshot. The example then walks through a variety of parameter changes, ending with both Vocal Doublers cranked up to 100. Boom!
The takeaways
The main takeaway from these few examples is that doubling doesn’t have to be time-consuming or hard to accomplish with a plug-in like


Vocal Doubler
Now you can see how to use the free Vocal Doubler plug-in on non-vocals as well, there’s nothing stopping you from getting out there and experimenting on your own. You can learn more about this plug-in’s creative possibilities in the article I wrote here. Have fun!
