6 Beginner Mistakes with Sends and Return Effects
Are you scared to use sends, auxiliary returns, and buses? Don’t be: we’ll show you what mistakes to avoid and how to use mix bus processing to your advantage.
When it comes to adding audio effects to your digital mix, you have options. Say you have a guitar part that you want to reverberate. You can insert a reverb plug-in right onto the track itself. We call this an “insert” effect. You can also slap a reverb plug on an “auxiliary return” track, and “send” the guitar track there for processing.
The “send and return” approach carries a ton of benefits. However, as with any approach, pitfalls abound. This article focuses on mix bus processing pitfalls—specifically, the kinds of mistakes that can occur when you make use of sends, returns, buses, and auxiliary channels.
Jump to these mistakes:
1. Not using sends and return effects at all
The key benefit of “aux returns” or “fx returns” (pretty much interchangeable terms these days) is that a single return can be used by multiple tracks at once. They're an ideal choice for the kinds of effects we use frequently in a mix, such as reverb and delay.
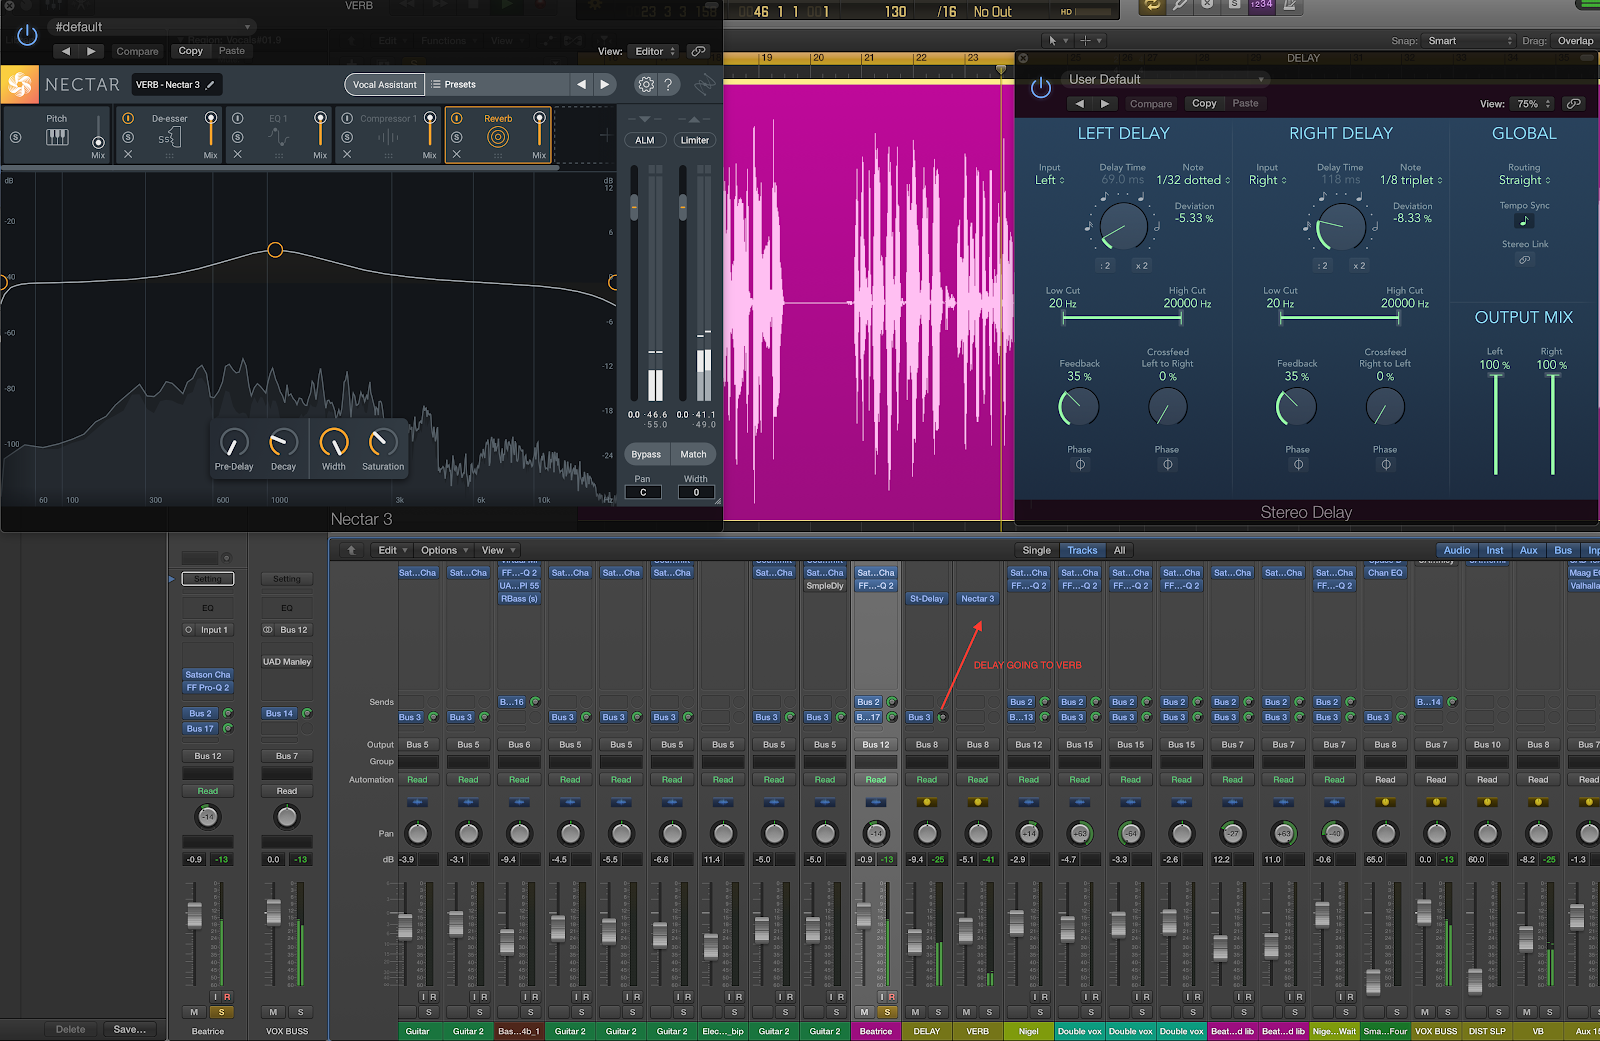
For example, to achieve a natural, coherent atmosphere while mixing an acoustic record, many engineers will send all the instruments to the same room reverb, like so:
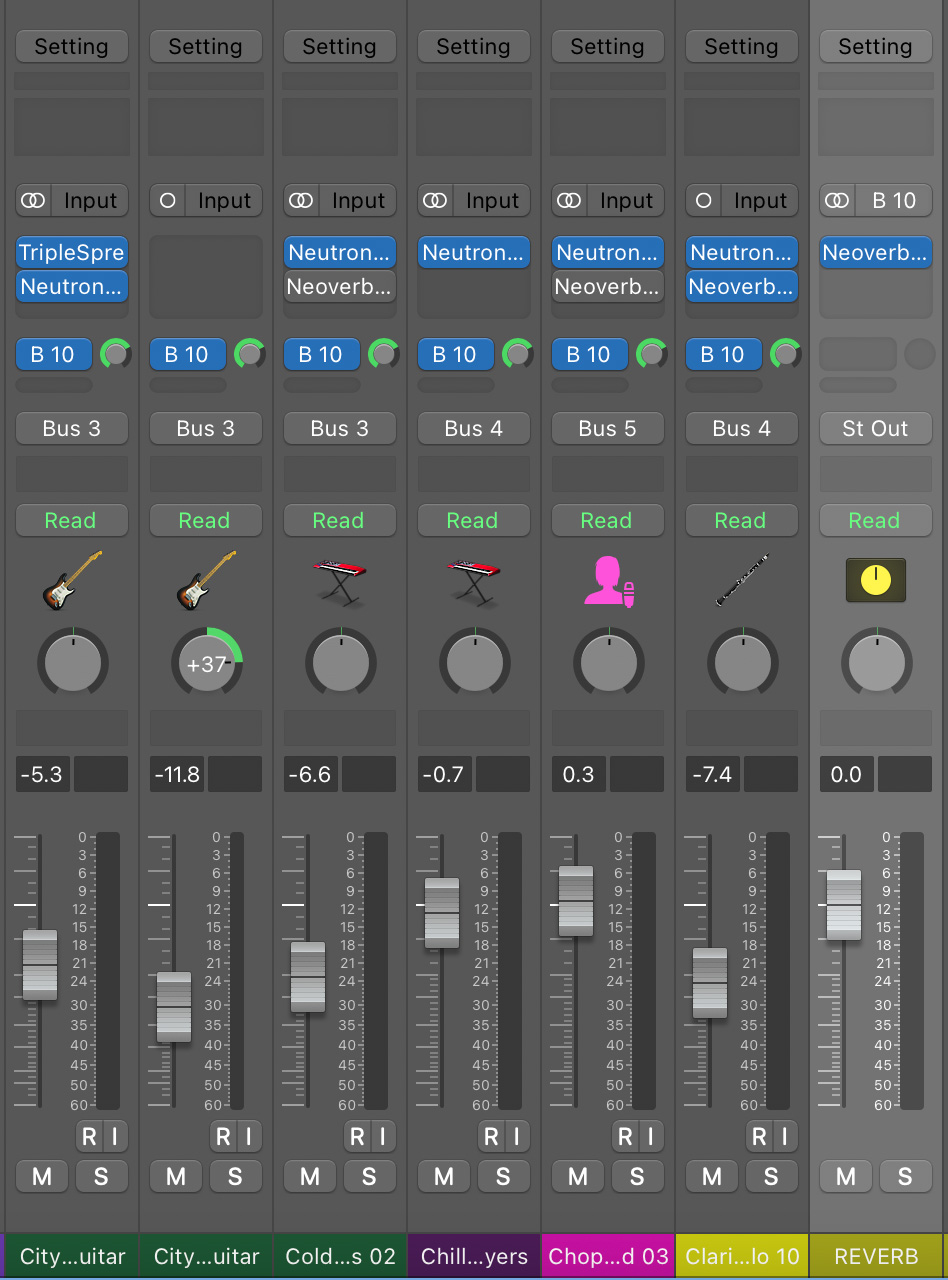
All instruments to one reverb in Logic Pro
This helps foster an illusion of sonic unity, especially helpful if the song was recorded in iso-booths or overdub passes.
Even an EDM mix, where naturalism isn’t important, can benefit from the use of return channels, as returns save CPU power.
Imagine you have the same reverb plug-in like


Neoverb
Most people don’t use sends and returns because they’re intimidated. So we’re going to explain how to set up fx sends and returns now in Logic Pro X and Pro Tools.
In Logic Pro X it’s as easy as clicking here:
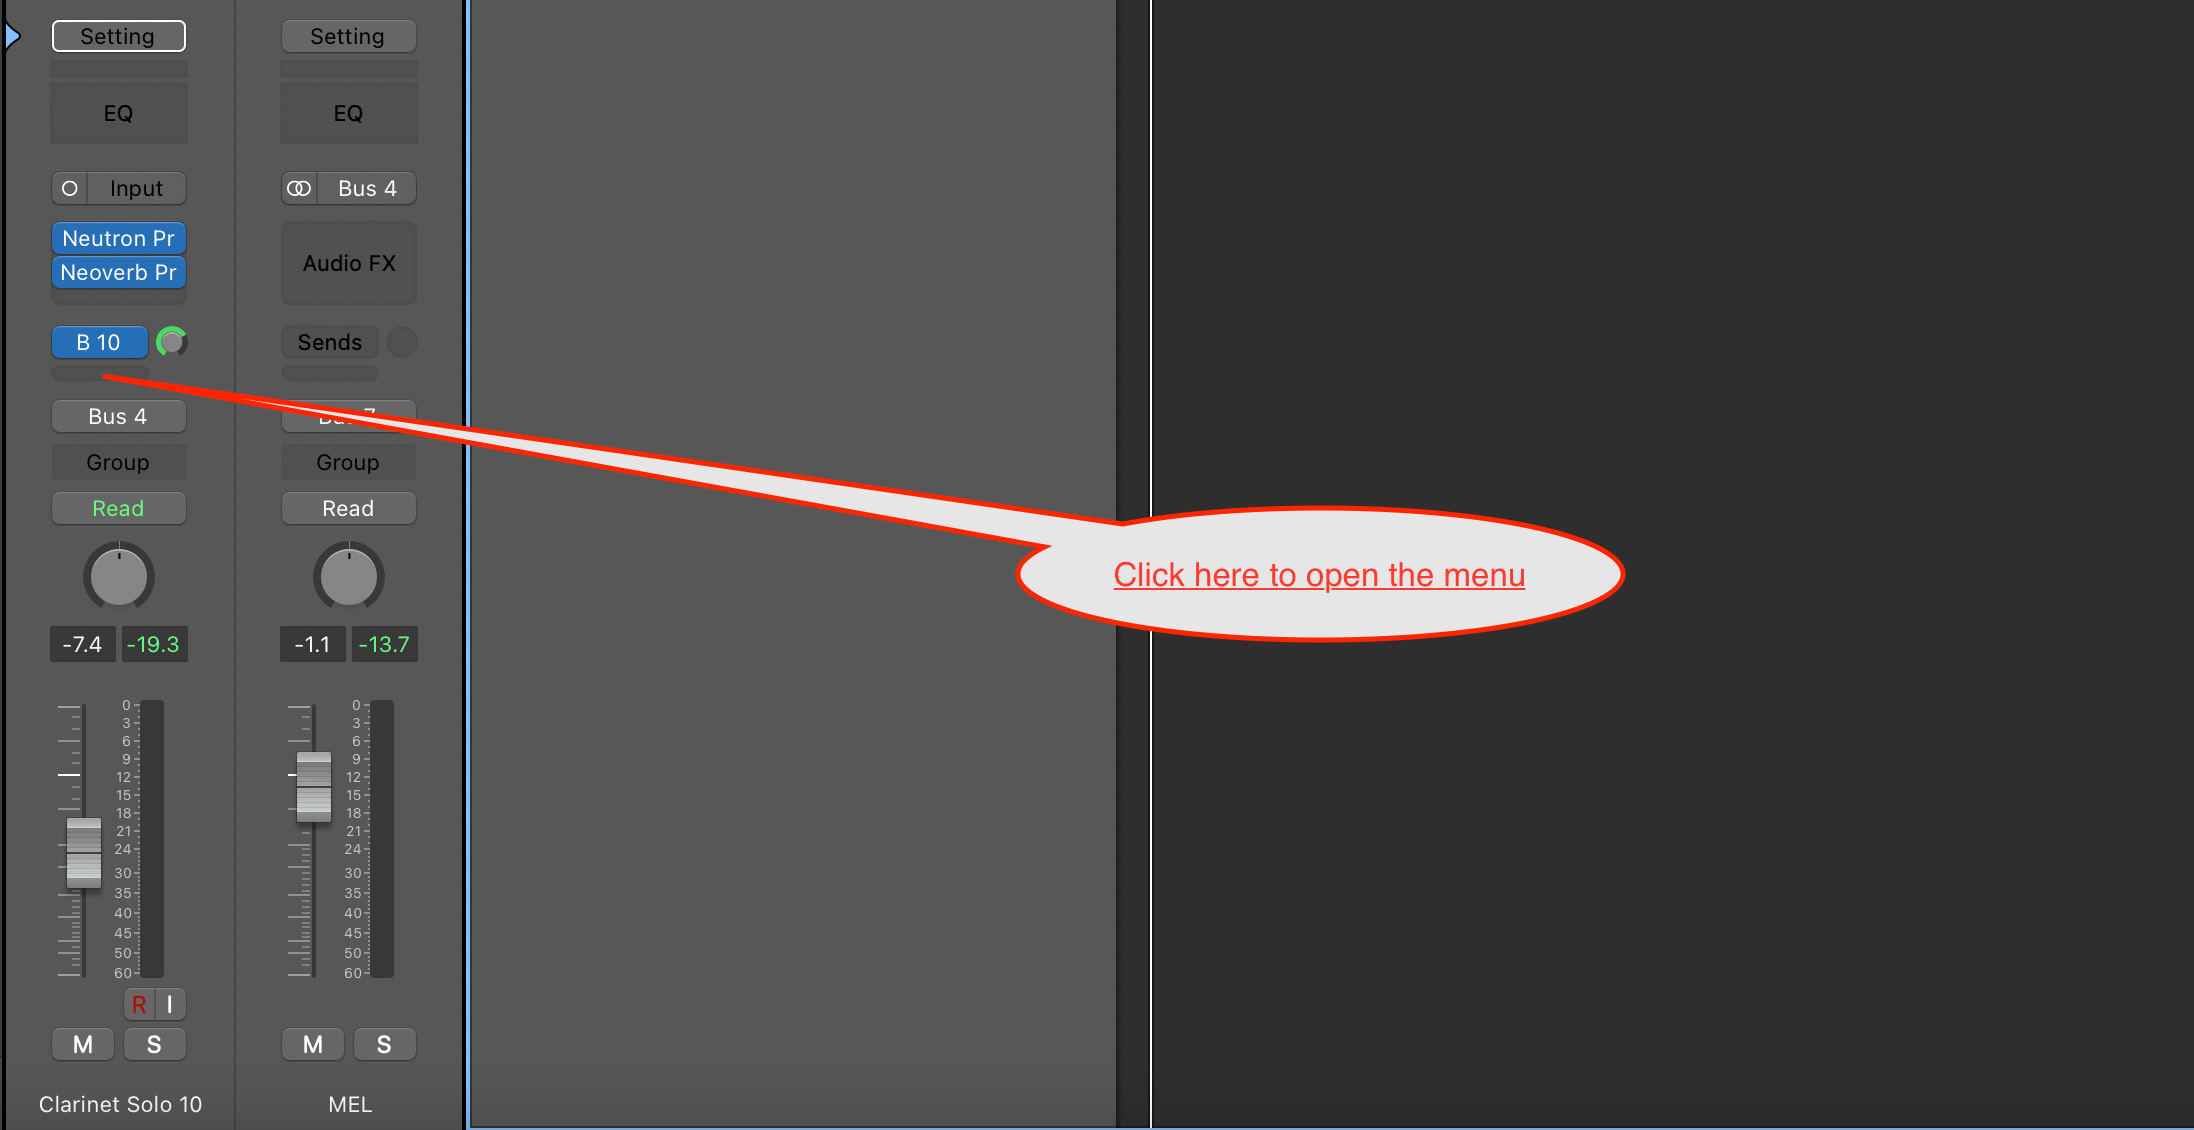
Where to click in Logic Pro X
This automatically opens a menu:
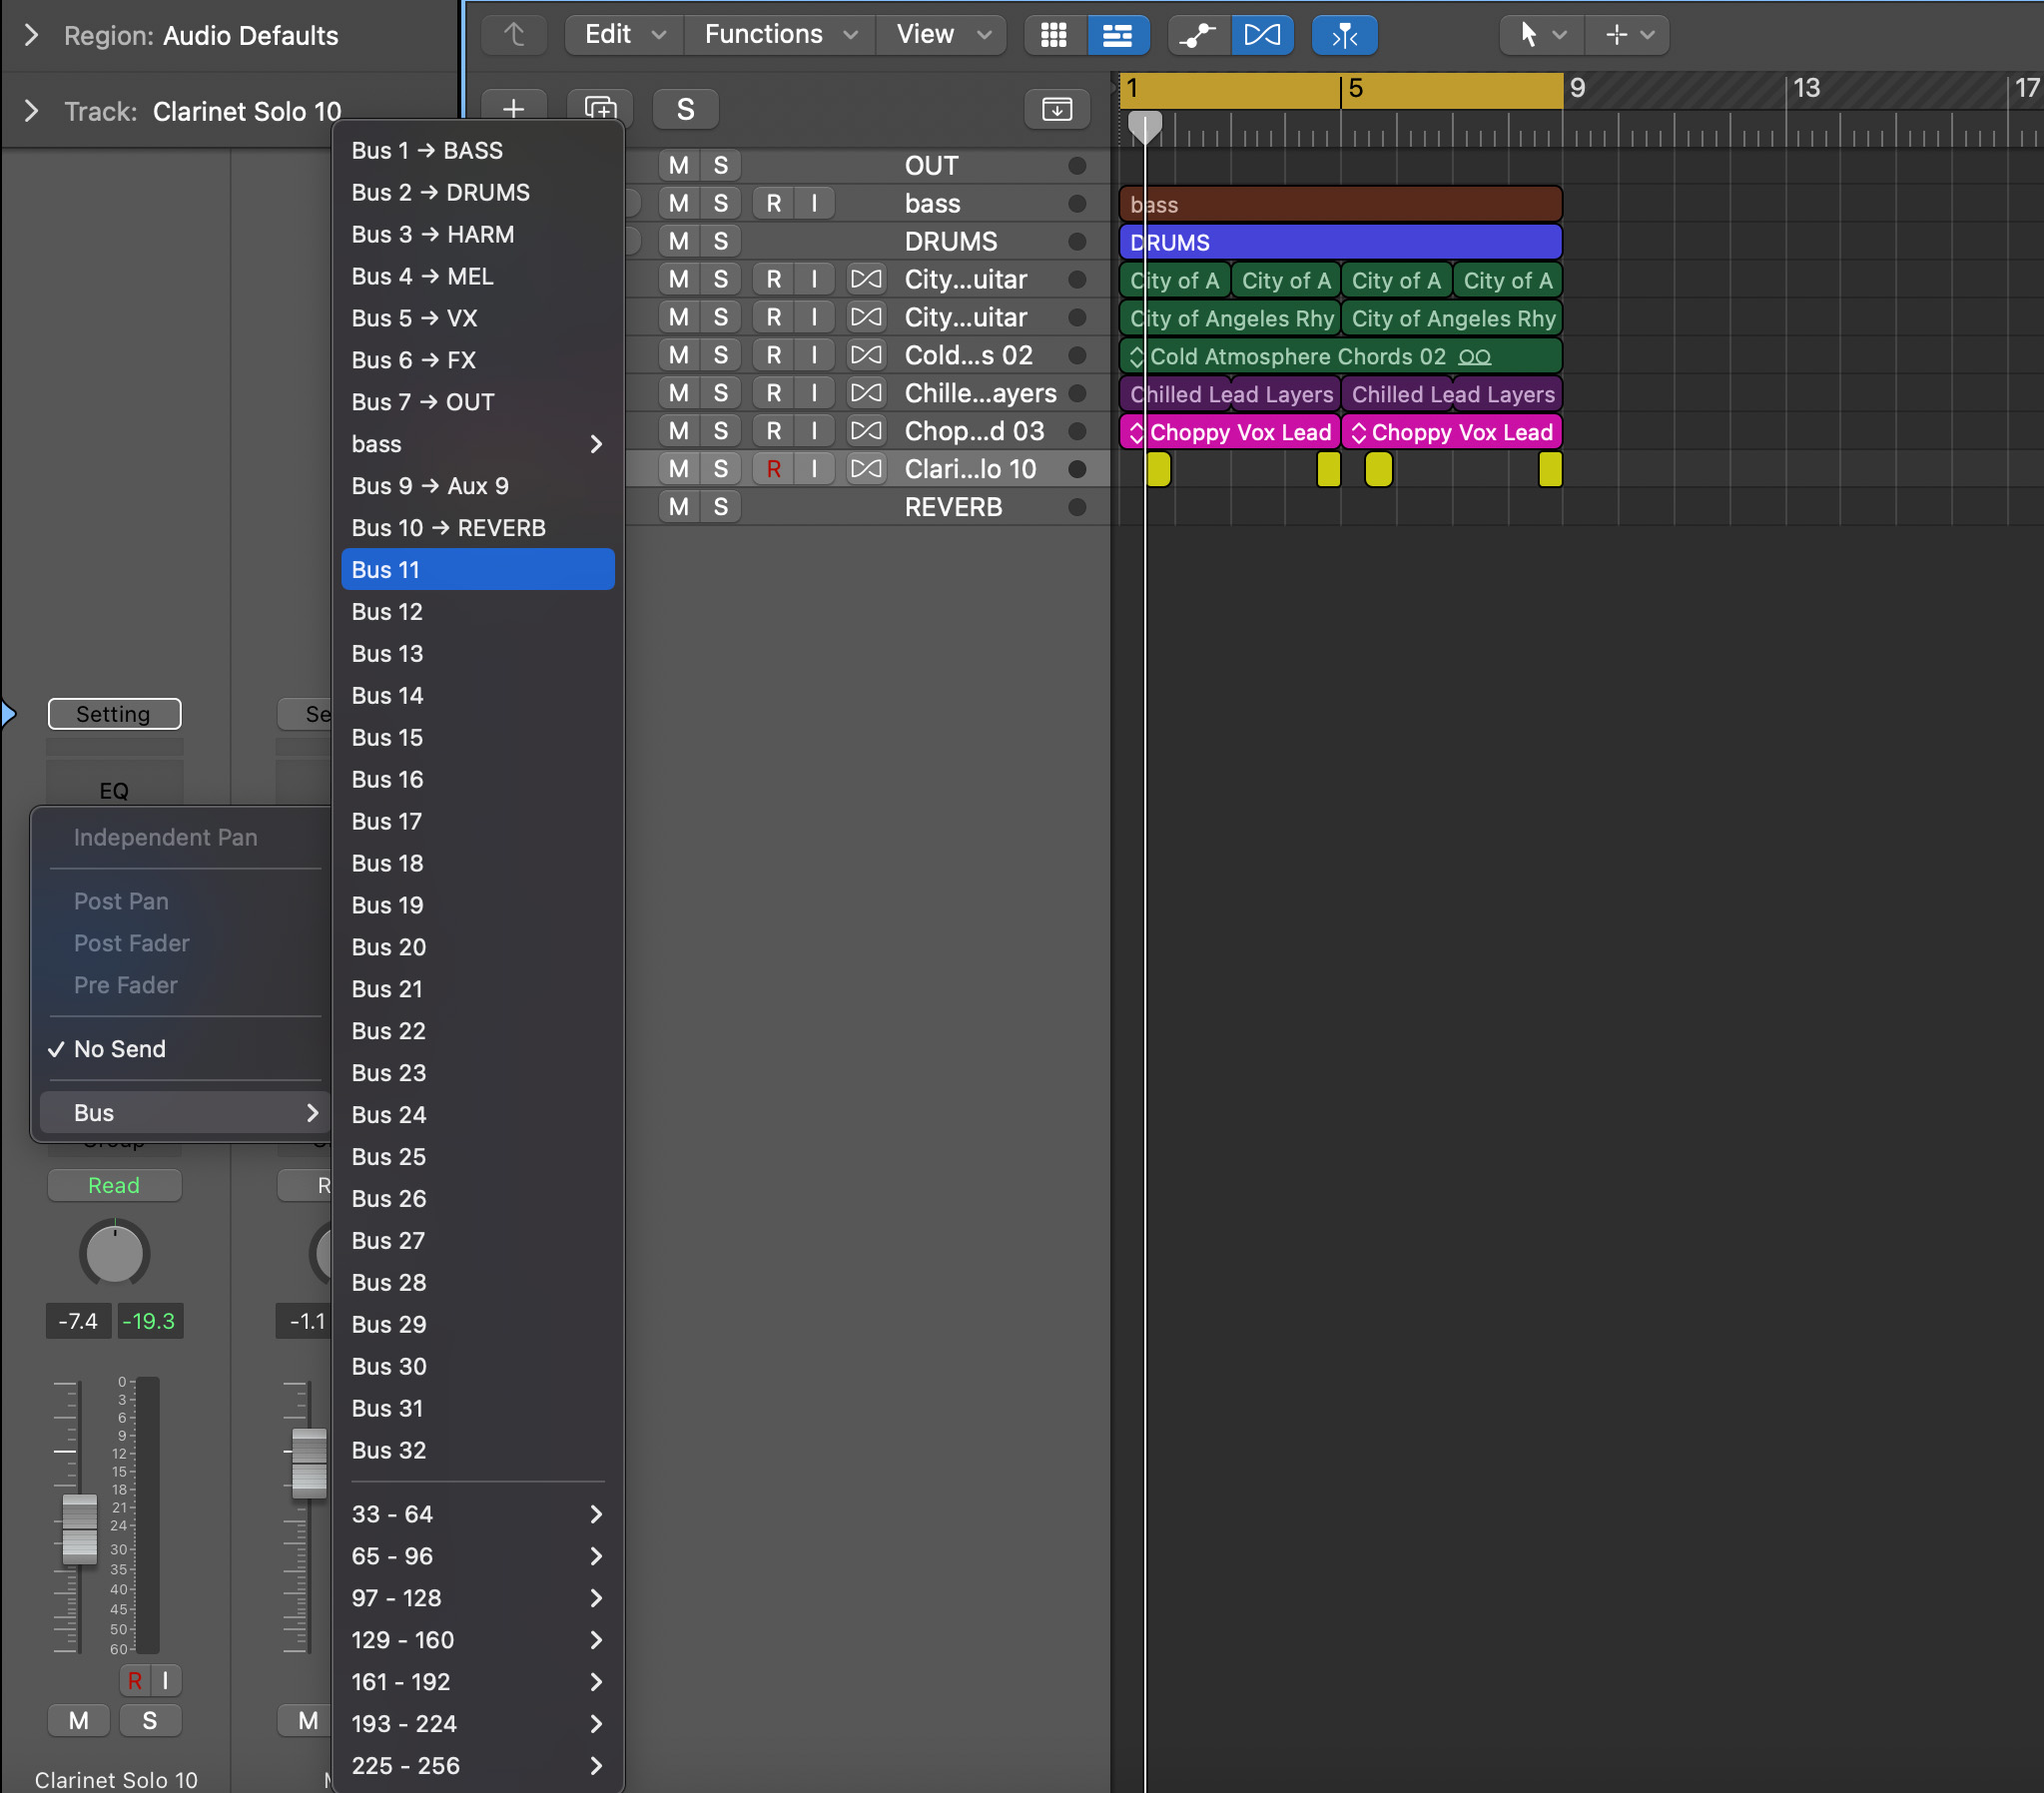
Send menu
Select an empty bus, and it should appear automatically.
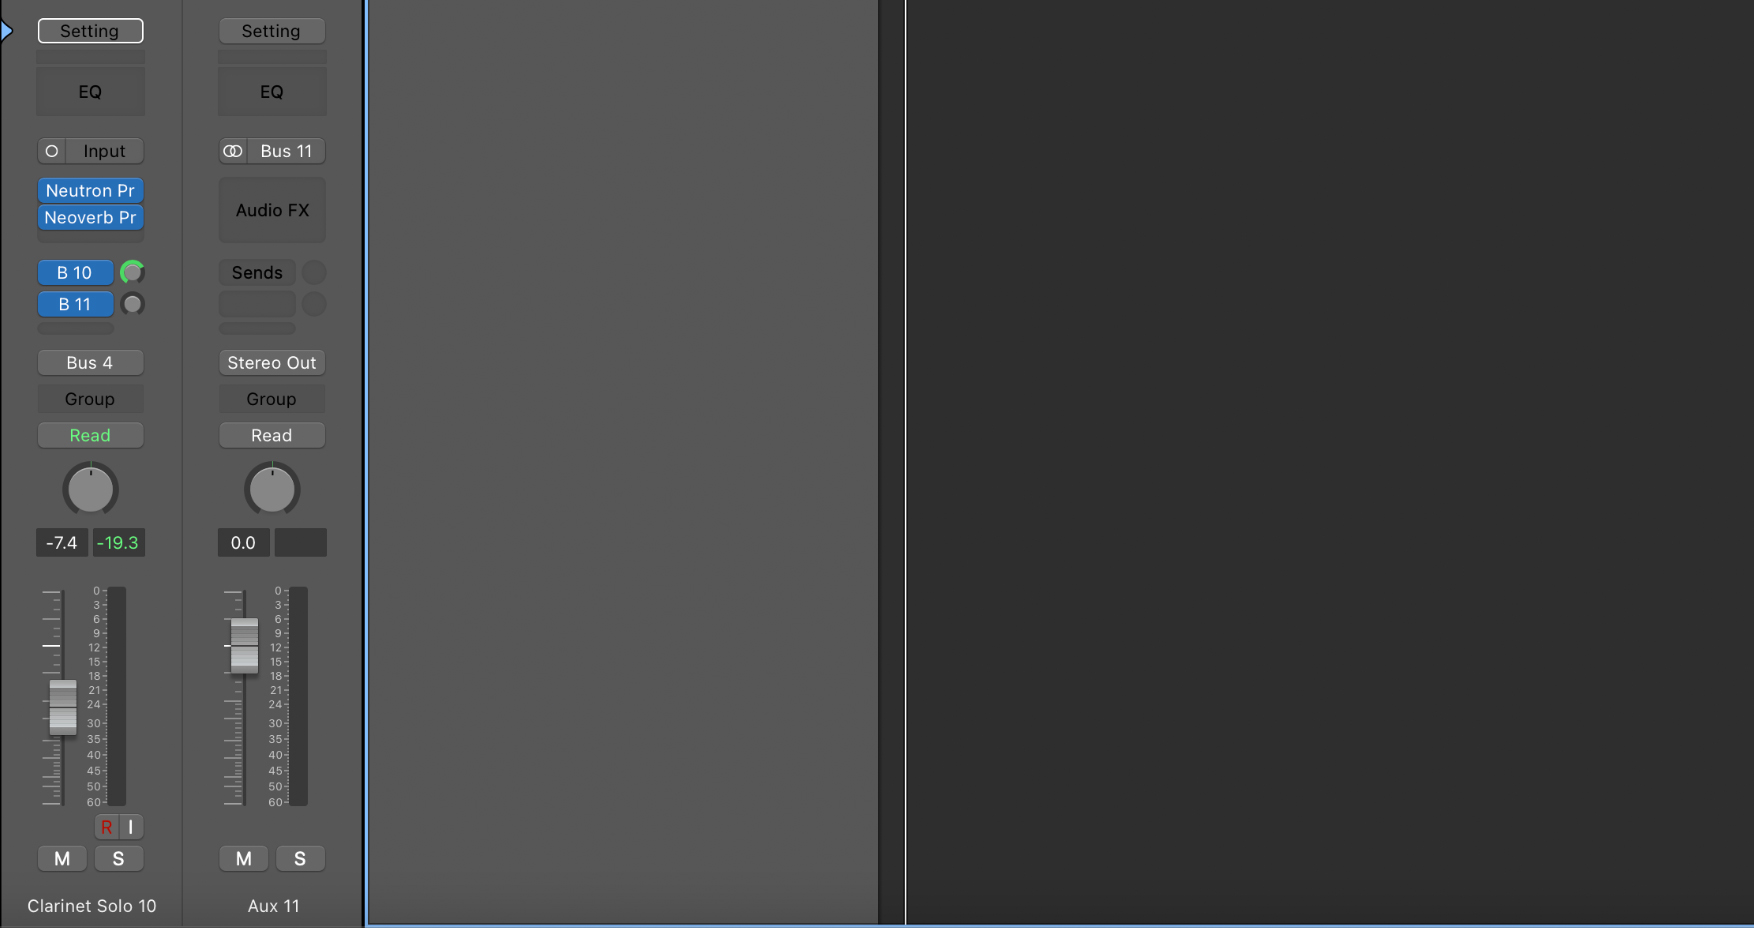
Send and return
In Pro Tools, it can be more difficult, but this is the way I like to do it. If I want to set up a send and return, I click here:
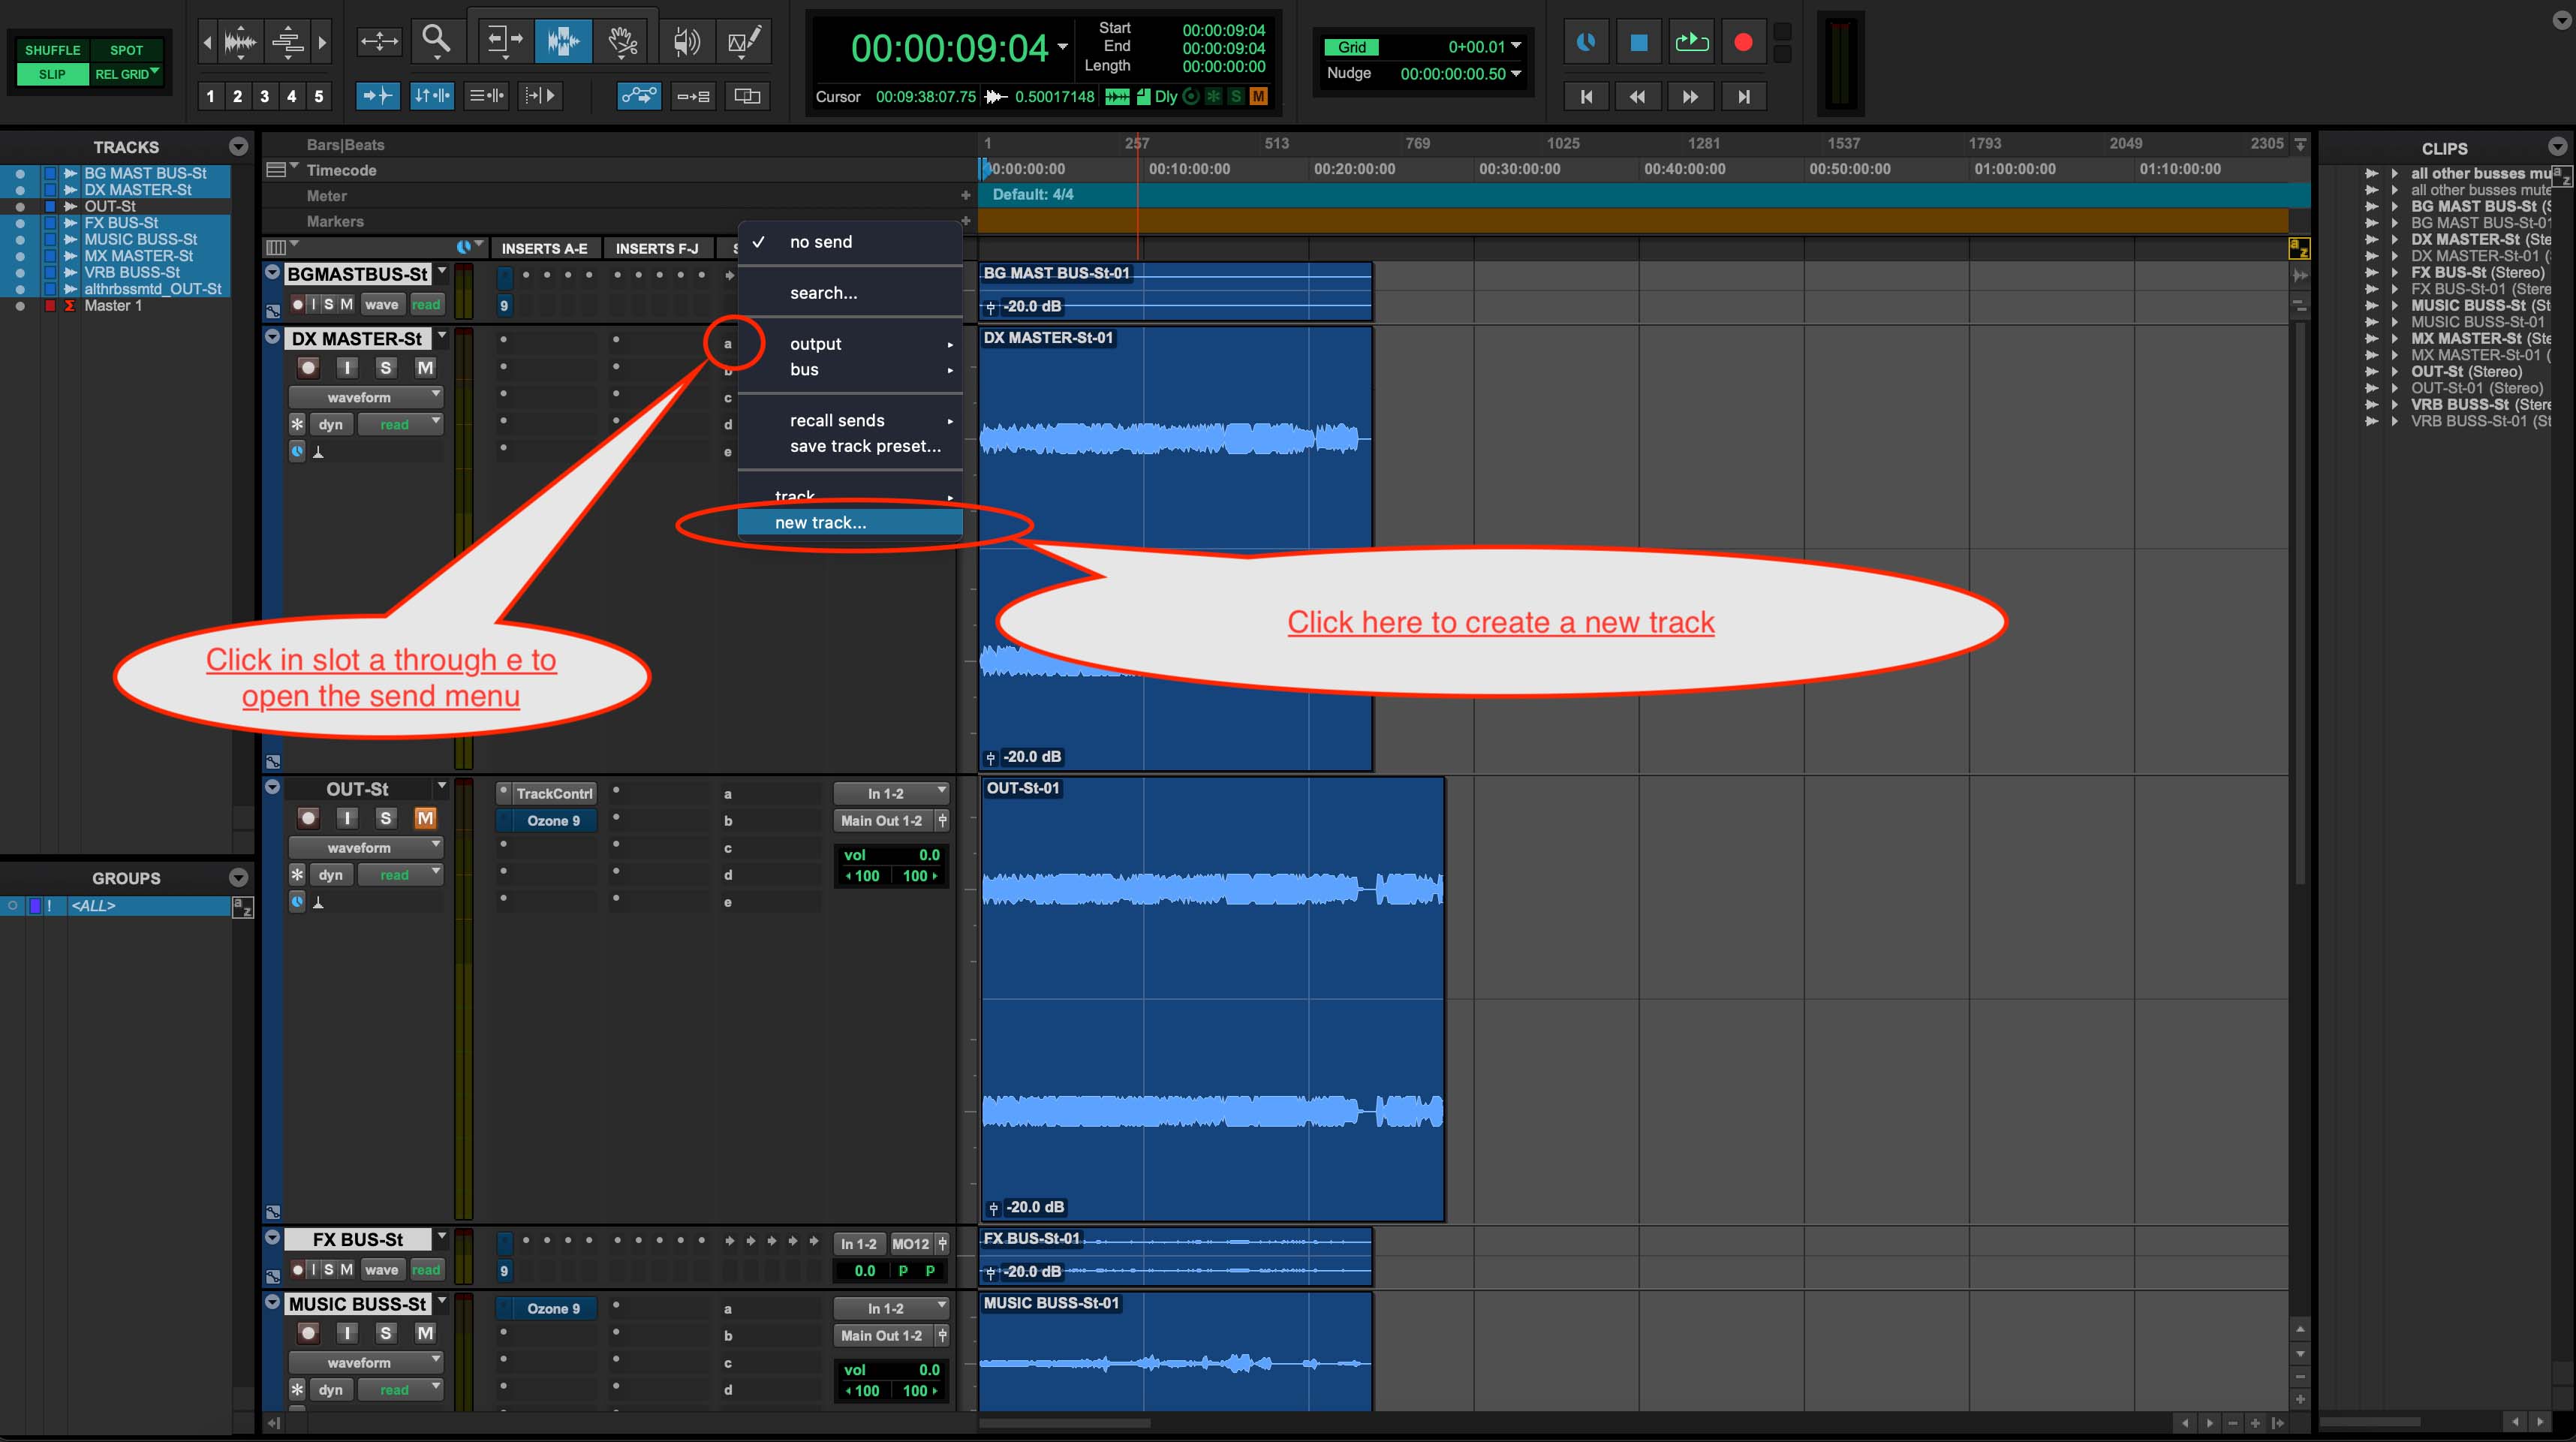
An easy place to click in Pro Tools
This gives me the option to create a new auxiliary track, like so:
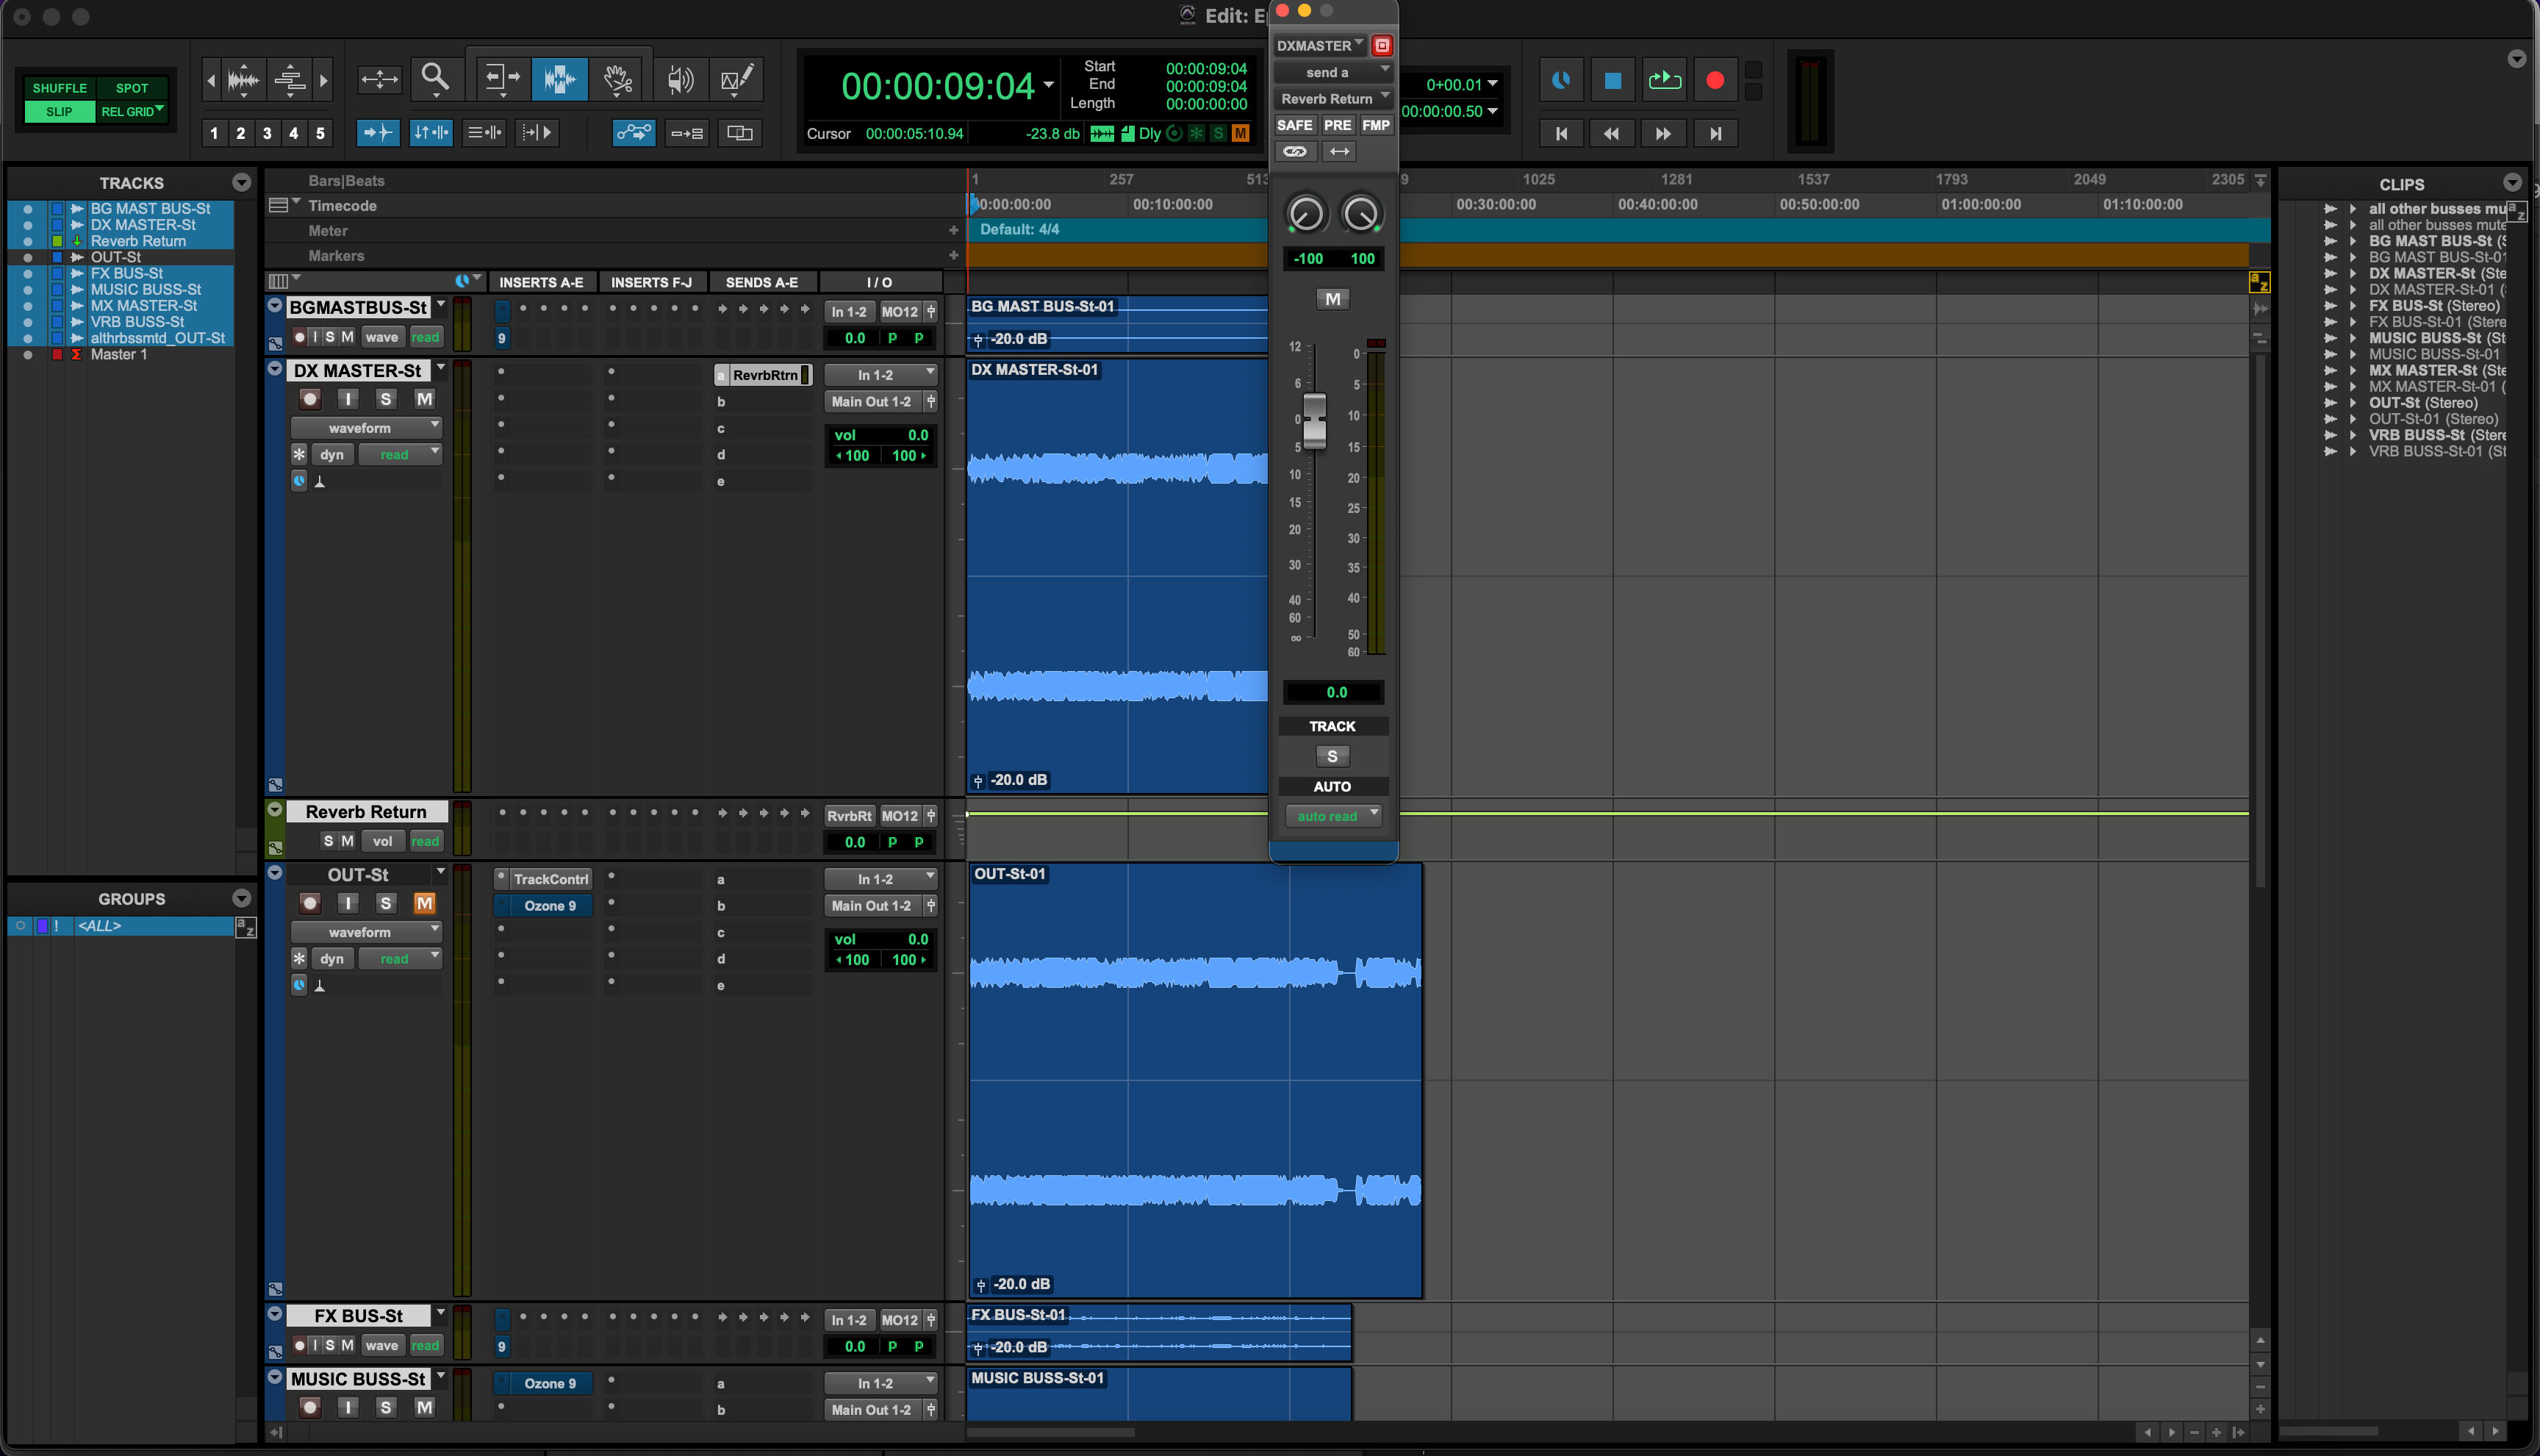
New track menu
Now, the return track is created below the original:
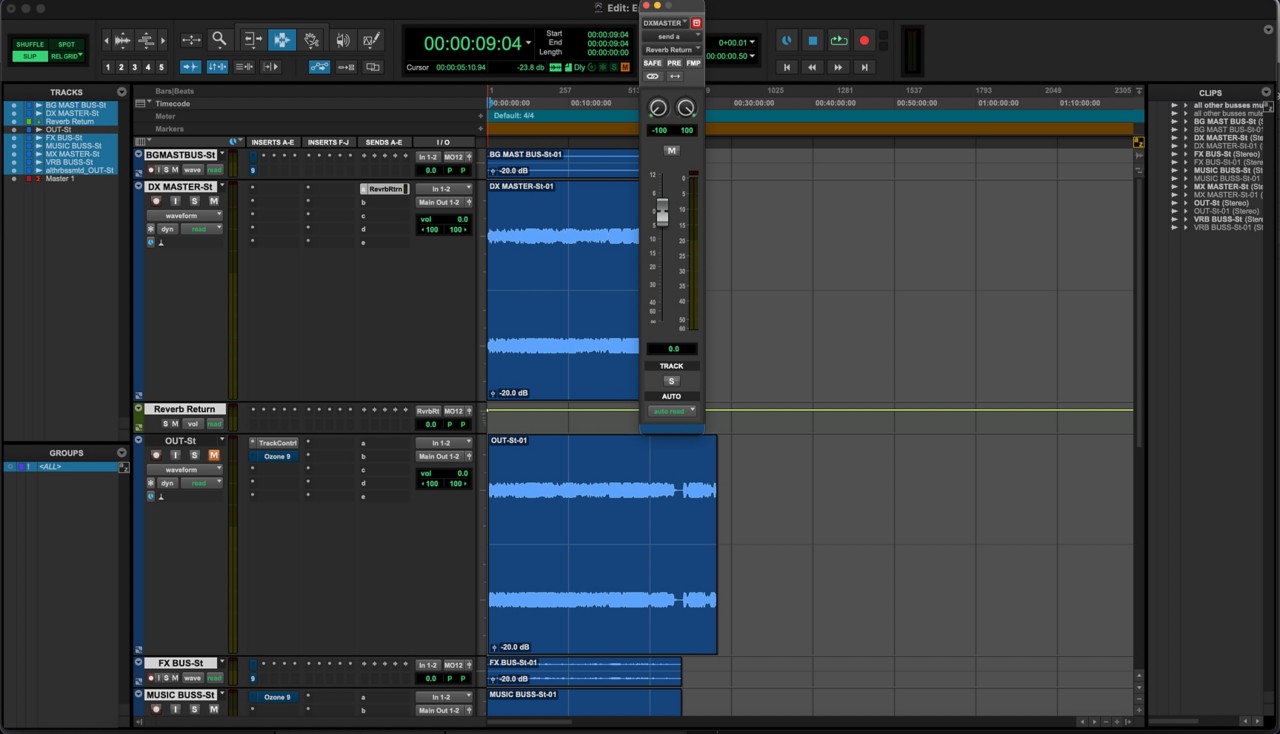
New return track created
If I want to send other tracks there, it’s as simple as selecting it in the menu, like this:
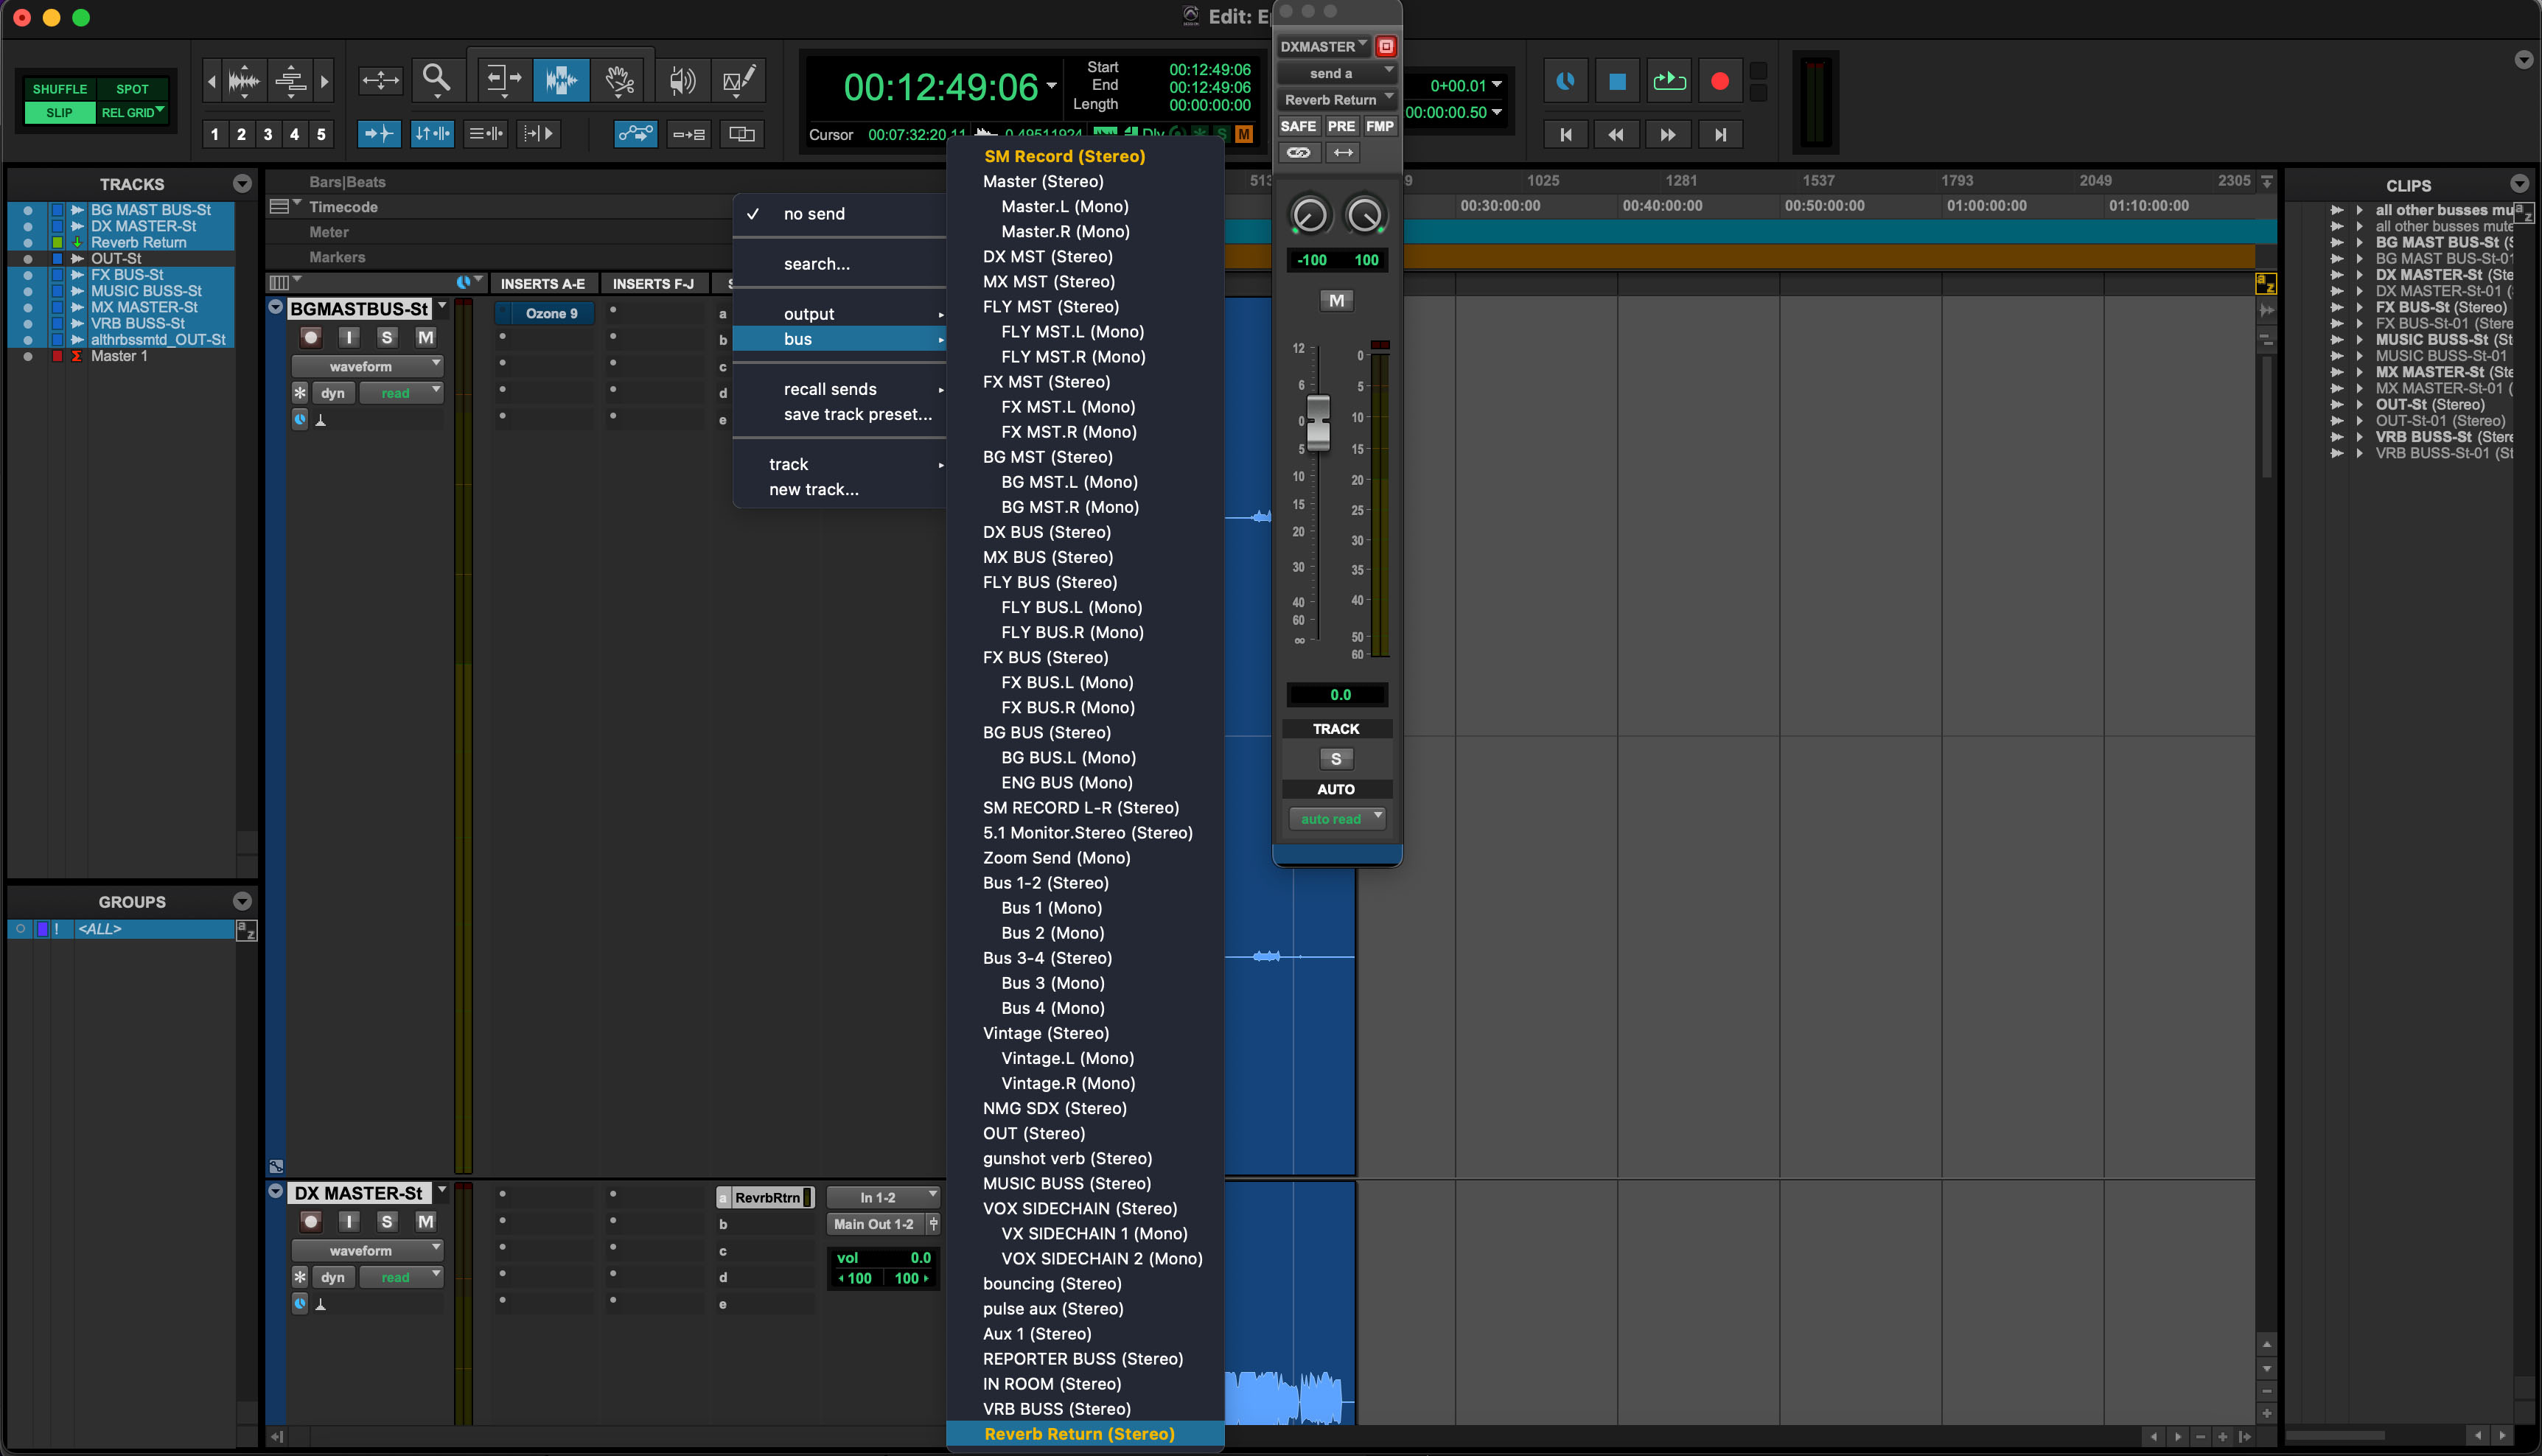
Sending to an established bus
It can get complicated in Pro Tools, especially if you’re routing buses to hardware summing mixers and the like, but this is one basic way to accomplish creating send and return effects in a simple in-the-box session.
2. Forgetting to use aux returns as submixes
We’ve demonstrated “sending” tracks to auxiliary returns above.
But we can also route tracks directly to auxiliary tracks, like so:
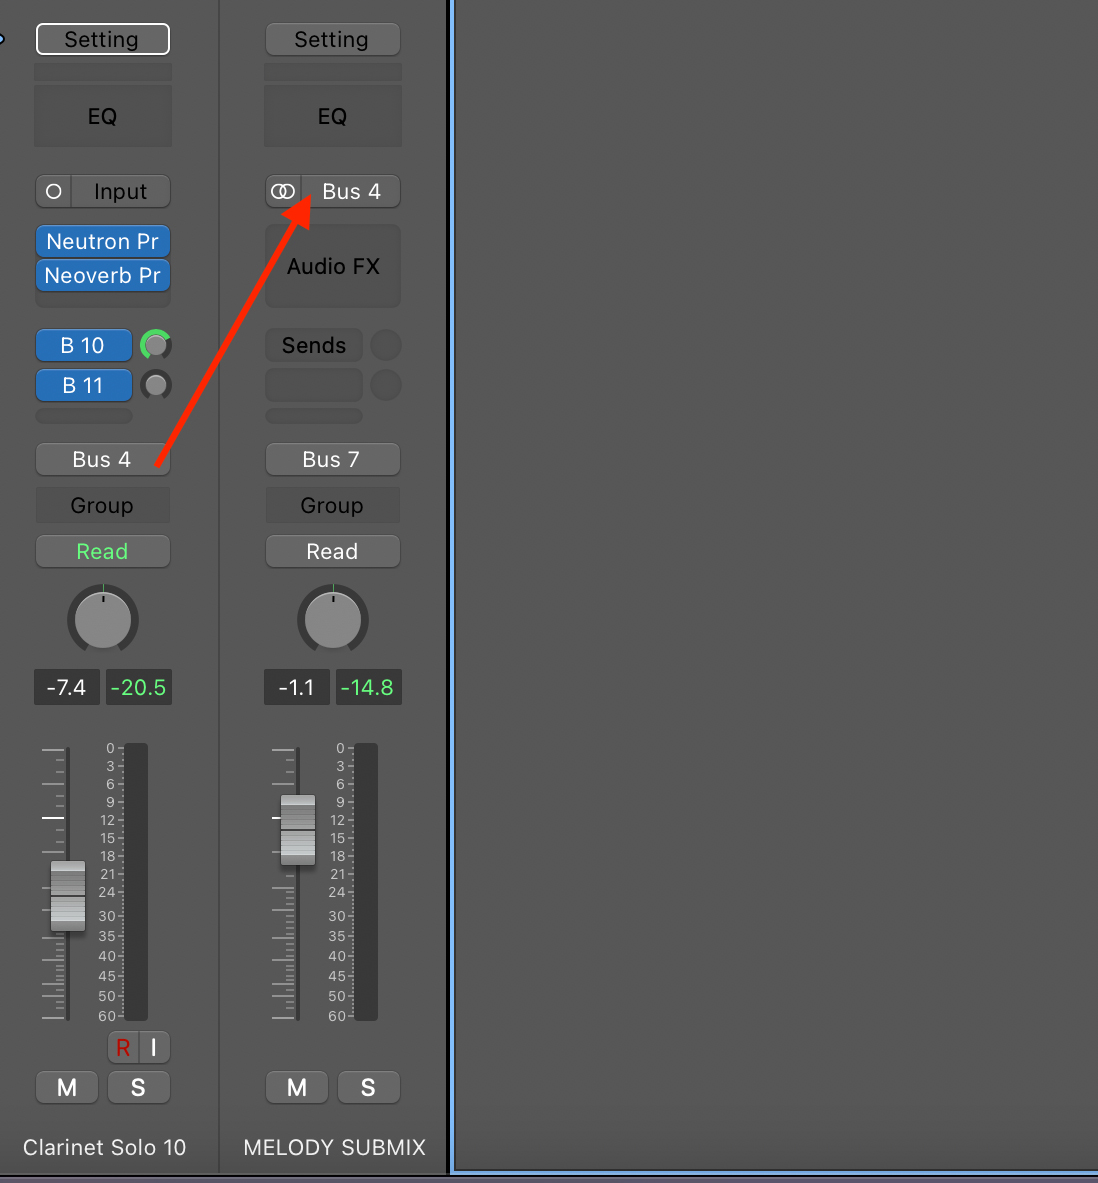
Routing to a submix
When we route channels to an auxiliary track, we call this a submix.
Not availing yourselves of submixes can be a huge mistake! If you have six guitar tracks and want to adjust the levels of all of them at once, you can route them to a single aux track and adjust the fader there. You can also solo or mute the group together this way.
A submix setup works a little differently in each DAW, but the end result is the same: the selected guitar track outputs are accessible from a single stereo channel. In large mixes where you need to make quick changes often, submixes are a necessity.
But wait—there’s more! If your guitars need some kind of group processing, like a high pass filter or some soft saturation, you can do this from the submix as well. And if your guitars are getting in the way of your vocal, you can group the lead vocals into a submix and use them as a sidechain input for the guitars.
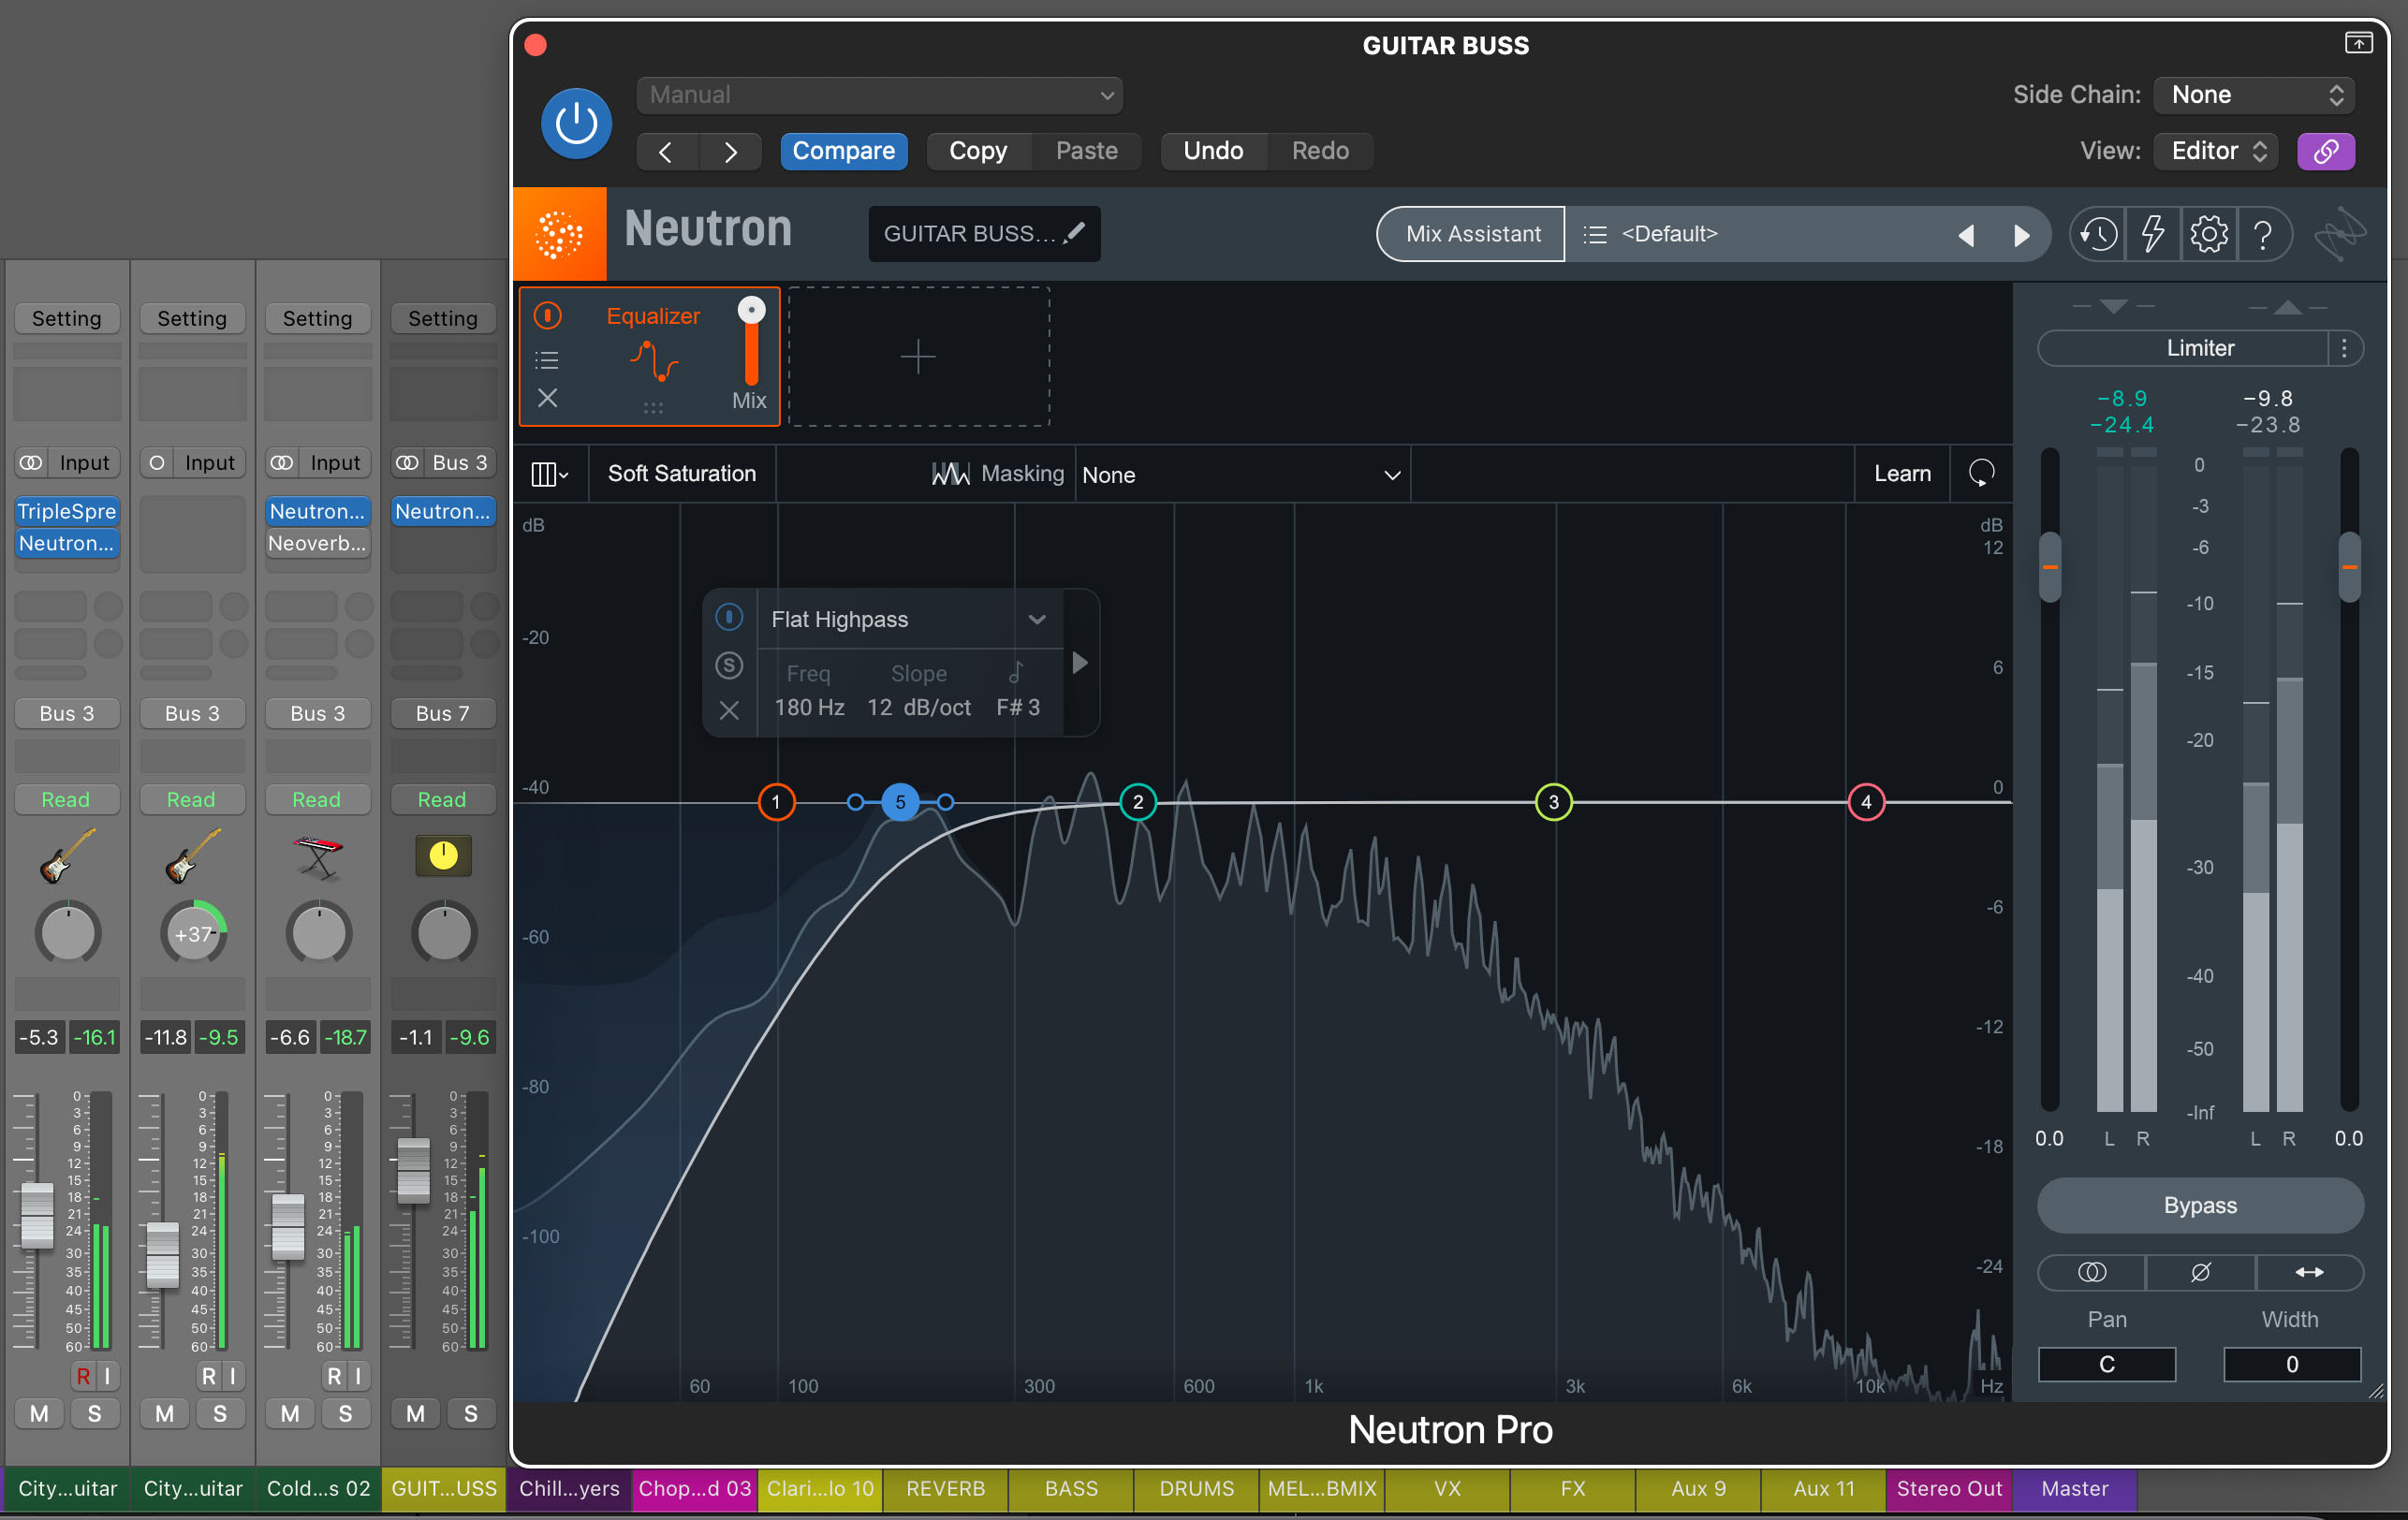
Submix processing with Neutron
3. Using a return effect when an insert would do a better job
For all this talk of return channels, it's worth mentioning that there are several scenarios where an insert is a better choice. Maybe you want to really go crazy on a sound-design level. Here, an insert path might be the better option.
But even when it comes to something like a reverb, there are times when you might want to choose an insert over a send/return approach. Here’s an example:
I often get the drum sound I want in a mix by adding a slight amount of reverb to the entire drum bus before applying compression for punch and/or glue. It marries the ambiance to the kit and makes everything more groovy.
Observe the drum bus in this example:
This is a drum bus with reverb applied as a send, and it sounds a little stale to me, a bit clinical. In particular, the kick drum feels annoyingly plastic.
Now, if I take this same reverb, dial the blend back to about 9.1%, and slap it on before my drum-buss compressor, there’s a palpable difference in feel:
It’s subtle, but it’s glorious: the verb is now being compressed with the drums, adding to the flavor and the glue. The timing on the kick drum’s tail is a bit different—it’s bouncier, and it grooves harder.
For more tips on when an insert will serve you better than a return (and vice-versa) I recommend this article on Aux vs. Inserts: to Send or Not to Send?
4. Avoiding automation on sends and returns
Because many DAWs hide their FX return channels—or tuck them off to the side, like Logic—it's easy to forget that a send or return can be automated. With multiple tracks under a single fader, automating returns is a powerful mixing move.
Don’t be afraid of automation while mixing. For example: when the chorus kicks in, automate the lead vocal send higher on the reverb, then revert it back to a lower, dryer setting for the verse. At the same time, you might want to automate the pan dial on the reverb return to make the effect wider.
You can also automate any plug-in on the return aux itself—don’t forget that this is a possibility!
Where you choose to automate can also result in a mistake. You can automate the level you send to the return track, and this will control how much signal hits the effect. Or, you can automate the fader of the return track, and the automation will take place after all the effects processing. These choices can yield dramatically different results, which is why avoiding the next mistake is vital:
5. Losing track of your auxiliary channels
Whenever you insert a time-based effect directly on a track, the dry/wet knob is a crucial parameter. If the wet setting is too high, you will draw listeners’ attention to the effect and take away from the music. Too low, and the effect won't have much effect at all.
Things work differently with return channels. Much of the time, you’ll want to default to 100% wet on a delay or a reverb. Why? Without an effect on your fx return, the track is essentially a duplicate, and you’re messing with your gain staging—adding more of the original sound than you quite possibly need!
However, we can use aux returns for more than just time-based effects like reverb and delay. We can also use them for things like compression or saturation, often referred to as parallel processing.
For things like compressors and distortion, be mindful that these are not meant to introduce noticeable time shifts. As such, they should also be considered in your gain staging! If you want to turn them down, it’s often wise to do that from the plug-in output, or the return track fader, and not from your send.
Turning down the send to a parallel compressor means less compression on the fx return. Turning down the return’s fader, after the compressor, means less level from the compressed track overall—but the amount of compression will remain the same. Keep this in mind.
Indeed, adding sends, returns, busses, and auxiliary tracks into your life is a double edged sword. It’s hard to keep track, and very easy to wind up with duplicated audio playing at full bore. Ask any engineer—it’s something even the most seasoned pros have to hunt for from time to time.
To help avoid this, try to get in the habit of consistently organizing your return channels the same way. Whether you always give them a specific color, or always put them in the same spot in your mixer layout, there are ways you can help prevent yourself from losing track of them.
6. Keeping track of Pre and Post fader sends
We’ve saved one of the harder opportunities for error for last: the difference between pre and post fader sends.
This actually isn’t too complicated, but it’s high on the list of things to check when something doesn’t sound like you intended it on your auxes.
Basically, on any send, you have the option to “tap” the signal from a given track before it hits the fader (pre-fader) or after it hits the fader (post-fader).
Again, let’s take a look at Logic and Pro Tools. This is the menu for the sends in Logic:
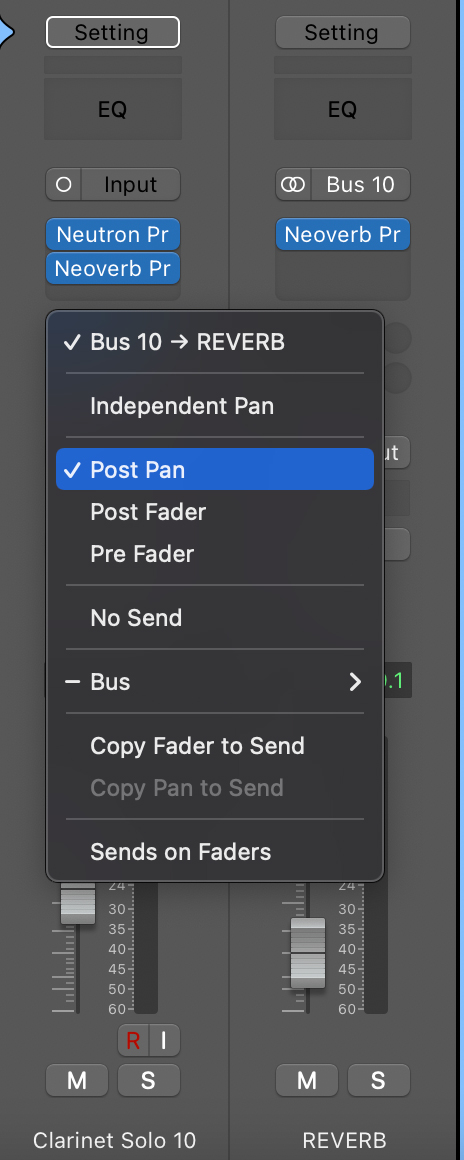
Logic send menu
And here’s how it looks in pro tools:
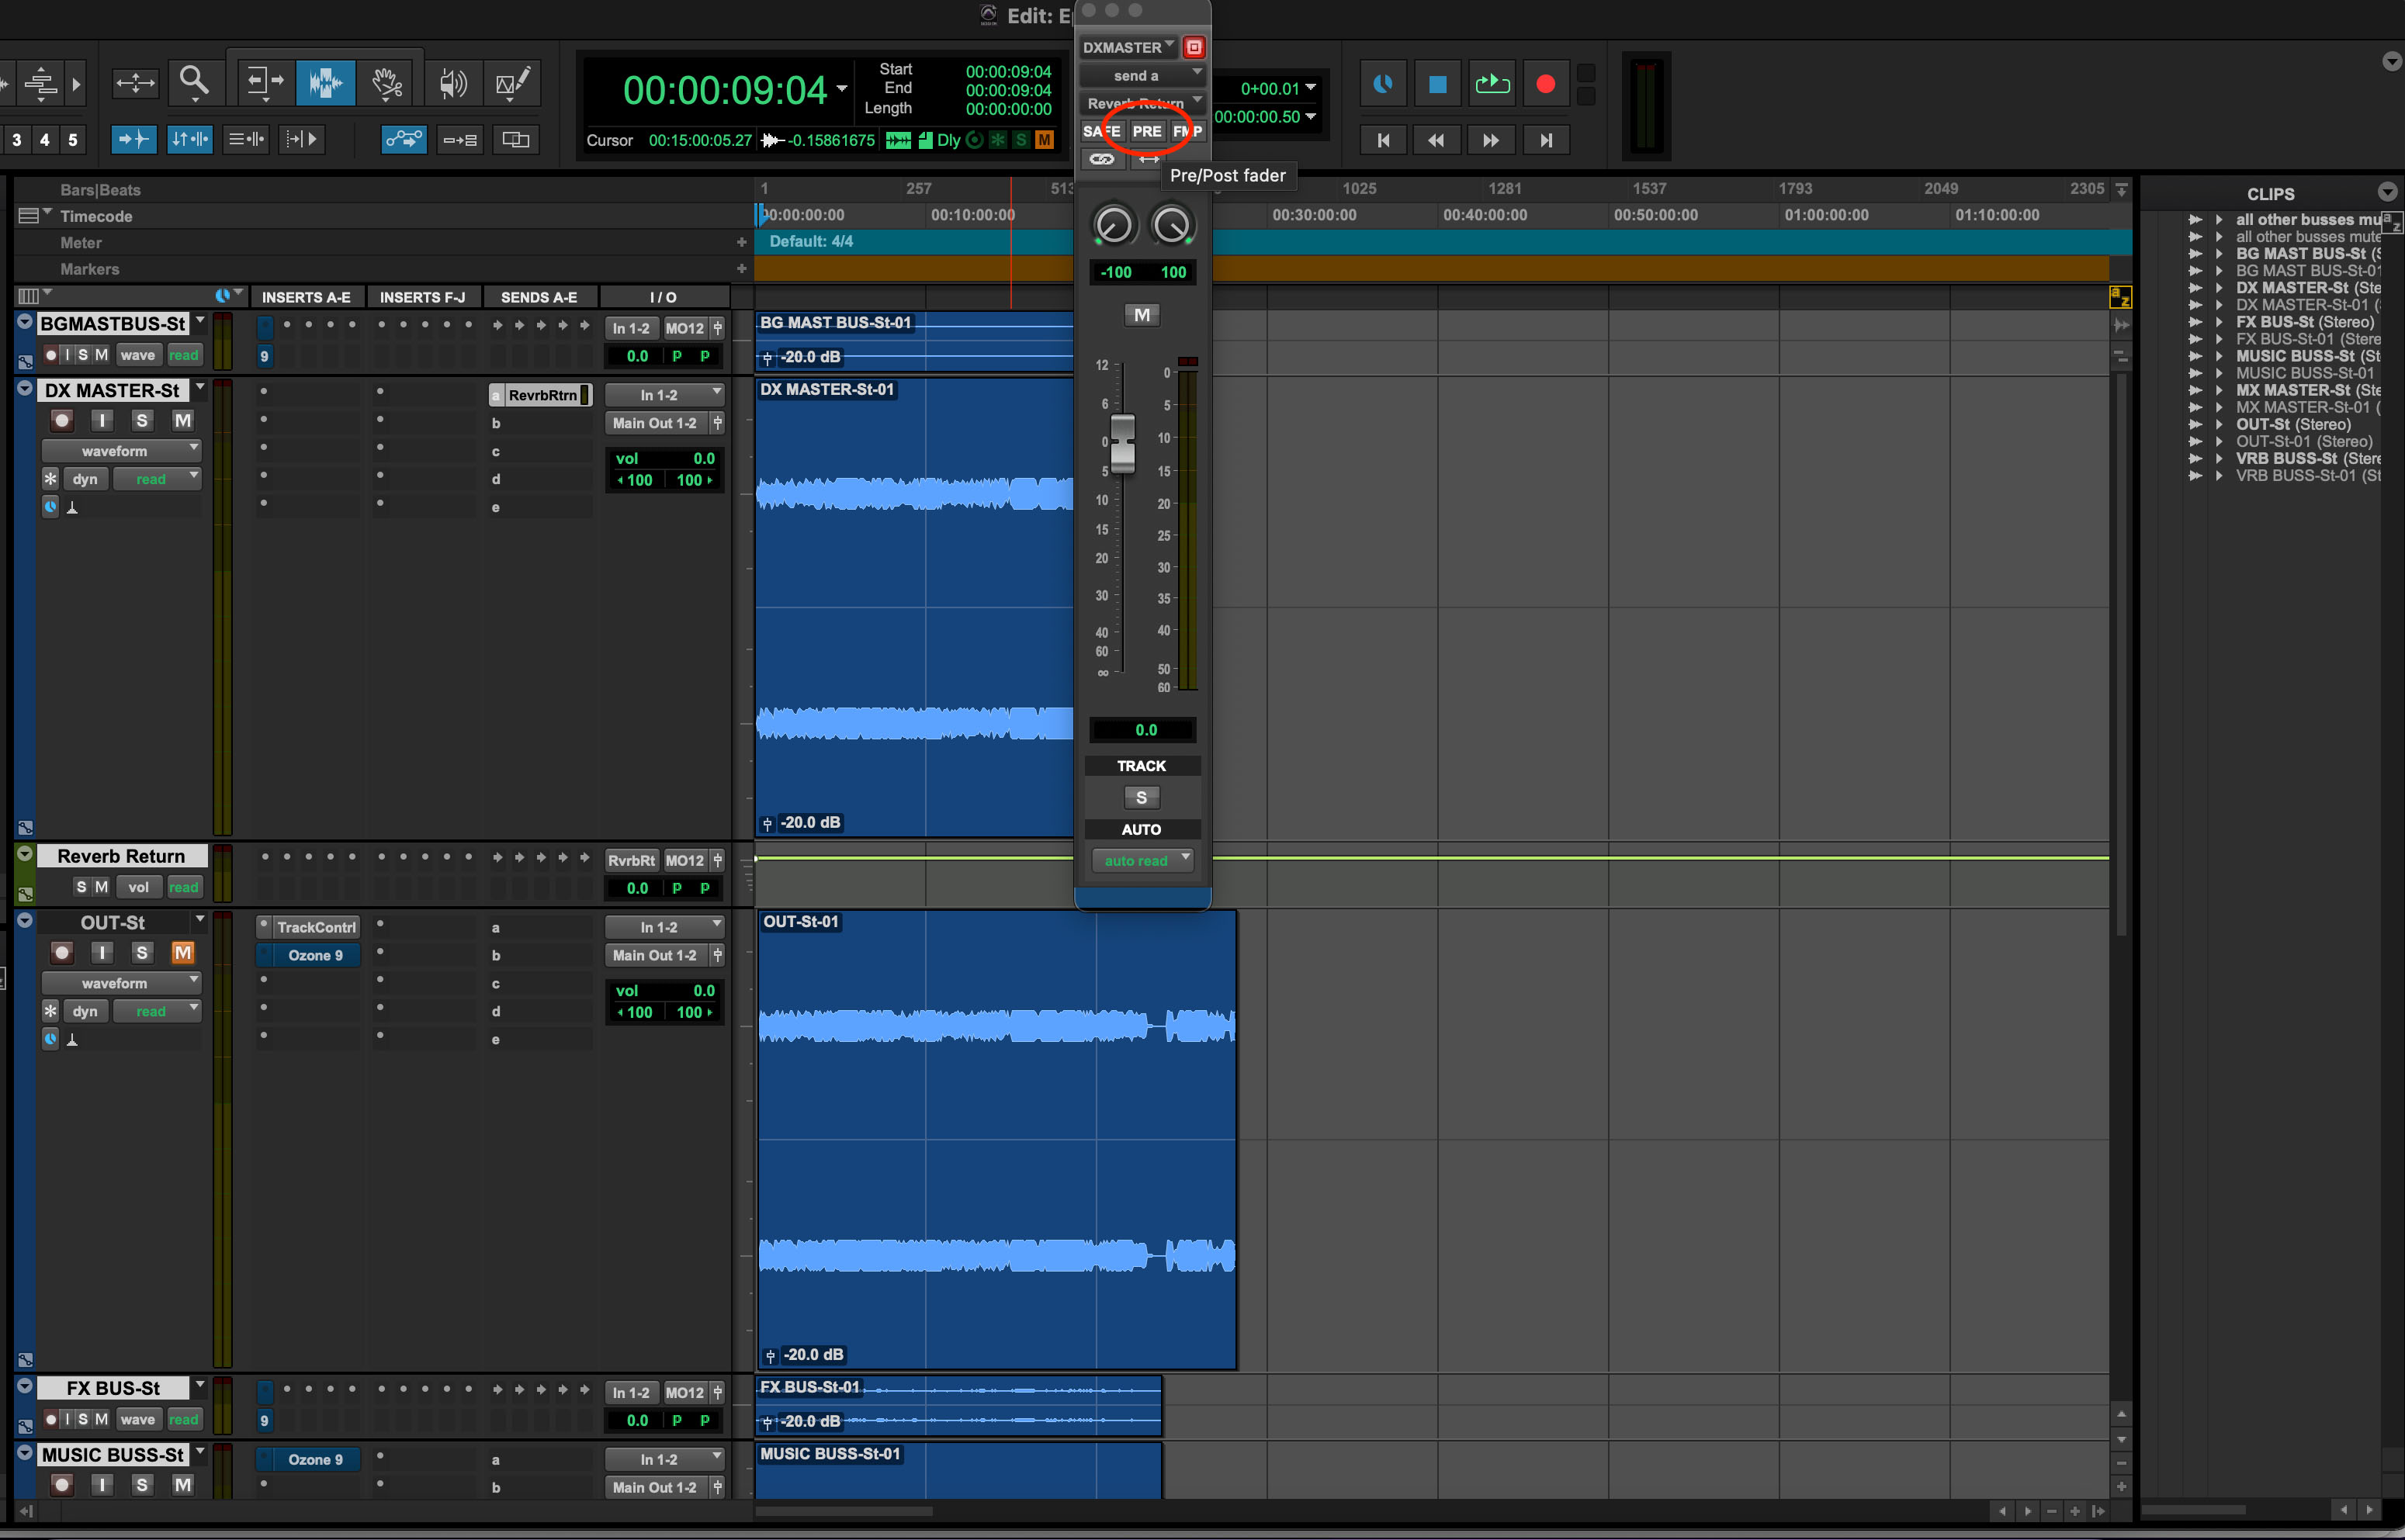
Pro Tools send menu
It’s easier if I explain post-fader first, as you’ll soon see:
If you use a post-fader send, the level of your effect will be affected by the fader of your original track. Turn your original track up on the fader, and you’ll be sending more signal to the fx return channel. Turn it down and less signal will go to the fx return.
Another way to think of it is that it keeps the effect level proportional to the level of the channel that’s sending to it. Most of the time, this is how we expect sends to work. For example if you’re automating the lead vocal level, the reverb wet/dry balance will stay consistent.
A pre-fader send will not give you this option. Rathert, it will send the exact same signal level to the return track, regardless of the fader level on the source track. This can have the rather odd consequence of hearing just the reverb or delay, and none of the dry signal if the fader on the source channel gets turned all the way down.
If you want to adjust the volume of your pre-fader send, you can do so from the send slider or dial itself (pumping more or less signal into all plug-ins on your fx return channel), or from the aux return fader (giving your more or less signal after the plug-in chain).
But the fader of your original track will not control the level of your auxiliary return. For these reasons, pre-fader sends are more frequently used to set up monitor mixes, both in live performances and during tracking sessions. They allow a performer to hear themselves at a consistent level regardless of how the mix engineer tweaks the mix. That said they can certainly be used creatively during mixing as well.
Confusing! But don’t worry, you’ll get the hang of it. Just be sure to keep track of pre and post fader sends so you don’t have unexpected gain issues in your mix.
Oh, many DAWs also have post-pan sends as well. In this case, the auxiliary return mimics the panning scheme of your original tracks too.
Start using sends and return effects
If you’re new to send-and-return techniques, I hope this article has given you a better idea of how to use them and what mistakes to avoid. Granted, there are other errors you can make, but what’s been provided here covers the most common ones.
Those with more experience may already have their own send and return strategies and we’d be happy to hear about them on Instagram, Twitter, or Facebook, or whatever social media is coming down the horizon to make our lives even more strange on a daily basis.
If you're looking for even more mixing tips, check out iZotope's guide on how to mix music, and explore all of the mixing plug-ins offered in iZotope's


Music Production Suite 7
