Tips to Repair a Compressed or Noisy Interview
iZotope RX 8 offers many tools to repair a compressed or noisy interview. Learn when and how to use them to achieve clear audio.
In today’s world of content creation, sometimes it’s often necessary to record on the fly, often with limited resources. This is a recipe for less-than-optimal audio, and it seems to happen a lot with field recordings, and especially interviews. The interviewer grabs whatever they can with a bad mic—e.g. on a phone in a noisy environment—and delivers a highly compressed file. The engineer in the studio listens to it and says, “Oh, no… how do I fix this?”
In this article, we’ll cover basic strategies and tips to repair a compressed or noisy interview so it’s usable in your content. We’ll examine the many tools offered by iZotope’s


RX 11 Advanced
This article references a previous version of RX. Learn about


RX 10 Advanced
Setting a bad (audio) example

Original interview audio
Our audio example is a 12-second voice recording that’s designed to simulate some of the conditions interviewers may encounter. You can see the file above (in all these figures, I am showing only one channel, as it was recorded centered/mono) and listen to it here:
This example was created as follows. First, my voice was recorded with a good-quality mic—but much too far away from it, with a loud computer fan and a clothes dryer running in the background. The recorded audio was data-compressed to 64 kbps MP3, loaded onto a smartphone, and played back into the same mic from the smartphone speaker.
Pretty nasty, huh? The scary thing is, someday you may end up having to work with audio that’s even worse!
To find solutions, first understand the problems
Where do we even start with something like this? It may seem overwhelming at first. The first thing to do is to understand what’s wrong: by examining the waveform and listening carefully to the artifacts that make it unpleasant to listen to, we can identify problems and implement solutions.
Remember that pristine audio quality isn’t always an attainable goal, especially if you’re working to a tight deadline. Fortunately, your greatest ally is your audience! The human ear and brain are designed to interpret voices perhaps more finely than any other sound source; listeners can often pick out what’s being said, even on truly terrible recordings. However, you don’t want to make the process an unpleasant chore—the more problems you can identify and fix, the happier your audience (and your client) will be.
So, what does our examination of the waveform tell us? The first thing we notice is that the audio suffers from a common symptom of excessive data compression: that phasey, swishy tone that’s fatiguing and irritating. There’s ear-bleeding sibilance in places, the whole signal is riddled with clipping, and the underlying noise makes everything that much harder to work with.
Now, notice what we’ve done: we’ve cut up this big job of audio repair into several neat slices, each of which we can deal with separately. Note that there’s no set order in which we tackle these problems, and keep in mind that the approach outlined below might not be what you choose—and that’s okay!
In this article, we’ll attack the main problems one by one, and see where we end up after initial repair passes. Remember, though, that it’s sometimes better to use multiple passes of the same module with different settings, either all in a row or interleaved with other processes, to get the best result. Think of peeling away layers of dirt from a work of art, evaluating which tool to use at any given moment. We’ll wrap up with an example of that approach.

Here’s our original audio (one channel shown for simplicity). We’re going to attack the clipping first.
Unclip the clips
First things first: that clipping has got to go! We start with some fairly straightforward settings on the De-clip module in RX 8:
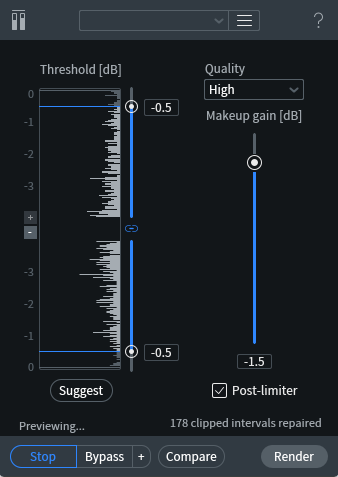
RX De-clip module
We’re not in a great hurry, so we can use the High Quality setting. I often gravitate toward the other settings when starting to work with problematic audio. Remember that in this case, we’re not trying to slam our levels for maximum punch, we’re trying to remove irritating artifacts. My strategy is usually to set a fairly conservative clipping threshold (-0.5 dB here), and combine the process with a slight reduction in overall level (-1.5 dB).
Check out the tally at the bottom of the display, which I captured immediately after the process was done. 178 clips repaired in under 12 seconds of audio!
The end result doesn’t look all that different from what we started with, but the audio is distinctly improved. Here’s the waveform:

After the De-clip module has done its work, here’s what the waveform looks like.
You can hear the audio here:
Lose the noise
With the clipping out of the way, the next obvious target is the noise underlying the track. In this case, we’re lucky, as the noise is fairly steady throughout the clip. If you have noise that comes and goes, you’ll have to work with smaller chunks of time, or combine noise removal with more destructive tricks like chopping out places where the interviewee isn’t talking and replacing them with silence.

Spectral De-noise needs a bit of exposed noise to work with. We chose the pause at the end.
Our module of choice here is Spectral De-noise. We start by giving the module a chunk of background noise to learn from. That interval with no speech is selected from the end of the clip, as shown above, and from that we get the following module parameters:
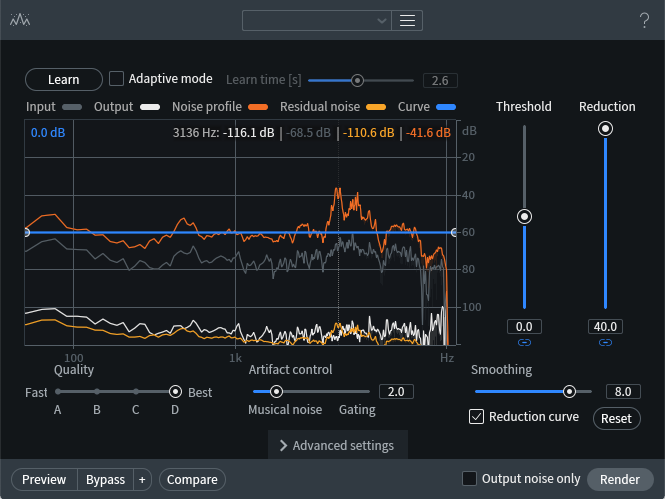
RX Spectral De-noise module settings
Note that I’m slamming the Reduction really hard! I can get away with that, because the section I’m using to teach the module about the noise is wide open, isolated, and very characteristic of the noise underlying the entire clip. If you’re working with smaller chunks (e.g. the place between phrases in the middle of the clip), you’ll likely get better results with a gentler setting.
Here’s the resulting waveform, which shows a much more dramatic improvement than the previous pass:

With the noise removed, we jump a lot closer to a usable result… but we’re not done yet.
The audio example also shows a marked improvement overall, as you can hear:
Slay the esses
With the noise gone and the clips snipped, those ear-bleeding “S” sounds are all the more obvious. Time to remove them, and we’re about to discover how effective the De-ess module is when dealing with stuff like this.
First, we need to select a bit of audio where the esses are particularly awful. Let’s use this chunk right here: that gnarly, final “best.” Some of the earlier phrases would work too.

The word “best” highlighted in the RX spectrogram
Here are our De-ess settings:
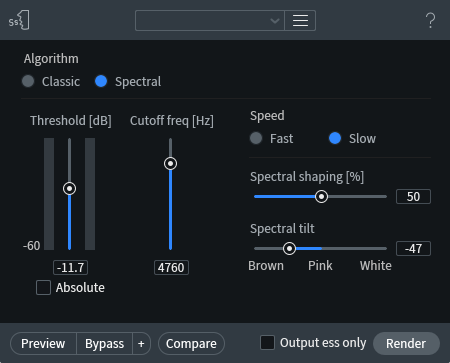
RX De-ess module settings
These took a lot of playing to get the best results, and you should plan to mess around and preview for quite a while. You’ll discover that setting the Threshold just right not only cleans up the esses, but also helps with the swishy sound of the voice.
The Cutoff frequency is pulled down below 5 kHz to soften the results. I elected to use Slow speed for a smoother result, and while I left Spectral shaping at its default of 50%, I used Spectral tilt to move the profile toward the Brown (low-frequency) side of things. Play with this setting to emphasize bass or give treble a touch of immediacy.
This was probably the most involved process I used, and at the end I was pretty pleased with the result. This file takes that de-essed audio and replaces some of the level lost in the process by adding 3 dB of gain:
Now what?
At this point, we come to a fork in the road: there are several different directions in which we could take the repair process, each having its own pluses and minuses. RX 8 has several modules optimized for dialogue cleanup, and this would be a good time to bring them into the mix.
The best way to decide which of these modules to use is simply to try them and hear what they do to our example, knowing that one click on the Undo button will get us back to where we can explore other options.
With the obvious artifacts dealt with, we’re ready to tackle the hollow sound of the voice itself. It may be a bit unorthodox, but to me the timbre suggests an almost reverberant character… so let’s try to remove that and see what happens.
We have two options for this process. First is the simplified Dialogue De-reverb module:
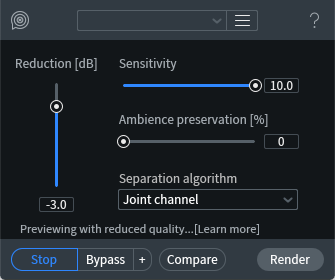
RX Dialogue De-reverb module

This module is easy to work with, but not very finely detailed. Its results are okay to my ears, but I think we can do better. The De-reverb module has a lot more in the way of tweakable settings:
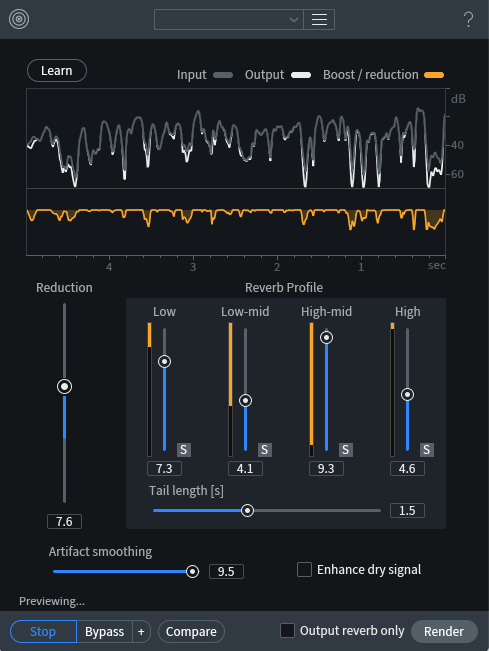
RX De-reverb module
It’s actually pretty extraordinary how well this module works to gently extract ambience from signals. The above settings let me home in on particular frequency bands and tweak them to get the best result, with the artifact smoothing nearly maxed out to prevent adding in new gunk while taking out the old gunk. This gave us a better sound…

However, I think we can do better still! Making a note that De-reverb seems to have a good effect, let’s step back and try a different approach: the Voice De-noise module.
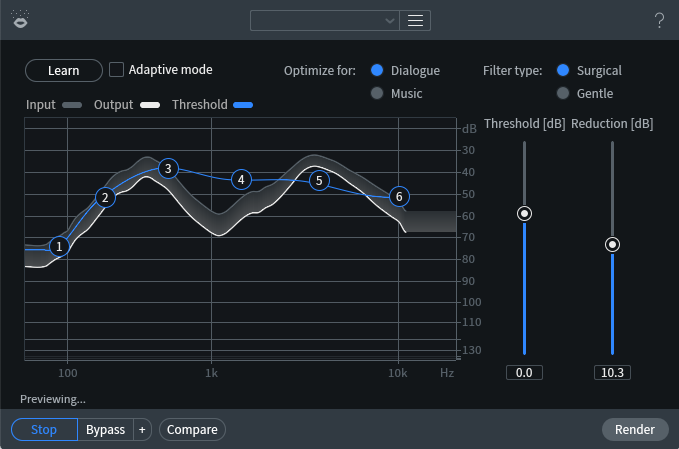
RX Voice De-noise module
This is a sort of dynamically adaptive EQ that follows the audio and removes noise in a way that’s sensitive to the underlying material—a voice-centric approach to the same sort of learned noise reduction that Spectral De-noise does. The settings above represent my first try at this module. Switching to the Gentle filter type and playing with the Reduction value, and then boosting the level with 2 dB of gain, got me to this surprisingly good result:
Here’s what the resulting waveform looks like. Way cleaner!

De-essing and Voice De-noise bring us ever closer to an ideal result.
Many steps make a journey
The end result of this process (so far) is a voice track that is by no means perfect, but is way more pleasant and intelligible than our original audio was. Where do we go from here?
Well, in some cases, the answer may be “nowhere.” If time is of the essence and the audience understands that the interview is being captured in a hurry, they may well be happy to accept interview audio that’s at this level of quality.
In other cases, where you want to tweak every last bit of quality out of your audio, then it’s time to layer on multiple instances of these modules with finer settings. As a quick experiment to see where this process could take me, I dove into the weeds with the following series of modules.
- Initial State
- De-clip
- Spectral De-noise
- De-ess
+3 dB Gain - Voice De-noise
+2 dB Gain - Dialogue De-reverb
- De-ess
+6 dB Gain
The last example will give you a good idea of what’s possible with a bit of patience:

Ten different module passes with increasing subtlety, leading to results that (literally) speak for themselves.
The end result is something that an interview podcast could publish with a fair bit of confidence, given the limitations of hasty field recording. It’s possible to get even cleaner with the application of specialty plug-ins like Zynaptiq UNCHIRP, which is specifically designed to do nothing but remove artifacts of overzealous MP3 compression—and which costs almost as much as RX 8 Standard to do that one thing. For most users, RX 8 has more than enough tools to handle the vast majority of dialogue cleanup tasks.
The takeaways
If you have RX 8 or


RX 10 Advanced
Feel free to try the various modules I’ve described, changing the settings and the order of operations to improve on my quick results. Also, be sure to try the RX 8 Repair Assistant! Its suggested module chains may or may not give better results than yours, but you can learn from its suggestions and add them to your toolbox.
Finally, keep in mind that compression can manifest differently in different audio files. As such, this project does not represent every scenario, nor every method of treatment. VoIP—voice over internet protocol—audio, for example, tends to lose high-end spectral content during the streaming and compression processes. This demands a tool like Spectral Recovery, which sources data from the rest of the audio file to replace these frequencies. All this is to say, be prepared to experiment with your audio repair from job to job.
When you need to repair a compressed or noisy interview, no one method will always do the trick. Practice on this and other files to learn strategies that can be applied flexibly, and you’ll be an interview repair whiz in no time.
