6 Ways to Use Reverb in Post Production Sound Design
Learn six ways to use reverb creatively in post-production sound design.
Post-production sound design is a magical, yet invisible process: when it’s done right, no one really notices you’ve done anything at all. But anyone who works a post mix can tell you a lot of hard work goes into making projects feel real. This is particularly true for reverb, as the elements we receive in our mixes often need some atmospheric massaging.
Reverb is a powerful tool in post for its ability to sell the pictures on the screen, suspending our disbelief in the process. In this article, we’re going to cover six ways to use reverb in post. Jump to a specific tip below:
1. Use reverb to tie ambience and ADR together
Right off the bat, the most practical example of using reverb in post is to tie some looped ADR dialogue in with the original scene.
ADR is dialogue recorded after the actual shoot and placed into the scene in post. Because ADR is often recorded in a studio, the spatial feel of the resulting audio rarely matches the ambience of what is recorded on-location. So, if you want that ADR audio to be believable in the scheme of things, you have to tune its atmosphere to match the original ambience.
You can do this the easy way, or you can do it the hard way—which can sometimes be more fun and rewarding. Don’t sleep on doing it the hard way; it teaches you a lot about how sound reverberates in a space.
The hard way involves tuning the reverb by ear to match the original ambience, adjusting its early reflection response, EQ curve, and tail size to fit the source. You may also have to add delay to simulate room reflection before the reverb, or equalize the reverb to help it fit the original scene. I walk you through the process in this article if you want to see it done step-by-step.
The easy way, quite frankly, is to use the intuitive algorithms of iZotope’s


Dialogue Match
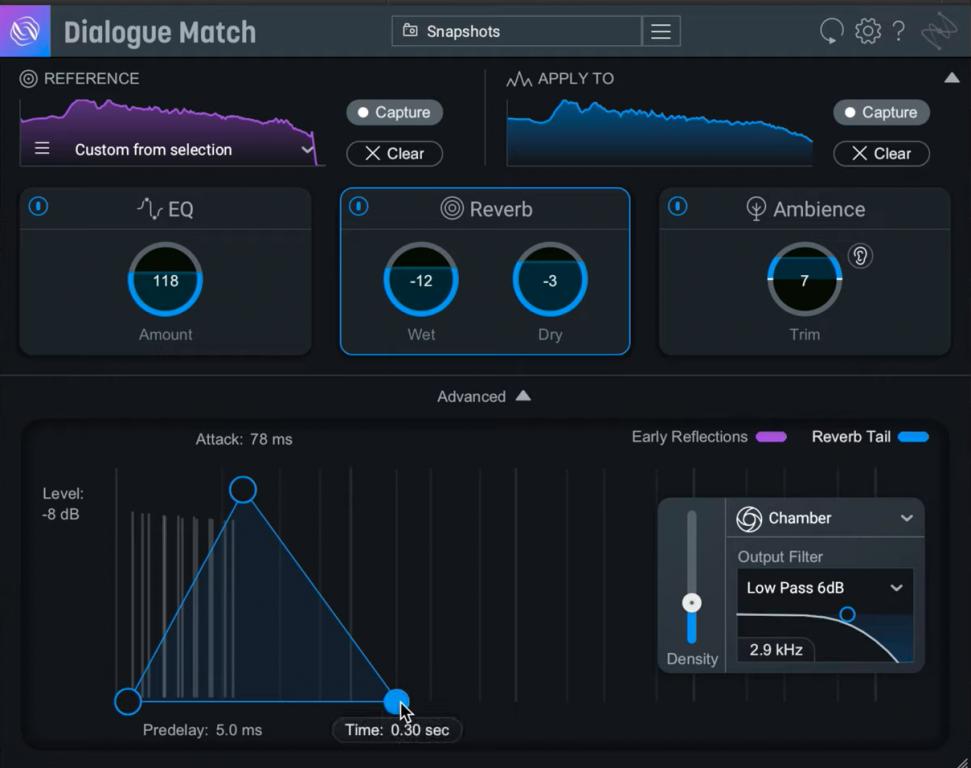
Dialogue Match
For a more in-depth tutorial on the process, refer to this article.
2. Use reverb to emphasize emotional beats
There’s a scene in Breaking Bad where Jesse Pinkman is about to meet a crazy drug dealer named Tuco Salamanca for the first time. When the guards let him into Tuco’s rooms, they close the door behind him, and the door slams with an exaggerated and noticeable thud.
In a recent re-bingeing of the show, I pointed this out to my partner, while we sat on the couch. I paused the show and exclaimed, “that’s reverb—there on that door!”
“What do you mean?” She replied.
“Nothing else in that room sounds so reverberant,” I went on, “but when they slam that door shut, it sounds big and roomy—almost echoey.”
“So what,” taking the remote from me as she said this.
“So what!? So that’s post production sound design! They added that reverb in to create a sense of dread for our main character here!”
She looked at me, nodded her head, and patted my arm as if to say, “I’m sorry you don’t have more friends.”
This is a common type of interaction between engineers and their spouses. Nevertheless, what I said about the scene is true—and it’s a crucial thing to remember: you can use exaggerated reverb, even in a natural context, to reinforce the mood of a scene—especially if that mood is dread or loneliness.
Simply pick the element that needs the reverb, and play around until it adds to the emotional beat. Be creative—there are no rules for this at first. Go nuts. However, you do need to take the resulting effect back down to something subtle in time. Maybe you back off the auxiliary return, or back off the blend knob. Don’t oversell this effect if the scene must remain realistic; you don’t want the reverb to be anything more than subliminal.
However, if the POV shifts into a specific character’s mindset, then the rules become much laxer. Countless are the scenes where a gunshot reverberates while the camera trains in, all slo-mo and close-up, on a character’s reaction to the unseen shot. This effect is hardly realistic, but it does capture the realism within that character’s head. Here you have more freedom to be expressive.
3. Contextualize sound effects in space with reverb
Picture this: a grenade falls off a high shelf and hits the floor with a muted thud. We don’t see the grenade hit the floor—we only hear it. Our point of view then switches to the grenade’s perspective: the device rolls down the hall, towards an open door, leading out of the house. We cut back to the shelf, and BOOM! The grenade explodes; but it explodes outside, leaving the interior unharmed.
Now imagine that you have to sell this scene with sound design. To get the feeling of the scene correct, we have to demonstrate two occurrences that don’t physically appear on the screen: the “thud” of the grenade hitting the floor, and the sound of the explosion outside the house. We have to do this well, or else we damage the integrity of the scene.
The sound of the grenade falling off the shelf, that first roll as it pitches towards the shelf lid—these sounds might not require reverb. But the thud of the grenade hitting the ground and rolling off-screen is not in our field of vision. It is heard, not seen.
This requires massaging of the auditory cues to achieve a greater degree of realism. Try adding a touch of ambience in a scene like this to contextualize the sound in space. Just apply a touch: too much will challenge credulity. Try some early reflections in a verb like


Stratus by Exponential Audio
Next, we cut to the grenade rolling, Coen-brothers style, down the hallway. That sound remains quite present, so we might not need any reverb here.
But when we cut back to the shelf, and the explosion resounds outside, this explosion will require reverb to connote the necessary context. Something like one of


Exponential Audio

STRATUS Exterior Preset, blend minimal, applied direct
4. Automate reverb to bring people in and out of the foreground
I worked last year on a film called The Architect, and it had a scene that demonstrates this tip. A character walked from the background of an office space into the foreground. He was the boss, talking to people in various cubicles, eventually stopping to schmooze with our main character.
As he walked from the background to the foreground, his voice and footsteps needed to remain audible. Also, the sounds had to be represented with the appropriate dimensional response. What was the solution? I paired the automation of an EQ with the automation of a reverb to both elements. The EQ curve started around here, in the background:

Neutron 3's EQ at beginning of automation
And ended here, when the boss had reached the foreground:
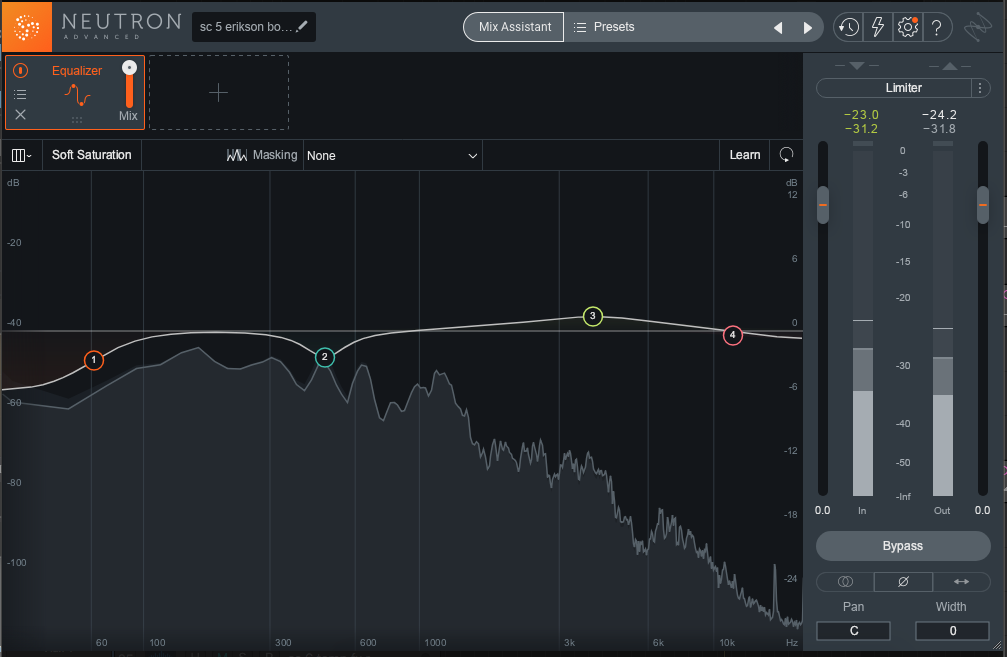
Neutron 3's EQ at beginning of automation
In the background, I used this blend of early reflections and reverb tail:
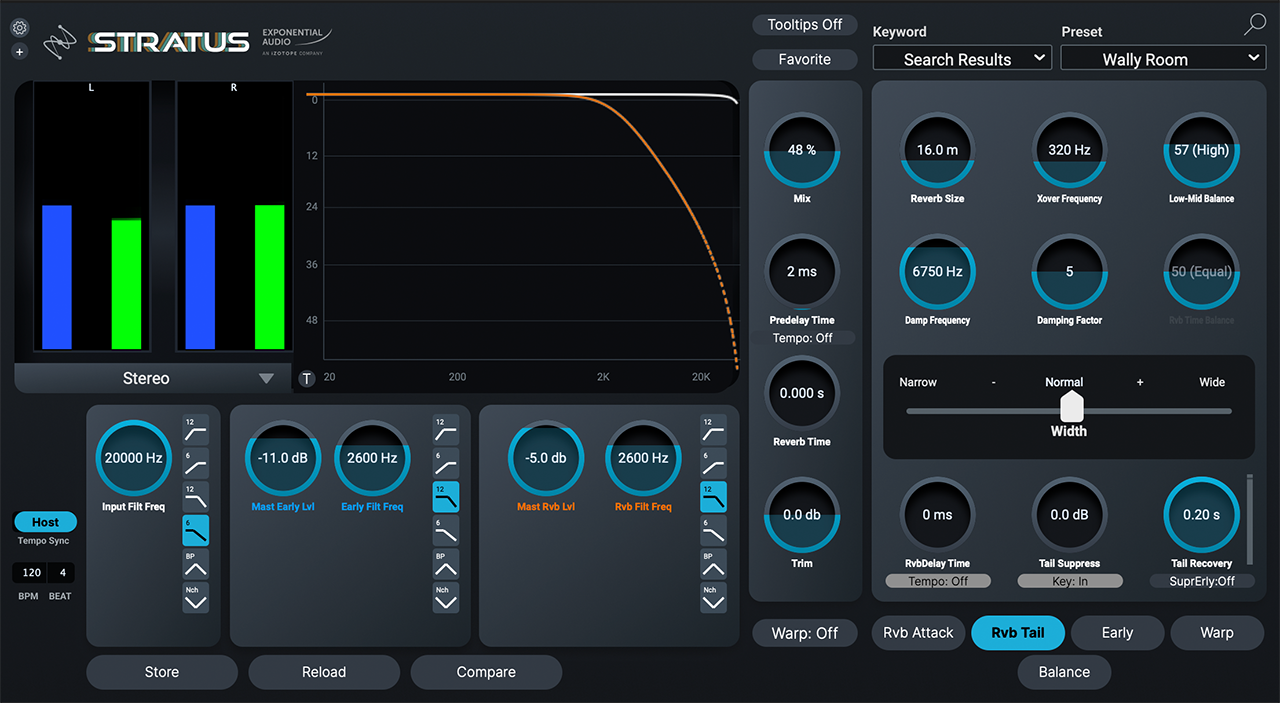
STRATUS reverb at beginning of automation
But by the end of the scene, we left it here:
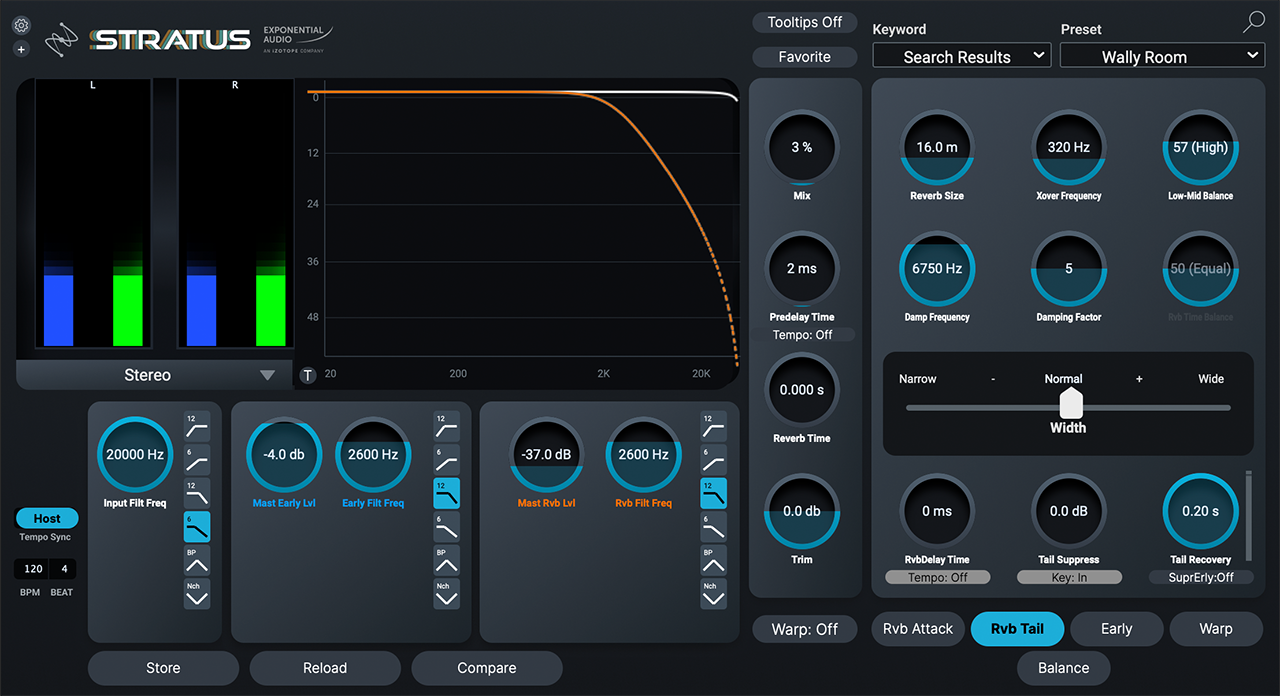
STRATUS reverb at end of automation
As you can see, the early reflections come up, the tail comes down, and the blend is almost at zero. This kind of processing is a great use for reverb in the post production process because it truly helps you contextualize sound for the film.
5. Use reverb to add dimensionality to narration
Narration is a part of many memorable films, from Fight Club to, well, pretty much any Martin Scorsese movie. Narration often feels divorced from the scene when it gets to you in a mix—it’s laid down in post, most of the time. However, the difference in sound between narration and scene audio can feel jarring and disconnected, especially if the character narrating our film is also present in the scene. It can be an unsettling disconnect.
One way to fix the problem is to apply a suitable, subtle reverb to the narrator. This reverb, used in small doses, can place narration apart from the scene, and emphasize certain emotional characteristics of the film as a whole. If the narration is wistful, something with a little more of a tail can be used to set the narrator in a notably different space than the scene setting. If it’s snappier and whittier, try some subtle use of early reflections to lend more presence while placing the verb in context. Play around with these conventions—there are no hard and fast rules here.
Sometimes the narration is actually a flashback: a character speaks to a person about something that happened in the past, and the audience sees the scene happening.
If this dialogue is taken from on-camera audio, don’t noise-reduce it to oblivion if you can help it. This may go counter to your intuition, but try fading up on a handle of atmosphere before the vocal begins in earnest. This small, subliminal bit of ambience can remind the viewer of the distance between the present-day scene and the flashback.
Sometimes this audio arrives in your mix as ADR. In such cases, it can be useful to grab an approximation of the original scene’s ambience and add it to the vocal—remember our old friend


Dialogue Match
6. Apply reverb to short, dreamlike flashbacks to push them further into memory
This move is often utilized in Christopher Nolan films: a character remembers something, and we see the briefest of snapshots. In West World, which is written in part by Christopher Nolan’s brother, this technique is used in practically every episode: take the image of Maeve’s hand grazing bits of wheat in an amber-lit field.
Sometimes you can heighten the emotion of this scene by adding reverb to the scene as a whole, pushing it into the background of someone’s memory. If the scene is quite short, and the memory is distant or scary or otherwise ethereal, you can go farther, modulating the reverb. Of course, this must be done with an appropriate amount of finesse. But do give it a try—you might well elevate the production audio.
The takeaways
There are only six use-cases in an endless sea of possibilities. Reverb is one of the most powerful tools we have in post; one could write a whole other article on the subject and still have more tips and tricks up their sleeve. If there’s one common throughline, it’s this: always serve the production. You are there to sell the movie’s reality, not the reverb you’re using. Keep that in mind as you proceed with your post-production endeavors. Enjoy!
