The Magic of RX 7 Music Rebalance, Part 3: Getting Weird
Learn how to deliberately abuse the capabilities of Music Rebalance to do wacky experimental things to your audio.
In Part 1 and Part 2 of this series, we discussed the basics of the Music Rebalance module in


RX 11 Advanced
We’re getting weird for part three, as we deliberately abuse the capabilities of Music Rebalance to do things to audio that are difficult to accomplish in other ways—at least, more difficult than moving a few sliders, anyway.
This article references a previous version of RX. Learn about 

RX 10 Advanced
1. Going full-tilt
Tilt EQ is one of the more popular types of equalization. It dates back to signal processors made for studios in the 1970s and is now available as a plug-in in most DAWs. The basic idea of tilt EQ is that you turn the bass up while turning the treble down, ideally keeping the average loudness the same while “tilting” the frequency response. The tone controls on home stereos worked together to accomplish this, and a fancy version called the Baxandall filter was developed for mastering use (you can find one in the Ozone 9 EQ).
With Music Rebalance, we can do something similar to Tilt EQ, but with finer control. We can add boom and power or bring out detail and sheen, but in a way that goes beyond traditional equalization. Music Rebalance grabs pieces of the high- or low-frequency material and emphasizes them in unusual ways, changing the complexion of the original music.
To demonstrate this technique, let’s check out the latest EP from French indie-garage band Normcore, Neighbors. This album offers its tracks under a Creative Commons Attribution license, meaning people can do whatever they want with the music, as long as they mention Normcore. So with that mentioned, let’s get started.
On this track, “Aside,” we hear wide ambience with booming drums and a male vocal drenched in echo. Lots to work with here, but with a very retro EQ profile:
First, we’ll tilt down toward the bass. In this context, “tilting down” means emphasizing the low end of your mix. So to tilt down on this track, we boost Bass and Percussion by 3 dB each. We then counterbalance that with a 3 dB cut to Voice and Other.
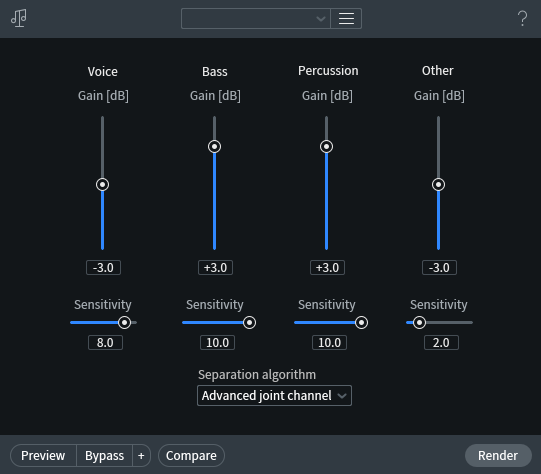
Tilting down with Music Rebalance
To pick out the details and accentuate interesting elements of the tilt, we’ve driven up the Sensitivity of the lower elements (head here to learn more about the Sensitivity control in Music Rebalance). An increased Sensitivity value results in more precise source separation, so this will focus our boosting more specifically on bass and percussion audio content.
A high Sensitivity setting also has the potential to produce audio artifacts if set too high, so we lower the Sensitivity of the Other group to prevent those artifacts. Originally we had lower Sensitivity on Voice too, but the vocals got too murky and benefited from tighter control. Here’s the result:
There’s a lot of power coming from the bass boost, surrounded by a weird sense of three-dimensionality that exists without being shrill. The original mix sounds trebly, almost sibilant, by comparison. Notice, however, that boosting the Percussion group also boosts the high end of percussive instruments, so this tilt is more nuanced than the standard tilt EQ.
What happens if we tilt up toward the treble? These settings are a bit trickier because the high-end information can distort and clip in less obvious ways than low-end slamming might. We back the Percussion off by 5 dB and the Bass by 3 dB, keeping Sensitivity low so they cast a wide net in pulling down the lows. Higher Sensitivities create an acid-trip-etched character for the chiming guitars and the lead vocal, which gets punchier and more present without becoming shrill:

Tilting up with Music Rebalance
This sort of tone-tweaking with Music Rebalance goes beyond simply boosting and cutting frequency ranges in a mix. It dives into the mix elements themselves and brings out all kinds of unusual details. It’s easy to overdo, but that’s part of the fun!
2. Sucking out instruments to transform ambience
We talked in previous parts of this series about how one has to be very careful when cutting or boosting mix elements in Music Rebalance—you may recall that we rarely went over 3 dB in either direction unless we were really emphasizing an effect. Well, it’s time to break that rule in a big way.
Massive boosts are obvious, and not much fun: they easily produce digital clipping and can destroy a mix. If you really want to distort your audio that badly, fire up Trash 2 and do it properly! But instead, what we want here is a massive cut, all the way down to silence. Music Rebalance will let you do that, and sometimes with wonderfully hideous results.
Choose a really obvious element in your mix and drop it down to zero. Then, play with the Sensitivity to get exactly the right feel. Low Sensitivity will allow a vague hint of the original material to sneak through, but higher Sensitivity will rip even that away, leaving a hole in the music where the targeted element used to be.
We start with a clip of roomy drums and guitar from the song “Work Music” by Anonymous420, from the album Corner Dot Com on the French label Loyalty Freak Music. Loyalty Freak releases all of its albums in the public domain, encouraging audio destruction like this—lucky us! Here’s the original section:
We start by dividing this clip into 8-bar segments, then pull the Percussion group down to silence. Every eight bars, we change Sensitivity from 0 to 10 and back, causing the drums to appear as a vague atmosphere and then vanish into an audio black hole. Boosting the Other group by 3 dB enhances the ambience in a horrible way:
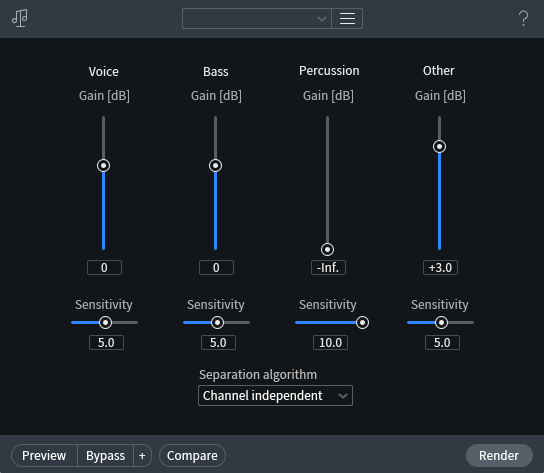
Sucking out the drums with Music Rebalance
This trick is so easy, yet does so much damage to once-balanced mixes. But why stop there?
3. Taking it further with different Separation algorithms
When you exaggerate these massive holes in the music, you can make the effect even more startling by changing up the Separation algorithm (head here to learn more about it). If you have material with a lot of joint information—heavy stereo ambience or room reverb—but you force Channel Independent analysis, you get the opposite of the nice stereo glue effect we discussed in part two. Instead, your previously lovely sense of space gets shattered into a stereo mess that makes headphone listening a crick-in-the-neck challenge.
For this next one, we return to Loyalty Freak Music for the delicate ballad “Surfing Blood Tears” from the Tequila Moonrise album I Hate Myself And I Want To Tie-Dye. Here’s the original:
We pull the Voice group down to silence, crank the Sensitivity up to 10 to just affect the vocal level, and adjust the Separation algorithm.
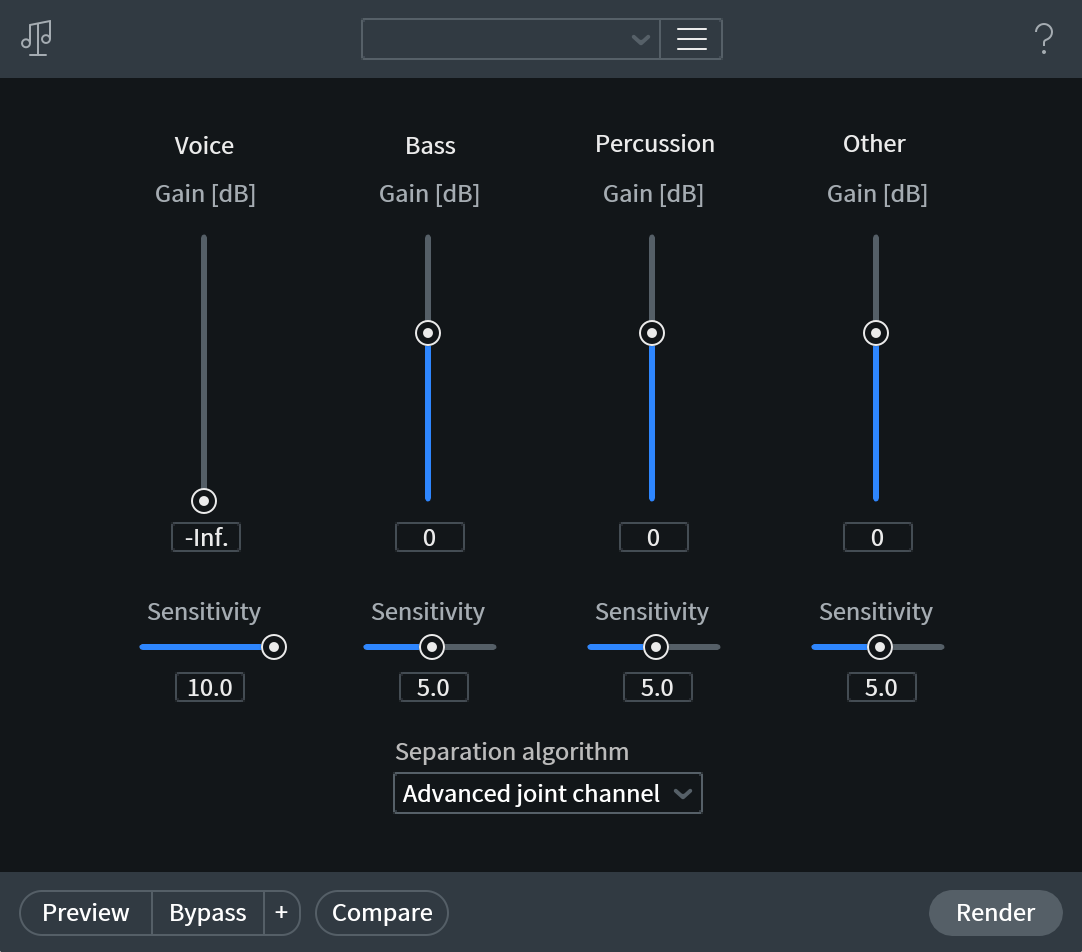
Using different Separation algorithms for more audio mangling
In the following audio example, the first and third parts of the clip use Advanced Joint Channel for the cleanest results. When we hit the second and fourth parts, we change to Channel Independent and wave goodbye to normalcy.
When something’s worth doing, it’s worth doing way the heck too much, right? Right!
Conclusion
Naturally, unless your musical playground lies within one of the really extreme experimental genres–like phlegmbient, aubergine glitch, or Hackensack bounce—you’re not going to be using these tricks everywhere within a full mix. However, as bits of audio spice to catch and hold the interest of your audience, they have a lot of potential. Use these tricks on stems or submixes and gently blend them back into the full track to give your mixes something that will leave audiences dancing, nodding their heads, and saying “Wait, what?”
From subtle, musical mix tweaks to the far ends of experimental madness, the real beauty of Music Rebalance lies in its simplicity and ease of use. A little practice and a good understanding of your music can turn this module from an unassuming bit of magic to a fabulous tool in your audio kit. Now get out there and have fun rebalancing—or unbalancing—your music!

