How to Use Insight 2 for Audio Post Production
Learn how to use Insight 2 in a post-production mixing workflow to create a mix that translates and meets streaming loudness standards.
In recent years, streaming has dominated the television and film industries as the primary video consumption medium for home viewers. As such, it’s more important than ever that your final mix is compliant with broadcast loudness standards—luckily,


Insight 2
In this video, re-recording mixer and field recordist Alex Knickerbocker walks you through how he uses Insight 2 in his post-production mixing workflow to create a mix that translates and meets streaming loudness standards.
Don’t forget to check out the article below for even more helpful resources!
Set your session up for success
Organization is key in any mixing session, but it’s especially critical in a post-production mixing scenario. With so many different audio elements to manage, you’ll save yourself endless headaches by checking your project’s tidiness and efficiency.
Summing your tracks to VCAs, or “submasters” is a great way to organize your session and control your mix. Not only does it promote sensible track groupings, but it also gives you an additional layer of gain staging opportunities to make intelligent and informed mix decisions.
In this session, we have a summed submaster channel for each type of production audio: dialogue, music, Foley, sound effects, and background. We’ve also routed the dialogue to its own submaster—also equipped with Insight 2—for an isolated level readout of the actors’ voices. It’s important to note that the output of this submaster doesn’t lead anywhere, as the intent is not to double the dialogue’s presence in the final mix—this channel exists purely for metering purposes.
Get to know the meters in Insight 2
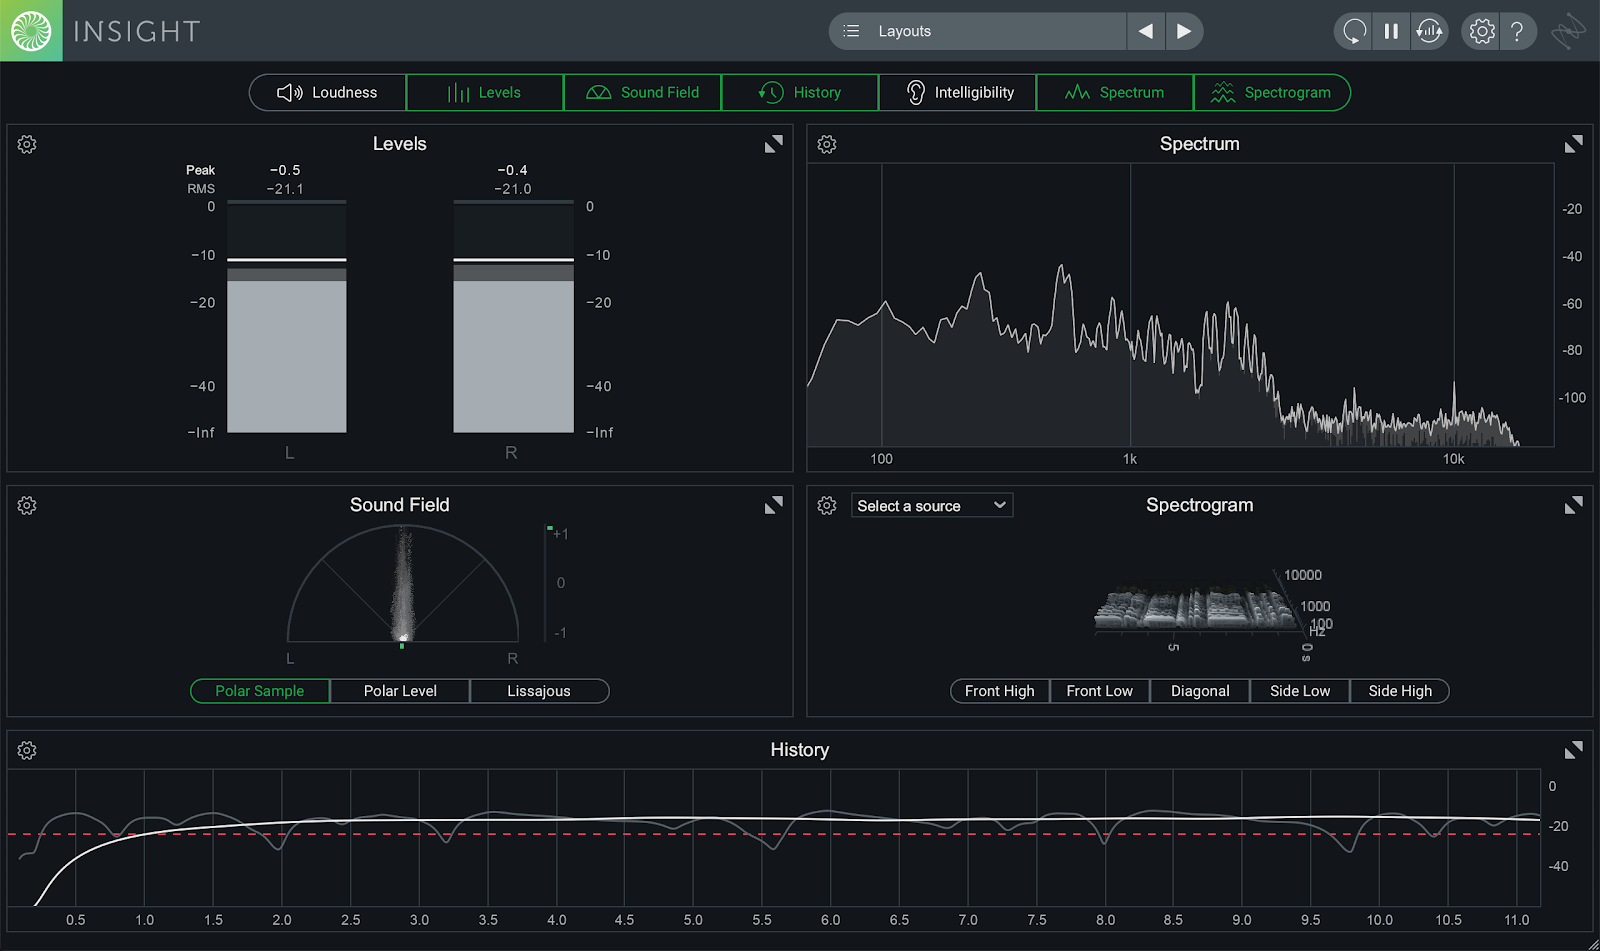
The various meter displays in Insight 2 show how your mixing choices affect the final loudness of your project. These display modules can be hidden, shown, and resized, so you can configure the UI however makes the most sense for your work. In our example, we used Loudness, Levels, Sound Field, Loudness History, Spectrum, and Spectrogram, so let’s dig in to what these meters actually tell us:
The Loudness module displays several different level displays measured in LUFS, an acronym for “loudness units relative to full scale.” LUFS are the standard unit of measure of the International Telecommunication Union—or ITU—so you’ll need to know the loudness of your audio in LUFS to deliver a production that’s fit for broadcast.
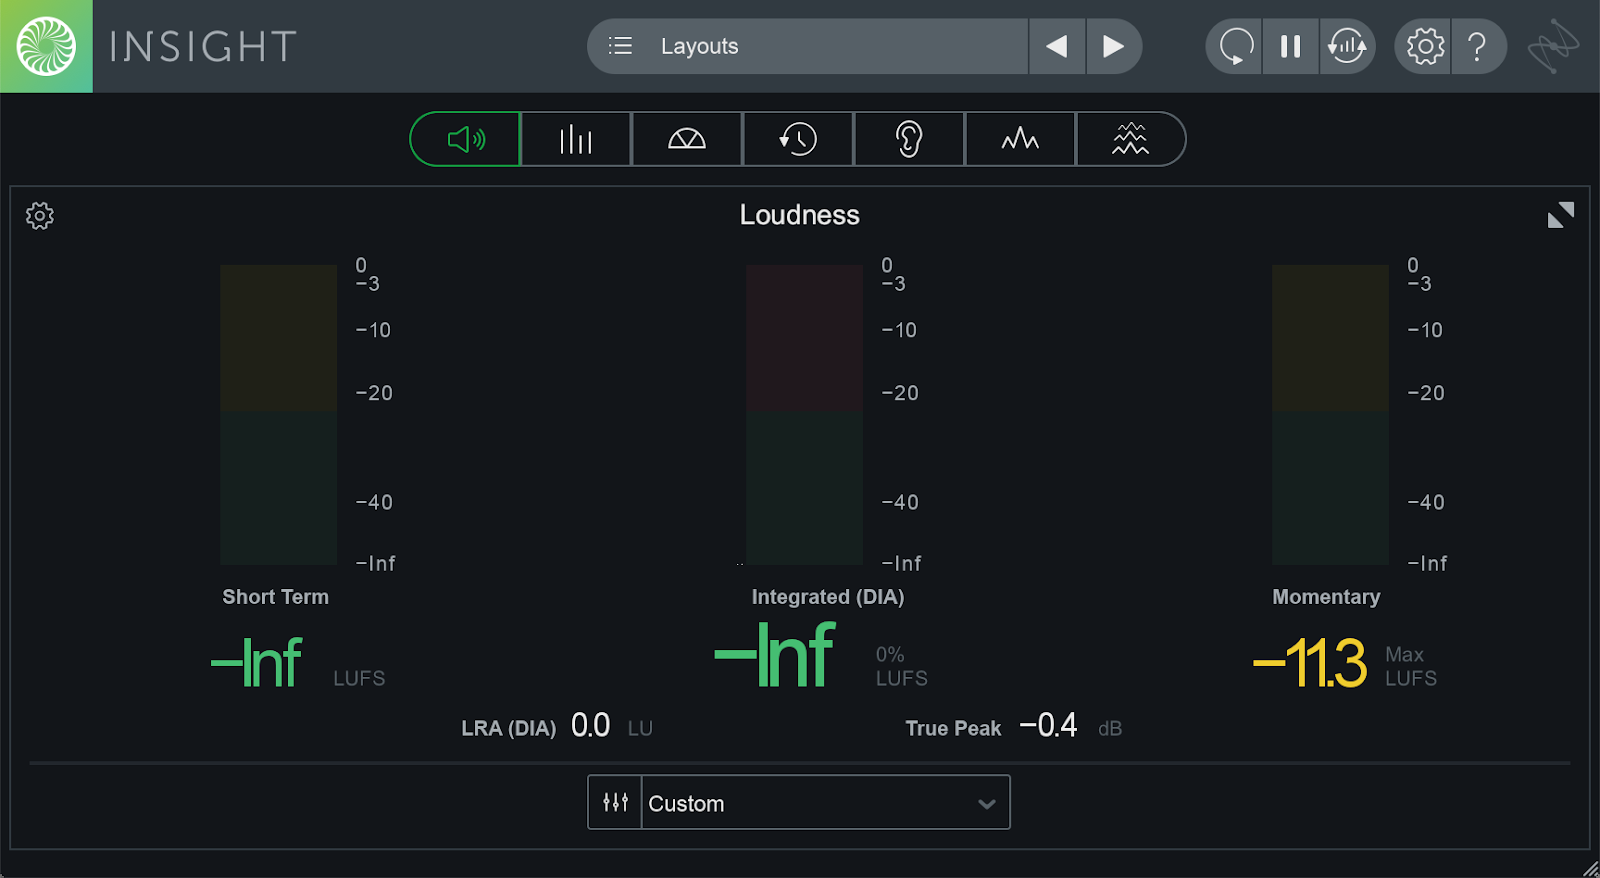
The Loudness module shows us three loudness measurements: Short Term, the average across three seconds of playback; Momentary, averaged across 400 ms; and Integrated, the average loudness of the entire audio file. We also have a dynamic range readout that shows the difference between the loudest and quietest moments of our audio, and a True Peak meter, which is crucial to monitor when meeting broadcast specs.

The Insight 2 Loudness module
The Levels module displays the Peak and RMS levels for each channel of my surround print master, while the Spectrum and Spectrogram modules provide valuable information about the frequency distribution within the audio. The Sound Field module allows us to view imaging and phase information, and the Loudness History module generates a graph of integrated loudness over time, as well as the Target loudness we’ve selected—more on that shortly.

The other modules in Insight 2
All these modules are used on my print master channel, but I find that I don’t need as much detail for my dialogue audio. On the dialogue submaster—the silent one—I use the Loudness, Levels, and History modules. When it comes to the dialogue content, I’m only really focusing on average loudness, presence in all output channels, and points in the Loudness History chart where vocals may be a bit too loud or too quiet.
Looking for more post production tools?
Insight 2 is available in RX Post Production Suite 6, giving you the tools you need to fix noisy production audio, bring stories to life, and send final deliverables at the right specifications, including RX 9 Advanced, Dialogue Match, Symphony 3D and Stratus 3D reverbs by Exponential Audio, and more.
Make use of Targets and Dialogue Gate
Insight 2 includes a library of 12 industry loudness Target presets—including the current Netflix spec—to reference while monitoring levels in the mix. When a Target is selected, it will appear in the assorted modules in Insight 2 to help you “aim” for it as you mix. This is an easy way to make sure you don’t run into any problems when you deliver your production audio for streaming broadcast.
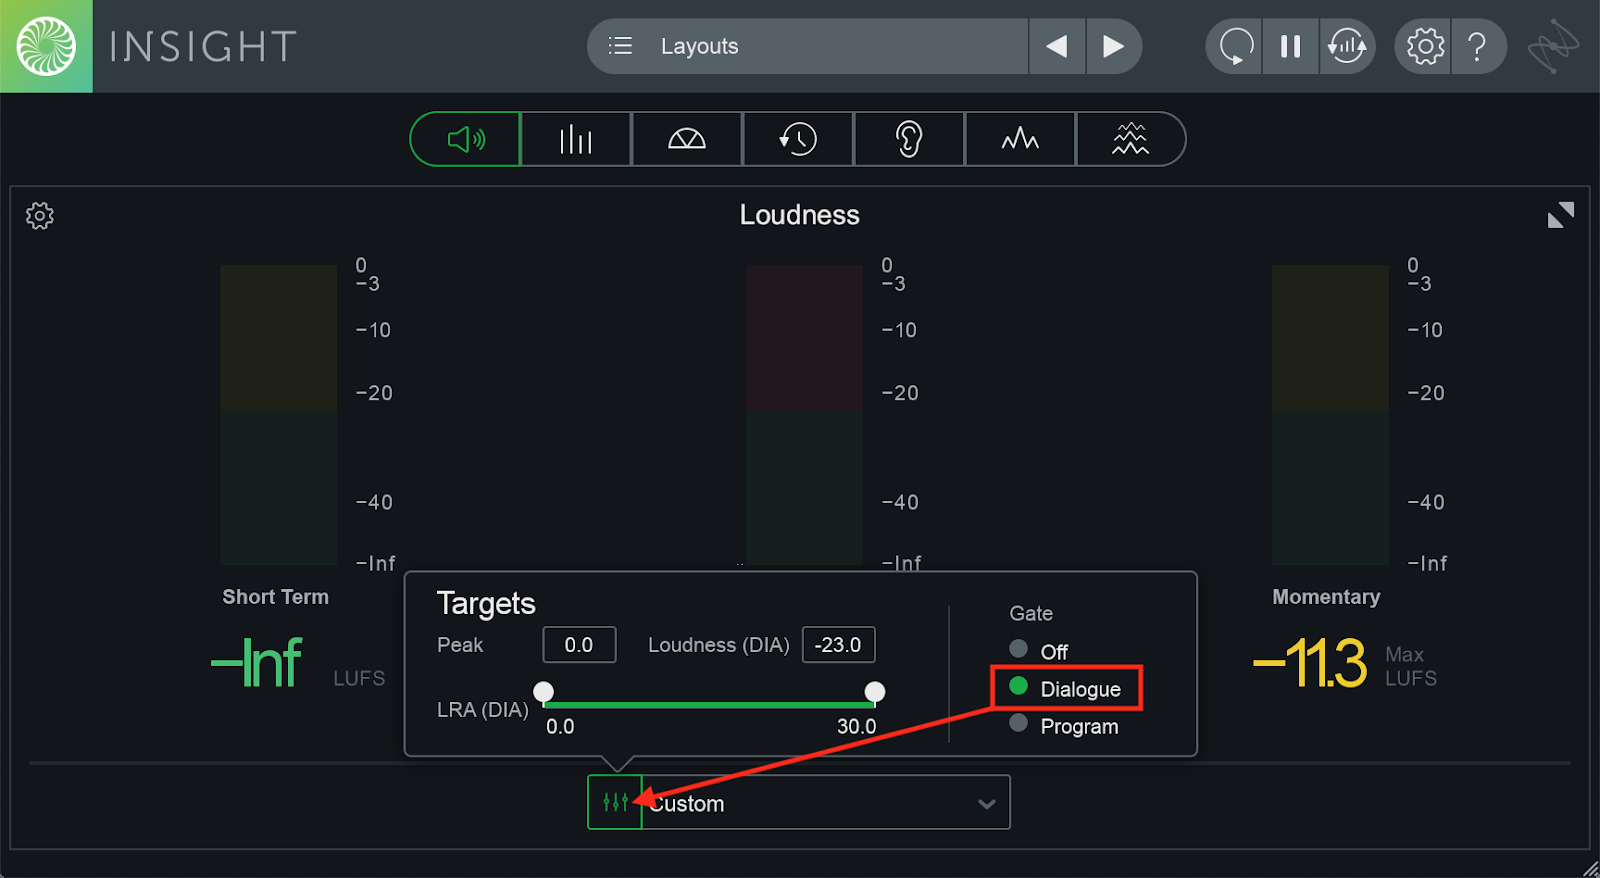
The Loudness module also offers a Dialogue Gate. This means that dialogue will only register in the modules in Insight 2 when it is actually audible among the other audio in your session. The advantage of Dialogue Gate is that it prevents your average loudness from being skewed downwards by the errant quiet word or section of dialogue. By using this feature, I was able to achieve the most accurate level readout possible for my dialogue content, which helped me arrive at an overall better mix.

Dialogue gate in the Insight 2 Loudness module
Devise a workflow that suits you
Okay, so we’ve got our session organized into submasters, we know what Insight 2 is showing us about our project, and we’re ready to start mixing—but where do we begin? Let’s walk through the approach used on this particular project:
For me, it’s almost always dialogue first. It’s typically the sonic element that needs to stand out the most because it plays the most literal role in delivering the emotional or intellectual content of the production. Whether it’s a movie, TV show, or podcast, the audience needs to hear the message delivered by the performers above all else.
I’ll start by muting all the tracks in my session except the dialogue submaster. By using the Loudness History module from the instance of Insight 2 on my dialogue submaster, along with some well-placed gain automation, I can easily balance my individual dialogue and voice-over tracks to achieve a consistent result, free of any drastic changes in speaking volume.
Once the dialogue is appropriately balanced, I usually mix the musical elements. Whereas the dialogue is intended to tell the story, the music tells the audience how to feel about the story. We want to be subtle to not devour the actors, but we also want the music to be just present enough to elicit an emotional response from our viewers or listeners. For this, I’ll call up the instance of Insight 2 on the print master so I’m seeing a picture of the entire mix.
Listening to only the dialogue and music submasters, I’ll bring the music down so it’s only slightly quieter than the dialogue. Since stereo content will naturally present louder in a 5.1 surround mix, my goal is to tuck the music around the dialogue so everything remains audible. While adjusting the level of the music tracks, I can use Insight 2 to keep an eye on my Integrated loudness and aim to have my mix at -24 LUFS, the loudness standard I’m working with for this project.
Next, it’s time for sound effects. I unmute the sound effects tracks so they become audible in the mix, keeping the print master instance of Insight 2 open for reference. Sound effects are often intended to add discrete ambience, so I don’t usually expect to see very dramatic metering in Insight 2. However, we’re working with several car sound effects in this project, so we’re likely to see some levels jump a bit more here. From here, the process is similar to that used for the dialogue and music: ride the faders of the sound effects submaster to place these sounds among the dialogue and music without compromising either.
Loudness History is showing me where on the timeline the music jumps above the desired level, so on the next playback, I’ll ride the gain of the music and the effects to make sure the two are balanced against one another. Once the session plays through, I can see that the levels for all the submixes so far are happily within an acceptable range of each other—nice!
Again, this is my personal approach. You may work differently, and that’s okay! The main takeaway is to monitor your levels closely, and to use your eyes and ears to keep your different tracks from eating each other up in the mixing process.
Conclusion
At the end of the day, mixing in post is all about balance and loudness compliance—and Insight 2 can help you with both of those. By organizing your session, understanding the multiple displays in the UI, using the appropriate loudness Target and Dialogue Gate settings, and finding the right workflow for you, you can turn in your finished production with confidence and pride, knowing that you’ve delivered quality, professional work. Happy mixing!


