Clean up your vocals: a step-by-step guide to a polished sound
Learn how to use iZotope RX to clean up your vocals like a pro. This guide covers everything from noise reduction and de-clipping to plosive removal and more, so you can prep your vocals for a great mix.
February is here, and for those of us in the audio world, that means one thing: RX season. With the Oscars looming and awards season in full swing, there’s no better time to talk about cleaning up vocals – even in a musical context: let’s face it, even the most talented singers can’t always escape the clutches of background noise, mouth clicks, or the occasional rogue plosive.
If you’ve just finished comping your vocal takes and are staring at a track where “forensic” imperfections abound, RX 11 is your best friend. In this guide, we’ll walk through how to clean up music vocals in a music context, step by step, so you can work with a polished track in the mixing stage.
1. Listen and identify the issues in context
Before diving into RX, take a moment to listen to your vocal track in the context of the mix. Put together a static mix of your song, vocal included, and listen down with a pen and paper in hand. Make note of any obvious problems.
Here are some things to look out for:
- Background noise (hums, hisses, eclectic noise, room tone)
- Excessive room ambiance (a reverb you don’t want)
- Distortions of any kind
- Mouth clicks and lip smacks
- Plosives (those pesky “p” and “b” pops)
- Breath sounds (if they’re too loud or distracting)
- Harsh resonances (to a point – I’ll explain later)
- Sonic incongruities (clicks, pops, sudden weirdnesses of any kind)
- Background elements that might need reduction (an instrument, headphone bleed, etc)
I am now going to treat you to a typical example of bad audio I might get from a singer. Because showing off a singer in this kind of raw state would be career, um, “unaliving,” you’re going to have to suffer through me, with pneumonia, doing a bad grunge vocal:
The music has been slapped together with apple loops, but serves us fine. The vocal has been recorded with a hyped up USB mic, and I’ve intentionally sung far away from the mic in a place with lots of room noise.
So yeah, even over the music you can hear we’re in trouble. But it’s best to do the in-context rundown first. That way, you don’t wind up wasting time overprocessing things that aren’t noticeable.
After this rundown, I like to compress my vocals drastically for a brief moment to see if compression might bring up some room tone or background noise – and if so, how much. Any compressor will work for this, including your DAW’s compressor.
This is another step to stave off overprocessing. We will absolutely disengage the compressor after this point.
I don’t run down the whole tune at this point, just enough to see how bad it might be.
2. Listen to the vocal on its own
With this task accomplished, it’s time to listen to the vocals in solo.
Now we hear more of the problem: room noise, room ambience, unruly resonances, some clicks and mouth noises, and distortions from the USB mic. I like to keep a notepad or Google doc going and write down problems as I hear them.
Yes, we have our work cut out for us. But now we now know exactly what that work is.
This two-step approach ensures we won’t spend extra time fixing stuff that would become inaudible within the mix. That’s super important. You don’t want to waste time. An ounce of prevention is worth a pound of cure.
Now, on to the cure:
3. Tackle mouth clicks with the Mouth De-click module
Mouth clicks can be subtle but incredibly annoying once you notice them. RX’s Mouth De-click is designed specifically for this.
Whether or not you’re going to use this plugin in-line, globally in standalone, or on selected parts of the audio (either as an “audiosuite” process or in the standalone app) is dependent on two factors:
The severity of the problem; and
The budget / time allowance you’ve been given.
I’m being utterly honest with you when including the second consideration. If something is riddled with mouth clicks in nearly every phrase and you’re being paid well by the hour – or, it’s your passion project – go into the standalone application, select the click, and “RX it out” with the Mouth De-click module like so:

Frequency selective Mouth De-click in RX
If the budget isn’t there and time is a factor for you, use Mouth de-click as an inline plugin in your DAW, and let it go to work.
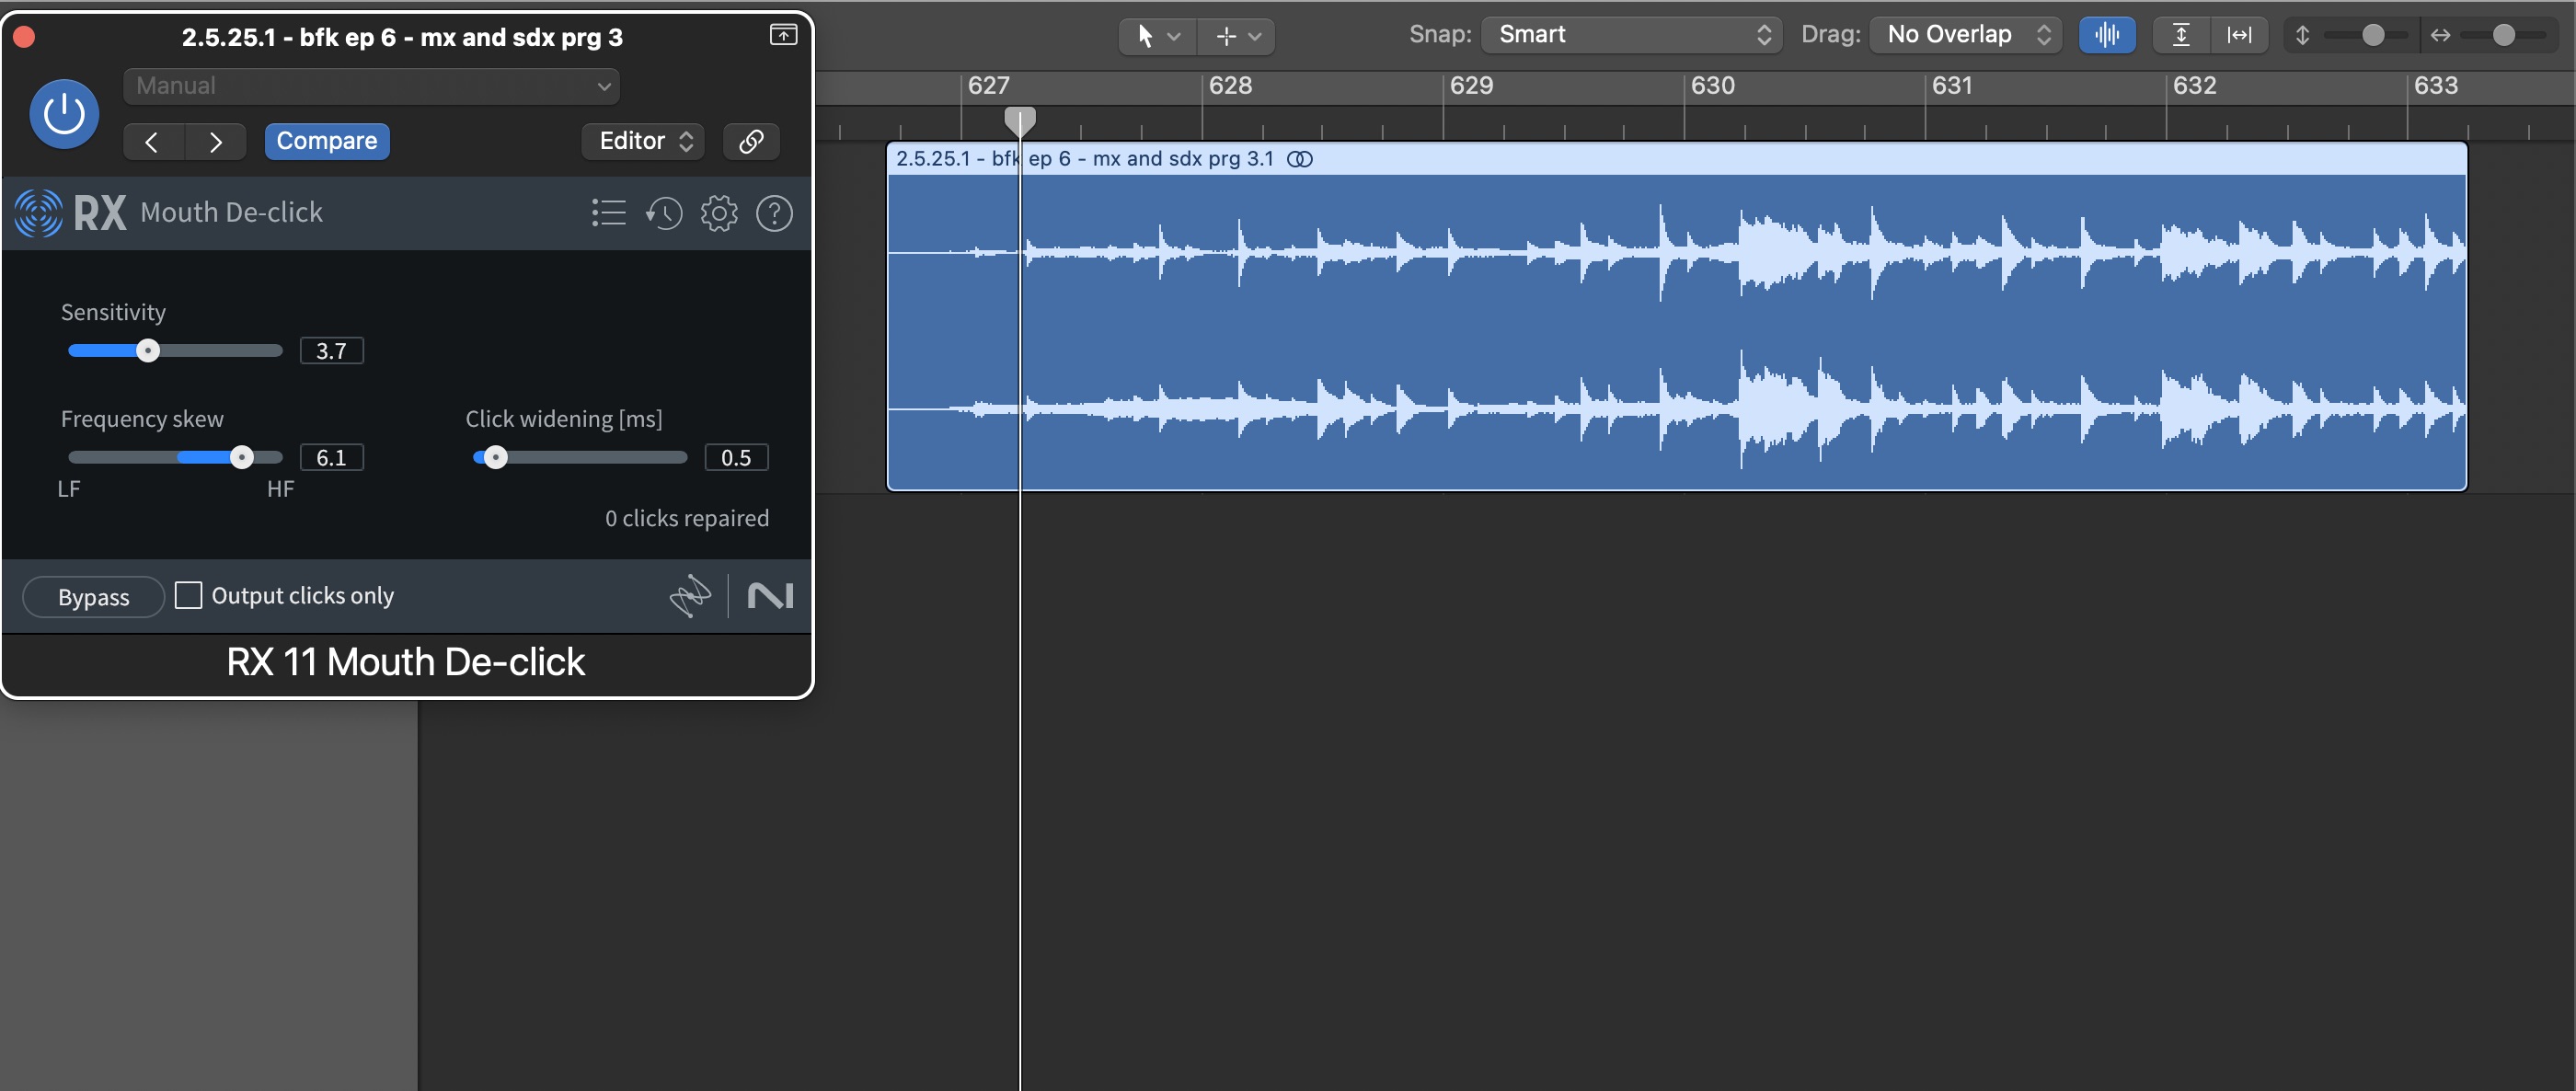
Mouth De-Click module in your DAW
This will fix the problem, but it won’t be a targeted fix – it will be a compromise that may take too many noises out, or leave a couple in, because it’s not tailored to each individual click. Still, in many professional contexts, this happens all the time: there are prominent mouth clicks on Radiohead records released well after the phrase “can you RX that” entered the lexicon.
4. Smooth out plosives with the De-plosive module
Plosives can ruin an otherwise great take. RX’s De-plosive tool makes quick work of them.

Selecting a plosive in RX
Again, I give you the same caveats as before: if the problem is severe and the budget is there, go in and fix each one in standalone, or as an “audiosuite” process within your DAW.
If the budget isn’t there, put on the De-plosive module, like so:

De-plosive in your DAW
Be conservative with your settings. The settings shown above are usually enough for a baritone or tenor. As a general rule of thumb, you can raise the frequency limit depending on the range of the vocalist (alto, mezzo, soprano).
It’s also important to note that some plosives manifest themselves as stubborn midrange noises that are better served with other modules in RX. When that happens, I often solve that issue with Spectral Repair (more on that module later) in RX’s standalone app.
5. Move on to the more complicated incongruities
Now that our vocal-specific issues have been reasonably addressed, it’s time to move on to sonic incongruities. These can come from bad cables, bad power supplies, and many other sources. They can manifest as clicks and pops, or they can be momentary distortions. Sometimes, in the case of digital errors, they can be weird glitches that almost sound like stutter edits.
I find it’s best to either handle these issues in the standalone RX app, or to use an “audiosuite” process where applicable. These are not the issues that plague all the audio – just some of the signal.
It’s worth noting that Pro Tools isn’t the only DAW with something akin to audiosuite processing. Logic has region processing, and Reaper has item-based effects.
A word of personal preference: I find it’s better to do this stuff before committing to de-noising processing. I’d rather De-noise something that has been de-clicked than bake errant clicks and pops into a de-noising pass.
Anyway, onto the tools that help you, which are:
De-click
Let’s start with De-click. This module is paramount for removing clicks and pops that aren’t caused by the vocalist’s mouth. Think of it as the fixer for problems introduced by faulty equipment – a dodgy cable, a scratchy connection, or even a glitchy interface.
The beauty of De-click lies in its precision. You can adjust the sensitivity to target only the offending clicks without messing with the integrity of the audio. If you’re dealing with a particularly stubborn click, try the “multiband” mode – it lets you isolate the frequency range where the click lives, so you can surgically remove it without affecting the rest of the signal.

De-click module in RX
De-crackle
Next up is De-crackle, an oft-overlooked module that shouldn’t be overlooked. It’s designed to tackle distortions, weird sonic incongruities, and borderline noises that don’t quite fit into the “mouth click” or “equipment click” categories.
Many engineers prefer De-crackle to other processors (i.e., De-clip and De-click) because it can get more transparent results. The downside to De-crackle is that it requires more fiddling.
If you want to get the most out of De-crackle, use it in RX’s standalone app, and apply it in a frequency-selective way. Lasso or “box in” the areas that need de-crackle, and you can better tune the algorithm to fix those issues.
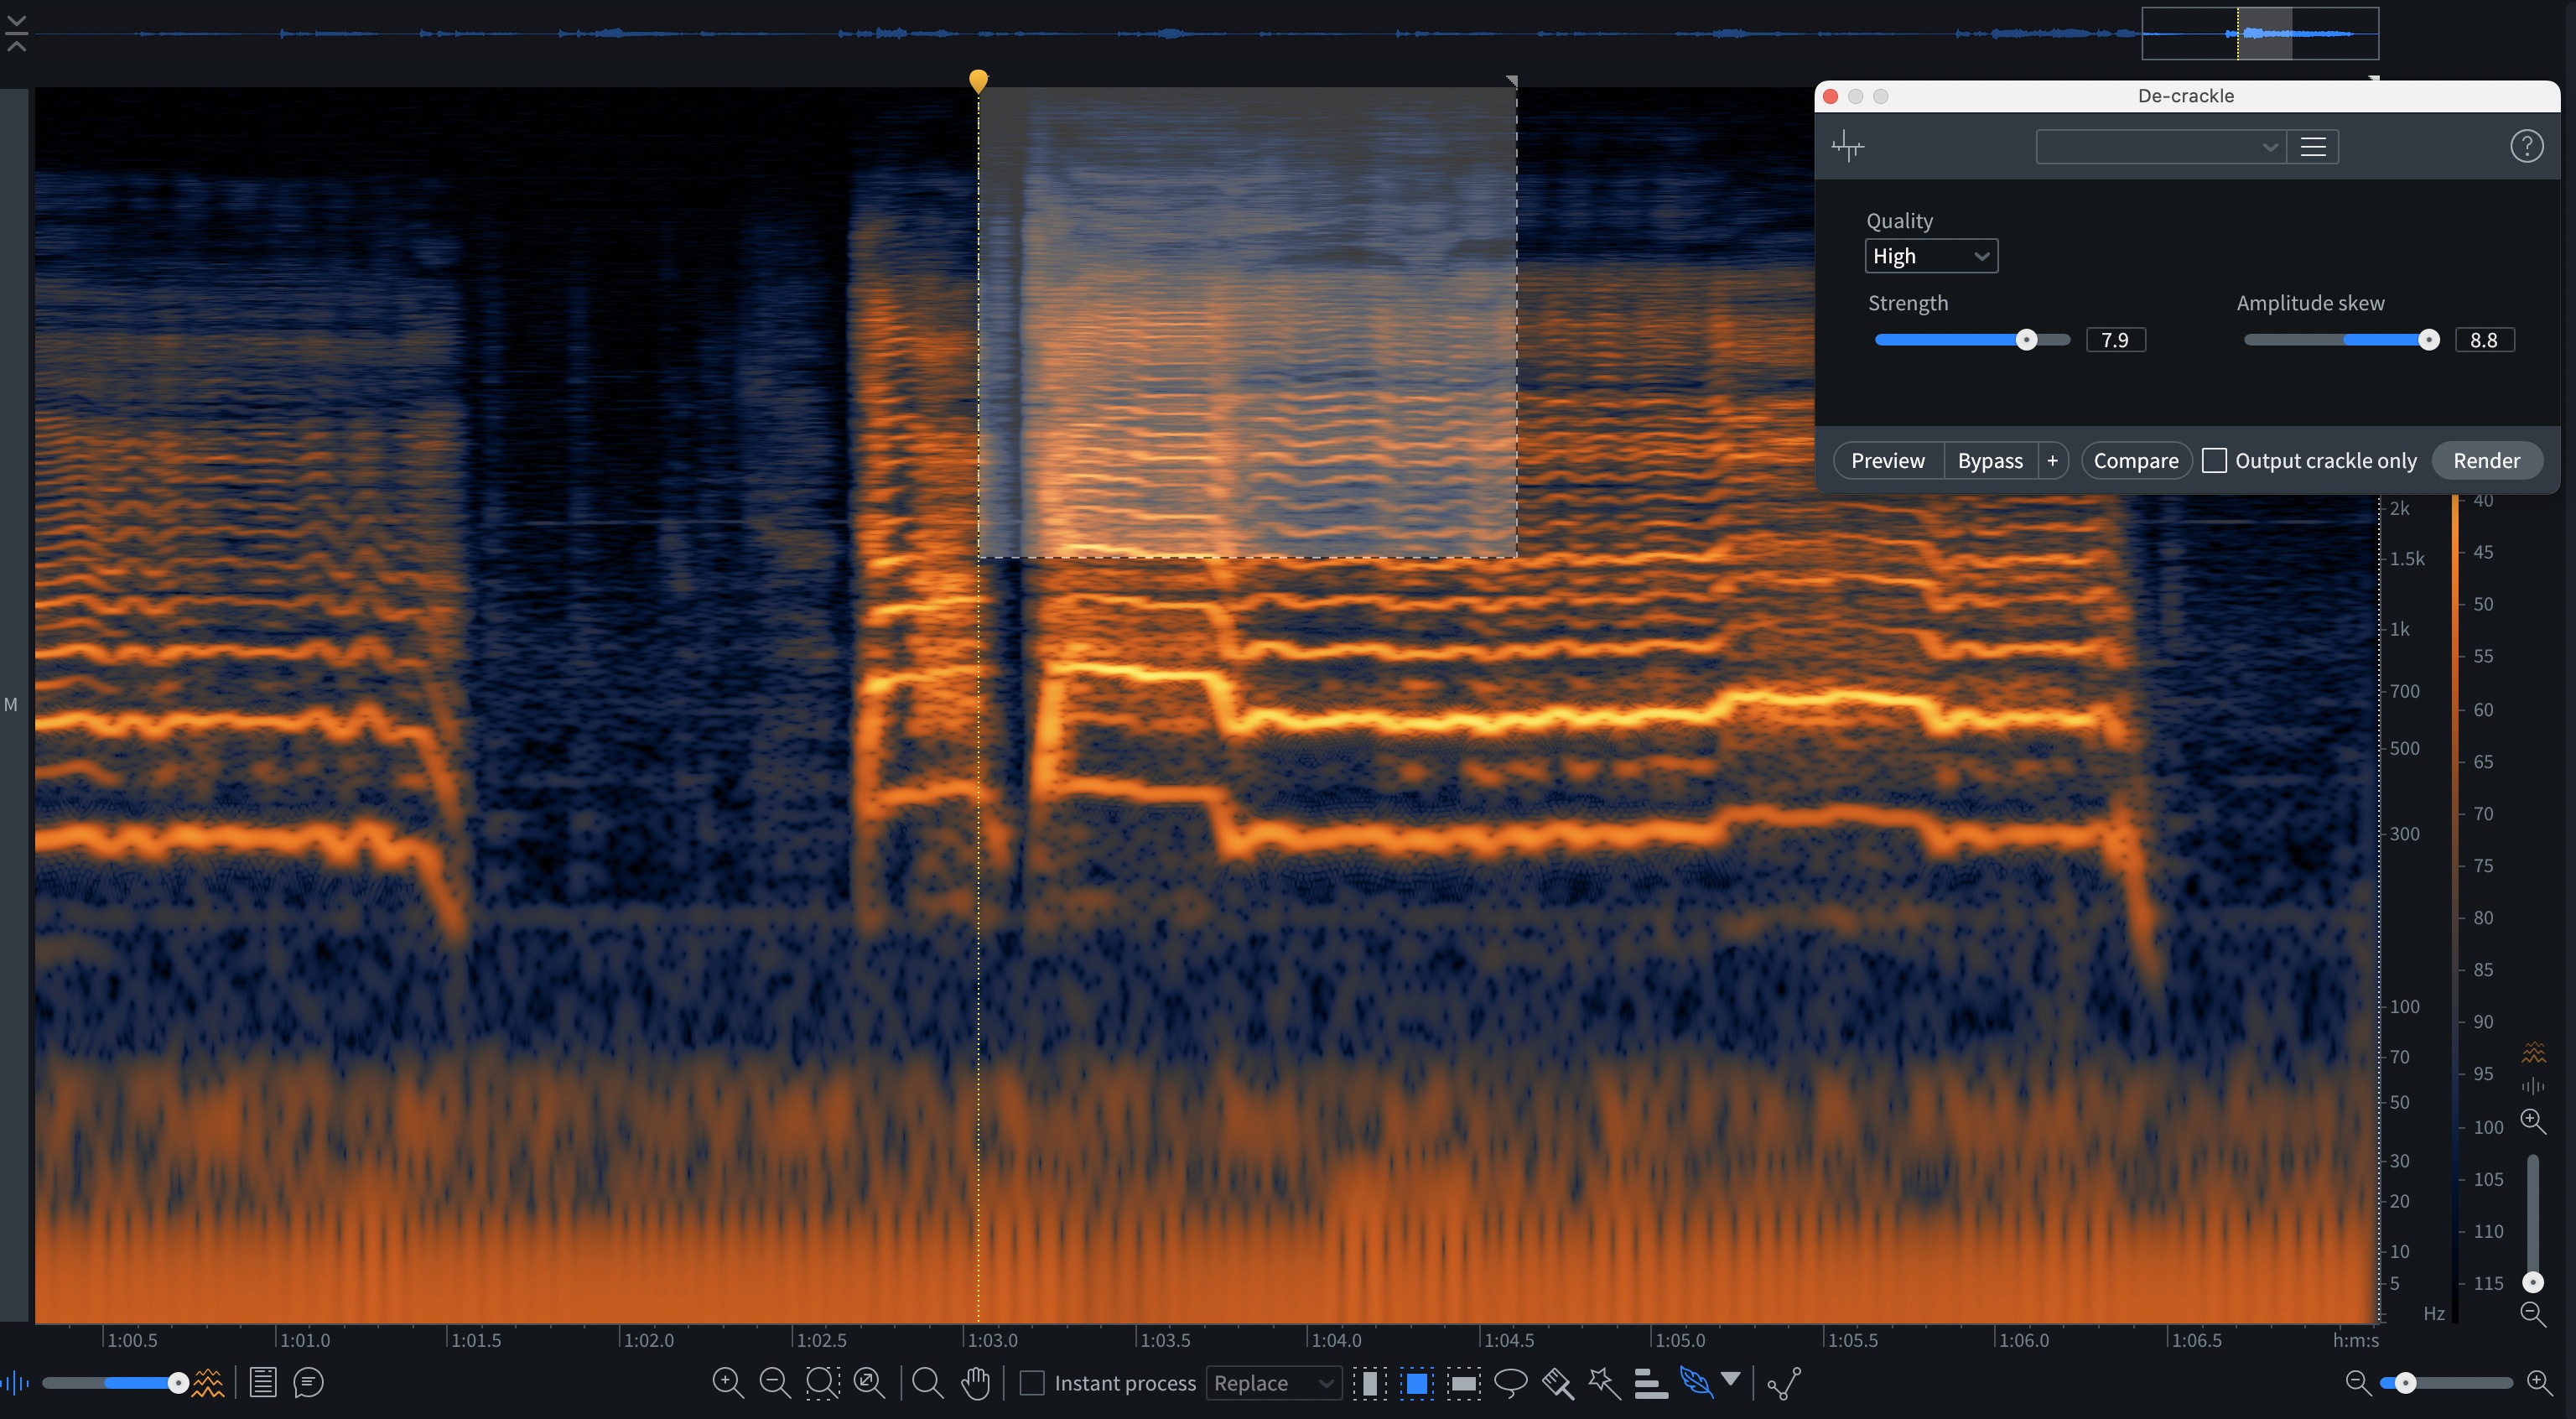
De-crackle module in RX
De-clip
The De-clip module is a godsend for anyone who’s ever dealt with analog overloads. You know the scenario: the vocalist belted out a note a little too loudly, and the microphone preamp couldn’t handle it. The result? A nasty clip that sticks out like a sore thumb – for instance, this:
De-clip excels at fixing these analog overloads. It reconstructs the clipped waveform by extrapolating what the signal should have looked like if it hadn’t been clipped.

De-clip settings in RX
That said, it’s not as effective on digital clipping, so if you’re dealing with a track pushed too hard in the box, you might need to look elsewhere (more on that in a second).
Deconstruct
Speaking of looking elsewhere, let’s talk about the Deconstruct module. This module is like De-clip’s more sophisticated cousin. It’s designed to tackle distortions that might elude De-clip – think inharmonic distortions, weird momentary resonances that refuse any amount of EQ, or artifacts that seem to defy categorization.
The key to using deconstruct effectively is to work with it in a frequency-selective capacity. You’re better served by targeting the specific frequencies where the distortion lives, and leaving the rest of the audio alone.
In the following example, I’ll show you how to use de-construct to further minimize the distortions we ran into with De-clip – and to correct some of the low frequency artifacts De-clip introduced
We’ll use these settings:

Deconstruct module in RX
Note the frequency selective way we’re using it, targeting areas that are specifically artifacting. Also, note the setting: this is my default. Pushing more than -4 dB, I run into issues. -3 to -4 has been the sweet spot for me.
Spectral Repair
Now we come to the Spectral Repair module, which is arguably one of the most versatile tools in RX’s arsenal. This module works by analyzing the audio around a selected problem, and then either attenuating or replacing the problematic section based on what it “sees” in the surrounding area.
The applications for spectral repair are virtually endless. Need to remove an inharmonic distortion, such as nasty intermodulation distortion between a sustained note’s overtones? Done.
Want to tame an overly aggressive sibilant? Easy.
Trying to get rid of a siren or car horn that bled into your recording? No problem.
The key is to experiment with the different modes – particularly attenuate and replace – and to use these modes in a frequency selective manner.
Observe this noise:
Hear that weird click at the end of the phrase? We can fix it with Spectral Replace, like so:

Spectral Replace settings in RX
Spectral Repair’s attenuate mode is also useful – it’ll get rid of a residual noise a little later on in the example:

Spectral attenuate setting in RX
And now observe the results:
A special word on other tools in RX
Many engineers get a lot of mileage out of the De-rustle and De-wind modules in these instances. I confess, I don’t default to these modules in my practice. They have worked for me here and there, but I find that a deep understanding of Spectral Repair usually fixes the problem. Having practiced a good deal with that module, I reach for it first.
Interpolate
This module is a bit of a dark horse, but it’s incredibly useful for fixing sudden dropouts or digital glitches in your audio.
You know those moments where the audio just... stops? Maybe it’s a dropout caused by a buffer issue, or perhaps it’s a glitch introduced during editing. Whatever the cause, Interpolate can often generate appropriate audio to fill in the gaps.
The magic of Interpolate lies in its ability to analyze the audio on either side of the dropout and create a seamless transition. It’s nearly invisible, provided the gap isn’t too large.
With Interpolate, you can go from this:
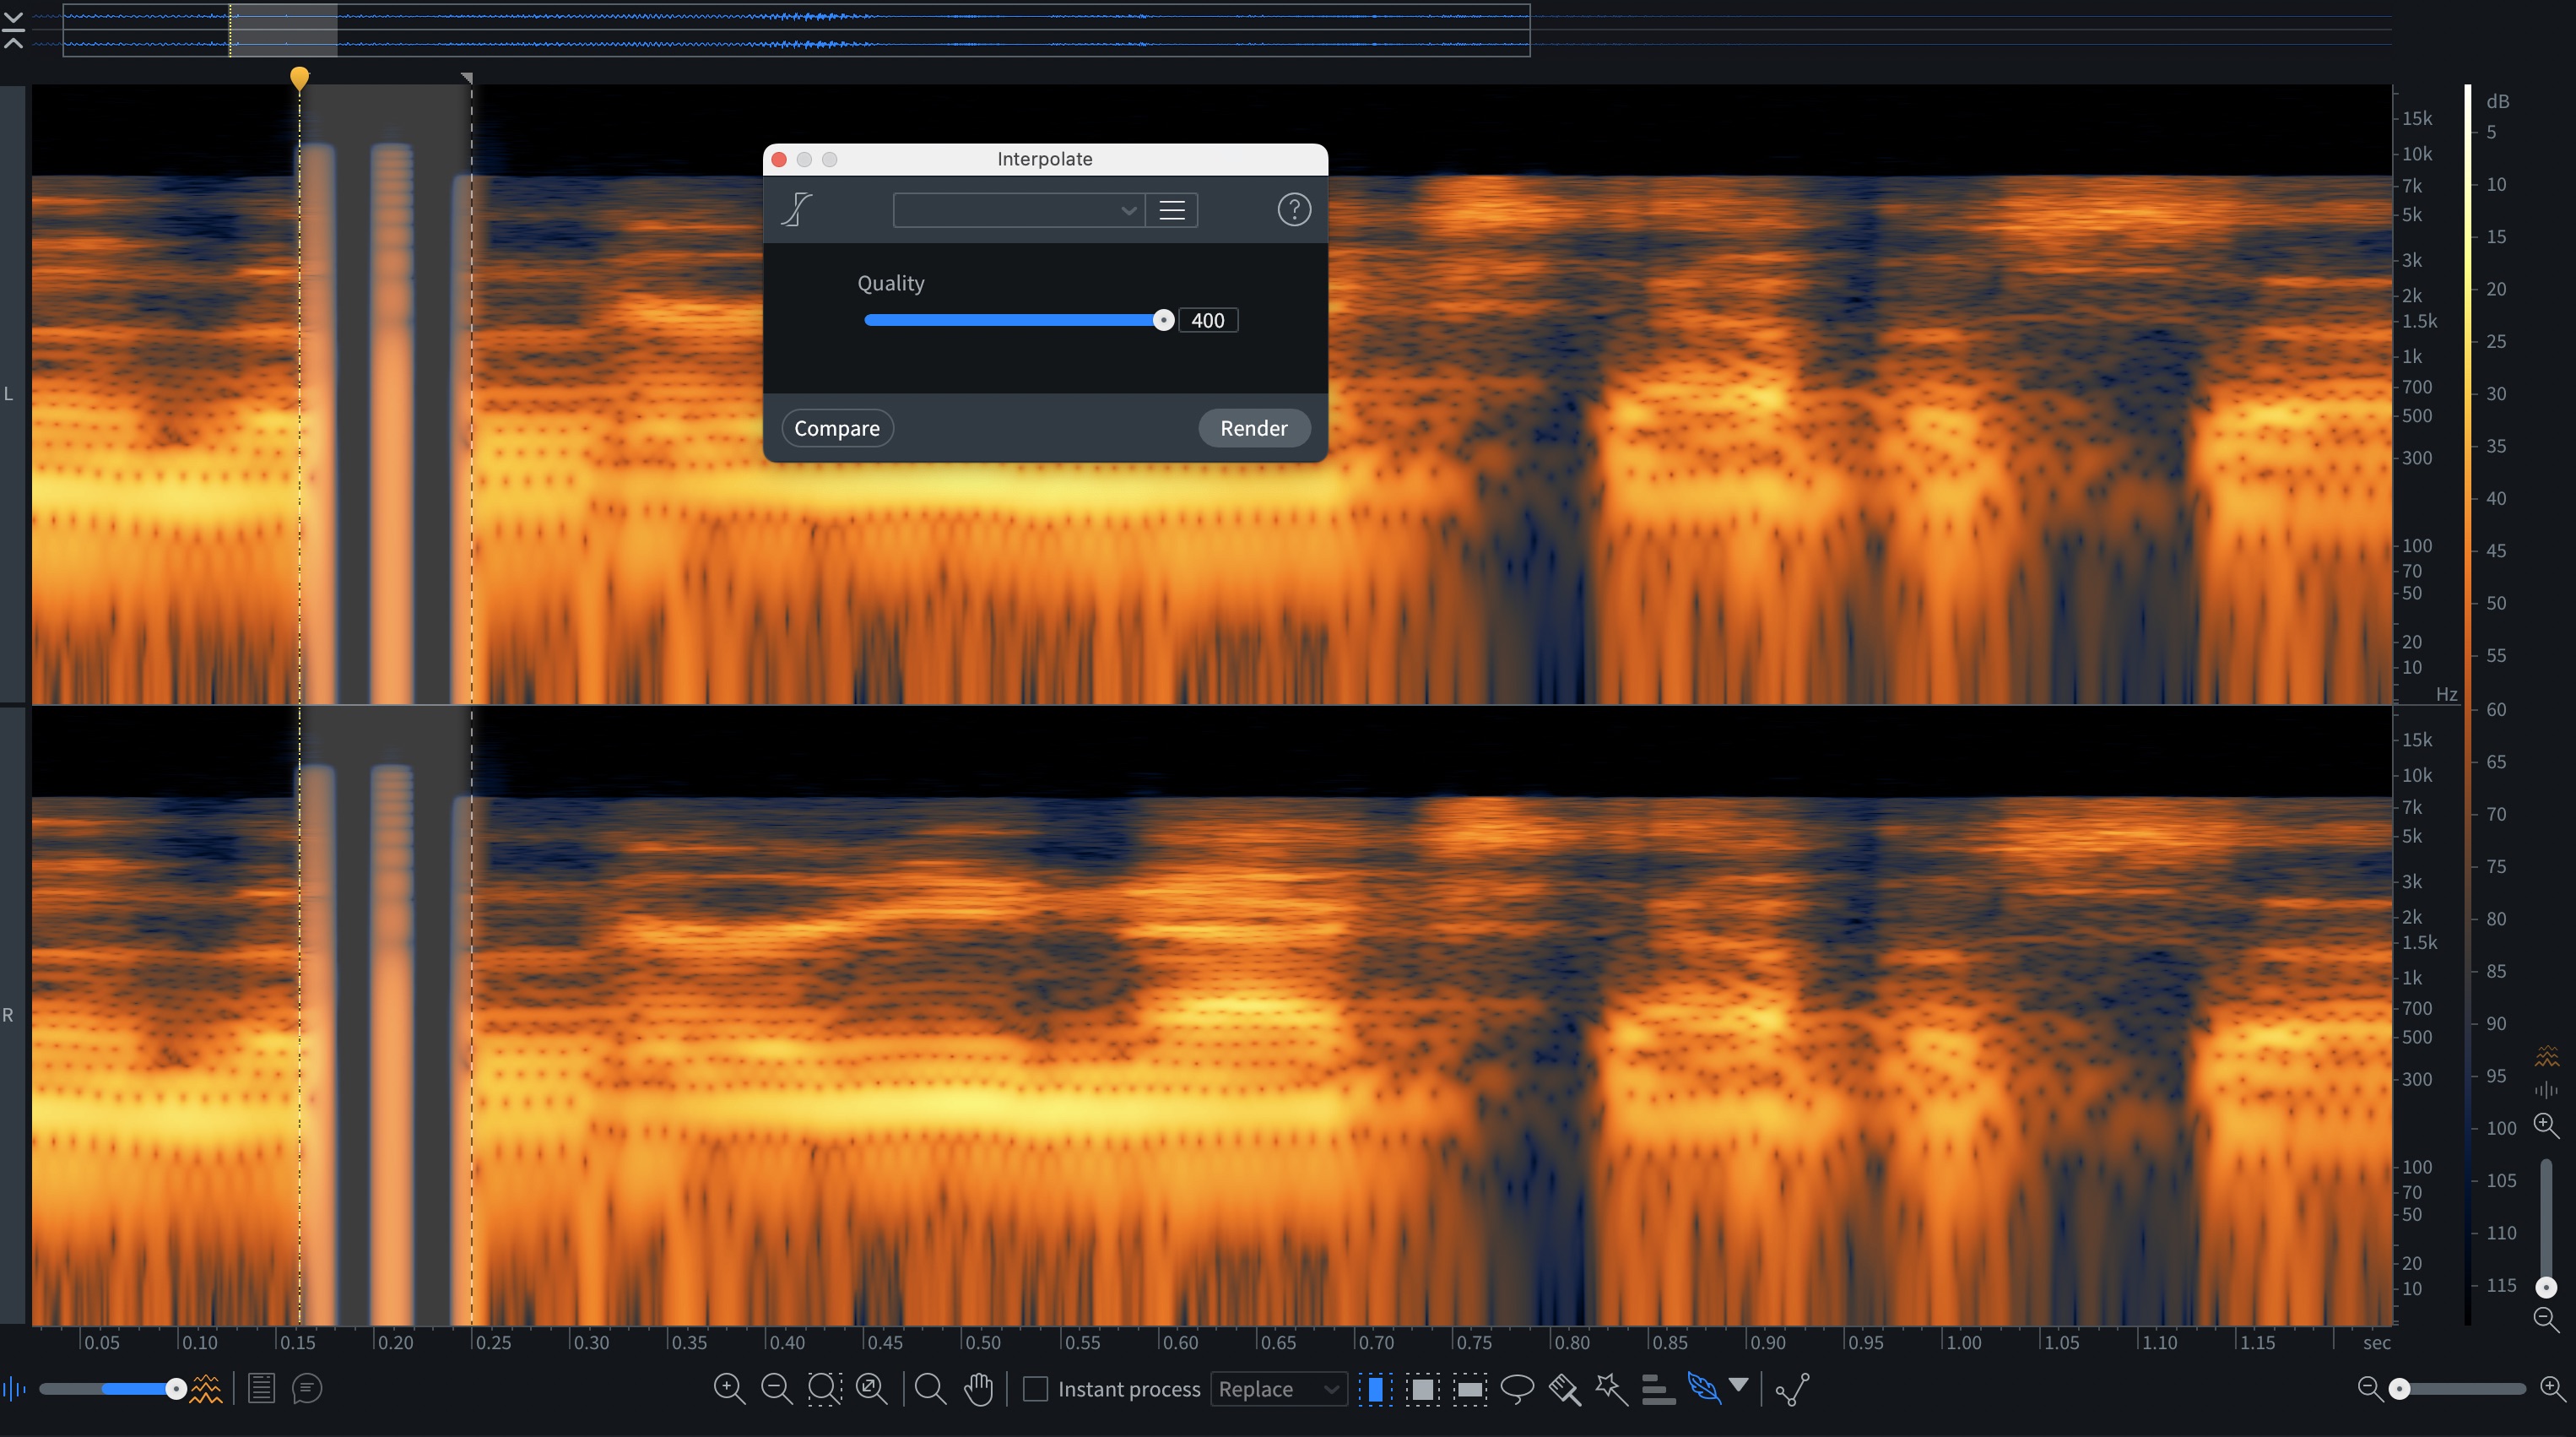
Interpolate module in RX
To this:
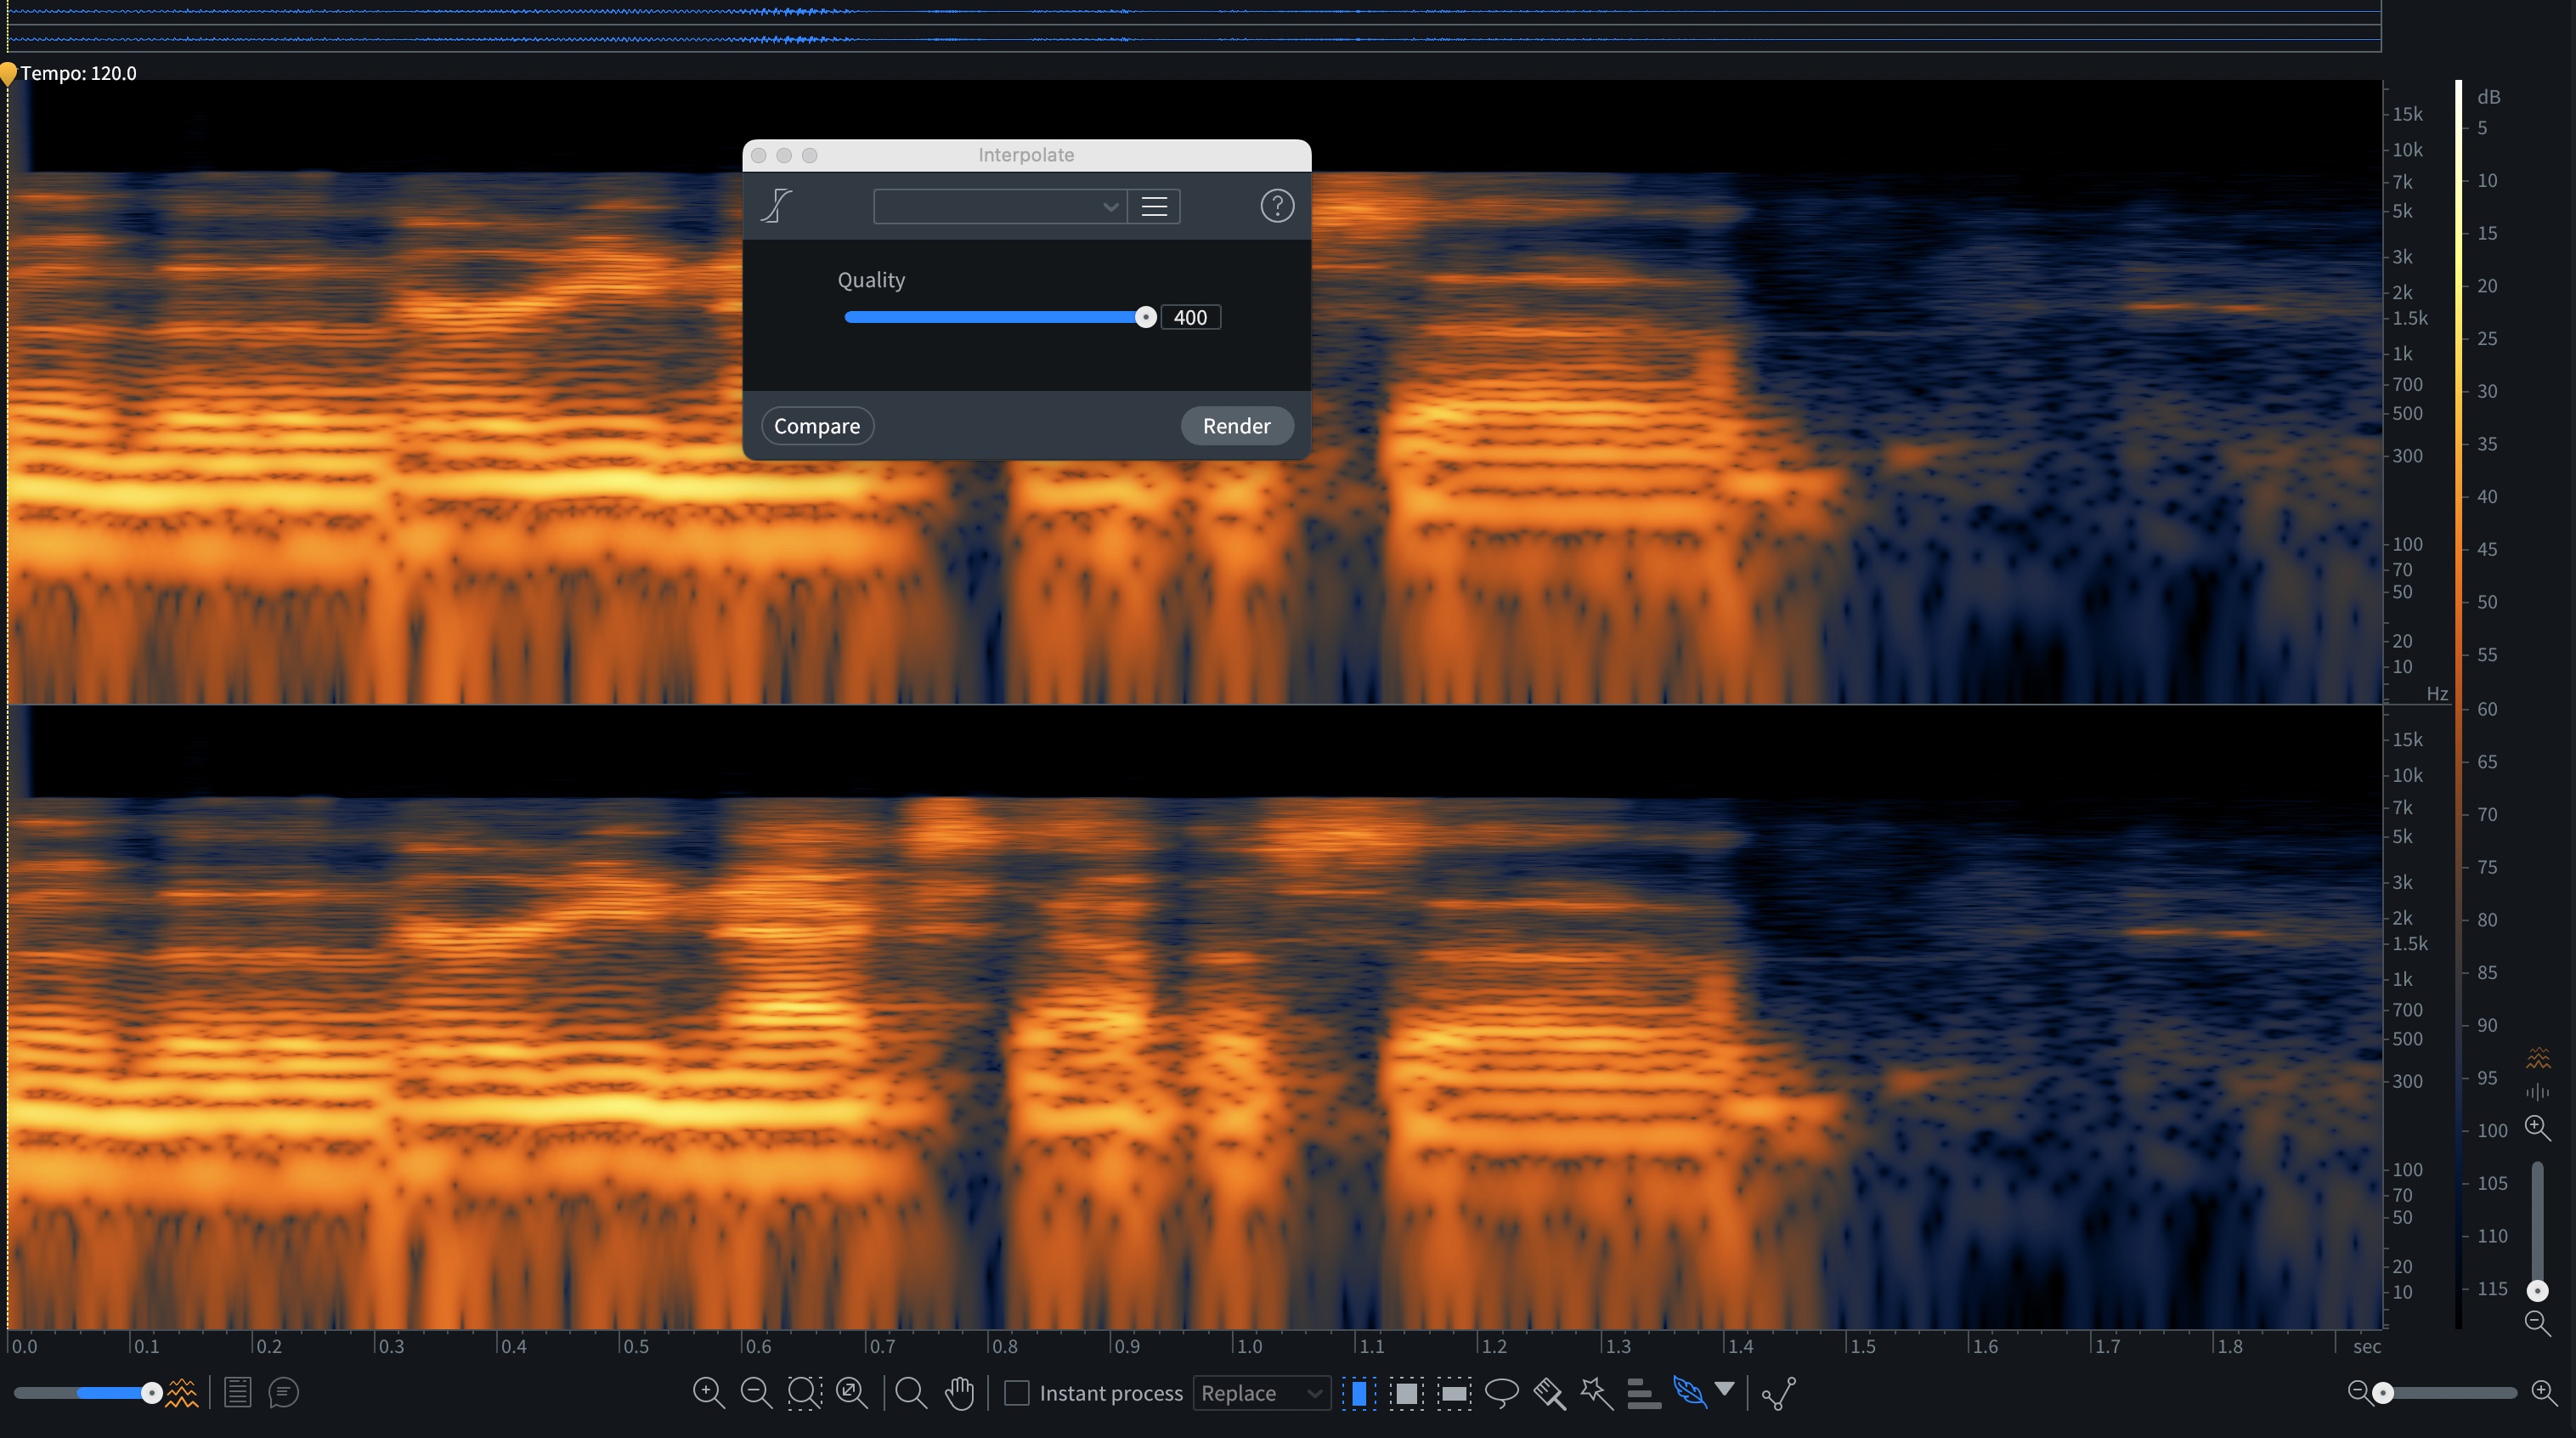
Fixed audio using Interpolate in RX
Breath control
Breath sounds can add naturalism to a vocal, but sometimes they’re too loud or distracting. RX’s Breath Control can help.
De-breath is designed to identify and reduce the volume of breath sounds without completely eliminating them. The trick is to use it subtly. If you go too hard, you risk making the vocal sound robotic or unnatural. But when used correctly, it can clean up a track while preserving the performance’s organic feel.

Breath Control settings in RX
Remember to pay attention to the controls – in fact, consider automating them, if you’re going to use this inline.
And always remember to check your work in context. After applying de-breath, listen to the vocal in the context of the full mix. Sometimes what sounds like a problem in solo turns out to be just fine when everything else is playing.
6. Address the broader issues
All right, you’ve handled the little incongruities – the clicks, the pops, the crackles, and the breaths.
Now it’s time to tackle the broadband issues. These are the problems that span across the frequency spectrum, the ones that can make a track feel muddy, noisy, or just plain unprofessional. Let’s break it down step-by-step. I believe sticking to this particular order works best.
De-hum
If you’ve got an annoying resonance – like a 60 Hz hum from a ground loop or a 50 Hz buzz from poorly shielded equipment – the De-hum module is your tool.
But don’t use De-hum if you don’t need it. It’s easy to get trigger-happy with noise reduction, and overusing de-hum can strip away low-end warmth that you actually want to keep, adding a weird and unnatural ringing in the process.
When you do use the module, I’d say shoot for Dynamic De-hum first. It’s a newer feature in RX, and I believe it’s much better than the static version.
Dynamic De-hum adapts to changes in the hum’s intensity, which means it’s less likely to leave artifacts or make your track sound unnatural. Just make sure to isolate a section of the audio where the hum is most prominent, let the module “learn” the noise profile, and then tweak the reduction level until the hum is gone but the vocals still feel natural.

De-hum results in RX
Dialogue De-verb
Next, let’s talk about Dialogue De-verb. Yes, it’s hidden in RX – you might need to check your key commands to access it – but it’s worth digging for.
A bit of self-serving trivia: this module continues to exist in RX even though Dialogue Isolate now has its own de-verbing process because I asked for it during beta testing (fun fact).
This module reduces reverb and room noise, and while it’s marketed for Dialogue, it works surprisingly well on sung vocals – better than many other processors.

Dialogue reverb
The key to using Dialogue De-verb effectively is subtlety. Crank it up too high, and your vocal will start to artifact. But when applied gently, it can take the edge off excessive room tone without making the performance feel sterile. If you’re working with a vocal that was recorded in a less-than-ideal space, this tool can be a lifesaver.
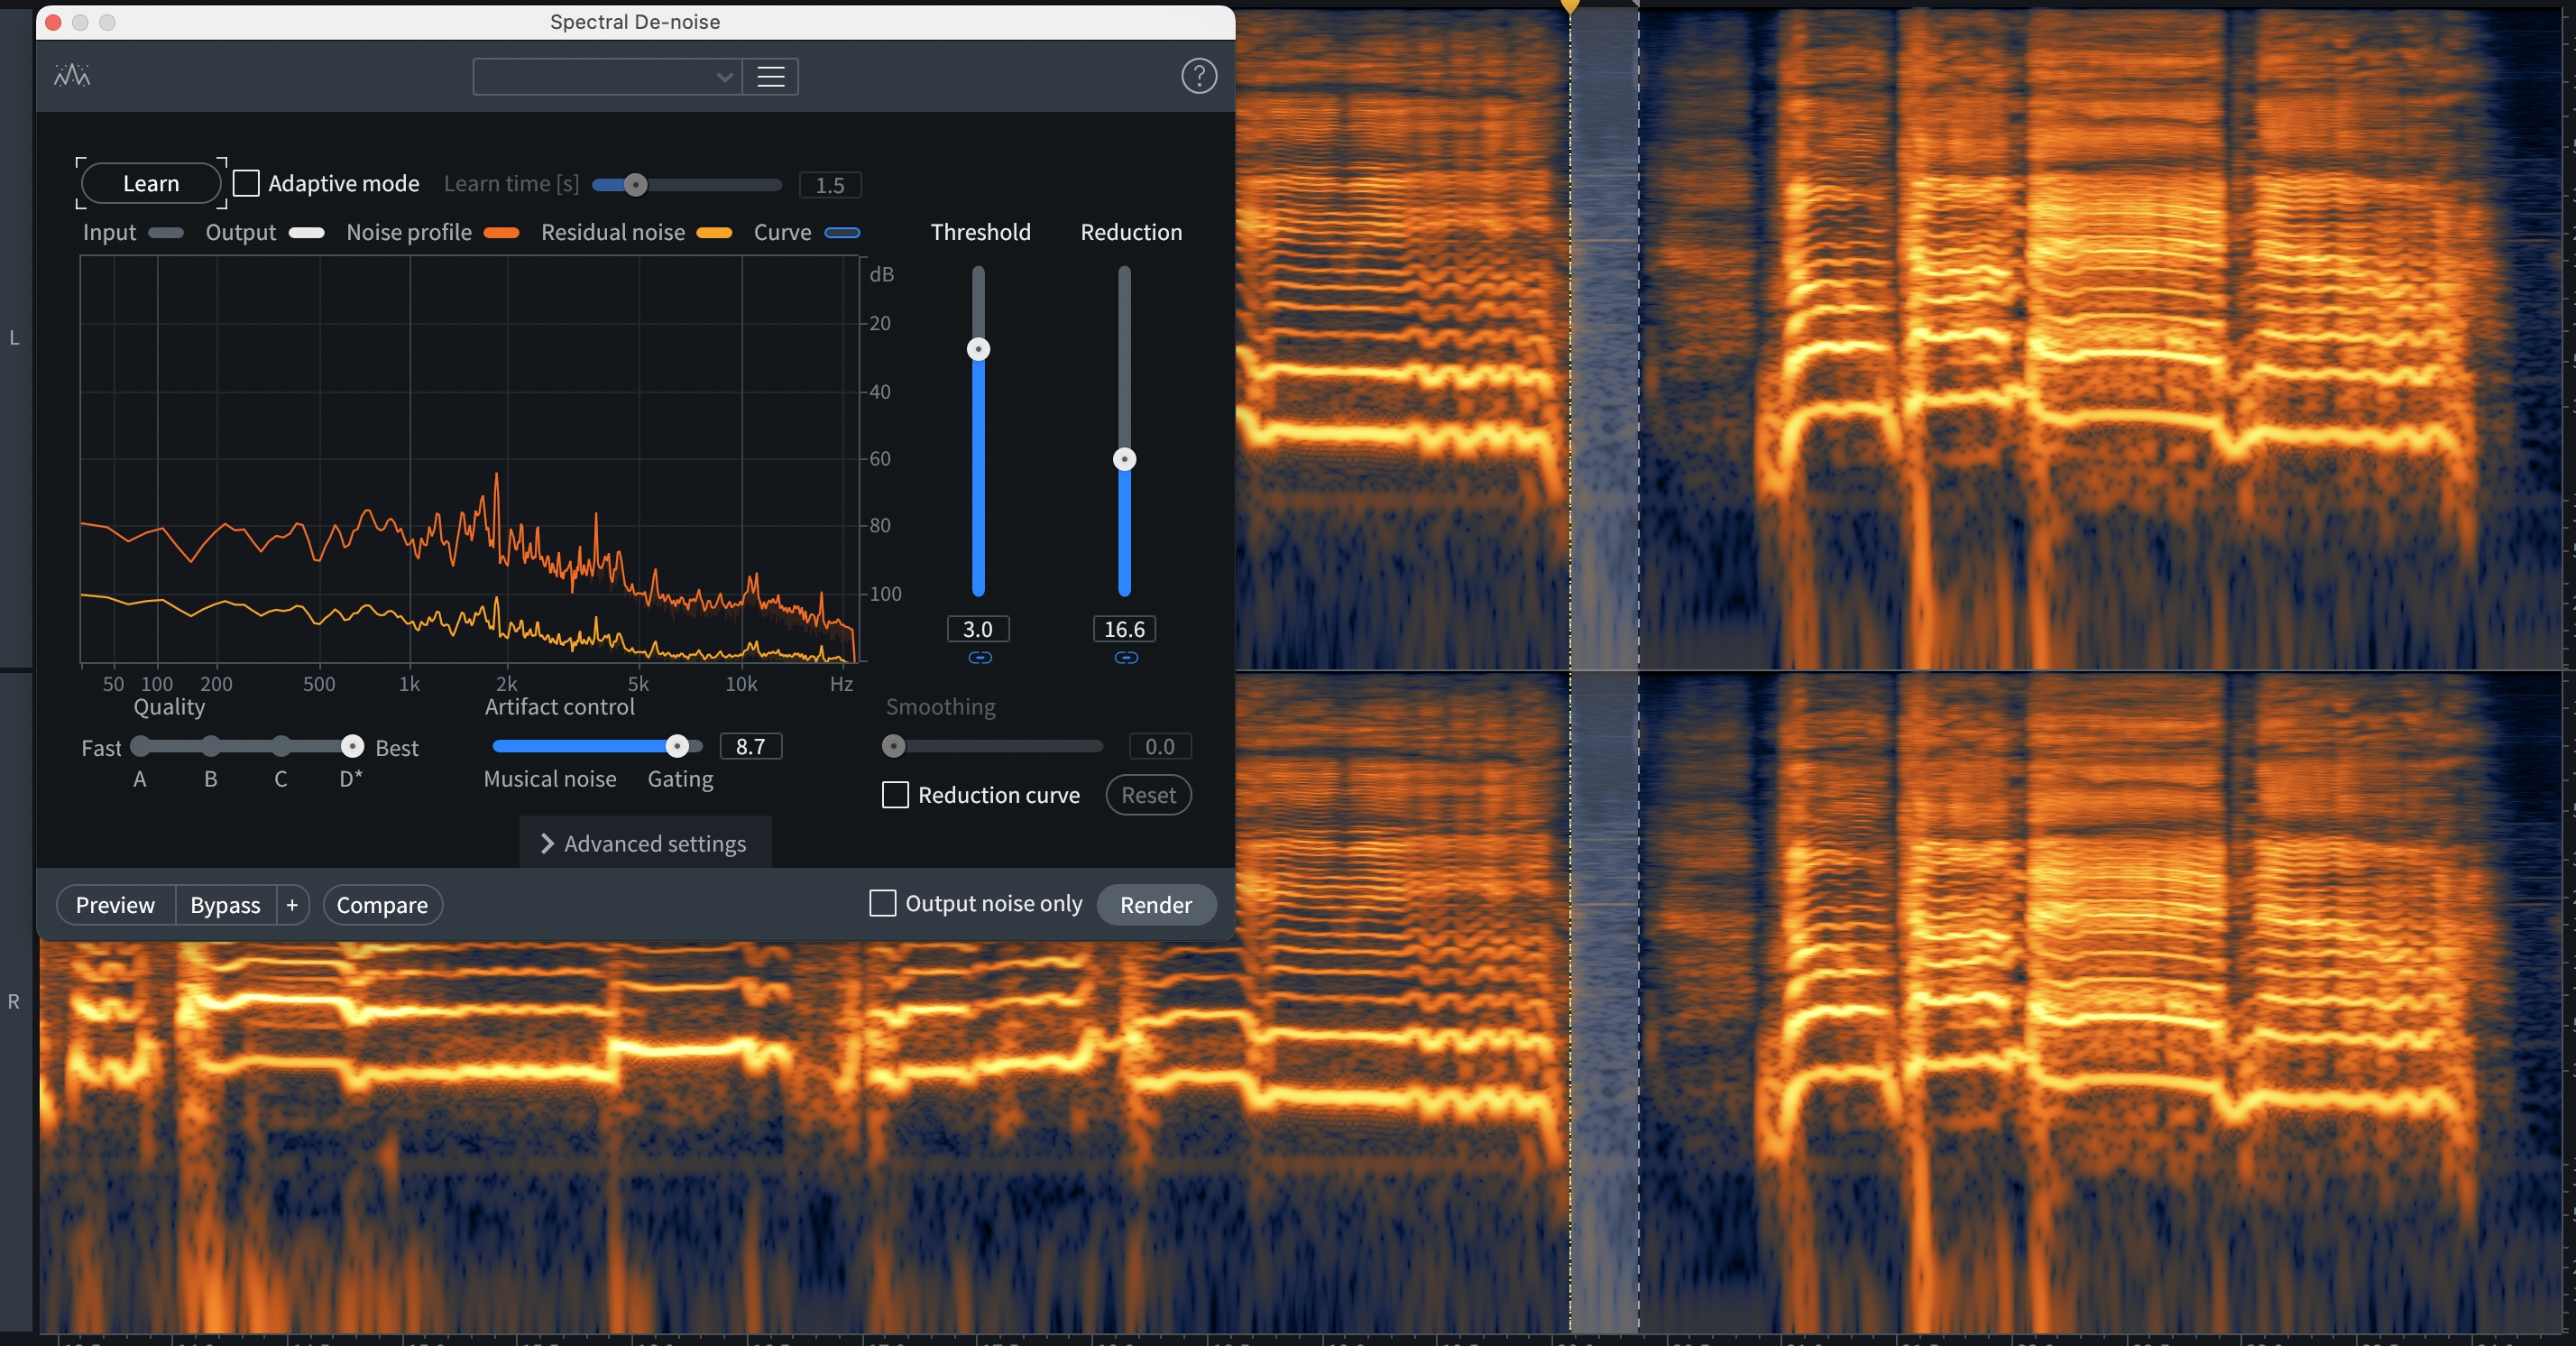
Spectral De-noise
Now, if you’re dealing with more general noise – like hiss, air conditioning rumble, or other broadband noise – Spectral De-noise is your friend. It’s one of the more natural-sounding noise reduction tools in RX, especially when used sparingly.
The trick here is to train the module to learn on a bit of silence, and then to avoid over processing. You can also draw in some curves to focus the processing to favor different frequencies. I do this quite often.
Let’s hear the before and after. Here’s our vocal:
We’ll learn some noise from this part:
Learning Spectral De-noise in RX
And we’ll tweak our setting like so:

Applying noise reduction with curve
Because I’ve used the curve, I can get away with a bit more noise reduction than if I hadn’t.
Dialogue Isolate
Finally, there’s Dialogue Isolate. This module was completely revamped in the latest version of RX, and it’s quickly become one of a go-to for cleaning up vocals in the post-production world. What makes it so powerful is its built-in de-reverb algorithm, which works surprisingly well on sung vocals.
Dialogue Isolate is great for situations where you’ve got a vocal that’s drowning in room tone or ambient noise. It can pull the vocal forward in the mix while pushing the noise and reverb into the background. Just be careful not to overdo it – like all noise reduction tools, Dialogue isolate can start to sound unnatural if pushed too far.
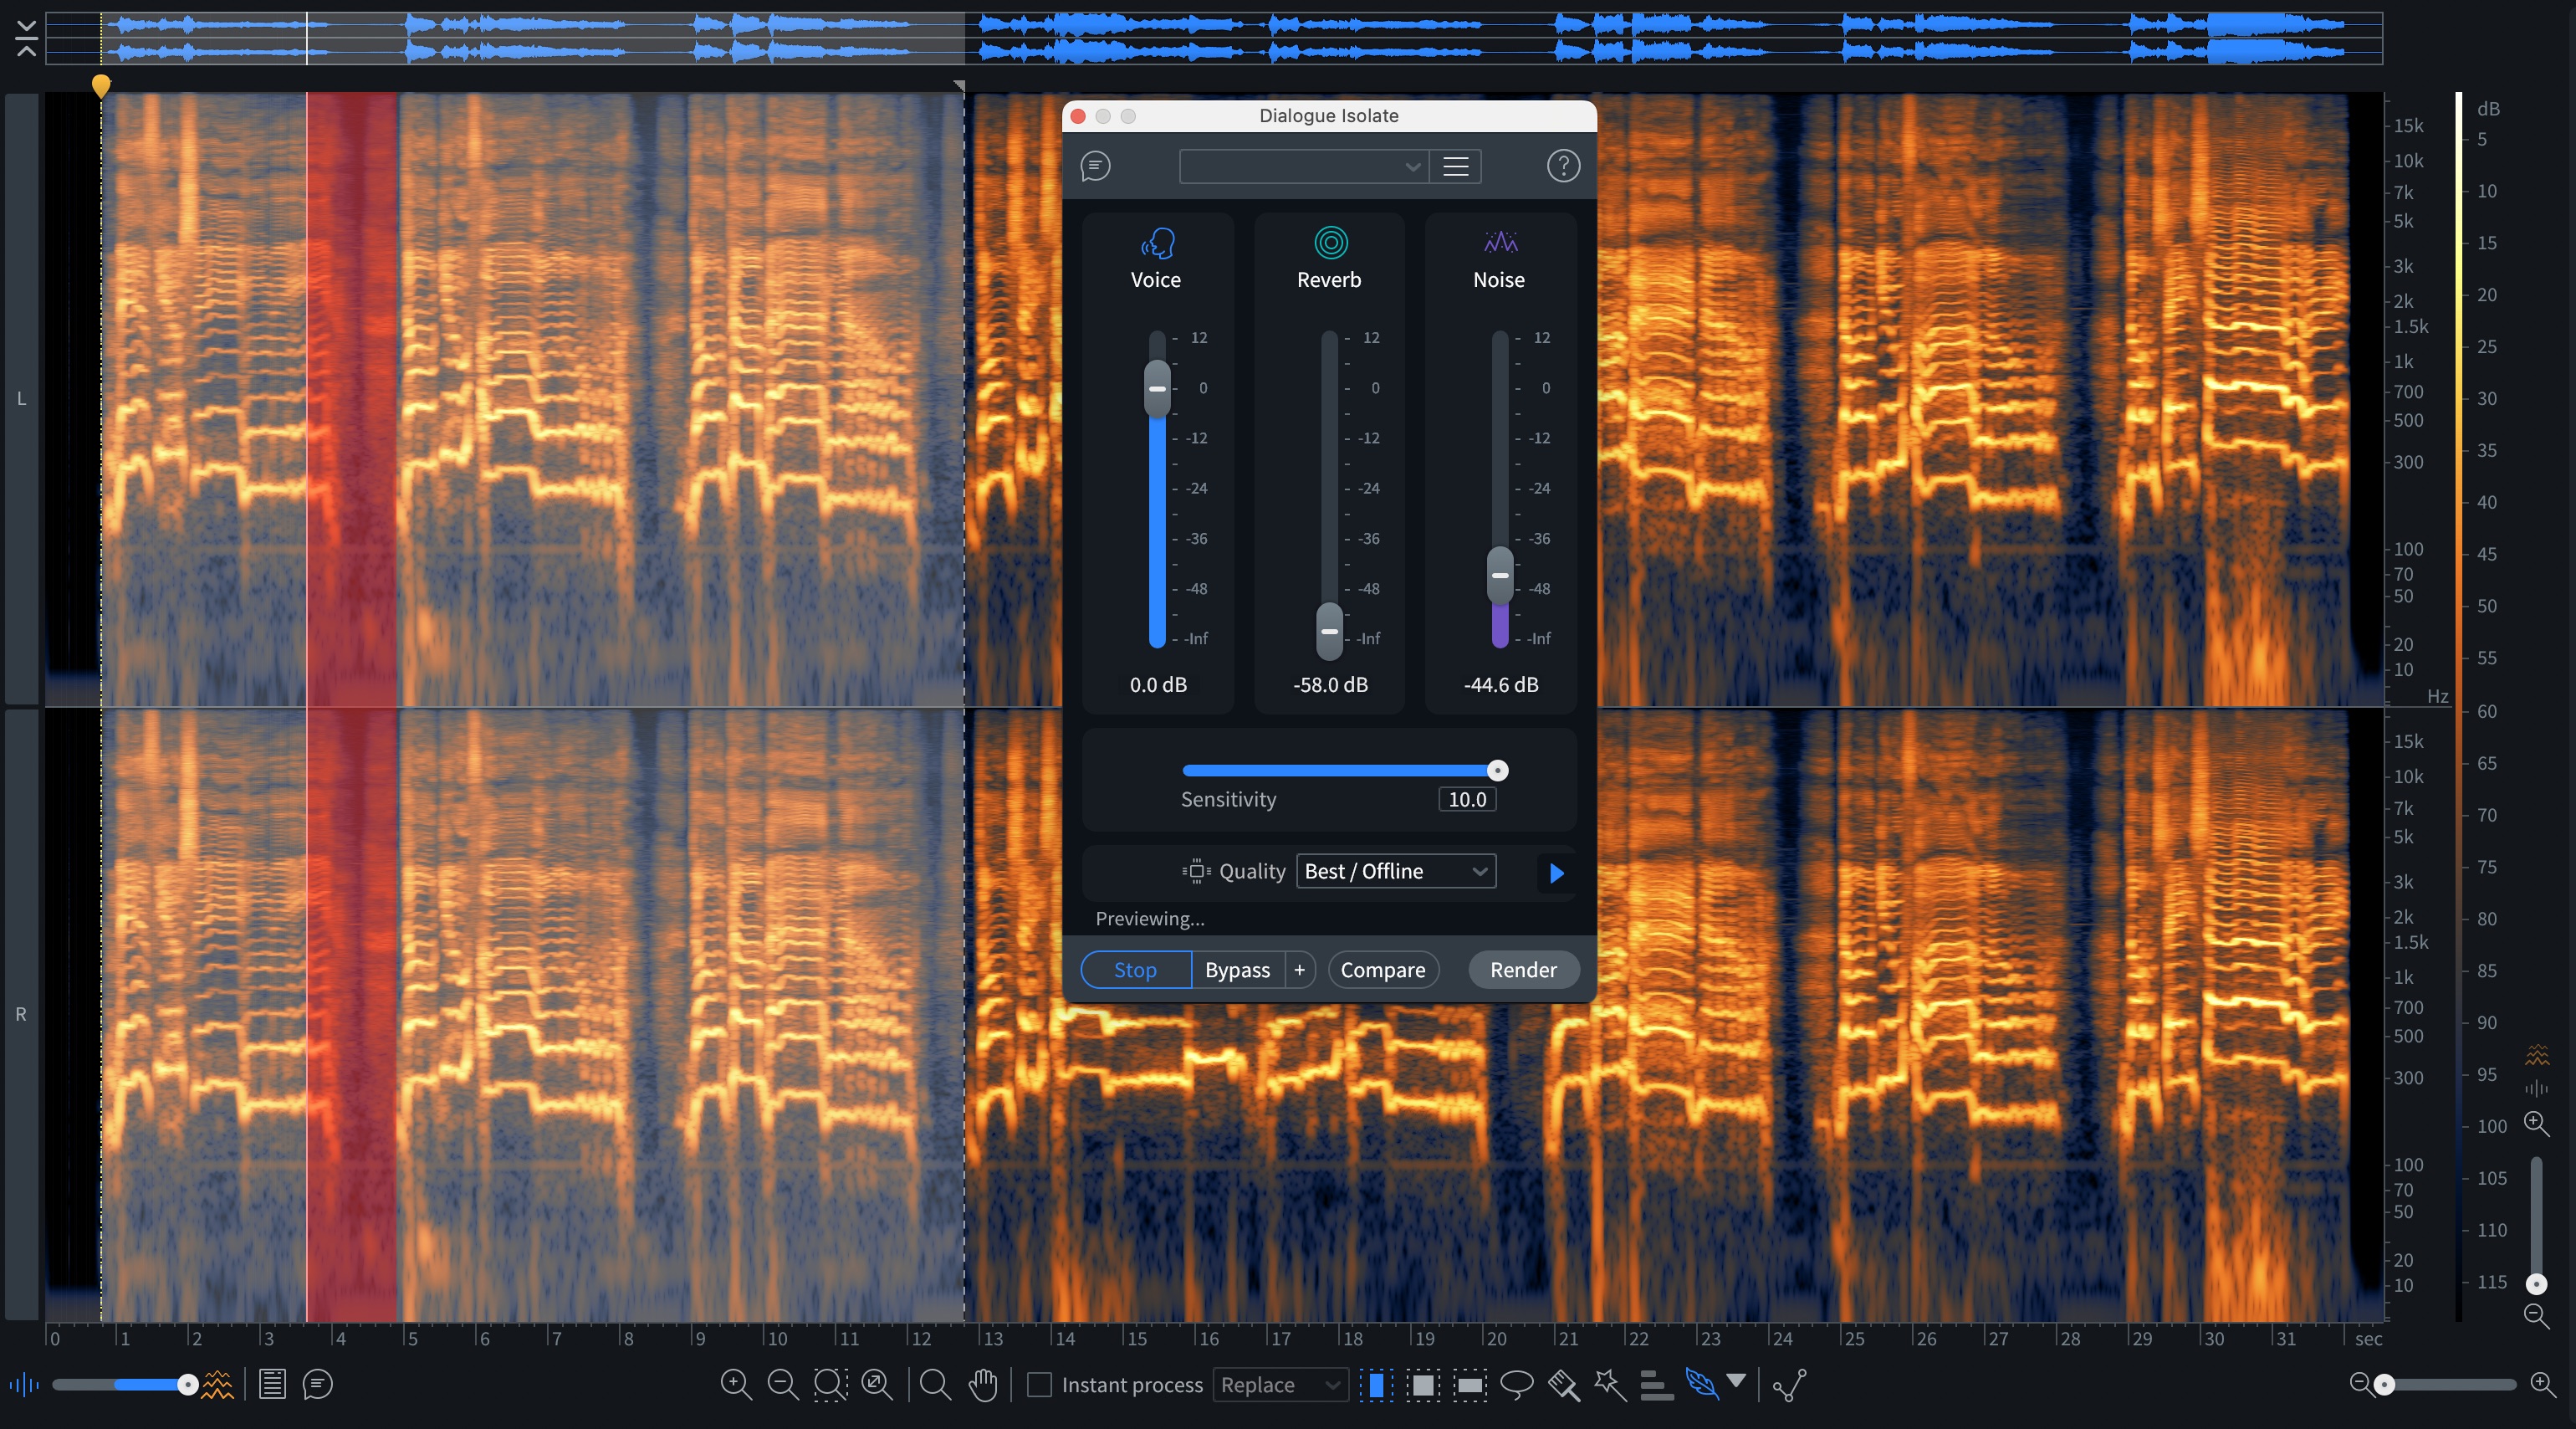
RX Dialogue Isolate
7. Export from RX Standalone if applicable
Once you’re happy with the cleanup, I find it useful to export the vocal track as a new file. Make sure to keep the original untouched file as a backup – just in case. Now you’re ready to get started mixing.
In the context of our tune, we’ve gone from this
To this:
In the context of the mix, you might not notice much of a difference. On its own however, we’ve done well to make it better:
More importantly, it’s precisely these changes that allow me to put together a credible mix of the vocal:
RX is the prescription for all your vocal woes
Remember: cleaning up vocals in RX is about solving problems, not creating more of them. Do the least amount of damage that will suffice, ensuring you have a solid foundation to build on. By following these steps, you’ll ensure that your vocal track is as clean and professional as possible before it hits the mixing stage.
You’ll note, we didn’t cover resonance suppression, de-essing, and other things that hamper a vocal. These are meat and potatoes mixing issues, and better talked about in their own article. I used a lot of tools to suppress the resonances that made this song sound “cheap” – but none of them were RX.
When it comes to RX, however, the goal isn’t to strip away all the humanity from the performance – it’s to enhance it. So, go forth and clean those vocals with confidence. Your mix (and your vocalist) will thank you.