5 advanced mastering tips using Ozone
Master audio like a pro with advanced Ozone tips. Learn multiband expansion, upward compression, mixed-phase EQ, and transient imaging skills for polished results.
While it’s true that Ozone is built in such a way as to be very approachable for those new to mastering, it is also an absolute powerhouse of a tool. Beneath the friendly, Master Assistant-capable exterior lie a great many options that can unlock some truly advanced audio mastering techniques. In this article, I’m going to pull back the curtain on five of my favorite expert mastering tips that – when needed – I turn to Ozone to implement.
From multiband upward expansion, upward compression, and complex transfer curves to mixed phase EQ, mid/side applications and more, I’ll show you how to set up different modules to achieve specific goals, complete with screenshots and audio demos. So with no further ado, let’s dig into it and really put Ozone to work.
Follow along with this tutorial using Ozone.
1. Multiband upward expansion with Ozone Dynamics
In the past, we’ve talked about the fundamentals of multiband compression, but did you know that Ozone’s Dynamics module is capable of upward expansion? If you lower the ratio of the “Limiter” section below 1.0:1 it will turn into an upward expander. When I use it in this way I tend to like to start by setting the “Compressor” ratio to 1.0:1 and lowering its threshold all the way down to -130.0 dB, effectively getting it out of the way.

Upward expansion settings in Ozone Dynamics
Why use upward expansion in mastering?
Before we go much further, let’s state what our goal is here. Simply, if we receive a mix that’s been pushed into compression and limiting a little too hard, it can be nice to have a way to inject a little life back into it. Upward expansion can often be part of that equation, however, in a single, wideband setup across a whole mix it’s unlikely to work particularly effectively. In a multiband configuration, though, we can start to get some mileage out of it. Here’s how I like to approach it.
Start by setting up three or four bands. I’m often a practitioner of “less is more,” but in this context I find having a little more separation can be useful. Don’t worry about the crossover frequencies right now – we’ll get to those momentarily. Next, ensure that “Link Bands” is engaged and set one band up for upward expansion as shown above. The others will follow. We may as well tweak our timing settings as well now. Since we want to grab peaks quickly, a fast attack time – on the order of 0.5 to 10 ms – is appropriate, and something like a 50 to 100 ms release is a reasonable starting point. At this point you should have something like this.

Multiband upward expansion starting point
Now it’s time to start tailoring this to your music. Let’s start with the crossovers. Soloing the bands one at a time, try to focus them on the following elements:
- The low thump of the kick
- The body and tone of the snare
- The rattle and snap of the snare, and midrange percussion
- High cymbals and percussion
Now, we want to set our thresholds in each band so they’re just grabbing the very tops of the transients and poking them out a bit without digging down into the body of the signal too much. One of the easiest ways to do this is with the following steps:
- Raise all thresholds to 0 dBFS
- Turn of “Link Bands”
- Turn on “Delta” mode
- One band at a time, lower the threshold until you just start to hear some transients show up in the delta signal
- Tune your attack and release times to shape the transient in a way that’s appropriate for that band
- Repeat with the remaining bands
- Turn off delta mode, turn on Link Bands, and audition your processing with the module bypass.
Here’s an example of the kind of result you can get with this approach.
Multiband upward expansion
Note the additional excitement and punch you can get with a setup like this! It’s also worth pointing out that you may need to lower either the input gain to Ozone or the clip/region/etc. gain in your audio workstation to give yourself a little headroom for your new peaks to extend into. You’ll need to do this before you set your thresholds. From here you can also experiment with your attack and release times, ratios, and thresholds; just do it with care – it’s easy to go overboard with upward expansion.
This is great for livening up a slightly flattened mix, but what if we want to approach things from the other direction? What if we have a mix that could benefit from some additional density and level, but we don’t want to squash our transients to achieve it? Enter upward compression.
2. Basic upward compression with Ozone Dynamics
Upward compression is another topic we’ve explored before, albeit from a mixingperspective in Neutron. However, it can also be very useful in mastering. Like the “Limiter” section in Ozone Dynamics, the “Compressor” section has an interesting behavior when you lower the ratio below 1.0:1. When you do this, it changes to a true upward compressor, raising softer signals as they fall below the threshold. The prerequisite warning with this type of signal processing is this: there is no limit on the amount of gain that will be applied below the threshold.
Practically, this means that with a sufficiently high threshold and ratio, your noise floor
could easily be raised 50–60 dB or more! Accordingly, caution is warranted.
Why use upward compression in mastering?
As I alluded to above, upward compression – sometimes implemented via parallel compression – can be a useful way to raise low-level parts of the signal without squashing or distorting your transients. Sometimes that squish and crunch is cool, but other times you may want to leave your transients as intact as possible. Upward compression can be a great way to achieve this, and again, some multiband separation can make it a little more well-behaved.
The setup procedure can be very similar to the one used above for multiband upward expansion. There are just a few key differences, summarized as follows:
- Work your thresholds from the bottom, up, stopping or even backing off a hair when you start to hear transients creep into the delta signal.
- Keep in mind that attack controls how quickly level is raised when the signal level drops below the threshold, and release controls how quickly level returns to unity gain as it crosses back above the threshold. As such, the sonic effect is almost the opposite of what we’re accustomed to with traditional compression and limiting.
A typical upward compression setup might end up looking something like this for me. Note that aside from the thresholds I’m using identical settings per-band. This helps keep things sounding a bit more transparent and natural.
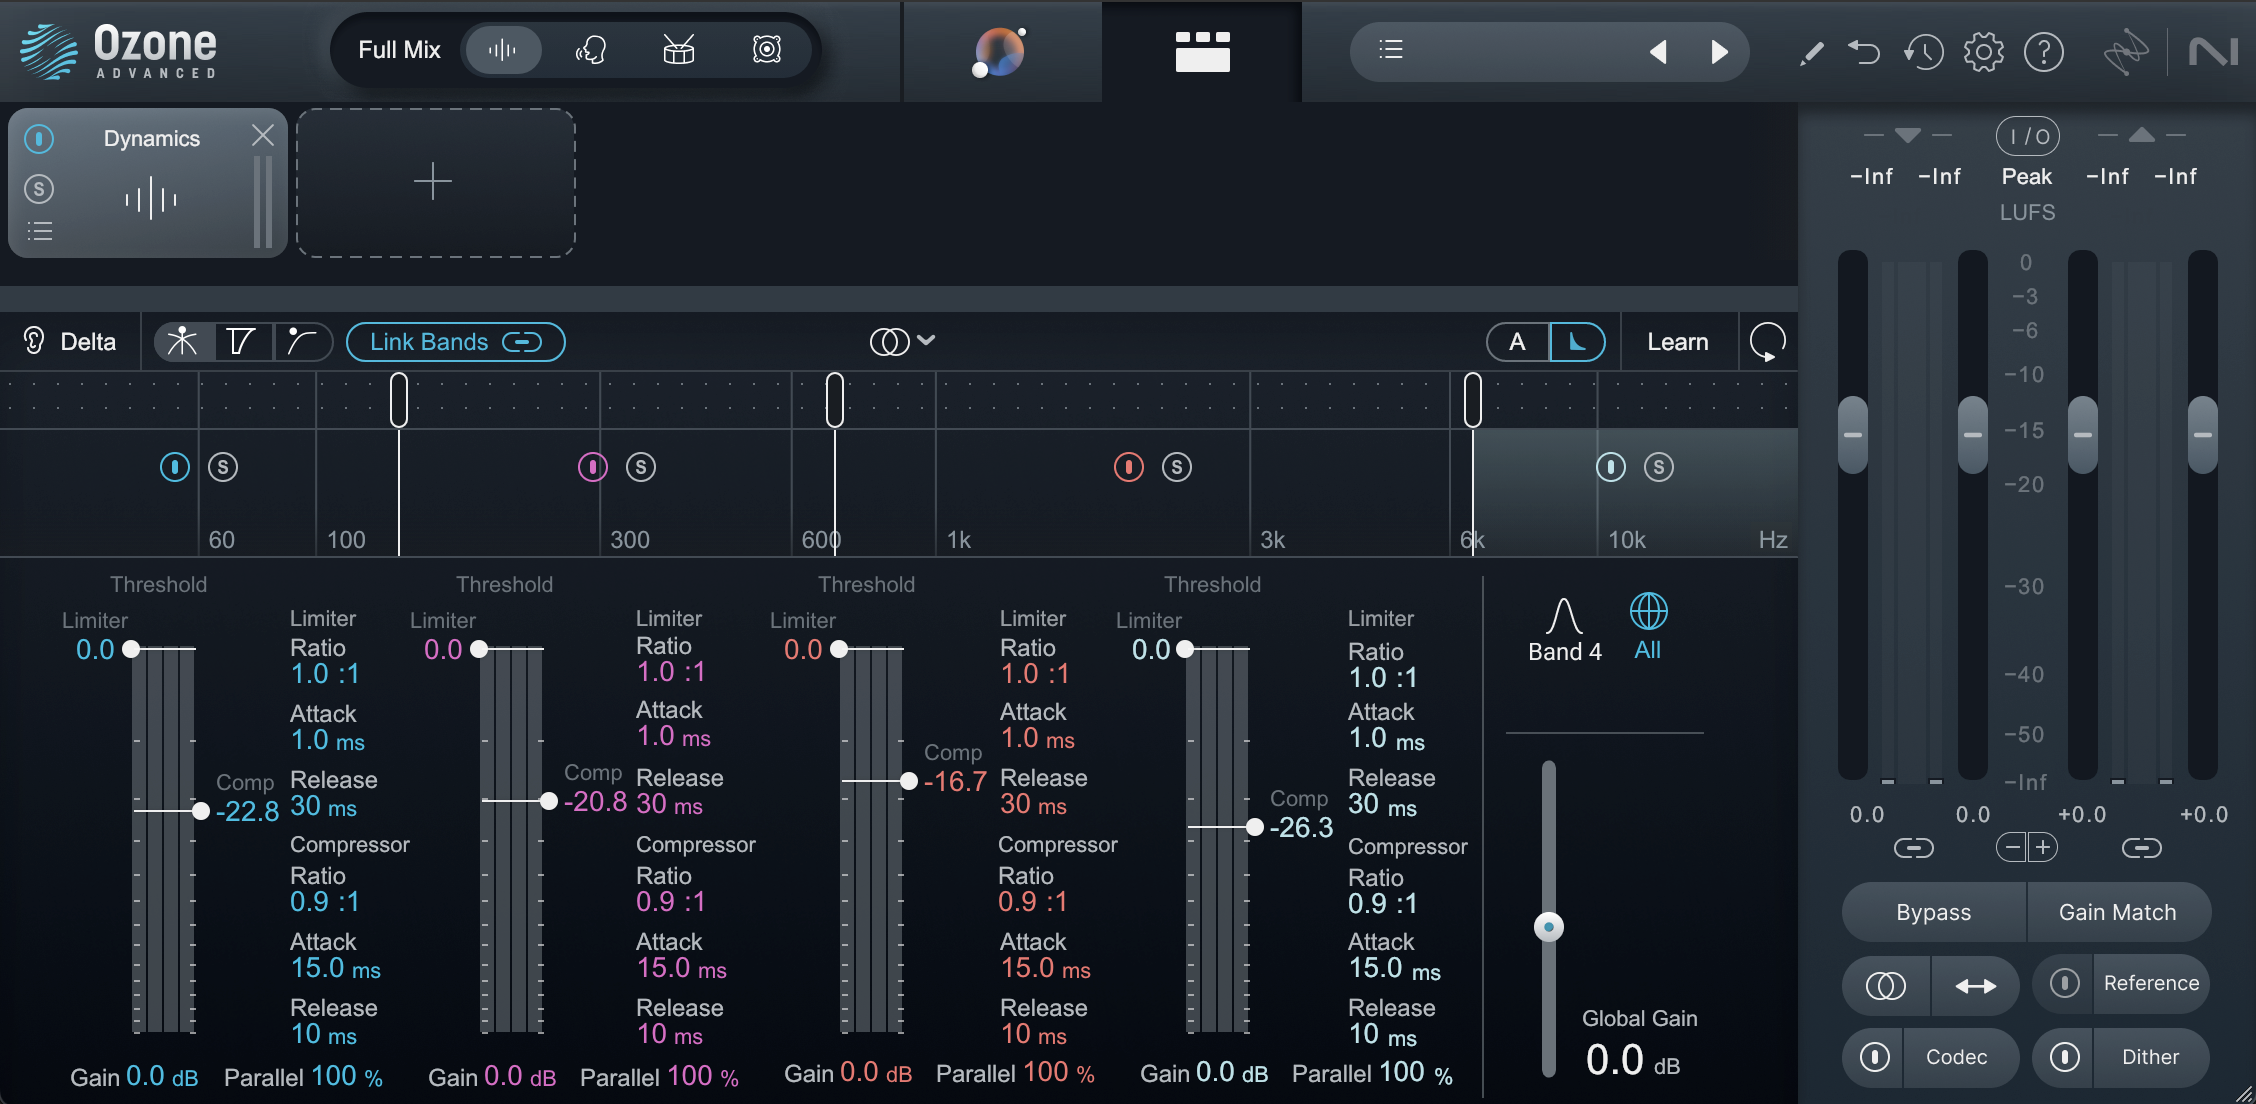
Multiband upward compression
And here’s the sonic impact this kind of treatment can make. Note the additional sustain on the guitars along with an overall increase in weight, density, and perceived level, all without changing the peak levels or transient impact.
Multiband upward compression
The other thing we have to be particularly careful of with this sort of processing is what I call “dynamic inversion” – where parts of the music that are meant to sound softer end up getting raised in level so much that they sound louder than the loud sections. To combat this, it can be highly useful to automate the output level of the Dynamics module. For example, here’s the middle bridge with and without some level automation to retain the intended macro-dynamics.
Upward compression with level automation
And here’s how I got there.
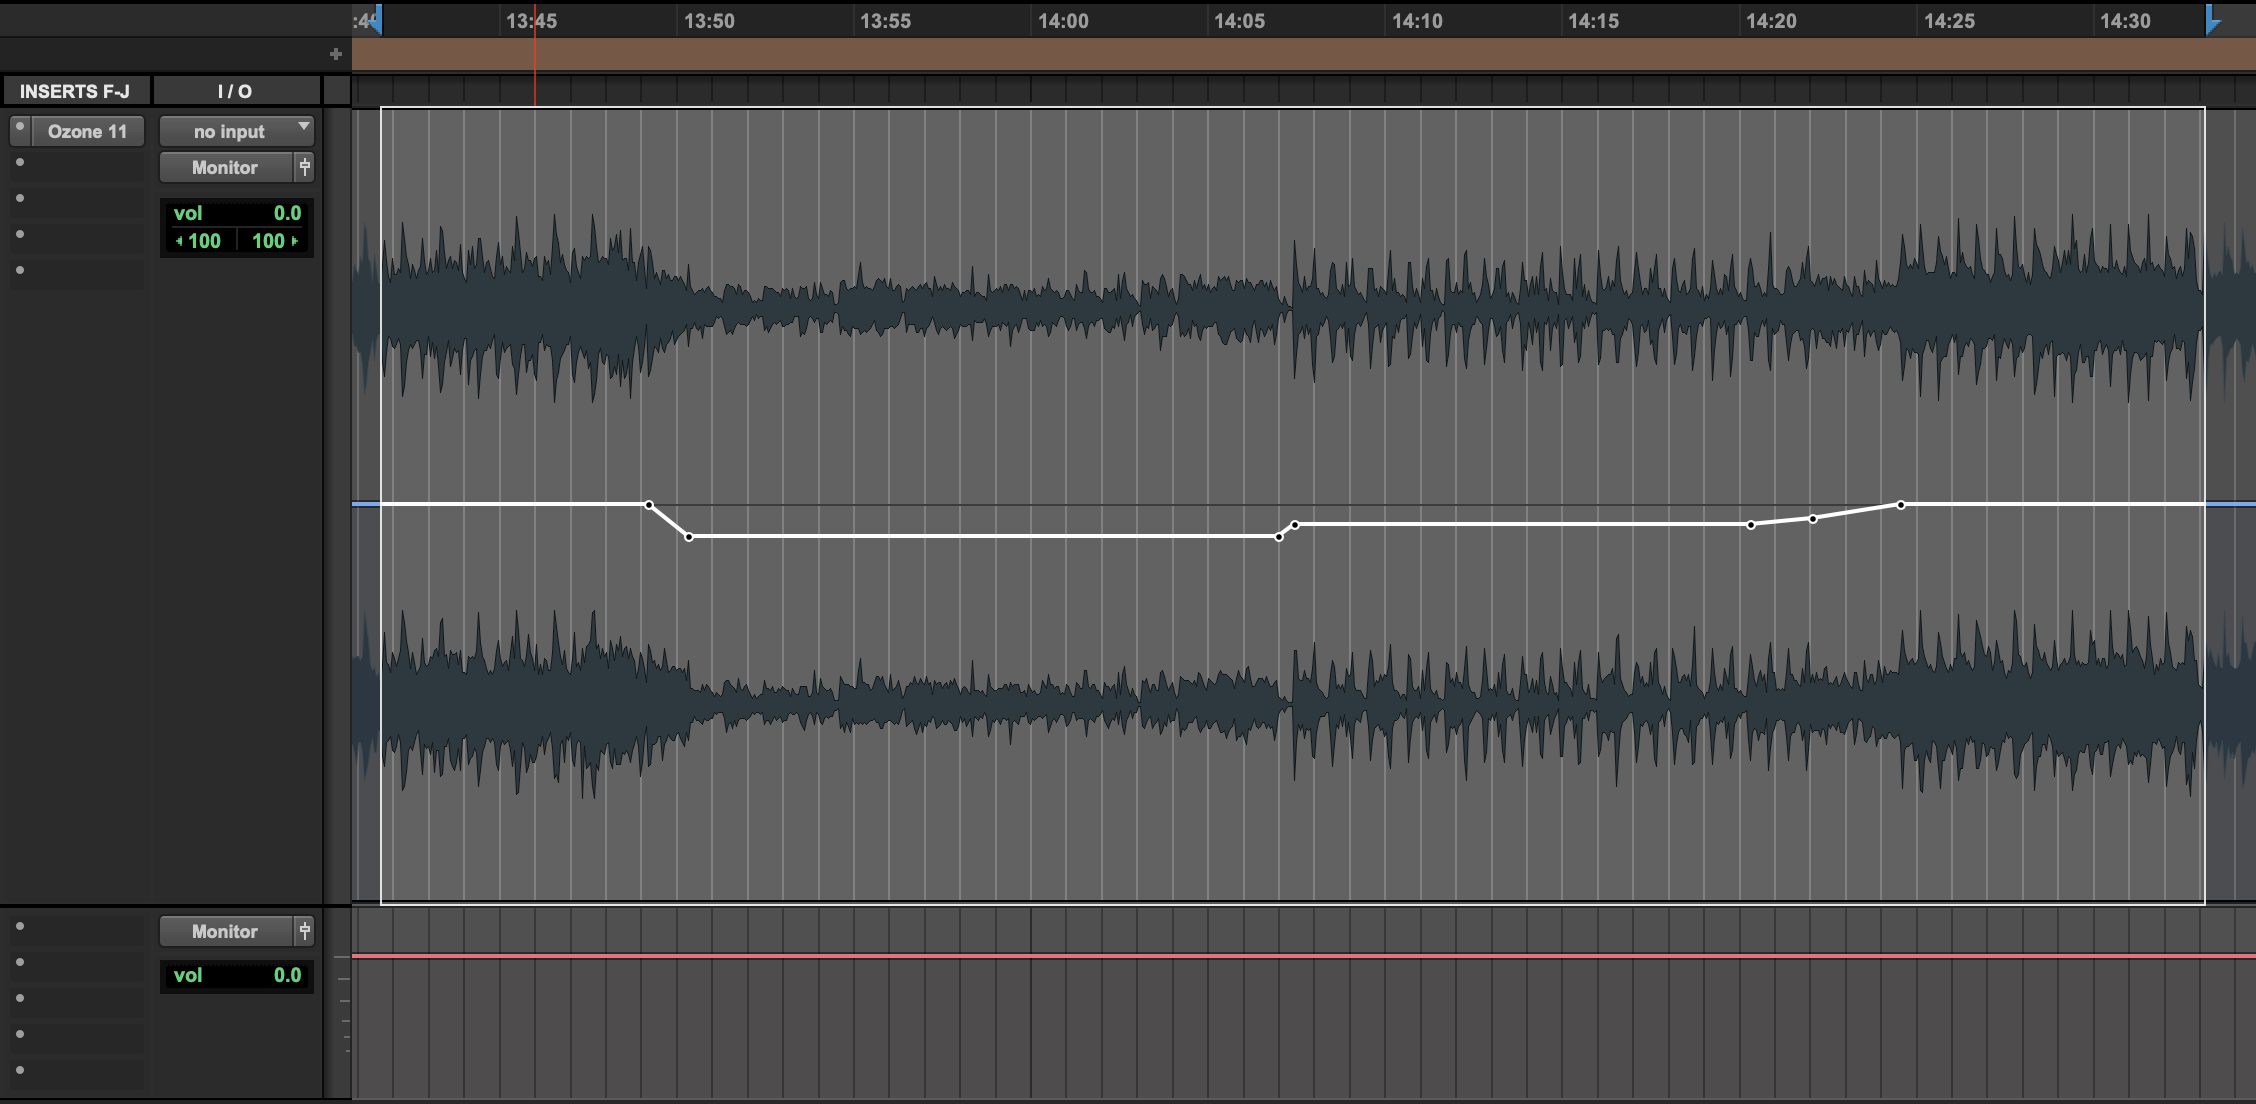
Level automation for macro-dynamic retention
3. Complex transfer curves in Ozone Dynamics
I don’t know about you, but when I see options like this, my brain goes into overdrive, wondering what sorts of other possibilities might exist. Could we do upward expansion and compression at the same time? What about a curve that approximates parallel compression, or advanced knee shapes? What sorts of complex transfer curves can we get out of this module?
What is a transfer curve?
I’m going to give you a few examples to start you on your exploratory journey, but first I want to make sure we’re all clear on what we mean by “transfer curve” or “transfer function.” If you’re already familiar with this, feel free to jump ahead.
In the context of dynamics processing, a transfer function is a graphical representation of the input level and output level. The input level is shown on the x-axis, while the output level is shown on the y-axis. This allows us to characterize the dynamics processor, at least for steady-state signals – attack and release behavior will modify this in reality, but it’s sort of like the road map for what the ideal dynamic behavior is.
Here’s a transfer curve for a simple compressor with its threshold at -12 dBFS and a 2:1 ratio.
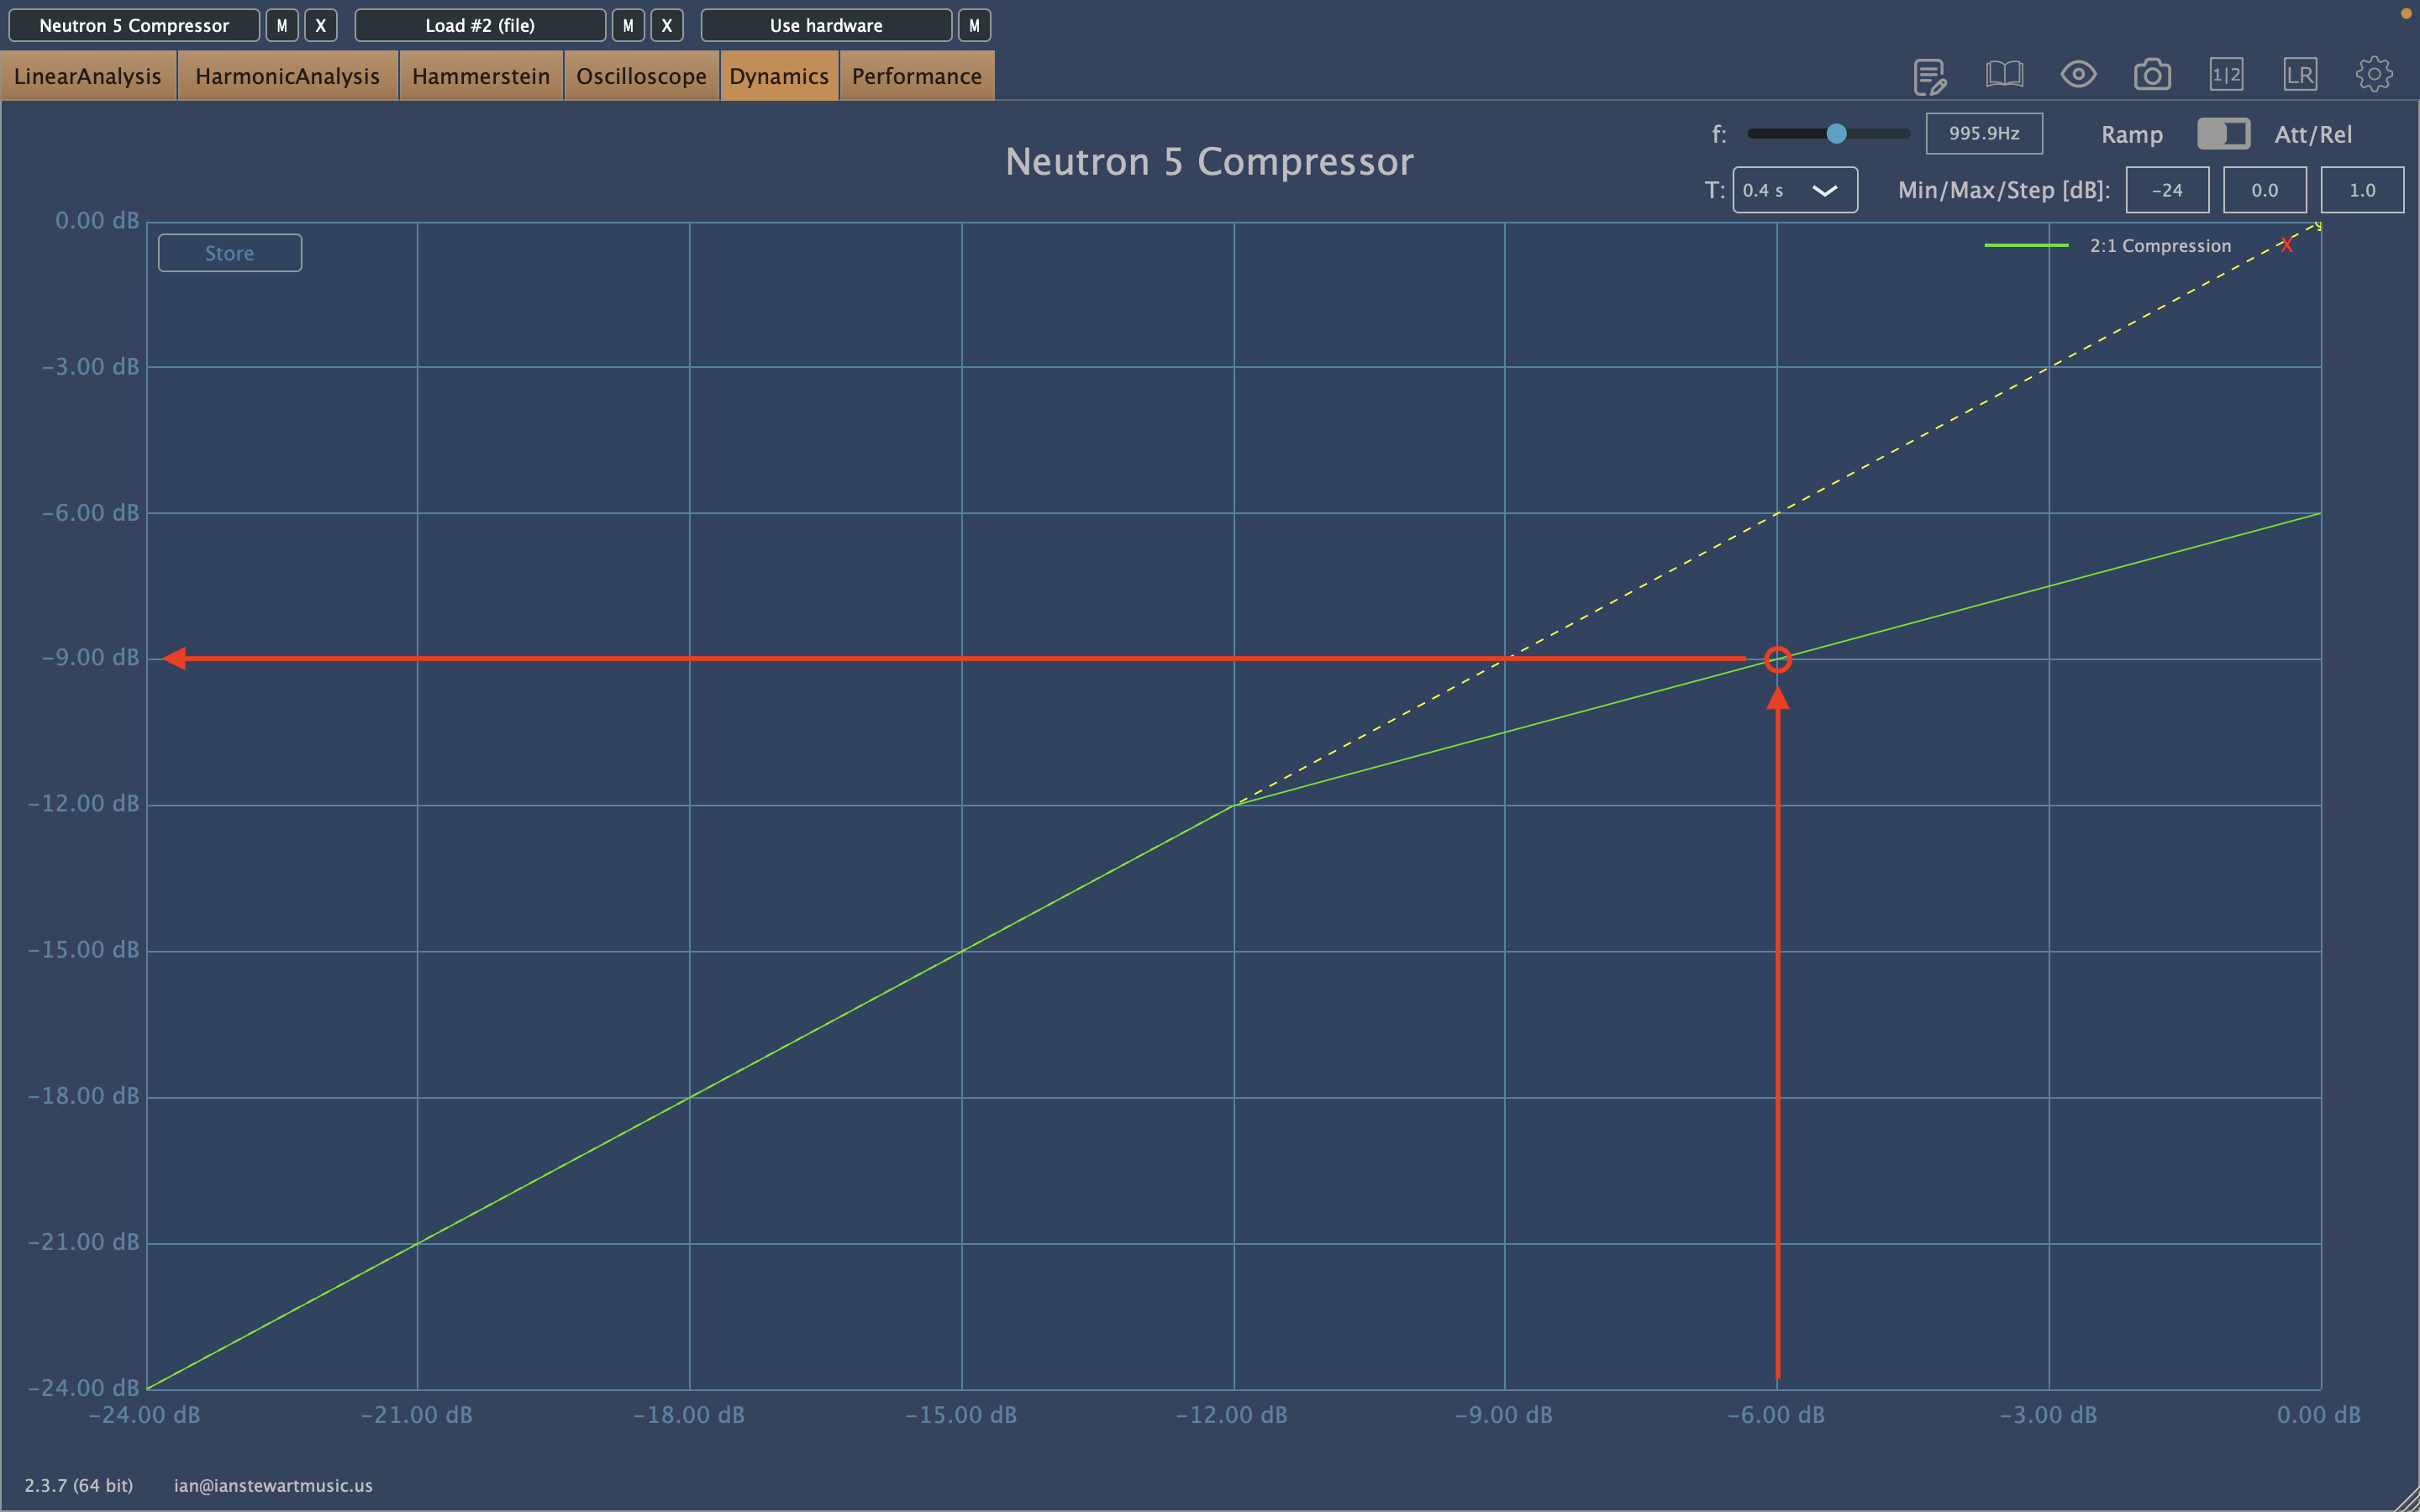
Basic 2:1 compression transfer curve
The dotted yellow line represents a linear transfer – one with no dynamic behavior – while the green line represents the behavior of the compressor.
If we want to know the corresponding output level for any given input level, we can compare the value on the x-axis to the corresponding value on the y-axis. For example, let’s say we want to know what the compressed output level would be for an input signal at -6 dBFS. We can scan across the x-axis to -6.00 dBFS, follow the red arrow up to the green transfer curve, and then follow the next red arrow back to the y-axis to find the corresponding output of -9.00 dBFS.
Let’s make some complex transfer curves!
Ok, so what sort of things could we achieve here? How about upward compression and expansion? Sure!
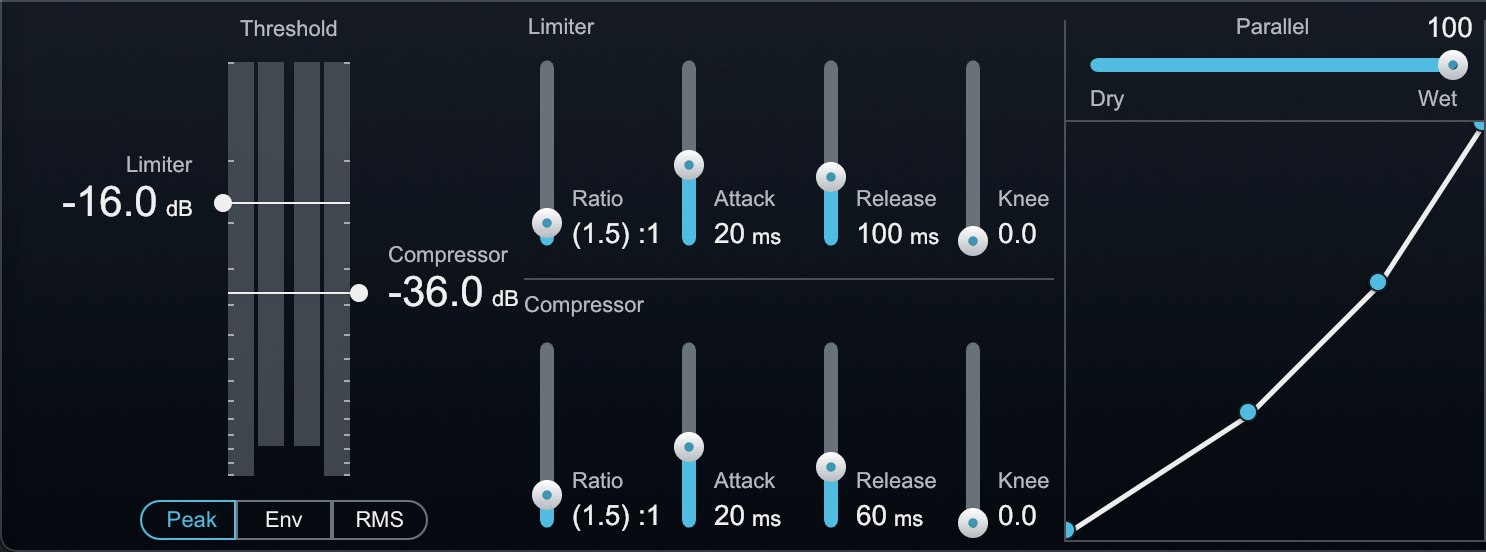
Upward compression and upward expansion together
I’ve exaggerated the ratios a bit to make it more obvious, but we could easily set that up. Of course thresholds, time-constants, and ratios will need to be tuned to taste based on the program material, but this could serve as a starting point.
What about a curve that approximates what we get from parallel compression, but with a little more control? Heck yeah!
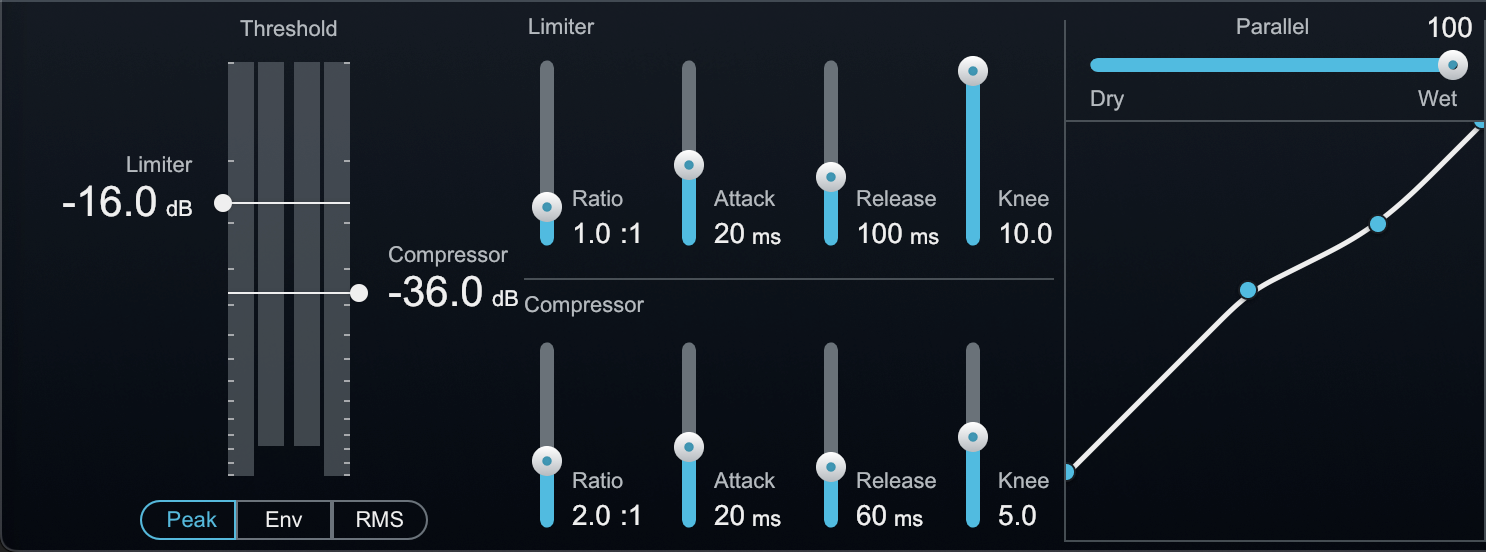
Parallel compression style curve
Excitingly, we can have different knee amounts and time-constants for the different portions of the curve! It’s also worth noting that while technically this is achieved with downward compression, it acts a lot like upward compression but with a controllable limit on the maximum amount of gain applied to low-level signals.
What if we wanted a subtler, more extended knee shape than what we can get with the knee control alone? Absolutely!
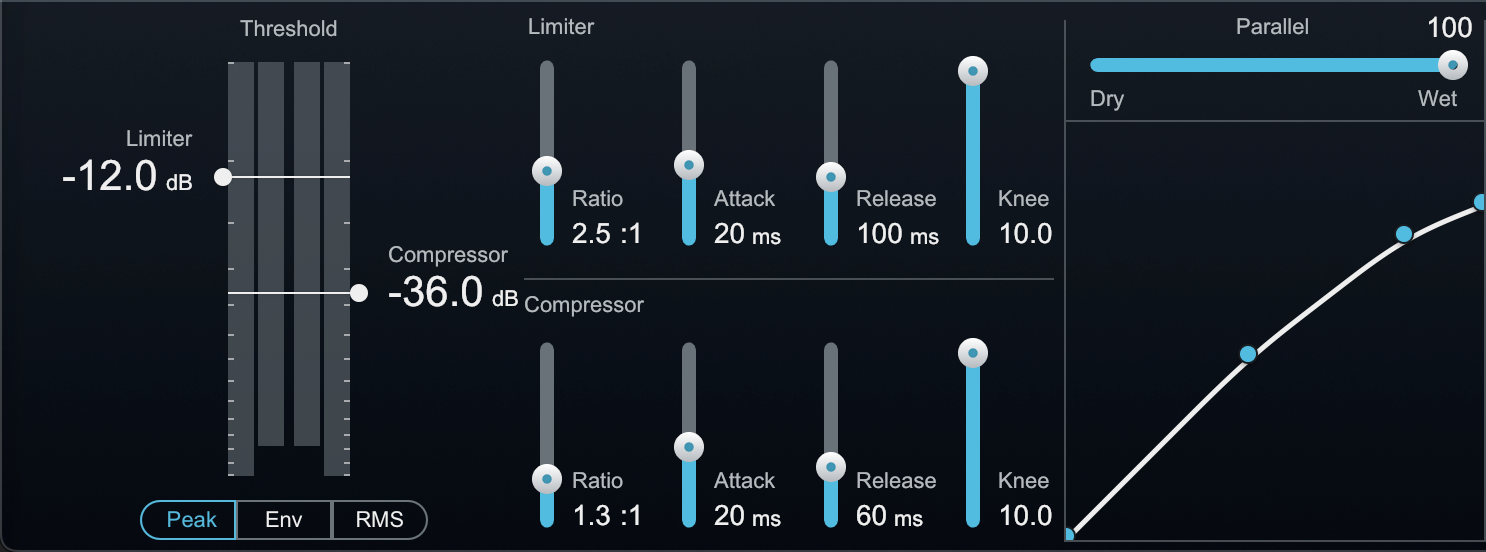
Extended very soft knee
This can be similar to the behavior you might get from a variable-mu tube compressor, but again with more control over ratios, transitions between them, and timing in each section.
Throw in peak, envelope, and RMS detection, sidechain filtering, multiband, mid/side, and left-right modes, and the possibilities quickly become too numerous to count. I’ll let your imagination be the guide as to how you might use these, but as you can see, the Dynamics module is much more than just a multiband compressor.
4. Mixed-phase EQ with Ozone EQ
Alright, that’s a whole lot about dynamics processing. Let’s shift gears to examine an advanced EQ technique. As a bonus, this is something you can even do in the free, standalone Ozone 11 EQ from Native Instruments.
You’ve probably heard of minimum phase and linear phase EQ, but did you know that the Ozone EQ can operate in mixed phase mode?
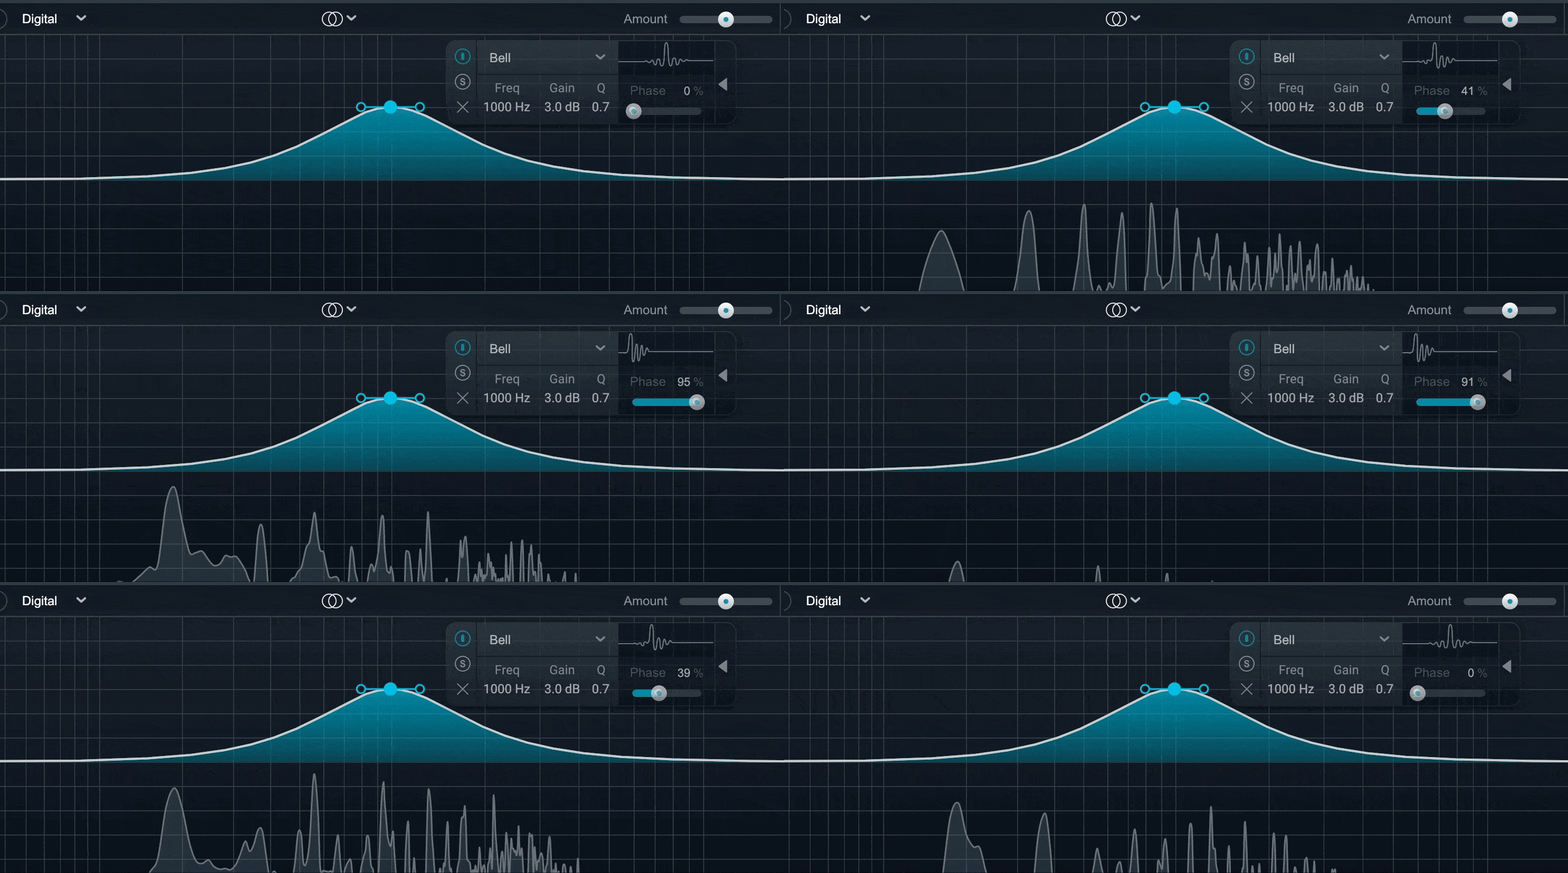
By putting the Ozone EQ into digital mode and sliding open the advanced panel you gain access to a phase control. This allows you to select linear phase – 0% – minimum phase – 100% – or anywhere in between.
Why use mixed phase EQ in mastering?
So why would you want this? First of all, phase plays an important role in mid/side EQ and I find I really prefer having an EQ where I can audition the differences. If I can do that on a per band basis, so much the better, and if I can find just the right balance between linear and minimum phase, even better still! The Ozone EQ lets me do just that. Here’s an example of the difference this can make, and at the risk of sounding obvious, you’ll definitely want headphones or a good stereo monitoring system for this.
Mid/side EQ in linear vs. minimum phase
To me, the phase slider ends up feeling sort of like a focus control in this context. Linear phase feels more focused, with elements retaining definitive positioning, while minimum phase feels a bit blurry and diffuse. This isn’t to say one is right and the other is wrong, or one is better and the other is worse: they’re simply different tools and different sounds, and having access to them all in one EQ is an excellent way to work.
Of course, there are other applications outside of mid/side, too. If you’ve never experimented with the subtle change in depth you get from a linear phase vs. minimum phase high-shelf, for example, I really suggest you give it a try! This is another area where going from a binary choice to a fully variable control is highly beneficial.
5. Transient-sustain imaging
Our final tip is a more nuanced way of approaching stereo imaging via Ozone’s Imager module. From time to time, I find myself wanting to tweak the imaging of things like drum or synth transients separately from the body or ambience of the signal.
For example, perhaps I want to leave the positioning of drums alone while widening up the ambience. Or maybe I want to narrow a low, floor-tom roll while leaving some low, droning guitars in the same frequency space fairly wide. The Transient/Sustain processing mode in Ozone allows us to do just that.
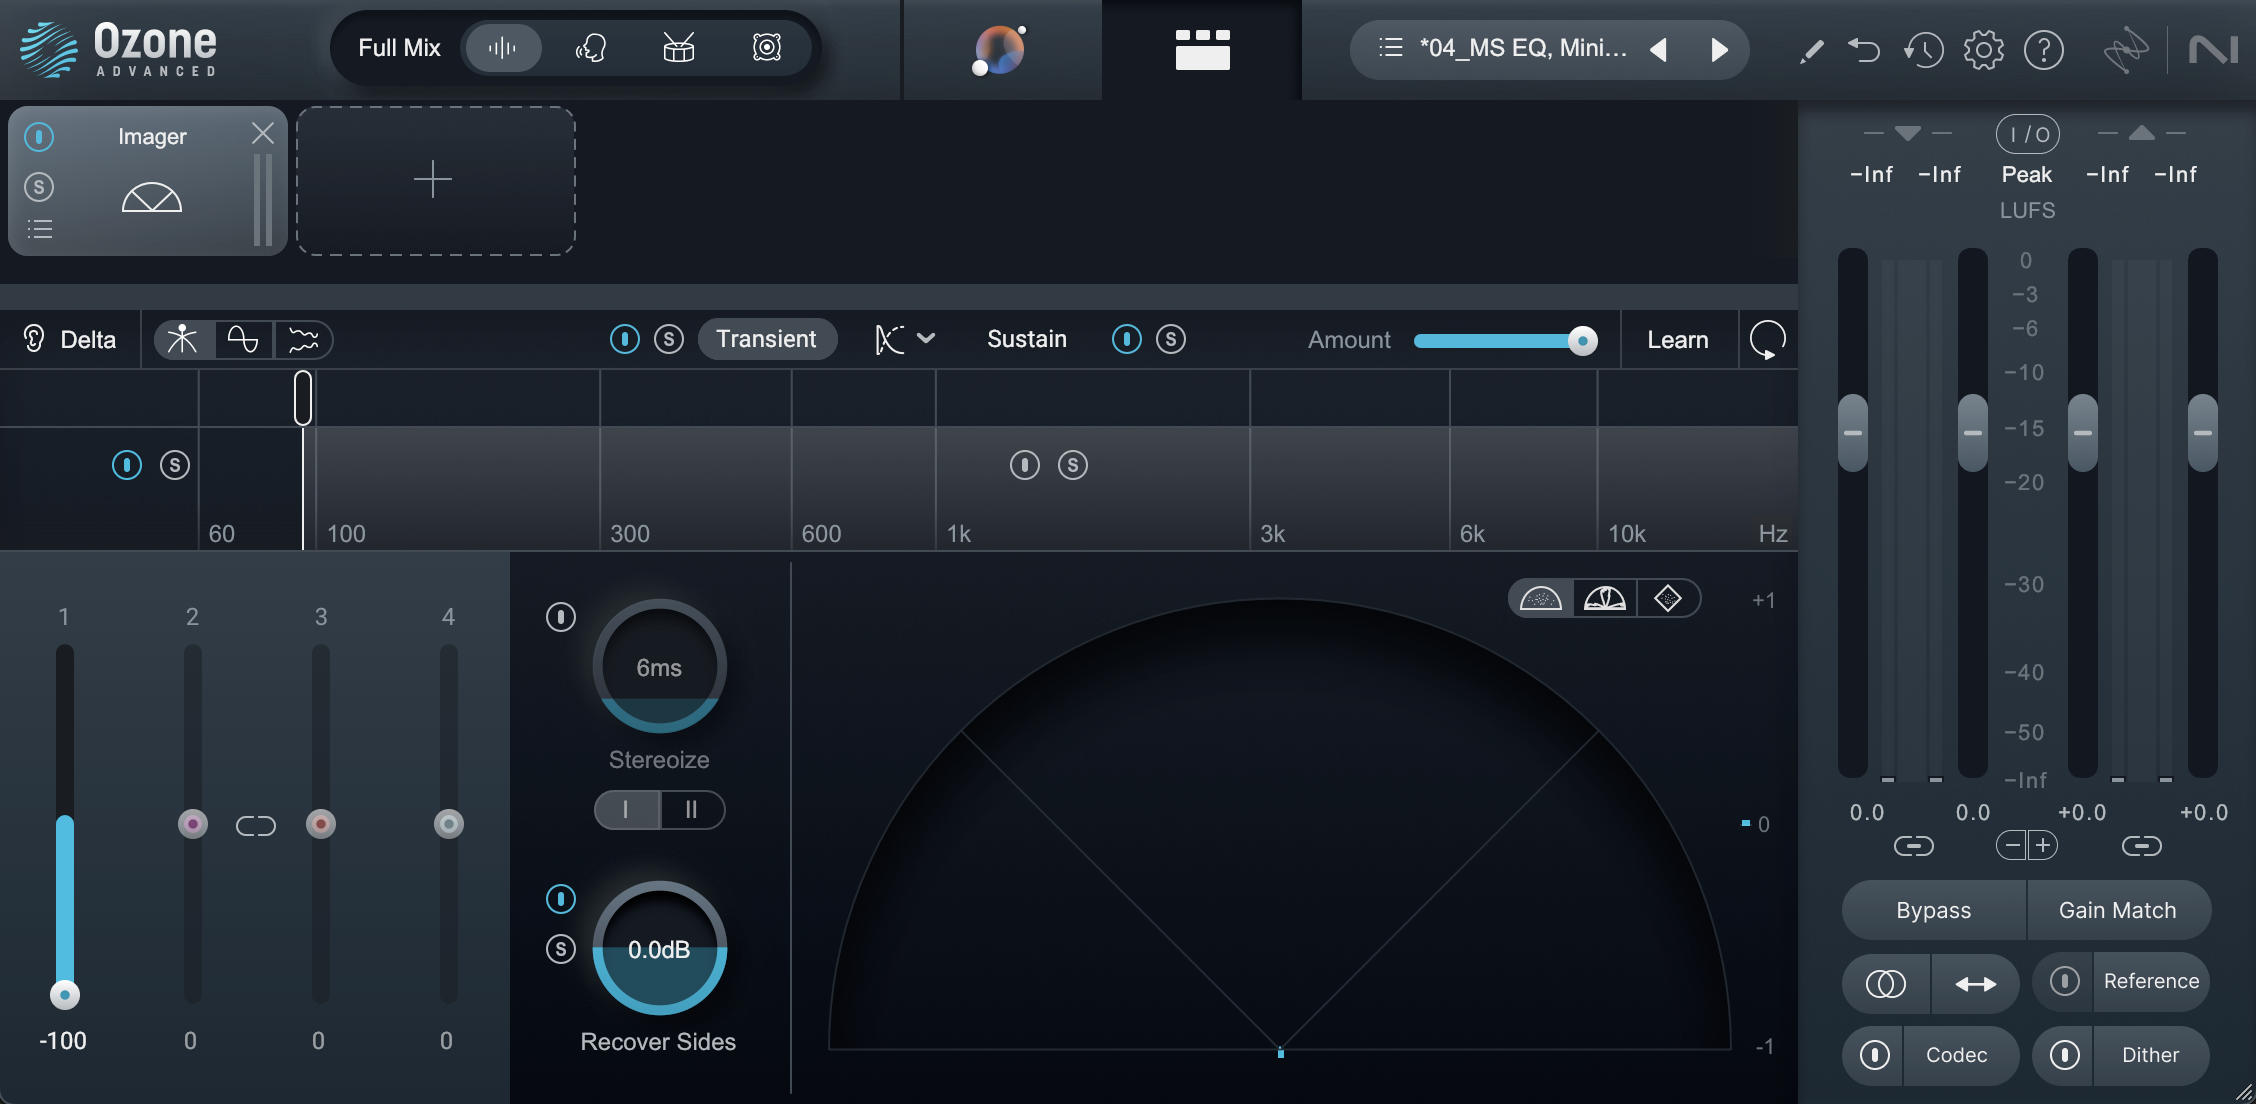
Transient/Sustain imaging
As with the other techniques discussed above, this isn’t something you always need, but when you do it sure is a nice option to be able to pull out of your tool chest.
Start using Ozone’s advanced capabilities
As we’ve seen, Ozone is a versatile tool that balances ease of use with advanced mastering capabilities. Above, we covered five expert techniques using its robust features, such as multiband upward expansion, upward compression, and mixed-phase EQ. By digging deep into modules like Dynamics, EQ, and Imager, you can breathe life into over-compressed mixes, fine-tune transient balance, and sculpt stereo imaging – methods that empower you to achieve polished, professional results.
It should be noted that often, a mix revision may be preferable to some of the approaches we’ve examined, but when you need them, techniques like multiband upward expansion can inject excitement and detail into over-compressed mixes, while upward compression allows you to boost low-level signals without crushing transients.
Mixed-phase EQ enables nuanced control over tonal balance, phase coherence, and imaging, especially in mid/side applications. Transient-sustain imaging further enhances this type of control, allowing precise manipulation of stereo width for transient and ambient components. Together, these techniques showcase Ozone’s potential as a powerhouse for achieving professional-quality audio mastering.
So, whether you’re an existing Ozone user looking to up your game, or a professional who thinks Ozone is just for the bedroom-producer crowd, you should now have a good understanding of Ozone’s powerful capabilities lurking beneath the surface. Good luck, and happy mastering.
