5 Tips to Record Professional-Quality Voice Over at Home
Learn how to get a professional-quality voice-over sound out of your home studio setup with these five tips.
Whether you’re an actor, podcaster, streamer, or spoken word artist of any sort, it’s important to have solutions to the many challenges recording from home poses. All of us want to achieve results so good, so polished that no one could tell we recorded in our bedrooms.
But recording a voice-over at home is not easy—there are pitfalls all throughout the process. And professionals need to achieve results so good and polished that the common listener can’t tell we recorded in our bedrooms.
How do we do this? Read on to find out how to record a voice-over at home that sounds professional, along with important voice-over tips.
Follow along with iZotope


RX 10 Elements
1. Set up your recording space
Room treatment is very important. It might not be the most glamorous thing to spend money on, but it’s the single most important expense for achieving a quality sound at home.
It doesn’t matter if you use a cheap USB mic, an SM57 into a pro-sumer interface, or the most expensive gear on the planet. If you don’t have a room that is quiet and free from unwanted frequency buildups, you’re not going to get a good result.
So you must treat the space. How you do this is dependent on the space you’re using for recording, as well as your chosen profession. You can read more about the process in our room treatment article.

Have all your gear either plugged straight into the wall, or plugged into a power conditioner.
Of course, all the treatment in the world won’t matter if your room itself isn’t quiet. What do I mean by quiet? Free from any noise that comes from machines and the outside world.
Tuning out the outside world can be a matter of bank-breaking expense; it’s the reason people go to professional studios, as they are often built with floated floors, walls, and ceilings to mitigate the outside world.
But you’re not aiming to record in a studio. You want to cut costs by recording at home. Luckily there are things you can do to achieve your goals.
First, minimize the noise within your control. If your fridge makes noise, unplug it for the duration of the recording. You'll likely have to forgo the air conditioner. Often the mic can pick up the sound of your computer. Here, longer cable runs from the studio machine might be necessary, or, if you don’t have space, you might need to purchase a hard disk recorder and plug your mic into that.
For actors, narrators, and radio presenters, quietude is especially key, so you must do whatever you can to minimize machine noise. Podcasters have some leeway: nobody is going to judge Marc Maron or Chapo Trap House on their room noise.
Streamers are more in control of any music bed that underpins their video. If there is a music bed or the underlying sound of a video game in your stream, you can have leeway to be a little noisier, so long as you can mask the noisiness with your existing soundbed.
For everyone else, there’s iZotope RX—the magical tool that can expertly expunge extraneous and erroneous noise from your recordings. More on how to use RX later, I promise!
2. Use the right equipment
When you're recording a voice-over, you need the right gear for the job—and when it comes to gear for the spoken word in the home-studio environment, the goal isn’t mojo or warmth. Cleanliness is key above all else.
You want a low signal-to-noise ratio and a clear/present sound. This is more valuable than any harmonic saturation in the world. A vocal with soaring trebles may be perfect for an RnB recording, but for a podcast, trebles need to be kept in check. High, whispery tones can become distracting and hard to listen to in a spoken word context, and distortion sticks out without a music bed.
Indeed, clarity extends beyond the mic and interface choices and goes into accessories. You ought to get a pop filter to minimize plosives (though RX can handle them as well).
You can get mic stands that minimize vibrational noise, or boom arms that stay both silent and convenient for adjustment.
The easiest equipment setup for voiceovers that works really well is this:
- Shure SM7B microphone
- A Cloudlifter preamp
- iZotope RX Elements
- Any audio interface like KOMPLETE AUDIO 6
This combo is almost a cheat code for ignoring the problems of inferior spaces and noisy rooms. If you have to keep it cheaper than that, you have options, but you’ll have to perform some unconvential problem solving.
If you’re streaming on camera, your choices depend on whether or not you want the mic in the shot. If you want a more clear and present sound, the mic will be in the shot, right in your face. If you don’t want the mic in the shot, you can pull it further back, but you will pick up more room tone, and you’d do well to make sure your room is treated and quiet

Using the right equipment can make a big difference in professional voice-over quality
3. Prepare yourself for the voice-over recording
Now it’s time for all the things you might not have considered, like your actual performance. You need to have everything prepared to record the best takes you possibly can.
Do you work with a script? I bet you haven’t thought about how crinkly the pages are going to be, have you? Remember that the mic picks up everything, so consider getting a tablet prepared with your lines or remarks instead of a ream of paper. Have a drink of water and eat an apple if you can to minimize mouth clicks before you even record.
Remember that you have the opportunity to edit, so you don’t have to be harsh on yourself, or put too much pressure on yourself should you mangle a word. Just record what you need to record multiple times.
One thing I’d like to add: it’s always good to slate your takes. In layman’s terms, this means clapping your hands once and solidly before each take, and then announcing what it is you’re about to record.
We do this because it creates a visual marker for the editing process:

"Slated" takes allow for easy visual representation
This is a screenshot of a video for iZotope I’m currently editing. I’ve circled where I’ve clapped. It makes a visual spike, and I know each clap is the beginning of a new take, which makes navigating the session easier.
4. Learn proper mic etiquette
One of the most important voice-over tips is proper microphone etiquette. A vocal is the only thing on display, mic technique is exceedingly important. You want a full and healthy sound without any faults from bad cables, overt sibilances, or distracting plosives. To that end, here are three tips:
- Invest in a windscreen for your microphone. Some engineers don’t use a windscreen when recording sung vocals, because it can soften the high-end. I don’t find that to be a hindrance in voice-over recording.
- Your biggest obstacle when recording vocals in a treated room at home will be minimizing room ambience. Not room noise, but room reflections. Even a well-treated bedroom or living room can add ambience to signal. So, use close-mic techniques to your advantage.
- A lot of USB mics, broadcast dynamics, and condenser mics have cardioid polar patterns. You would do well to try this pattern out, and speak anywhere between four and six inches away from the capsule. This can help you “overpower” the room.
To demonstrate this last point, here is my voice in a treated home-studio room, using a USB microphone plugged into a laptop, recorded about 12 inches away from the capsule.
This is my voice in the same room, about six inches from the capsule.
Finally, this is what it sounds like when I speak about three inches away from the capsule.
You’ll note there are positive and negative aspects to each of the closer examples, so try to find the best compromise that works for you. You’ll find that if you speak directly into the mic (on-axis), you might hear unwanted high-frequency harshness or sibilance. It might be aggravating whenever you say a word with the letter S or F in it.
You can experiment in tamping down sibilance in the recording stage. Simply repeat the word “sibilance” into a mic while moving around the capsule, going from addressing the mic dead-on straight (on-axis), or address the capsule diagonally (off-axis). The optimal position will be one where you don’t lose too much presence, but you aren’t ripping your ears off with sibilance.
Finally, here’s a bonus tip that leads us into editing:
Always record room tone around your takes, even if it’s only ten seconds of relative silence. That way, you’ll be able to feed RX audio to help it learn what to fix during the editing phase. Use this room tone when implementing RX De-Noise, De-Hum, Ambience Match, and other modules.
5. Clean up your voice-over audio
Even in the most treated rooms, you can run into issues that would demand audio repair software like RX. A burst of low end could ruin the best, liveliest take. Using a tool like RX De-plosive would fix this in a second. Maybe you forgot to eat your apple (to reduce mouth noises), or you just drank a big ole glass of water; you’d want RX Mouth De-click to get that out.
In a home environment with bespoke treatment, you’re apt to run into sonic irregularities sometimes, so it’s wise to invest in RX. Start with Elements if common de-noising and de-clipping is what you think will be best. I’ll show you how powerful it is now.
Observe this vocal:
We can hear room noise, room ambience, and clipping distortion. We’ll use the following settings to sort all that out in RX.

RX Voice De-noise plug-in
We’ve used the Learn button on a piece of audio that’s capturing room tone to learn the noise profile of my room.
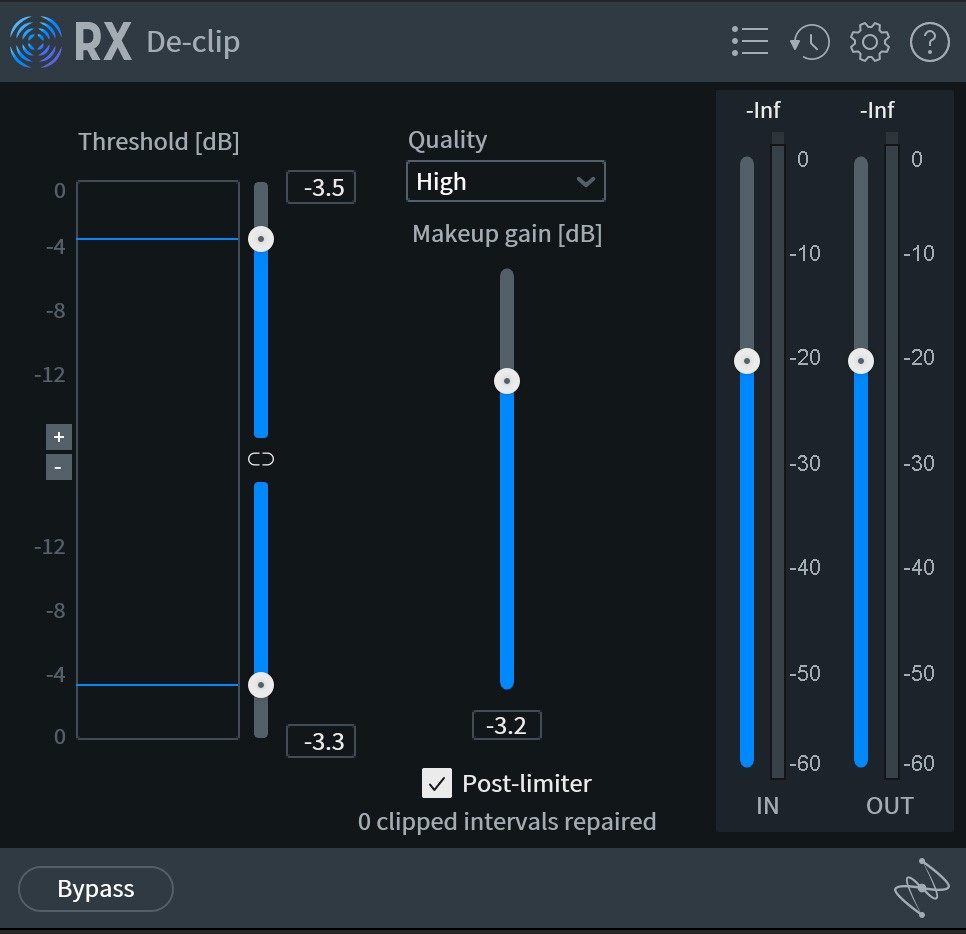
I’m also using the de-clip to take out as much of that clipping distortion as I can without harmful sonic tradeoffs.

RX De-clip plug-in
Finally, De-reverb helps us mitigate some of the room ambience. I’ve used the Learn button again to train the plug-in to distinguish the background ambience from my voice.

RX De-reverb plug-in
Using those RX modules to help clean up the audio will bring us to this result.
RX Elements is fantastic for the price—but if you’re a pro looking to make a living doing this, you’ll find yourself upgrading to standard in no time. As powerful as De-reverb and De-noise are, Dialogue De-reverb and Spectral De-noise are even more transparent and useful, to say nothing of the vast spectral editing abilities in the full-bore version. RX Elements is absolutely great for starting out; RX Standard, working at home, will be a boon to making your sounds as professional as possible.
Start recording voice-overs at home
That about does it for tips on recording professional quality voice over at home—at least for the space we have here. If you want to see a comprehensive article on editing VO in any DAW, let us know and we can make that happen.
For now, I’ll leave you with one last plea to treat your room: it really makes a difference; it is more than half the battle.

