11 Tips to Fix Cheap Sounding Audio in the Mix
Home recording studios have come a long way—but they can still yield cheap-sounding audio. So when a flat sounding drum kit or a comb-filtered vocal comes your way, read these tips to learn how to make them sizzle!
I don’t know about you, but I get a lot of material made in home recording studios. And while a lot of the raw sounds coming my way are great, many recordings sport flaws that impart a palpably “cheap” sound to the material. These flaws have many root causes, such as interfaces that don’t do well for dynamic range or harmonic content; rooms that impart comb filtering to vocals; basses recorded without definition; and badly mic’d drums.
It’s my task, among others, to make these “cheap” sounds feel more “expensive”—that is, to help these mixes play nicely against their better-recorded references. They need to work in a Spotify playlist. They cannot be trounced by the competition. This is my fundamental meaning when I use terms like “cheap” and “expensive.”
Now, can we define a “cheap” sound? For our purposes, I believe we can: a cheap sound problematically alerts you to how and where it was recorded, taking your attention away from the sound itself.
“Expensive” is more difficult to define; consider that a hissy, band-passed signal used to cost a lot of money; it was the only game in town when Edison was king! So let’s shift the target a bit: if you’re listening to a reference, and you only appreciate the recording for how well it works, that’s expensive enough for us.
There’s an old saying in mixing involving polish and unmentionable bodily excretions. To some extent, it’s true, but there are some things you can do. We’ll cover some common scenarios instrument by instrument, but first we must mention some basic strategies to get things to the right starting place—a place where you can make creative decisions.
Proper editing
I’ve written on editing in several articles—here and here are good places to look—so I won’t go into detail in this piece. But editing sloppy performances into something more tight and powerful can help you re-energize a performance, and make it something worth polishing.
Phase alignment between multi-mic’d instruments
This has also been covered, but it’s no less essential. Make sure drums, guitar cabs, pianos, and anything else with two or more mics thrown up is properly phase aligned.
Clear panning decisions and proper levels for the static mix
Before moving to individual instruments, try to work out a static mix where every instrument has its own stereophonic location, one that doesn’t tread on the heels of another instrument. Likewise, instrument balances should be solidified, so that everything is present in the way it needs to be. Make sure you can hear the vocal over the guitar; make sure a tom isn’t drowning out the rest of the kit when it's struck.
Common sense measures, I know, but they are foundational for the following tips and tricks, which we’ll cover instrument by instrument:
1. Your drum overheads sound dry
Sure, the sounds are all there. But something is missing. Under the microscope, the snare is papery and thin. The ride cymbal resembles someone dinging a toy bell. The crashes are splashy. The toms don’t have much weight and power.
Start by identifying reference tracks for great, appropriate overheads. I constantly come back to “Everybody Here Wants You” by Jeff Buckley and “The Raven Who Refused to Sing” by Steven Wilson. These songs provide a big, naturalistic overhead sound.
For your overheads, try an incremental approach. Here stacking plug-ins or modules might be a good idea, provided each one adds a little something to the mix.
Let’s start with the idea that we want to improve the overall timbre before making adjustments a micro level. Here, we might skip EQ first and try some broadband color injection by means of “analog” flare; a tape saturator from Ozone, followed by some low-level harmonic excitement from Neutron, might do the trick if used subtly. Look for broad tonal improvements—less harshness, a more pleasing smoothness. These things can be obtained with tape-style compression and emulative saturation.
Next, a character compressor might work. Aim to bring out the room a little, and to smooth peaks and valleys in the signal that are causing everything to feel off kilter. Don’t go crazy here—the key is minimal, but noticeable, improvement on a global scale.
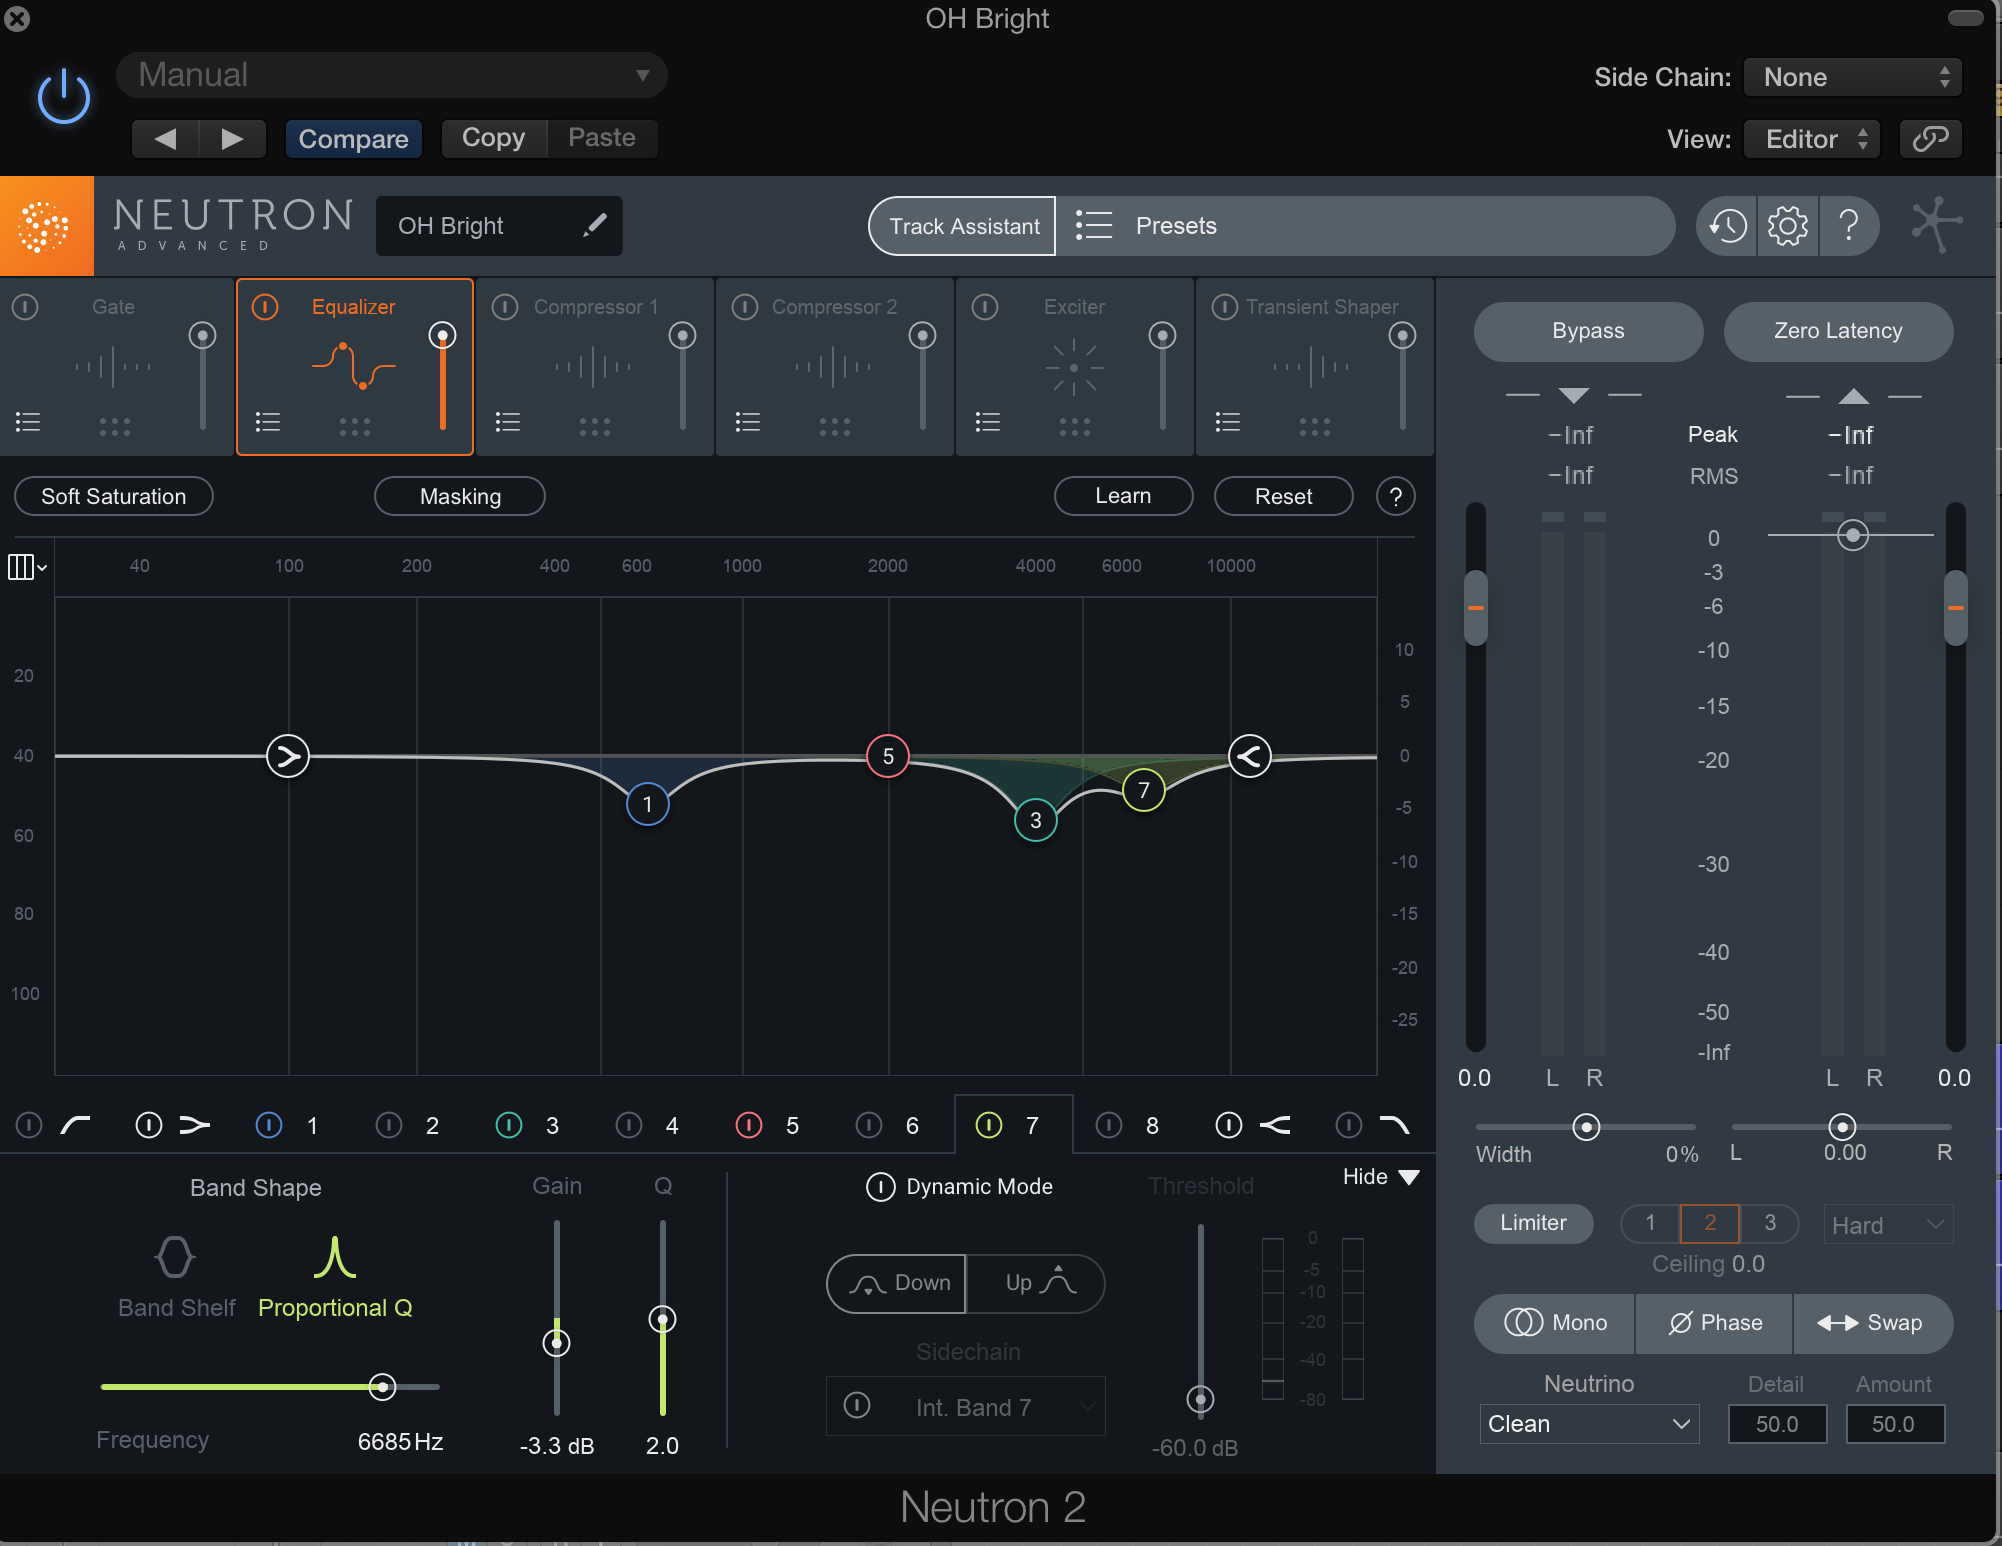
If we wind up aggravating some already resonant frequency, don’t worry, it might be worth the trade-off. And besides, now we can bring in the EQ. We want to use minimal dips in the overly harsh areas.
If it’s horrid whenever a crash comes in, try a small, dynamic attenuation at the frequency center, usually 3–6 kHz. That papery frequency when the snare hits, it may be in the 6 kHz range as well. Try a small dip there. The frequencies may change depending on the recording, but try to locate problem areas for the snare, the crashes, and the toms, and use small attenuations to deal with them.

Overhead EQ
How do things sound now? Are the snare, toms, and crash cymbal okay? If so, let’s move onto the ride. What can we do to improve the “dink?”
Try a little reverb, one that focuses on the frequency of the ride we’d like to bring out. Buss the overheads to an aux track, EQing before the verb to bring out the register of the ride. It might look more like a bandpass than anything else, and it’s probably lower than you’d think you’d want to go, perhaps in the 900 Hz area. We want to round out the body of the ride, and that’s why we aim so low. Time the verb to track and edge it in ever so carefully.
Next, route both the reverb and the overheads to another auxiliary channel, so you can marry these two timbres with further downstream processing, like another round of light, gluey, character compression, or a vibey EQ to give some high-end sheen or low-mid gravitas.
No one of these elements is doing any heavy lifting—I’m rarely hitting more than 0.5 dB of gain reduction, for example. But taken together, we elevate the sound to something that feels more expensive.
2. Your kick sounds like a beachball
If your kick sounds like a beach ball, it’s not the end of the world: try attenuating the midrange a good deal and boosting the lows around the fundamental. There might be a high, resonant ringing that isn’t helping. Look for it and notch it out. From there, you can send the kick to a buss for parallel compression and a healthy amount of harmonic distortion to fill out the midrange again. When you edge the parallel-compressed track back in, the kick should sound more pleasing than it did before.
If that doesn’t work, there’s always sample replacement.
3. Your snare sounds like someone flicking a piece of paper
Try a cut around 6 kHz, and a boost between 100–200 Hz to see if that adds some body. If you’re lacking impact on snare hits—if it feels a bit flat—try some compression next, emphasizing the transient with a medium attack and a medium-fast release.
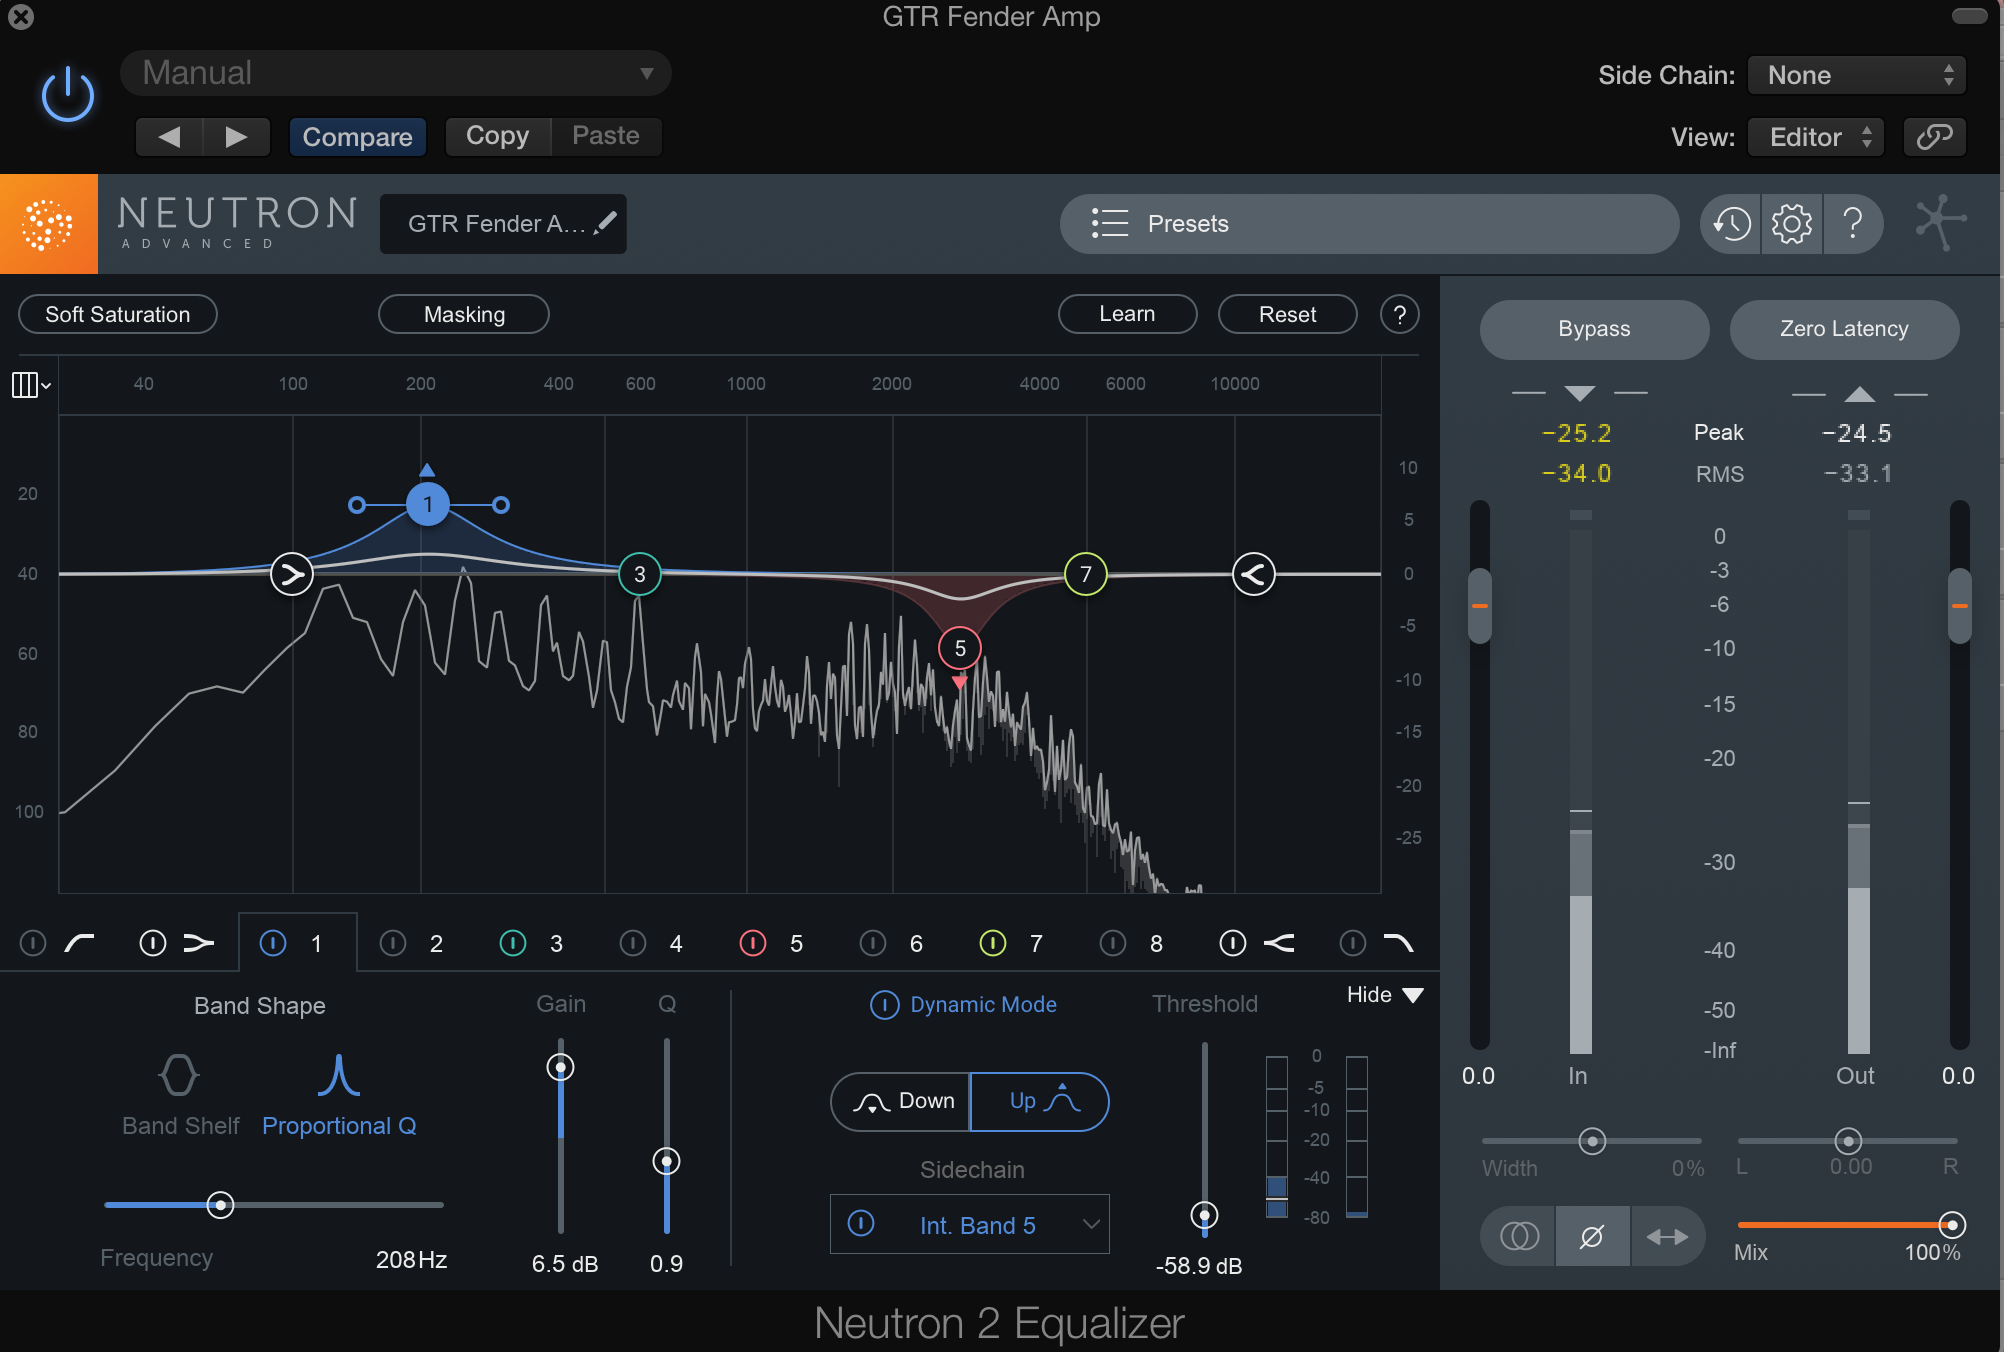
You may still hear that dreaded papery noise. If so, solo the snare and see if it goes away. You may be surprised: one of the first things I look for in dealing with a papery snare is whether that sound is actually coming from the kick; often it is. In this case, attenuate that frequency in the kick track with a dynamic equalizer that’s sidechained to the snare. You can easily set this up in Neutron 2, as shown below.

Kick sidechained to snare
You may need to mult the snare, gate it, and sidechain to the multed track.
4. The snare lacks body
If you’re finding there’s not enough body to the snare itself, no matter what you do, here’s a trick that might work:
Send the processed snare to a parallel track. Gate it, so you only hear the snare hits. Pitch it down a semitone or two. Add EQ to beef up the 100–200 Hz range, slap on an amp simulation to cheat the sound aware from its mechanized roots, and finally, throw on reverb that compliments the flavor of the material. Edge this to taste—you don’t want too much of the track, just enough to suggest body. Such a chain might look like this:

Parallel snare
5. There’s no high end in the snare
If there’s no bottom snare mic, and your snare has no high-end, you’re not out of luck yet. Mult the snare, copying it over to a new track. EQ the first copy to minimize ring and give you a nice, beefy hit, with a little bit of crack. Frequency ranges may change depending on the snare, but try 100–200 Hz for the beef, and 1 kHz or so for the crack.
On the mult, gate the snare, so you only hear the hits. High-pass everything to around 4 kHz, and maybe boost a shelf around 8 kHz. Add high-end excitement with Neutron or Ozone. Maybe add some compression or transient shaping, depending on whether you want to emphasize on the attack or sustain. Now edge this in until you can hear the sizzle. If it sounds out of place—obviously fake, in other words—try sending both copies to a subtle reverb that helps marry the two together.

Parallel high-end snare
6. Your bass lacks high-end content
Sometimes a bass comes in that’s overly woofy, fuzzy, beefy, and ill-defined. Ask yourself, does it suit the material? If so, it’s a matter of fitting into the mix, of curtailing the bits that bloom unhelpfully. Dynamic EQ can be of service, because sometimes the bloom doesn’t happen, so you wouldn’t want to cut that frequency all the time.
Now, if you do need high-end in your bass, cheer up, because all is not lost. Your methodology here is a bit like the snare trick above: copy the track, isolate what little high end there is with EQ (make sure to grab some mids as well), add some harmonic excitement (the mids here help generate overtones higher up), and edge the signal into the mix. Sometimes modulation, like chorus or even flanging, can help this track cut a bit more. So can compression.
7. You need more meat from your bass or electric guitar
I’m grouping these together for lack of space, and also because the general principle is the same: if you’re missing vital meat for these instruments, here’s a way to get some viscera out of that bone. Again, your tools are parallel processing, EQ, harmonic excitement, and if necessary, modulation or reverb.
Copy the offending track. Identify the frequency range you want to hear—the one that’s missing. Isolate both this range and any frequencies immediately below (i.e., grab the 100 Hz range alongside 200 Hz, or 40 Hz alongside 80 Hz). Stimulate more of this range with harmonic excitement, from Neutron, Ozone, Nectar, Trash, or any other harmonic excitement plug-in at your disposal. Hopefully, the inclusion of frequencies below the targeted band will help the distortion to liven-up overtones that can fill out the missing band.
Where do modulation and reverb come in? The former can be used to thicken the sound more if employed subtly, and also, to help the sound stand out a bit without raising its apparent level.
If you find the parallel bottom-end offers little staying power—if it plonks out of the mix and dies quickly, without benefiting the sound—try a short, subtle reverb (Yes even on bass)! You must tune its frequency and tailor its time, but still, it can help this parallel track feel like feel more like a part of the original sound. But please, don’t overuse this reverb! You need barely a touch.
8. Your electric guitars are harsh in the midrange
Sometimes a guitar amp mic’d in a home recording studio gives off an overzealous high-midrange, one that sounds too harsh. Unfortunately, a static cut in the high mids tends to dull the sound, rather than solve the problem. Here, dynamic EQ can come to the rescue. Try a dynamic cut where the harshness occurs in the high-midrange, and then, sidechain a small boost around 200–300 Hz to this high cut. This helps lift the lows slightly whenever the harshness comes in.

Electric guitar
Low level amounts of harmonic saturation can also do some magic here. An alternative chain could be Ozone’s Vintage Tape module, followed by an infinitesimal amount of harmonic distortion (try the Warm or Retro Setting), and then spectral shaping on the high-mids, all before EQ or compression.
9. Acoustic guitars that suffer from the room
A badly recorded acoustic guitar in a dense arrangement isn’t the end of the world. You can fit it into the mix with the usual tools—high pass filtering if necessary, attenuation in problematic frequencies, dynamics-taming to even out the playing, and panning.
But when your badly-recorded acoustic guitar is the standout track, it’s a much deeper problem. A naturalistic, beautiful sound is probably out the question.
I’ve tried various ways and means—parallel warmth through low-level harmonic distortion, fake stereo through EQ adjustments and stereo delays, reverb as an atmospheric enhancement. At best, I have something that kinda, sorta works. Usually, it winds up being a waste of time.
Instead, go for vibe over sonic glory. A tune like “You Will. You? Will. You? Will. You? Will.” by Bright Eyes comes to mind, with its far-away vocals and roomy guitar, both used for effect—they bolster the isolation of the singer. Try extirpating the problematic frequencies and suiting your mix to the repair work you had to do.
If the producer really wants something else, then you ought to recommend the track be re-recorded; try to cultivate a relationship with the producer that allows you to make this suggestion in a way that would be welcomed.
10. Your piano doesn’t sound so grand
The same applies here, too: if the piano can sink into a dense mix, that’s one thing. If it’s the standout feature, you’ve got similar options: a vibey mix built around fixing the piano (check out Hawksley Workman’s “Song for Sarah Jane” for an example of a vibey piano and vocal combination), or the suggestion of re-recording.
However, there is another option available to you. It’s not cheap, it’s very time consuming, and it’s not ideal—both ethically and sonically. You can sample-replace the piano with Melodyne (in polyphonic modes) and an excellent piano library. Please be advised that even with love and care, you won’t create a sound that fools the mastering engineer; this person will spot the fake. Divorcing the track from its reality will have, at the very least, subliminal effects on the listener. Still, this technically is an option—one that Dr. Gregory House might employ if he were a mixing engineer, but an option nonetheless.
11. Vocals suffer from comb filtering
Comb filtering in the recording can be caused by recording in a badly treated room. If you can’t spot it with your ears right away, you’ll feel it with your frustrated heart: none of your conventional EQ tricks will rid the sound of its weird, apparent thinness.
The way I see it, you have two primary options: saturation for a vibey sound that hides the filtering, or controlled reverberation to fill out the low-end, which usually results in a more “live” feel.
For the former, try using something like Nectar 3. Pinpoint the offending frequency in the high-mids, and instantiate a dynamic attenuation from the EQ section. Then, put the band in follow Follow EQ mode. That way, the module can track these harmful nodes and do its best to minimize them. Next, try adding some distortion, either in parallel with the module’s slider, or subtly with 100% distortion. This effect can effectively work to hide the signs of comb filtering.
The other tool, as you may have guessed by now, is reverb—used here specifically to engender the feeling of a live concert in an area setting. First balance the signal as best you can with a combination of subtractive EQ, boosts emphasizing what’s missing from the signal, some pleasant harmonic distortion to fill out the missing frequencies due to comb filtering, and some character compression for even more tonal glue.
Next, send the vocal out to a slap delay and a big reverb. Send some of the delay to the reverb, and edge both the delay and the reverb into the mix. The result may feel more like a living, breathing vocal.
Conclusion
You’ll notice we didn’t cover MIDI instruments; that’s because you can change them to better sounds. We also didn’t cover analog synths, electric pianos, horns, and other instruments. That’s because we’ve run out of room! But, if you’re canny, you’ll spot some of the same techniques employed frequently: parallel processing, harmonic saturation, and reverb used to bring out the tones we want to stick around. These tools, when used creatively in the ways demonstrated above, can really help you out of a bind. They might not make your mix sound like it was recorded at Ocean Ways studio, but you should at least get them out of the bedroom!


