Mix Bus Compression 101
Learn how mix bus compression differs from other uses of compression, and how it can enhance your mix, smoothing musical dynamics and “gluing” tracks together.
One of the more difficult concepts in audio production to fully understand, and consequently apply effectively, is mix bus compression.
Adding a compressor to your master mix bus can add punch, smooth out overall musical dynamics, or “glue” your tracks together adding thickness and density to your mix. If applied incorrectly or too aggressively, it can overly squash transients and destroy musical dynamics, potentially rendering your mix flat and lifeless.
In this article, we will explore what mix bus compression is and define best practices for applying it to your mix bus with different examples.
Learn how to apply mix bus compression in your mix with a free demo of


Neutron
What is mix bus compression?
Mix bus compression is the act of adding a stereo compressor to your final mix bus chain, thereby compressing the entire mix. Unlike using compression on a single track such as a kick drum or a bass guitar where you have the freedom to be more aggressive with your settings, mix bus compression often requires a more subtle and constrained approach as it will affect every element in your mix simultaneously, and interdependently.
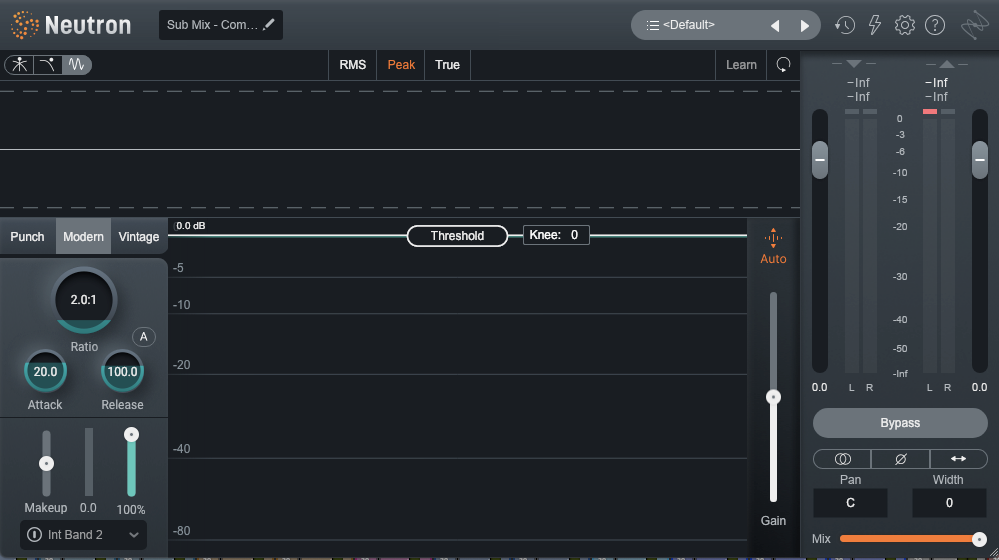
Stereo compressor in Neutron
Should I always use mix bus compression?
Some mix engineers choose not to use mix bus compression, opting to leave the mix bus “pure.” However, there are just as many mix engineers who choose to use a stereo compressor like the one included in Neutron or Ozone, for example, as part of their mix bus chain. Whether or not to approach a mix this way is a matter of preference and neither is better or worse.
The key here is to apply the stereo mix bus compressor at the very beginning of the mixing process. It is always better to “monitor through,” or ”mix into” a mix bus compressor while you work as this type of compression will affect the relative dynamics of your entire mix. Adding a compressor after you have finished mixing has the potential to undo all of your hard work, and is best left for mastering.
A common misconception about compression
It is a common misconception that compression makes things louder. In reality compression makes things quieter. By reducing the louder moments in relation to the softer moments, we reduce the overall dynamic range of a signal. This in turn will grant us more overall headroom hence allowing us to then turn the entire signal up, in effect, making it louder.
Mix bus compression parameters
Many of us already know and understand the different parameters of a compressor, however, mix bus compression is unique in its application compared to other uses of compression. With this in mind, let’s take a look at how these parameters affect a signal when that signal is your entire mix.
Attack
An attack time that is too fast can squash transients causing our mix to lose impact and punch. A slower attack time will allow more transient information to pass before the compression engages.
Pro tip: When learning to hear attack times, it can be helpful to start with a long attack time, somewhere around 80ms, slowly lower it until you begin to hear it affecting your transients, shortening, or pinching them, and then back off the attack time to the desired amount.
Release
Quite often our release times are set in relation to the tempo of the track. The trick here is to enhance the groove of the song, not fight against it. This is achieved by allowing the compressor to return to unity gain, or close thereto, before the next major transient occurs.
When set too slow, the compressor will not have a chance to return to unity gain by the time the next major transient occurs causing it to be diminished and your mix to lose impact.
In contrast, setting your release time too fast can potentially create distortion or cause your mix to “pump” unnaturally.
With the


Neutron
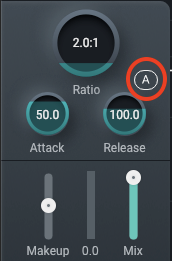
Adaptive release circled in red in Neutron
Ratio
When implementing compression on an entire mix, a little goes a long way! Anything more than a ratio of 3:1 on a mix bus, as a general rule, is too much. I try to keep my ratios in the range of 1.5:1 to 2.5:1. I recommend starting with 2:1.
Threshold
Threshold is the level at which compression will start to take place. At any moment, any part of a signal that goes above the threshold will cause the compressor to engage. There is no set level to recommend here as it is dependent on the program material you are working with. This is as much the case with a single instrument as it is with your entire mix.
Makeup Gain
The human ear has different sensitivity to different frequencies, at different volumes. As we turn things up we become more sensitive to low and high frequencies. For this reason, louder often sounds better, making it difficult to maintain objectivity when making comparisons.
Makeup gain allows us to offset the amount of gain reduction applied by the compressor to match that of the original uncompressed signal. This is important in order to make an objective assessment of how the compressor is affecting the sound. Is it actually making your mix better, or does it just seem that way because it is louder?
With the Neutron Compressor we have the option of engaging “Auto Gain.” This feature will automatically adjust the output gain to compensate for changes in level as a result of dynamic processing.
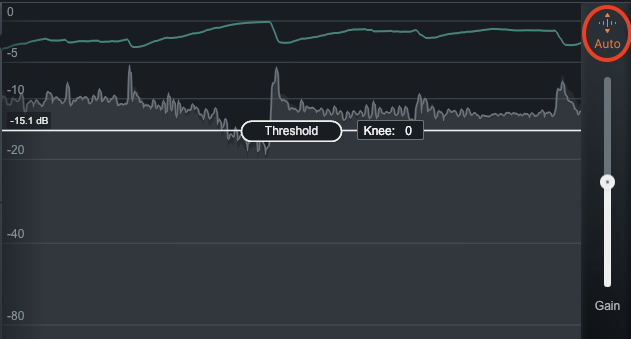
Auto gain function in Neutron
Mix bus compression audio examples
Let’s listen to some examples of mix bus compression in action, from emphasizing punch to using a sidechain filter to achieve transparent compression.
Emphasizing punch with mix bus compression
Let’s start by listening to an unprocessed mix of “Overconsious” by In Tall Buildings.
We can hear that the uncompressed mix is already quite punchy.
By engaging our compressor with the following settings, let’s see if we can’t emphasize that punch just a bit more while simultaneously adding a bit of glue.

Using Neutron to add a bit of punch and glue
Notice that my threshold is set to catch the transients, but only just touches the rest of the program material. I have a fairly slow attack at 50ms, a moderate to fast release at 130ms, and I have engaged the “auto gain” in order to match the level of the processed signal with the bypassed signal.
It is subtle, but you should notice that the transients are still present, the sustained portion of the signal a bit more cohesive, and there is a subtle pump to the track that is in time with the groove.
Using a sidechain filter to achieve transparency
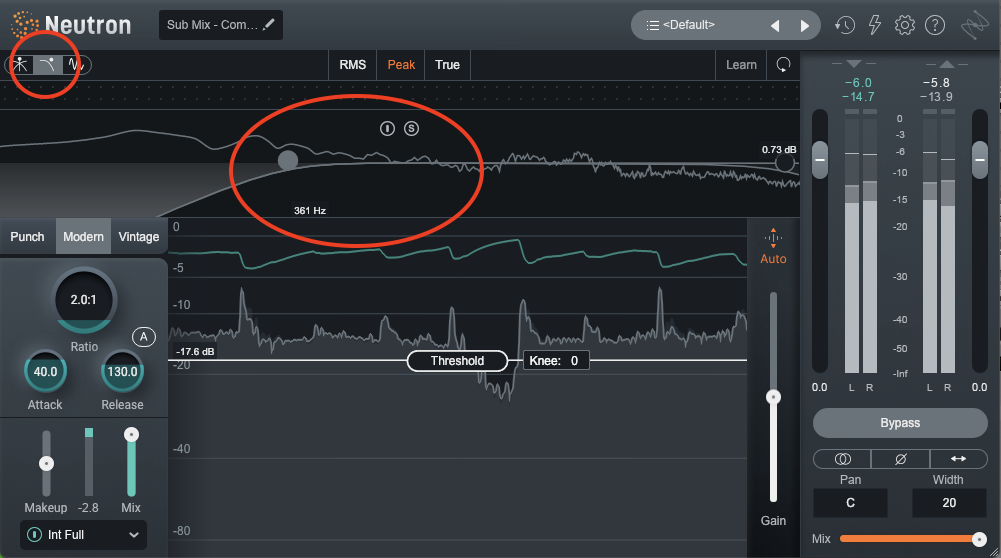
As most of the energy in a mix comes from low frequency information, it is this frequency range that causes a compressor to engage the most. This low frequency information can cause the compressor to trigger too much in relation to the upper frequency information enhancing the pumping effect and making the compression audible even with very conservative settings.
By applying a high pass filter to the detection circuit, our low frequency information, which is typically kick drum, bass and sub bass, pass virtually unaffected. In this scenario it is the mid to upper frequencies that are triggering the compressor.
In the case of our example, “Overconcious,” this is mostly the vocal and snare.
Listen to the two examples below, both with the same settings. One with no sidechain filter and one with the sidechain filter engaged.
Neutron without sidechain filtering
In this example we can clearly hear the kick drum triggering the compressor and our mix pumping.

Neutron with sidechain filtering
By engaging the sidechain filter we can achieve a much smoother, much more transparent sound. The kick drum and bass are able to pass and therefore it is mostly the vocal and the keys that are causing our compressor to work. We have maintained punch, de-emphasized pumping, and created a slightly more cohesive and overall glued together sound of the sustained notes.
What to avoid when using mix bus compression
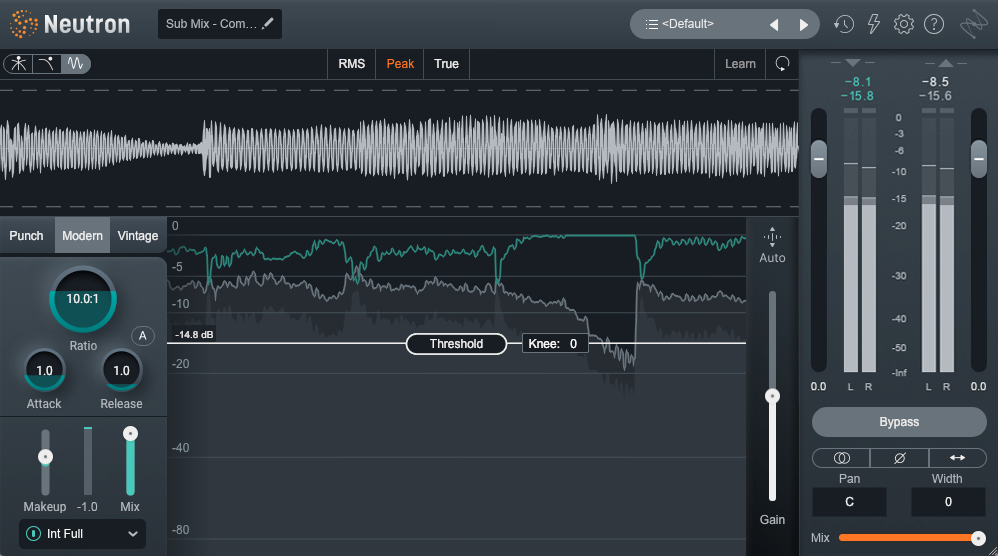
It is very tempting to want to bring down our transient information in order to create more headroom and bring up the overall level of our track. For this we often want to have a fast attack and a fast release. This would be an attempt to “peak limit,” however this can be dangerous and is often left to the mastering engineer if it is used at all.
Let’s listen to the same song again, only this time with extremely fast attack and release times of 1ms and a high ratio of 10:1.
Using Neutron incorrectly in an effort to increase overall level of our mix
Although we have made the overall track louder here, we have lost our transient material and added a fair amount of distortion. As the original mix already sounds balanced and punchy, we would be better off simply increasing the overall level by using a fader instead of compression.
Here is an example of the original unprocessed track, but with the level increased by a fader and not by compression.
As we can hear in this example, having a track that is clear, undistorted, punchy when appropriate, while maintaining dynamic range, more often than not, will sound better than a track that has been over compressed.
How to start using mix bus compression
Mix bus compression takes time and practice to begin to hear clearly and to implement effectively. No one setting is right for every song so listening and understanding what the compressor is doing is key. However, the astute among you may remember that we’ve recommended that you mix into mix bus compression from the get-go. This leads us to a seeming paradox: if every song needs its own settings, but you need those settings in order to start mixing, how do you even take the first step?
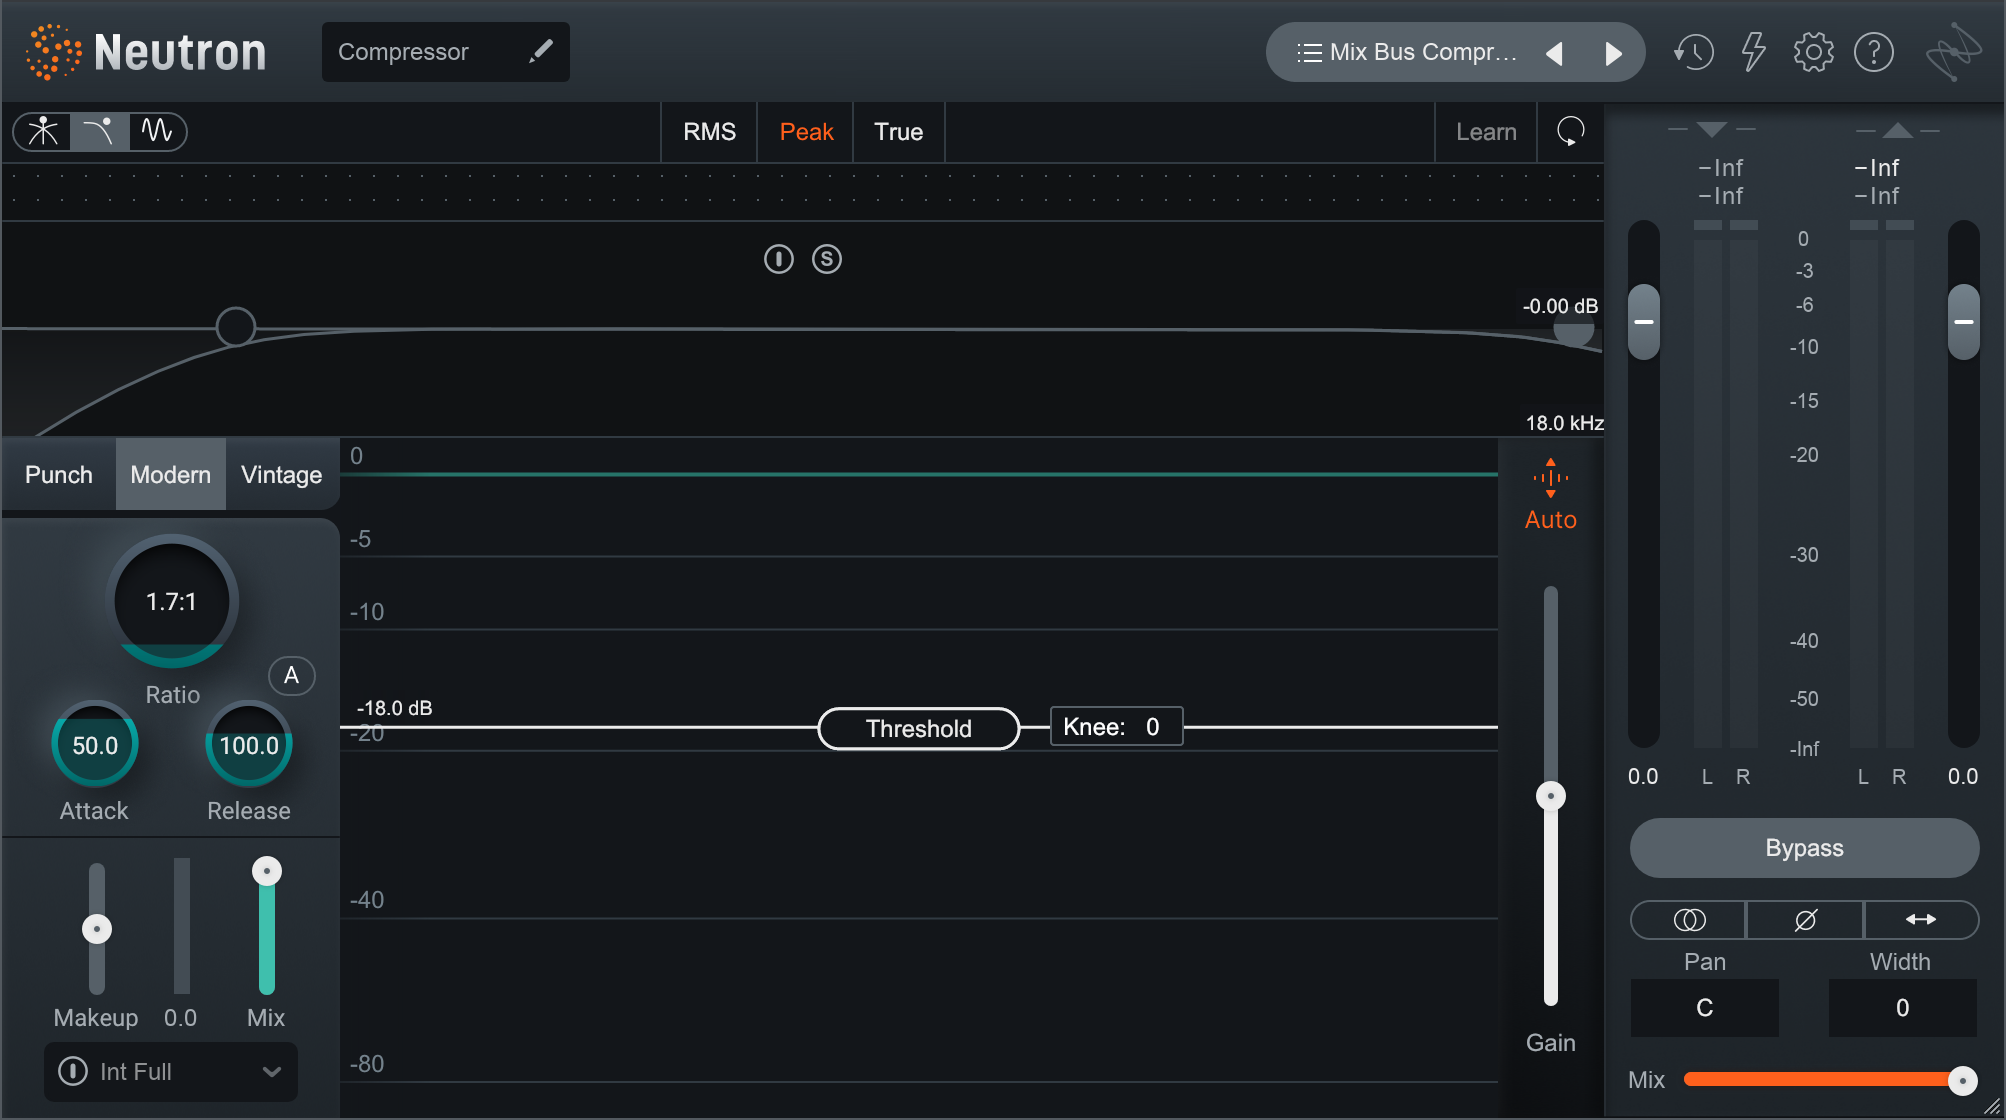
In practice, the solution is to have a default mix bus compressor that’s subtle enough to work well in a wide variety of mix scenarios. You can use this to start mixing into and setting up your initial level balance and rough mix. For example, try the following settings as a good, general, default:
- Ratio = 1.7:1
- Attack = 50 ms
- Release = 100 ms
- Threshold = -18 dBFS
In Neutron, that might look a bit like this.
Default mix bus compressor settings in Neutron
Once things are starting to feel good, you can pull up your compressor and subtly tweak one parameter at a time. What would a 2:1 ratio sound like? How about a 30 ms attack, or what about 80 ms? Can the release be shortened or lengthened a little to enhance the groove more effectively? Or maybe it all works just as it is!
One final word to the wise: if mixing into a mix bus compressor is new to you, it can be easy to forget it’s there and wonder why things are falling apart or reacting in weird ways when you push up a fader. The easiest way to avoid this is to keep the compressor plugin open off to the side and keep an eye on the amount of gain reduction. If you start to see more than 2–3 dB of gain reduction on a regular basis, you may want to consider raising your threshold, or reducing the input gain to the compressor.
Armed with these tools though, you’re in a great spot to start using mix bus compression on your next mix!
Key mix bus compression takeaways
We hope this tutorial has given you enough context about mix bus compression to get started using it in your mixing sessions. To wrap it all up, here are some key takeaways you should keep in mind when you apply mix bus compression to your mix.
- If you decide to use mix bus compression, set up your compressor before you start mixing
- As a general rule, keep your settings conservative, 1.5:1 or 2:1 ratio, fairly high threshold
- When setting release times, consider the tempo of the track
- Always A-B the uncompressed signal to the compressed signal at the same level to make an objective analysis.
- Before reaching for a compressor, reach for a fader first!
And if you haven't already, download your free demo of iZotope Neutron to help get you the professional sound you're looking for.


