Layering Drums: Benefits, Pitfalls, and Techniques
Layering drum samples opens up a new world to building custom drum sounds and kits. Let’s discuss some benefits, pitfalls, and techniques for drum layering.
As producers, we have access to millions of drum samples online. Databases like Splice Sounds make it even easier to find the perfect drum samples for a track.
But even with all of these possibilities, we can further customize our drum sounds by layering multiple samples. In this article, we'll discuss the benefits for layering drums, common pitfalls, mixing techniques to blend samples into one sound, and creative techniques to add some character to your drums.
Benefits
Before discussing the advantages of drum layering, it’s worth mentioning that doing so is not always necessary. As we’ll discuss later on, samples layered together have to work together, and ideally should sound like one drum hit (even when soloed).
In the end, if you can find one sample that does what you need it to do, that will sound cleaner than a bunch of samples sloppily layered together.
However, proper layering can often lead to more interesting results than a single sample.
The first and most obvious reason that we’d want to layer drum samples is to create brand new drum sounds. Even with the nearly infinite possibilities available for sample choice, many producers end up going for very similar drum sounds. By layering samples, you’re able to create a unique sound that likely isn’t found in another track.
Drum layering is also useful for taking the best aspects of several drums samples to create a better overall drum sound. You may find a single drum sample that is nearly what you need for your track, but find that it’s missing something.
A common example is a juicy kick drum that has nice low and mid-frequency content, but is missing some high-frequency bite or click. In this case, we can layer a more clicky kick drum to compensate for what the first sample is lacking. With some blending, we can create the perfect kick drum that we’re looking for.
Downsides and pitfalls
As we’ve already alluded to, layering drums can pose some challenges. In some tracks, you may actually want to hear the individual layers, but usually, the goal is for the layers to be perceived as a singular drum hit. Since the drum samples that we use were originally intended to stand on their own, we can run into some problems that prevent the samples from sounding like this single hit.
The main obstacle that we’ll face is lining up the transients of drum samples. Unless we do this properly, we’ll get a sort of flam effect, as we’ll be able to hear the impact of each sample. This “sneakers in the dryer” effect can be distracting and take away from the groove.
First of all, we’ll need to make sure that the transient in each layer is aligned with the others. Most drum samples begin right at the transient, but some may have a short period of silence at the beginning of the sample (before the transient).
If we’re working with drum samples in audio channels, lining up the transients is pretty simple to do by sight. We can simply trim the silence off the beginning of the audio clips or position samples to have their transients line up perfectly.
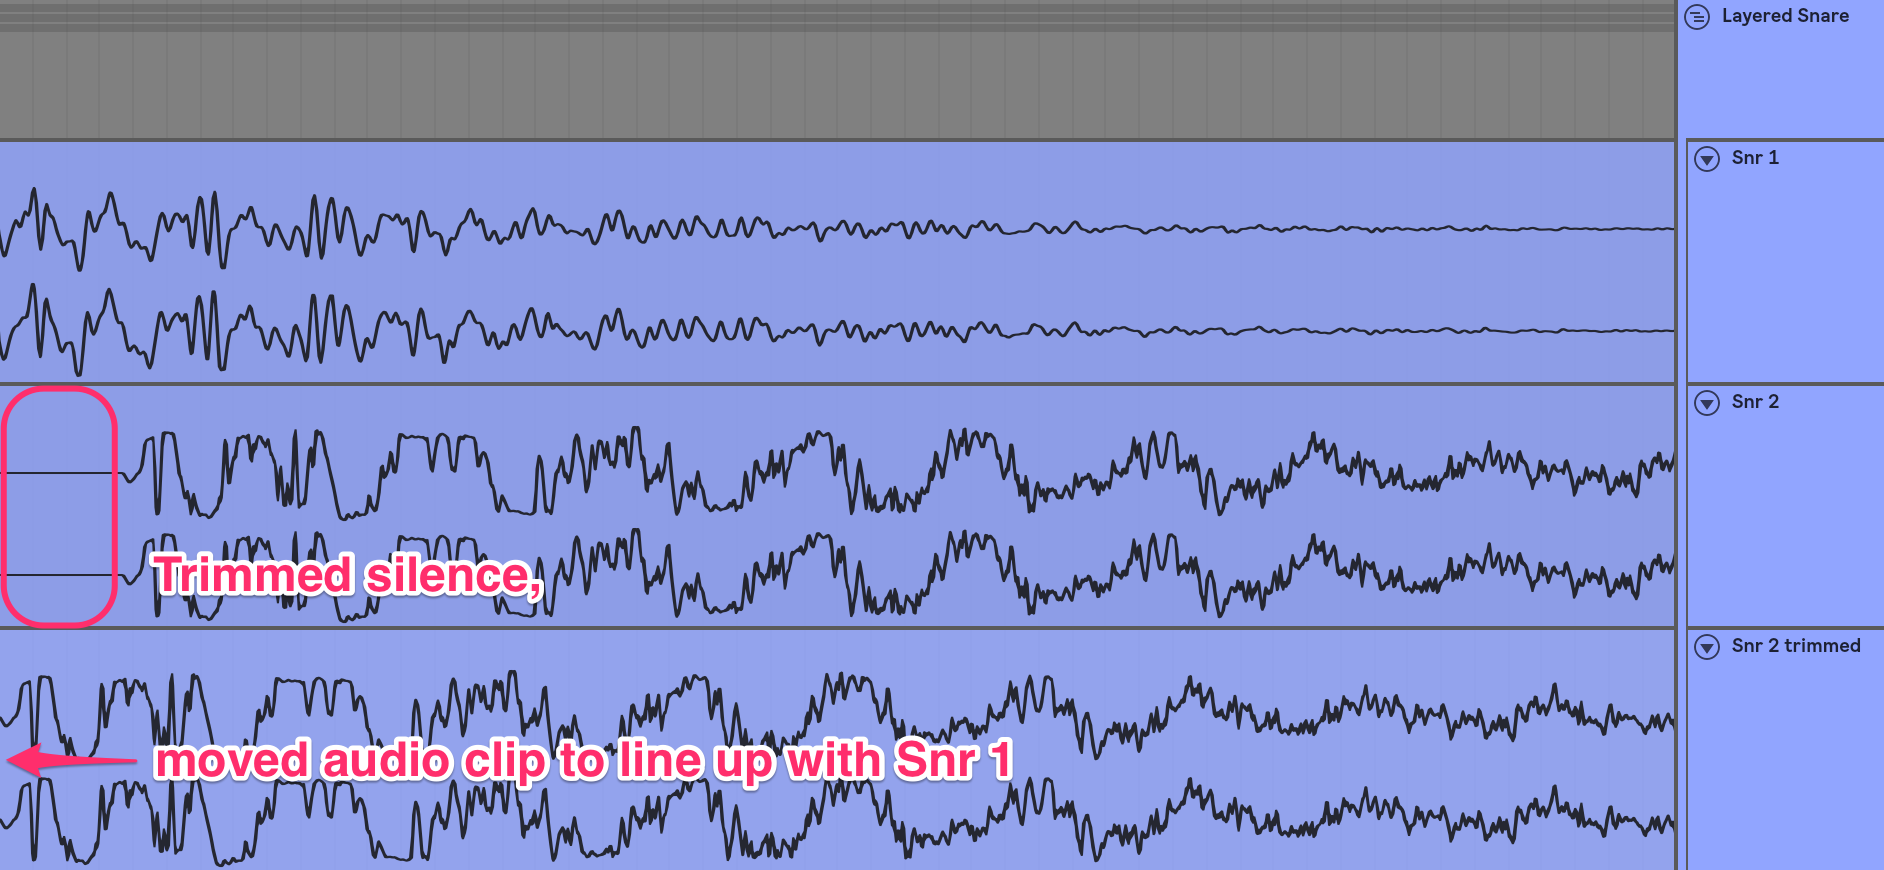
Aligning transients in audio channels
If the samples are being launched from a sampler, we can adjust the start time of the sample so that each sample begins at the transient. When we launch the samples using MIDI, the transients will be aligned.

Adjusting sample start time in sampler
Either way, even a small difference in timing between transients can cause samples to stand out from each other, so make sure to zoom in as far as you can when making adjustments. Even without any additional processing, by timing the transients correctly, the layers blend together better.
Another important aspect of aligning transients is the polarity of each sample during the transient. The transient in some samples may have a positive polarity, while others may have a negative polarity.

Transient polarities
If a transient with a positive polarity and a transient with negative polarity are layered, we run the risk of introducing destructive interference, which can take away from the clarity and body of the final drum sound.
To make sure that transients and polarities are lined up, I follow a few steps. First, as I work with samplers for drums, I make sure that the start time for each sample occurs on a zero point, where the waveform crosses the zero line.

Zero point
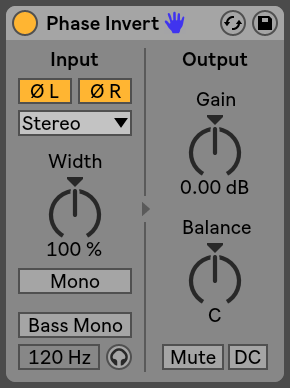
If some layers’ transients have different polarities than others, we can perform a polarity flip (often called “phase invert”) to invert the polarity of mismatched signals. Most DAWs will have a stock plug-in that can do this.
Zero point
From here, layered samples should sound pretty blended. If I’m still hearing individual layers in the transient, I may apply a very short fade in (1 ms or lower if possible) to the beginning of each sample.
This adds a short attack time to the sample, but I make sure that the fade is short enough to leave the transient intact. This will cause the samples to fade in with the same attack time, which can subliminally help to blend the layers.
Transient and polarity alignment is especially important when layering kick drums, as cancelation in the lows can greatly diminish the kick’s body. Each kick sample has a slightly different low end, and layering them can cause these low frequencies to sound unfocused.
A clear low end is extremely important for the mix, so it’s usually a good idea to find one kick sample to command the lows for your overall kick drum sound. Additional samples can be layered depending on what the main kick is missing.
Lastly, some drum samples just have incompatible timbres and are hard to blend, like an acoustic snare and an electronic percussion sound. Layering mismatching samples like this can be an interesting effect, but likely won’t sound like a single drum hit, as you’ll probably be able to hear each layer separately.
Mixing techniques to blend layers
Once your drum layers are properly aligned, audio effects and processors can be used to further define the group of samples as one drum hit. If this processing is done after the samples are layered, each sample will be affected by the same processing parameters, creating an overall “sound” for the drum hit.
Theoretically, any effect can be used to create this cohesiveness. However, if you’re trying to preserve the sonic character of the original layers, there are some relatively transparent effects that we can use to glue the layers together.
Compression is the most natural direction that we can go to do this. Bus compression, compression performed on a group of elements in the mix, is a standard method to glue sounds together. Specifically, drum bus compression is a common technique to make a drum kit more cohesive, and we can use the same mentality to make layers sound more cohesive.
The main consideration when using compression to blend drum layers is setting the proper attack and release times. For example, hard compression with a very short attack time has the potential to squash the drum transient. A long release time can potentially cause shorter layers to become overly compressed.
However, a short attack time will allow the compressor to affect the transients of all layers, which can help to glue the layers together. Some moderate compression and the “right” attack and release times can preserve the transient while creating a consistent sonic character for the overall drum hit.
We can also perform transient shaping after layering. By controlling the overall transient of the drum hit with one envelope, the layers will sound more like a single hit. Neutron 2’s Transient Shaper module is a great option for this, as it also allows for individual transient shaping in different ranges of the frequency spectrum.
Some distortion or saturation can also help to blend layers. This can be done either as an insert effect or in parallel. Distortion and saturation create new upper harmonics in a sound, which in this case will be created by the frequency content of all drum layers. The same distortion or saturation being applied to all layers will create a consistent timbre for the drum hit as a whole, blending the layers together.
Creative layering techniques
As we’ve discussed, there are plenty of technical reasons to layer drum samples. However, we can also use drum layering in a creative context.
First, we can assign different layers to different areas of the stereo field. Creating differences in stereo placement can cause layers to sound disjointed, but transient alignment and the above blending techniques can be used to ensure your drum samples sound like an individual hit.
This layering technique is most useful for drum hits like the kick and snare, which will have a mono layer down the middle of the stereo field. With layering, we can add layers in the sides of the stereo field to make the drum hit cover more stereo space.
There are plenty of ways to do this, including panning, mid / side EQing, stereo widening, and the Haas Effect.
Standard panning is pretty straightforward, as some layers can simply be panned to the sides of the stereo field. However, with panning alone, you won’t be able to have one layer populate both sides of the stereo field.
Even if you just make two copies of the layer and pan them, the result will not sound any wider than the original layer, only louder as the two copies will have pure constructive interference. I lowered the level of each copy by about 2 dB in the second example to achieve the same perceived volume.

Original snare

Panned copies do not sound wide
Therefore, panning can be used if you want to have an unbalanced timbre in the stereo field, an effect that can sound interesting.
To have one layer sound spread, we can use mid / side EQing. Many EQs have the ability to separately process the center and sides of the stereo field. We can use this to cause a layer to sound “wider”.
First, we can find the most important frequencies in the main center layer using a spectrum analyzer. We can then attenuate these frequencies in the wide layers, but only in the center of the stereo field. This will allow the mono layer to command these frequencies in the center and push the frequency content of the support layer to the sides of the stereo field.
The change is subtle, but still helpful. In the following examples, listen as the transient appears to become wider after mid / side EQing of one layer.
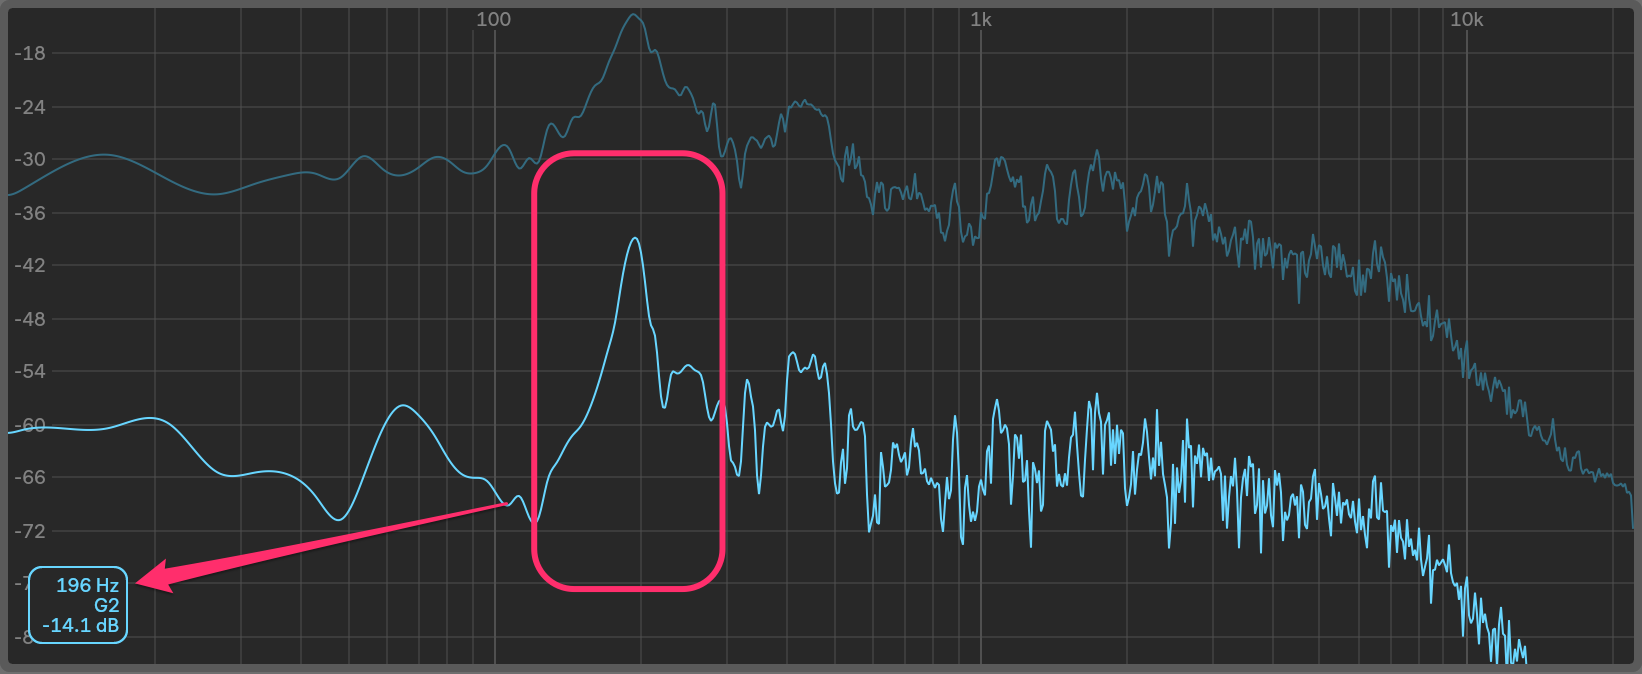
Key frequencies in main center snare

Main snare key frequencies filtered out of wide snare
We can also use stereo imaging plug-ins to “widen” a layer, causing it to populate the sides of the stereo field. There are plenty of dedicated stereo imagers (like Ozone’s Imager) and plug-ins that have stereo imaging built-in (like the Visual Mixer in Neutron 2).
Stereo-widening plug-ins do have the potential to introduce artifacts into the sound, but this won’t be too noticeable if you’re just using one to widen a supportive drum layer.
Lastly, we can use the Haas Effect to widen a layer. By creating a timing difference in the left and right channels, the layer will sound like two copies directionally coming from both sides, rather than from one point in the stereo field. This creates the impression of width, which we can use to push a support layer into the sides of the stereo field.
Keep in mind that this (and stereo imaging plug-ins that use this process) can cause phasing and comb-filtering issues when summing to mono, so should be done sparingly.
Another creative way we can layer drums is using sidechain gating. By using the main sample as a sidechain trigger, we can cause support layers to only play when the main sample hits.
This is useful for adding textures to the drum sound that are still tied to the drum sound’s volume envelope. We can layer anything from white noise to field recordings to synths with drum hits, each of which can give the drum sound some extra character.

Sidechain gating the field recording off of the snare
Conclusion
With the techniques that we’ve discussed, drum samples can be layered and blended together to create interesting and defined drum sounds. Whether you do so to create more well-rounded drum sounds or get creative to create interesting drums that are unique to your track, layering drum samples can be a great way to spice up your projects.

