How to Mix Hi-Hats: 8 Tips for Added Energy
When mixing drums, the hi-hat is often undervalued versus low-end elements. But a hi-hat is vital to an overall great drum mix, here are eight tips to get you there.
In our blog articles “5 Tips for Mixing High End” and “8 Tips for Taming Harsh Treble in the Mix” we provided some general tips for managing high end in a mix. Today, we’re diving into a specific sound that occupies the top end of the frequency spectrum: hi-hats.
When mixing drums, the hi-hat typically doesn’t get as much consideration as low end elements. But this sound is vital to an overall great drum mix. Here are eight tips for mixing hi-hats, including remedies for harsh cymbals and rides.
This article references a previous version of Neutron. Learn about 

Neutron 5
1. Tuck things in first by removing low frequencies
If there are too many hi-hats, cymbals, and rides clanging around—or if they are not processed properly—the mix can become sharp enough to take an ear off. To save your ears and ensure vocals, guitars, and synths shine through, managing the high frequencies produced by hats is vital.
But before shaping the high end, it will serve you well to remove any low frequencies tacked onto hi-hats during the recording process. By rolling off the lows, the natural brightness of the drum kit will come through and you’ll be less inclined to boost needlessly later on.
To do this efficiently, organize your hi-hats within a submix and set a high-pass filter to 100 Hz. Move the cutoff upward until you begin to hear the sonic character change, then back off slightly to ensure the signal sounds clean but not thin. You will usually end up somewhere around 300 Hz.
2. It’s easy to go overboard with hi-hat processing
Since hi-hats occupy a small frequency range, they experience the effects of processing much faster than other drum hits. This makes it easy to go overboard with saturation, EQ, and compression.
The best defense against this mixing mistake is to work with good quality recordings. This way, you won’t feel the need to overcompensate with effects. If you are working with cheap-sounding audio, consider re-recording the track or heading to a sample platform like Splice to download a replacement. It's pretty hard to fix a damaged hi-hat, and starting from scratch might actually save you some time.
Otherwise, be sure to take breaks to keep your ears fresh. 10 minutes away from the mix makes it easier to catch ringing and harshness produced by over-processing upon returning.
3. Try these two transient shaping tricks for added flair or clarity
Neutron’s Transient Shaper is my not-so-secret “secret weapon” for all manner of drums. Here are two ways to use the plug-in with hi-hats, based on my own experience.
Approach #1
When a hi-hat mix is lacking flair, reach for the transient attack dial and turn it up until you hear it cut through the mix more. Err on the side of caution here—hats only need a small push to sound lively. That being said, if your client expects an in-your-face EDM or trap sound, going beyond normal bounds might be the ticket. Conversely, reducing the attack will tame hats with hard transients.
Approach #2
This approach has a corrective purpose. Some recordings and samples include too much room tone or bleed from other instruments. While you don’t want to rob these sounds of their character, making strategic adjustments, like trimming the tail of an open hat to separate it from the snare will result in a more balanced mix. To do this, reduce the sustain on Transient Shaper, which will shorten the length of a hat. If you want to add length to hi-hats, increase the sustain.
4. Too sibilant? Try a de-esser on your hi-hat
Though we regularly discuss de-essers within the context of vocal mixing, they are equally useful to remedy problematic high-frequency instruments.
Here’s when to use them: say you’re mixing a particularly sibilant hi-hat track, but filtering with EQ colors the signal or removes parts of the sound you want to keep. For a more precise solution, instantiate a de-esser and pull the cutoff somewhere around 10–12 kHz. Then, adjust the cutoff dial accordingly until you’ve identified the offenders—you may find this trick corrects signals with more transparency than a static EQ.
To ensure you’ve grabbed the problematic frequencies, use a plug-in like RX, which allows you to output just the ess sounds. When you do this, you should hear only the unpleasant sharp frequencies and not the “body” of the hats.
Pro-tip: remember that some resonances exist in a lower part of the spectrum, between 4–8 kHz. It's worth exploring this frequency band too.
5. Pan for feel and space for a vibrant hi-hat sound
In pursuit of a vibrant hi-hat sound, many new producers (and even engineers) can get stuck in a loop of auditioning new samples, adding processing, and adjusting levels in the hopes of making the right combination of decisions.
A bump in level or saturation might be what’s needed (more on that later), but there is a good case to be made for panning when you need some excitement. By panning hi-hats to the sides, everything that’s left in the center will get more attention, simultaneously making the mix feel wider and more rhythmic.
For hip-hop and electronic tracks, I like to pan hats 30–50% away from the center. Some mixers will also hardpan hi-hats, or choose their stereo location based on the structure of a drum kit.
You’ll eventually find your preferences, just remember to consider mix balance as you do. When you do hardpan a hi-hat to the right, be sure to place a sound that counters or supports that activity on the left. One idea is to pan a closed hat to one side and an open hat to the other. Adding a splash of reverb and keeping the output in the center will keep things sounding glued together.
6. Break up programmed hats with velocity and swing
Many pop songs today are using programmed hi-hats, even in the presence of acoustic instruments.
Unless you (or the client) are going for a straight, robotic sound, you will want to break up the monotony of programmed patterns, which can begin to sound stale without changes in velocity, swing, or note length. In fact, even 16th note trap patterns, which are supposed to sound “programmed” can benefit from variation. For example, slightly raising the level of hats leading into a snare propels listeners forward.
While these tasks typically fall on the producer, you may be the producer, or you may have been given the entire DAW session with MIDI included. So take a few minutes to dive into those MIDI sequences and adjust the parameters above until you get a more natural-sounding or interesting result. There are a number of DAW-specific plug-ins that will randomize this for you as well.
7. Get corrective with a dynamic EQ
A dynamic EQ is a better choice than its static counterpart in a number of hi-hat mixing scenarios. Here are two I encounter often:
Scenario #1:
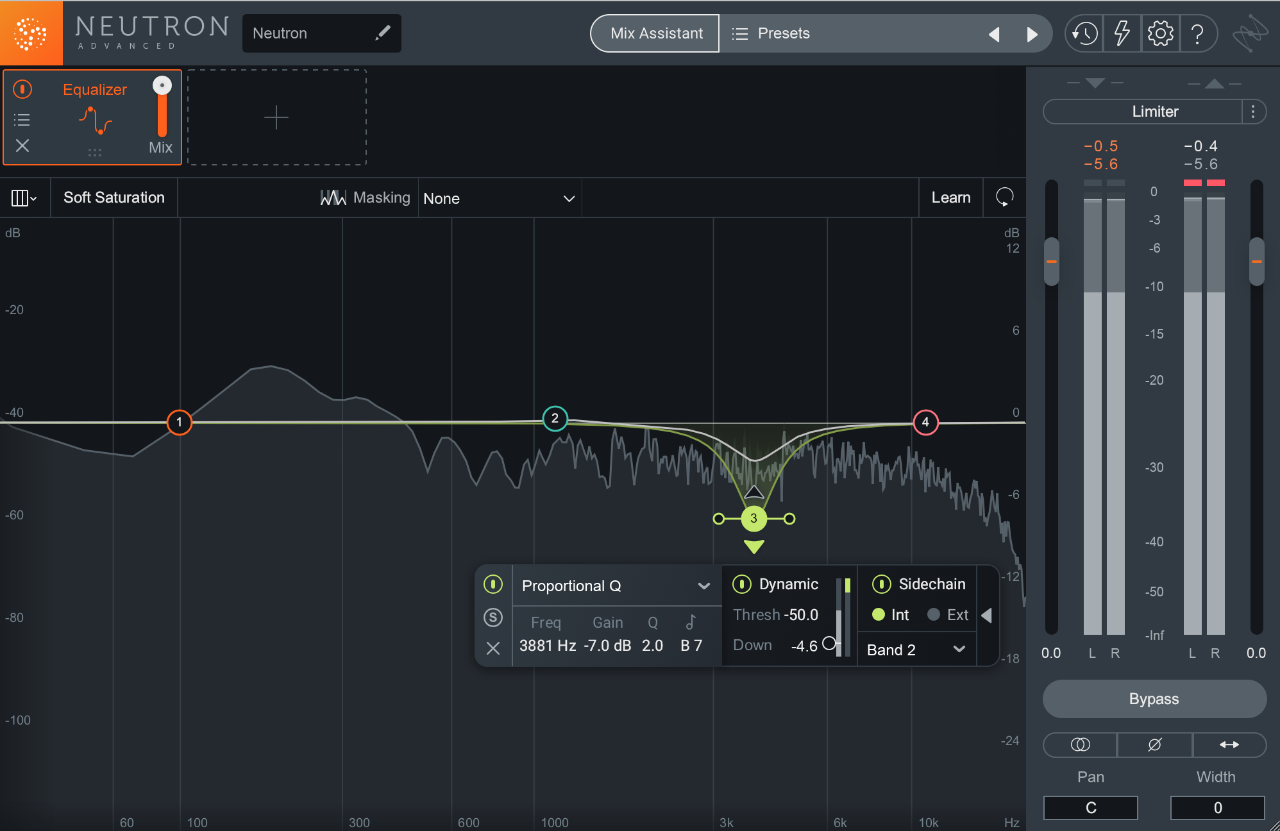
When a lower band of frequencies in a hi-hat pattern clashes with the snare in a drum loop. In most cases, you can’t go into the audio and adjust the hi-hat without altering the snare too. A dynamic EQ provides a workaround. Simply select the problematic hi-hat frequencies and then chose the snare as the sidechain input. This will duck the selected hi-hat frequencies every time the snare is played. Here’s what this setup looks like in Neutron:

Node 3 covers the problematic hi-hat frequencies, which are now being triggered to drop in level whenever Node 2’s frequencies (from the snare) are present.
Scenario #2:
When a drummer slams down on the cymbals in some sections of a recording but plays softly in others. Having a dynamic option to attenuate the harshness only when the nasty frequencies are present is a big help.
8. Work in layers to beef up your hi-hat
iZotope has published a number of drum mixing articles on how to layer kicks, snares, and percussion to achieve more textured and powerful grooves. This same concept applies to mix hi-hats.
After removing stinging frequencies in a hi-hat with EQ, you may find your hat now sounds dull and gets washed away in the mix. To bring back some energy, program a white noise sample to match the rhythm of the hats. The white noise will fill out the spectrum—making up the lost frequencies—and produce a more full-bodied hat sound. Adding some modulation or reverb to the white noise sample will improve high-end detail as well.
Another trick to excite filtered hi-hats is to slap on some saturation or distortion. While not exactly a “layer,” the added harmonics from these plug-ins will make the hats sound thicker, as if another sound was added to it.
Conclusion
The tips in this article should give you a handle on some of the common issues encountered when mixing hi-hats, along with solutions to fix them. I find that most of the work is corrective—once hi-hats can be heard clearly, they contribute to the overall groove in an engaging way. A clean sound also helps to ensure minimal (over-) processing later on.
Before I go, here’s a bonus tip: You will find that many of these tips work well together—like combining transient shaping with dynamic EQ or panning with swing. So remember to experiment with the points above.


