How to master an album for a professional, consistent sound
Mastering a song is one thing, but mastering an album requires its own set of skills and considerations. Learn how to master your next EP or album for a consistent sound.
Mastering singles can be fun, quick, and rewarding, but there’s almost nothing I love more than mastering a full album. Mastering an album makes you exercise your mastering muscles in a way you just don’t have to when you’re working on singles. It’s not enough to just make each song sound good on its own, you have to find the through-line, think about song sequence and spacing, and achieve some sort of cohesive, holistic vision for the entirety of the project.
So how do you do that? I’m glad you asked. In this article, we’ll explore ten pro tips for mastering an album. Let’s get into it!
Follow along with this tutorial using


Ozone Advanced


Insight 2


Audiolens


RX 11 Advanced


Music Production Suite 7
What does it mean to master an album?
If you’ve read some of our other articles about what mastering is, or how to master a song from start to finish, you likely have a good idea of what it means to master a song. In some ways, mastering an album is no different. We still need to go through the same basic steps for each song, however, we also need to think in a more global, meta way about the collection of songs as a whole.
I’ve often likened mastering an album to curating an art exhibit. Each piece may be interesting, engaging, complex, or challenging on its own, but by deciding how to lay them out, space them, light them, and draw the observer’s eye from one to the next, you can create an experience that is greater than the sum of its parts. The same is true of album mastering. When an album is done being mastered, it should – hopefully – feel like a compelling, unified body of work that draws the listener through it in a way it didn’t before mastering.
10 expert tips for mastering an album
If you need some guidance on how to master individual songs, the articles linked above are great places to start, as is the Are You Listening? series on YouTube. Plus, we have many more articles for you to peruse on our audio mastering page. In this article though, we’re going to focus on the techniques and approaches that are specific to album mastering. So, with no further ado, let’s dig in.
1. Set up your session
First things first, setting up a mastering session in most audio workstations is a little different than setting up a mix session. There are some DAWs that are entirely built around mastering – like WaveLab – and others that have a specific mastering environment – like Studio One – but we’re going to look at a relatively DAW-agnostic way to build an album mastering template. Let’s start by considering our requirements.
- We need a track or two to host our mixes. One can suffice, but two can be nice to stagger alternating songs between.
- We need a way to adjust the gain of each song while still being able to monitor the flat mix at its original level.
- We need a way to apply our mastering processing to each song, after the gain adjustment. Ideally, this will also be flexible enough that we can insert analog outboard hardware if desired.
- We also need two tracks to record our processed masters back into the DAW. Here, two tracks will allow us to do overlaps and crossfades between songs if we need.
- We need a way to monitor our flat mix, without any gain or processing. And lastly,
- We need a way to monitor our processed master, level matched to the flat mix.
Here’s how I set this up in the Logic Pro mixer. Arrows indicate which buses feed to which auxes and tracks. I’ve also added a “Dither” bus so that I can monitor through dither and True Peak limiting. More on this later.
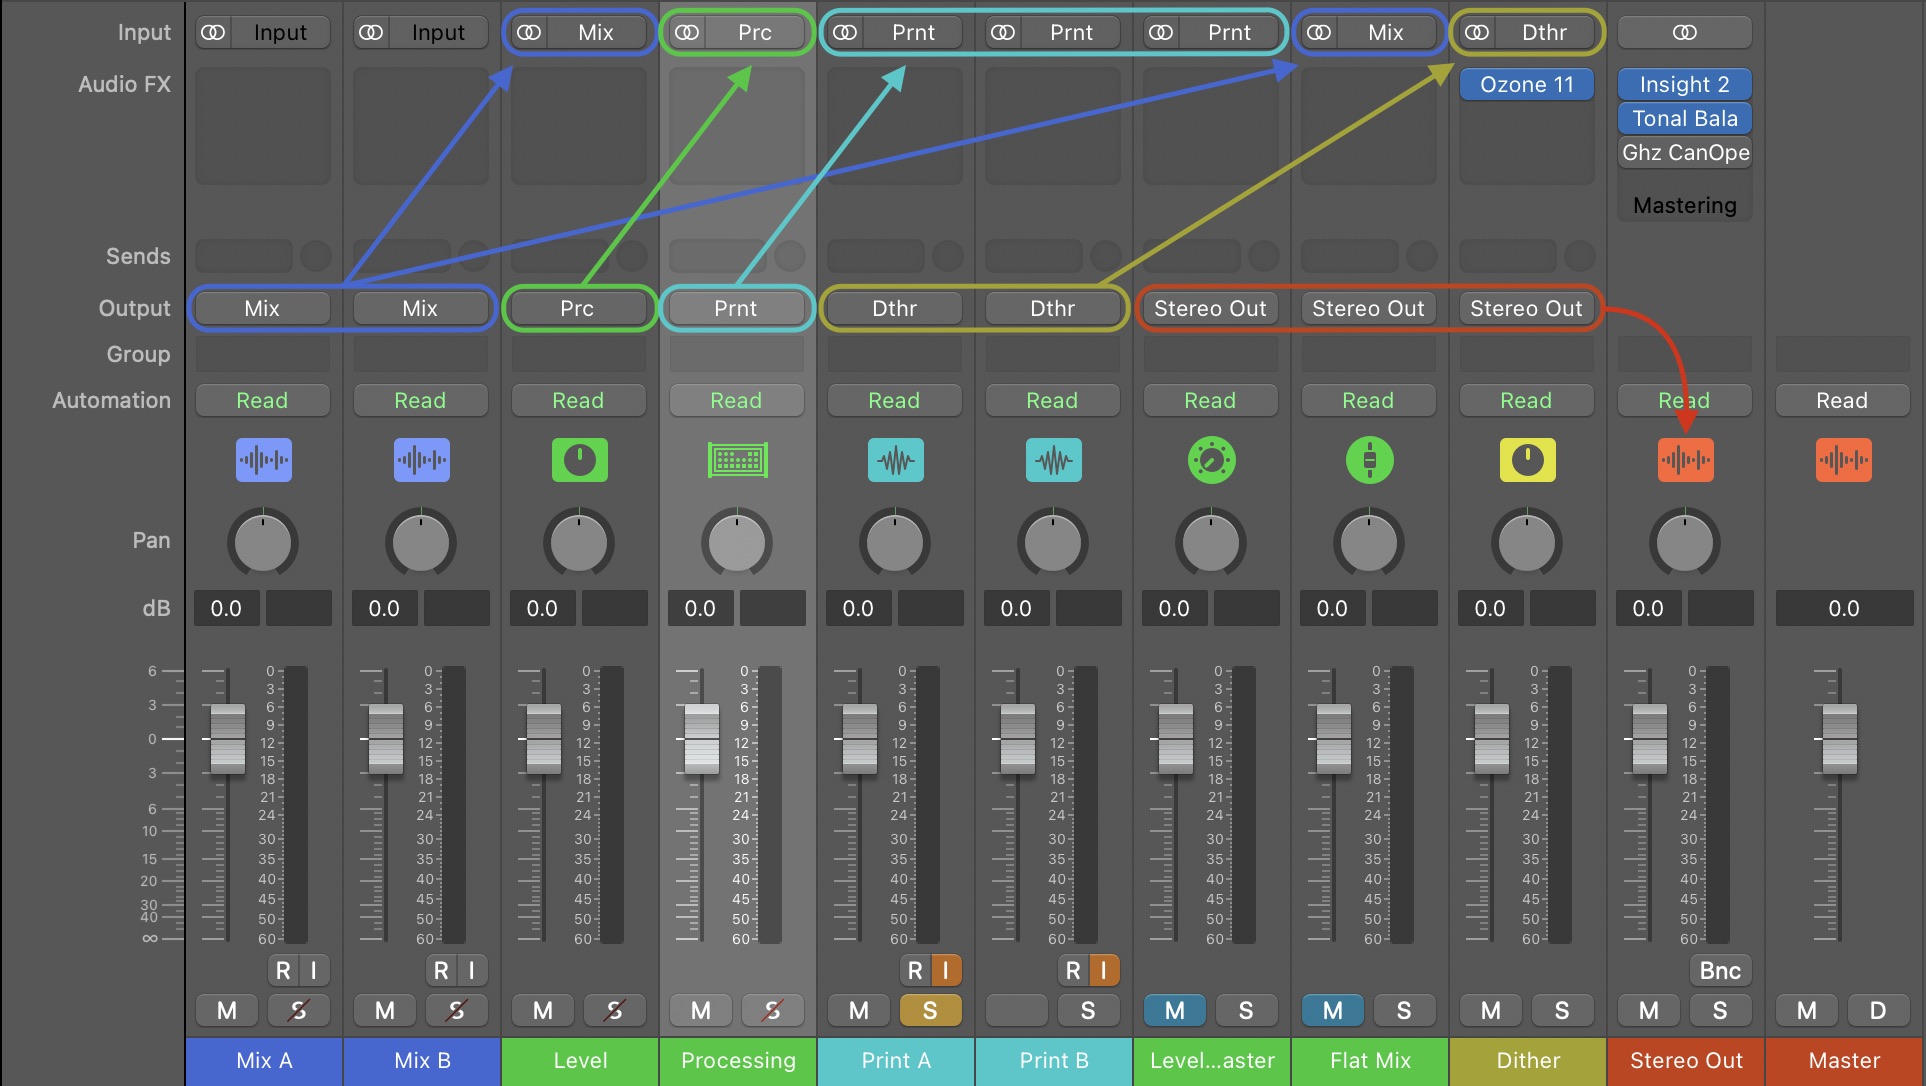
Album mastering template routing in Logic Pro
And here’s what it might look like in the main “tracks” view.
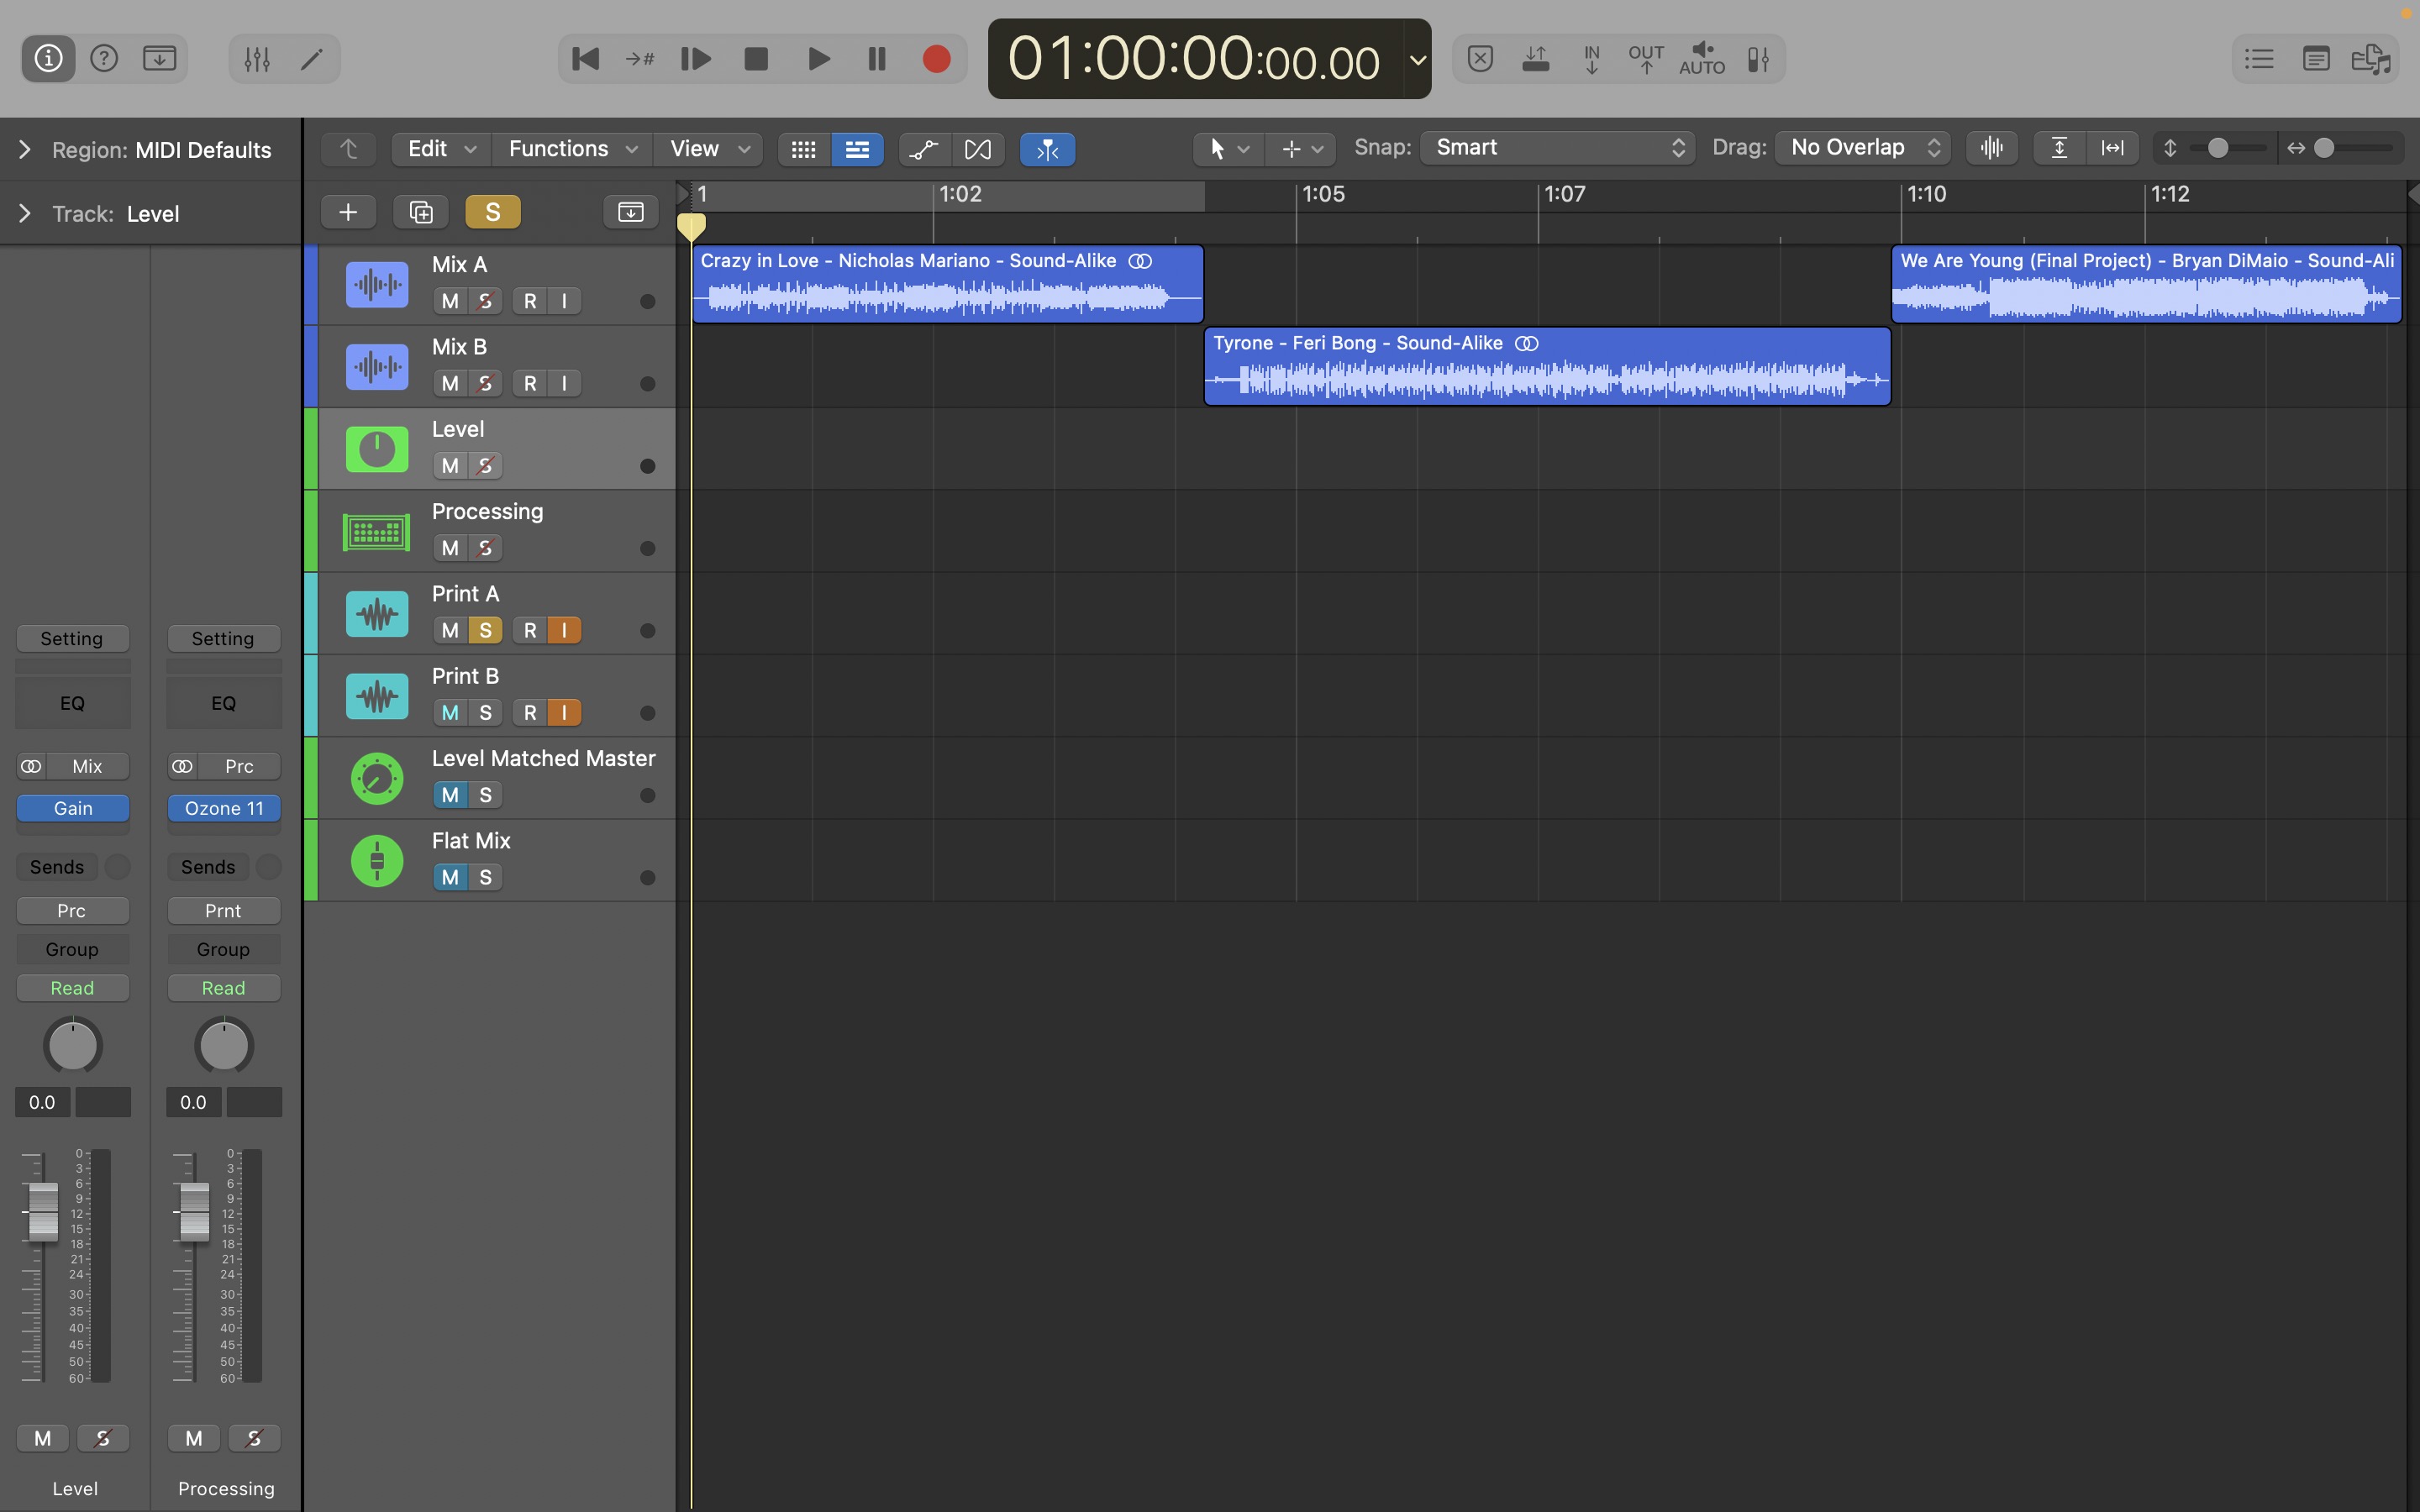
Album mastering layout in Logic Pro
It’s important to solo-safe the first four tracks, and use exclusive solos to switch between your four “monitoring” tracks. In Logic and some other DAWs you may also need to mute the last two auxes. Before you go any further, go ahead and save that as a template you can use as a starting point in the future.
Load your tracks and figure out where to start
Ok, now that your session is set up, go ahead and load your mixes onto the first two tracks as illustrated above. What comes next is quite possibly one of the trickiest parts of mastering an album: figuring out which song to master first. You might think, “Why not just start at the beginning?” but what if the first song is not terribly representative of the rest of the album, or there are other songs with much lower loudness potential? In either of those cases, you’re potentially making a lot of extra work for yourself.
Here’s how I like to approach this challenge. While I do my initial listen-through of all the songs to take notes I specifically keep an ear out for a few things:
- Which mix sounds the best, like it’s the closest to being done and will need the least work?
- Which song seems like it has the lowest loudness potential, and thus will be the limiting factor in terms of how loud other songs on the album can be pushed?
- Which song is most representative of the entire album?
If you’re lucky enough to have all three of these criteria apply to one song, congratulations: that’s where to start! More likely though, these will be two or three different songs in which case you have a judgment call to make. Generally, all else being equal, I will opt to start with the best sounding mix. If there’s another mix that I think will be the limiting factor for loudness I may just leave myself a little extra room.
The one caveat is if the best sounding mix is just not terribly representative of the rest of the album. For example, if it’s a reprise or interlude track in a slightly different style. In that case I’m likely to select the next best sounding mix, or the one with the least loudness potential. Once you’ve selected your starting track, it’s time to master!
2. Establish a benchmark
After one of the trickiest parts of album mastering, it’s time to reward yourself with one of the easiest parts: master your selected starting song so that it sounds great! This is going to serve as your benchmark for the other songs on the album.
As you work through the first song, start getting used to using your template to your advantage. Listen through your Print A track at full level, then switch to your Level Matched Master and pull down the level so it matches the loudness of the Flat Mix track. You can use an LUFS meter like


Insight 2
Toggle between your Flat Mix and Level Matched Master to make sure you’re making things better, and not just louder. Once you’re happy with where you’ve gotten your benchmark song to, save your Ozone settings as a preset, record arm your Print A track, and record your processed master in.
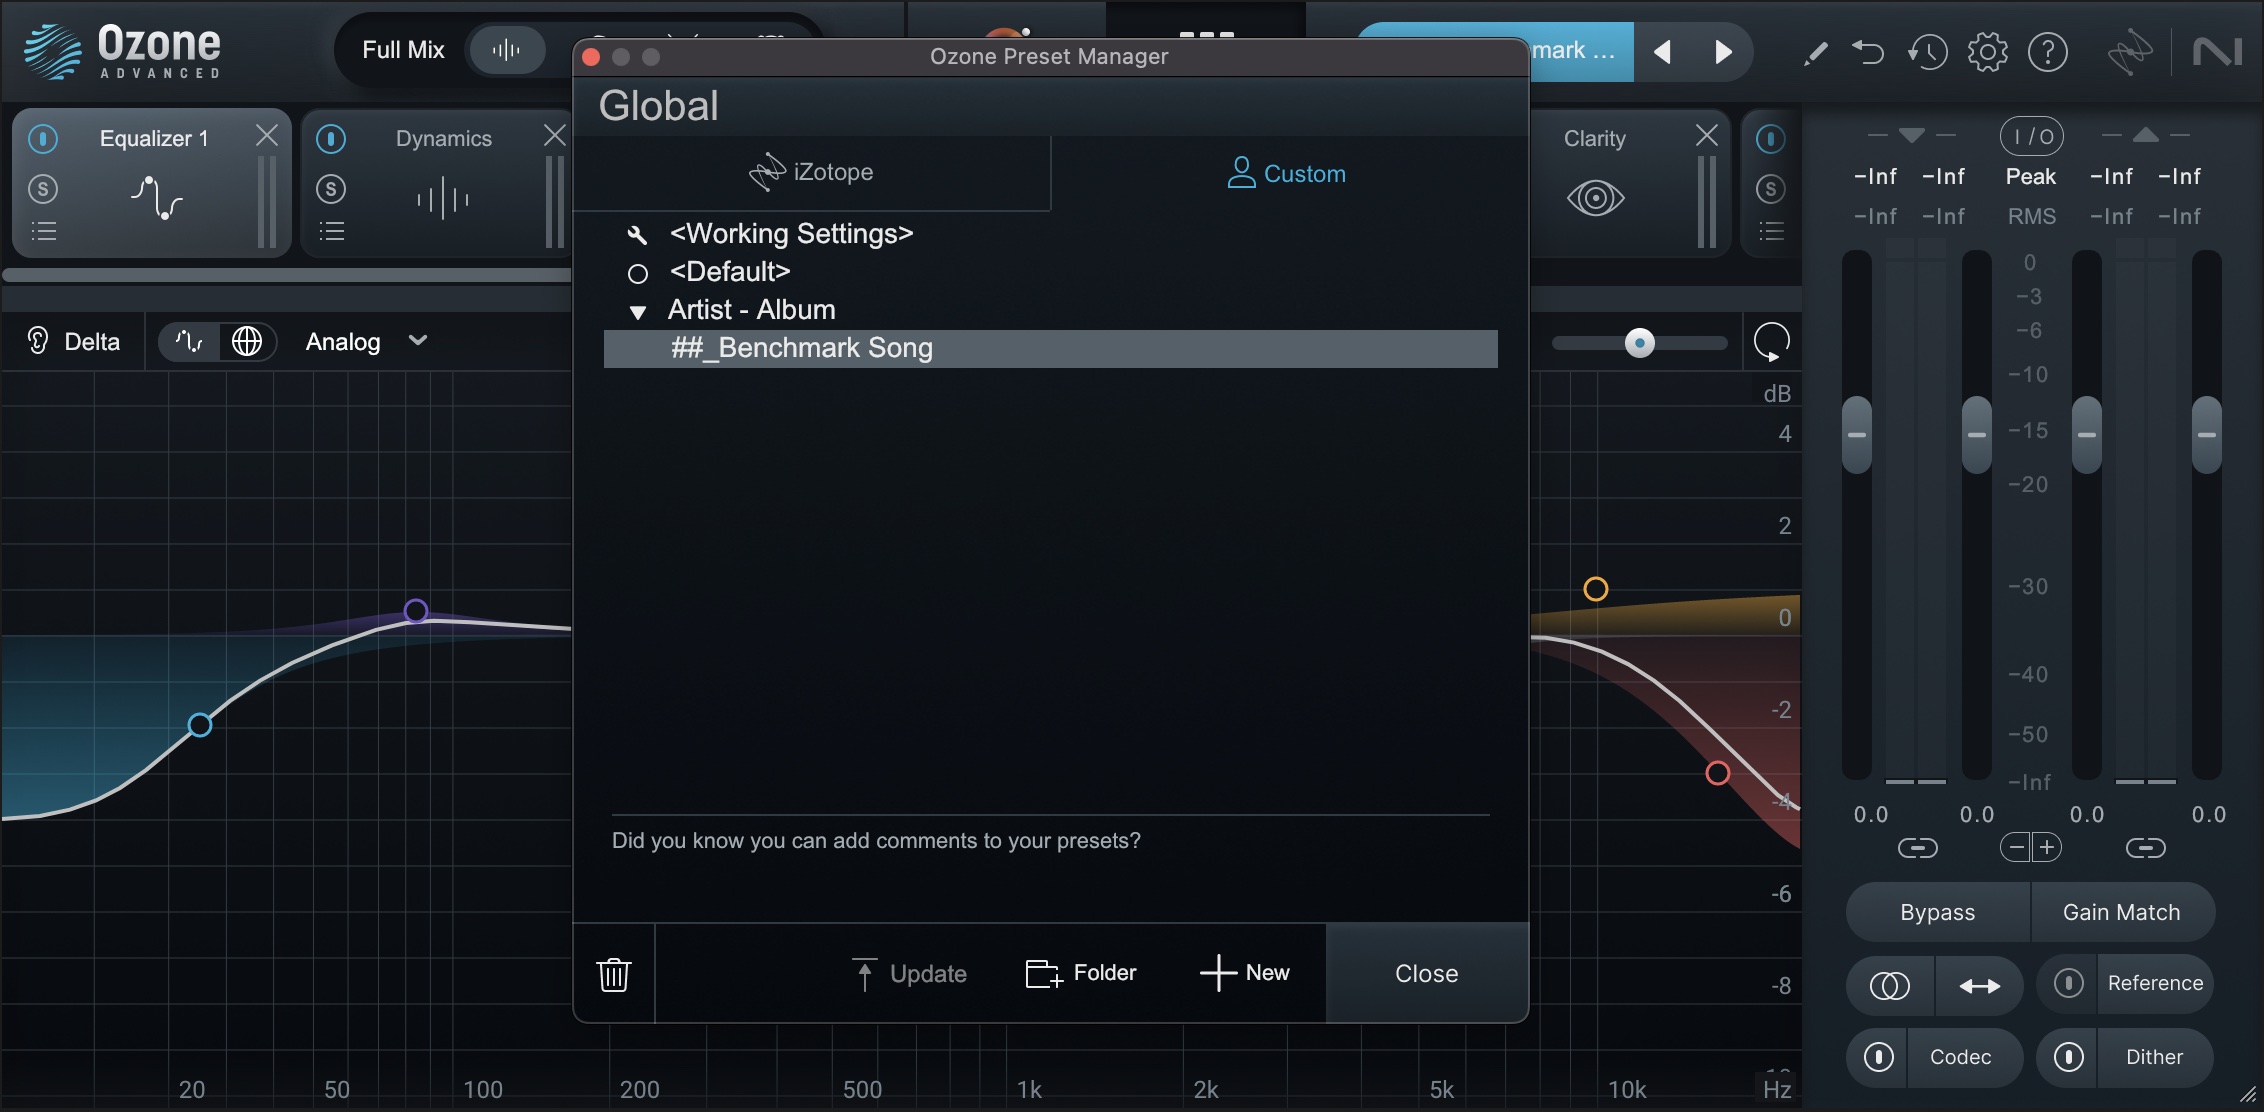
Save an Ozone preset for each song
Soon, you’re going to move on to other songs, so you may want to mute the flat mix region – some DAWs call this a clip, media item, or similar – for your benchmark song. That way you can drop your playhead back over your master of the benchmark song to A/B without also hearing the original mix coming through. You’ll do this with each song as you finish, and if you ever need to return to a previous song to make changes and record in a new version, you can just unmute the source region.
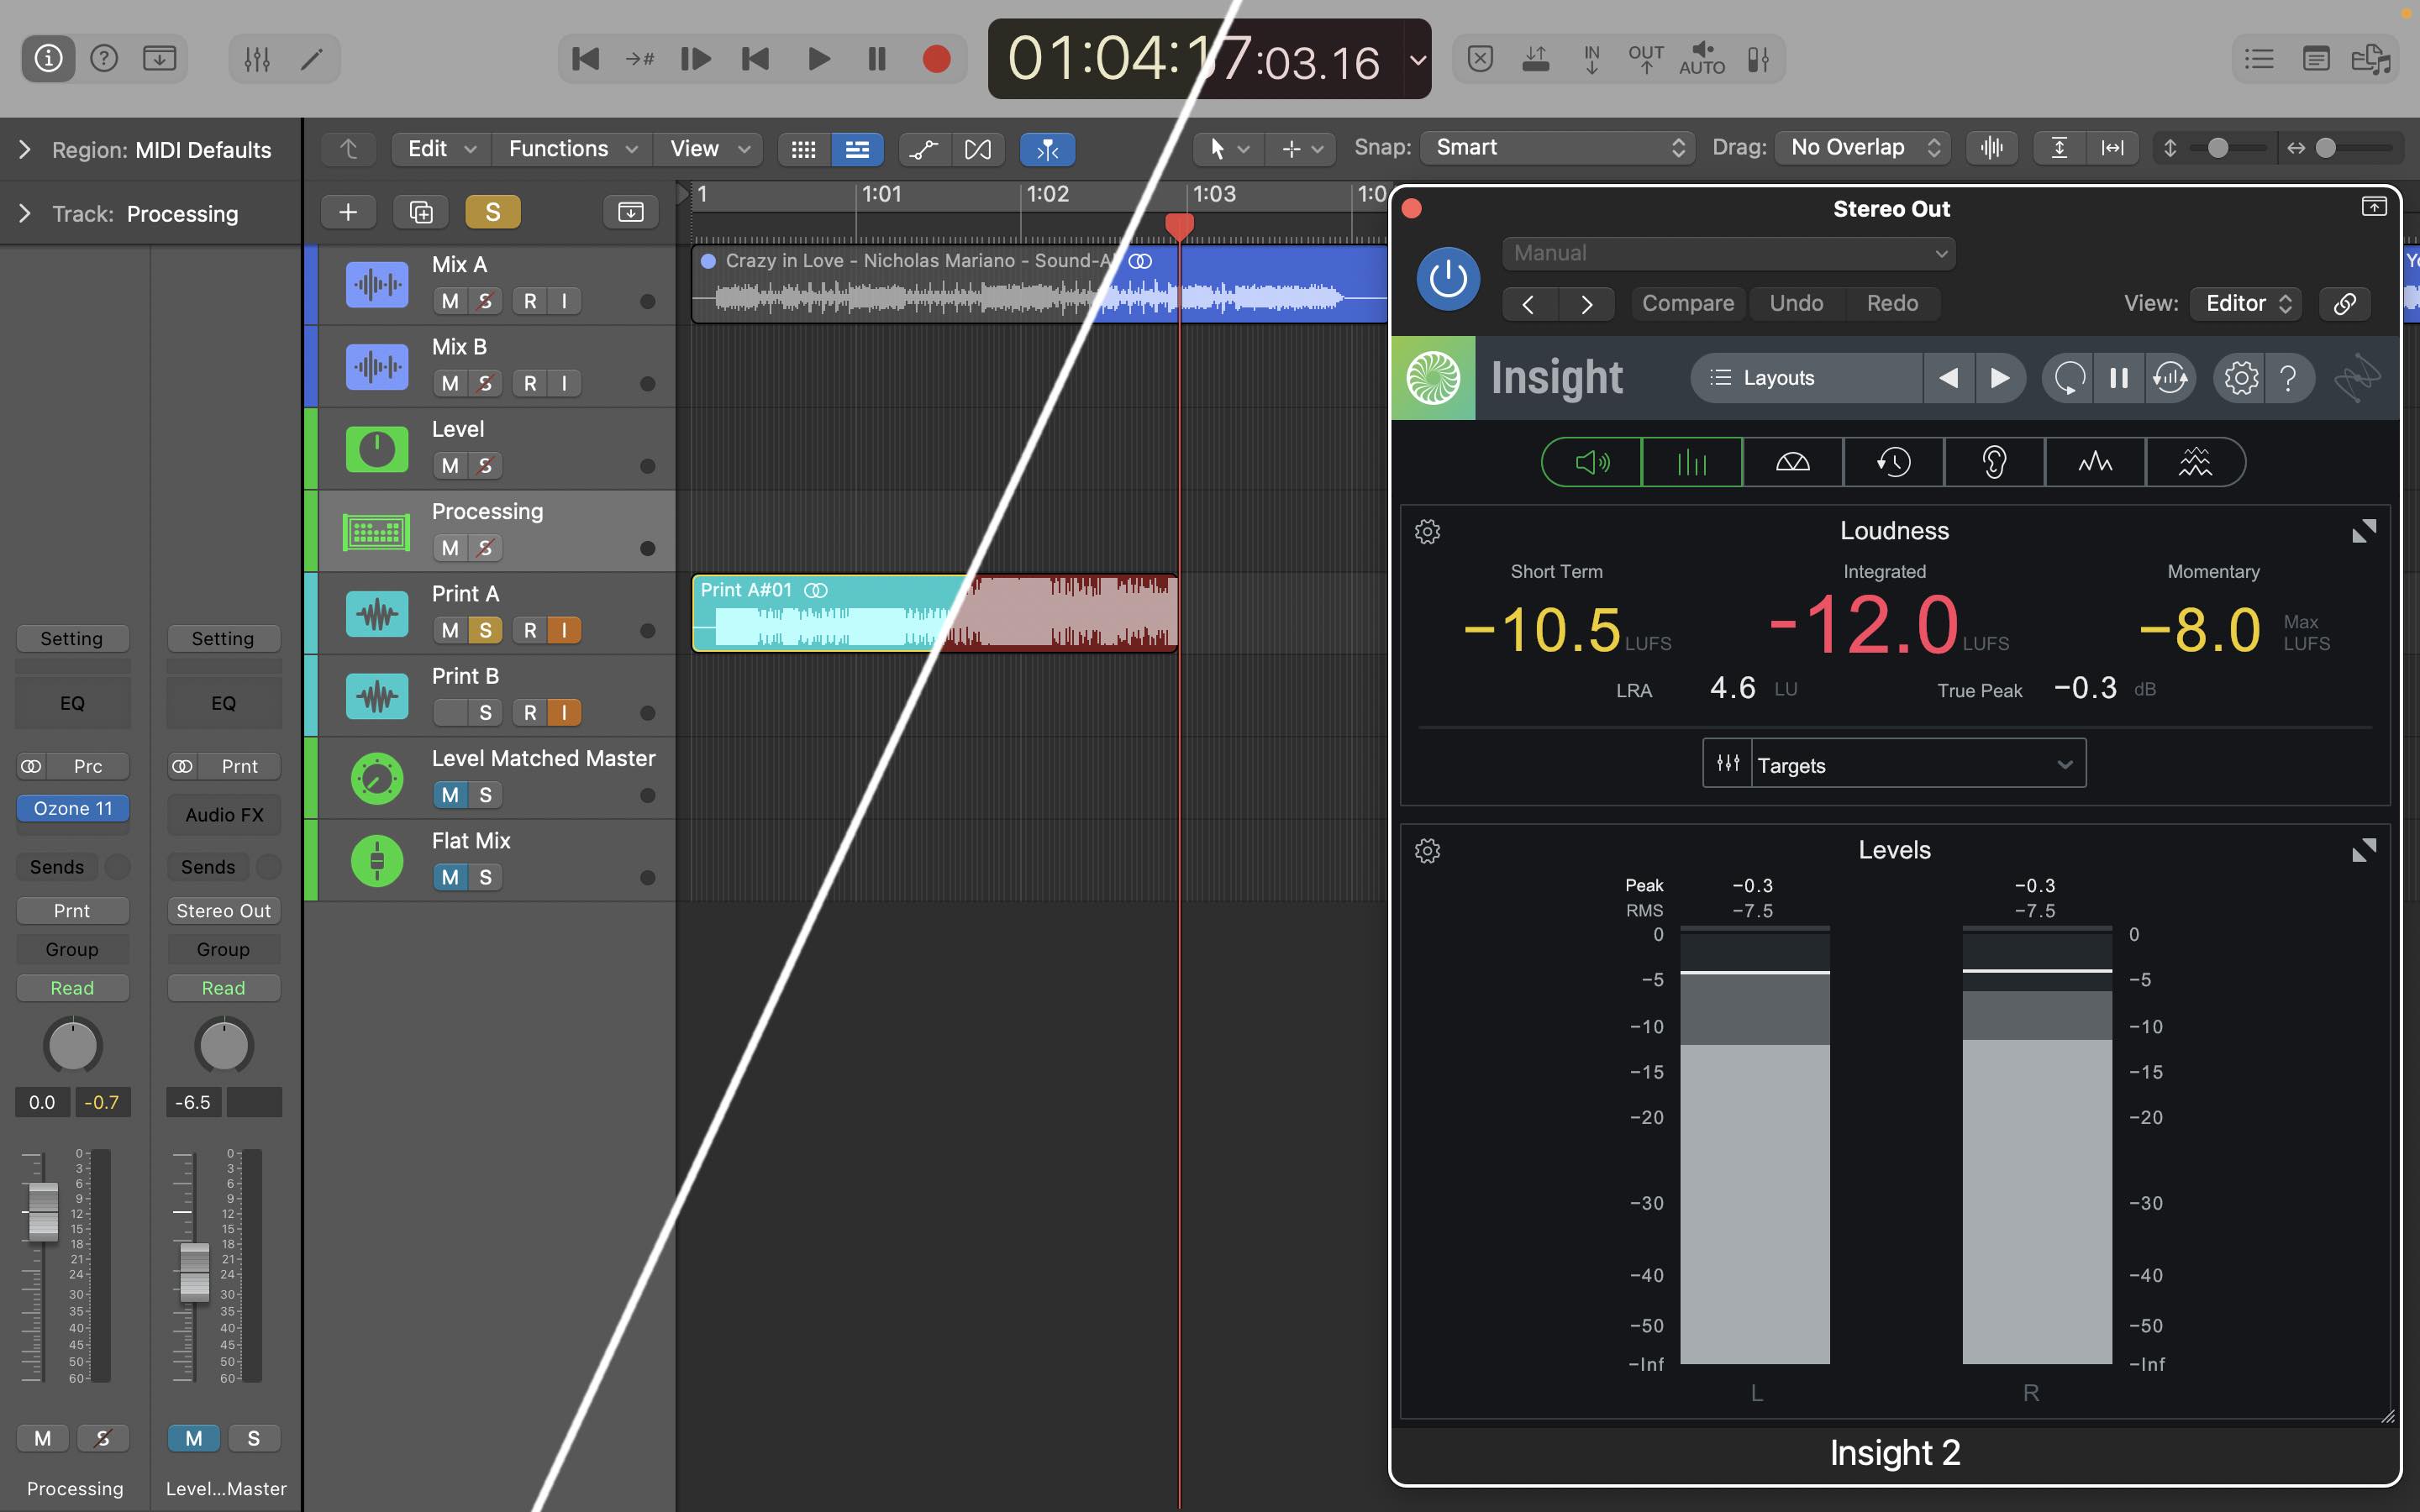
Record in your processed master and mute the source region
One other important consideration here is where you place your main Maximizer that you’re using for level. You can certainly include it in your main Ozone processing for each song and record it to the print tracks, but this means that if you need to tweak overall levels of songs after they’re recorded in, you probably need to adjust the gain setting for the Maximizer module and re-print the song. It also means that if you want to do a version for vinyl without any limiting you’ll again need to do a separate record pass.
One alternative I like is to adjust your routing a bit and place your level Maximizer on the “Dither” track, before the True Peak limiting and dither. The tradeoff here is that you use the same limiter settings for the whole album. Often that can work just fine. However, if you’re after a really hot master, you may find that individual Maximizer settings per song work better. In that case, you may just have to live with the workflow tradeoffs.
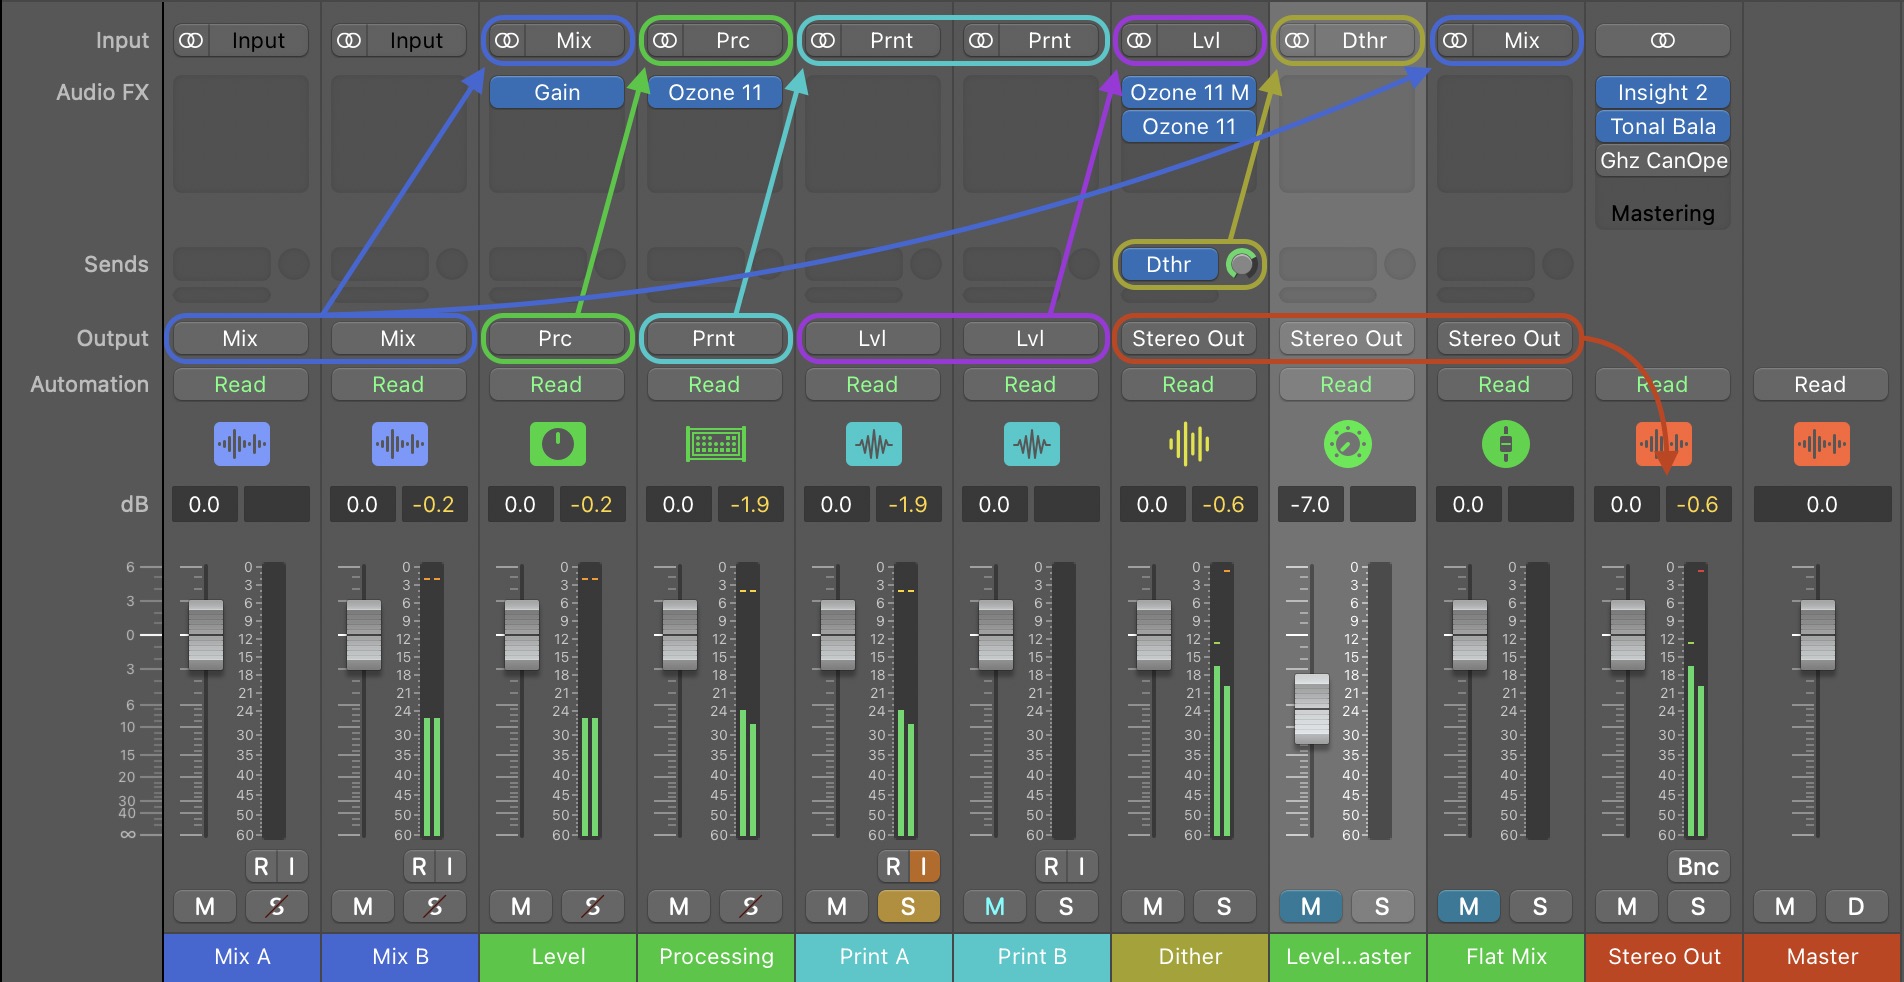
Alternative template routing
If you do choose to use this routing, note that you’ll need to only have one print track set to have input monitoring on at a time – at least in Logic Pro. Since your Print tracks feed into the Dither track, and that feeds the Level Matched Master, just make sure that when you exclusive-solo your Level Matched Master track it’s not receiving the mastered signal through both Print tracks.
3. Consider song sequencing
If you haven’t already, now is a really good time to think about song sequencing. Not only can the order of songs on the album shape the experience of the listeners, but it can also subtly – or not so subtly – influence how you process and level each song. For me, song sequencing is one of those fun, creative parts of album and EP mastering, but I understand that for some people it can be a bit stressful.
Whether that stress comes from the sheer number of possible permutations, or a self-imposed pressure to “get it right,” the good news is that there’s no real right or wrong way to sequence an album. One approach I often like is to think about it as arranging two or three sets of music that a band might play at a gig. Other times, or with other styles, it can be fun to put on your DJ hat and think about how you might manipulate a dance floor. Either way, have fun with it!
4. Move the remaining songs toward your benchmark
Now comes the bulk of the hard work. It might not be as tricky as picking which song to start with, but it requires a lot of focused attention, critical listening, and thoughtful processing – or sometimes not processing. There’s a crucial point I want to drive home here though:
The goal here is not to somehow make all the songs completely match in terms of tonality, dynamics, width, etc. but rather to get them living together well. They each can – and should – have their own sonic identity, while still sounding like they’re related. An analogy I like here is to imagine a big holiday family get-together: you might have that one crazy uncle, the little cousin who’s running around like a miniature nuclear inferno, and the mellow hippie aunt, but you can tell they’re all cut from the same cloth.
If you’re new to album mastering – which I’m guessing you are given that you’re reading this – here are two ways I like to approach this. First, you can think of and use your benchmark track like an internal reference track. Second, if you want a helping hand to get moving in the right direction,


Audiolens
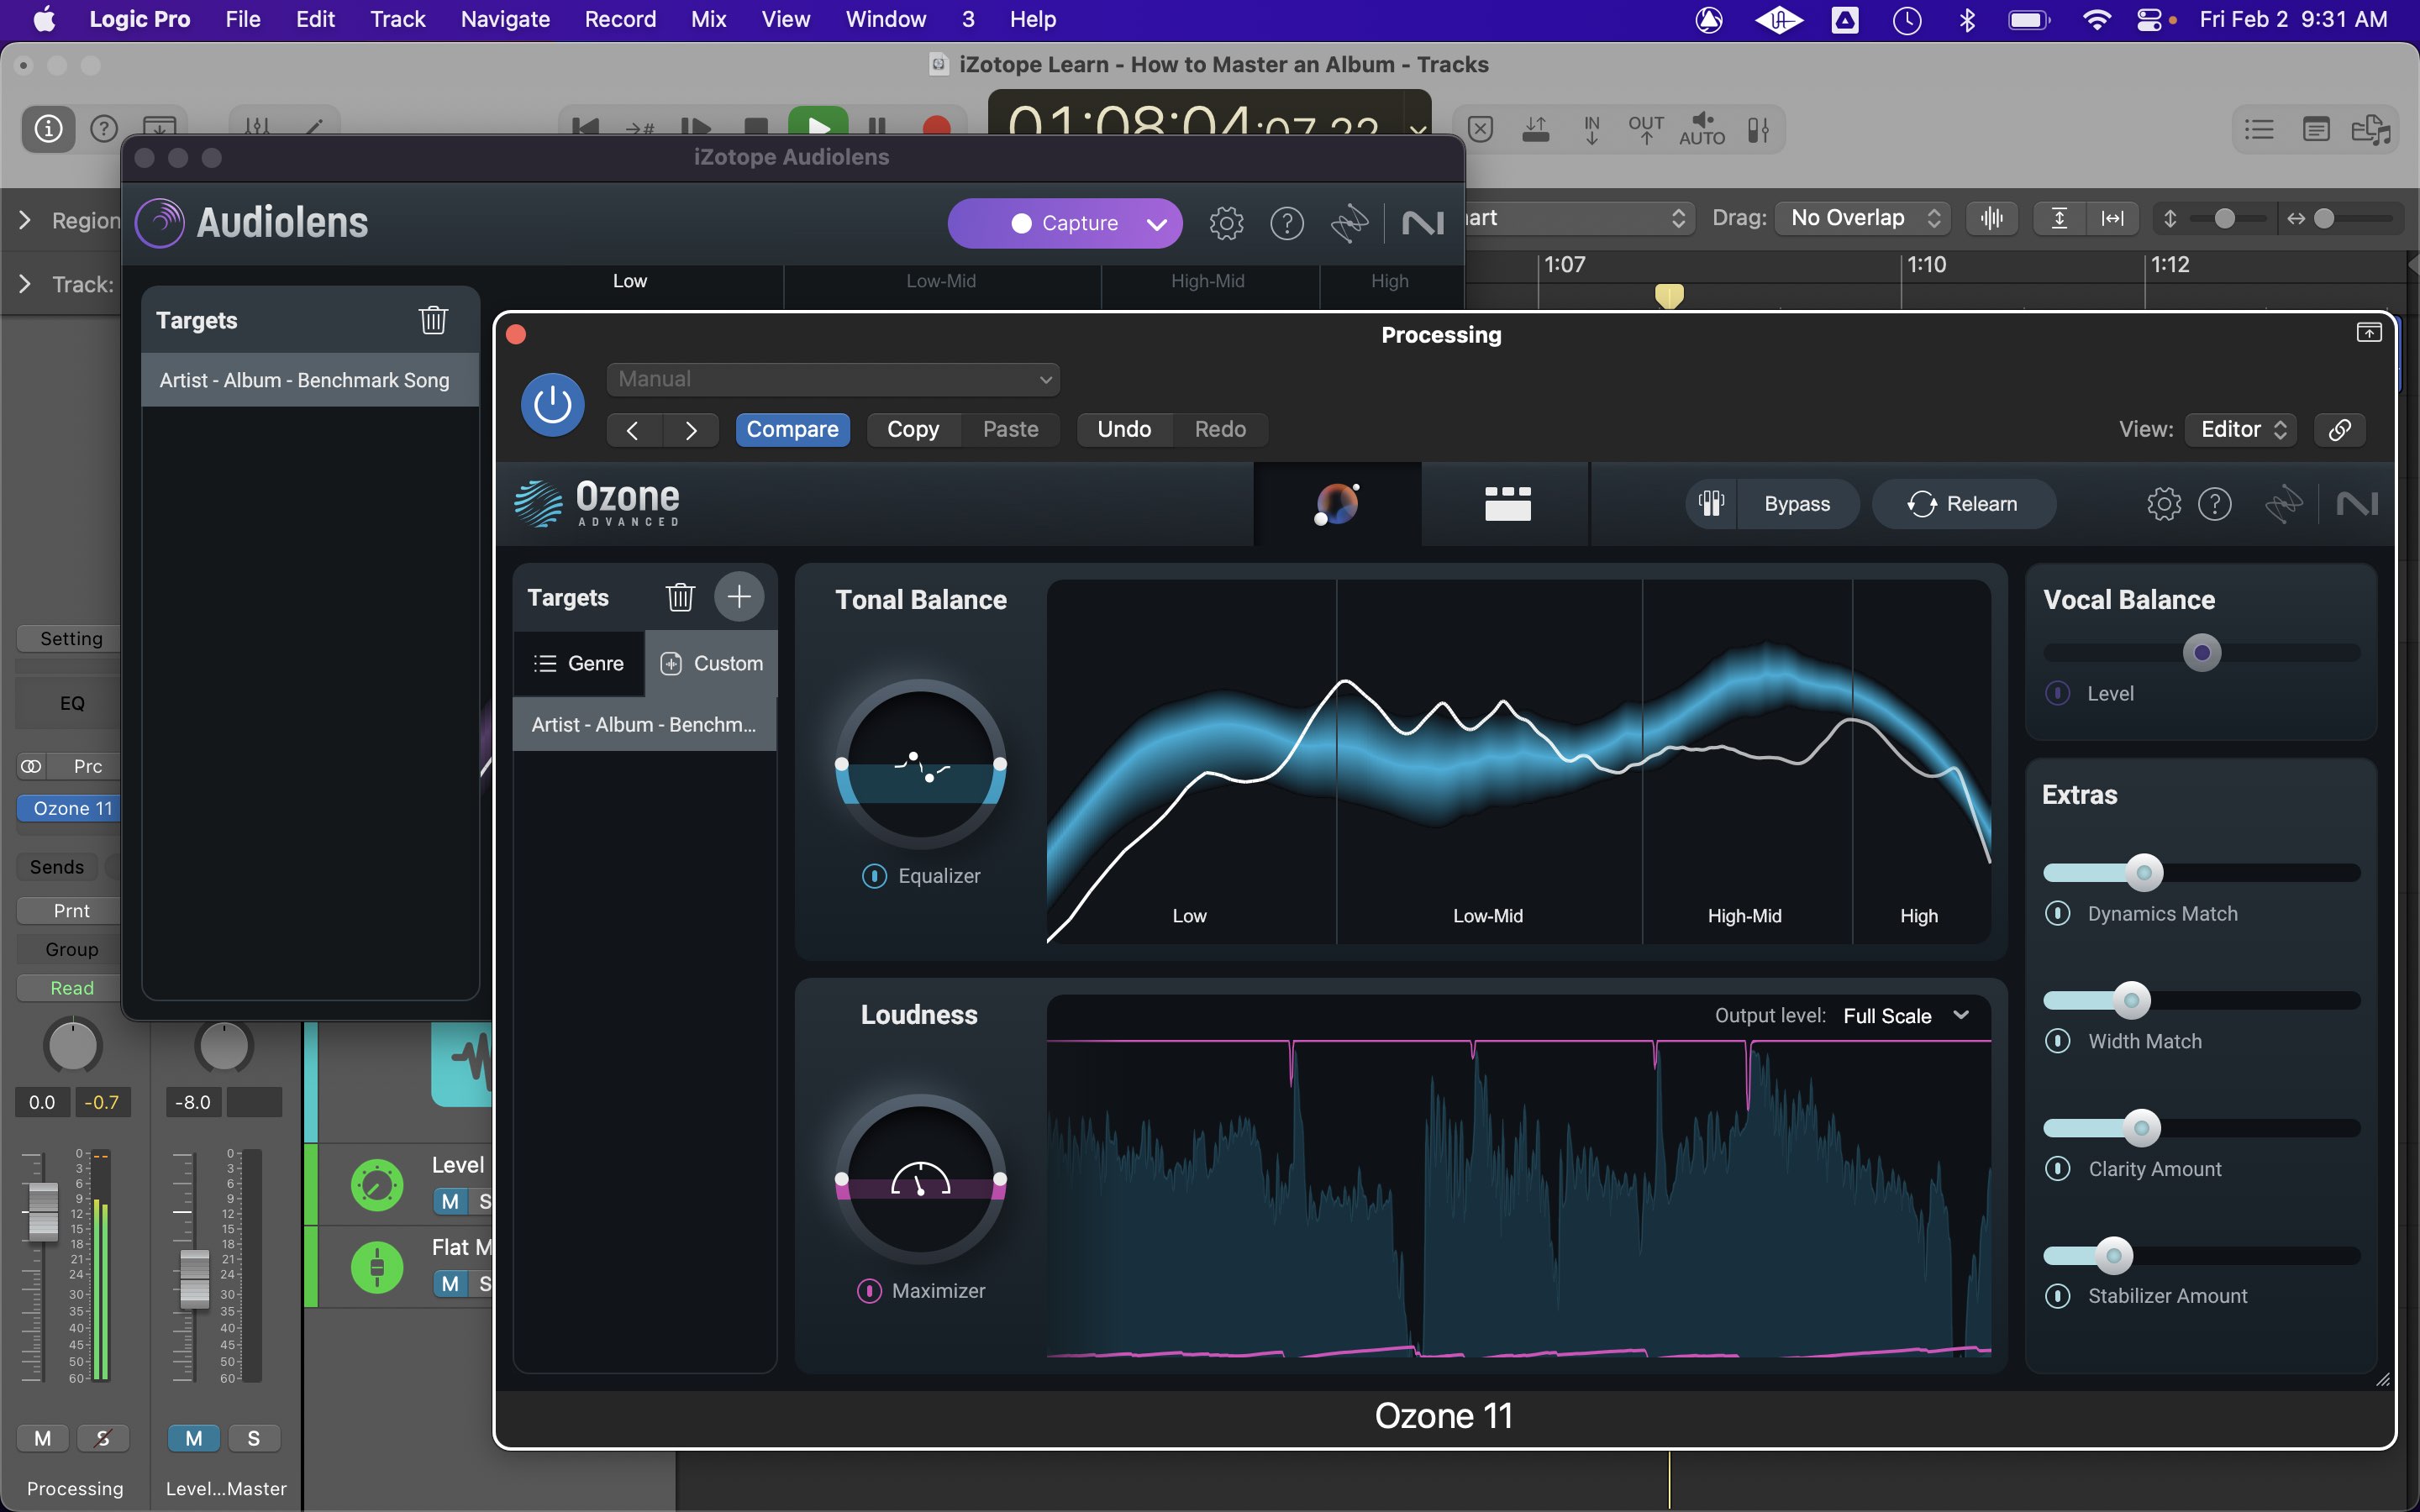
Start balancing the remaining songs
Remember though, this should only serve as a starting point, albeit a very useful one. If you choose to use Master Assistant with a custom Audiolens target, play around with the macro controls to refine your starting point. Then switch to the module view tab and listen through what each module is doing, making tweaks as necessary. Remember to A/B between your Loudness Matched Master and Flat Mix tracks to make sure you’re not doing any undue harm, and also between your print track and the print of your benchmark track.
This process is often somewhat cyclical: do a level-matched listen with the flat mix, make some adjustments, listen at full level against the benchmark track, make further refinements, rinse, repeat. At this point you may also be working through the album in order, so it becomes important to check each song not only against the benchmark, but also against the song that precedes it. Once you get each song to an appropriate place, record arm one of your print tracks and record it in, following the same procedure you used for the benchmark track.
Also, don’t forget to take regular ear-breaks! If you look up and find you’ve been working for an hour straight, you’re definitely overdue for a 5–10 minute break.
5. Listen, adjust, re-listen, re-adjust
Once you have all of your songs printed in, it’s time to start fine-tuning. Listen through all the songs, cross-referencing them against each other. Have you beat your benchmark with one or more of the other tracks? If so, you may need to go back, tweak the processing settings for the benchmark and reprint it. Wash, rinse, repeat. Give yourself ample breaks so that you can maintain focus. Go take a walk, play some video games, or do something else to distract your mind for a bit if you need.
This can be another tricky part of the process, as knowing when to call it quits can be tough. On the one hand, you don’t want to overthink things and drive yourself mad going in circles, or end up wildly over-processing things; on the other hand, mastering is it. There’s nothing else that comes after this before distribution. It’s the last chance to get it right. Give each song its due, but if you need to step away for a day in order to do that, no one would blame you.
What does mastering do to an album?
The changes made in mastering can often seem subtle. However, what I frequently hear from clients whose albums I work on is that while the differences in any one song may be small, the impact across the whole album in making it feel like a cohesive, unified, whole is palpable. So yes, just like mastering singles, mastering an album will improve the level, tonal balance, dynamics, and imaging of all the songs, but more importantly it can take it from feeling like a smattering of songs, to a singular piece of musical art.
6. Finalize song spacing, fades, and levels
We’re making good headway. At this point, it’s time to finalize the layout of your album. That means adjusting spacing between songs, adding fades to the starts and ends of files – often called tops and tails – and making any final level tweaks.
Adjusting song spacing
Much like the overall song sequence, the spacing in between songs can subtly impact listeners’ experience of the album. Also like sequencing, there’s not necessarily any right or wrong way to set spacing, but here are a few factors to keep in mind.
- When setting spacing, allow yourself to listen to at least the last 30–60 seconds of the outgoing track. It’s all too easy to make spaces far too short if you just listen to the last 10–15 seconds.
- Songs with a similar tempo or energy can likely get away with shorter spaces between them, while songs with a bigger change in tempo or energy may warrant more space.
- Genre can also play a strong role. Certainly, in jazz and classical idioms, longer spacing between songs is not uncommon.
- Sometimes it can also work to continue counting in the meter of the ending song and place the first downbeat of the next song a bar or two later on what would have been the one.
- If you do overlap adjacent songs, think carefully about where to place the track transition between them, and what the experience will be if someone doesn’t listen to them back to back.
Add fades
I always encourage my clients to leave the fades for mastering, although if they have something specific in mind there’s no harm in sending a reference. Regardless, we often want to add at least short fades to the tops and tails of files to make sure there are no clicks during transitions. Doing this in a very quiet environment, or in closed-back headphones if needed, is important so that you don’t prematurely cut anything off.
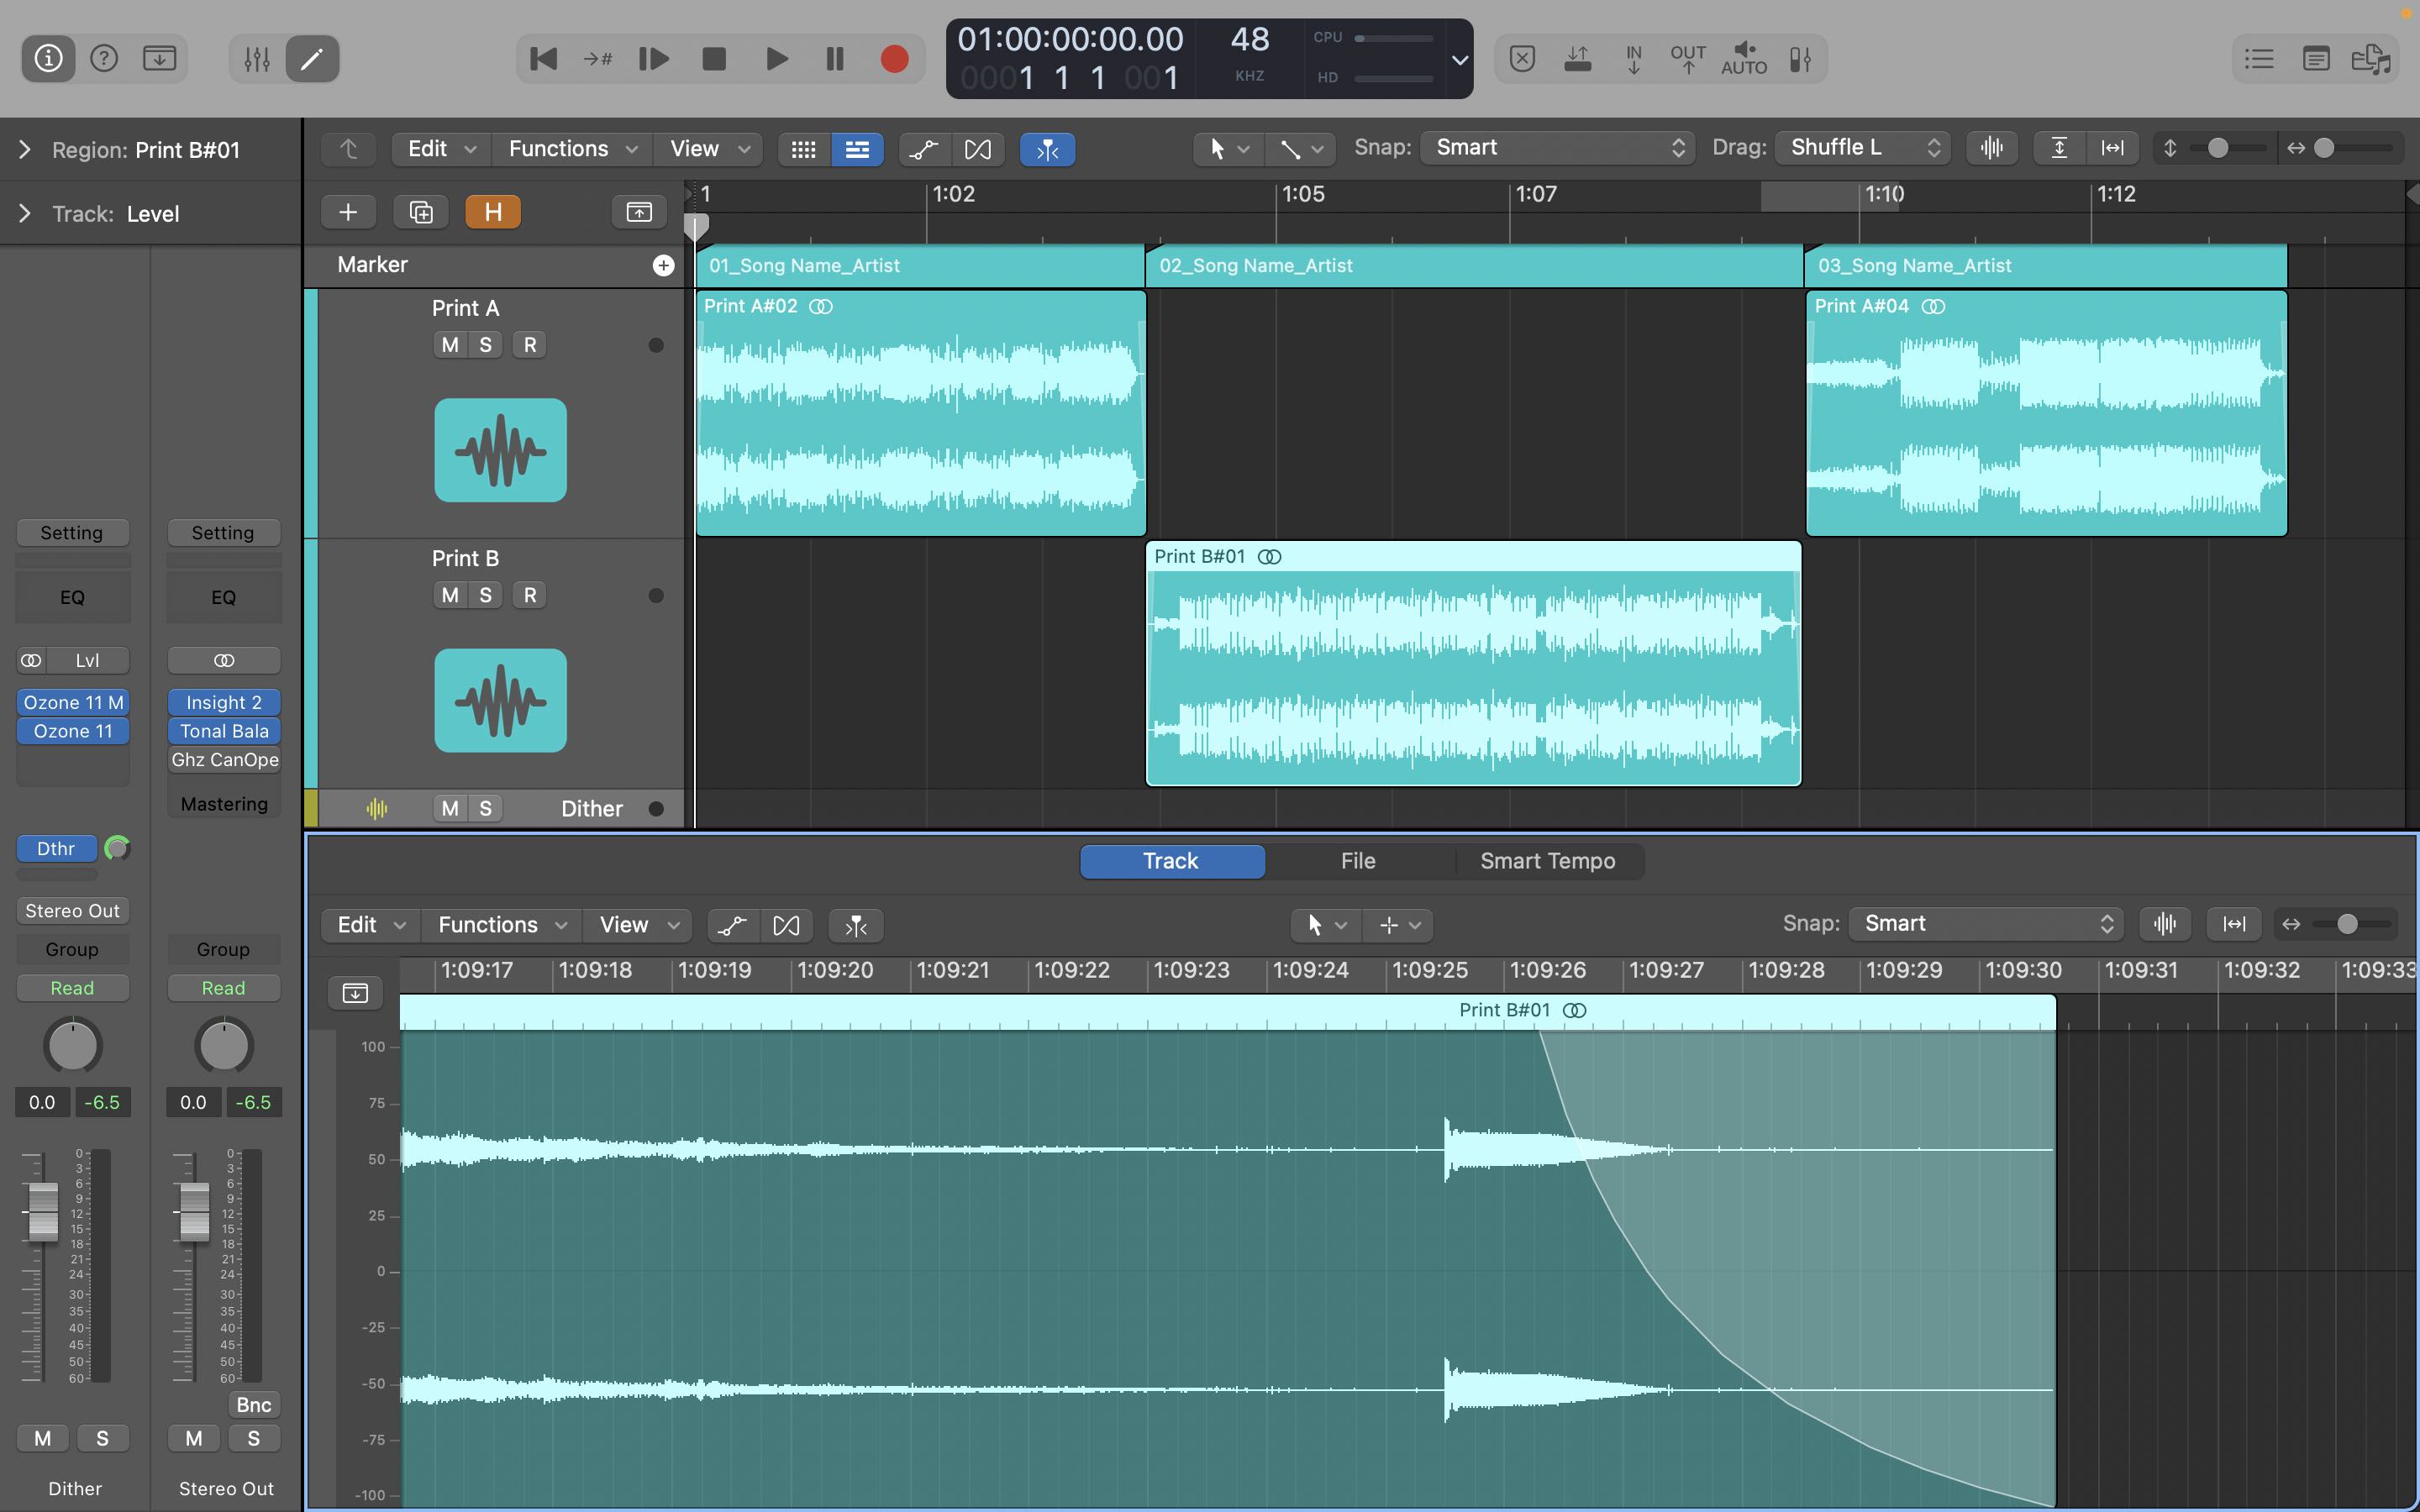
Finalizing your mastering session
Check levels one more time
Do a final level check and make any adjustments that may be needed – this is another great reason to use the alternative routing shown above and not print the limiting to your captured tracks. Again, here are some principles to keep in mind:
- Needle-drop between choruses or other loud sections of adjacent tracks. Do they sound similarly loud? Are the vocals or other lead instruments at nearly the same level, even if the rest of the instrumentation sounds different in level? If not, make some subtle adjustments so that they are. Clip gain is a great way of doing this.
- What about the levels between the end of one song and the beginning of the next? If there’s a large disparity, consider some gentle level automation to even out the transition.
Lastly, a word on loudness and LUFS. Meters like Insight can be invaluable to check levels, get songs in the ballpark, and understand how everything will translate to streaming services. However, they should not be used to determine final levels. Not every song on an album should have the same integrated LUFS value, and in fact, if they did they would likely sound quite unnatural. Let your ears be the final judge here.
7. Export your masters with spacing baked in
Alright! We’re done adjusting audio! Now it’s time to set song start and end markers and bounce – or export – your masters. It’s a good idea to use the marker or region feature in your DAW to set the start and end points for each song so that you can precisely set bounce ranges for repeatability. The end marker for one song and the start marker of the next should be exactly adjacent – or even the same – so that any space in between songs is included in the final renders. It’s also good practice to leave at least 200 ms before the start of a song.
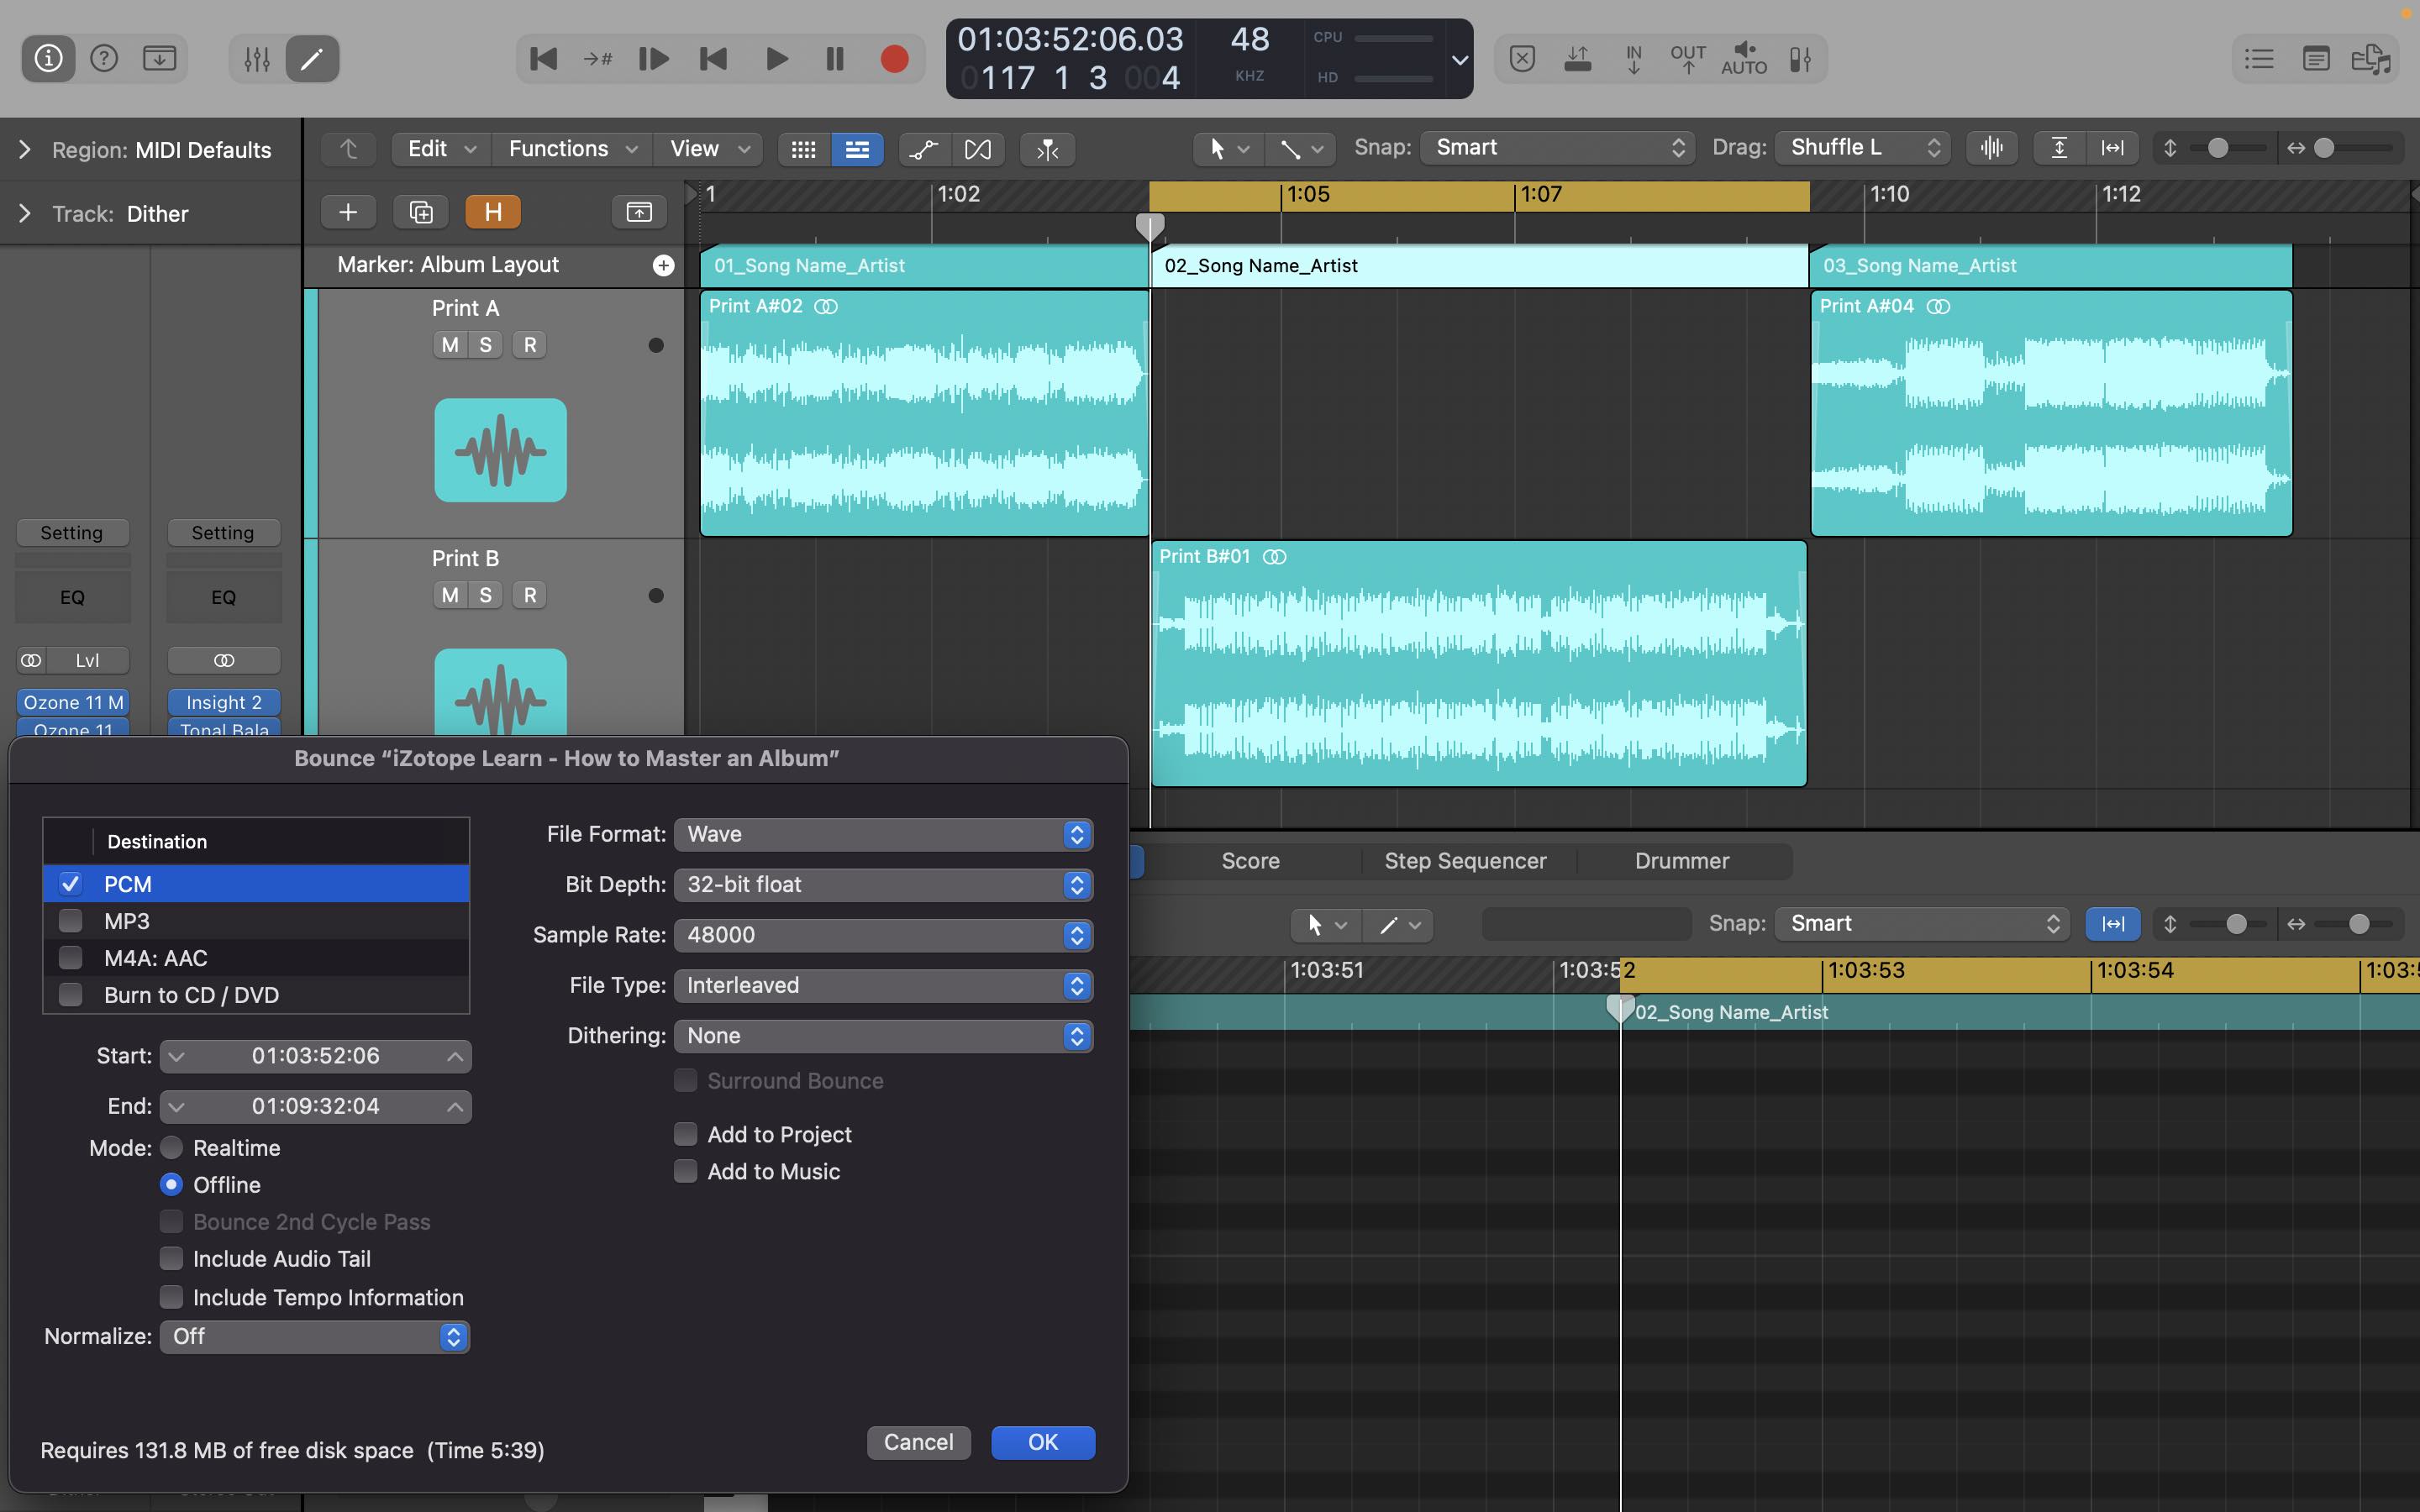
Set markers and export songs
When you export your masters, it’s a good idea to use the sample rate that you mastered at and a 32-bit floating point bit depth. This way, you have the highest fidelity possible and can use it as an archival version to generate other versions – often called “parts” – for delivery.
Incidentally, on the topic of sample rates, there are a few approaches here. Some mastering engineers like to upsample all the mixes to 96kHz before they load them into the mastering session. I generally prefer to leave the mixes at their original sample rate and work at that rate for my mastering sessions. The one exception is if I receive eight mixes at 48 kHz, two at 44.1 kHz, and one at 88.2 kHz, I’ll upsample them all to 88.2 kHz. In other words, I’ll resample any mixes at lower sample rates to the sample rate of the mix with the highest rate.
8. Add and verify metadata
Metadata used to be a bigger part of mastering than it is these days, but it’s still a good step to understand and know about. Currently, when you upload your masters to an aggregator like CD Baby, DistroKid or TuneCore, they will make you input all your metadata separately at that stage. They will then assign ISRCs – international standard recording codes – for each song and send those, along with all the metadata, to the streaming providers.
However, there are still cases, and good reasons, to embed metadata. For example:
- If you’re preparing AAC or MP3 files to send out as promo copies
- If you need to prepare a DDP – disc description protocol – file set for CD duplication
In both of these cases, you should include, at a minimum, the artist, album, song name and number, ISRC, and UPC codes. Apps like Metadatics or Meta on the Mac – sorry, I don’t have good, equivalent Windows recommendations – can be handy for adding this kind of information.
Make a “PQ” sheet
If you’re making CDs or vinyl it’s also a good idea to make a “PQ” sheet, also called a cue sheet. Technically, a PQ sheet only applies to CDs, so these days it’s more common to hear them referred to as cue sheets. Whatever you call them, they contain info on track names, durations, and spacing, and often will be needed by a CD manufacturing plant or vinyl cutting engineer.
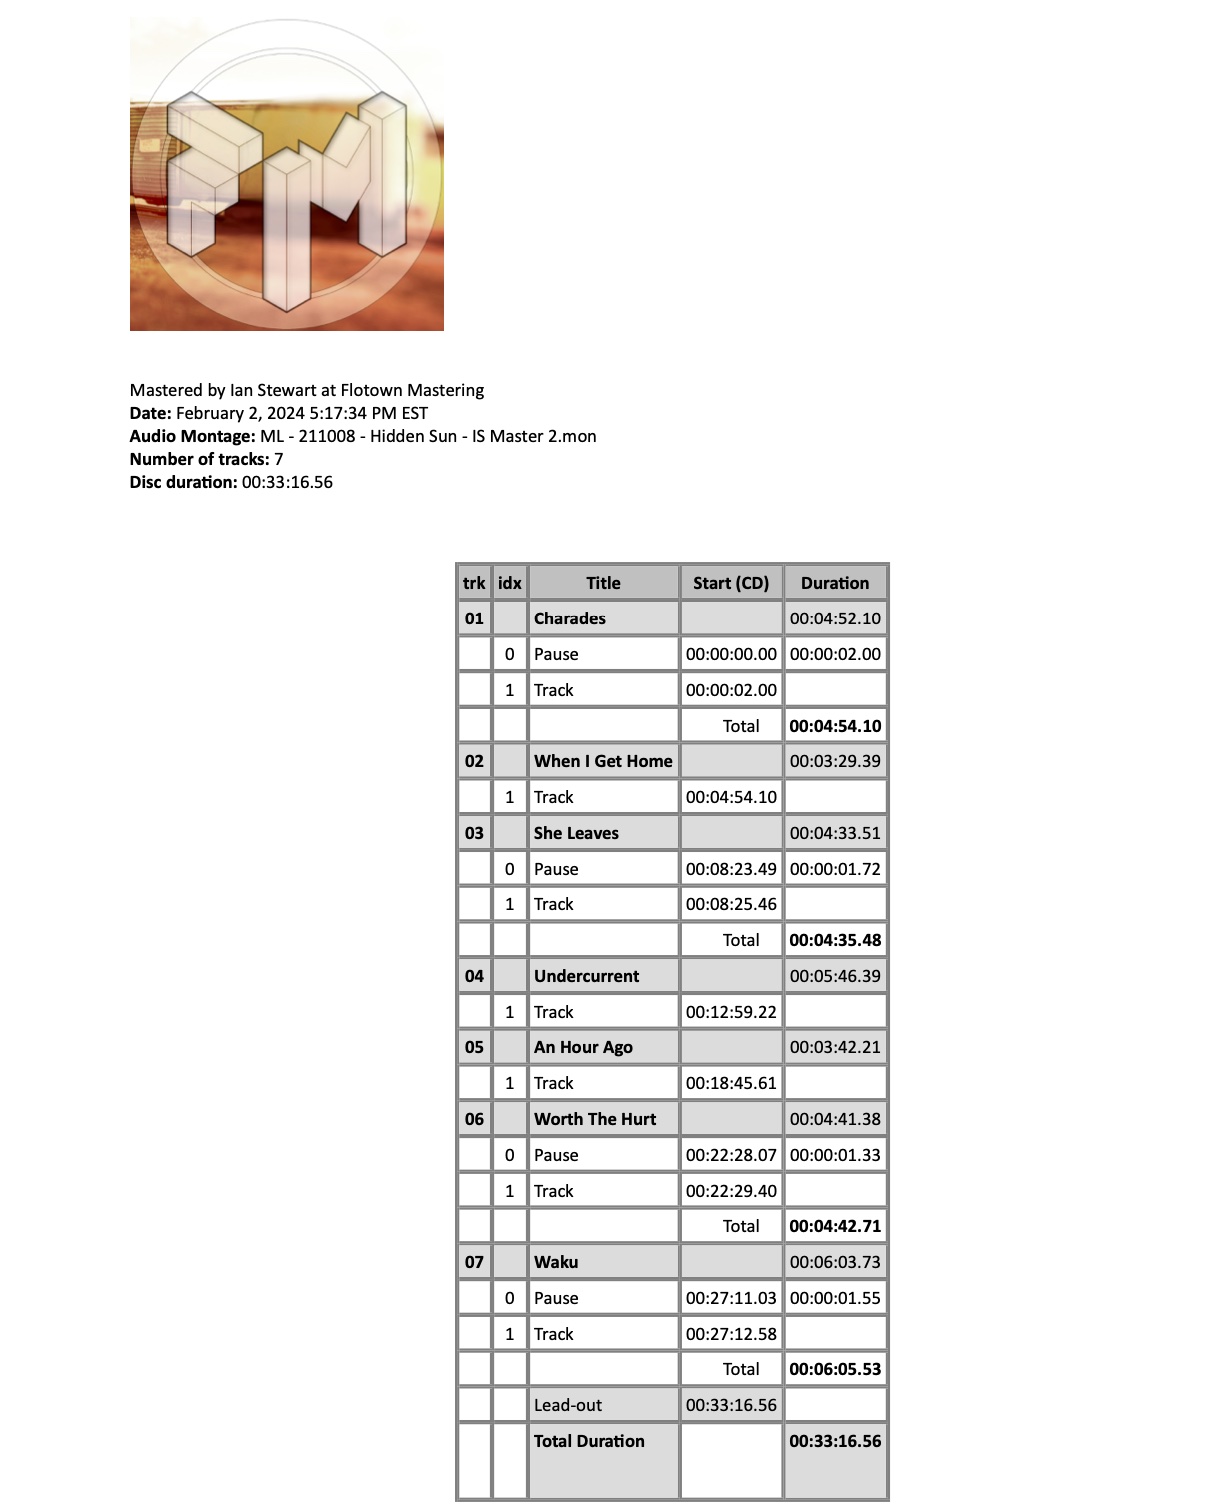
A sample PQ sheet
9. Create your delivery parts
At this point you’re ready to create your delivery parts. These may vary depending on the distribution channels, but here are some common formats for different mediums.
- Streaming: Some aggregators still want 16-bit, 44.1kHz .wav files, but by and large these days it makes sense to send 24-bit files at the sample rate of your mastering session.
- CD: 16-bit, 44.1kHz is the requirement for CD. Some duplication plants will accept .wav files, while others may want a DDP or Red Book CD, accompanied by a PQ sheet.
- Vinyl and cassette: As with streaming, hi-res files are a great place to start. The main difference with vinyl and cassette is that it makes sense to make one file per side so that all the sequencing and spacing is baked in and doesn’t need to be recreated.
- MP3 and AAC: As mentioned, MP3 or AACs are still sometimes used to send promo versions out. These can be encoded from the archival .wav files, although the maximum sample rate for MP3s is 48 kHz.
A great way to create all these production parts is to use the batch processor in


RX 11 Advanced
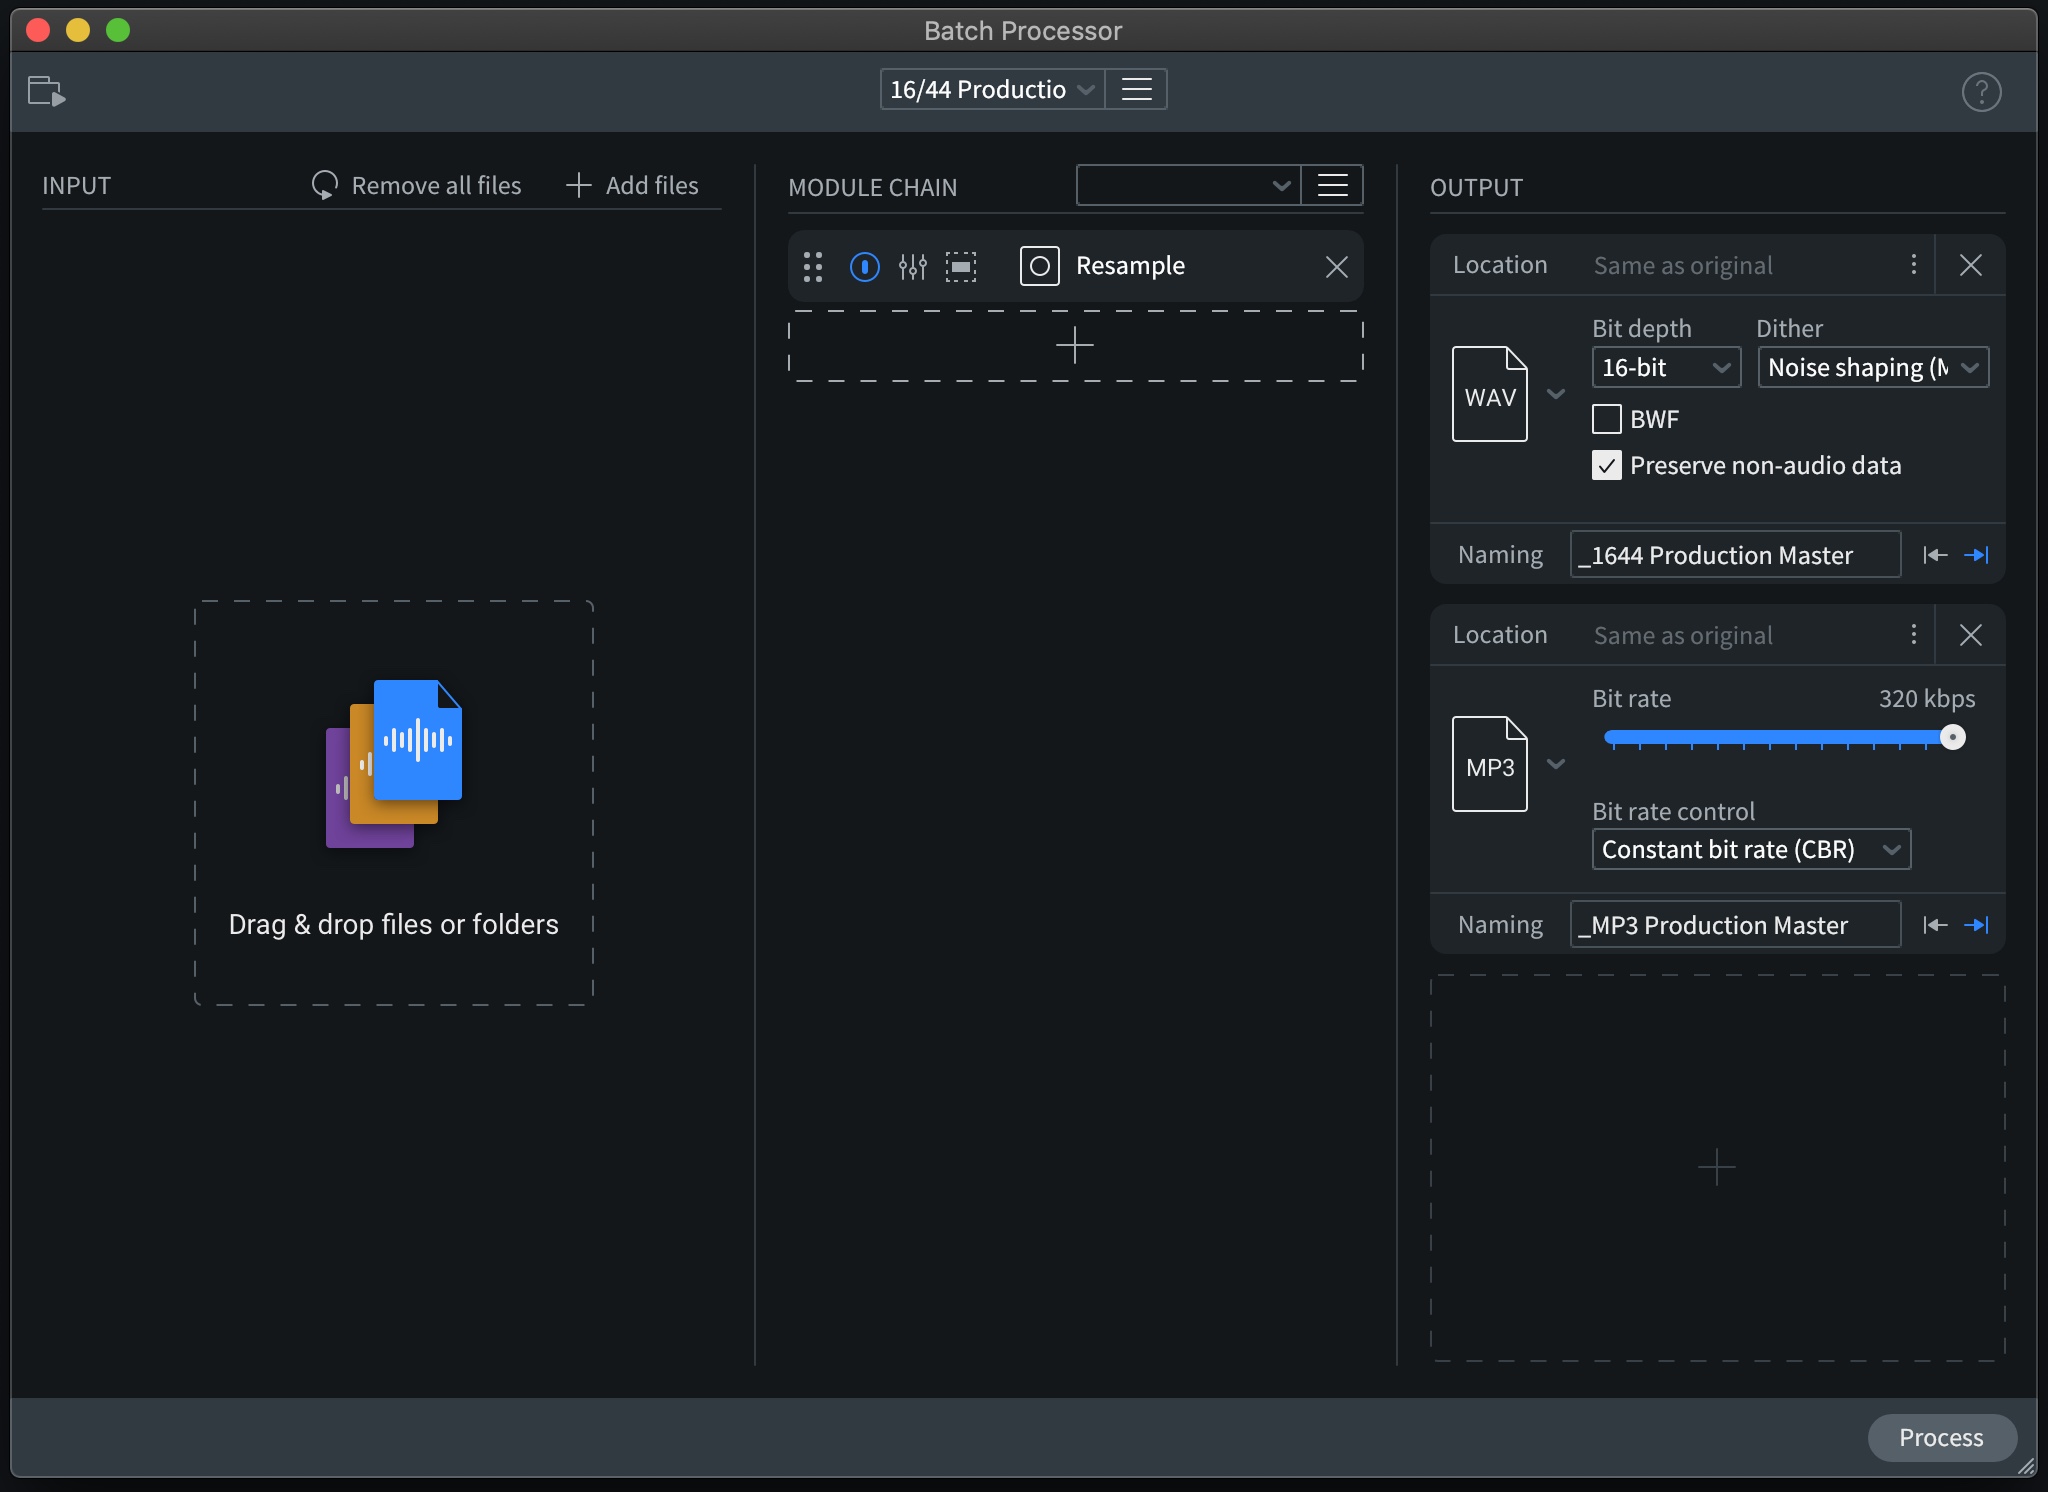
RX batch processor for production parts
10. QC everything
Ok, the final step! This isn’t specific to album mastering, but it’s as important here as it is in any other mastering project, and with the sheer number of files that can be included in album projects it can be easy to want to look for shortcuts.
Don’t do it!
It’s important to listen through all your production parts to make sure there are no dropouts, clicks, pops, or any other unintentional artifacts. This should be done with detailed, hi resolution headphones. When you’re done with your QC pass, it’s time to package up your master and send it out!
Start mastering albums with a consistent, clean sound
If after all that you’re thinking, “Man, mastering an album sounds like a lot of work!” you’re not wrong. It is. But it is also incredibly rewarding!
So to recap, start off by setting up an album mastering session and saving it as a template. Having a DAW setup that can accommodate a lot of A/B listening both between unprocessed and processed mixes, along with mastered songs and the current song you’re working on is crucial.
Then, pick a song to start with and establish a benchmark master which will also serve as an internal reference track. Next, make sure you’ve got your song sequence locked in and start working on all the remaining tracks to move them toward the sound of your benchmark, but don’t worry about trying to precisely match the sound of every song. Each song having a unique character is desirable, so long as they feel like part of the same family.
Don’t worry if this part of the process feels cyclical. As long as you keep moving in the right direction things are going well. If you start to feel like you’re getting further from your destination, it may be time for a break or to take a few steps backwards.
Once you’re happy with your processing, adjust song spacing, add fades, and check your levels one more time. If you need to add some subtle level automation to make the end of one song work with the beginning of the next, that can be entirely appropriate. With spacing, fades, and levels finalized, add markers to specify export ranges – including silence between songs – and export each song to an archival format.
If warranted for your distribution formats, add and verify metadata and make PQ or cue sheets. Then you can use RX to make your final delivery parts, and last but not least, quality check everything!
So there you have it: 10 steps to mastering an album. Have fun with it, and if the going gets tough, remember the sense of reward and satisfaction that comes with compiling and delivering that final product. Good luck, and happy album mastering!
