How To Expand Your Rhythmic Possibilities With Stutter Edit
Learn how to get the most out of your sonic adventures with Stutter Edit's powerful Gesture and timeline features.
iZotope's live remix software Stutter Edit is a great tool for both studio and stage. Stutter Edit's features revolve around an innovative engine that continuously samples live audio, storing that audio in a buffer that can be manipulated in a myriad of ways. The key to unlocking Stutter Edit's capabilities is the use of Gestures: a set of effects and their associated timelines that reside on a single MIDI note.
Here are a few tips for using Gestures and timelines to get control far beyond the standard automation lanes found in your host application or DAW.
Manipulating Gestures in real time
Regardless of what audio input source you use, you'll need to do a couple of things in order to process your audio. First, instantiate Stutter Edit on the audio track. Then, depending on your DAW, you may need to create a MIDI track with the MIDI output aimed at Stutter Edit.
PRO TIP: "Gesture" keys trigger an individual Gesture, which is seen as an instance of the Stutter Edit program. In a created Gesture, everything is turned off. So start from the bare bones to create a Gesture and explore some of Stutter Edit's powerful timeline features.
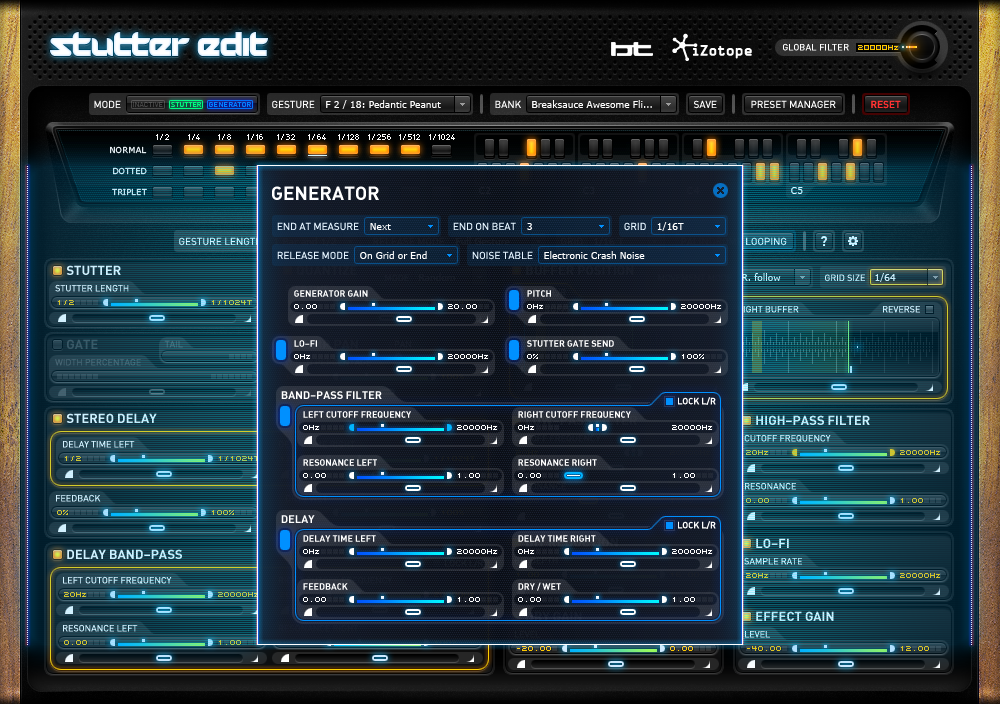
The Gesture Length, Grid, and Release Mode enable you to keep your Gestures tight. You can determine whether the Gesture will end the moment you take your finger off a key, or continue until the Gesture is fully realized. Here are explanations for these Stutter Edit features:
Gesture Length
This control defines how long the Gesture lasts.
Grid
This parameter controls how Stutter Edit will quantize the MIDI it is being sent. For example, setting Grid to "⅛" means the Gesture will always start exactly on the next eight note.
Release Mode
This setting lets you determine how the Gesture will end. For example, if Release Mode is set to Full Gesture, the entire Gesture will play through from start to finish—even if you only tap the note.
One other key feature is a button called Palindrome Looping. Palindrome Looping sends your audio from the start to the end and then back to the beginning of the bar. It can be used for cyclical dynamic effects.
Using the Timeline Dots
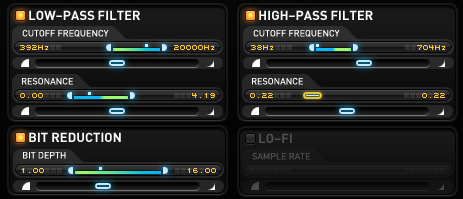
When a Gesture is triggered, progress through the Gesture is designated by the Timeline Dot in each active module. The Timeline Dot will slide from the beginning (designated by the blue section of the Range) through to the end (designated by the green section).

In the image above, we can see a few details about the Low-Pass Filter module. The Cutoff Frequency will start at 20,000 Hz and end at 392 Hz, and the Resonance will start at 0 and end at 4.19. If we wanted to reverse the motion of the Cutoff Frequency, we could right-click and select Flip Range. The green section and blue section would then switch, and the Cutoff Frequency would start at 392 Hz and end at 20,000 Hz.
PRO TIP: The two handles on either side of the blue and green bar can be dragged to adjust the start and end points.
Playing with the Mod Wheel in real time
The Timeline can also be controlled manually, making Stutter Edit a powerful performance tool. To do so, use the Mod Wheel.
The Mod Wheel is automatically assigned to control and override the Timeline. Push the Mod Wheel up to advance your location in the Timeline, or push it down to reverse the Timeline. This allows you to add a more human element to your effects within a DAW, or allows you to truly play your effects in a live performance.
By default in Stutter Edit, the Mod Wheel is going to control the timeline. As you move the Mod Wheel, you can control where in these ranges you're going to be sitting. When you release this Gesture, you're going to go back to the audio.
Start experimenting
These are just a couple of examples of some of the sounds you can create with Stutter Edit. Once you start to play in some of these gestures and take over the timeline with the Mod Wheel, you will see how easily you can make cool, dynamic, evolving effects that would be difficult to create otherwise because there are so many parameters moving all over the place.
Now that you understand how to work with some of the parameters in Stutter Edit's modules, we recommend you turn on the other modules and engage each of the parameters in those other modules with their own ranges and curves. You'll see how quickly you can make some really interesting effects that would be difficult and time consuming to program in a different way.


