How to EQ Guitars in Your Mix
In this tutorial, learn how to EQ guitars to reduce unwanted frequencies, bring fullness and clarity to the guitars, and create space for other instruments in your mix.
How to EQ guitars is often managed as a matter of taste. We EQ guitars to make space for other parts of the mix, reduce unwanted harsh or ringing frequencies, and occasionally sweeten certain frequency areas with additive EQ. EQing electric and acoustic guitars are very similar, although you might find certain ideas we’ll cover will apply more to one or another. This article contains a few guitar recordings from Skyler Skjelset’s record, Back in Heaven.
Learn how to:
- Address guitar frequency issues with:
- Fine tune guitar EQ to improve clarity
- Consider a boost for additional warmth
We’ll be using iZotope to outline how to EQ guitars. You can follow along by starting a free trial of iZotope’s


iZotope Music Production Suite Pro: Monthly


Music Production Suite 7


Neutron
What is EQ and how is it used?
EQ, or “equalizing,” is the process of increasing or decreasing the loudness of a chosen audio frequency, or area of frequencies (referred to and used on equipment as a “band,” “shelf,” etc.). We use EQ to subtract unwanted frequencies, as well as add frequencies when needed. If you need to get started on EQ, check out this article. The frequency chart below will also help you understand how audio frequencies translate to certain musical instruments and common terminology for groups of frequencies in the audio spectrum.

iZotope Carnegie Chart
This article references a previous version of Neutron. Learn about 

Neutron 5
Remove unwanted guitar frequencies
If you’re lucky, you’re working with a really dialed-in acoustic or electric guitar tone and you just want to do a basic cleanup. Or maybe you just need a good starting place for a tone that needs some work. Using filters and shelves is a great place to start for either scenario! Check out this article I recently wrote on mixing low end for some useful content that will overlap with this subject.

High pass and high frequency shelf in Neutron
How to use high pass and low pass filters for guitars
Using a high pass filter is a great starting place for all EQ jobs, and is very useful for guitars! In use, a high pass filter will cut off low frequencies to the point you set it at. The term is a bit funny, and almost sounds like it does the opposite thing. I think of it as “allowing high frequencies to pass a certain point.”
There are very few scenarios where you really want frequencies below 60 Hz, 80 Hz, 100 Hz, or even a bit higher out of a guitar. Try using Neutron’s Solo mode (the “S” button on any selected EQ band) to isolate that frequency band and hear what’s really happening down there.
Oftentimes, it’s just rumbles or electrical noises that you can cut off to clean up the low end in your mix—it’s like getting free real estate! If there are many bass elements, or instruments with low end, subtracting low end with a high pass filter on your guitars will help reduce clutter in the low end and focus the low end on tracks where it really matters. Try listening to your whole mix, and slowly roll up the high pass filter on your guitar to a point where you’ve reduced unneeded sub frequencies, while still retaining your desired amount of fullness in the low end.
Using a low pass filter is similar, but not usually as necessary. Like the high pass, it will conversely cut out high frequencies to the point you set it at. Cutting out a bit of electrical, static, or room noise up beyond 10 kHz is standard. If a guitar sounds too bright, you might also try using a shelf, but be careful to not cut out too much of the “air” frequencies that live up high that tend to give your signal a bit of extra dimension.
How to use a high shelf or low shelf to EQ guitars
Here’s my hot take: the EQ shelf is the most underutilized and one of the most useful tools in recording! A shelf will either boost or cut the whole area of low or high end you set it at. Think of it as an “overall” adjustment.

A low and a high shelf in Neutron
Let’s start with the low shelf, which is useful to dial in the whole low end in your guitar—before or after you’ve cut out some crud with a high pass filter. I like to start by taking a low shelf on my guitar, subtract as much gain as possible, and roll the frequency value upwards from 20 Hz (the lowest setting) until you feel like “the bass is gone from this guitar.” You might land somewhere just south or north of 160 Hz. Now, you’re just left with the higher end of your guitar.
With the full song arrangement playing, roll back in the gain of the low shelf until it feels good! This should help you achieve good low end balance with your guitars and everything else in your mix.
High shelves are also useful for a broad stroke control of high end. Try using the same method I described above to pinpoint the “high end” of your guitar. There’s a variety of different places you might land, but I tend to fall around 3–6 kHz. Perhaps you need a subtle bump or dip in high end overall and a shelf is a great way to do just that!
Listen to how much clearer this guitar sounds with a bit of high pass and shelving:
Guitar Before & After High Pass, Shelving
Fine tune guitar EQ to improve clarity
File the bell filters under the “general” EQ section. A bell filter affects a certain area of frequencies that you set with a high and low point, as well as a Q, (known as the bandwidth—or number of frequencies—that will be cut or boosted by the EQ), that allows you to select the slope of the EQ. When you’re on the hunt for a frequency range that is not working for you, try boosting or listening (with the speaker in Neutron) to an area, adjust the band's width to get that right spot, then cut to taste. This is commonly referred to as the boost and cut method.

Using bell filters in Neutron
What should you be on the hunt for exactly? Fullness and harshness come to mind first. 160–300 Hz will contain a lot of body for both electric and acoustic guitars. Too much will sound tubby and reduce clarity. Harsh frequencies, the ones that really bite your ears and make you say “OW!” tend to be from 1.5K–4K. All the stuff in between, in the “midrange,” really makes something sound way too forward, or hollow if there isn’t enough. Play around and get a feel for offending frequencies.
How to notch and subtract ringing frequencies
In addition to everything else, or sometimes just on it’s own, a notch is the way to go. A notch is a bell with a small Q or width, but just taken to the extreme and isolated to a certain frequency or just around it. If you hear a note that’s too loud, or a harmonic that is “ringing” or “singing” annoyingly, give it a notch with a pretty severe cut in volume—maybe 10 dB or more in some cases.
This can be achieved using Neutron’s EQ Learn feature. By simply clicking “Learn” on the EQ, the plug-in will analyze your audio and place nodes at areas of interest that may be causing issues in your mix. It will find what you’re looking for, as well as make suggestions for EQ ideas you hadn’t yet considered.
Alternatively, using the same listening function or boost and cut method like we did with the bell filter is also a great way to find the offenders.
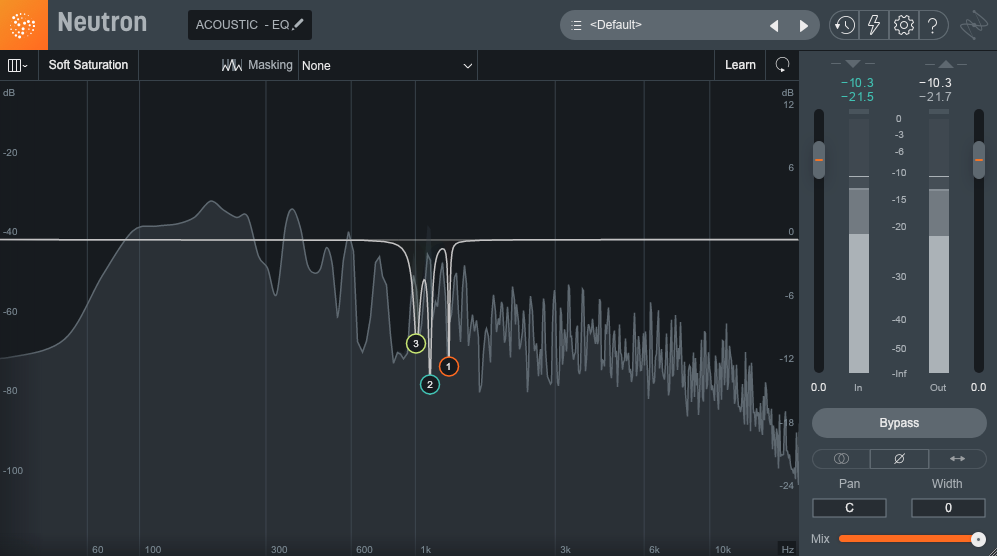
Several tight Q notches in Neutron
A lot of these frequencies live in the midrange from around 800–2K Hz. Especially in acoustic guitars, I’ll sometimes have several surgical notches gravitating around 1 kHz to clean up those whistling frequencies that annoyingly stick out in a mix. Ringing frequencies are just a natural part of guitars, so it’s nice to try and listen with a full arrangement and make sure you’re not cutting too much to avoid hollowing out your tone. Check out how this acoustic guitar sounds with and without notches—ah, the relief!
Guitar Before & After Midrange Notches
Bonus step: How to use additive EQ with guitars
We’ve talked a lot about subtractive EQ first because a lot of the time, as you subtract, what you want comes to the surface with having to add anything. However, sometimes you just need a bit more. The bell and the shelf are your go to tools here. Take a look at the chart at the top of the article again and notice the adjectives associated with frequency ranges. Warmth, presence, brightness, and air, are all common things to want more of out of a guitar. 1–3 dB boosts can really go a long way. I find myself and others especially adding high frequency air for dimension to acoustic guitars, and presence to electric guitars for that in your face feel.
Check out this slightly dull electric and then with a high shelf boost with headphones or studio monitors—it’s subtle, but it does bring more life into the guitar.
Guitar Before & After Shelf Boost
After EQ moves, finalize the mix
If you need perspective on your guitars, use reference tracks that you’re familiar with, or music similar to what you’re working on to see what kind of frequency spectrum they are living in. Once you’ve got some experience, trust your ears and remember, if it sounds good, it is good.
I hope this tutorial has helped you understand how to EQ guitars to get rid of unwanted frequencies, make space for other elements in your mix, and bring life to your electric and acoustic guitars. You can access even more EQ, compression, and mixing tools with iZotope’s


Music Production Suite 7


iZotope Music Production Suite Pro: Monthly
