How to Create, Produce, Mix, and Master Your Own Music (Start to Finish)
Learn how to use iZotope and Native Instruments tools to turn your earliest ideas into release-ready tracks—from creating and producing all the way to mixing and mastering your music.
End-to-end music production in home studios has skyrocketed in recent years, with more people than ever writing, producing, mixing, mastering, and releasing their own music on streaming platforms. So how do you get started making release-ready tracks?
In this tutorial, learn how to use Native Instruments KOMPLETE 14 to create and produce your song, with legendary synths, sampled instruments, and effects that will give you the inspiration you need to find your sound. Next, learn how to use plug-ins included in iZotope’s


Music Production Suite 7


RX 11 Advanced


Neutron


Ozone Advanced
This article references a previous version of Neutron and Ozone. Learn about the powerful new features in the latest version of Neutron and the latest version of Ozone.
Jump to these sections:
Create your music
Datsunn makes a song using various instruments from the KOMPLETE 14 bundle, as well as some real acoustic instruments like a baritone ukulele and percussion instruments to try to capture more of a spacious sound and get some cool vibes going.
He’s using Ableton Live, along with a template for his sessions that includes many of his favorite sounds that he likes to use.
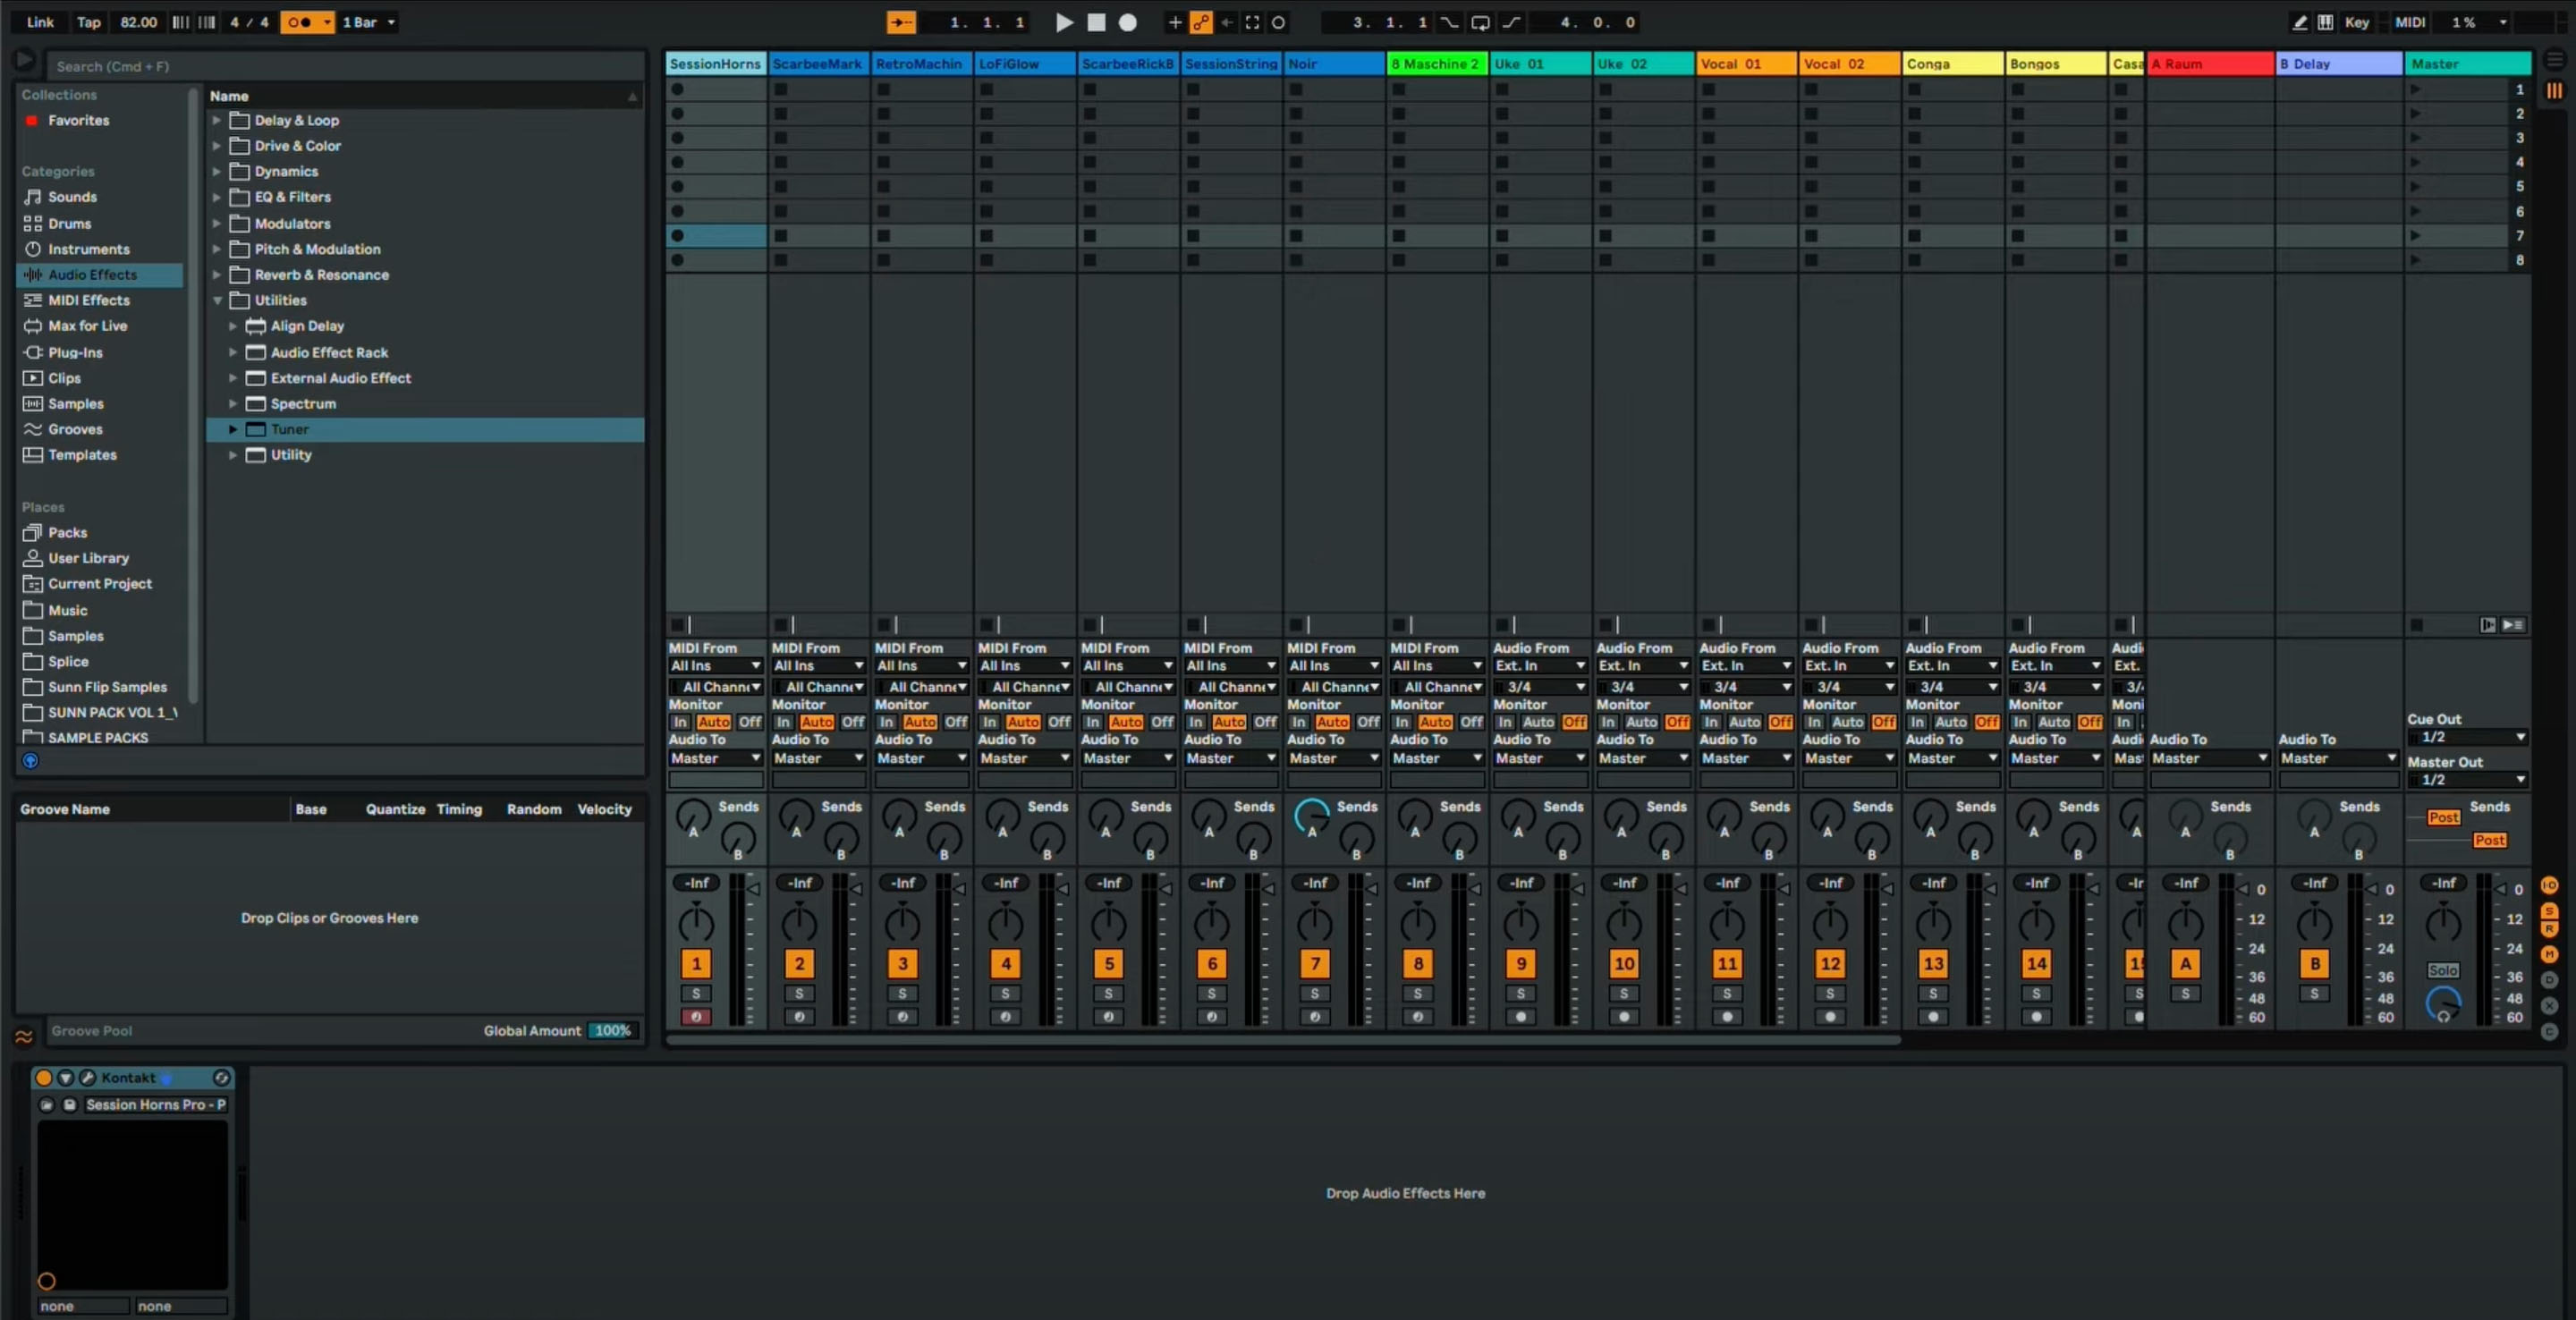
Ableton Live mix template
Here’s what Datsunn has open in his session (all included in KOMPLETE 14):
- SESSION HORNS is a versatile and playable horn section that will instantly perk up your productions. The trombone, tenor sax and two trumpets have been sampled to perfection and deliver a rich, authentic sound, playable by anyone.
- SCARBEE MARK I, the legendary electric piano of the 1970s ranges from warm and mellow to bright and 'barking' and can also produce chiming bell-like tones.
- RETRO MACHINES MK2 is a collection of 16 definitive analog synthesizers and keyboards, sampled and refined for KONTAKT.
- SCARBEE RICKENBACKER® BASS The punchy midrange and stunning power of a Rickenbacker® 4003 captured in software.
- LO-FI GLOW includes keys, synths, guitars, and bass recorded and processed for lo-fi warmth with over 150 tweakable presets.
- SESSION STRINGS includes high-quality ready-to-go string sections for modern productions.
- NOIRE—Nils Frahm’s sampled concert grand, with pure, felt-dampened, and sound design versions, along with extensive customization options
Datsunn also starts with some basic ukulele and vocal tracks loaded in, but as he works on the song, these change even more.
He starts with some percussion, laying down a bit of a percussive groove to play over instead of just listening to the monotonous metronome that producers are used to. He duplicates two different sections of the same percussive recording and layers them to give the song a bit of a different swing.
Next, Datsunn moves into some chord progressions on his ukulele. He tries to leave this song as raw as possible for Geoff to mix and master the song, but he uses GUITAR RIG to give the uke a bit more “sound,” layers some vocals, and adds some small production bits.
As you can see in the video, he continues with vocals. His lyrics about mother earth are not what he originally had in mind, but that’s where his brain went when he started singing the melody.
PRO TIP: Separate instruments into groups if you’re doing blocks of recording like this with the vocals. As you can see on screen, he has the intro harmonies, then the main vocals, and then another batch of background harmonies at the end.
He then adds some horns using his KOMPLETE KONTROL and the SESSION HORNSsounds, then adds in some synths and the LO-FI GLOW plug-in to bring in some texture.
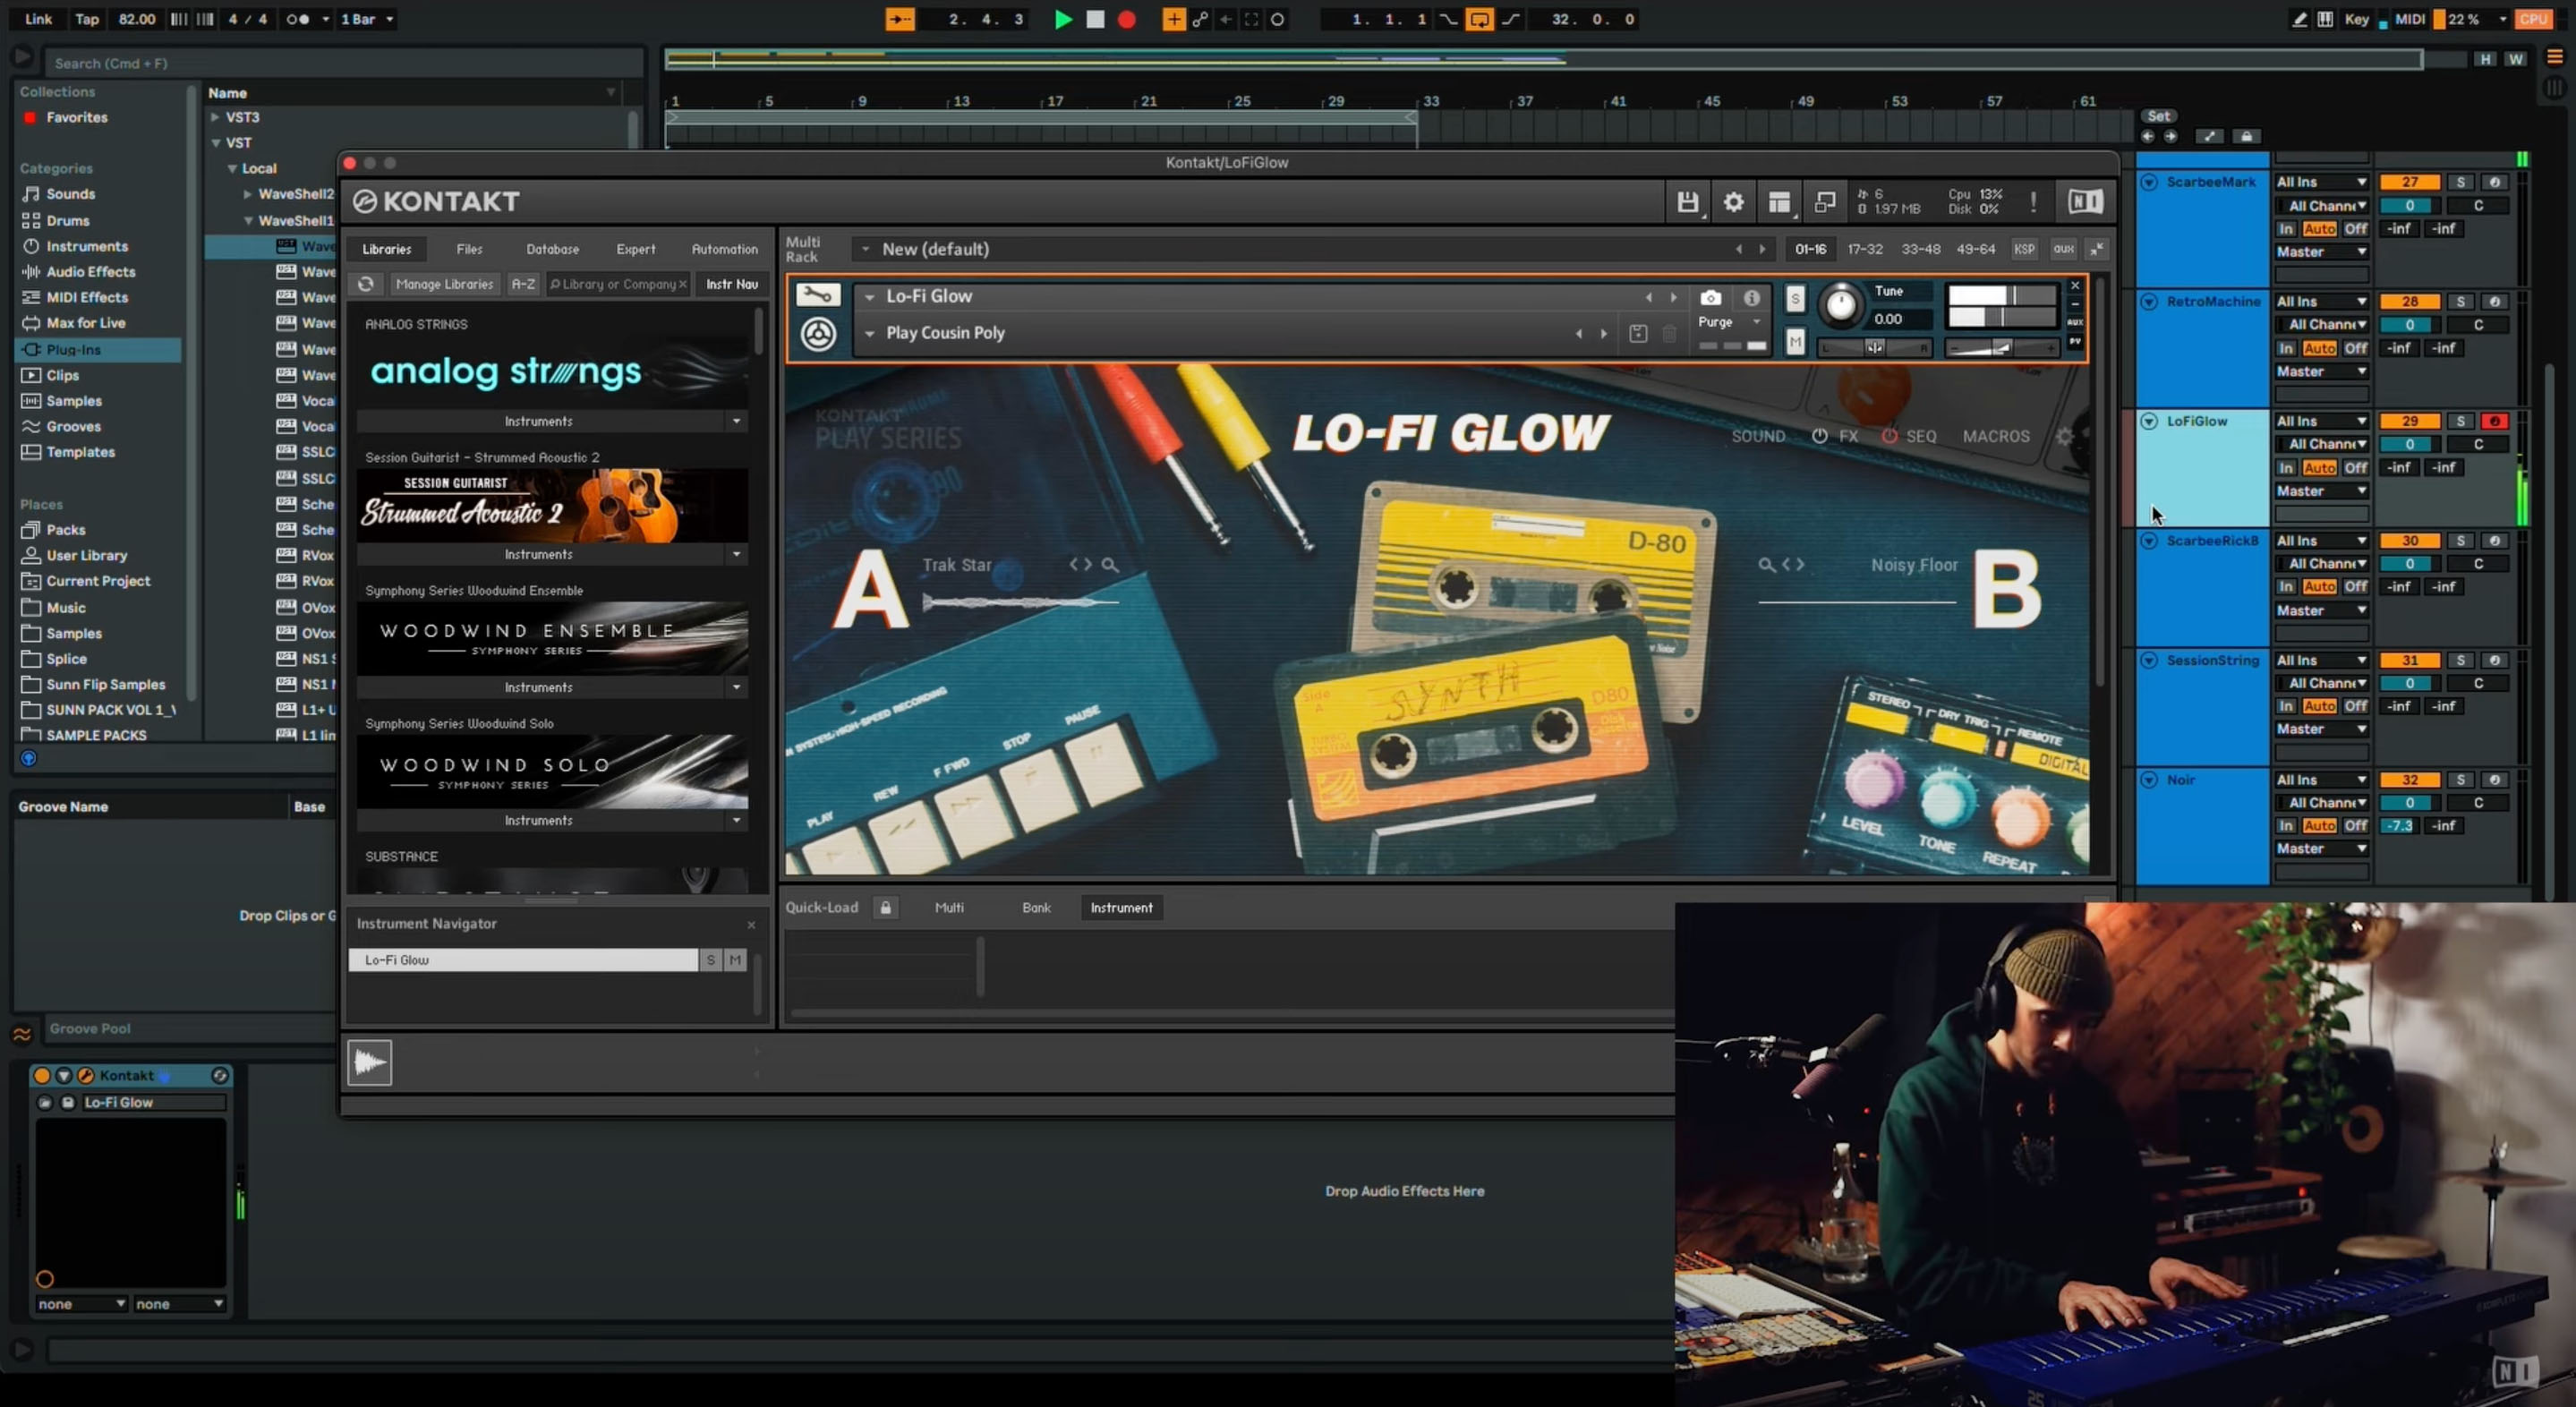
Datsunn uses the LO-FI GLOW plug-in to bring in some texture
When Datsunn moves into the chorus, he uses the RETRO MACHINES MK2, Poly Pad 1 for some arpeggios to give the song a little sparkle, along with some piano pads to give it body. He follows up with REPLIKA/SCARBEE MARK I for even more texture. Then he rounds it out with the bassline using the SCARBEE RICKENBACKER BASS and some percussion sounds with the DRUMLAB kit.
Produce your music
After Datsunn records all of the tracks, he moves into some production tips, like taking out some of the elements in the beginning to craft more of an intro.
To easily create an intro, he drags everything in his session over four bars so that he has space to create that intro using some of the elements he already recorded.
He then borrows some vocals from later in the song and pastes them into the intro to create a nice vibe, along with the SCARBEE MARK I trills that he created earlier. With a steady buildup of the percussion, it brings the listener into the song.
You can use the same techniques for the outro, or even automate a fade out.
Moving into the main parts of the song, he uses


Stutter Edit 2
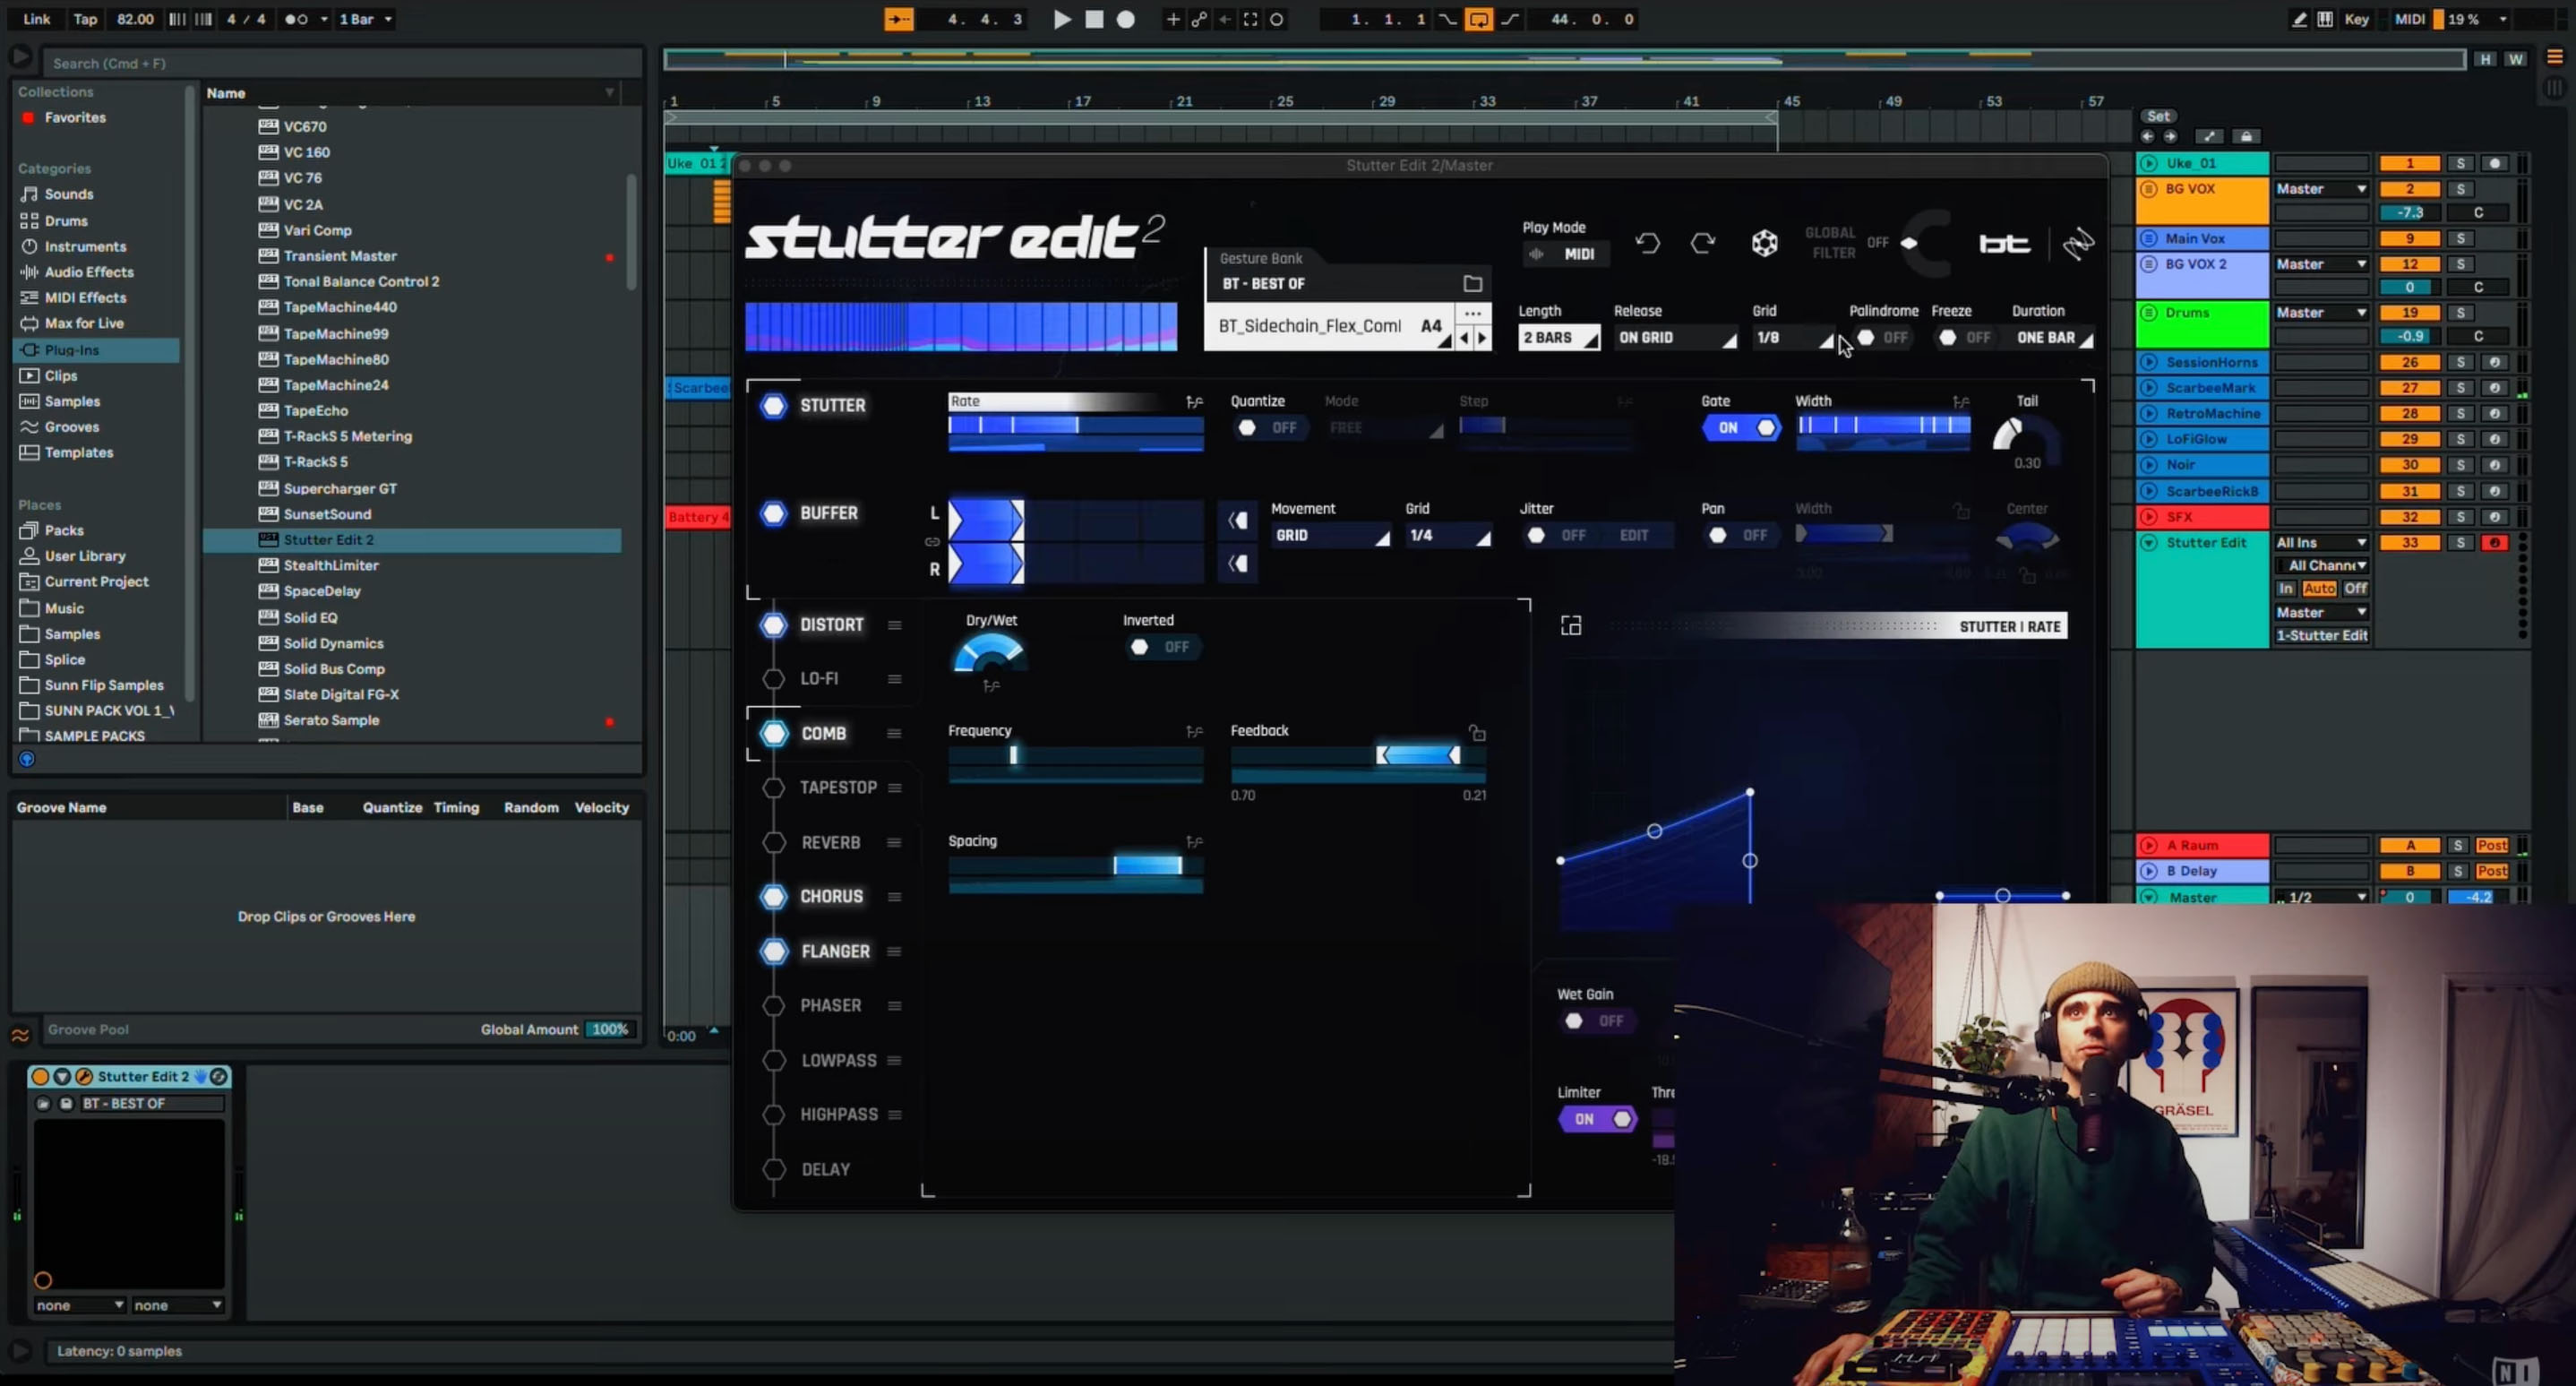
Adding some graininess with Stutter Edit
There’s a lot of space in this song. It’s very textural. It needs EQ, it needs tonal balance, it needs all of the processing that iZotope tools can provide. In the mixing and mastering steps, the song will come together sonically.
Mix your music
Geoff Manchester is mixing and mastering Datsunn’s track using iZotope products. Here’s how he does it.
Geoff starts with the demo Datsunn sent over:
Reference tracks are a great starting point for mixing, and Datsunn sent over Childish Gambino’s “Redbone” to use as a reference track for his music.
Geoff loads this track in


Tonal Balance Control 2
Instead, Geoff decides to take some elements from “Redbone” like the pinched, chorus-y vocals, and bring them into the Datsunn track through mixing.
One of the things that strikes Geoff about the original demo that Datsunn sent over is how good it sounded, which is not only a testament to Datsunn’s talent, but also to the quality of the Native Instruments library of samples.
Listening to and organizing your mix
The first thing Geoff recommends you do in a mixing session is listen to all of the tracks that you have and organize them with colors and labels so you know what your tracks are at a glance. “Guitars are green,” or “percussion is purple,” will help make the mixing process easier. Mixing is hard, and it’s really important to organize your session files in a way that makes sense to you.
This listening process will also help you note any issues that you can take care of during mixing, like plosives, mouth clicks, or breaths.
Geoff notices Datsunn was using a TLM 103 microphone, which is a great microphone, but also a bright microphone that can accentuate stuff like breaths and clicks. Things like this can be noted while listening to the session for the first time.
Repairing your mix
In Geoff’s listening pass, he notices there are a couple of breaths that he could fix. Breaths are okay (we all breathe), but they are a little sharp and we can control them so they don’t stick out as much. You can hear some of them here.
There are a couple of mouth clicks as well. They’re also normal in vocal recordings, but it’s important to note that when you employ dynamics processing on them, like compressors, limiters, even saturation—anything that brings the body of the audio up in the processing, the clicks, the breaths, all that stuff comes up too. So it’s important to take care of some of that ahead before processing.
There are a couple of ways to tackle the breaths and the clicks with


RX 11 Advanced
To move the audio out of the DAW into RX, use RX Connect. For those who are new to RX, think of it like a photo editor for audio.
Here’s where the breaths and clicks are using the RX Spectrogram:
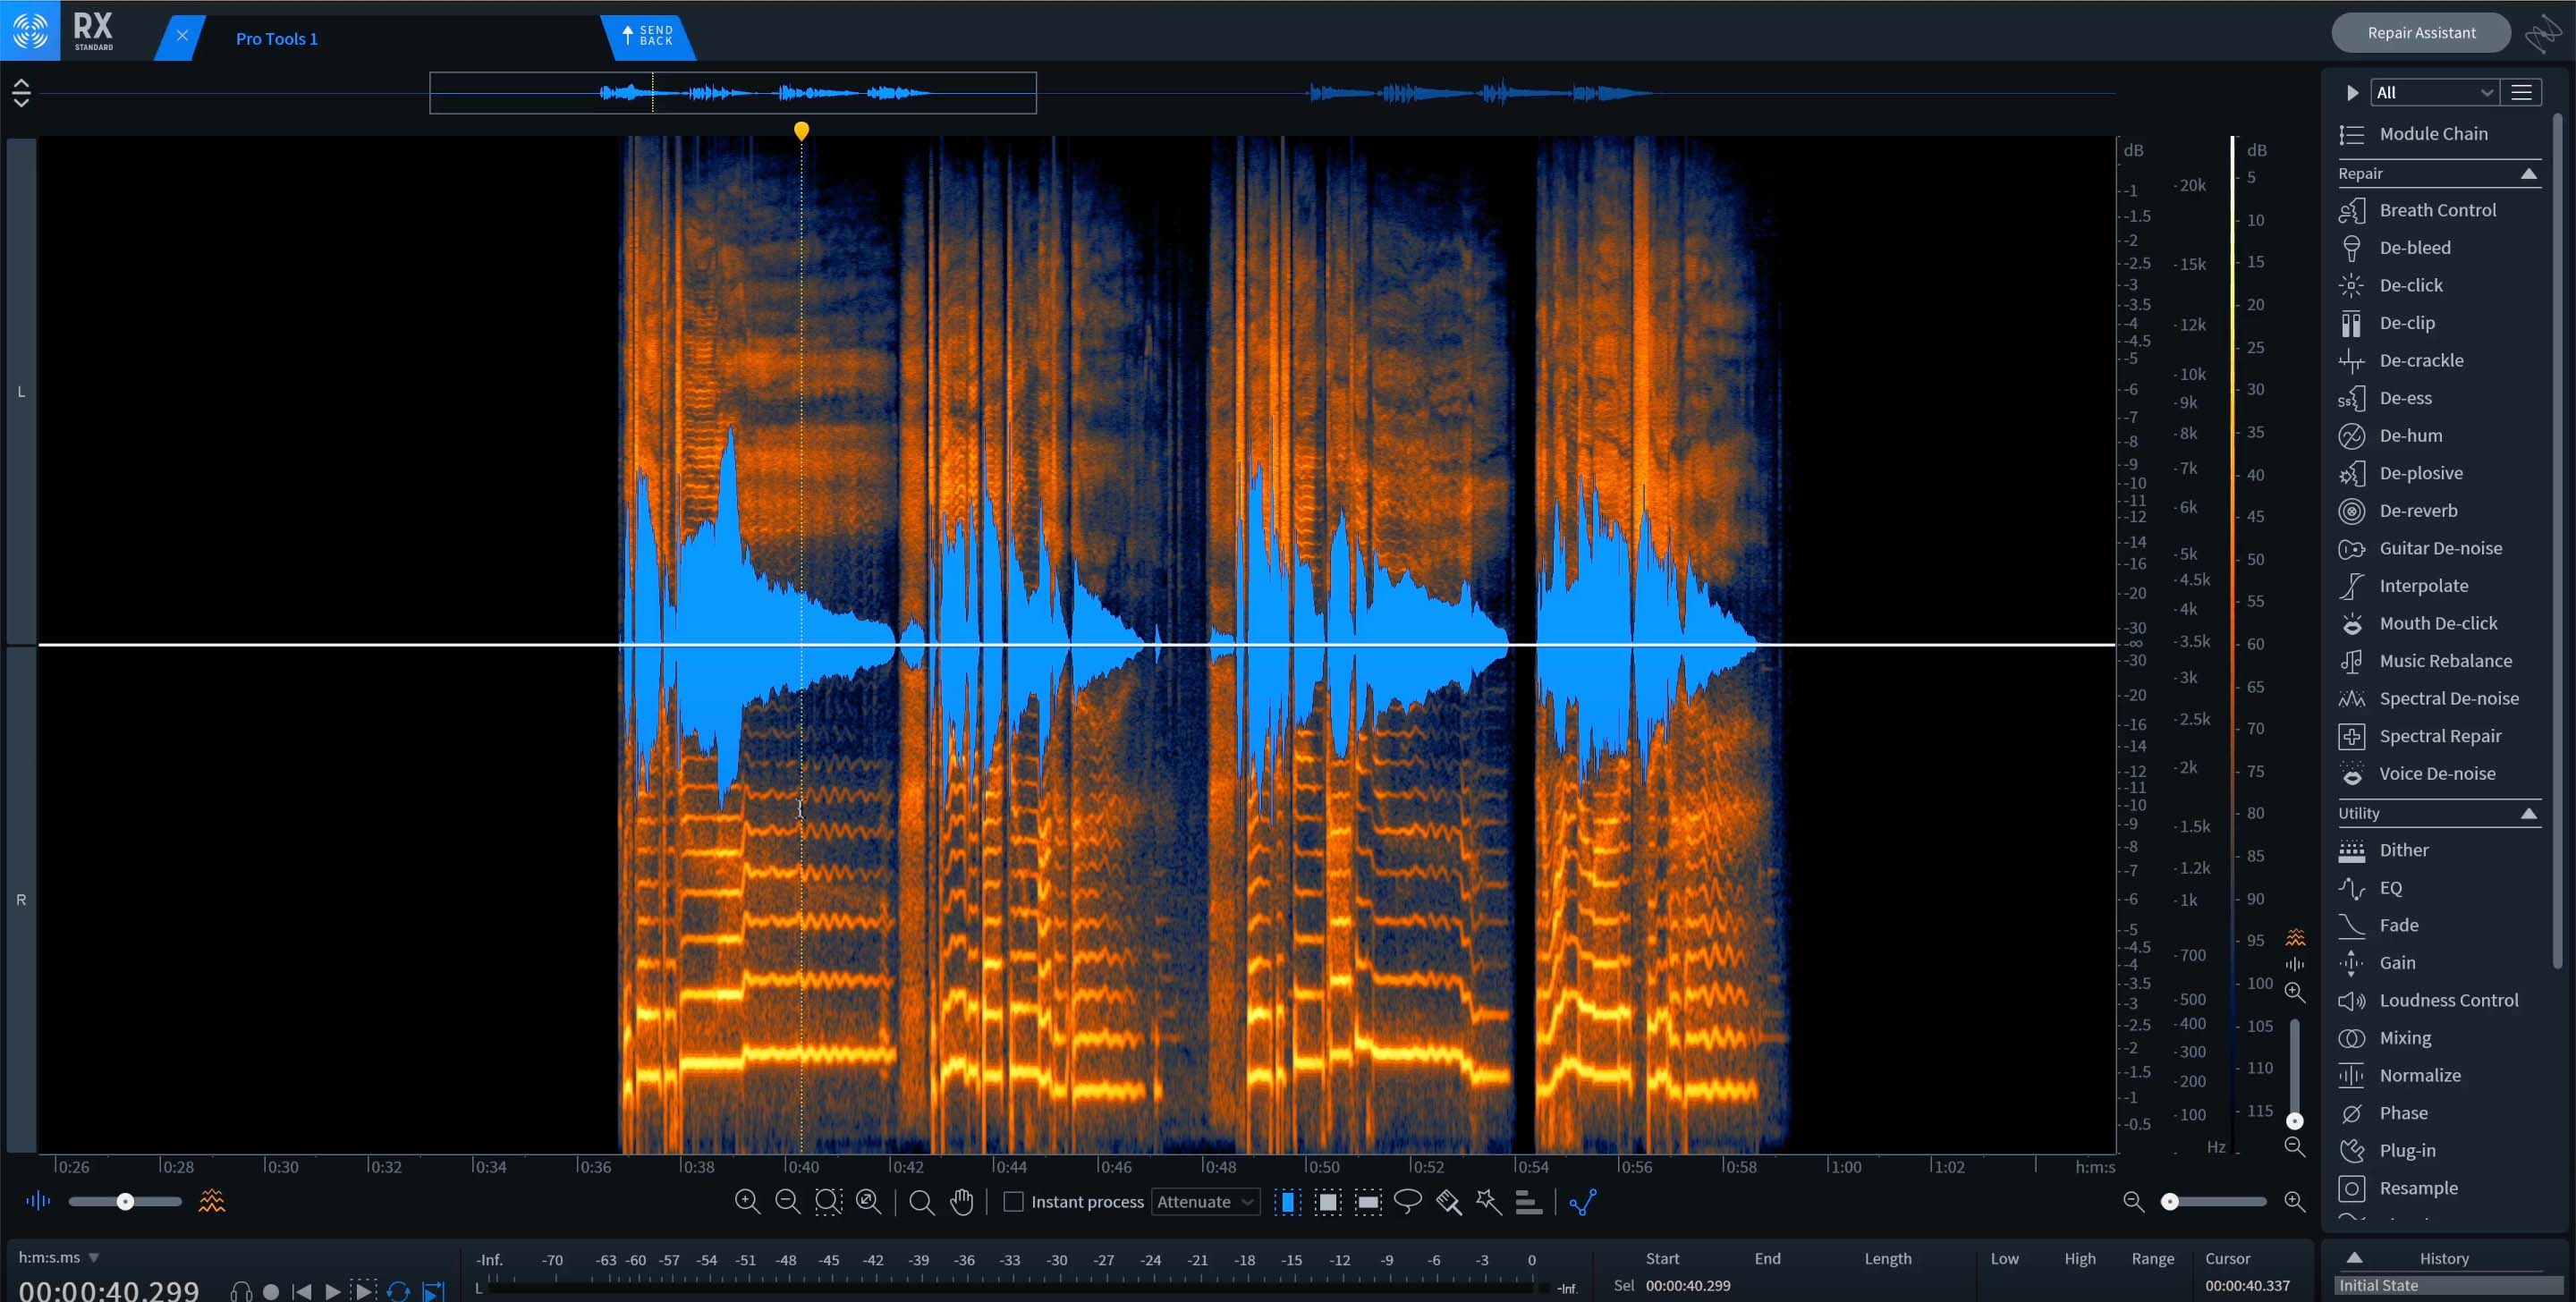
Vocals in the RX spectrogram
To tackle the breaths, Geoff uses RX Breath Control in gain mode to bring the breaths down by -14.2 dB. The sensitivity, how hard the plug-in is looking for breaths, he leaves at 72.
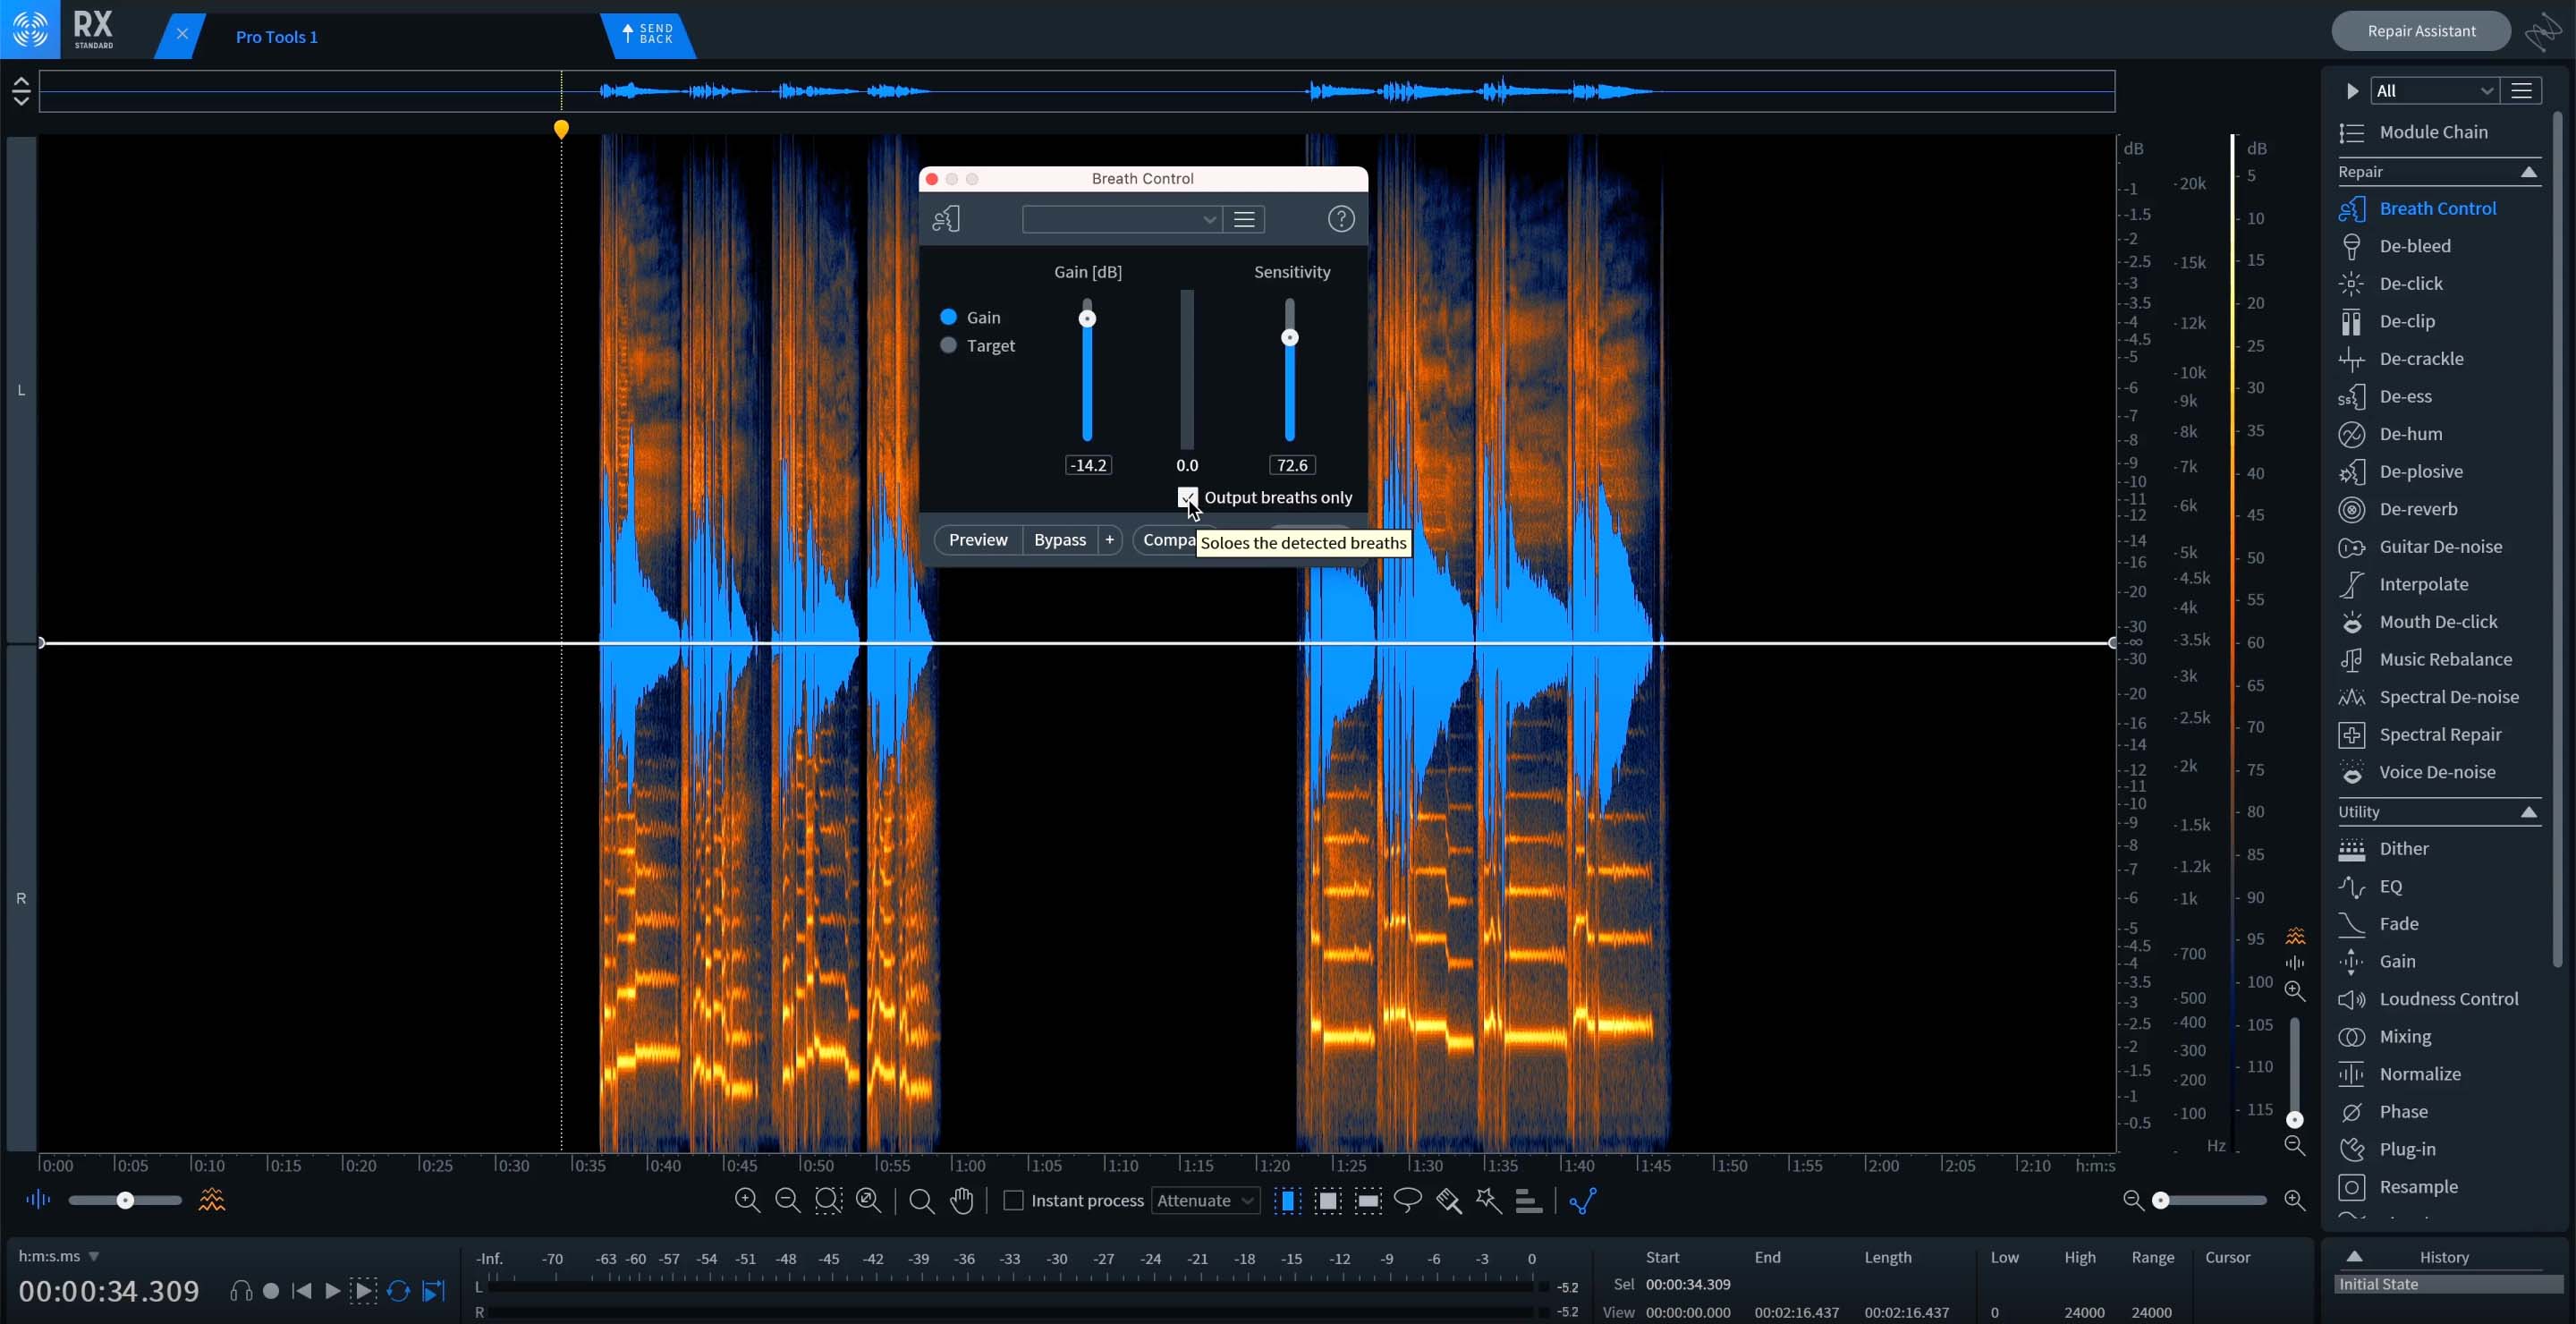
RX Breath Control
To make sure the module is only catching the breaths and not any other audio, he selects “Output breaths only” to listen to what the module is picking up, and presses preview.
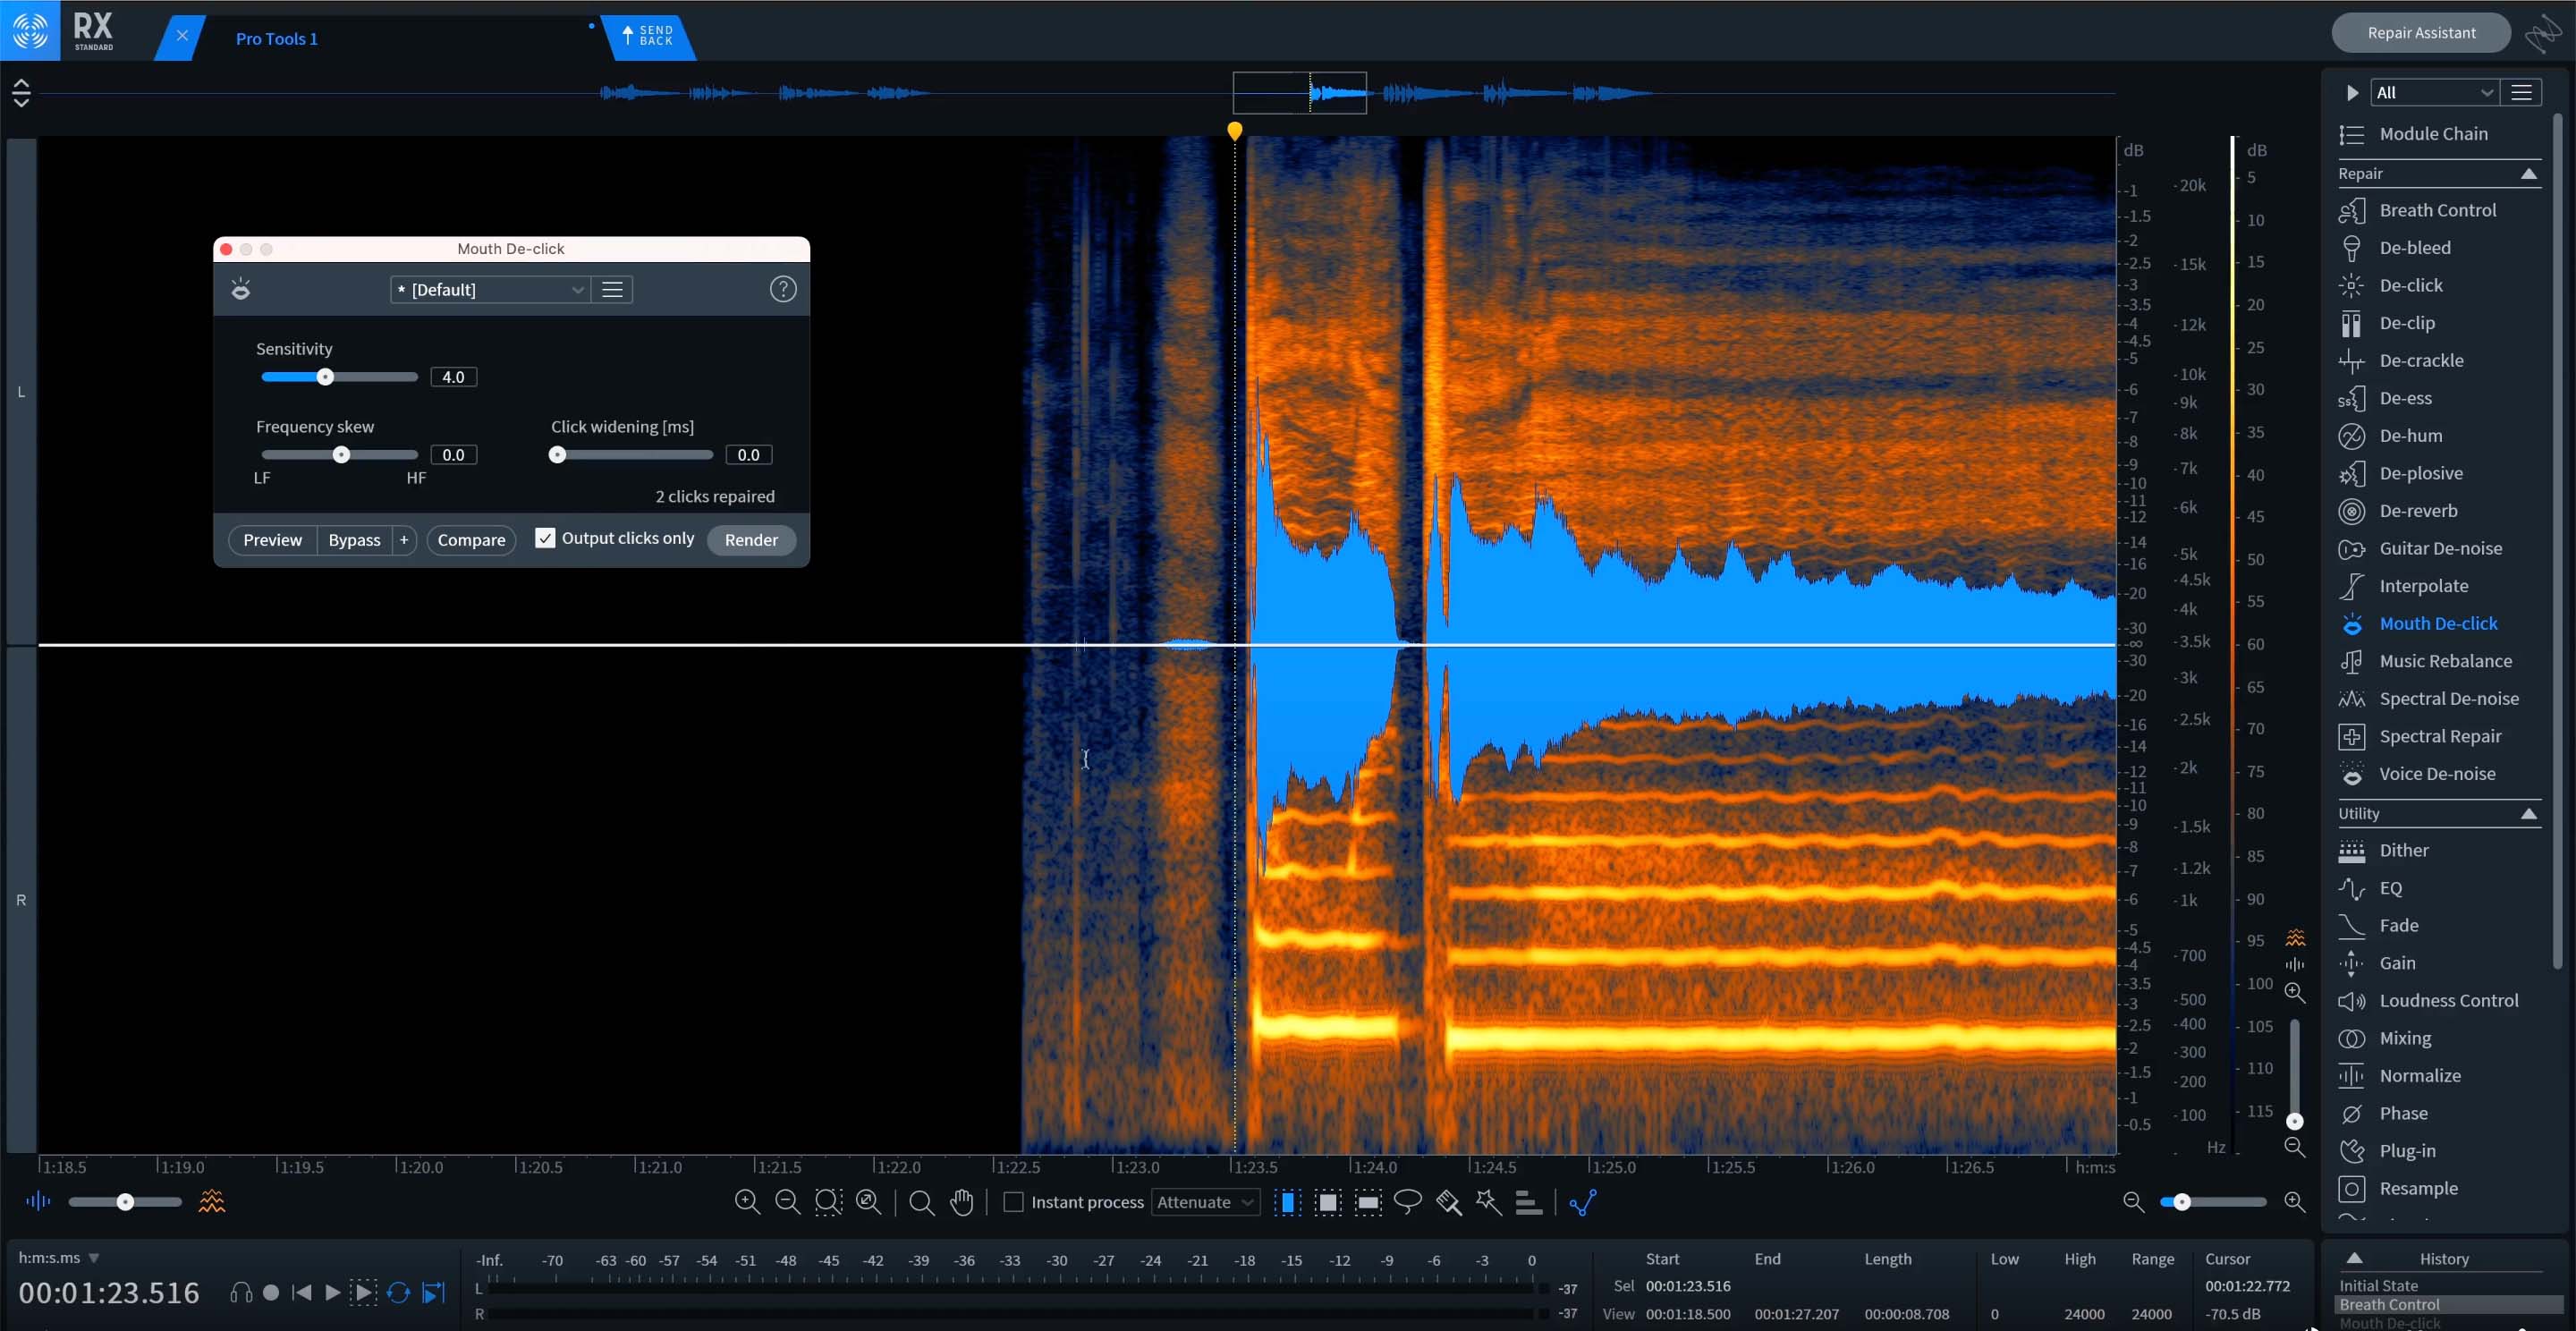
RX Mouth De-click
Once he is happy with the audio, he presses render. As a reminder, RX Breath Control doesn’t remove the breaths, it just attenuated them so that they’re less audible in the mix.
The next thing is handling the mouth clicks. He highlights them on the Spectrogram, goes to RX Mouth De-click, and uses the default settings.
And then when he is ready to send the audio back into Pro Tools, he presses “send back” in RX, heads back into the DAW and presses “Render” via RX Connect, and it overwrites the audio file in DAW.
That’s just one example of how to clean up audio in a key instrument like vocals to ensure there are no breaths and pops that can distract the listener.
Mixing vocals
Datsunn has a great voice, and Geoff is able to impart some of that “Redbone” vibe onto his vocals with


Nectar 3 Plus


Neoverb
In Nectar, Geoff has a vocal chain going left to right. The first EQ makes sure that he can control any resonances or frequencies that he doesn't want to be accentuated by any additional processing down the line, followed by a de-esser, a second EQ, a compressor, and the Nectar Dimension module.
Geoff and Datsunn are trying to get the “pinched” Childish Gambino vibe, and while Datsunn isn’t singing with that croaky, choked voice that’s heard in “Redbone,” Geoff can scoop out some of the lows, de-ess the vocal, use an EQ boost, compress the vocal, and then add the Dimension module to give it a chorus effect in order to bring out the vibe they’re looking for.
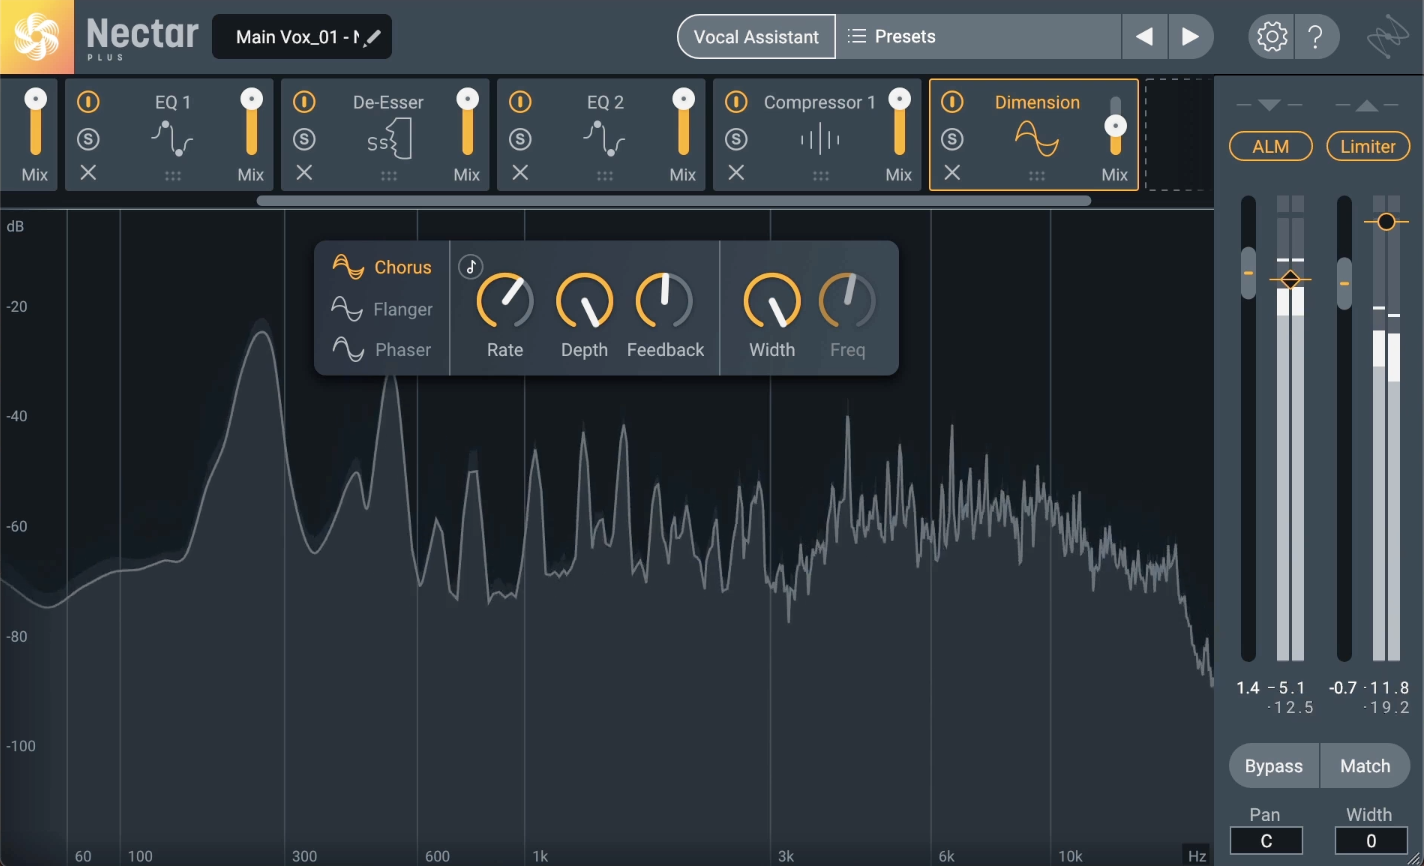
Vocal chain in iZotope Nectar
Geoff also has a couple of send effects that are going to Neoverb, which is the iZotope dedicated reverb plug-in.
PRO TIP: If you’re looking for a great starting point for your vocals, use Nectar’s Vocal Assistant and select “Assist” to get a head start on the vocal processing for your mix. You can choose the vibe (vintage, medium, or dialogue) as well as the intensity (light, medium, or aggressive). This is what Geoff used to start off his vocal chain, selecting medium in both vibe and intensity.
Heading over to the main vocal verb, Geoff has an instance of Neoverb on the track. He also uses Neoverb’s Reverb Assistant to get the vocal to a good spot before he tweaks a little further.
Here’s the vocals before and after with Neoverb.
The vocals are straddling a large chamber and a plate sound. The nice part about using a plug-in like Neoverb is that there’s no need to set up lots of sends with a bunch of reverb algorithms. You can blend them all in one plug-in, so you can get your large chamber and also get the tight sound that would be great on vocals with a plate.
There are also two EQs that allow you to sculpt the sound going into the reverb so you don’t get a big muddy mess when you go to mix the reverb.
And when using Reverb Assistant, you can actually tailor your reverb sound while the audio is playing.
Geoff also has a vocal ride reverb in the mix with an emphasis on the large chamber sound to focus on a couple of words that Datsunn is singing. He uses the pencil tool in ProTools to achieve this. You can see the rides that he makes on this reverb send:
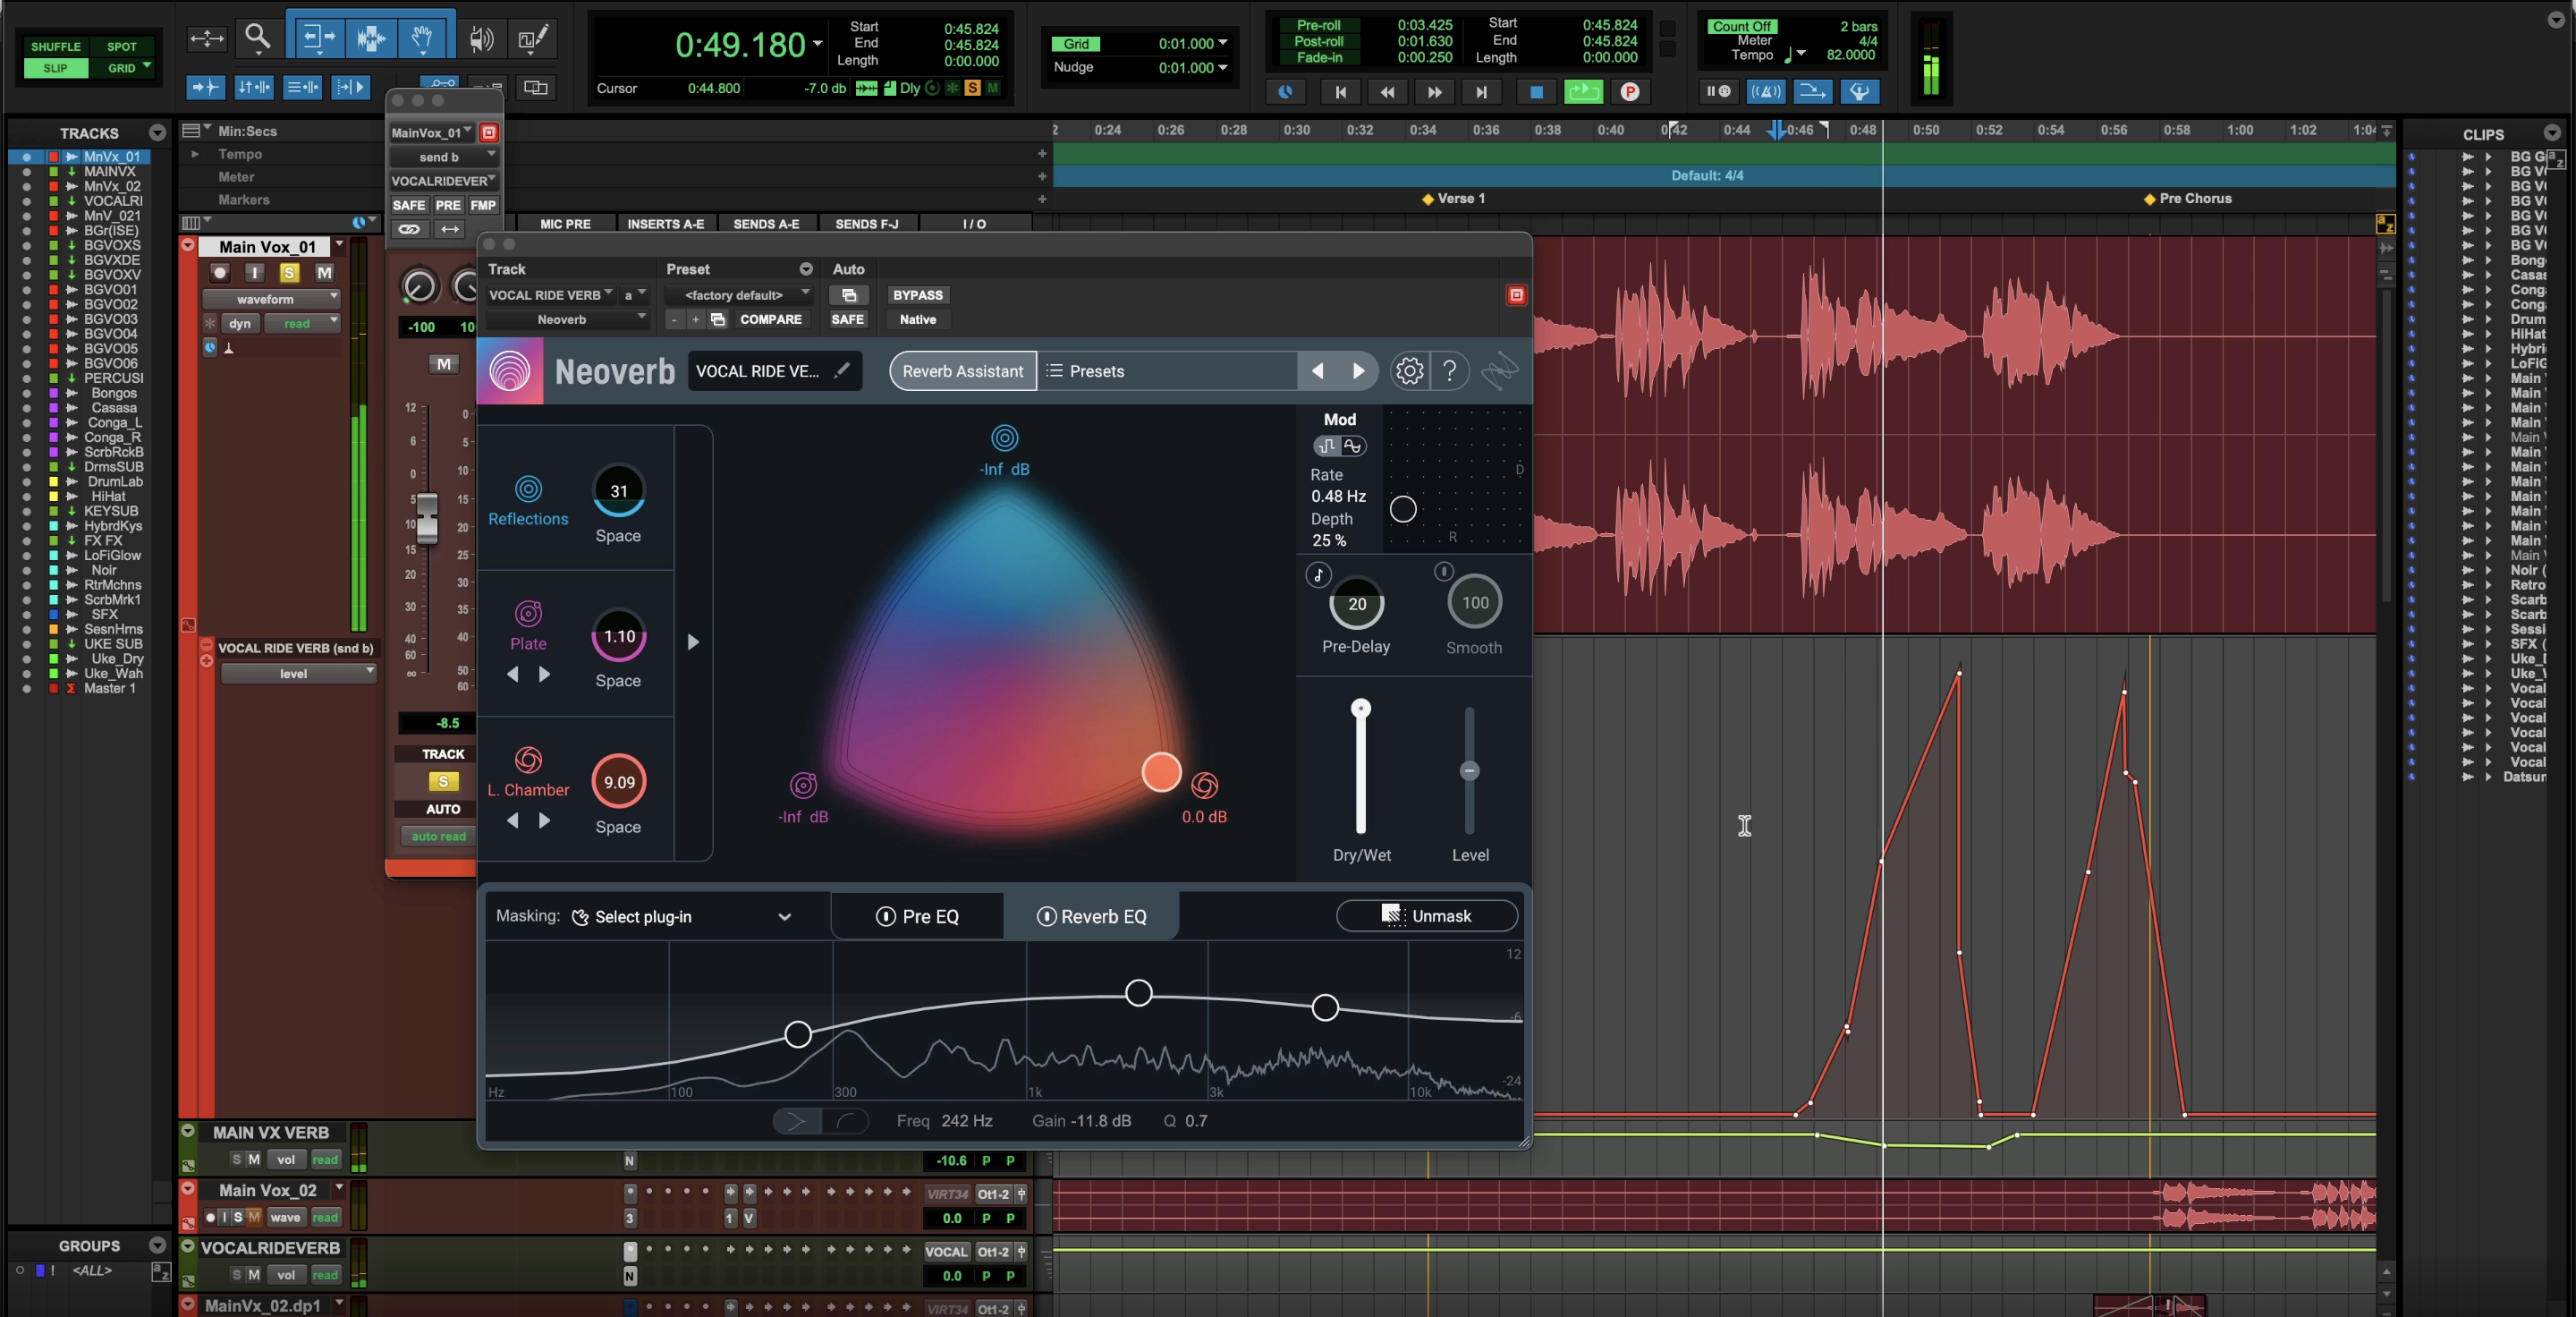
Using the pencil tool in ProTools to emphasize the ride reverb on certain words
Things like using reverb rides that spotlight small moments and treating them with a delicate amount of processing are what you can do in the mixing process to really take the mix from good to great, and keep the listener engaged.
Mixing vocals: frequency cleanup
Another technique in getting a great vocal sound is to take a look at the frequencies that might be competing with the vocal from other instruments and notch out space in the mix.
For example, the SCARBEE MARK I track could be EQ’d to make space for the vocal. Geoff adds Neutron to it, and then adds a high pass filter that allows the highs to pass, and cuts out some of the lows with a gentle flat high pass filter shape. He then dips around 2 KHz.
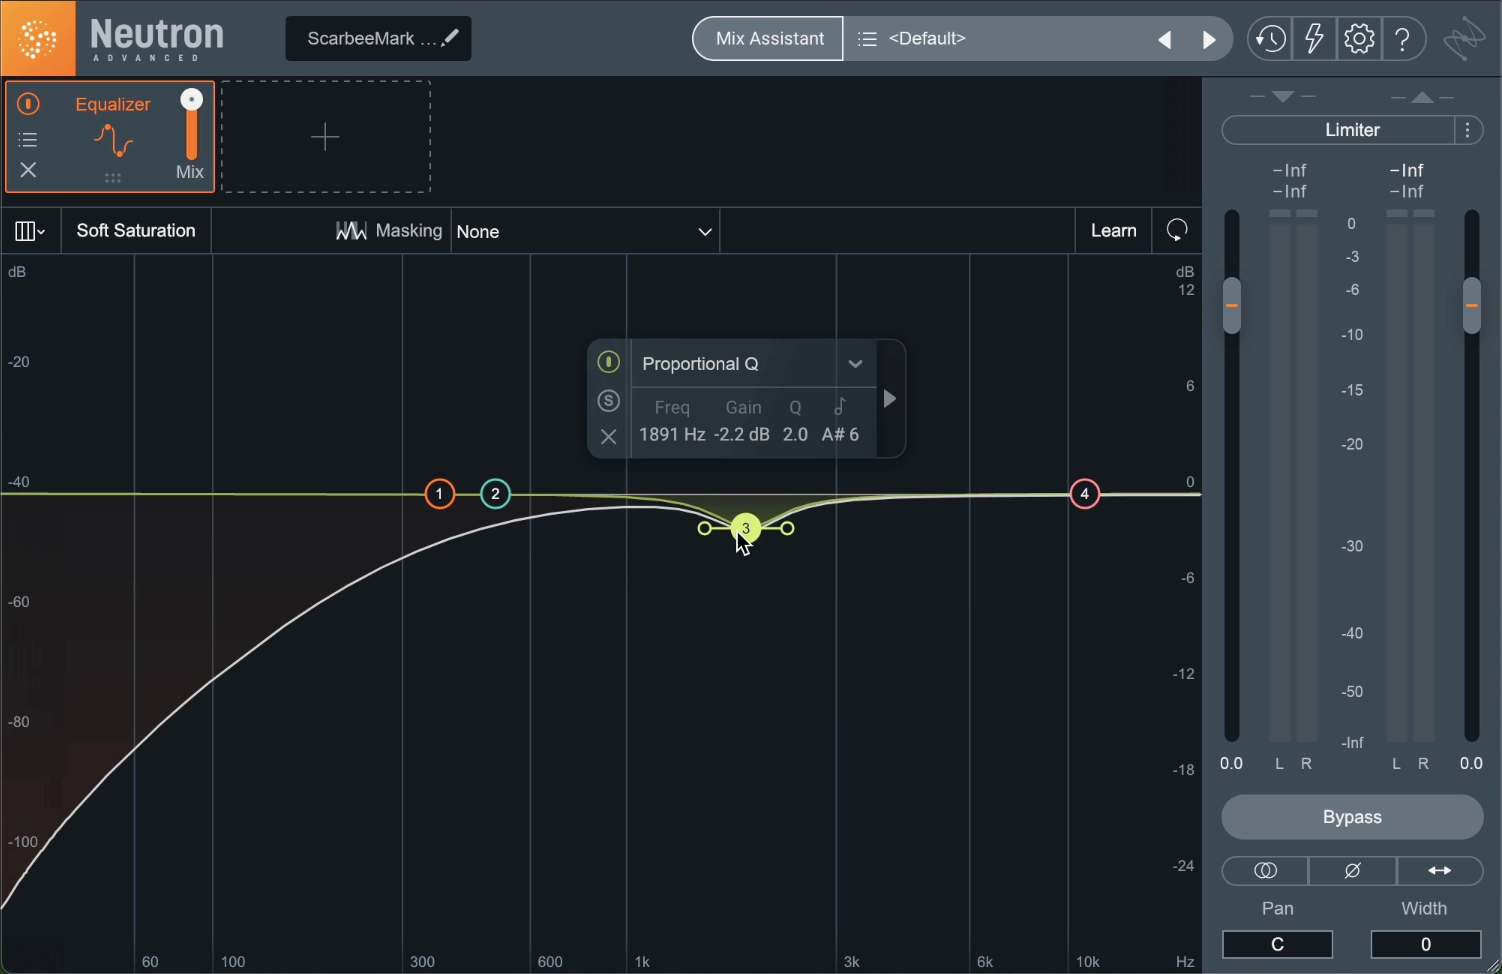
Adding a high pass filter to the SCARBEE MARK I track using Neutron’s Equalizer module
Geoff says, “I found in my experience mixing and learning from others that if you accentuate the 2K on the vocal, it’s like having the singer step forward in the mix. We have to reduce that information elsewhere to make that boost really pop in the vocal.”
Taking away energy from instruments in that frequency domain is something that will go a long way in presenting a cleaner, more professional mix.
With that said, Geoff ducks 2 KHz on many of the tracks as well as a high pass in this mix to make sure the sweetness and the tone in the vocal is present.
Mixing drums and bass
Cleaning up a muddy mix is a big part of mixing drums and bass. In Datsunn’s mix, there is DRUMLAB, which is an entire drum kit, as well as the SCARBEE RICKENBACKER® BASS. It’s important to see if there’s any masking occurring between those two instruments. This can be done by pulling up Neutron in the SCARBEE Bass, heading to the Masking Meter, and selecting the DRUMLAB kit that also has an instance of Neutron added to it.
Neutron’s Masking Meter provides a window into any potential masking that can be occurring by showing orange flashes on the meter while the track is playing, which displays where masking is happening between the drums and bass.
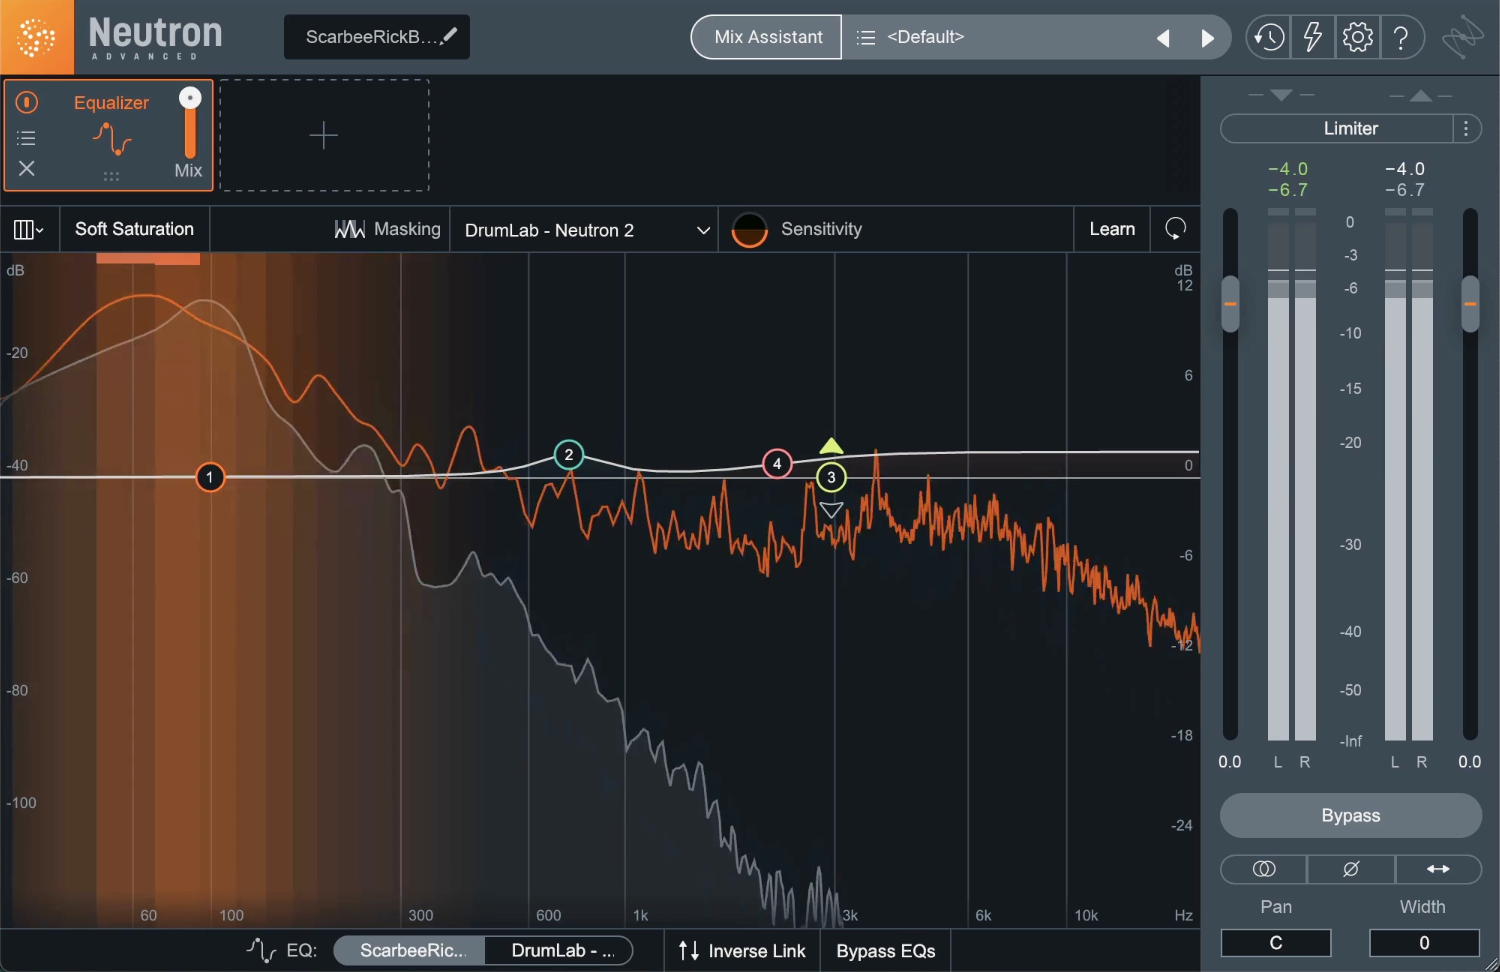
Masking meter in Neutron
There is some frequency masking right around the fundamental frequency of the bass and the kick. Geoff decides to leave it as it is, because he likes to call that “happy masking,” it’s adding something to the mix. Knowing that a clash is happening can help in future mixing decisions.
If he wants to untangle the bass and drums, he can do it with the iZotope inter-plug-in communication protocol where he can affect the EQ of the DRUMLAB track all from the Neutron that’s on the bass track.
This article references a previous version of Ozone. Learn about 

Ozone 11 Advanced
There’s some additional processing on the low end. When Datsunn was making this track, he was really grooving on the drums and as a mix engineer, and Geoff feels some of it was lost in the mixing process. To remedy this, Geoff adds Low End Focus in Ozone to the DRUMLAB mix in the punchy mode to increase the contrast of the transient information, so that the kick really pokes through.
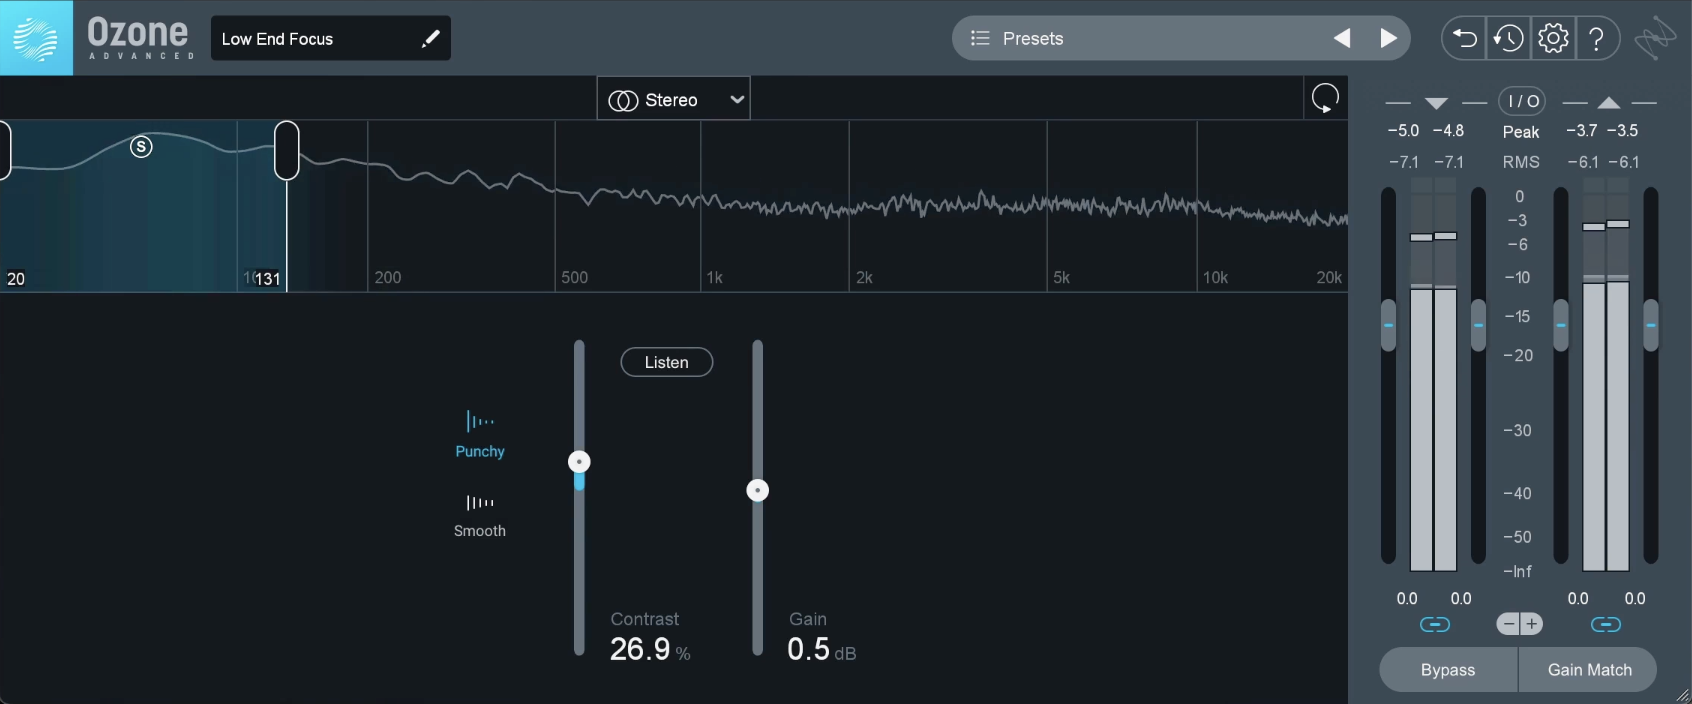
Geoff adds Low End Focus in Ozone to help the kick punch through the mix
Balancing your mix
One of the last items to highlight in mixing is


Tonal Balance Control 2
You can bring in one track, or even a full folder of songs that you love to create a composite curve from, and Tonal Balance Control will give you the tonal spread and show you where the healthy energy regions are for you to be in. You can mix your track and make sure that your white line resides somewhere in the bounds of low, low-mid, high, etc.
Geoff goes for bass heavy, because he finds it’s better for the mix.
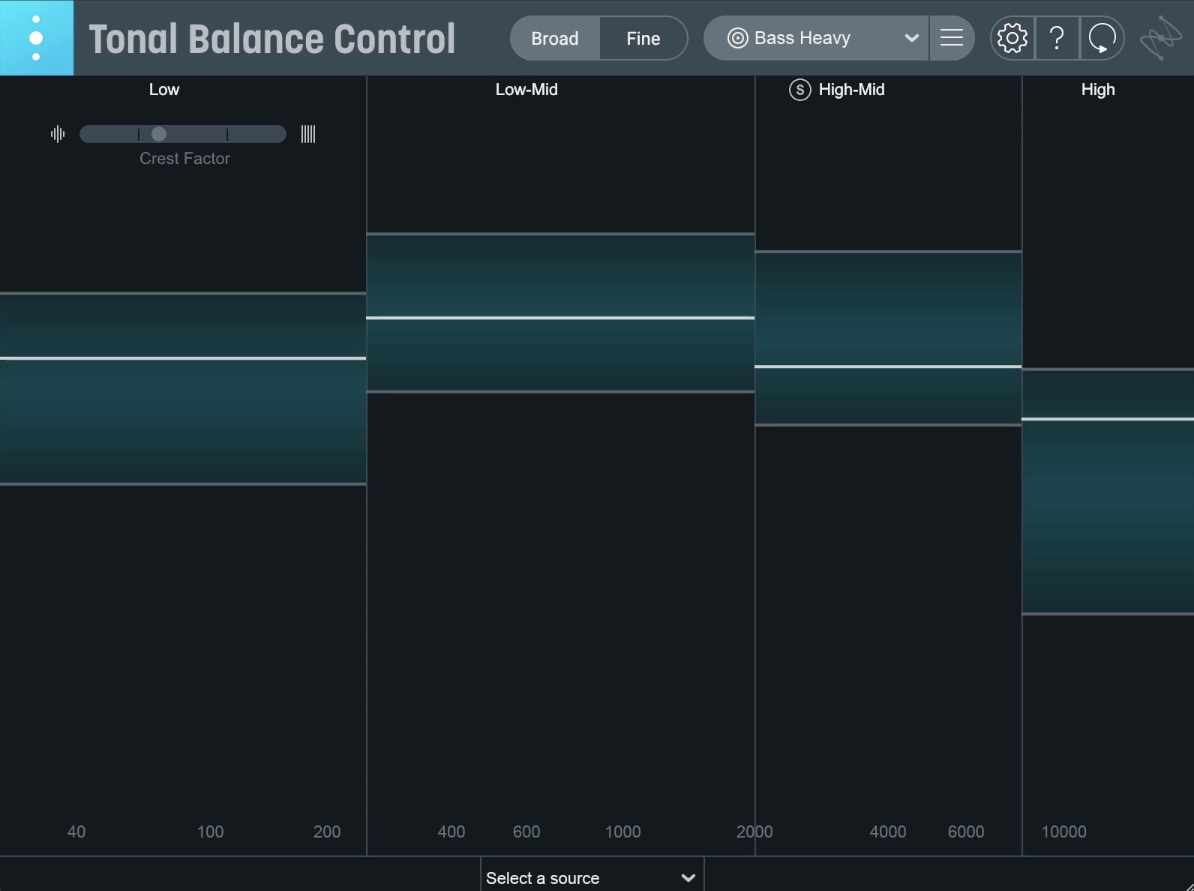
Tonal Balance Control
As you can see, Geoff’s white lines are within the bounds of the brackets in Tonal Balance Control. One way that he can ensure that he is in bounds is going to Ozone within Tonal Balance Control and trying to push the targets of the mix using small subtle mastering moves with the Equalizer.
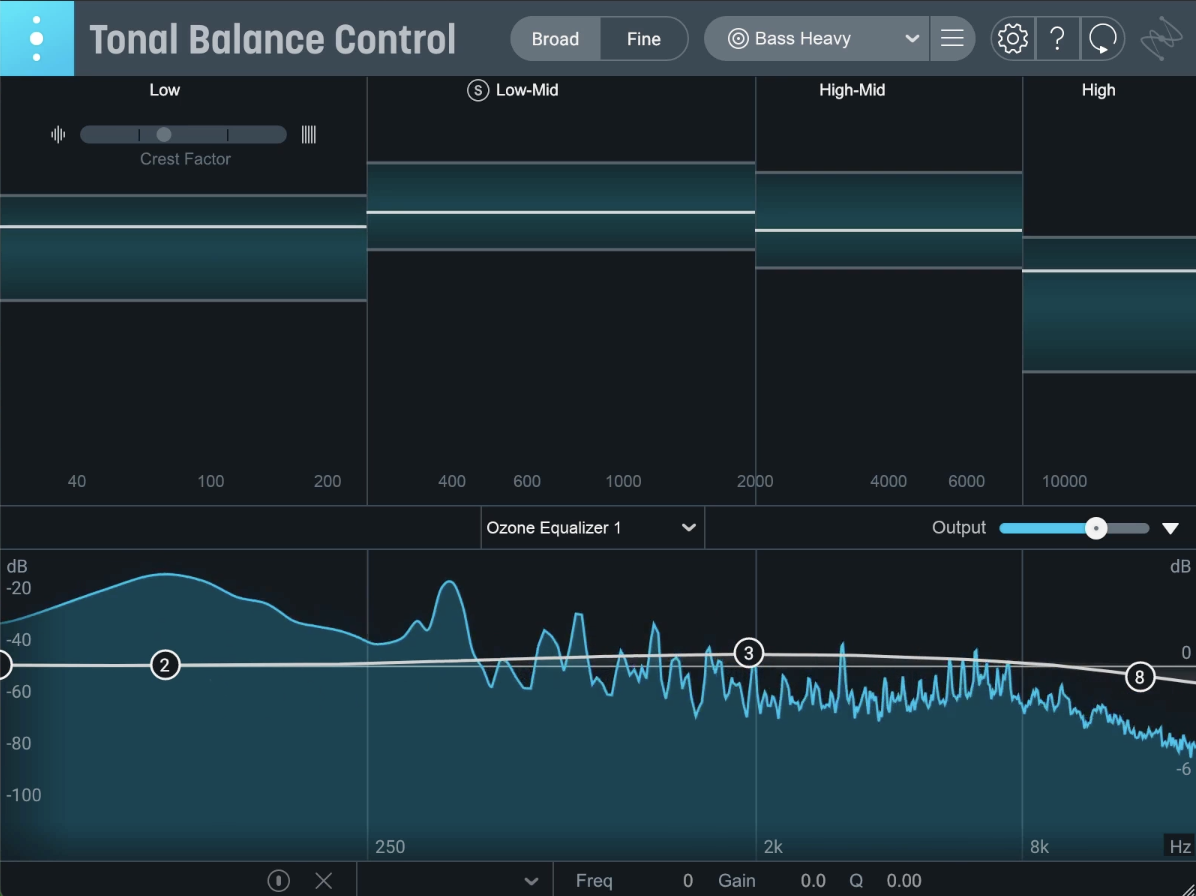
Making subtle mastering moves with Ozone's EQ within Tonal Balance Control
It’s possible to affect a lot of change across the mix by using Tonal Balance Control, matching and conforming to a target by talking to different plug-ins in the session like


Ozone Advanced


Neutron


Relay
Master your music
For the mastering process, Geoff has Ozone open and he has a simple mastering chain set up, including EQ, Dynamic EQ, and the Maximizer by using Ozone’s Master Assistant.
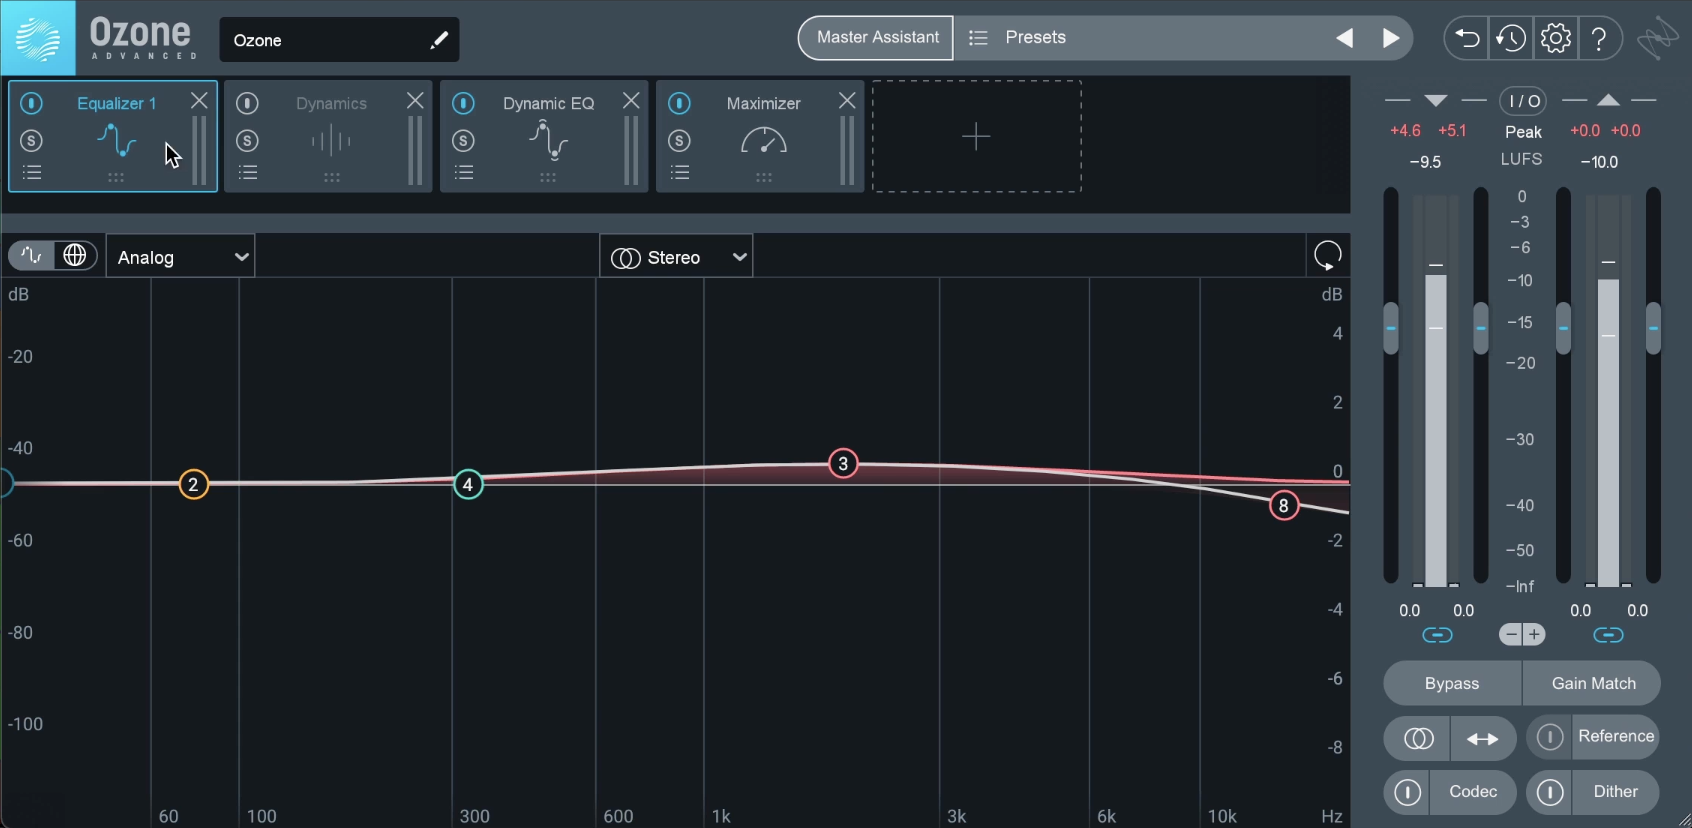
Mastering chain in Ozone
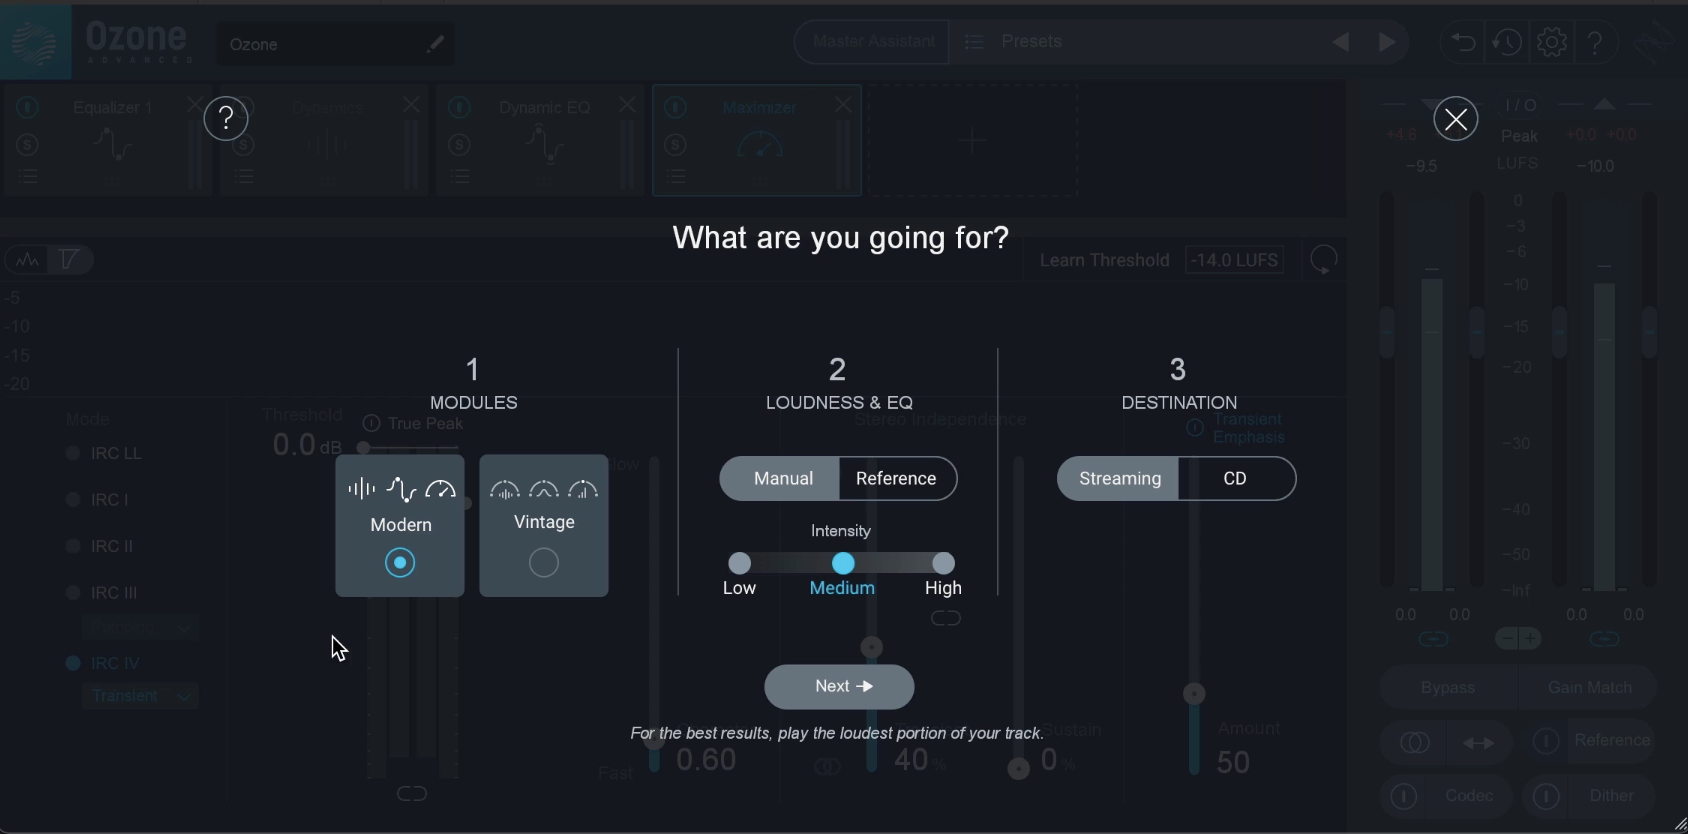
Master Assistant in Ozone
In the Master Assistant he chooses the modern module, a medium intensity, since Datsunn’s mix is already very hot, and he sets the destination as streaming. He doesn’t have to push levels because the mix is already loud, so he really focuses on making sure the mix isn’t peaking.
Here's what the final version sounds like:
Start making your music
We hope this tutorial has inspired you to start making your own music from start to finish. Don't forget to check out


Music Production Suite 7


