6 Creative Reverb Techniques in Music Production
Reverb is a valuable tool for mix engineers. However, its uses extend throughout music production. In this article, we cover some creative ways to use reverb.
Reverb is an incredibly useful tool for mix engineers. The sense of space that it provides can bring life to a sound, creating a convincing physical world in which the song takes place. However, the applications of reverb extend throughout every aspect of music production.
In this article, we’ll cover six ways to use reverb in a sound design and arranging context. We’ll cover how reverb can be used as an insert effect when creating a sound, how to give return reverbs more character, and how to use reverb as a standalone transitional effect or groove element.
1. Insert effect: background wash
With extreme settings, we can use an insert reverb to fade a sound into the background. Doing so can be used to design support layers or percussion using only the room noise. This can create a more interesting and characteristic ambience than the ambience caused by standard reverb on other elements.
With a dry / wet setting over 50%, an insert reverb will output more reverb signal than dry signal. We can even set the dry / wet parameter to 100% and work exclusively with the reverb signal.
Be warned that, by eliminating the dry signal, the sound in question will not be nearly as present in the mix. Therefore, this method should not be used with main focal elements, as those should remain clear to cut through the mix.
When creating background layers with this method, it can help to have control over the reverb’s volume envelope. We’ll be using Exponential Audio’s


Exponential Audio
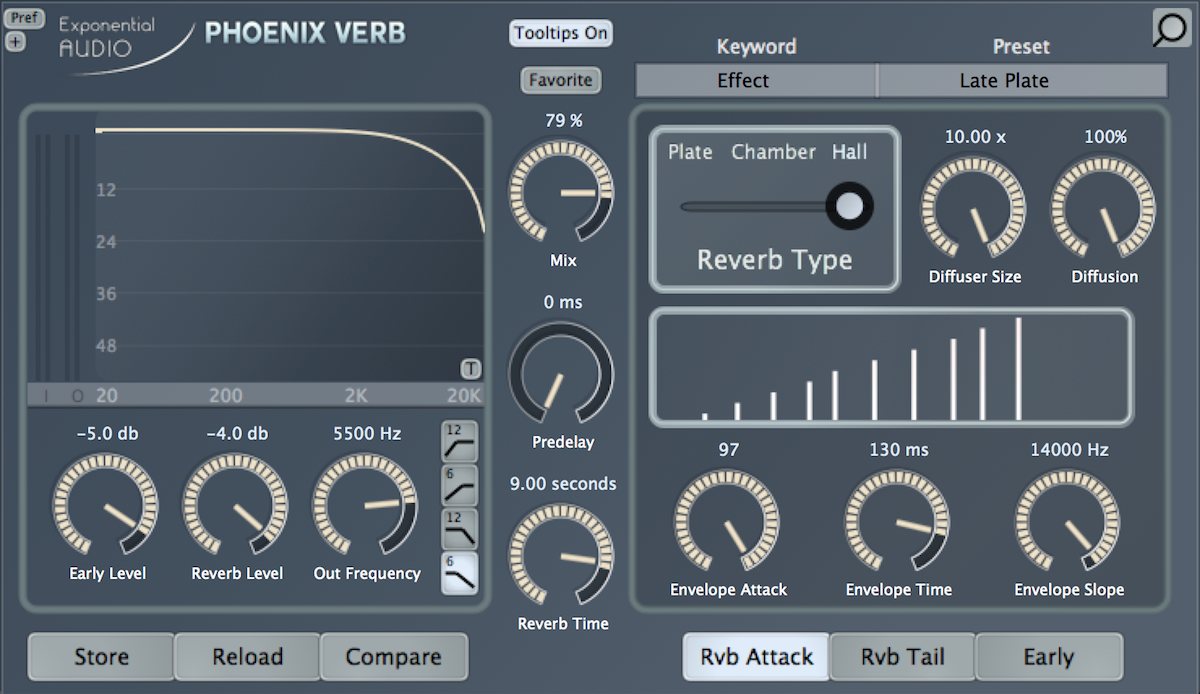
Phoenix Verb Rvb Attack
With a long reverb decay time, we can make ambient pads from most sounds. A sustained instrument like a synth or key instrument will be pushed into the background ambience.
A percussion loop or individual drum sounds can also be processed in a similar way to create a more rhythmic ambience layer.
With a shorter decay time, we get a small room reverb. With the plug-in set to 100% wet, the sound will be more in-focus but provide a short room ambience. This is an interesting technique to use with both instrument and percussion sounds.
2. Insert effect: creating realistic vintage samples
In many genres of music, especially hip-hop and electronic music, producers often sample vintage vinyl recordings. These recordings’ sonic character can create a nostalgic feeling, which can be an interesting effect in many different types of tracks.
There are many lo-fi FX plug-ins that emulate the sonic character of old recordings or speakers. On their own, these plug-ins can be used to recreate these vintage-sounding samples from just about any sound, including modern software instruments.
However, many of these old recordings made use of reverb, even if it was just caused by room noise during recording.
Using this logic, we can place a reverb plug-in before a lo-fi emulator in a sound’s processing chain. This will incorporate the reverb signal into the lo-fi signal, resulting in a more realistic-sounding recreation of a vintage recording.
This technique, along with a lo-fi processor, allows us to create our own vintage-sounding samples without having to (illegally) sample them from other tracks.
In the following example, I create a vintage-sounding string sample from a software instrument. I’m using Native Instruments Kontakt’s factory strings ensemble patch.
To achieve the vintage sound, I use iZotope Vinyl as my lo-fi processor. In addition to several speaker emulations, it has the ability to add noises that might come from an old record player.
I can add an insert reverb before Vinyl to build some reverb into the vintage sample. I elected to go for a longer reverb, as string parts like this may be played in large halls.
3. Return effect: processing the reverb sound
By using a return channel to add reverb, we separate the dry and wet signals for independent processing. This is a standard technique, as it allows for the reverb signal to be EQ-ed separately from the dry signal, blending it into the mix more effectively.
However, we can also take advantage of independent reverb processing to create a more interesting reverb sound with FX plug-ins.
This tactic will not create the subtle ambience that we get from standard reverbs, as this method sounds more like an effect than anything. This will, however, cause the reverb signal to act like its own characteristic sound in the track, providing similar results to using an insert reverb to wash a sound into the background.
Theoretically, we can use any type of audio effect to change the reverb signal’s sonic character. Ideally, the reverb should not distract from dry elements, but can still be processed to become more interesting.
We can use distortion or saturation to make the reverb signal sound more raw and bright. This can create a unique layer of air.
In the example below, I do this with a relatively dry and dull Rhodes piano sample:
I’d like to add some interesting character to the sample’s highs. I use a return channel to add some reverb, using an instance of Exponential Audio’s


Exponential Audio


Trash 2
We can use pitch-shifting to alter a reverb signal’s pitch. By doing so, we detach the reverb signal from the dry signal, making the reverb a more independent element in the mix. However, because the reverb signal is still generated from an element in the track, we preserve some continuity between the elements.
In the example below, I once again send the Rhodes sample to a reverb return channel with a 1.5 second decay time. I resample this onto two other audio channels. These audio clips can then be re-pitched to create reverberant harmonies attached to the Rhodes sample.
4. Return effect: mismatched reverbs
The standard purpose of reverb is to place a sound in a physical space. As a result, we’re used to hearing reverb react to the original sound both in timing and timbre.
We can play with this expectation by using reverb created from one sound (we’ll say Sound A) as the reverb tail of another sound (Sound B). While the reverb will still react to Sound B’s timing, it will have the sonic characteristics of Sound A.
Again, as the reverb is sonically different from its triggering sound, the reverb signal will act like its own element. However, as it is built off of another sound in the track, it will still sound related to the track’s sonic palette.
First, we choose what reverb sound we want. In the following example, I have a basic drum loop, a percussion loop, and a key instrument playing some chords.
I set up a return channel with a reverb plug-in. I set a long decay time, as we’ll be shortening it later. By sending the percussion to the return channel, a reverb signal is generated from the sound of the percussion loop.

Percussion reverb
I want our custom reverb tail to be attached to the snare so that the percussion reverb seems to be triggered when the snare hits.
We can do this by placing a gate on the reverb return channel. I isolate the snare from the drum loop in a separate channel and set it to be the gate’s sidechain input. As a result, any time that the snare plays, the gate opens and allows some of the percussion reverb to come through.
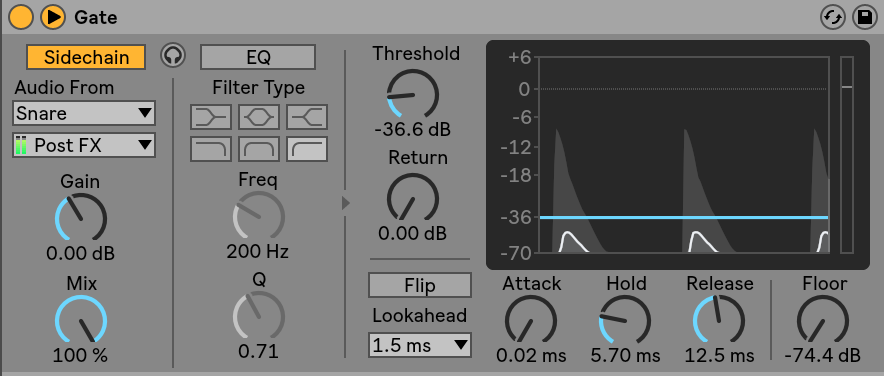
Sidechain gating
This reverb tail’s length can be set by adjusting the hold and release parameters on the gate. Since we set a long decay time for the reverb, we have a long block of reverb signal to mold with the gate. We can also effectively use the gate’s attack parameter as a pre-delay for the mismatched reverb.
I elected to have the gate close suddenly to add a small room reverb to the snare. By adjusting the gate parameters, we can arrive at a unique reverb sound that maintains some sonic continuity with other elements the track.
5. Standalone element: reverse reverbs
Reverb can also be used to create standalone linear elements in an arrangement. The most common reverb technique in this context is the reverse reverb. A reverse reverb is exactly what it sounds like: a reverb tail that plays in reverse from silence to the loudest part of the tail.
The reverse often leads into the initial transient or note of an element in the track. As the reverb sound is built off of this element, it references the element’s sonic character before the element plays in full.
As a result, reverse reverbs are extremely useful transitional effects, great at introducing new sounds in a way that is both smooth and interesting.
To create a reverse reverb, we first decide which sound we want to introduce more smoothly. The best candidates are sounds with sudden attacks or sounds introduced at the beginning of a new section, as the reverse reverb can help to create a smoother transition into a new section.
In the following example, I’ve added a string sample to the example beat from Tip #4. I would love to create reverse reverbs to go into these string samples so they don’t play as suddenly.
Once we know which sound should be introduced with a reverse reverb, it’s easiest to bounce this sound to a new channel.
We do this because we have to isolate the first note, which the reverse will lead into. If we don’t do this, the reverb sound may contain frequencies from other notes and won’t sound as connected to the first note.

Isolate first notes
With the first note isolated, we reverse the audio clip. All DAWs should have a way to do this rather easily.
We can then insert a reverb plug-in on the audio channel. This reverb can be set to 100% wet. The original dry sound occurs after the reverse, so we’re only really interested in the reverb signal here.
An easy way to set this reverb’s decay time is to map out the reverse’s ideal length in the DAW arrangement window. Using Ableton’s grid markers, I can see that I want this reverse to last for a quarter note.
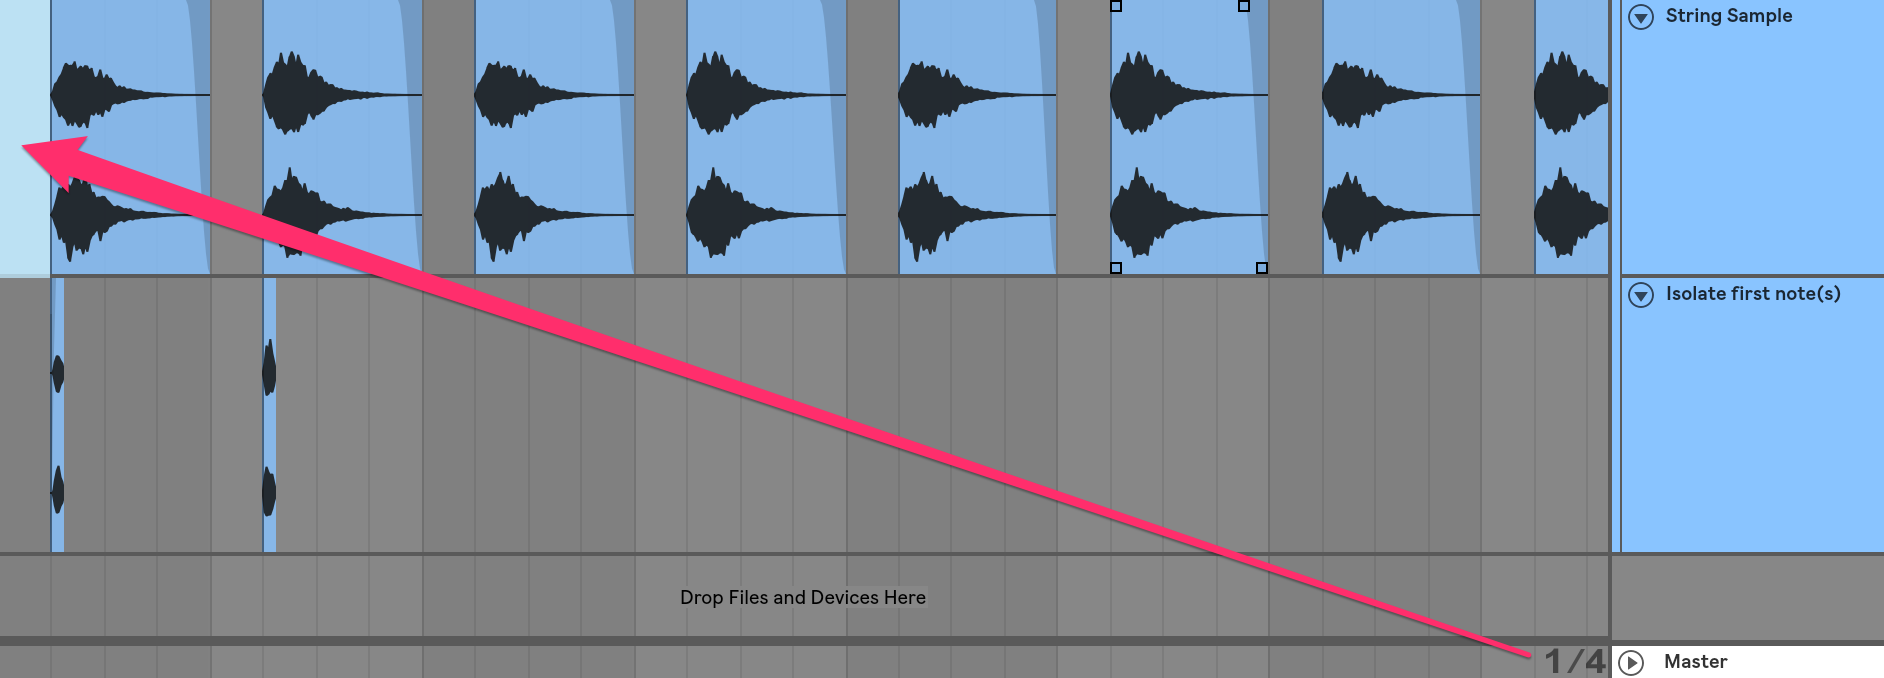
Measuring ideal reverse length
With the quarter note length in mind, we can use a note length calculator like this to calculate the duration (in ms) of different beat subdivisions. With my tempo of 93 bpm and the length of one quarter note, my duration still comes out to 645 ms. I set this as the decay time for the reverb plug-in.
Once again, we bounce this channel out to a new audio channel. We’re left with an audio clip that contains the reversed first note with a reverb tail following it. By cropping the initial note out of the audio clip, we can isolate the reverb tail itself. Due to how we’ve set the decay time, the reverb tail decays in about 645 ms in a natural way.

Reverb tail
Next, we reverse the audio clip of the reverb tail. This clip is then lined up before the original sound’s first note so that the reverse will lead directly into it. I extend the reverse into the string sounds and fade to blend the two more smoothly.
Voilà! The sound is now introduced more smoothly than simply playing at the beginning of the next section.

Reverse reverb
It’s also possible to create a reverse reverb without calculating the proper reverb decay time. Instead, we just create a longer tail than necessary, follow all the same steps, and use clip cropping and fades to arrive at the same length for the reverse.
We can also follow all of the above steps to create a reverse reverb built from all elements in the track. Instead of bouncing out one sound at the beginning of the process, we can resample the master output and isolate the first note or so.
This type of reverse reverb creates a much more dramatic effect and is better used as a general transition than for introducing specific elements. We can EQ the reverse so it doesn’t contain all the frequencies of the next section. This will allow the downbeat of that section to maintain its fullness relative to the reverse while still transitioning in an interesting way.
In the following example, I create reverse reverbs from the master output to accentuate some downbeats in the groove.
6. Standalone element: reverb in the drum groove
Lastly, we can use reverb to create some unique filler sounds that add to a drum groove. These filler sounds act like glitches in the percussion, but are built from other drum sounds and sonically fit with the rest of the drum kit.
In our example beat, I want to create one of these glitches from the snare.
First, I send the snare to a return channel that contains a reverb plug-in. I prefer to use short reverb decay times or long reverbs with gates to shorten them. This creates a short, snappy glitch that fits with the percussion groove.
It’s possible to use a longer reverb decay time, but this won’t add as much to the groove as something short and choppy.
At this point, it just sounds like the snare has a room reverb. However, we can detach the reverb from the snare using a variety of methods.
First is pre-delay. Most reverb plug-ins have a pre-delay parameter, which sets the time between the dry sound and early reflections in the reverb. This is normally used to set the size of the reverb space, as sound waves in a large space will travel for a longer distance before reflecting off surfaces and creating reverb.
In this instance, we can increase the pre-delay to the point that the original snare and the short reverb are not aligned anymore. With moderate pre-delay settings, this can create a flam effect. With longer pre-delay settings, the reverb signal is delayed until it becomes its own sound in the groove.

Pre-delayed reverb glitch
For flamming, the pre-delay method works well. However, if the goal is to use the reverb as another drum sound, pre-delay can be awkward to work with. Many reverb plug-ins cannot have a very high pre-delay setting. This makes it difficult to move the reverb glitch to the eighth or quarter note after the snare, which may be the sound that we want.
By using a delay plug-in (set to 100% wet, no feedback) or track delay, we have the ability to work with longer delay times. A delay plug-in is the best option, as it can be synced to the track’s tempo. On the return channel, the delay plug-in can be placed before or after the reverb plug-in and will easily place the reverb glitch where we want it in the groove.
I also increase the beat offset parameter on Ableton’s delay plug-in, which effectively just moves the glitch a bit later. I do this just to have the glitch sit exactly where I want in the groove.

Delayed reverb glitch
Conclusion
With a bit of outside-the-box thinking, we can repurpose reverb in a variety of creative ways. Whether to simply create interesting reverb sounds or to use reverb in the arrangement, these methods can give a unique character to a track.
