3 Unconventional Ways to Use Vocal Samples
Follow along as we arpeggiate a vocal sample, add a reverse reverb, and create a new instrument.
Vocal samples are some of the most versatile sounds to work with. They can easily be cut, stretched, and transposed to fit just about any genre or style. As a primer, listen to Burial and J Dilla, two masters of vocal sampling.
It’s a small, but fun challenge to edit vocal samples so they don’t sound anything like lyrics or their source material. In general, using sounds as they weren’t intended to be used brings a lot of satisfaction, especially when their application is common.
In this article, I’ll show you three unconventional ways to use vocal samples in your music. I’ll be using this vocal sample for all three examples:
Arpeggiate vocal samples
Arpeggiators are commonly associated with 80s basslines and dramatic sci-fi synths. But they can also be used effectively for creative vocal patterns.
Things can start sounding silly pretty quickly, so it’s best to start with low parameter settings for rate, steps, and gate, then move your way up.
Drag a vocal sample into your DAW sampler and add an arpeggiator. I’m using Ableton Live:

Arpeggiator in Ableton Live
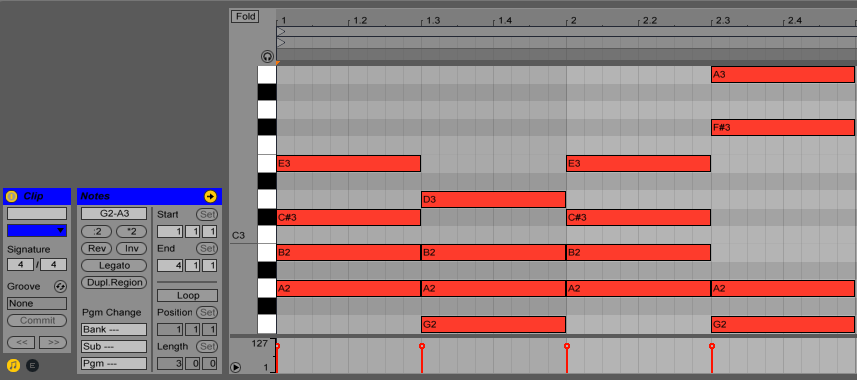
Quick note: arpeggiators only generate MIDI data, so they won’t work on audio tracks. While a default pattern triggers the vocal, single out an exciting moment using the sample start and end. Next, draw out some melodies or chords.

MIDI Editor in Ableton Live
This is what I came up with. It’s a simple four-chord progression with a 1/4 note arpeggiation rate. I recorded some sample start automation so the vocal sounds slightly different every few notes. I added some reverb, too.
I duplicated the track and changed the second arpeggiation rate to a 1/4 note to provide a counter rhythm to the first clip. For a more abstract sound, I added VocalSynth 2, using a slightly modified Dark Echoes preset. The second vocal is now rougher and metallic sounding, with a dubby vibe caused by delay.
The arpeggiated vocals act as the rhythmic backbone which can you build the rest of your track around.
Reverse reverbs
Adding a reverse reverb to a vocal sample is a quick trick that will give vocals a haunting quality. It’s helpful when you want to prepare listeners for a new section of your song, or complement specific vocal passages.
To start, drag a vocal into your DAW and reverse it. In Live, simply click the sample, then click Rev.

Sample Editor in Ableton Live
Add a reverb with a long tail (a five or more second echo after the sample), then record the vocal sample onto a new track and reverse the new recording. The vocal should now play forward as originally intended, but the long reverb will be in reverse, creating a swelling effect leading into the sample.

Reversing a sample in Ableton Live
I used a short snippet from the vocal sample above and added a reverb with a six second decay time.
Re-recorded and reversed, with the words trimmed out, leaving only the swell.
For a slightly different version, I processed the sample with VocalSynth, giving it a more synthetic quality.
Strategically place reverse reverbs in your track whenever you need an energy boost. This could be before a main melody, bassline, or impact. Feel free to try out this method with non-vocal samples too.
Create a new instrument
One of the best feelings as a music producer is creating a sound you have never heard before. Treating your vocal sample as an instrument is one way to make this happen.
This method is the most fun when you do away with conventional vocal processing and explore parameter extremes. All the imperfections and unique tonal characteristics of the vocal sample will rise to the surface, and you’ll get a whole new perspective on the sound you’re working with.
Find a moment in your vocal sample that stands out and drag it into a DAW sampler. If you experience any pops or clicks, zoom into the waveform and adjust the start and end of the vocal so it sits on the zero point. Alternatively, you can add a short fade on either side.
Sustained notes that are also vowels will produce more ambient instruments, but feel free to experiment.
Here is a basic descending melody:

Descending melody in Ableton Live
On its own, the sample sounds dry and lacks character. Here’s where VocalSynth 2 comes in. I’m using the Petan Tonic preset, with additional formant filtering and pitch variation.
When you want to move into new sonic territory, VocalSynth is a helpful tool. It can create really wild and unpredictable sounds that you can later dial down to something more functional.
There are still shreds of a vocal buried in there, but it comes out sounding much more like a modern soft synth. To clean things up, I removed some bottom end with EQ and reduced the filter frequency to around 11 kHz. I also added an LFO that controls filter frequency, creating a sweeping effect.
In three main steps, I’m able to turn a basic vocal sample into something that sounds quite different. If you record your own vocals for this one, you’ll really be making music that no one else can.
Wrapping up
Vocals are great sound sources for twisting and shaping into new forms. If you aren’t using vocals as a focal point in your music, you can ignore the correct way (if that even exists) to mix vocals, and simply mess around until you get something you like.
That being said, vocals can be fussy, so work with the vocal to pull out it’s best qualities. Hopefully these three examples have given you some inspiration to develop your own vocal editing tricks.

