Using Compression to Help Vocals Sit in a Mix
Learn how to use compressors to help make vocals sound loud, full, and present in this vocal compression mixing tutorial.
Compression is one of the most powerful yet often misunderstood tools in music production. When I was first learning audio, I remember knowing I had to use a compressor, but I had no idea how to set it up, or how to hear what it was doing. This article will help to uncover some of the mysteries of compression, and guide you on how to set the compressor plug-in parameters flawlessly no matter what the style or genre of your vocal.
Hear the difference these simple compression techniques can make to your vocal in a mix:
Compression on Vocals Before/After
In this piece you’ll learn:
- What audio compression is
- How to use vocal compression settings to get the sound you’re looking for
- Common uses for compression in different genres and styles of vocal production
Before we dive into compression settings, let’s examine what compression is in vocal production.
What is audio compression?
Compression reduces the dynamic range of a signal. Vocal recordings are naturally dynamic, which means they have a wide range of loud and soft parts. Compression reduces the distance between the loudest and softest part of the vocal, making it more consistent in volume throughout. As a result, the whole vocal sounds louder and more present in the mix without the loud parts peaking, and the quiet parts getting lost in the mix.
Here is an example: If you have a vocal recording that has the quietest word around -10 dB, and the loudest word around -5 dB, then you have a 5 dB range for your vocal dynamics.
Compressors will reduce that range. Heavy compression will result in a much smaller range (1dB, for example, between the quietest and loudest part) and light compression might only reduce the range to 4 dB.
How to dial in vocal compression settings
Here is my technique to help get over any apprehension with compressors and to get you started compressing any vocal in any genre. I’ll be using


Nectar Pro


iZotope Music Production Suite Pro: Monthly


Neutron


Ozone Advanced

Vocal compression settings using Nectar Pro
Step 1: Threshold
The threshold is at what point the compressor kicks in and starts compressing. It is measured in decibels (dB) and anything louder than the threshold will be compressed. Anything quieter than the threshold will be left alone.

To set your threshold, first identify and loop one phrase of your vocal. Then, listen and look at your meters to identify what the quietest word is in that phrase. Set your threshold there.
Setting your threshold near the quietest word essentially sets the bottom of your range. As a result, everything louder than the quietest word will be reduced in volume as a result.
Note: make sure you set your threshold near the quietest word, but not so low that you start capturing breaths or excess noise. If your breaths start to sound loud and extreme, move your threshold a little higher.
Step 2: Ratio
The ratio is how much the signal louder than the threshold will be compressed, or reduced in volume. Ratios are commonly set up as 5:1, 2:1, etc. The larger the first number, the more the signal will be reduced in volume after it goes over the threshold.

Ratio controls
A good place to start with pop vocals is a 5:1 ratio. Try a higher ratio (7:1, 8:1) for more heavily compressed vocals with minimal dynamic range, or a lower ratio (2:1, 3:1) for a more natural sound with some dynamics preserved.
Once you set your threshold and ratio, you will hear the overall volume of the vocal reduce. Don’t let that confuse you too much, you will add back the gain in the last step.
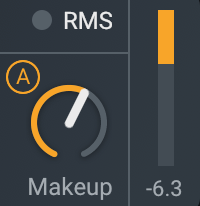
Step 3: Makeup Gain
Makeup Gain is the volume of the compressed signal. It can also be called “output gain,” or sometimes simply “gain.”

Makeup gain settings
After you set your threshold and your ratio, the signal will sound quieter than before. This is a result of gain reduction; peaks being reduced in volume after going over the threshold. Many compressors have a meter to tell you how much gain you lost in the compression process. If you have one, use it to guide you on the last step!
To bring your compressed vocal back to a higher volume to make it sit solidly in the mix, check out your gain reduction to see how much gain you lost in the compression process. If it says 5 dB, add that back on your makeup gain. This will boost the entire compressed vocal by 5 dB. Because you already have a smaller range between loud and soft after compressing, the vocal will sound louder and more present overall as a result.
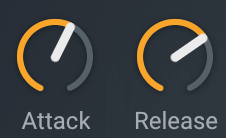
Attack and Release
You might also want to play around with attack and release on your compressor. Adjust these parameters (in milliseconds) to control how quickly the compressor kicks in and lets go.

Attack and Release parameters
Here is an example of an uncompressed vocal in a mix. You can hear it, but it’s a little bit behind the rest of the instrumental and some words aren’t as present as others.
Here is the same vocal, compressed with the method above. The threshold is set near the quietest word with a 5:1 ratio, and makeup gain added at the end to bring the vocal forward:
Common uses for vocal compression in vocal production
Compression is best used on vocals (or any part of your mix) that need dynamic control. How much compression is used depends on the style of the performance and also the genre of music.
Generally, pop music features a heavily compressed vocal with very little dynamic variation. This is important stylistically, because pop music is often heavily compressed on all elements, including a loud, and many times “brickwalled” master.
However, other genres will benefit from more subtle compression. Classical music, for example, is generally uncompressed or very minimally compressed. In a composition where the vocal dynamics are written in by the composer to help to convey the story (for example, an aria), go very easy on the compression or don’t use it at all.
If you don’t know how much compression to use on your vocal, listen to a reference track in a similar genre and analyze how dynamic the vocal is. If you can barely hear any changes in dynamics, it’s heavily compressed. If you can hear the subtle phrasing of dynamics in the performance, there is less compression used.
If you’re still not sure how to set up your compressor or other parameters on your vocal channel strip, use Nectar’s Vocal Assistant to analyze your audio and apply processing based on the audio itself.
Start adding compression to your vocals
Load up a compressor module included in a plug-in like


Nectar Pro


